Search the Community
Showing results for tags 'custom'.
Found 427 results
-
Hello, Like many people I'd love to have a MOTU line made by Lego but as we know it's impossible. So as I'm in a Brikcheadz phase I decide to build He Man and Skeletor just to see and finally I love them. Don't know if I'll build more or some vehicles or playset as the format is a bit big. if you have any opinion, comments, they'll be welcome.
-

[MOC] "VOODOO" Custom Lowrider
Paliason posted a topic in LEGO Technic, Mindstorms, Model Team and Scale Modeling
Hi Guys! I finished my new model. I didn't hold on to any real car, but it is similar to the old classic Chevrolet Bell Air / Impala. There's nothing to open, it's just a riding model. Drive / Turn = standard L-Motor / Servo. There is a 1:1 transfer from the L-motor to the differential. photos: FLICKR -
Hey Eurobrickers, lately I've been really into creating original characters using the pantheon of minifig parts. As much as I enjoy building larger MOCs working with bricks and such, this minifig stuff is much more suited to a busy AFOL's lifestyle. I thought it would be cool to share my Figbarf with ya'll and see if ya'll had any you wanted to share as well. Alien Girl Rock Band Biker Gang PLEASE SHARE, I WANT TO SEE YOUR ORIGINAL CREATIONS!
-
Hi everyone, Here are some custom decals I created, based on the official LEGO Rohan Soldier design. Feel free to use (and modify them), but please give me credit if used for commercial purposes. Thanks, ~RBC MODS/ADMINS, FEEL FREE TO ADD THESE TO THE CASTLE DECALS INDEX. Thanks!
-
 Hi I'm L, still mainly play with PF1 motor even PF2 has been released for now With the PF2(new electrical system that broke the old lego paradigm) PF1 motor are no longer likely to come out anymore Imao So I'd like to make compatible motor for the PF1 electric building system myself consider the proper shapes, specifications, and placement of the wires and while im making it, i wanna make it really good and nice to use, over lego motor to acieve it, I want to hear the user's reaction or wish. I look forward to hearing from your idea Question here 1. Which is more important (1) Torque(strength) (2) Speed 2. Size(Size and torques are in semi-parallel relationship) (1) 2x2(Micro motor size) (2) 2x4(S size) (3) PF Series's was fine, just need more torque 3. Shape (1) Round (Like XL Motor) (2) Square(Like Old Lego Motor) (3) Oval(Like M Motor, Flat Bottom Type) 4. Building type (1) Pin & Hole (2) Stud & Tube (3) Axle & Axle Hole 5. the unit of length (1) odd number(etc. 3x5x5) (2) even number(etc. 2x4x4) 6. Power Supply Method (1)PF1 (2)PF2 and last, I'm going to post it on the crowdfunding site if it's a good response after I've made the motor brick prototype. So what if there was a third-party motor with better performance? 1) If the performance is good, it can be purchased. 2) Because it is not Lego, it is not purchased. thanks for your asnwer and have a nice day~ and any critical, basic ideas are always welcome from L
 -

My Lithium Iron Phosphate batteries
z3_2drive posted a topic in LEGO Technic, Mindstorms, Model Team and Scale Modeling
Ok, I'm not going in-depth, just a brief description for those who are interested. The two custom rechargeable battery packs I use consist of three batteries connected (soldered) in series, wrapped in electrical tape. The batteries used look like this: and my battery packs look like this: To charge them you also need a 'power supply'-a device that regulates current and voltage to give power or in this case, charge the batteries. If you have a background in electronics, and if you are good at soldering and have access to all the components/wires/power supply box, then you can try to make your own. All details about the batteries themselves such as voltage, maximum current, charging voltage¤t can all be found at this ebay link, where you can buy them for about 8-9 dollars each http://www.ebay.com/itm/Tenergy-Tenergy-LiFePO4-18650-3-2V-1100mAh-Power-Cell-Max-25A-w-Tabs-SALE-/390575207953?pt=US_Rechargeable_Batteries&hash=item5af018b611 -

PFx Brick video test
Sariel posted a topic in LEGO Technic, Mindstorms, Model Team and Scale Modeling
Well, I for one supported it at Kickstarter without hesitation. You can support it too: https://www.kickstarter.com/projects/fxbricks/pfx-brick -
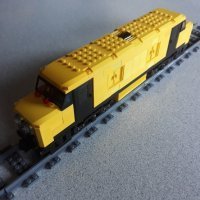
For my first post I'd like to share something I built a few months back. This is my first actual post so please do be gentle :P I decided to design a much more fleshed out version of the 60051 High Speed Passenger Train by adding various types of new custom passenger cars and locomotives. I implemented some ideas from the 10233 Horizon Express, which is quite noticeable from the pictures below (such as the all-black 10233 inter-car bogey). Firstly I wanted the design to be much more detailed and to use more advanced building techniques such as those seen in 10233 than what is standard for a City set. For instance, I wanted my passenger cars to be intermodal articulated (cheers Duq :P) to really catch that high speed train vibe. Additionally, it had to have functioning doors and fairly detailed interiors. However, common limitations prevented me from doing particular designs such as a restaurant car as an interior four studs wide simply would not be enough for me to create a bar/lounge that didn't look like it was being choked by the walls of the car. If anyone wishes to build/use the designs, I'm more than happy to upload relevant .lxf files for you all :) just be sure to credit me properly. So without further ado, have at it! 1. Inter-car bogey (10233 design in all-black) Express2 - Bogey by Bartybum, on Flickr 2. Short end coach Express2 - Coach End Short by Bartybum, on Flickr 3. Short coach middle Express2 - Coach Short by Bartybum, on Flickr 4. Short locomotive Express2 - Engine by Bartybum, on Flickr 5. Long coach middle (No end coach as of yet, as I'm yet to design one) Express2 - Coach Long by Bartybum, on Flickr 6. Long locomotive Express2 - Engine Long by Bartybum, on Flickr 7. Super locomotive (uses inter-car bogey and is therefore inseparable from the rest of the consist) Express2 - Super Engine by Bartybum, on Flickr At this point I asked myself, why stop at one storey? Why not follow the footsteps of the Metroliner and go double decker? Naturally I did :) 8. Two storey coach Express2 - Two Storey Coach by Bartybum, on Flickr 9. Two storey transition coach Express2 - Two Storey Transition Coach by Bartybum, on Flickr Obviously since this is Lego, you can switch around cars if need be, so you can make whatever configuration you want. Two examples: Express2 by Bartybum, on Flickr Express2.1 by Bartybum, on Flickr Since LDD doesn't do stickers the abrupt disappearance of red and dark grey from the nose looks just a bit jarring. Keep in mind that these designs are built with the implication of the stickers on the nose already being there. Now that all's said and done, just hit me up in the replies if you'd like .lxf files, more than happy to give them out :) EDIT: .zip files in reply section
-
How to apply custom decals on LDD renders
BEAVeR posted a topic in Digital LEGO: Tools, Techniques, and Projects
You may have encountered it: you built a nice model in LDD, but it looks surreal because it lacks decorations on e.g. the minifigs. This tutorial is here to help you with that. In this little tutorial, I will try to explain how you can enhance the POV-Ray renders of your LDD models with custom decorations. You can design entirely new figures for example, or you can apply the decorations that aren’t available in LDD. My example in this tutorial will be a stormtrooper minifig. This figure lacks all decoration in LDD, and is commonly used in digital Star Wars builds. It gives me the opportunity to explain how to decorate surfaces that aren’t directly accessible in LDD, how to fit custom decals and explain the general principles. This method doesn’t involve any hacking and doesn’t require any sick programming skills (although the custom decorations might need your artistic talents…). And the best of all: all programs I use here are entirely free! I’ll be using Lego Digital Designer, LDD2POV-Ray, POV-Ray and Inkscape. So let’s get started! Decorate the target pieces in LDD LDD2POV-Ray, the program that will eventually place your custom decorations, can only replace already applied decorations. So firstly, you need to give the pieces you want to decorate a replacement decoration in LDD. Make sure to use different decorations for each surface, so that you later can keep track of which filler to replace with which substitute. Also, taking a screenshot for reference is not a bad idea to support your memory. But wait a minute… Some parts don’t allow for any decorations at all in LDD! Minifig torso’s are not a problem at all, but things like helmets are a whole different story. But luckily, there is an easy way to apply decorations that will work in most cases (no guarantees though!). You have to export your .lxf file to the LXFML format (File -> Export Model). This .lxfml file is actually a textual representation of your model. Among others, it contains a list with the placed parts, including their color(s) and decoration(s). To find your part, use the search function (Ctrl + F / Cmd + F) and type in: in which you replace 30408 (the designID of the storm trooper helmet in this example) with the designID of the part you desperately want to decorate. You can find this ID by clicking on the part in LDD and looking at the bottom left corner. If multiple of these parts are available, you can give the specific part a different color and check for the one that says materials=”26” in which you replace 26 with the number of the color you used (you can find this number by hovering over the color in the color menu in LDD). The key part is then to change the part that says decorations=”0,0,0” in which the amount of zeros dictates the amount of surfaces that you can decorate. If the line isn’t present at all, you’re out of luck and won’t be able to decorate your part. Otherwise, replace the zeros with valid decoration ID’s. It’s best to take decorations that are square and detailed (I will explain why later), so I suggest using the decorations of the 2x2 flat tiles. You can find these ID’s by placing some of these decorated tiles in your model, and check in the LXFML file what number is filled in in the decorations line of those parts. To make it easier for you, here are some handy decoration ID’s you can use: 73023, 63708, 99825, 55350, 63404, 601245 Then, save your file, and open it with LDD. You’ll see your parts are looking very ugly with those random decorations, but you’ll be happy to have decorations. You can copy these parts to a ‘normal’ .lxf file, and get rid of the parts you used to find the decoration numbers. Now we can move on to step 2! 2. Open your model with LDD2POV-Ray LDD2POV-Ray is a program that converts your LDD model into a file that can be rendered with POV-Ray, a ray tracer that simulates the behaviour of real light to simulate a realistic effect. You can set lighting etc, but more importantly, you can set your own decorations. To do this, go to the “Decorations” tab, and check the box “Use custom decorations”. A list will appear at the bottom, showing all the decorations you used. Clicking on them will reveal a thumbnail. Now you’ll be happy that you used different decorations to know which is which. You’ll notice that the decorations (unless they are square) are a bit stretched out. That’s because the program only accepts square decorations. So to load your own decorations, you’ll have to make sure they are square. Otherwise, they won’t cover the whole area you intended. If you already have your decorations (you found them on one of the indexes of the customisation forum here, for example), you can skip to step 4. Otherwise, I’ll give a brief account on how to make your own decorations in step 3. 3. Create your own decorations Personally, I make my decorations with Inkscape. It’s an easy to use vector based program. That means you can easily create very clean, smooth and crisp shapes. I’ll leave it to others to educate you in this nice software, but I’ll show you some general strategies to make accurate decorations. When working on complex curved shapes, like the storm trooper helmet, you won’t know for certain how your image will be mapped to the surface. That’s when the screenshot you took comes in handily. Because you have used decorations with a lot of detail (if you’ve been following properly!), you can easily see how the image is deformed and placed on the surface. You can identify the regions where you want your details to come, look to what part of the placed decoration it corresponds, see what it looks like in its flat state (you can see this in the thumbnail in LDD2POV-Ray), and place your detail in the according place. So in the example of the storm trooper helmet, you can see that the mouth should somewhere at the center of the graph. LDD2POV-Ray shows that that graph is a bit above the, so now you know you have to place the mouth around the center of your decal. When you’ve finished your decoration, you have to make sure your decoration is square. This will most certainly occur when you’re designing decorations for minifig torsos. If you leave it in its actual proportions and plug it in LDD2POV-Ray, you’ll see that the image doesn’t fill the whole area, compared to the stretched out decoration you have to replace. So you resize your decoration. In Inkscape, simply go to the top, where you can enter dimensions. Then you go to File -> Export Bitmap and a dialogue box will pop up. Make sure to select ‘from selection’, and that the amount of pixels of your image is high enough. Otherwise it will look pixelated in the render. Finally, chose .png as file format, and remove the background color of your decoration. Because it might look like the right color in Inkscape, but in your render it will look like the decal has a different color than the body, which isn’t what you wanted. So now you have your parts temporarily decorated, and you got your custom decorations ready. So time to replace them and render them. 4. Render your decorated model Firstly, you have to load your new decorations in LDD2POV-Ray. There are multiple ways to do this, but the easiest method is to select the decoration you want to replace and then click on the empty canvas. A window will pop up to allow you to select your decoration. Just select it. Repeat for the other decorations, making sure you replace the right decoration with the right replacement (that screenshot will come in handy now, especially since you can’t have both LDD and LDD2POV-Ray open at the same time at this moment!). Then you can fiddle around with different settings like lighting etc. For test renders I suggest to place in the first tab the slider on the lowest positions: ‘LDD geometry’. This will result in slightly less good, but much faster renders, allowing you to quickly get feedback about your decorations, so that you can adjust placement and proportions. For flat parts this won’t be necessary, but it can help for curved parts. That’s why I included the TIE pilot in the render. You can see the ensignas are slightly deformed. That’s not my intention, but I already predeformed the circles in the decal, so that it looks more or less round on the surface. You’ll have to experiment a lot with these ones. Anyway, when you're satisfied and feel the need for a more glamorous render, you can turn 'render with visible bevels' on in the slider bar, and wait for some time. You'll get something like this. Hopefully now you know all about rendering your custom minifigs, making your models more realistic. I hope to see some around! Anyway: happy rendering of your minifigs! If anyone is interested in downloading the decorations I designed for the stormtrooper (for now without back printing) and the TIE pilot (torso printing already present in LDD), have a look at this page. Hope you've found this useful. -
After couple of years working on a not-car projects I picked up BMW i8 as my next project. This time I plan to post a work-in-progress pics here as well. Just for fun I think 05-May-2018Started with side. It has interesting door shape - both - the front and the end are sloped. Let's see how this construction will flow together with 75 degree inverted slope 06-May-2018Yep - it flows very nicely with 75 degree inverted slope. But - wow.. the struggle with the door end and the section around it. It has three different angles there in a small area. So complicated. I bet I'll return to this section 06-May-2018Continued with front grill. Those small neck brackets are really nice. They give the narrow gray line just above the kidney-grill section. And at the bottom the bumper will cover half of the plate, so the lines both will be as narrow as it can get. Also - a small update at door window line. Implemented the half plate increase (do not mistake that with half-stud offset). This gives the window line much smoother increase from front to the rear 07-May-2018Continued with headlights. There isn't much space to work within but somehow I managed to "break" the headlight in two angles and cover the side of it. 08-May-2018Something unusual. Normally - when I redo a part of my MOC, it gets more accurate shape, but at the same time it gets more fragile. Not in this case. The headlight outter section and the outter-bottom part of the bumper got nice curvy shape and is even stronger than before. 16-May-2018Changed the bottom of the grill section. Instead of half-covering the lower plate, I changed the entire supporting construction and implemented there headlight brick technique. This gives the desired grill look and the bumper fits there perfectly too. Now I'm struggling with the air intake and the small loop below the grill. Have tried like three or four different techniques, but nothing fits there like I want it to... 18-May-2018 After countless iterations I think I finally got the front air intake right. Turns out - I had to use the smallLEGO Technic panels. The connection is strong and easy. To be continued...
-
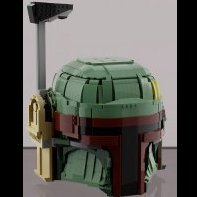
Hi Everybody! This is AVS, also known as Crimson Shadow79 on Flickr. This my first custom Lego MOC that I have made. I hope you guys enjoy it as much as enjoyed building it. With rumours circulating of a Boba Fett movie and also the new Star Wars show coming out i thought i should make the most famous bounty hunter and Mandalorian in Star Wars. Therefore I went ahead and made Boba Fetts helmet. I made it on Mecabricks and the link to the model is given below, so please check it out. Again hope you enjoy and do let me know how it is :) Link: https://www.mecabricks.com/en/models/LGVjKOxAjnz
-

Finding someone who can print custom face decals on blank minifigure heads
MatthewRC posted a topic in Minifig Customisation Workshop
Hey, guys. I’m trying to gather LEGO parts to be used for stop motion brickfilming, but I heard using blank LEGO minifigure heads is highly advised. I was intending to do a LEGO Scooby-Doo brickfilm, but I need to know someone who can add custom face decals to blank minifigure heads for Velma Dinkley. The custom face decals I need for Velma are dual sided. One with just glasses and freckles on the first side and the other with freckles only and without glasses. First, I need to know where I can find face decals from LEGO Scooby-Doo minifigures online. That way I can find a Velma face pattern so I can manipulate the image with Gimp. Then, I can show whoever can help me the patterns I want on both sides of my blank minifigure heads. Please let me know who can help me. Thanks! -
Hello all you happy lego people! I know I've been away for ages and I do hope I am remembering all the proper rules here so let me know if I screw up and I'll fix it or get rid of it. Sorry to inconvenience anyone just throwing that out. Anyway I have been in the process of casting new custom pieces such as weapons, accessorys, Kits you get it and not gonna lie I do intend to bricklink I know advertisement is a absolute no no on this forum. I am not wanting to break that rule so while I indeed have plans nothing apart from certain projects will be mentioned here not even the name of what I speak of will be on this or any other thread I make. By the nature of this project being mentioned it tiptoes that fine line as is so please do not think I intend to advertise I will do that where it is appropriate I swear. Ok a couple of my projects for this is to have a fellow create some new parts to actually bring some my kits to life. I am makijg rough design sketches for him but I need to know a few parameters of blocks already out there. First up is Pins and their brick plugs. I know that to ensure the pins like on the Astromech body the holes have a slightly thinner inside that opens up to a little larger section to allow the pin to lock in place till you pull them out. My first question is a common one I'm sure but what is the diameter of the two sections of the socket the pin goes into. Next up deals again with the pegs and socket parts but this time in a lateral setup. How close together can a double pin tube like the one on the astromech for it's legs to peg in be with out interference on the pin next to it? Well that covers the most pressing things I need for a sketch. I'll likely have much more soon. Can anyone direct me to a handy place to find the dimensions of bricks, Pins and such? I have some calipers but I trust them mostly with finding diameter of objects I think can fit into a Lego claw. So that's about it for the moment. I do hope this isn't against the rules I mean I have seen custom brick and weapon threads before but I'm not 100% if this falls into that category as these are for 3D printed prototypes That I'll touch up and use resin for. Like I said if I made a mess let me know I'll clean it up ASAP. On the fact Everything is Awesome I do not post anything breaking the rules of the forum. It's against the instructions but we all slip once in a while. Thank you for the time and hope to hear some good feedback if this is indeed the right way to ask. All of you take care and build tomorrow's masterpieces, Plokman
-
First off, I would like to say that, no, I am not terrible at maths! All shall be explained! (Sorry, this may be quite a lot of reading!) The Back Story: First aspect: Some weeks ago, I was having a general look for sets that might be of interest to me. I stumbled upon a very good deal on the Lego City Bus Station (Set no. 60154). I decided in a spur of the moment purchase to pick up 2 sets, with no real plan… That’s what sowed the seed! Second aspect: In the not so distant past, I had purchased a huge Lego haul from eBay containing many train set items and accessories. In amongst this, was an incomplete copy of the Lego Freight Rail Runner (Set no. 4564) – (maybe 80% complete) – at the time I didn’t really know what to do with it. Over time I harvested the 9V motor, wheels, couplings, bogie plates, wagon parts and straight track – basically all the good stuff! Now, I’m a big fan of seeing people doing set combining! I have never seen anyone attempt something like this! (Correct me if I’m wrong!) The Hypothesis: “Is it feasible to make a decent looking locomotive of any kind, combining Sets 60154 and 4564? – Using minimal significant other parts, but in cases where necessary only using parts I currently have, and not resorting to ordering things. The locomotive should ideally use Power Functions with 2 motors, lights are not necessary. Also, the finished model should be sturdy, strong, and able to be played with by children.” Answer, Was It Possible? Yes, and in my opinion, it turned out rather well. What I attempted to build was a massively simplified Class 37, with much artistic licence! Here is the finished product: Thus, the idea for “60154 + 4564 = 37?” was born! What do you think? Any questions, thoughts, or criticism will be much appreciated. Regards, James :)
-
Hello everyone ! Some months ago, I designed several custom parts that could be parts of the current CCBS. Earlier this week, I finally decided to order them. And they arrived today. So, ladies and gentlemen, I'm proud to show you the first Hero Factory custom parts ! First of all, here's a render of my parts altogether : And here are the parts I received this morning : I ordered them on Shapeways, I chose Frosted Ultra Detail. And the final result is very clean, it almost looks like real Lego parts ! Unfortunately, this material is very fragile, so I won't use them in MOCs, at the moment they are only prototypes, but I hope I will be able to produce those parts in wider quantities within the next twelve months. Here's a "comparison" with the official "equivalent" parts from Lego : And here's an example of what can be done with such parts : I could build more, but sincerely, I'm afraid to break my parts if I stress them too much. But anyways, this first try is quite concluding, and I hope I will very soon be able to make more of these. If you want to see more pictures, check the Brickshelf gallery (not public yet). P.S. : Plus, they smell good. I'm not good at recognizing odors, but I would say it smells like teen spirit almond.
-

[MOC] Cutaway Leadsled
HorcikDesigns posted a topic in LEGO Technic, Mindstorms, Model Team and Scale Modeling
Hi, I would like to show you my new MOC. it is Leadsled, that I once promised to build. 1K - Cutaway Leadsled by Horcik Designs I wanted to build big red car, that would fit nicely on display next to my Tatra T2-603. (visit my Flickr or Scale modelling forum here to find photos of it) It features 4-forward gearbox, working steering wheel, no HOG (it is display model), huge but fake V8, openable doors with locks, openable trunk with gravitational lock (it is too heavy to stay opened) and detachable hood. And loads of minor details and holes. What?! 1K - Cutaway Leadsled by Horcik Designs, on Flickr 1K - Cutaway Leadsled by Horcik Designs, on Flickr This MOC was directly inspired by cutaway technical drawings of cars. In my opinion, all original Technic model were supposed to look like 3D-ized cutaway drawings. Leadsled showtime by Horcik Designs, on Flickr 1K - Cutaway Leadsled by Horcik Designs, on Flickr 1K - Cutaway Leadsled by Horcik Designs, on Flickr 1K Leadsled chassis by Horcik Designs, on Flickr 1K Leadsled Teaser by Horcik Designs, on Flickr Hope you like it. :) More photos on my Flickr Album. -
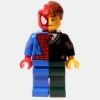
Let’s see you guys’ go brick me custom Brickheadz. Here’s mine: (me and my monster) https://imgur.com/a/vnInf .
-
Hi! Does anyone any on know where to find accurate decal templates for torso, legs and arms? I would be really cool if it is already scaled to minifigure size. That would save me alot of time. Thanks! Aaron
-
Long Story Short: I have long had hopes for how I wanted my town to turn out, and built a huge table that I dreamed of filling with custom creations and an elaborate layout… However, after many years of collecting lego, it seems as though not even the least of my plans will EVER be fulfilled. I have posted photos of how my layout looks currently: messy and full of holes that rely on the idea of custom buildings. What I need is some advice on how to best arrange my present collection, using only what I've got (some extra parts permitting) to make the most of it, but allow for effective additions down the track. I am also open to suggestions for custom builds that I can start and complete with what I've got. Short story long: All of the sets I own are pictured, all complete, but some with parts floating around elsewhere in the room. In addition to what is shown, I have the 7744 police station (demolished because I couldn't stand the blue windows and unfinished structure) the 4956 creator houses (sacrificed in an attempt to build the large red-roof house at the back) and the bridge from 7900 heavy loader set. To be honest, the town looks pretty lost without the police station and random emergency vehicles floating around. If anybody has ideas on how to repurpose the police station or photos of fitting, alternate designs would be great. In the past, I've gotten sick of seeing things the same all the time, and tried to make little modifications here and there which I could never finish properly with the parts I had. Most of those have been reverted, but I've started too many projects and finished none. The simplest plan I had for this corner of the town was to have a marina running along the water's edge, a port where the large boat is parked, and a railway line from the port wrapping around the outside edge of the table. The shopfronts you see, in a mad rush, were placed around a makeshift square, lane, and the idea was to have port vehicles drive up and around the back of the port, and exit along the water. All of which I can guess is very space ineficcient, and is holding up many other decisions for my layout. A proper automotive shop is currently in the workings to replace the car dealership, but that's it. I have no idea whether what I'm doing is right or wrong, but would greatly appreciate some advice to straighten my thinking, and give me a cleaner slate to work with.
-

Purist/Non-Purist Non-Original/Custom Accessories
Silent Nomad posted a topic in Minifig Customisation Workshop
I make alterations to minifigures sometimes, but a lot of the time, I simply find myself adding accessories that the characters didn't originally have in their sets. I've tried mentioning them in topics aimed at general minifigure customization, but I've gotten little to no response there, so I thought I'd make a place dedicated to that idea. Below are some examples of my own accessory additions, or images that inspired me to alter the accessories. When I saw the Green Lantern lantern that Sheldon is holding in the image below, I thought that it was much closer to the scale of minifigures than the one offered in the Green Lantern set, itself. I also became curious if I could make that same design in any other colors with existing pieces, so I looked up the four pieces used to make it, and I discovered that I could also make red, blue, yellow, black, and white lanterns. My Hal Jordan now has a much smaller personal lantern battery, and I made one in yellow for my Sinestro as well. I also gave Hal and Sinestro translucent studs on their hands in their respective colors to represent glowing rings. When I saw the Teen Titans Robin from the Jokerland set, and I saw what they gave him for his bo staff (a black lightsaber blade), I was unsatisfied with both the length and color. I wondered if the old longer rod with narrower stop came in the newer version of grey, and I found it, so I'm using that now, and it works perfectly. I don't like the ADU guns used for the Super Heroes themes whenever a non-space-based minifigure needs a gun, and I liked the old black guns used in the Indiana Jones theme, so I was very excited when Lego brought them back for use with Sabine from Rebels, so I bought a bunch of those from B&P and I use them with my Avengers Black Widow, my USM Nick Fury, and I'll give one to any normal human character in the future to whom Lego gives an ADU gun. Speaking of Black Widow and ADU guns, that's what they give her in the Age of Ultron sets, though her shock sticks are arguably more iconic to that movie, so I wonder why they didn't give her those. I got the idea to give her trans light blue lightsaber blades for them, because that's the color normally used to represent electricity, and then I see this image on the Marvel Super Heroes minisite, which shows that piece used for that purpose. That made me more confident about that choice. The Winter Soldier minifigure doesn't come with any weapons in his package, but I wanted him to have a sniper rifle of some sort, so I gave him a blaster rifle that's used in Star Wars sets. None of the Indiana Jones and the Last Crusade sets have the Holy Grail, which is what they're hunting in that movie, so I gave my Indiana Jones minifigure a gold goblet piece for that, along with the other two small pieces I gave him to represent the other movies in the trilogy (I gave a crystal skull piece to my Mutt Williams minifigure, if anyone's curious). I'd love to see what other ideas anyone else came up with. Please share, but focus on the accessories here. There are other places to post the minifigures, themselves. -

Secret Recipe in making decal customs more legit?
remarksss posted a topic in Minifig Customisation Workshop
Hey guys, newbie heree. Im just starting to make decal customs and realized that the decals i made looks very paper-ish. Do you guys have a secret recipe for it to look more legit? likee it really looks like it has been printed? -
Obscurative Tectodemonic Neogargoylatry Although generally considered one of the mortal sins of Granite Magic, Obscurative Tectodemonic Neogargoylatry (OTN) is sometimes resorted to in times of lithic wrath. The earthquakes surrounding such an unnatural spectacle of nature spread panic among creatures softer and warmer than the ancient rock below their feet. Obscurative Tectodemonic Neogargoylatry by MWardancer, auf Flickr A pretty straight-forward build. TLG for some reason chose violet as color for their stone monsters. I figured gray is a little more ... stonish.
-

[WIP] Technic Lady figures
syclone posted a topic in LEGO Technic, Mindstorms, Model Team and Scale Modeling
Good Day! Since first seeing Technic figures in a catalog back in 2005, I really wondered whether there was a female version as well. Unfortunately , as we know , there are none. This problem is solve-able either modifying an original lego part (which will decrease the number of those in existance) or making your own. As a purist almost , I would choose the second version. I was surprised that no one has done this before (there is a broken link to a japanese website where someone done that in 2000's, but no pictures to be found anywhere), I took my free time to make a quick mock-up. First step was to get the torso and head into my 3D program - Autodesk 123D - from LDraw. That was done using LDView (place part in x=0, y=0, z=0 and export the file containing it through LDView as an .stl). Next was the chest, which was done using a few spheres, lofted surfaces and tubes (I tried not to exagerrate the size too much, just for it to be slightly notice-able). Luckily there were mannequin's side & top-down shots for inspiration. Next I exported this hair piece and scaled it up to approximate size & placement. Please note that I'm a noob at 3D modelling, and my "art side" is non-existent (for me it would be easier to draw a mechanical piece as a blueprint rather than a human being), so I would love to hear any suggestions and ideas. I do eventually plan to upload the finished model to Shapeways, but I can send it via e-mail. Question: Do you think the "reduced"? waist (as the one printed on minifigs) is necessary? Images: -
Hi, I'm Jake and I just launched a Kickstarter campaign. We're looking to gain backers for our project, which is to create one-of-a-kind figures for people to enjoy! We do star wars figures too if you have a design that you would like printed.
-
Hi, I'm Jake and I just launched my first Kickstarter campaign. We're looking to gain backers for our project, which is to create one-of-a-kind figures for people to enjoy! Leave any questions here if you have them too!