Search the Community
Showing results for tags 'rc'.
Found 537 results
-
[MOC] Subaru WRX STI W/ Instructions
Touc4nx posted a topic in LEGO Technic, Mindstorms, Model Team and Scale Modeling
After 9 month of work, I present the completed version of my latest Moc, a 2019 Subaru WRX STI It features : AWD, with lockable central differential 6+R Sequential gearbox Fornt McPherson Suspension Rear double wishbone suspension, with anti-roll bar Working fake boxer engine Opening doors (front one with handle) Opening hood (or bonnet) Opening trunk Interior with detailed dashboard Decorated engine bay Render of the gearbox : Full driveline The belly shot The interior, with some detail, such as aerations. Engine bay, made to look as close as possible to the real one : It can also be built in white, with some minor adjustments. I also created Instructions for it. The instructions are made for the black one, but can, with minor adjustment be used for the white one. The instructions are 1218 pages long, handmade with Stud.io 2.0. You can download a sample here. Or look down here. You can Buy the instructions on Rebrickable. https://rebrickable.com/mocs/MOC-38243/Toucanx/subaru-wrx-sti/#comments And of course a video : I Hope you like it. If you have any question, don't hesitate, I will try to answer quickly. After this line, starts the WIP thread. ––––––––––––––––––––––––––––––––––––––––––––––––––––––––––––––––––––––––––––––––– Hi everyone, It's been a long time since I haven't posted on this forum, but today I would like to share a new project that I have started not so long ago. It's a Subaru Impreza WRX STI car that I will make. The list of what I will put in the car is the following : Awd Boxer 4 engine McPherson suspension for the front wheels Indépendant double whisbone for the rear wheels Lockable central differential 5 speed sequential gearbox I searched a bit for 5-speed sequential gearbox but I didn't found any. So I took a 4-speed gearbox design by @Rage_Hobbit (found there) and I added a 5th speed. Here is the result : You can download the .lfx. Note that you are supposed to place rubber band linking the orange pieces to the black one under the blue triangle. I have already made the boxer engine and most of the chassis. It will use these wheels : It's the one that are used in 42077 rally car. However I ran in a problem, it seems that the gearbox can not support the force involved in the transmission. The gears do a lot of skipping noises (doesn't sound healthy for the pieces). So I wanted to know if anyone knew a reliable 5-speed sequential gearbox / a 5+r sequential gearbox. That's it for today. More updates coming soon. -
.thumb.png.116032e930e483fb4ebbfdc62183bd34.png)
[WIP] RC Off-roader w/ Dual Diagonal Drive
Didumos69 posted a topic in LEGO Technic, Mindstorms, Model Team and Scale Modeling
RC Off-roader with Dual Diagonal Drive I think I'm onto something that will get me through the winter. Summary Dual diagonal drive means: 1) having two separate drive trains with equal torque while 2) preserving the advantage of having an open distribution for cornering and 3) passing diagonal tests without using differential locks. Background I have been playing with this idea for a while already, especially after seeing @KevinMoo's dual drive models (Mitsubishi Pajero and Dual-Driveshaft Pickup). @KevinMoo rightfully addressed the vulnerability of LEGO parts in RC models and the fact that using independent drive trains for the left and right sides, loses the benefit of differentials while cornering. This got me thinking. Using independent drive trains for left and right in a 4WD model does indeed drop the benefit of differentials while cornering, but what if we would pair the wheels diagonally, so pair the left front (LF) wheel with the right rear (RR) wheel, and pair the right front (RF) wheel with the left rear (LR) wheel? The resulting 'dual diagonal drive' (I borrowed the term from the electric skateboard scene) would serve two major benefits: While cornering, the LF and RR wheels will average to a speed that is very close to the average speed of the RF and LR wheels. So not having an open distribution by means of a differential between the two drive trains is much less of a problem as with separate drive trains for the left and right side wheels. On a very uneven surface, where one or two wheels may lose contact with the ground, the wheels that do have contact are typically lined up diagonally, see image. With dual diagonal drive, the vehicle would still have traction, even without locking any differentials. Only on slippery surfaces, there are chances of spinning wheels. So this is what I'm thinking of. We start with the basic dual diagonal drive setup: Two separate drive trains, one for the LF and RR wheels and one for the RF and LR wheels. The drive trains cross using two 24t gears and an auxiliary 16t gear that sits right underneath the auxiliary axle for the other drive train. So no clutch gears are involved in this crossing. I inserted a 1L Technic liftarm inside each differential - idea from @Madoca 1977's Toyota Land Cruiser 80 - to prevent the bevel gears from popping out. Next we add a manual locking feature, which closes the differentials with a single lever. This locking feature will force each pair of wheels involved in one of the drive trains to have equal speed. Now we connect each XL-motor to one of the differentials, using a small 4-speed gearbox. That means; two separate 4-speed gearboxes. This may be a bit ambitious, we'll have to see in real-life whether this is feasible or not. I might fall back to two 2-speed gearboxes. I did pay attention to the amount of torque in the transmission though. I geared up the XL-motor outputs and geared down the transmission output. That makes the transmission spin faster with less torque. The gearboxes are operated synchronously using a 90-degree stepper, which is controlled by a Servo-motor. Each gear shift axle has its own 90-degree limiter. And finally the outputs of the XL-motors are transferred to a fake V8-engine via a normal differential. The sole purpose of this differential is to combine the XL-motor outputs for the fake engine. For the steering I'm thinking of using a servo motor. I don't really like the directness of steering with a servo-motor, but the steering link attachment points are moved one stud backwards, which confines the steering angle. This adds to better handling and protects the CV-joints in the wheel hubs. I don't know where this is going to end. I'm not even sure about the exact kind of car I will be targeting, but it sure needs to be some kind of all-rounder. Comments and suggestions are welcome. -
Hello Eurobrick ! Short introduction to my latest MOC : a wheel dozer. A wheel dozer is basically a big blade to push material mounted on 4 (or more) wheels mostly used in mining industry. It is a quite simple vehicle I suppose this is one reasin it is not built a lot in Technic. By the way, I’m a bit late to post this, it is already more than a week old. What’s inside? Propulsion is made through a PF-XL motor placed at the rear end of the truck with a fake L6 engine. The vehicle is 4 wheel drive with a differential on both front and rear axle, plus the rear axle is pendular. A servomotor is used for steering in a simplified technic than the one used on set 42030 (Volvo L350). The front blade is also operated by a single Servomotor which accomodate the upper-lower positionning easily, and intermediate position can also be reached thanks to the use of the BuWizz controller. (sorry last picture is a bit dark I will regenerate it later) Additionnal info on this MOC and some other general info on wheel dozer on my blog at : https://superk-technic.com/wheel-dozer/ Thank you for reading !
-

[MOC] Azimus mini rc racecar
syclone posted a topic in LEGO Technic, Mindstorms, Model Team and Scale Modeling
Good Day! So I was really bored this friday, and wondered how small a buggy motor powered car can be, just for pure interest. As it turns out, 2 buggy motors don't occupy that much space XD. So here it is, mini-size car powered by two beasts, Azimus! Needless to say, it's crazy fun! Design was inspired by Lexus concept vehicle from Minority Report, and Deora II from HotWheels. Albeit it was mainly made that way to accomodate the BuWizz as low as possible and turned out different from both. Pics on G-Drive and Brickshelf whenever it approves. Video&photos below (click to enlarge) https://www.youtube.com/watch?v=RCORMtsr1JY Have a Nice Day! -
Lancia Delta Integrale
Porsche96 posted a topic in LEGO Technic, Mindstorms, Model Team and Scale Modeling
Lancia Delta Integrale Specification Scale 1:14 Length 37s / width 19s / height 13s (54/23,5/13,5 cm) Weight: 1050 g Front suspension: none Rear suspension: none AWD Functions Driving - 3L Steering - Servo Today, I want to present Lancia Delta Integrale. I’m sure that everyone know the original one, which won many rallies. There was few versions of Integrale: from norma road cars to monster with power of hundreds hp. This model is usual one. My main goal was to build small, fast car, which gives a lot of fun. The construction is quite simple. Lancia is driven by 3Ls - 2Ls for rear, powered by 8878 BB and IR receiver V2, and one L for front, powered by 8800 BB. For steering (with Ackermann geometry) I used servo. Photos Gallery I encourge you to follow my new Instagram account. -
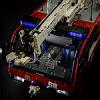
 Hello guys! At last I can represent to all of you my latest MOC. It's a Lego Technic Liebherr LR 11000 Crawler Crane. I tried to build a copy of a famous Liebherr-brand crawler crane. If to be honest it was my dream to build a human-high technic crane. This model is approx two meters high. It has five independent winches! Real crane has six, but two of them goes to one hook, what was not necessary to represent in lego version. Except string crane is build of 100% Lego. As a counterweight I used three big battery boxes in the superstructure and three ones in the additional counterweight carriage. Below I will list crane's functions. RC: 1,2) Chassis drive and steering - one L motor for each track. 3) Superstructure rotation 4) Operator's cabin uplifting via small linear actuator 5) Main boom winch 6) Luffing Jib winch - winch is located on the main boom like in the original model 7) First hook winch 8) Second hook winch - winch is located on the main boom like in the original model Manual: 1) Derrick boom winch - needs only when assembling/disassembling crane 2) Addiction counterweight extensioin - need to balance crane under heavy loads 3) Addiction counterweight up/low - need to balance crane under heavy loads or without a load 4) Addiction counterweight steering - need to steer wheels in the counterweight carriage when superstructure rotating and need to make wheels parallel to move crane forward or backward 5) Chassis uplifting - chassis have installed four small linear actuators which can lift the chassis under the ground to put on tracks like in the real Liebherr!! As TLG doesn't have any pulleys of 0.5 stud wide and with the pin hole in the center and 3D parts are too expensive I decided to drill the original ones. Firstly I used 4 mm drill to make a round hole instead of an axle, after 4,5 mm and finished with the 5 mm drill. No any part was broke. And this time I already has video to show you: And a couple of photos. https://bricksafe.com/pages/Aleh/liebherr_lr_11000 Hope you will like it. Feel free to ask any questions. Also very appreciate critics. But for sure my wife definitely will not stand another crane To start building i was inspired by the set 42042 - I love it too moch!
 -

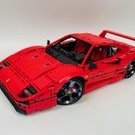
[MOC] Ultimate Muscle Car
paave posted a topic in LEGO Technic, Mindstorms, Model Team and Scale Modeling
Hi! There's a third version of my muscle car: - PF: XL, M, IR, LiPo - Opening doors, bonnet, trunk - Independent front suspension - Leaf spring rear suspension - Working supercharger - Rubber return to center mechanism - Adjustable seats - Removable body. Video: More photos: Building Instructions: https://rebrickable.com/mocs/MOC-17750/paave/ultimate-muscle-car/ -
Book Review (Review by Thorsten Benter) Almost a year has passed since initial publication of this book. There are a number of on-line reviews available – this one on EB seems to come in a bit late. Well, I don’t think so, in contrast. This book is a comprehensive how-to-build-a-train resource rather than a compilation of what is out there. And this sets the book aside from so many others. It will be up-to-date as long as The LEGO Company produces bricks and sets. Plus, with the arrival of the Powered Up system, more space becomes available inside the train body as compared to comparable PF functionality: The dedicated receiver becomes obsolete and no line of sight is required for communication creating some additional space – space for sophisticated building techniques! This books tells you everything you need to know about the historical LEGO train theme development at TLG, about scales and widths, about pivot points, microstriping, SNOTing and offsetting, and so much more with relevance to train building! (Note: A PDF copy of this review with higher resolution pictures will be shortly available at Holger’s website) Summary: A must-have for every LEGO train fan, for people entertaining the idea of getting into LEGO trains, and for people who still don’t know that they will become train fans after reading the book Superb photography of LEGO models, outstanding renders of CAD models In-depth analysis and assessment of the different LEGO train eras Demonstration and teaching of advanced building and design skills My personal LEGO book score: 10/10 About the book: Author: Holger Matthes Published: Oct. 2017 by No Starch Press Inc., San Francisco, CA, USA. Hardcover, 135 pages + 90(+) pages reserved for 4 full building instructions (ICE train, gondola car, Swiss Crocodile, and a vintage passenger coach), 150+ most relevant and educational figures (excluding the beautiful chapter openers or page breakers as well as the set building instructions), 20+ tables including bulleted lists. ISBN: 1-59327-819-5 Price: € 14 (Kindle edition, Amazon); € 23 (Print edition, Amazon) both as of 9-2018. $ 19 (ebook only), $ 25 (ebook and print edition, nostarch.com) both as of 9-2018. The present English edition published by No Starch Press is based on the initial German edition “LEGO Eisenbahn – Konzepte und Techniken für realistische Modelle”, which was originally published by dpunkt Verlag Heidelberg, ISBN: 978-3-86490-355-7. The initial German edition of the book based on Holger’s manuscript composed in 2015/16 caught the attention of foreign publishers: It began with the present English edition in 2017. It then took a bit longer until the Chinese publisher “Posts & Telecom Press” (who has already published a bunch of LEGO books written by fans) very recently released the Chinese version: http://www.ptpress.com.cn/shopping/buy?bookId=0ed0cd68-ca59-41fc-9bf9-193b06089996 (ISBN: 978-7-115-48419-2): After publication in 2017, No Starch Press’ English version became the reference for further translations. In summer 2018, the Spanish (“LEGO TRENES”; LEGO TRENES https://www.amazon.es/TRENES-Libros-Singulares-Holger-Matthes/dp/8441540179) and the Italian (“TRENI LEGO”; https://www.amazon.it/Treni-Lego-colori-Holger-Matthes/dp/8868956411) editions became available. And the Russian version is on its way (sorry, Holger couldn’t tell me any further information about its availability): (Note that the Russian cover on the right is purely made up by me – Google translator says the Cyrillic headline reads “in preparation” – but who knows …) About the author Holger Matthes is a hobbyist who has been building with LEGO since 2000. He was involved in the creation of various official LEGO projects such as the Hobby Train set #10183 and frequently presents his models and gives workshops at LEGO exhibitions worldwide [copied from Amazon website]. Table of content of the book (short version) Part 1: Overview and history Introduction A history of LEGO trains Part 2: Building your own train models (My own creations – MOCs) Basic principles Designing your own models Case studies in design Part 3: Building instructions A note on the included building instructions Appended to the body of the book, you’ll find four high quality and carefully composed instructions in addition to two free online instructions: Inter-City Express (ICE; driving and trailer cars, PF motorization, windshield designs) Gondola car Swiss electric Be 6/6 “Crocodile” Vintage passenger car Steam Engine BR 10 (as bonus online available at http://holgermatthes.de/bricks/en/br10.php) Steam Engine BR 80 (as bonus online available at http://holgermatthes.de/bricks/en/br80.php) There is further information available online. Holger directs you to https://www.nostarch.com/legotrains; but most of the very valuable stuff is actually hosted on his website. I highly recommend to visit his site: http://www.holgermatthes.de/bricks/en/index.php. You will find a wealth of background information, tips&tricks, how-to, and much more. The Book Let’s face it: Almost one year after initial publication, Holger still sets the stage with this book for LEGO train fans. It will be tough to get it much further; not on 135 pages (not counting the instructions pages), not with regard to the topics covered, not with regard to the width of the audience addressed. This book provides diverse perspectives on the art of building LEGO trains, coaches, and rolling stock – and is at the same time always determined, focused, and addresses most relevant “issues”. Train builders repeatedly face tough challenges: A train is not a building, which simply resides in all its beauty; rather trains are work horses – either hauling heavy cargo loads or endless passenger coaches, or switching rolling stock for hours and hours in a train show – or on your personal layout. At the same time, a LEGO train is “beautiful” and “esthetic” in the recognition of a train fan - as a building is for City fans. However, to be able to render real trains into LEGO models, regardless on the scale used, requires some serious knowledge about the myriads of LEGO bricks available, about advanced building techniques, and even electrical wiring skills. There simply isn’t much space in a LEGO train. Space as in “Space … is big. Really big. You just won't believe how vastly, hugely, mind-bogglingly big it is. I mean, you may think it's a long way down the road to the chemist's, but that's just peanuts to space.” [Douglas Adams, The Hitchhikers Guide to the Galaxy, 1979]. It is usually >extremely< packed inside a LEGO train model, particularly when electrifying it. Shaping the outer appearance with advanced building methods such as SNOT or angled and carefully secured pieces usually eats up all the space inside the hull. And lastly: Trains need to be sturdy. They not only haul heavy loads – they also have to run endless distances on track – in the best case on long stretches of straight track and smooth curves, here and there a bit bumpy – in the worst case negotiating endless and sharply bent curves and switch points in complex rail yards. This is exactly what Holger addresses in his book: How to achieve a sturdy, reliable, and at the same time esthetic and beautiful train. And we should just get it straight from the very beginning: Stickers are frequently recognized as the “icing on the cake”. And this is certainly true. BUT: Believe it or not, you can also legally “build” tiny lines, sloped coloring, narrowly split windows and much more when using advanced building techniques! And that sets aside this book from so many postings, building instructions, and other resources: Holger shows us how to accomplish “brick-built stickering” by using the endless variety of bricks and plates to build streamlined and nicely accentuated and smooth surfaces – rather than using the bulky, essentially non-LEGO-philosophy-but-by-TLG-released ICE #55768 nose with stickers attached all over it … There is so much more in the book. This is what I am trying to highlight in the following. Holger’s book is a must for us all: Beginners, advanced builders, as well as Train Tech gurus! And those who believe that they already are. One more thing to add: Photography and CAD image rendering. Or: A picture is worth a thousand words. Holger says: “The biggest thank you goes out to my old friend and master photographer Andy Bahler, without whose pictures this book would have been useless. His commitment, night after night, was above and beyond expectation …” The pictures are spectacular – you will notice right away. Organization of the book There are three parts in this book, although there is no such explicit assignment in the table of contents. Holger tells us on page 2 though: “The first part of the book gives an overview of LEGO trains over the different eras, covers some history, and answers questions about how to combine old LEGO trains from the attic with today’s kits. The second part of the book is about building your own LEGO train models, also known as My Own Creations (MOCs). Using my many years of experience building LEGO models, I’ll show you how to create proper train models, covering both the possibilities and the limitations. Finally, the book ends with step-by-step building instructions for several models.” Usually, the table of content is a good starting point for the organization analysis. However, this book is extremely focused and self-contained in each of the chapters of the three parts. This is very helpful (and also very different from other books), as the LEGO universe, including train worlds, is as diverse as it possibly gets. The number of pieces alone currently available through TLC’s official channels such as LEGO sets, PaB, and LEGO stores – or even more so – through the uncountable BrickLink stores around the globe is truly mind-boggling. Well, it is not only the sheer number, but more so the endless combinations possible – and what you achieve with such. Chances are: One gets rapidly lost and a little frustrated. Exactly this is NOT happening when “reading” this book. OK. We do it differently – as it seems appropriate for a “different” book: We walk through, as the very nice and focused organization of the book simply allows that. Part 1 “INTRODUCTION Decades ago, the toy designers at LEGO likely never imagined how durable their work would be. Today, parents can dust off their childhood LEGO trains and play together with their children who have just received their first brand-new LEGO train set. And fans of all ages can revive older sets and parts to create entirely new models.” In order to prevent such an almost natural “disorientation” or lost in parts and ways to connect them, in part one the book begins with a review of on-line resources. Information-, instruction-, and brick-availability-wise. Holger lists only the most relevant internet locations. Start here and progress further on your own. It makes your building life so much easier. As with every printed book, online references may become outdated at some point in time. Holger names thus only most reliable web portals, which will most probably exist for a long time. “A HISTORY OF LEGO TRAINS Let’s explore the evolution of the LEGO train systems from the earliest set to the present.” Next, there is a historical review of which type of train system was available at what time defining an era. This is rather significant. First of all, this approach results in a theme classification rather than a temporal evolution of sets: The blue, grey, 9V, RC, and PF era. As the pieces from different areas are naturally largely interchangeable (otherwise it would not be LEGO!), you may mix them as you see fit. Nevertheless, each era has a certain typical appearance – if you want to capture that, you need to know what was going on during that particular era. As an example, people in love with the grey (12 V) era often capture the look and feel of that time – for example studs everywhere, not many curved bricks/diverse slopes (as they were not available at that time) – rather limited colors schemes, black, red, and yellow ... The reader learns what has been produced when and in what color scheme. There is also ample of information on the technical features of each era – it appears as if the author is deeply involved and well connected in the LEGO train community – all the way up to participate in the design of selected sets. Holger shares his knowledge with the reader – always in a concise and focused way. It is pointed out that Holger is not even attempting to compile a complete list of sets available within the different eras – in contrast, he is summarizing the unique era characteristics and features. He focuses on power sources, tracks (including switches and crossings), and other elements (wheels, baseplates, in addition to unique features, such as trucks, couplings and buffers). The grey (12 V) era sections stands out of course, as this was the most diverse and most creative train theme ever (IMHO, of course!). Here you will find an – again unique – compilation of “remote-controlled accessories”, “windows and doors”, “light bricks”, “weighted bricks” … What I personally find extremely useful – and it must have been a considerable effort – is i) a summary table, listing the most important features of each era, and ii) Holger’s evaluation of these features he headlines as “Seen from today’s perspective”. Even long-time and experienced train enthusiasts will surely find valuable information in this chapter! Part 2 “BASIC PRINCIPLES Let’s dive into the world of LEGO elements and explore the endless ways to connect them.” Now that one knows the individual features of the different eras, Holger opens part two of the book with a compilation of relevant LEGO pieces for train building. It is really surprising how many there are! I have built trains myself – seeing all the various elements nicely grouped and organized makes it so much easier to get an overview of individual pieces, select the ones you may want to try out – and compare them to other options. This section is extremely helpful when you start off with a new model – or when you want to overhaul an already existing train. In the following section, Holger introduces typical train specific building techniques (although you can use many of them throughout the entire LEGO universe!). And is not surprising that there are eleven dedicated pages on SNOTing and fractional-plate offsetting in all three dimensions. These are the most crucial techniques when shaping the look of a train. SNOT (studs not on top) is a powerful technique and has become very popular among train fans. Originally rather restricted to a few elements, which allowed to “reverse” the building order, the LEGO Company has released a broad variety of SNOT elements over time. These are of course also shown in the preceding chapter on relevant LEGO train pieces. I’d say that this chapter is extremely important for beginners and of great interest to experts as there are various approaches shown side-by-side. At least for me this chapter is highly inspiring. The same is true for plate offsetting, i.e., building with only one half stud or even less displacement off the stud grid. First, the look of a train becomes much smoother even when not using curved bricks; secondly, this technique allows you to literally “build” colored surfaces with fine structures and even thin stripes (called microstriping). Without using stickers that is … Ever used minifig guns to create pantographs? Or ice skates as door handles? No? Well – Holger shows you! “DESIGNING YOUR OWN MODELS You might be wondering if you’re ready to begin making your own models. Which train should you build? Maybe you should start with the commuter train that takes you to work every day, or a freight train? And who hasn’t dreamed of a beautiful steam engine in LEGO?” Now we are getting down to business. The following two chapters of part 2 are not about “building a train” – they are about “how to do it right”. We are talking about scaling and modeling rather than “pushing along”. Before Holger goes into details though, he points out the importance of thoroughly choosing a scale. This is an extremely important decision to be made when attempting to model a real-world train. How much detailing is required? How much abstraction is allowed? Citing Holger again (page 73): “Building a recognizable model isn’t about scaling every part exactly, although proportion matters. Intentionally omitting some details or exaggerating others is usually necessary. Scale modeling with LEGO is a bit like drawing a caricature: the end result may not be an exact likeness, but it is recognizable and undeniable.” We learn about model scales (1, L, O, HO …), alternative approaches (scaling by wheel size) as well as choosing a model width (6-, 7-, 8-stud-wide). Don’t mix these up – almost any scale may be used for any track width! There are so many diverse examples here on EB. Holger narrows the scope of widths covered in his book to 6 - 8 stud wide (see cover page of the book), as these are the widths most builders choose – in addition to the official 6-wide LEGO models. He discusses the advantages and downsides of each of these widths in detail. A very important aspect when designing and building a LEGO train – regardless of the model scale – is the official LEGO track geometry. Maximum distances of fixed axles, alleviation of this rather restricted distance using articulated single trucks (a theme repeatedly discussed here on EB), sliding middle axles in three axle trucks – you will find all the answers in this book. When it comes to attaching cars to each other – even more design aspects have to be considered, which are all discussed: Pivot points vs car distance, additional pivot points to reduce car distance, the effect of pivot points on design issues, to name a few. And then: Steam engine design: 7 full pages! As far as I am concerned, steam engines are the most challenging models to render in LEGO. To say it with Anthony Sava’s words: “I'd buy a set with a steam engine in it, but I have little interest in buying a box on wheels.” (EB Forum, April 2nd 2018). Holger shows us all the challenges and caveats. The remaining sections in this chapter are: Power and Control, discussing mostly the implementation of PF elements, Modeling Details, and Track Design and Layout. Again, extremely valuable information and guides are given. One comment on third party suppliers: At the time of writing this book, both SBrick controllers (as a replacement for PF receivers, featuring wireless Bluetooth connectivity) as well as ME Models (as a supplier of wider radii curves) were actively present on the market. As of now (i.e., August 2018) though, the new LEGO Powered Up system introduced lately makes SBricks for trains almost obsolete – and Me Models have gone out of business some time ago. There are a good number of very good 3rd party alternatives for additional track pieces – large curve radii, complex switch point geometries to name only a few. They come as superb injection molded pieces which are almost indistinguishable from original LEGO track, as well as 3D printed varieties. I believe that a book of the format Holger has chosen simply does have to deal in-depth with such developments as they are much more volatile than almost any LEGO product. Taking aside the LEGO RC interim solution of course. But again, Holger gives a full account of why RC happened at all and why its lifetime was even shorter than that of many 3rd party small businesses. I really enjoyed this section very much. Regarding very recent developments by TLG naturally not covered in the book (the original German manuscript was written in 2015/16): The introduction of the Powered Up system leaves much more space within a train engine so that all the building tips and tricks provided in Holger’s book become even more intriguing! It appears as we can even more freely combine advanced power/remote control options with the present advanced building instructions. Which makes this book even more valuable! “CASE STUDIES IN DESIGN Armed with the tools and knowledge about LEGO modeling covered in the previous chapters, we’ll now take a closer look at the actual design process using some of my own builds as a guide.” This chapter needs to be explored – interpreted – by yourself. This is – as far as I am concerned – the heart of the book. Here you will learn how to begin designing a model. I find this part the most difficult: How to begin – looking at the all the bricks, plates, slopes, clips, there are so many of them … so we should take this to our heart: “Designing a model is a creative and personal process: there’s no right or wrong way to build a successful model. The guidelines in this section are meant to get you started. You’ll certainly develop your own strategies along the way.” Along with: Decide on a scale and choose the width: 6-, 7-, or 8-wide? Decide how the train will be powered and what type of track it’ll run on. Choose a target audience: should it be a realistic, recognizable model, or are play functions more important? You will notice: This is about >you<! Nevertheless, you will also learn a lot in this chapter. Holger has chosen a regional express train (Bombardier double deck train), a powerful electric locomotive (Siemens Vectron engine), and a (well, Holger is German after all …) steam engine (BR 10) as case studies. This is a very clever selection – as the techniques he shows apply to almost every engine I am aware of – including American diesels as well as American steamers … or all the various European trains, Emanuele (EB member LT12V) is currently presenting here on EB … And finally … Part 3 “BUILDING INSTRUCTIONS! Get inspired with these step-by-step instructions for building an Inter-City Express, a simple gondola, a Swiss Electric Locomotive Be 6/8 “Crocodile,” a vintage passenger car, and a steam engine.” From page 136 to 227 you will find first class, high(est)-quality building instructions for the above referenced models. There is nothing more to add. As said: This book is a must … Play Well! @Jim Thank you very much Jim for giving me the opportunity of writing this review for EB - it was a great pleasure. And for sending me this wonderful book! @HoMa Thank you Holger for writing this book. And for all the additional information you gave me when writing this review and for your comments! Thanks for reading, Thorsten
-

[MOC] Compact RC Semi-trailer truck
Hogwartus posted a topic in LEGO Technic, Mindstorms, Model Team and Scale Modeling
I' ve made a scale model of semi-trailer truck with a trailer. It's in 1:60 scale, so wouldn't look out of place in a minifigure scale Lego City. But it is remotely controlled. Video: Functions: drive (truck RWD) - L motor steering (with right geometry) - Servo motor remotely openable trailer's cargo door - M motor Everything is controlled remotely using SBrick, powered by standard 8881 battery box. Internals of the trailer, door opening mechanism, battery box and sbrick were packed here: Please watch the video to see this machine in action and for more details. __________________________ Feel free to share your thoughts. I hope you liked this model. -
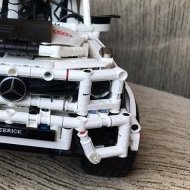
[MOD] RC Koenigsegg Agera RS1 Megacar 1:10
T Lego posted a topic in LEGO Technic, Mindstorms, Model Team and Scale Modeling
Hello everyone, I'd like to share my latest MOD: Koenigsegg Agera RS1 This car is one of my favorite road-going super/hyper/megacars, and therefore I decided to build it. To me and many others, Koenigsegg is a very special car manufacturer: It was founded in the nineties by Cristian von Koenigsegg, a man without any engineering education background and budget. On top of that, all Koenigseggs are handcrafted and are produced in limited quantities. I like the RS in particular, beceause it is IMO the most beautifull Koenigsegg and it holds the top speed world record. This car is not fully designed by me. @Pvdb build the Koenigsegg one:1 more than two years ago. The RS1 and One:1 have very similar Bodyworks and since Pvdb nailed that on his One:1, i decided to use his bodywork as a shell around my disigned chassis. In addition to that, I also used his door meganism, beceause I could not imagine me designing a better one Specifications: Dimensions 59x27x15 Studs Weight: 2600 g Estimated parts quantity: 2500 parts Powerfuntion elements: 2x PF AAA batteries, 2x PF V2 reciever ,4x PF L motor, 1x PF Servo motor, 1x PF M motor, 2x PF 50 cm wire The RS1 is basically the same as any other RS, but it has the one MegaWatt engine upgrade. The RS1 is specced in white with a black center stripe and it has many blue accents such as the interior, skirts, spoiler, diffuser and front splitter. Many of those parts of the RS1 have just a very thin stripe of blue painted on it. This means you can not replicate that with regulare LEGO parts. Stickers seemed like the only solution, but at some point the idea to use rubber bands for some accents popped in my mind. I only used this trick in the front splitter. Features: Easily removable Roof, like the real car Openable front trunk and engine bay Motorized dihedral synchro-helix actuation doors, Powered by a PF M motor Front double wishbone suspension with negative caster angle Rear triplex suspension with double wishbones Steering with working steering wheel, powered by a PF Servo motor Propulsion with working V8 engine, powered by 4x PF L motor I wanted both doors to be opeable by just one motor. This meant I had to make selector for wich door is connected to the motor. I had some free space in the center tunnel, so I decided to use the handbrake as a selector. Just behind the front wheels there is a driving ring wich can engage in two different clutch gears. Both clutch gears are connected to different doors. The motor and this meganism is placed underneath the trim. Here is the full 'transformer mode'. The front trunk and engine cover can be opened manually. If you look closely, you can see the battery and The L motors behind the seats. The recievers are placed behind the rear axle. Replicating the triplex suspension was for me a 'must have' on this car. It consists of two inclined shock absorbers and a horizontally placed pneumatic cilinder. The pneumatic cilinder is definately the most realistic looking way to make the central shock, but it is not practical. It offers resistance when extending and retracting, so I mounted some springs behind it to ensure that the model doesn't sag. In addition to all of that I also put some links on the suspension system. They are only there for an aesthetic reason though. finally, a video demonstration. Enjoy! Comments and questions are welcome! -
[MOC] Dakar Truck
Lucio Switch posted a topic in LEGO Technic, Mindstorms, Model Team and Scale Modeling
Hi to everybody! It's been a while since I posted something new...so now here we are. Little prefaction, in the last year both time and motivations are dropped down, this Moc was almost ready in may 2017 and it took me a bit to find the desire to do pics video and instructions.....the instructions are not ready yet, but they are at a good point. IMG_2348 by Lucio Switch, su Flickr Now about the Moc, this is a sort of a Dakar Truck, it's a lot simpler compared to my usual Mocs, the idea behind it was to use the Claas Tires, trapezoidal panels...and don't use the parts of my Crane Truck, furthermore, to make it light (or try to do so), I added less details then usual. So it's son of a lot of (personal) compromises. It is driven by 4Xl Motors, 2 for the front axle and 2 for the rear and it's steered by a servo motor. 2 M motors are used to run the pump and to actuate a pneumatic valve. It's powered by 2 Li-Po battery and controlled by 2 SBricks. 6 pairs of Led are used for the lights. One small pneumatic pump, a pneumatic valve and 2 small pneumatic cylinders make up the pneumatic system. The truck has live axles with Anti Roll-bar, the differentials are lockable pneumatically. It has openale door, tiltable cab (with some interior details), and a door in the back to acces the battery. That's all, I hope you like it! -

[WIP] Gravedigger - Monster Truck Chassis v1 RC with BuWizz
TheQuoteMan posted a topic in LEGO Technic, Mindstorms, Model Team and Scale Modeling
Fellow Technic Builders, Let me share my first serious and almost finished MOC - possible the most recognisable Monster Truck of all times, Gravedigger. Firstly, let's start with the picture of the real ting, in case you are not as obsessed with Monster Trucks/Gravedigger as I am: And here my version (now with stickers) The idea of recreating it with Technic was what drove me back to Lego after my dark ages. Firstly I wanted to just do a simple MOD of 42005 with body and colour swap, but then we've got the Claas tires which are a perfect fit for this project, so it got bigger and bigger. Anyway, here we are after two years of building: 2XL engines for power, geared up 3 times (one engine per axle) 2 servos for steering PF switch controlled by a M engine for switching from crab steering to opposite LEGO Lights Weight: 1281g Dimensions: 44 studs or 35cm long 15 studs or 12cm wide (chassis) 27 studs or 22cm wide (wheels) 32 studs or 26cm tall Performance wise is runs 3:1 geared up XL engines powered through BuWizz which combined with low centre of gravity allows for a fun stuff like less or more controlled driving on side two wheels: And to be seen in a video: Plus a video of the steering switch at work: The model is not very mechanically realistic, e.g. it has portal axles while the monster trucks use planetary geared axles, but it is my first MOC and it was meant to be fun in outdoor, not off-road play and it is. There is a mention of the chassis being v1 in the topic. I want to improve it and develop optimal Monster Truck chassis and have a set of bodies to replace on the top. As such, I am recreating the model in stud.io for my reference and possible instructions and the renders of the powertrain are available in links below (I don't want to overburden the post with pictures, anyone who will be interested in them will surely click a link). Build time so far: 2 years. This is my first MOC, I know it is far from perfect (e.g no torque allowing to climb a ramp and have enough speed to make a decent jump) but is fun for me so far and overall I am happy with the result. https://ibb.co/mVecNT https://ibb.co/ew12p8 https://ibb.co/f8rDwo https://ibb.co/dinWhT I have also ordered a set of custom stickers for the details and they are on the way. Can't wait to hear your opinions, guys as the stuff being published here humbles me with cleverness and complexity. -
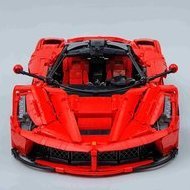
LEGO RC Fiat Panda 4x4
CrisGarage posted a topic in LEGO Technic, Mindstorms, Model Team and Scale Modeling
The Fiat Panda is an Italian utility car created for all needs. It's known for its simplicity but above all for its ability to do almost everything. The 4x4 version, despite the 50 hp, is capable of climbing on various types of terrain, in fact it is also used for trials (just change the wheels). I wanted to create it in a small offroad version. The design is quite similar to the real model even if with some difference like the roof. I added a front bumper with 2 PF Lights, very useful for night rides, and a winch (you can see how it works at the end of the video). 1 PF L Motor for propulsion with a 2 speed gearbox and a 4x4 transmission without differential (I added a second reinforcement gear in the rear axle). The gearbox is compact and strong enough and the winch system is connected to it. The total gear ratio is: First Gear 1:3.33; Second Gear 1:1.67. Pendular suspension for good stability on rough terrain, even if the model is not high enough to work properly :(. The rear opening hatch and the small trailer are good for transporting small loads. The old model was very squarish and very low so I had to revise it more carefully. -

New attempt at RC Forklift
steph77 posted a topic in LEGO Technic, Mindstorms, Model Team and Scale Modeling
Hi all, Here is an attempt at building a new forklift. My previous one used the TLG design for the boom. This time i decided to build my own. Why? Just because the TLG boom had a big inner central mecha that makes impossible for the driver to look in front of him... I solved this by using a string based mechanics to lift the first stage of the mast. The second stage is also indirectly lift by the first one's movement. The whole arm has a tilting mechanism: The model has a propulsion base on one medium size motor, a tilting mechanism based on the same one. The direction is made with a servoand the main lifting use also a medium size motor. At all stage, the power is enough. Some other pictures: Front view. the driver just can look in front of him. Good idea no? Maximun size of the full open mast The model has drive and steering. Led light are also at party. The steering Wheel is custom made using technic disk and a Polly tire I hope you'll like it. Steph -
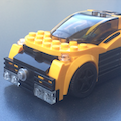
The Honda CR-Z is a sport compact hybrid electric automobile manufactured by Honda and marketed as a "sport hybrid coupe.The CR-Z combines a hybrid gasoline-electric powertrain with traditional sports car elements, most notably having a 2+2 seating arrangement and a standard 6-speed manual transmission. The CR-Z is regarded as the spiritual successor to the second generation Honda CR-X in both name and exterior design. Honda CR-Z - Drive it like you own it by lachlan cameron, on Flickr This is a special design and is a one off build. No instructions will be made of this car. Honda CR-Z - Drive it like you own it by lachlan cameron, on Flickr I worked with my client on the features and design of the car to ensure accuracy to the original car - the 2016 Honda CR-Z! Honda CR-Z - red hatchback by lachlan cameron, on Flickr This car sports 4wd, torsion bar suspension front and rear, working steering wheel, RC doors powered by 2 m-motors tucked into the Center console, opening trunk and hood, 4 cyl. In-line engine, 2 lipo batteries and 2 Sbricks, 4 light in the front, 2 light at the rear. Honda CR-Z - Drive it like you own it by lachlan cameron, on Flickr Flickr album: https://flic.kr/s/aHskBY38RU Instagram: https://www.instagram.com/loxlego Honda CR-Z - Drive it like you own it by lachlan cameron, on Flickr Honda CR-Z - Drive it like you own it by lachlan cameron, on Flickr Honda CR-Z - Drive it like you own it by lachlan cameron, on Flickr Honda CR-Z - Drive it like you own it by lachlan cameron, on Flickr Honda CR-Z - Drive it like you own it by lachlan cameron, on Flickr
-
.thumb.gif.ad7c8d88b264ee812194946c07404504.gif)
[AMS-2][MOD] Lego 9394 RC Dragster - Powered by a buggy motor!
mocbuild101 posted a topic in LEGO Technic, Mindstorms, Model Team and Scale Modeling
Yes, it's an airplane that can drift! (or rather do doughnuts) But first, I think the video is the best introduction: Cool, isn't it? I was actually very surprised how well it worked when I first tested it - especially considering how bad my previous MODs were.. (in fact, it's probably the only RC set MOD that I've done that worked at all!) It was quite a challenge to fit all the electrics in such a small body, and was actually the main reason why I only kept one of the original functions... Features: Steering - powered by PF servo. Drive - geared down 3:5 from fast output of buggy motor. Motorized wings (not RC) - powered by PF M-motor. Easy to remove battery box - if not using rechargeable battery. Other Specs: Weight: 650g (with rechargeable battery) Original functions kept: 1 (out of 3) Theoretical top speed: 14km/h (at least) Links: YouTube: https://www.youtube.com/watch?v=6pTW9vclg0c Bricksafe: https://www.bricksafe.com/pages/mocbuild101/9394-rc-dragster-mod Contest voting: https://www.eurobricks.com/forum/index.php?/forums/topic/162664-ams-2-dragify-your-set-voting More photos: Enjoy! And don't forget to vote! -
Lego Technic 9397 Logging Truck RC Mod with Sbrick
TmoneyTechnic posted a topic in LEGO Technic, Mindstorms, Model Team and Scale Modeling
Hey guys, sorry I haven't posted in a while. I've had the clips to make this video for 2 months now, but not enough time to edit. Anyhow, with that said, here's what I have done. I have rebuilt both of the rear axles so they can be driven by 2 L-Motors, and rebuilt the front axle so that it can be steered by a servo, and still be able to fit an engine and have room in the cab for other motors. I also rebuilt the front of the truck since it seemed too sparse to me, but I've left the rest of the truck (besides some of the internals) original. I decided I only wanted to use a single Sbrick, and I had only one port left, since there was already an M-Motor in the model to drive the functions connected to the distribution gearbox, so I built a custom sequential shifter that I could fit in the cab, and access the axles of the changeover catches in the gearbox, and thus shift through the functions sequentially. This is done with one M-Motor. All of the internal mechanics of the gearbox were left stock, besides the elimination of any white 24 tooth clutch gears. I did not change the rest of the model that much, though I did think having an inline-4 seemed kind of lame, so I put in a V8 instead. i will not release any instructions due to the extense of the modifications. Please enjoy the video and photos below, and feel free to leave a reply! -
-kpia.thumb.png.a265cddff9575859eea3a4d2aad663c2.png)
MOC Tank LT vz. 38 (Pz. 38 (t))
Technic BOOM posted a topic in LEGO Technic, Mindstorms, Model Team and Scale Modeling
Czechoslovakia WW2 tank. Power functions: 1x XL motor 2x L motor 3x M motor Fuction and chassis Lego. Desing Cobi small army WW2. -
Czechoslovakia WW2 tank. Power functions: 1x XL motor 2x L motor 3x M motor Fuction and chassis Lego. Desing Cobi small army WW2.
-
MOC RC Hägglunds BV 206 ATV
Technic BOOM posted a topic in LEGO Technic, Mindstorms, Model Team and Scale Modeling
Please suport my project on Lego Ideas. https://ideas.lego.com/projects/bc17ae38-b3e7-4cb2-b804-401e0bcc7aef Power functions: 3x L-motor 1x IR Receiver 1x IR Remote Control 1x AAA Battery Box 1x Control Switch 1x Extension Wire Description All openable doors. Model have fake motor V6. Color: Black and Yellow Number of Pieces: 800-100 Thank you very much for your support! Military version: Hägglunds BV 206s -
I would like to present the result of my Winter-project. A big thank you to everybody who supported me in the corresponding WIP-topic and of course to @DugaldIC for challenging me! Instructions are available on Rebrickable. Features: Turn-table-based wheel-hubs with minimal slack 4WD by means of 4 L-motors powered by two BuWizz 2 units Fully independent suspension Steering with Servo-motor 30 degree steering angle with Ackermann geometry Caster angle Fake V8-engine driven by M-motor Can handle a rough ride Liftable by roof, nose and tail Everything in-system Stats: Parts #: 1844 Weight: 1980gr Length: 54 studs Width: 35 studs Height: 23 studs I hope this will pull @Blakbird back into Technic . Some stills from video-material. And finally a few short videos.
-

Jacob Moon's Mocs technic related builds
Jacob Moons Mocs posted a topic in LEGO Technic, Mindstorms, Model Team and Scale Modeling
I build Lego transformers but this will mostly be about my rc cars and other technic related builds -
[MOC] Audi Rally Car
T Lego posted a topic in LEGO Technic, Mindstorms, Model Team and Scale Modeling
Hi everyone, This is my first MOC to be published here on the forum: a small/compact rally hatchback. It is not a copy of an existing car, but the front is inspired by modern Audi's. The design parameters that I want to achieve include the following: Fast drivetrain Lots of torque (the car must be able to drive on tarmac, dirt and sand) An average scale of 1:12.5 Front and rear independent suspension Front and rear PF lights Servo steering with small turning radius Buwizz 2.0 to increase performance (located under the bonnet for better weightdistribution and easy acces) A light and rigid chassis Openable doors and bonnet A realistic/clean interior (no visible moters/wires/chassis beams) A gapless body, using rather pannels than beams Drift (on sand) It contains 100% LEGO parts (excpet BuWizz) with a total of 1178 parts. I am very happy with the result. Here are some pictures The Buwizz with easy acces... Clean interior... Openable glovebox... Rear suspension... Front suspension... The underside shows the chassis, wires and motors... Annd finally a little video to demonstrate the fucntions and the oudoor performance. Building instructions/partslist: https://rebrickable.com/mocs/MOC-14441/T-Lego/technic-rc-audi-rally-car-with-buwizz-20/#comments Hope you like it, comments, criticism and questions are welcome! -

[MOC] Jeep Mighty FC
Technonsense posted a topic in LEGO Technic, Mindstorms, Model Team and Scale Modeling
I wanted to build a small rc version of a Jeep Mighty FC for a long time, and finally managed to do so: My main goal was outdoor performance, so I've used a XL motor geared down 1:2.78 for propulsion. A servo motor was used for steering. With only 12 studs between the insides of the wheel hubs, I had to squeeze in portal axles for the front and rear. Of course we also have suspension: The belly-shot: And the video(sorry for bad resolution): The chassis can be separated from the bodywork and battery in about 10sec. Although it was only possible to build in yellow, I tried to include as much detail as possible and did my best to hide most of the interior. I hope you like it. Feel free to leave your comments and criticism! -

The Second Dual Crane Pipe Transporter
Superkoala posted a topic in LEGO Technic, Mindstorms, Model Team and Scale Modeling
I am continuing to explore the fascinating world of the pipe transportation with a new prototype. You may already have seen it on youtube, I’m a bit late to post here (busy week-end). If you have a good memory, I did a first prototype on track (here) that had some limitation; in particular it couldn’t transport more than one pipe at once. The complete album is available on FlickR Prototype 2. For this second iteration, I started again form a white sheet to try something new : The transporter is now on tire with multiple axle steering for a good maneuverability and good translation speed (more adapted to road). I choose to keep two cranes for the consistency with the first proto. First advantage this allows making them smaller, as each crane support almost half of the weight of the pipe they don’t need to be reinforced and a mini actuator is enough to make them move. Second advantage is that the pipe remains horizontal even if not loaded exactly on its center of gravity. What’s inside ? There is 6 functions in this truck (5RC + 1 manual). Propulsion on axle 3 and 4. Steering on axle 1-2 and 5-6. The cranes : 1- 360 degrees Rotation. 2- 90 degrees Lift. 3- Cable. The truck was built from the center to the extremity, both crane are a copy-paste and are actuated by the same motors placed in the middle of the truck. Advantage: the crane move simultaneously and are always in the same position, drawback: you can’t use only one crane if you want to (I don’t know why you would have to use only one crane but well.) This was a choice at the conception because the goal of this prototype was to test the concept. With an alternative built it would have been possible to upgrade the truck so each crane have its set of motor , and the simultaneous movement is manage through the software (because yes, SBrick allows you to control several port with one command) Last functions are the additional lateral support that are deployed manually. They were added lattely in the building process (when I tried to install a larger pipe that clashed with the cranes), so I did not had enough room left in the truck to install the pneumatic line. Not a big issue in my opinion, I will do better next time. Good and not compare to the first prototype: Good Can transport more than one pipe Can load/unload up to two pipe in total autonomy No real length limitation Better road capabilities Not good Still requires a manual intervention to catch the pipe Range of operation : Cranes are not long enough to load the additional support. The dual crane are still not independent. Some improvements are still possible. So, project to be continued. Thank you for reading Edit: One additional word: in the video you can see a support vehicle. It is a not-so-good mini forklift only used to load the truck, It has been possible by the use of a 3rd Sbrick (both vehicle controlled through the same interface) and 4 M motors. Dedicated video here (yes I was terribly boring when I did the miniature ):