Search the Community
Showing results for tags 'Technic'.
Found 1584 results
-

[MOC] Armored Trophy Truck [free building instructions]
keymaker posted a topic in LEGO Technic, Mindstorms, Model Team and Scale Modeling
Hi, It lasted a bit, but I managed to finish this project and here I am. I would like to share with you my latest MOC - Armored Trophy Truck. It was designed mostly to test new Buwizz 3.0 unit and Buwizz motors. I also wanted to increase my own experience in building fast MOCs this time. As there are many trophy trucks out there created by many great builders I tried to take some different approach. So to protect cabin and motors, I put armor on my creation :) Thanks to panels both motors and cabin are protected from dirt, dust and stones. I also added roll cage to protect the driver. More details and presentation how fast this truck is you can check on the video below. Instructions are free of charge, I hope many of you will be able to build it and have fun playing with it outdoors as I did. Link: https://rebrickable.com/mocs/MOC-94026/keymaker/armored-trophy-truck-rc/#details Details and main functions: • dimensions LxWxH: 36x16x14.5 cm • weight: 1.22 kg • RWD drive (2xBuwizz motors) • steering (C+ L motor) with positive caster • double wishbone suspension at front • live axle suspension at rear • additional suppressors in rear suspension to protect frame during high jumps • high ground clearance • front, rear and whole truck chassis are protected against dirt, dust and stones • roll cage • rear wheels are connected via portal hubs - gear ratio can be adjusted More photos: https://bricksafe.com/pages/keymaker/9.-armored-trophy-truck -

[MOC]◄Hummer H1 1992►[2021]
Michael217 posted a topic in LEGO Technic, Mindstorms, Model Team and Scale Modeling
Welcome to my garage LEGO!!! Hello! My name is Michael. I'm a Builder from Russia, I love muscle cars! Hummer H1 1992 Hello everyone! So I have completed my next project, the merger of technology and system! This time I have collected a living legend of Hummer H1! Description: - Drive - 2L motors - Steering - Servo - Power Supply - Small BB - Independent suspension - The steering wheel turns with the wheels - Open the doors, hood... - Well-designed interior and space under the hood - About 2000 parts Instagram: https://www.instagram.com/lego_muscle_garage/ Join my group in VK: https://vk.com/legomusclegarage All photos on the link: https://bricksafe.com/pages/Michael217/hummer-h1-1992 Enjoy your viewing! Rate, comment! Thanks!) -
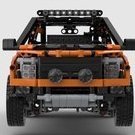
Hello everyone, let me introduce my latest creation. Ever since I get 42093 corvette I had an idea to disassemble it and use all this parts to create something playable and offroad capable. This 1:15 model of legendary F-150 truck was made with Power Functions elements and Sbrick for future truck trial competion or just for indoor fun (because of the weight (1250 g) I think this is not very competitive truck). It was a long project for me because of time constraints so I had started it before LEGO release their bigger one. This model has 4WD transmission with 2 L-motors driving each axle separetly (driving ratio - 3,5:1), servo motor for steering. Front suspension is independent double wishbone, rear is live axle with panara link. The model has openable doors, sunroof, hood and tailgate. Instructions in pdf were made in Stud io (my first experience with this software so it took a long time). Link for instructions: https://reb.li/m/93403 Also I created some additional color options with available parts. I hope to add instructions for those and the video with the orignal orange one later.
-

[MOC] Lego Technic Tugboat
makushima posted a topic in LEGO Technic, Mindstorms, Model Team and Scale Modeling
Lego Technic Tugboat Lego Technic MOC - Technic Tugboat by makushima Lego Technic MOC - Technic Tugboat by makushima -
.thumb.png.116032e930e483fb4ebbfdc62183bd34.png) Hot Trot - RC Trial Pickup w/ Diagonal AWD I would like to present to you my shot at a 42129 B model. About the name 'Hot Trot': On a very uneven surface, a vehicle typically moves its weight from one diagonal pair of wheels to the other as it proceeds from bump to bump. Hence the word 'Trot' in the name of this model. It refers to a horse proceeding at a moderate pace, lifting each diagonal pair of legs alternately. Instructions are on Rebrickable. Diagonal AWD With Diagonal AWD I mean: 1) having two separate drive trains with equal torque that 2) keep a vehicle going on a very uneven surface while 3) preserving the advantage of having a distribution optimal for cornering. We all know the downside of a classic 4WD setup with three open differentials; as soon as one wheel loses grip, all power will flow to that wheel, causing the vehicle to lose traction. One way to deal with that is to add differential locks like in the Zetros. Another approach that is commonly seen in LEGO Technic builds is to have separate drive trains for front and rear wheels like in the 42099 X-treme Offroader, in which case you need a slipping front wheel and a slipping rear wheel to completely lose traction. This approach however, has two downsides: There is no open distribution of torque between front and rear wheels, which is not optimal for cornering, because the front wheels are not free to average to a higher speed than the rear wheels. On a very uneven surface, for instance in diagonal tests, where wheels start losing contact with the surface, it's likely to have a front and (diagonally opposite) rear wheel loose traction. But what if we would separate the drivetrains diagonally: A drivetrain with a differential between the left front (LF) wheel and the right rear (RR) wheel, and a drivetrain with a differential between the right front (RF) wheel and the left rear (LR) wheel? The resulting 'Diagonal AWD' would serve two major benefits: While cornering, the LF and RR wheels will average to a speed that is almost equal to the average speed of the RF and LR wheels. So not having an open distribution between two diagonally arranged drivetrains is much less of a problem than with separate drivetrains for the front and rear axles. On a very uneven surface, where wheels start losing contact with the surface, the wheels that still have contact are typically lined up diagonally. With Diagonal AWD, the vehicle will still have traction, even without additional differential locking. The vehicle will only lose traction when two wheels at one end or at one side will lose grip. Drive trains I wanted to have the motors at the same level as the rest of the drivetrain to keep the center of gravity low. I came up with a fairly flat setup with longitudinally placed motors, a differential at the heart of each drive train and bevel gears to make the 90 degree angles towards the wheels. Each motor drives a 16t clutch gear locked to the differential using a 'floating' driving ring. After some trial and error the best option to properly brace the bevel gears that make the 90 degree angles to the wheels, turned out to be a symmetrical setup with the motors rotating in opposite directions. Because of these opposite directions, using a clutch gear to make the drivetrains cross in a completely flat layout, was not an option. The clutch gear would rotate in opposite direction compared to the axle it's attached to, which would give loads of friction, particularly in motorized models. But luckily, the Zetros has exactly the right gears to make the drivetrains cross independently. The biggest challenge was to prevent the gears that make the 90 degree angles from slipping. I've experimented a lot, but no matter how strong I braced the bevel gears, I could always make them slip with my bare hands, using 24t gears to put force on the axles. So the goal was to make sure the gears can at least handle the power provided by the motors without slipping, even when one drivetrain gets completely blocked. I eventually succeeded, but it has cost me long hours of tinkering and trial and error. I created completely locked up structures for the bevel gears, using the 4 available 5x7 frames and 8 of the 11 beams with alternating holes. These structures are also tailored to fit the main structure well and to provide form-locked mounting points for the suspension arms. The two assemblies are extremely hard to build, because you can only insert the gears and axles after the structure has been put together. Suspension I incorporated independent double wishbone suspension with the springs arranged in a pushrod style. The springs have been mounted such that they compress by approximately 33% under the vehicle's own weight. This gives a very nice road holding, because the springs can both expand and compress while taking bumps. I managed to optimize the spring setup for max suspension travel, which is about 3L, which fitted my objectives perfectly. The suspension travel shouldn't rule out the chances of having a wheel coming loose from the surface, because that's when the Diagonal AWD kicks in. It seemed obvious to use the new longer male half of the CV-joints for the rear axles, so the rear axles use 8L suspension arms. The suspension arms of the front axles are shorter, because I had to build the gear-rack assembly around the drivetrain axles and wanted the steering links to have the same length as the suspension arms to avoid bump steering. The steering setup has an Ackermann geometry. The steering links have been reinforced such that they never detach from the gear-rack assembly and the gear-rack assembly itself has been braced in a way that rules out unintended transversal movement. The 2 phone handsets came in handy for this purpose. Chassis and bodywork The main structure is as stiff as I could possibly make it. I even used the motors as structural elements to add to rigidity. I wanted to rule out flex as much as possible, because I wanted to demonstrate how responsive the suspension is and because a flexible chassis would reduce the chances of the Diagonal AWD kicking in. Apart from the extensions necessary to mount the springs, the main structure is just 5L tall. On top of this main structure I've build a strong structure for the cabin of the vehicle. The bodywork does not have any features like openable doors or whatever. People that know me, know that I'm mainly interested in drivetrains and suspension. The bodywork is robust however and I did pay attention to the interior this time. You can lift it by the roof and I also made it very easy to remove the battery box. Powered Up Profile Because I don't use the medium motor, and because I have the large PU motors running in opposite directions, I could not use the Control+ app to operate this model. However a default profile in the Powered UP app could be easily tweaked to what this model needs: Finally I want to mention that I started using Energizer Ultimate Lithium Mignon batteries for my MOCs. They are strong, long-lasting and most importantly; they are at least 20% lighter than alkaline batteries. Photos
Hot Trot - RC Trial Pickup w/ Diagonal AWD I would like to present to you my shot at a 42129 B model. About the name 'Hot Trot': On a very uneven surface, a vehicle typically moves its weight from one diagonal pair of wheels to the other as it proceeds from bump to bump. Hence the word 'Trot' in the name of this model. It refers to a horse proceeding at a moderate pace, lifting each diagonal pair of legs alternately. Instructions are on Rebrickable. Diagonal AWD With Diagonal AWD I mean: 1) having two separate drive trains with equal torque that 2) keep a vehicle going on a very uneven surface while 3) preserving the advantage of having a distribution optimal for cornering. We all know the downside of a classic 4WD setup with three open differentials; as soon as one wheel loses grip, all power will flow to that wheel, causing the vehicle to lose traction. One way to deal with that is to add differential locks like in the Zetros. Another approach that is commonly seen in LEGO Technic builds is to have separate drive trains for front and rear wheels like in the 42099 X-treme Offroader, in which case you need a slipping front wheel and a slipping rear wheel to completely lose traction. This approach however, has two downsides: There is no open distribution of torque between front and rear wheels, which is not optimal for cornering, because the front wheels are not free to average to a higher speed than the rear wheels. On a very uneven surface, for instance in diagonal tests, where wheels start losing contact with the surface, it's likely to have a front and (diagonally opposite) rear wheel loose traction. But what if we would separate the drivetrains diagonally: A drivetrain with a differential between the left front (LF) wheel and the right rear (RR) wheel, and a drivetrain with a differential between the right front (RF) wheel and the left rear (LR) wheel? The resulting 'Diagonal AWD' would serve two major benefits: While cornering, the LF and RR wheels will average to a speed that is almost equal to the average speed of the RF and LR wheels. So not having an open distribution between two diagonally arranged drivetrains is much less of a problem than with separate drivetrains for the front and rear axles. On a very uneven surface, where wheels start losing contact with the surface, the wheels that still have contact are typically lined up diagonally. With Diagonal AWD, the vehicle will still have traction, even without additional differential locking. The vehicle will only lose traction when two wheels at one end or at one side will lose grip. Drive trains I wanted to have the motors at the same level as the rest of the drivetrain to keep the center of gravity low. I came up with a fairly flat setup with longitudinally placed motors, a differential at the heart of each drive train and bevel gears to make the 90 degree angles towards the wheels. Each motor drives a 16t clutch gear locked to the differential using a 'floating' driving ring. After some trial and error the best option to properly brace the bevel gears that make the 90 degree angles to the wheels, turned out to be a symmetrical setup with the motors rotating in opposite directions. Because of these opposite directions, using a clutch gear to make the drivetrains cross in a completely flat layout, was not an option. The clutch gear would rotate in opposite direction compared to the axle it's attached to, which would give loads of friction, particularly in motorized models. But luckily, the Zetros has exactly the right gears to make the drivetrains cross independently. The biggest challenge was to prevent the gears that make the 90 degree angles from slipping. I've experimented a lot, but no matter how strong I braced the bevel gears, I could always make them slip with my bare hands, using 24t gears to put force on the axles. So the goal was to make sure the gears can at least handle the power provided by the motors without slipping, even when one drivetrain gets completely blocked. I eventually succeeded, but it has cost me long hours of tinkering and trial and error. I created completely locked up structures for the bevel gears, using the 4 available 5x7 frames and 8 of the 11 beams with alternating holes. These structures are also tailored to fit the main structure well and to provide form-locked mounting points for the suspension arms. The two assemblies are extremely hard to build, because you can only insert the gears and axles after the structure has been put together. Suspension I incorporated independent double wishbone suspension with the springs arranged in a pushrod style. The springs have been mounted such that they compress by approximately 33% under the vehicle's own weight. This gives a very nice road holding, because the springs can both expand and compress while taking bumps. I managed to optimize the spring setup for max suspension travel, which is about 3L, which fitted my objectives perfectly. The suspension travel shouldn't rule out the chances of having a wheel coming loose from the surface, because that's when the Diagonal AWD kicks in. It seemed obvious to use the new longer male half of the CV-joints for the rear axles, so the rear axles use 8L suspension arms. The suspension arms of the front axles are shorter, because I had to build the gear-rack assembly around the drivetrain axles and wanted the steering links to have the same length as the suspension arms to avoid bump steering. The steering setup has an Ackermann geometry. The steering links have been reinforced such that they never detach from the gear-rack assembly and the gear-rack assembly itself has been braced in a way that rules out unintended transversal movement. The 2 phone handsets came in handy for this purpose. Chassis and bodywork The main structure is as stiff as I could possibly make it. I even used the motors as structural elements to add to rigidity. I wanted to rule out flex as much as possible, because I wanted to demonstrate how responsive the suspension is and because a flexible chassis would reduce the chances of the Diagonal AWD kicking in. Apart from the extensions necessary to mount the springs, the main structure is just 5L tall. On top of this main structure I've build a strong structure for the cabin of the vehicle. The bodywork does not have any features like openable doors or whatever. People that know me, know that I'm mainly interested in drivetrains and suspension. The bodywork is robust however and I did pay attention to the interior this time. You can lift it by the roof and I also made it very easy to remove the battery box. Powered Up Profile Because I don't use the medium motor, and because I have the large PU motors running in opposite directions, I could not use the Control+ app to operate this model. However a default profile in the Powered UP app could be easily tweaked to what this model needs: Finally I want to mention that I started using Energizer Ultimate Lithium Mignon batteries for my MOCs. They are strong, long-lasting and most importantly; they are at least 20% lighter than alkaline batteries. Photos -
[MOC] RC Mars Rover with 11+ functions
teetertater posted a topic in LEGO Technic, Mindstorms, Model Team and Scale Modeling
This is a project MOC I've been working on during my evenings and weekends for about 5 months. I really tried to cram in all the features I thought would be cool. The rover weighs just short of 3kg, has 11 motors, over 4 meters of pneumatic hose. It's controlled with two remote controls. Getting all those features with limited parts and tight space constraints was a huge challenge Main Functions: 4W Drive, Steering Switch between crab and 4-wheel steering "Solar Panel" unfold/fold Crane up/down, left/right, extension/retraction, "pincer" Cargo bay door open/close Pneumatic airlock Fully RC Other small stuff: Rotating satelite dish Detailed cabin Independent suspension on all wheels Two servos each control two pneumatic functions Design process I started with the chassis, and moved on from there. Driving and steering worked a lot better before it put on all the weight! I had to plan ahead for everything I wanted to add and how it would fit together, which got really complicated so I had to start drawing out the connections. I basically had one drawing for how the modules physically fit together, one for the pneumatics connections, and one for the electronics. Even things like the lengths of the cables would determine which battery I could hook them up to, and every single battery connection and remote control button is in use. I used a few clever tricks to give motors more than one function. For example, each pneumatic pump is also a switch, depending on the direction it spins, using a design I borrowed from youtube. Each servo motor controls two switches each, because by design it was possible to make functions opposites of each other. The pneumatics engage in order of easiest to most difficult, so there are some rubber bands to set the order of activation. E.g. the up/down motion of the crane is paired with the storage lid. Improvements There are a lot of possible improvements that could be made, but I'm eager to move on to the next project and I'm happy enough with it already. Here's what I would change: Less functions overall. My line of thought when I started this project was "ooh I'll make everything with pneumatics because they're cool, and make it all remote control, and add crab steering because why not, and etc etc". But then it really dragged on forever. Next time I'll keep it small and simpler. Especially now that I've ticked most of my idea boxes No / fewer remote-control pneumatics switches. I did it, it's possible, but it takes up a lot of space and often doesn't work so well More robust steering (and no crab steering). The crab steering takes up like a third of the space and adds a ton of weight, and doesn't work very well. After trying it myself, I'm even more impressed by Madoca's shaman If a vehicle, all wheel drive For something so heavy and high torque like this, i'll definitely keep each driveline on separate batteries. Having two drivelines (left and right) improved the performance a lot, but since I needed every single battery output I moved all motors to the same battery, which killed performance I'll probably avoid exteriors and paneling — I'm not that great at it and it just adds weight Inspiration The idea and inspiration came from Eurobricks mars mission contest (ZeroBricks, Samolot, Kubic5), Simon stallenhag's artwork, and image searches for mars rover concept art I'll take more (and higher quality) pics of it as I take it apart, just need to wait for a free day with good lighting! Happy to answer any questions! Thanks for reading -
 Hi everyone! I have a big question. from the 7th of may to the 15th of may (26th of february to the 6th of march was the old date) we will do our next "phaenoBRICKS" exhibition. We, means the "Steineland Harz + Heide" RLUG which is a part of the "Stein Hanse", a big LUG in the Northern Germany. The phaeno (www.phaeno.de) is a very famous science-museum and we are glad und proud to have the possibility to do our LEGO(R)-exhibition in it again. The last one was in the year 2020, one week before the great pandemic had forced us to stop holding exhibitions. It was a great success, over 13K people visited the phaenoBRICKs on it´s playtime. Now I started planing for 2022 and here is the reason I came to you. The phaeno is a museum to do experiments, learn physics, mechanics, chemistry .. and many more. The perfect area to present a nice GBC-project. The last time we only had a small circle with only about 20 GBC-elements. This time I hope to make it larger und bigger. It fits perfect to the phaneo, how you can imagine. I hope .. no it will be great, if it were possible to find and build a community here in this forum that would have the time and desire to carry out this project together with us. I am sure, the phaeno will support you and us, with paying the hotel and getting here for example. The details we can clear up personally later. At first I would be happy to hear from you, we all are very dear and nice AFOLs with familiar atmosphere. We always try to accomodate international guests, last year from France and Austria, next year from Denmark and France again. It would be nice to create a recurring GBC-attraction at the phaenoBRICKS. Greetings from Wolfsburg! llap Olli picture from: https://de.wikipedia.org/wiki/Phæno Von Richard Bartz - Eigenes Werk, CC BY-SA 3.0, https://commons.wikimedia.org/w/index.php?curid=25934991
 -

[MOC] Forklift - 8460 alternate
The01 posted a topic in LEGO Technic, Mindstorms, Model Team and Scale Modeling
Hello, here is a new MOC - a Forklift. It is an alternate build of the 8460 - Pneumatic Crane Truck / Mobile Crane. It is kept in the typical studful technic building style, like the 8460 - crane. Its features are: Fork moving up and down Tilting of the fork (pneumatic) I'm very new here, please ask me questions and give me suggestions how to improve my posts, thank you! Here is a video: And some more photos: Even more photos! Instructions! Thank you for reading! I hope you like it. -

[MOC] 42099+42110 Defender RC conversion (Control+)
cyberdyne systems posted a topic in LEGO Technic, Mindstorms, Model Team and Scale Modeling
Good day, everyone! This project has started as an idea of creating better a bodywork for 42099, but after some time in development it turned into undependent rc modification of Defender 42110. I took inspiration from Bowler WildCat and Bowler Nemesis which are extreme buggy-like offroaders based on Land Rover cars. So I pondered the question, What if... new Defender would be made into Bowler? In result - original defender has become lower, has got lower roof profile, bigger tires, front and rear pushbars, snorkel pipe, stronger footrests, two sets of additional lights and fog lights, antennas, front and rear mudguards, some chains ('cause chains are cool!). Engine was swapped from 6-inline to V8-supercharged! (After I made this model in spring, LR has announced that they will actually make a V8 Defender. Sadly, not supercharged :) Engine and cooling fan are connected to the front axle via chain links. (Yes, chains ARE cool. I had to buy whole Ducati set for this) And the most important - Control+ components. As this Bow-fender shares control profile with 42099, set of electrics is the same. One XL+ for each axle One L+ for steering SmartHub for SmartThings And then I found out that I am... well... not really good in making offroad chassis. At least it was my first try. So I tuned it as much as possible and made a note for future to learn more about lego offroading. (I think, I'll start with Zetros). Video of how this Bow-fender drives on everything it can is of course here: Watch till the very end! And Thanks for watching. Subscribe. P.S. This cat was walking nearby, while I was making video, so I asked him to participate. So there is A cat in the video now, instead of THE Cat - erpillar :) -
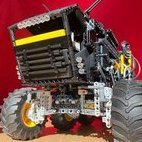
Simple model of a ripsaw controlled by BuWizz. Features drive with 2 RC motors, suspension, and a dual-missile turret that can be elevated and lowered. Functions/features: Drive (2x RC motors, 1 per track) Suspension Dual-missile turret Turret elevation It's been several months without publishing any new MOCs, and this is largely due to me working on my huge New Flyer XD60 articulated bus model. I placed two major orders of pieces directly from LEGO back in August, and as their parts take several weeks to ship I decided to work on a smaller project in the meantime. Since my Azure Racer XL I wanted to create another MOC using RC motors and BuWizz, so I decided to go with a tracked vehicle this time. However, I did not want it to be just another boring tracked vehicle with drive only (like my Lime Tracker from 2017), and I realized a ripsaw would be just big enough to house a turret that can be elevated and lowered. The building process actually started out with the body instead of the tracks. The model has a rather modular build, with individual parts (tracks, chassis, body) built separately and joined together. The turret mechanism was built in the rear of the body, and it is elevated by two small LAs. To reduce complexity, the turret motor is attached directly to the turret and moves with it when elevating. This however required more space in the chassis to allow it room to move. Both the turret elevation and missile firing are driven by PF M motors, and the turret consists of the new spring-loaded turret in a brick housing from the 51515 set. The missile firing motor has a 2L liftarm attached to it that hits the release button on the left/right missiles depending on the direction it turns. Overall, both turret functions worked well. As for the tracks, they have a suspension system with bogies attached to arms with shock absorbers. This part was a challenge, as the tracks needed to sit high but also be reinforced enough to resist the forces from turning. After several attempts with the tracks falling off, I was able to create a setup with the optimal tension in the tracks to prevent them from falling off during serious driving but also not too tight as to add excessive friction. I was initially worried that driving the tracks straight from the RC motors' outer outputs wouldn't be enough torque, but it looks like the finished model performed fine. In the end, the model performed well other than being a little bit top-heavy, but I feel like I could've modeled the shape better to make it resemble a real ripsaw more. I tried to be loose with the design, using curved panels over flat panels and stacked liftarms wherever possible, but still I feel like it can be improved. And as for the color, I think DBG would work best for a ripsaw like this (a Google search for "ripsaw" would show several dark gray ripsaws), but given all the pieces I'm ordering for my New Flyer XD60 model I didn't want to spend anymore on pieces for a side project, so I went with white for the model. Photos: Video:
-

[MOC] Vintage Tractor
proran posted a topic in LEGO Technic, Mindstorms, Model Team and Scale Modeling
Hi all! It's been a while since I've posted anything here. But here you go, my little side project: Vintage Tractor Functions: Steering via steering wheel Fake L3 piston engine driven by the rear wheels via differential Moving valves synced to the pistons (more or less) Simple 2-speed gearbox controlled by a lever Rear Power-Take-Off controlled by a lever The main feature of the build are the moving intake and exhaust valves synced to the piston movements. They are driven by two cams phased 180 deg from each other. The biggest challenged was to figure out the way to move the valves for the central cylinder in the opposite way. The end solution was to link it to the opposite shaft using a 5M lift arm. See it in action in the video below. Video: The model is different from how I usually build. Since my last post more than 5 years ago I've been working on two projects, mostly in series (not in parallel). Both of them are very complex (to my taste) and move at a very slow pace inspite of huge amount of time invested in it. I am a perfectionist and while I am trying to restrict that side of me in the daily life, Lego is a way to let it go. So for two "real" projects I optimize every single module of a MOC dozens and dozens of time. And it takes forever to finish anything. That MOC here is my brake from it. It's a study into what I can get if I don't optimize too much. The idea was to accept the first solution which works. The finished result as you can see is not polished and rough around the edges. But it works. And it was completed in a fraction of a time needed for my serious MOC of mine. And I am happy with it. As for some other people, the inspiration came from the beautiful 4000025. At about the same time I saw an Allis Chalmer Model B displayed as a decoration at my local grocery store. And I felt in love with that thing. It's one of the most elegant piston-driven vehicles I saw IRL. Four cylinders, gearbox, torque tube, differential, and portal axles. What else do you need? So I've settled to re-create it in Technic with the following objectives: Do it quickly; Try to accept the first solution which works Function-over-looks Make it true Technic without much system parts Try to implement all the main functions in a small scale Make everything work reliably So in the end I wasn't able to build the Model B. It ended up as a generic tractor looking nothing like my inspiration. Which is fine, since function-over-looks was one of the objectives. With the release of this part I am now eager to build a true replica of the Model B. But, that a next step... I send my greetings to the talented builders who posted some truly incredible vintage tractors here recently: 4000025-Inspired Ferguson TE20 Tractor by @Brickend Vintage Tractor by @MangaNOID Old Little Tractor Lanz Bulldog by @Jundis To finish it off here are some additional photos. I am lucky to live in Southern Ontario, where farms are breathtakingly beautiful Criticism is welcomed! And stay tuned for a proper MOC. Hopefully won't be long. It is sitting on the shelf waiting for the video and some additional photos. -
[MOC] Lamborghini Countach LPI 800-4 | by Isaac Yaw
Isaac Yaw posted a topic in LEGO Technic, Mindstorms, Model Team and Scale Modeling
Instructions: https://rebrickable.com/mocs/MOC-88040/Isaac Yaw/lamborghini-countach-lpi-800-4-moc-by-isaac-yaw/#details Video: https://youtu.be/02IeQWBDSdU Details and description: This is a MOC of the newest Lamborghini Countach LPI 800-4 that was unveiled recently. This MOC was made to be modular so that its chassis can be built to fit other supercar designs onto it. The instructions for just the chassis can also be found under my profile (MOCs). Functions: 1) Steering - includes working steering wheel and 'Hand of God' steering mechanism 2) Drivetrain - working 'fake' V12 engine with 4-speed gearbox (controlled by a gear stick via stepper mechanism) 3) Independent suspensions 4) Working scissor doors mechanism - controlled via linear actuator 5) Adjustable 'active' rear wing 6) Modular design Do support me by sharing and spreading this creation out to more LEGO fanatics and like my creation! Check out my other pages too! Thank you! Instagram: https://www.instagram.com/isaacs_lego_technic_creations/ Youtube: https://www.youtube.com/channel/UClKs2hHTw4g4ymL-tMJJZSA Rebrickable: https://rebrickable.com/users/Isaac Yaw/mocs/ Update: Awesome high-quality pictures from Fredleg! More Pictures can be found here: https://bricksafe.com/pages/Isaacyaw/lamborghini-countach-lpi-800-4 -

Working Orrery
Jcreations912 posted a topic in LEGO Technic, Mindstorms, Model Team and Scale Modeling
Hey everyone! Welcome to my latest LEGO Ideas project - a kinetic sculpture of an Orrery where the earth goes round the sun and the moon round the earth. Go support it here: https://ideas.lego.com/projects/bc099c6a-9cf0-427b-a35e-3aff4599b150 Build This build consists of the Sun, the Earth and the Moon, built on a vintage/antique style base. The Moon revolves around the Earth while the earth revolves around the Sun. The mechanics are hidden nicely inside the base. I have put a lot of effort into making the model as sturdy as I can, and the motion as smooth as possible. The model was built to look as nice as possible, with a detailed, brick-built version of the Earth. Dimensions of the build: 35x18.5x28 (LxBxHcm) Pieces This model has 1200 LEGO Bricks (give or take a few). I built the model digitally to check! Aim My aim with this model was not to make a 100% accurate scientific model of an orrery, but rather to make something that looked great on display, while still being functional. I also wanted to make the design as compact so as to keep it affordable. Another important aspect of this project was the varied build experience - a combination of Technic and System bricks to create an interesting and fun build. This model would also have a very wide appeal - from space and astronomy fans to technic fans, as well as people who like collecting models for display. Hope you like this project! Don't forget to support and share! :D -

[MOC] Propeller plane - with realistic controls
Jerry LEGO Creations posted a topic in LEGO Technic, Mindstorms, Model Team and Scale Modeling
Hi all, I'm happy to present my newest MOC, a propeller plane with realistic controls. This is the list of functions: Working rudder Working ailerons Working elevator Openable canopy Freely spinning propeller Steering rear wheel It is a medium sized build at 707 parts. The dimensions are as follows: length: 30 cm / 11" width: 33 cm / 13" height: 10 cm / 4" The working controls are the main part of the plane. This is an overview of the mechanisms: Propeller plane controls by Jerry LEGO Creations, on Flickr The yellow parts control the elevator, the yellow the ailerons and the magenta parts are for the rudder. The way the ailerons and elevator work are not too complex. By moving the yoke forwards and backwards, the rearmost connector also moves. This connector is connected to the elevator. The ailerons are connected to the yoke via a set of gears. The most interesting part of these 2 mechanisms, is the CV joint. This joint allows the axle to move in and out easily, while transferring the rotation to the gears. The way the rudder works is a bit more complex. Here is a render showing the different parts of that mechanism: details pedals by Jerry LEGO Creations, on Flickr The yellow parts are the pedals. When you push a pedal forwards, it also pushes a purple liftarm forwards. To this liftarm a rubber band is attached at the bushes. The rubber band makes the rudder return to centre. The purple liftarm is blocked from moving backwards (towards the seat) by the dark green parts. This is done to make sure that both rubber bands don't cancel each other out. The movement from the pedals is transferred to the light blue liftarms. These are in turn attached to the lime parts. The lime 3L liftarm rotates about the pin in the middle. It is also the link between both pedals. The lime green thin liftarms are connected to an axle which finally rotates the rudder. Renders showing the mechanisms in action can be seen at 1:19 in the video. If you are interested in building it for yourself, here you can find free instructions: ReBrickable It is also on Lego Ideas, any support will be highly appreciated: Lego Ideas Finally, here are some more images showing the plane: Propeller plane rear side 2 by Jerry LEGO Creations, on Flickr Propeller plane front 2 by Jerry LEGO Creations, on Flickr Propeller plane top by Jerry LEGO Creations, on Flickr Propeller plane front by Jerry LEGO Creations, on Flickr -
[MOC] Mad Max's Peacemaker (C-model of 42069)
A Great Builder posted a topic in LEGO Technic, Mindstorms, Model Team and Scale Modeling
This is an alternative build (C-model) inspired by the Peacemaker from Mad Max's Fury Road (2015 film) The instructions are 2 PDF files. The first, includes the steps to build the chassis (this is a replica of the car tank built and used for the movie) The second PDF includes the instructions on how to complete the model by building the bodywork. I included a mount base for display. Model is functional with or without the bodywork. I made an effort to make as realistic as possible and therefore the model is manual. i will upload versions of this using Power Functions and Control +, But I am working on other models for now. Instructions available at Rebrickable: https://rebrickable.com/mocs/MOC-67431/A_Great_Builder/peacemaker-42069-c-model/#details Functions are: Full tracked independent suspension Central V8 engine Double differential steering "Hand of God" Turret (turns with engine's torque) Manual axle (to manually add torque to the system) Mount display Detachable bodywork PD. I made a YouTube video but it was one of my first videos ever and it's not as dynamic as my most recent video. Eventually I will create a shorter video once I have the motorized versions. -
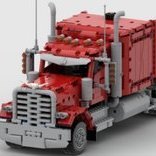
Hello guys. I want to present you my first MOC. I like Lego, I like American trucks, I decided to combine these two hobbies. I was inspired by the legendary Peterbilt 379. Features: opening engine hood opening doors HOG steering with working steering wheel in the cabin V8 fake engine with moving pistons It took me 3 months to work on the model. I redid many of the details several times and it was a very valuable experience. I am happy with the result. Instruction at Rebrickable:https://rebrickable.com/mocs/MOC-86136/efgen86/classic-us-truck/#details P.S. I do not speak English. I use translator.
-

6x4 tractor unit inspired by Scania
functionalTechnic posted a topic in LEGO Technic, Mindstorms, Model Team and Scale Modeling
Hi guys Recently, I finished another model. It is a tractor unit inspired by Scania S-Series trucks. It has 6x4 drive and suspended axles. The front axle is suspended with normal LEGO hard shock absorbers. The rear axles have rubber suspension which imitates air-suspension as used in real trucks. The suspension at the rear axles is a bit hard but chassis is in return flat. The fifth wheel as a self-locking mechanism so that you can couple a trailer easily. To open the fifth wheel a small linear actuator is used. For steering a PU L motor sits directly on the front axle. For propulsion I used two PU XL motors. But check the pictures and video: Instruction at Rebrickable: https://rebrickable.com/mocs/MOC-86508/FT-creations/6x4-tractor-unit-inspired-by-scania/#details -

Pretty compact inline 3 LPE
Pnumetac posted a topic in LEGO Technic, Mindstorms, Model Team and Scale Modeling
Hi, I designed a pretty compact inline 3 pneumatic engine: If someone‘s interested, I‘ll consider making instructions. Pascal Here are some pictures: https://share.icloud.com/photos/0nS1bu-NzDFND9IuROoaiSaQw https://bricksafe.com/pages/Paacsl/compact-inline-3-lpe -
Infuriating Details
SirSpoony posted a topic in LEGO Technic, Mindstorms, Model Team and Scale Modeling
What, in your opinion, is the most infuriating detail on any specific Technic set? This could be a grille, or the orientation of a wheel/s, or any other little thing of note, such as a mechanical axis point. Also, it doesn't have to be a bad or a good set, this is focusing solely on the specific detail of the model. -

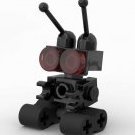
Motorised Johnny 5 MOC <Not an Alternative Build>
RJ BrickBuilds posted a topic in LEGO Technic, Mindstorms, Model Team and Scale Modeling
01 by RJ BrickBuilds, on Flickr Hello, Bozos! You can support Johnny 5 on Lego Ideas to turn him into an Official Johnny 5 Lego Set here: Johnny 5 on Lego Ideas Who is Johnny 5? Those who don’t know him, Johnny 5, also known as “S-A-I-N-T Prototype Number 5” or Number 5 for short, is a very lively and inquisitive military robot prototype who’s perpetually hungry for more “input”. He is the star of the 1980’s movies Short Circuit and Short Circuit 2 and a TV special called Hot Cars. He became sentient when he was luckily struck by lightning during a combat demonstration. Although he is designed to serve the military as a robot prototype, he has an adorable child-like behaviour and has a great respect for life. He is a peace-loving robot and refuses to use his military capabilities to harm others. Despite being very intelligent and inventive, his naivety and trusting nature has been taken advantaged of on several occasions. Design This model is fully motorised using Powered Up motors and hub and controlled through a mobile device using the Powered UP App. It uses Technic parts to ensure stability of the structure, and System parts to capture the look and form of Johnny 5. The following are the playable features of the model: Movement – This model can move around on tank tracks and uses skid steer to change directions. Body – Johnny 5’s body can tilt using a Powered Up L motor and controlled using a mobile. Arms – Arms can be raised and lowered individually using the Powered Up App. The fingers can be adjusted manually as well as the elbows. Head – The head can be tilted and turned using the Powered Up App. Eyebrows – Eyebrows can be manually adjusted to suit the desired facial expression. Laser – The laser at the back can be raised and lowered using the Powered Up App. Watch the YouTube video here to illustrate these functions better: Johnny 5 on Youtube Total Pieces: 2,711 Dimensions: Studs: W 68.4 x L 36.1 x H 73.5 Inch: W 21.5 x L 11.4 x H 23.2 cm: W 54.7 x L 28.9 x H 58.8 Weight: 99.8 ounces or 2.83 kg Johnny 5 MOC Pictures: 02 by RJ BrickBuilds, on Flickr 03 by RJ BrickBuilds, on Flickr 06 by RJ BrickBuilds, on Flickr 05 by RJ BrickBuilds, on Flickr 04 by RJ BrickBuilds, on Flickr 07 by RJ BrickBuilds, on Flickr 08 by RJ BrickBuilds, on Flickr 09 by RJ BrickBuilds, on Flickr 10 by RJ BrickBuilds, on Flickr -

Lego GBC Closing Forks Module
sawyer klegr posted a topic in LEGO Technic, Mindstorms, Model Team and Scale Modeling
This great ball contraption uses a series of gears and pins to grab the balls and lift them. The mechanism is quite reliable, especially for a module that I designed. Would like to have made it run a bit faster as it does not quite run at 1bps, but it should be able to run at that speed if it is run on 9v. (it was only running at 7.2v in the video as the batteries are rechargeable) Photos on Flickr. -
Johnny 5 is on Lego Ideas
RJ BrickBuilds posted a topic in LEGO Technic, Mindstorms, Model Team and Scale Modeling
Johnny 5 needs your support to become an OFFICIAL JOHNNY 5 LEGO SET. Click the link below to support and feel free to share. - Link Removed - Who is Johnny 5? Hello, Bozos! Those who don’t know him, Johnny 5, also known as “S-A-I-N-T Prototype Number 5” or Number 5 for short, is a very lively and inquisitive military robot prototype who’s perpetually hungry for more “input”. He is the star of the 1980’s movies Short Circuit and Short Circuit 2 and a TV special called Hot Cars. He became sentient when he was luckily struck by lightning during a combat demonstration. Although he is designed to serve the military as a robot prototype, he has an adorable child-like behaviour and has a great respect for life. He is a peace-loving robot and refuses to use his military capabilities to harm others. Despite being very intelligent and inventive, his naivety and trusting nature has been taken advantaged of on several occasions. Why Make a Johnny 5 Lego Set? In Short Circuit 2, Johnny 5 set up a new business with his old friend Ben Jahrvi that builds and sells toy robots made in Johnny 5's likeness. This little robot never made it into actual production after the film. Johnny 5’s popularity and the unavailability of access to these cute little Johnny 5 robots made people clamour for this toy. To date anyone can google sites for 3D printing Johnny 5 robots and websites dedicated to producing both life-like and miniature Johnny 5’s. Johnny 5 is one of the iconic fictional robots in cinema to date. He’s part of every child who’s lived through the 80’s like me who are now AFOLs and longed for the Johnny 5 toy that never came out. Design This model is fully motorised using Powered Up motors and hub and controlled through a mobile device using the Powered UP App. It uses Technic parts to ensure stability of the structure, and System parts to capture the look and form of Johnny 5. The following are the playable features of the model: Movement – This model can move around on tank tracks and uses skid steer to change directions. Body – Johnny 5’s body can tilt using a Powered Up L motor and controlled using a mobile. Arms – Arms can be raised and lowered individually using the Powered Up App. The fingers can be adjusted manually as well as the elbows. Head – The head can be tilted and turned using the Powered Up App. Eyebrows – Eyebrows can be manually adjusted to suit the desired facial expression. Laser – The laser at the back can be raised and lowered using the Powered Up App. Total Pieces: 2,711 Dimensions: Studs: W 68.4 x L 36.1 x H 73.5 Inch: W 21.5 x L 11.4 x H 23.2 cm: W 54.7 x L 28.9 x H 58.8 Weight: 99.8 ounces or 2.83 kg -

[WIP] Lifted Truck with 3 steering modes
JLiu15 posted a topic in LEGO Technic, Mindstorms, Model Team and Scale Modeling
With my Ripsaw Tank MOC essentially done by now (just waiting for some final pieces to arrive) and my PAB order for my New Flyer XD60 articulated bus model still yet to arrive (with more pieces coming for that), I've decided to start another MOC in the meantime. This will be my second model combining Control+ and Robot Inventor after my Heavy Duty Skid-steer Loader. It will have two identical axles, each with a steering motor (medium angular motor) to control steering, and thanks to their absolute positioning feature I don't think I'll have to calibrate it every time, like on e.g. the 42099 set. I was originally planning to use Control+ L motors for the steering, and have this be a Control+ MOC, but found the medium angular motor to fit better with the absolute positioning being another plus. I plan on creating a control profile in the Mindstorms app with different sliders for normal, crab, and 4-wheel steering modes. The drivetrain consists of heavy-duty differentials and planetary hubs, so this eliminates the need for significant gearing down inside the chassis. For propulsion, I plan to use 2 Control+ XL motors, with a fake engine driven by a separate motor. This way, the fake engine can run at all times and there will be less friction in the drivetrain. I anticipate building the chassis to be pretty straightforward, as the entire chassis is essentially a mirror image with two identical axles. As for the bodywork, I'm leaning towards a red car-like body. If so, I will probably name this MOC "Red Beryl C", where "C" is for Crawler. It would be the third model in my Red Beryl series, after my Red Beryl GT of 2018 and Red Beryl X of 2019. Let me know what you think, and any suggestions you may have. Photos: The front axle, with planetary hubs, long shock absorbers, and a medium angular motor for steering: The front axle, with the wheels attached. Note that this is the underside, with the heavy-duty differential visible: -
My name is Johan and I am 61 years old and I have been a big fan of technical Lego for years. Now that my grandson is starting to play with Lego, I am also active in technical Lego again. On this forum I would like to discover how I can help small children discover technical Lego step by step. If you have any suggestions, I'd love to hear them!
-
[WIP] BuWizz Ripsaw Tank with Turret
JLiu15 posted a topic in LEGO Technic, Mindstorms, Model Team and Scale Modeling
Hey guys, I'm starting a smaller project here with the aim of maximum playability. Currently I'm waiting for a huge Pick-A-Brick order to arrive for my New Flyer XD60 project, so I've decided to do a small project in the meantime, especially since I haven't published anything since January. This will be a small and simple ripsaw model equipped with a two-missile turret, using new missile elements from the Robot Inventor set. The model will probably be modular, with the body and chassis largely built modularly and connected together when finished. Currently I have the turret and some of the body built. The turret can also raise and lower, but unfortunately cannot rotate as the BuWizz unit only has 4 ports (and two will be taken by the drive motors). As for the drive motors, I plan to use 4 L motors with one connected to each sprocket, although I might also go with one RC motor per track. Overall, I see this model as an upgrade from my Lime Tracker of 2017, as this one will be driven by the more powerful L motor and feature BuWizz. I think this will be a fun little MOC to drive around. It's nice to build something else after months of work on a single project, and it'll be a great way to pass the time as I wait for parts to arrive for that project. Photos: