Search the Community
Showing results for tags 'Power functions'.
Found 368 results
-
Hi All, I'm new to this forum, and new to the Lego RC train world. I have just started collecting this range with my son (who's 5) so this is mostly about me.... :) In all seriousness, he is over the moon with these trains and the sets in general and we have 3 already (60051, 60197 and 60198). I'm looking for some expert guidance as to the best and most cost effective way to be able to remotely control/motorise the switch tracks (points). Having done some research online, I see there are many ways, although i haven't found a definitive step by step guide yet. It would be good to get some valuable feedback and guidance from someone who has been through this process if possible (i.e method and functionality vs cost and practicality). Appreciate the time spent reading my post and any feedback received. James.
-
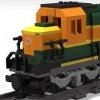
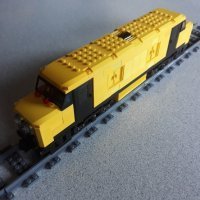
Silicon Valley, California, is not particularly well-known for trains, nor public transit in general. Caltrain operates a commuter service along the peninsula. While most of its modern rolling stock is too large for regular track at my typical 1:48 scale, they also own and operate a pair of MP15DC switchers: EMD offered the MP15DC as a successor to the SW1500 series of switcher, the key difference being longer standard trucks and a higher top speed. Caltrain's two units (#503 and #504) were acquired from Union Pacific, which in turn acquired them from Southern Pacific. I believe the two are usually based in San Jose, though they can be seen up and down the peninsula running various maintenance-of-way jobs or "rescuing" stalled Caltrain commuter sets. This is the first "normal" diesel locomotive I've built in a long time, and the first time I've built something local. It's relatively straightforward mechanically: two 9V "mini-motors", one driving each truck, with the battery box in between them and the receiver in the cab. Pulling power is plentiful as the locomotive is reasonably heavy for its size. Pressing down on the single exposed stud on the hood powers the battery box on/off, and the power state can be checked via the small clear window on the hood. I took advantage of many recently-introduced parts on this model, such as they grey Collectible Minifig base which I used to plate over the sides and hide the works. Grey 1 x 2 x 2 windows, truncated corner tiles, and 2 x 1 wedges are relatively recent parts that help capture the shape of this locomotive. One innovation is an improvement on the technique I used for the cab windows on the TP56 locomotive. In this model, each "half" window is held captive by rotated tiles, greatly simplifying construction (a technique that @Commander Wolf absolutely loathes). The full Brickshelf gallery is here, pending moderation. I also took a number of work-in-progress screenshots in LDD, which you might find useful. Until next time, and may your commuter train never have to be rescued by one of these! INSTRUCTIONS: https://reb.li/m/137017
-
This is an expansion, upgrade and update of the Tiger 4 x 4 x 4 The idea was to improve certain aspects of the 4x4 version: 1. The bewel gears were the weak part of the driveline, so the 6x6 uses additional 12:20 gearing after bewel gears, increasing available torque by 67% 2. Adding a second rear axle additonally helps to spread the load while climbing, increasing available overall torque by another 50%, allowing for a total of 2,5x more torque than 4x4. 3. Using defender wheels, and self-built hubs the pivot point is now a stud closer to the steering wheel and steering angle is increased from 18 to 25-30 degrees, removing the need for rear steering. 4. Center section was widened by 2 studs, allowing both gearboxes to be placed in parallel and the steering servo motor low in the center. Total gear reduction has been increased to 1:5 in high gear and 1:15 in low gear. Gear switching mechanism is now faster and more reliable. 5. Suspension is now pendular with a shock absorber in front and tandem axles with shock absorbes in the back. This allows the suspension to smoothly adjust to the terrain at slow speeds without wasting energy compressing the shock absorbers. At high speeds the shock aborbers smooth out the ride. In the picture below you can see the blue 1x7 beams which swing and allow the front suspension to act like pendular: 6. The model now has working fake engine(s) and steering wheel.I'm thinking of adding a hook arm with a winch in the back, so I can use this model to pull others out during trial truck races 7. Number of motors have been reduced by removing rear wheel steering and having one motor for the gearbox, allowing to add aditional functions as before mentioned hook arm. So...that's all about it for now, I'm only missing defender wheels to finish this monster. Yes it's going to be heavier and slower, but I expect it to be even more capable and reliable.
-
Hello all! I recently bought myself a BuWizz 2.0 and I've been experimenting with transmission designs using the new Chiron shifting bits and gears. I'm trying to figure out how to control a servo with the BuWizz unit in such a way that it only has full left, centered, and full right as options for a 3 speed transmission. The closest thing I can find is the light buttons in the control setup, but they only allow for center and full lock in one direction. Has anyone figured out a good way to control a servo like this or found a clean way around it? Thanks!
-
Hi all! Is there any chain that's stronger than the rather pitiful technic links? I've been wanting LEGO to make sturdy chain links using the large treads forever now, and if they do have something like that I'm unaware of it. But is there a stronger chain available from LEGO, or should I just resort to buying and cutting up some tread links? I'm picturing something pretty similar in size to the chains found in K'NEX roller coaster sets. Thanks in advance for the guidance and/or bad news! :P I'm working on a somewhat realistic boxer engine for an MOC. I thought it would be interesting to have XL motors where the camshafts would be and have the timing belt (technic chain) actually drive the thing, but of course the old links are far too weak to handle one motor, much less two. I'd like to use the large tread links since they're plenty strong enough, but the tread face is five studs wide and would 1) be obviously unrealistic, and 2) take up most of the space in the engine bay. If I have to I'll use two chains next to each other and hope that holds, but if I can I'd like to keep it as narrow as possible. Cheers!
-
I designed and built my latest Lego vehicle, “Billy Goat’s Steamboat,” for Eurobricks’ bonus collaboration, “The Great GOAT Boat Race,” displayed at Brickworld Chicago 2019. The steamboat is my first boat MOC since childhood. There were no rules for this collab except that it had to be a boat featuring a goat. The hull was modified from an earlier MOC, Joker’s Blimp (lower right), but in place of cross axle supports inside, I used 11x11 quarter gears (upper right), anchored apart by a couple layers of plates to hold the shape. Underneath there are wheels to easily move the boat, however the total weight kept Billy Goat’s boat from gathering enough steam to move from the pair of independently rotating PF-enabled paddle wheels. Oh well, such is the the typical pitfall of designing entirely in LDD prior to testing with real bricks. Billy Goat’s Steamboat was nominated for Best Sea Vessel at Brickworld Chicago 2019.
-
[MOC] Volvo L 350H wheel loader
mpj posted a topic in LEGO Technic, Mindstorms, Model Team and Scale Modeling
Hello! In march I completed my latest Moc, and today I took some photos. It's a wheel loader Volvo L 350H in 1.22 scale. It is an updated version of L 350G by Lego, which I used as parts pack. The bucket is in 1.22 scale, so I decided to build in this scale. I used XL motor for driving, and M motor for steering, by 2 mini LAs. Arm and bucket are controlled by L and M motors, and they have quite good movement range. Battery box and receivers are inside the bonnet. The tyres are third party, 96mm diameter. Sticker are home made! I hope you like it! -

Offroad Vehicle Design bible
Zerobricks posted a topic in LEGO Technic, Mindstorms, Model Team and Scale Modeling
I started this project because I wanted to share my experiences building various offroad models over the last decade. This topic is meant to guide the builders with comparisments, suggestion and best building practices, It is however not a place to find already finished and perfected designs - that's up to you. Various aspects of the design of the vehicles will be split into several subgroups and explained in details. 1. Number of wheels First thing we need to know is how many wheels our design will have. Most common setups are as following: 4x4 Setup Advantages: 1. The simplest and most widely setup 2. Having only 4 wheels means lower weight and higher performance 3. Higher manoeuverability 4. Simple suspension and driveline design Disadvantages: 1. With only 4 wheels the suspension has to be designed to be as flexible as possible to get the most out of the wheels 2. In a case of a mechanical failure of a single wheel, the whole model's performance is greatly affected 6x6 Setup with double rear axles Advantages: 1. Two rear axle provide more traction area, especially when going uphill 2. Usually 6x6 vehicles are longer than 4x4 and therefore less likely to tip over 3. Since the front and second axle are usually closer than in 4x4 setup, there is less ground clearance needed between them 4. Greater redundancy in a case of a mechanical failure Disadvantages: 1. Lower manoeuverability due to a longer wheelbase even with rear wheel steering 2. More complex driveline and suspension design is required 8x8 or more wheels setup Advantages: 1. Having 8 or more allows for much greater traction area 2. Ability to drive over ditches 3. Because wheels are usually much closer there is much less chances of getting stuck on top of an obstacle 4. Excellent redundancy in a case of a mechanical failure 5. Better weight distribution 6. Less suspension travel required per each wheel as with 4x4 or 6x6 and hence better stability Disadvantages: 1. Lower manoeuverability even with rear wheel steering 2. Powering 8 or more requires a very complex driveline 3. Depending on a driveline, combined torque required for powering all 8 wheels can destroy gears if a single wheel gets stuck 2. Type of wheels and tyres Now that we decided on how many wheels we want for our offroad beast, we have to look into what type of tyres and wheels we want to use. I will hereby cover only the bigger types of tyres and wheels. 1. 94.8x44R Advantages: 1. Low weight 2. Good thread design 3. Low rolling resistance Disadvantages: 1. Low traction, these tyres are prone to slip on the rim at high loads 2. Due to its rounded shape the tyres tend to slide off obstacles when crawling over them 2. 94.3x38R Advantages: 1. Low weight 2. Medium traction 3. Low rolling resistance 4. Realistic design and proportions Disadvantages: 1. Shallow thread pattern 2. These tyres are very hard and don't adjust to the terrain 3. 107x44R Advantages: 1. Low weight 2. Medium traction 3. Very deep thread 4. Currently largest tyres by diameter Disadvantages: 1. High rolling restistance and vibrations due to the thread pattern 2. These tyres are a bit hard and don't adjust to the terrain 4. Power Puller tyres Advantages: 1. High traction 2. Good thread 3. Largest Lego tyres ever produced 4. Deep wheel offset Disadvantages: 1. High weight 2. Hard to use, they require complex hub assemblies 3. Very rare and expensive 5. Outdoor challenger wheels Advantages: 1. Very high traction 2. Very good thread pattern 3. Deep wheel offset 4. Over 7 studs of space inside the wheel Disadvantages: 1. High weight 2. Hard to attach to the standard axles 3. They require a lot of torque to use them at their full potential. 6. Tumbler wheels Advantages: 1. Low weight 2. High traction 3. Very flexible Disadvantages: 1. Low thread pattern 2. Small size 3. Expensive For the 94.8x44R. 94.3x38R and 107x44R tyres we have a choice of two wheels: 1. Racing wheel large Advantages: 1. Good mounting option with axlehole and pinhole 2. Available in multiple colours 3. Cheap Disadvantages: 1. No inside wheel offset means steering pivot point can't be placed inside the wheel. 1. Futuristic wheel Advantages: 1. Deep wheel offset allows us to place steering pivot point inside or closer to the wheel than racing wheel large 2. Slightly larger wheel size stops the 94.8x44R tyre from slipping on the rim Disadvantages: 1. Limited mounting options, with only one axlehole 2. Hard to find 3. Hubs Now that we have our wheels and tyres we need a way to mount and power them. Here are the most common currently available options: 1. New standard ungeared CV hubs These hubs are usually driven by the CV joint counterpart which pops inside Advantages: 1. Low steering pivot offset - usually at the edge of the tyre: 2. Firm wheel mounting 3. Readily available, easy to use and to build on. Disadvantages: 1. Low operating angle - the CV joint can operate to a maximum of about 30 degrees, which limits steering angle. 2. Very low torque transfer - the CV joints are prone to deforming and popping out even with low torque applies to them 3. Low ground clearance 2. Old ungeared CV hubs Advantages: 1. Low steering pivot offset - usually at the edge of the tyre 2. Firm wheel mounting 3. Better ground clearance than newer hubs Disadvantages: 1. Very low operating angle - the CV joint can operate to a maximum of about 25 degrees, which limits steering angle. 2. Very low torque transfer - the CV joints are prone to deforming and popping out even with low torque applies to them 3. Hard to find and expensive 4. No other mounting points than 4 ball joints 3. Built cardan ungeared hubs Example of a hub using a cardan joint to directly transfer the power to the wheel Advantages: 1. Low steering pivot offset - usually at the edge of the tyre 2. Easy to build 3. Can transfer higher torque than a CV joint 4. Higher steering angle Disadvantages: 1. Mounting relies only on the axle and is not as firm as standard hubs 2. Not capable of transferring high torque to the wheels 3. Low ground clearance 4. Standard portal hubs Advantages: 1. Easy to use and to build on. 2. Can transfer very high torque to the wheels when using 8z and 24Z gear combination 3. High steering angle 4. High ground clearance 5. Firm wheel mounting Disadvantages: 1. Very high steering pivot offset - requires stronger steering mechanisms and more fender space for wheel to swing 5. Built portal hubs Advantages: 1. Easy to build. 2. Can transfer very high torque to the wheels when using 8z and 24Z gear combination 3. High steering angle 4. Higher ground clearance than standard portal hubs 5. Low steering pivot offset when using futuristic wheels Disadvantages: 1. Wheels are mounted and held only by one axle, not as firm as standard hubs 2. Hub relies on friction of the components to keep it together, which can slide apart after prolonged use 6. Built planetary hub Advantages: 1. Highest gear ratio of all other hubs, 1:4 2. Firm wheel mounting when using futuristic of power puller wheels 3. High steering angle 4. Lower steering offset than standard portal hubs Disadvantages: 1. Requires old turntable, futuristic or power puller wheels for best results - all are hard to find 2. High number of moving gears 3. Least efficient due to the high friction caused by the large surface contact area and number of moving gears 4. Suspension Suspension is the mechanism that will keep our model's wheels in contact to the ground and will be supporting most of its weight. Most of the designs cover 4x4's Following factors determine the type of suspension system we will use: 1. Weight of the model - The heavier the model, the stronger the suspension components have to be 2. Speed - Faster models require more responsive suspension systems with low unsprung weight 3. Flexibility - The higher the obstacles you want to climb over the more flex and/or wheel travel suspension has to provide 1. No suspension I have yet to see and offroad vehicle without any type of suspension (except for maybe 42070, 42081 and 42082), but I will list my opinion regardless: Advantages: 1. Simple design - having no suspension simplifies our design...and that's about it Disadvantages: 1. No flex over terrain means, there are only 3 wheels at once touching the ground 2. Low stability 3. Poor weight distribution 4. No shock absorption at high speeds 2. Pendular suspension This is the simplest suspension you can put on your vehicle. It basically means one or more of your axles are free to swing about. When using this suspension I suggest using the small turntable where drive axle enters the axle. This will keep the drive axle from carrying the weight of the model, which causes unnecessary friction. 42030 is a typical example of this suspension system. Advantages: 1. Simple, robust design 2. Using this suspension on both axles can give the model very high flexibility 3. If there are no springs used, the model can have perfect weight distribution on left and right wheel Disadvantages: 1. Large unsprung weight, poor responsivness at high speeds 2. No shock absorption means this suspension is not suitable for high speeds 2. When using on one axle, the stability of the whole model relies on the unsuspended axle. 3. When using pendular suspension on both axles springs or a transfer mechanism are required to keep the model upright 3. Single torque tube suspension This suspension became available with the release of the 8110 Unimog. Best examples of this suspension are 8110, 9398 and 41999. It is the simplest suspension which also allows for vertical suspension movement. Advantages: 1. Simple, robust design 2. Universal joints can be placed inside the ball joint, allowing power to be transferred to the axle 3. Easy to implement Disadvantages: 1. Large unsprung weight, poor responsivness at high speeds 2. Axle requires a some kind of a linkage system to keep it cenetred (panhard or parallel links as seen above). 3. Using this suspension on the front axle usually results in negative caster angle which causes higher rolling resistance 4. When used on rear drive axle, the suspension has the tendency to cause oscillate, especially with soft suspension and high power 4. Hard to connect springs to the chassis 4. Double torque tube suspension This is an evolution of the single torque tube suspension, which uses two ball joints to drive each wheel side respectively. It is my own original idea. Advantages: 1. Simple, robust design 2. Universal joints can be placed inside the ball joint, allowing power to be transferred to the axle 3. Easy to implement 4. Self-cenetring, since axles are connected in the center there is no need for linkages to center it 5. Can carry power to each wheel side independently 6. Drive torque compensation Disadvantages: 1. Large unsprung weight, poor responsivness at high speeds 2. Using this suspension on the front axle usually results in negative caster angle which causes higher rolling resistance 3. When used on rear drive axle, the suspension has the tendency to cause oscillate, especially with soft suspension and high power 4. Hard to connect springs to the chassis 5. Parallel floating axle This suspension uses linkages which keep the axle parallel to the chassis of the model. For best functionality and reliability the lengths of all links and that of the double cardan joint should be equal. Also all the linkages and drive axles should be parallel. Advantages: 1. Keeping the axle parallel to the chassis reduces the oscillations effect 2. Better responsivness compared to the torque tubes 3. Neutral caster angle when used on front axles. 4. Self cenetring when using A arm as upper link or 4 link setup 5. Can be configured to carry power to each wheel side independently 6. If configured to carry power to each wheel side independently the drive torque can be compensated. 7. Easy to connect spring to the chassis Disadvantages: 1. High unsprung weight, less responsive at high speeds 2. Increased mechanical complexity, double cardan joints required to carry the power to the axle 6. Half axle independent suspension This is the simplest independent suspension you can build. Best example of such suspension are Tatra and Pinzgauer trucks. Advantages: 1. Independent suspension with low unspring weight, suitable for high speed 2. Robust design with low number of moving parts 3. Easy to connect spring to the chassis Disadvantages: 1. Changes of the caster angle as the wheels travel up and down 2. Hard to implement a drive system that does not carry the weight of the vehicle 3. Hard to implement steering system 4. Wheels tend to drag sideways on the ground when suspension travels up and down, reducing efficiency 7. Trailing arm parallel independent suspension Personally I have not used this suspension yet, but I did use a normal trailing arm suspension which does not keep the hubs parallel. Normal trailing arm suspension which does not keep the hubs parallel acts similarly to torque tube suspension. For the prallel version of the trailing suspension I imagine the following: Advantages: 1. Independent suspension with low unspring weight, suitable for high speed 2. Robust design with low number of moving parts 3. Long links allow for high suspension travel 4. Very easy to connect spring to the chassis 5. Can be configured to carry power to each wheel side independently Disadvantages: 1. Hard to keep the wheels from sagging under the weight of the model. 2. Difficult to transfer power to the wheels 8. Double wishbone suspension This suspension uses two A-shaped arms to keep the wheel hubs in place. As of late it's my favourite suspension system due to: Advantages: 1. Independent suspension with low unspring weight, suitable for high speed 2. Very customizable design with lots of adjustable characteristics (suspension arm lengths, caster angle, camber angle, steering geometries) 3. When build correctly it is far more robust than live axle suspension 4. Increased ground clearance compared to live axle suspension, especially when used with portal hubs 5. Can be configured to carry power to each wheel side independently 6. Extremely easy mounting of springs 7. Very stable compared to live axles 8. Frame holding the suspension can be part of the chassis, therebye lowering the center of gravity Disadvantages: 1. More moving parts as live axle suspension, increased mechanical complexity 2. Limited wheel travel - Lego wishbones allow a max. of around 25 degrees of suspension angle 9. Multi-link suspension To be updated when I build my first multi-link offroad suspension. I can assume the following characteristics: 1. Independent suspension with low unspuing weight, suitable for high speed 2. Extremely customizable design with lots of adjustable charactersitics (suspension arm lengths, caster angle, camber angle, steering geometries, virtual pivot point) 3. Large steering pivot point compensation 4. Increased ground clearance compared to live axle suspension, especially when used with portal hubs 5. Can be configured to carry power to each wheel side independently 6. Very stable compared to live axles 7. Frame holding the suspension can be part of the chassis, thereby lowering the center of gravity Disadvantages: 1. Very high amount of moving parts, increased mechanical complexity 2. Limited wheel travel - Lego wishbones allow a max. of around 25 degrees of suspension angle 3. Hard to connect springs to the chassis 10. Spring types Listed below are the most common types of springs available: 6.5L Soft shock absorber Advantages: 1. Small, easy to implement Disadvantages: 1. One stud of suspension travel 2. Low spring rate, can't support heavy models 6.5L Hard shock absorber 1. Small, easy to implement 2. High spring rate, can support heavy models Disadvantages: 1. One stud of suspension travel 9L soft shock absorber When using 9L shock absorbers I suggest you do not use the default offset upper attachment point, but use an in-line attachment point instead. This will reduce the friction and allow for better high speed performance Example: Advantages: 1. Two studs of suspension travel 2. More attachment possibilities than 6.5 L shock absorber Disadvantages: 1. Default attachment points create friction 2. Low spring rate, can't support heavy models 9L hard shock absorber Advantages: 1. Two studs of suspension travel 2. More attachment possibilities than 6.5 L shock absorber 3. High spring rate, can support heavy models Disadvantages: 1. Default attachment points create friction 2. Rare and expensive 11. Attaching springs to live axles If we start with basics, the first things we have to check is how position of springs affects suspension of live axles. The closer you place the springs together, the more flex the suspension will have, but it will also be less stable: I suggest you to keep springs at a distance of around 1/2 of the total model width. When placing springs you should keep them in-line with the wheel bearing in order to reduce friction. First example of bad spring placements: And example of good spring placement: When using multiple springs make sure to place them symmetrically centrred to the wheel hub: When attaching springs to torque tube suspension, you have to allow springs to tilt in two planes: You can also attach the springs to the suspension links to increase suspension travel. This technique is especially common on Trophy Trucks: 12. Attaching springs to independent suspension Independent suspension allows for much more flexible spring placement. Generally the closer you attach the spring to the main suspension arm pivot, the higher spring travel you get, but lower suspension force. Examples going from the hardest suspension with low travel to the softest with high travel: You can also attach springs inside the suspension arms: Or horizontally: As with the live axles make sure springs are in the center of the wishbones. Example of good placements: And an example of bad spring placement, which causes excessive friction and suspension binding: 5. Steering Steering is the system which allows our model to change direction. Generally there are two types of steering system used: 1. Skid steering Advantages: 1. Very simple to implement and control with two separate motors for left and right sided wheels. 2. Does not require a dedicated steering motor Disadvantages: 1. Not efficient, since wheels have to skid to steer 2. Power had to be reduced or even reversed in order to steer. 3. Not very accurate 4. Not very effective offroad 2. Classical steering with steerable wheels Advantages: 1. Efficient, with minimum loss of speed 2. Accurate 3. Does not reduce the power of the drive motors 4. Can be used in front, rear or all axles for tight steering radius or crab steering 5. Effective offroad Disadvantages: 1. Requires more complex hub assemblies 2. For best steering accuracy you need a dedicated servo motor. Examples of a simple classical steering system for live axles 1. Parallel steering system for live axles Here both hubs are always parallel. Position of the steering in the front or rear rack has no affect on the steering. Advantages: 1. Very simple and robust 2. Easy to build Disadvantages: 1. No Ackermann steering geometry 2. Steering rack moves inwards as it steers, requiring more space. 2. Ackermann steering system for live axles This system allows the hubs to steer at different rates. The steering arms are offset inside so they form a virtual steering point where at the point where lines meet. Advantages: 1. Better steering performance Disadvantages: 1. More complex assembly 2. Steering rack moves inwards as it steers, requiring more space. 3. Steering system with diagonal linkages This system acts similar as Ackermann steering system by using diagonal steering links. Advantages: 1. Better steering performance 2. Steering rack only has to move in one direction without sideways movements 3. Can be configured to be used in front or the rear of the axle. Disadvantages: 1. More complex assembly 4. Simple steering system for independent suspension 1. Very simple and robust 2. Easy to build 3. Can be even more robust when using double steering racks and links 4. Steering rack only has to move in one direction without sideways movements Disadvantages: 1. No Ackermann steering geometry 5. Ackermann steering system for independent suspension Advantages: 1. Better steering performance 2. Steering rack only has to move in one direction without sideways movements Disadvantages: 1. More complex assembly, less robust. 3. General steering tips 1. When using independent suspension always make sure your links are paralel to the suspension arms, otherwise you may end up with wheels which are not parallel and are causing excessive friction: 2. When using standard portal hubs make sure your steering system is robust enough to deal with the forces generated by wheel driving into obstacles. 3. If possible use servo motors which allow for high steering precision and return to center. They are especially useful at high speed models. 4. Most efficient way to steer the wheels is using the steering racks. 5. Build axles in such way they have positive caster angle, example for direction of travel from right to left. This will self-center your wheels and reduce rolling resistance. 6. Drivelines Drivelines are the responsible for transferring the power from the motors to the wheels. There are various drivelines you can build, here I listed few with their characteristics: Driveline types 1. Permanent 4x4 Advantages: 1. Simple, centralized, low mechanical complexity 2. Wheels are always powered, great offroad performance 3. Light weight Disadvantages: 1. Poor steering radius 2. Tyres have to skid when steering, lowering efficiency of the model 2. 4x4 with open differentials Typical example of this driveline is 42070 Advantages: 1. Differentials allow the wheels to so spin at different rates when steering 2. Very efficient since wheels don't have to skid when steering Disadvantages: 1. If one wheel loses traction, all the power is transfereed to it, poor offroad performance 3. 4x4 with lockable differentials Advantages: 1. Differentials allow the wheels to so spin at different rates when steering 2. Very efficient since wheels don't have to skid when steering 3. All differentials can be locked, so wheels are powered for great offroad performance Disadvantages: 1. Higher mechanical complexity 2. Dedicated motor is required to actuate differential locks, higher weight 4. Axle mounted motors Typical example of this driveline are 9398 and 41999. Advantages: 1. Differentials allow the wheels to so spin at different rates when steering 2. Very efficient since wheels don't have to skid when steering 3. If one wheel gets off the ground the second axle can still pull/push the model. Disadvantages: 1. Higher mechanical complexity 2. Usually the rear axle motor is more loaded than the front, especially when climbing uphill, the motors can't "help" each other. 3. Worse offroad performance than permanent 4x4 5. H drive: This is my favourite driveline due to the following reasons: Advantages: 1. Motors allow the wheels to so spin at different rates when steering 2. Model can skid steer 3. Very efficient since wheels don't have to skid when steering normally 4. Having 2 drivelines allows you to carry more torque to the wheels 5. Redundancy, even if one drive fails the model can still move 6. Wheels are always powered, great offroad performance Disadvantages: 1. Higher mechanical complexity 2. Slightly higher weight 6. Wheel motor drive Each motor powers a wheel independently. Advantages: 1. Motors allow the wheels to so spin at different rates when steering 2. Model can skid steer 3. Very efficient since wheels don't have to skid when steering normally 4. Redundancy, even if one or more motors fails the model can still move 6. Lower mechanical complexity Disadvantages: 1. Motors can't "help" each other 2. Higher weight due to a higher motor count Transferring power axially When transferring power via axles, you can reduce the flex by using connectors instead of simple "bare" axle: Use axles with stops to prevent them from sliding out of gears: Where possible always brace tooth gears from both sides: Transferring power at an angle Where pairs of U joints are used, make sure to align them to eliminate vibrations: Brick built CV joint which can transfer high torque at over 30 degrees angle Brick built cardan joint which can transfer extremely high torque up to 15 degrees angle Brick built flexible drive which can transfer medium high torque, extract and retract, suitable for low angles Transferring power perpendicularly The following perpendicular gearboxes are the best suitable for transferring high torque Avoid knob and worm gears, because they waste energy Gearboxes In my models I generally use the following gearboxes: 1:3 differential gearbox Advantages: 1. Very high gear ratio between low and high gear, 1:3 2. Capable of transferring high torque 3. Very efficient since only 2 gears are used at any time Disadvantages: 1. Takes a lot of space 2. This gearbox requires a good housing to brace the gears properly Compact two speed gearbox Advantages: 1. High gear ratio between low and high gear, 1:2,77 2. Capable of transferring high torque 3. Very efficient since only 2 gears are used at any time 4. Very compact design Disadvantages: 1. Requires two of the rare 20 tooth clutch gears 2. More complex shifter assembly. Diagonal gearbox Advantages: 1. High number of gears 2. High gear ratio possible, over 4:1 2. Capable of transferring high torque 3. Very efficient since only 2 gears are used at any time Disadvantages: 1. Takes a lot of space 2. Input and output axles are not parallel. 3. A complex shifting assembly is required for sequential operation. Driveline effect on suspension Transferring torque on the wheels can affect the suspension, especially when live axles are used. The following photo shows how the torque causes one side of the axle to push down and the other to lift up: In order to minimize this effect I suggest the following: 1. Make sure to have most if not all the downgearing inside the axles, so you do not need high torque going to the axles. 2. Make sure your models have a low center of gravity 3. You can eliminate this effect by using two counte rotating axles which cancel each other's torque, example below: 7. Motors and control Following are the most common types of motors used for Lego models. You can find more info here: http://www.philohome.com/motors/motorcomp.htm My personal favourites are L and RC motors due to the balanced output speed to torque ration and great mounting options. 1. PF-M Advantages: 1. High speed output 2. Smallest available motor 3. Cheap and available Disadvantages: 1. Low torque 2. Poor mounting options 2. PF-L Advantages: 1. High speed output 2. High torque 3. Cheap and available 4. Great mounting options Disadvantages: 1. Odd shape 3. PF-XL Advantages: 1. Very high torque 3. Cheap and available 4. Good mounting options Disadvantages: 1. Slow speed output 2. Large form factor 4. PF-Servo Advantages: 1. Very high torque 2. Very precise output with 15 positions 3. Good mounting options Disadvantages: 1. Slow speed output 2. Output axle can move a max of 180 degrees 3. Large form factor 4. Hard to find 5. 9V-RC motor Advantages: 1. Most oowerful Lego motor 2. Very high speed output 3. Good mounting options 4. Two output axles with different gearing ratios 5. Drive axles can pass through the motor Disadvantages: 1. Low output torque 2. Low efficiency 3. Power hungry 4. Odd form factor 5. Hard to find and expensive Power options 1. PF - AA battery box Advantages: 1. High capacity 2. Good mounting options 3. Works with rechargeable batteries, but with lower performance 4. Cheap and easy to find Disadvantages: 1. 750mA current limit - not enough to fully power RC motor 2. Heavy 3. Has to be removed and opened to replace batteries 4. Wasteful 5. Odd form factor 2. PF - LiPo battery box Advantages: 1. Small form factor 2. Light weight 3. Easy to recharge Disadvantages: 1. 750mA current limit - not enough to fully power RC motor 2. Low capacity 3. Studded design 4. Expensive and hard to find 3. RC control unit Advantages: 1. No current limit - can power 2RC motors at once 2. 3 Power levels 3. Has integrated steering output with 7 positions 4. Good mounting options 5. Easy battery replacement 6. Radio based control Disadvantages: 1. Poor quality, prone to breaking 2. Limited angle (45 degrees) and torque from the steering output 3. Has to be removed and opened to replace batteries 4. Very large form factor 5. Expensive and hard to find 6. Heavy 7. Required dedicated antennas and remote Control options 1. PF receiver and controller Advantages: 1. Receiver is easy to integrate into the model 2. Controllers have physical feedback 3. Cheap and easy to find Disadvantages: 1. IR based, low range, useless outside 2. Lack of PWM motor control, unless using train controller which is awkward to use 3. Odd form factor for use with steering 2. RC control unit See above 3. Third party options such as BuWizz and Sbrick Advantages: 1. Smaller form factors, easy to integrate into model 2. More outputs than PF system 3. Smooth control of motors 4. High range thanks to Bluetooth control 5. Higher power available with BuWizz 6. Customizable profiles Disadvantages: 1. Smart device is required 2. No physical feedback 3. Sbrick is limited by PF battery box 4. Price 8. Chassis Chasis is the backbone of your model which olds everything together. For chassis I suggest you to use the following components in order to make it strong and robust enough to deal with the stresses involved when crawling or driving at high speed: Some flex in the chassis might be a good thing to improve offroad capability, but only if id does not affect the driveline and cause friction on the drive axles. Remeember to use diagonal support, since triangles are the strongest shapes. You can also use panels and motors as structural support. Interlocking your chassis will keep it from slipping apart. For good examples of chassis designs I suggest you check the instructions for 9398 and 42083. -
[TC15[ Motorized BiCopter
Zerobricks posted a topic in LEGO Technic, Mindstorms, Model Team and Scale Modeling
I started working on this model many weeks ago in Lego Digital Designer first. The whole concept started with the quarter circles from BWE, which are able to perfectly accomodate the small rotors. I was heavily inspired by the (movie) Avatar's rendition of helicopters. After a lot of tinkering in LDD, it was time to start building in real life: It was here I discovered I made a big mistake. The control stick located in the cab used to tilt the rotors was reversed! I had to go back to the drawing board and correct the control mechanism. Few days, fixes and improvements later, this is what the final model looks like: I wanted the colors to randomly switch from yellow to make it look more eye-striking. Where possible I used black 2L pins instead of the blue ones. As stated in the topic name, this is a motorized model, powered by the small LiPo battery box which is hidden in the tail, next to a single M motor: The single M motor powers a total of 3 functions: - Drive rotors (always engaged, spinning in one direction only) - Opening cargo doors and rear ramp (powered by a gearbox) - Working winch (powered by a gearbox) You can see the driveline of all the motorized functions here: The red mechanism at closest to the M motor makes sure rotors are spinning in one direction only, irrelevant of which direction M motor spins. This way changing direction of the gearbox does not change in which direction rotors spin. Gearboy in front switches between openining doors+ramp and a winch. The doors and ramp are actuated by a single actuator located right behind the cockpit: The rear of the cargo doors is connected to the ramp via bewel gears, so both open at once: I also bult a small container which can be easily lifted by the motorized winch: The container can easily fit inside the cargo bay area: You can see the finished model's video below: -
I created this boxcar to push my unpowered locomotives. It has all necessary Power Functions equipment with 2 train motors. It allows me to create locomotives without having to incorporate power. The IR receiver is mounted sideways because I run my trains on a wall mounted track about close to the ceiling (see picture). In the future I hope to add a rechargeable battery and power pickups (for a hybrid 9v/Power Functions system). Thanks for looking! Unfinished_Projects Designed using Stud.io 2.0 and rendered with POV-RAY
-
Hi! As a new member of our large society I'd like to present you one of (as I humbly think) my greatest models so far - the humanoid's arm. Creation has been building by mine for January and February this year. In April it has taken a third place in local competition for students and, as if that wasn't enough, in June I was also presented it at Warsaw, Polish capital. Here's also a humorous entry featured it at Brother's Brick blog: https://www.brothers-brick.com/2018/04/17/judgment-day-starts-with-a-technic-arm/?fbclid=IwAR1f4tKQdujN5YtRemM4K3OmIlpCGO6GcdgWRsEgeJDDWpn7Ayb3K4tl-hs#more-107955 The arm itself is a combination of pneumatic and electric (Power Functions) componenets controlled remotely or by panel with system of valves. It's quite large, even slighty more than actual human's arm. It includes a total of 6 motors, 2 IR receivers, 7 pneumatic cylinders and 4 linear actuators. Features prehensile palm with tendon-like controlled fingers, natural range of thumb's movement, fingers abduction, movable forwards and backwards wrist axis, rotated and elevated forearm. Just look: Also let's see some photos: If you liked it, I'll try to upload some photos and videos of my robots soon! Sorry for my poor English :/
-

Review: Powered Up! 88006, 88007, 88008, 88009, 88010, 88011
mostlytechnic posted a topic in Special LEGO Themes
Lego 88006, 88007, 88008, 88009, 88010, 88011 Powered Up! components Thanks to Lego and EuroBricks for making this review possible! Since Lego is switching to a new system instead of Power Functions, they wanted people to check out the new parts. Name: Powered Up Set Number: 88006, 88007, 88008, 88009, 88010, 88011 Pieces: n/a Price: varies, see below Minifigs: 0 Theme: Technic, Train, Boost, and Creator Year of Release: 2019 These sets are technically new, but the parts aren't. They've been available in the Boost and Train sets for a while now, so lots of people have already looked at them. Sariel did x-rays of all the PF and PUP devices (and older too!) JopieK did a teardown of the PUP parts and posted it here on EB. treczoks is putting together documentation on the protocols and others are doing similar. This review will be different than my normal ones, since it's not a standard set. It's not really a "set" at all. I want to compare the new parts to the old PF system, both in function and design. So first, here's all the PF and PUP sets: A couple of them don't have any prices that I've seen online yet. The highlighted prices are ones that I saw listed on the Lego US site, but they're not online now (12/20/2018). Obviously, all the Lego electronics are pricey. But for comparison, to get a full train setup (speed remote, battery box, motor, IR receiver) you'd be at $55. The equivalent PUP setup (motor, remote, hub) would be around $90 (guessing at the train motor price). The bluetooth electronics are much more complicated and expensive than infrared is. A simple motorized set (something like the new Vestas windmill, or the Roller Coaster, or similar) would be very expensive in the PUP ecosystem, since there is no "dumb" battery box. It's possible that Lego will add one at some point for those set types, or they'd need to keep PF alive. There's also a few gaps in the lineup. The WeDo motor, which is PUP compatible since it's in the Batmobile set, is not available standalone. I'm actually really curious why they used that motor in that set instead of the "PUP Medium" motor. Also, there's only the one motor so far. There's no XL or other "big" motor, so we'll have to see if the PUP Medium motor is powerful enough to handle the XL's loads. The switch is not really needed anymore, since the hub has controls built in. I can see extension wires coming - I'm sure builders will want them, and it'd be simple enough. As for the much-desired adapter wires, that's a bit tougher. It'd be great to control PF motors from a PUP hub. However, the PUP system identifies the motors, so the adapter cable would have to identify to the hub that it's a PF motor. The hub would not know which motor it was. Enough of the talk, let's look at the parts. The Box Bags IMG_4289 by mostlytechnic, on Flickr These parts come in individual bags. Anyone who's ordered PF components individually will be familiar with them. These aren't sets that you'll find on a store shelf (except maybe a Lego store), so the outward appearance and extra space taken up isn't worth the cost to box them. The Contents IMG_4291 by mostlytechnic, on Flickr Here are the parts themselves. The Interesting Parts IMG_4291 by mostlytechnic, on Flickr I always have an "interesting part" section in my reviews to highlight new molds, colors, rare parts, etc. But here, they're all interesting so I just repeated the photo. If that annoys you, just keep scrolling and see new images below. The Manual IMG_4290 by mostlytechnic, on Flickr For a company that normally has zero text in their manuals, wow. Here's some of the paperwork that comes with these, because they have electronic parts. Each document is in THIRTY FIVE different languages, so each paper is only a couple sentences. Each of the battery-powered parts has a "how to put the batteries in" flyer. Every item had a paper saying "Protect the environment by not disposing of this product with your household waste. Check with your local authority for recycling advice and facilities." Yes, every single item had that included. Battery Boxes IMG_4307 by mostlytechnic, on Flickr Here are the current Lego battery boxes. From left to right is the 6 AA box, mostly used in Technic, then the Boost Hub, currently only used in the Boost robotic set which holds 6 AAA batteries, then the PUP Hub, also holding 6 AAA batteries, and finally the PF 6 AAA battery box, commonly used in trains. The new hub is the exact same size as the 6 AAA box, and it has the green power button in the same location. However, the new one has the connections on the end instead of on top. The Hub IMG_4302 by mostlytechnic, on Flickr First, we have the basic Powered Up hub. This is the 6 AAA box, which is 3 parts. The batteries go into a "cartridge" which snaps into the base. It might be possible for a rechargeable module to become available at some point, but there's no external charging port like the PF rechargeable box, so it'd require taking the box apart still. The Boost Hub IMG_4293 by mostlytechnic, on Flickr Likewise, the Boost Hub uses a battery "cartridge." However, it's part of the base so it would be possible to have a rechargeable battery module with a port in the bottom. The Motor Lineup IMG_4295 by mostlytechnic, on Flickr The new PUP motor (sometimes called the Boost motor since that's where it's currently available) is almost as large as the PF XL motor, but it's studded. The only pin connections are on the face of it. The PUP motors do have a big feature that the PF ones don't. They have built in rotary encoders, like the Mindstorm motors do, so programmable systems can see how much they've turned. The motor can actually be used as an input sensor too - put a tire on it and have a dial control! This only works with the Boost hub though since you need the programming capability to do anything with the information. The Train Motors IMG_4308 by mostlytechnic, on Flickr The new train motor is identical in shape and size to the PF one. The only outward difference is the cable- it's shorter and wider. The Plug IMG_4298 by mostlytechnic, on Flickr As you can see, the new plug is smaller, but the cable is wider. Overall it takes up less space, since once it's plugged in, the hard plastic sticks out one stud. The old connector was fully exposed all the time. It'll take a little different building design though, since the new plug sticks out from the battery box. The Sensor IMG_4300 by mostlytechnic, on Flickr This, to me, is the oddest part of the inclusion in this shipment. This sensor comes with the Boost robotics set. In that setting, it makes sense, and I understand why people would want to buy it alone (to add more sensors to their design). However, without the Boost set, it's usefulness is limited. It does nothing useful when connected to the regular Hub. When it's connected to the Boost Hub, it's a great color and distance sensor with lots of usage. I'm actually now trying to piece together a Boost set out of my parts collection to try all the Boost designs, since I have the Hub, Sensor, and Motor here. But to the majority of people using the new PUP system, they won't see any use for the sensor. Yet. What if, down the road, Lego sells a train set that includes the sensor and some software updates to the basic Hub? It'd be trivial then to have some colored tiles on the train tracks so that the train could be programmed. Make noises at certain locations, stop, etc. The current Duplo trains do that! So why not bring that functionality to the older kids and AFOLs? This DOES need a software update from Lego though, since like I said, the smaller Hub does not allow any programming or recognize the sensor, as far as I can tell. And the Boost Hub is too big for a standard 6 wide Lego train. The Remote IMG_4304 by mostlytechnic, on Flickr Speaking of trains and controlling them, here's the new remote. It is TINY! Granted, I'm a big guy (6 foot 3) with big hands, but this is small. It's certainly smaller than the PF speed remote. And personally, I'm torn on the functionality. If you're not aware, the Hub can detect what motor is connected and act differently based on that. If you connect the Medium motor, this remote acts like the old small PF remote - the buttons give you 100% power for as long as you hold them. Release the button, and the motor stops. If you connect the train motor, this remote acts like the PF speed remote. The + and - buttons step through speeds and it keeps running. The red button stops it. This makes sense for kids and keeps the line of parts simpler, but it removes advanced functionality. What if I want to run the medium motor at lower speed? I can't. The top center of the remote is an RGB LED. It lights up the same color as the hub to show what units are paired together. The PF system allowed 4 "frequencies" with 2 channels each. The PUP system has 5 "frequencies" with 2 channels each. This remote also removes the need for the PF switch. You can turn the button sections of this remote. So if you want one motor running reversed, just turn that set of buttons upside down. If you want to steer left and right, you can turn the buttons sideways. One thing you cannot do is modify the remote, the way the PF remotes would be modified, with addon parts. Lego themselves has done this - like the 9398 Crawler set: The new remote has some pin holes on the sides, but no way to attach to the buttons. The App IMG_4311 by mostlytechnic, on Flickr The big new function with the new system is the app. There's the Boost app, which allows programming the Boost Hub, and the PUP app, which controls the basic Hub. This app is very limited. You pick which set (currently the Batmobile, Freight Train, and Passenger Train), and then appropriate controls appear. It's all preconfigured and not modifiable. It doesn't allow you to design your own controls the way SBrick and others do, so if you want to make a new vehicle, you have to control it like it's a train or Batmobile (using those particular motors, since the hub knows what is connected!) I strongly suspect Lego will come out with another app (or a major update to this one) to control custom builds, and frankly, I don't know why they haven't yet. The Performance, Speed IMG_4573 by mostlytechnic, on Flickr I mounted a tire on each motor (both PUP and PF) and checked the RPM at full speed. Here's the results: As you can see, the PUP M motor is closer in speed to the XL than the other PF motors. The PUP train goes slightly faster at full speed than the PF train motor. I checked all the speeds, and it ranges from about 500 to 1800. The Performance, Power IMG_4574 by mostlytechnic, on Flickr I also checked the force each motor can generate. As I don't have a proper torque meter, I made my own rig. In the photo, it was trying to lift a heatsink from a computer. That was too easy, so I moved on to a heavier weight. The XL motor was still able to lift that, but none of the other motors could. The measurements on the train motors were at full speed. One thing I noticed - the PUP train motor would cut out after a few seconds at a stall. When I hit stop, it would be immediately ready to run again, so I don't think this was the internal thermistor cutting it out. I think the hub is monitoring the speed and shutting it off when it wasn't rotating. I should try having an actual train drag a load and see what happens... The Conclusion So, what's my conclusion? Overall, I see what Lego wanted to do with the new PUP system. It eliminates the IR weakness, removes the need for a separate receiver, and updates the system to be "app-enabled" like all the cool toys are now. I think that also brought some new limitations that Lego CAN remove, but hasn't yet. I'm looking forward to seeing the PUP system appear in Technic sets to see how Lego handles that. That will be a while though, since the only motorized Technic set in the first half of 2019 is the Stunt Racer, and it still uses the PF system. That COULD have been a great set to use PUP in, similar to the Batmobile, but for some reason they chose not to. I'm guessing the M motor doesn't have the speed for the stunt racer and they didn't want to put the WeDo motors in? That doesn't seem like great logic to me, and I really hope there's more motor options to come. The PUP M motor is too big and too slow for a lot of Technic applications. Right now we're in the transition phase and I hope Lego is listening to the various categories of users. AFOL train users want to connect multiple motors on the same channel to run big trains. Technic users need smaller motors. Creator needs a simpler, cheaper system. And almost everyone needs customizable app interfaces -

App for controlling Lego Power Functions 1.0 New Version BETA
PF Remote posted a topic in General LEGO Discussion
Hi,I thought about making an App for controlling Lego Power Functions 1.0(not PU). And now I am done with programming this app, without any programming knowledge. In the next updates I am going to make a PU remote too, so you can combine different Lego Sets and I want to make a Mini Jack IR Blaster Support for smartphones, that hadn t an IR blaster built in. Right now the App is only for devices with built in IR blaster. I know there was an App before for controlling Lego Power Functions, but this app had some features that weren t pretty good. This is also one of the reasons why I made this kind of App. Please open the Play Store Link on your smartphone.Link for the App: -
42095 RC Tracked Racer replica
Zerobricks posted a topic in LEGO Technic, Mindstorms, Model Team and Scale Modeling
I spent the whole night building the replica of ucoming 42095 42095 RC Tracked Racer and here are the results: Of course there are some minor differences compared to the upcoming set, mainly in the lack of correct rear sprocket wheels and mirror elements, but I think you can get a basic idea of what to expect from the set. -
Like many others, I felt the latest release of the Hogwarts Express was lacking. In turn, I have stuffed an M motor in the boiler, radically altered the rods (based on the Emerald Night), put the PF receiver and battery box in the tender, and added doors to the carriage (Again, a la EM). The overall effect I think is much better visually and because I can run it at events now. I've included an internals picture so anybody wishing to see how it was done and get ideas is more than welcome to. The last one links to a video of the train in action. I can't remember how to link a Flickr video right...
-
Today I present my LEGO version of the famous German VT 11.5 Trans Europ Express – or just TEE. If you want to know a bit more about the real train, wikipedia helps: https://en.wikipedia.org/wiki/DB_Class_VT_11.5 (Picture used with kind permission of Ulrich Budde © http://www.bundesbahnzeit.de/) It took me a while to finalize this model but I was busy on my building desk the last couple of weeks. From the specifications: 6 units in total (2 engine units and 4 waggons) 3 Power Functions train motors (2 in the front engine unit, on in the back) LEGO LED lights for the train front and end lights 7-wide (my favourite width for LEGO MOC trains) total length ca. 2.5 meters runs through standard LEGO track geometry (even if it looks silly), I prefer BrickTracks curves and TrixBrix/4DBrix switches custom LEGO parts: none modified LEGO parts: 2x 2x4 tile with the TEE logo by http://www.steindrucker.com yellow sticker on the coupling cover from an old LEGO sticker sheet Non-LEGO items – a piece of red tape to cover the center LED on the nose – interior lights using mini battery powered LEDs (source: ebay, search for "LED mini fairy string light") – Trans Europ Express decal by http://www.modellbahndecals.de/ in scale 1:45 It started all with the idea to use two Brick, Round Corner 3 x 3 x 2 Dome Top for the characteristic nose of the engine units. A much bigger challenge were the grey-silver stripe which swings from the lower front lights up to the driver's cabin. For a long time I favoured a solution using rigid hoses, but it didn't work out and the hose did not "swing". So I ended with the plate variant, at least I did not build any steps. I also realised the round bull's-eye windows. The first one has to be located as close as possible to the end of the tan section. So the arched brick helped here. We still miss an element which fits between the 1 x 3 x 2 arch and the larger 1 x 6 x 3 arch. But I found a solution using curved solpes covering most of that gap. I am still stuggling with the right colour of the roof section behind the driver's cabin. Originally it should be light bluish grey (same colour as the stripe). But in real live all the grime from the exhausts makes this roof look more dark/dirty. So I also build a dark bluish grey variant. Both can be swaped easily and this feature allows easy access to the rechargeable battery box. Which colour do you prefer for this roof section? The rest of the roof also was a nice building experience using some SNOT. I wanted to use dopple-cheese pieces and curves slopes. And the roof should become 7 studs wide. That did not equal out fine so I had to use vertical tile on both sides of the middle brick column. The picture explains the rest of that SNOT nightmare … But now enjoy some pictures: More pictures in various sizes on Flickr! Best regards, Holger
-
BuWizz Small car competition
Zerobricks posted a topic in LEGO Technic, Mindstorms, Model Team and Scale Modeling
RULES Build a body on the top of the predefined chassis. Instructions can be found here: http://bit.ly/Competition_instuctions You may extend or retract the cassis by 2 studs and change the type of wheels. Any other changes to the chassis are not allowed. You are only allowed to use unmodified Lego bricks and a BuWizz, no gluing or such allowed. You may use third party rubber bands or strings. Each participant is judged in for the following: 1. Aesthetics – the model with the best-looking body 2. Most epic stunts performed – a jump, drift, crash, chase, etc… Try your best to set up and record the most epic video of your creation. Contest voting will be held at here Eurobricks forums, each user can assign points to 6 competitors using the following formula: Contestant 1 : 10 points Contestant 2 : 6 points Contestant 3 : 4 points Contestant 4 : 3 points Contestant 5 : 2 points Contestant 6 : 1 points Competition start: 10.09.2018 Competition END: 20.10.2018 31.10.2018, 23:59 CET PRIZES: 1 st prize: 3 x BuWiz 2 nd prize: 2 x BuWiz 3 rd prize: 1 x BuWiz -

[MOC] Tracked Loader
Superkoala posted a topic in LEGO Technic, Mindstorms, Model Team and Scale Modeling
Hello Eurobrick. Let me introduce you my "holidays' MOC" : the tracked loader. It is the merging of a traditionnal articulated wheel loader and the tracks I build few months ago for the Cossack. In the main lines: it is a 4x4 vehicle with a steering by articulation and a rear pendular axle. The bucket is elevated by a pair of linear actuator and tilted by a single actuator. The rear hood is openable and reveals a functionnal mini V6 engine and an easy access to the BuWizz. The loader is equipped with a minimalistic cabin (seat and fake steering wheel) and has access ladder and platform with handrail. All the images are available on FlickR There is 4 PF-M motor used in this MOC, one for each function: – Propulsion – Steering through two mini-LA – Elevation of the bucket through two LA – Tilting of the bucket through on LA All the functions are controlled through a single BuWizz. Special note regarding the engine : The V6 engine has been designed once all the motor and Buwizz were installed. As a consequence, only a 5×8 studs hole was available. The V6 engine fits in this space and is functional. See the video here below for more detail. Thank you for reading ! If you're interested, the complete review of this MOC is available on Superk-Technic.com -

[MOC] Unimog 437
Thirdwigg posted a topic in LEGO Technic, Mindstorms, Model Team and Scale Modeling
I guess you could say I couldn't make up my mind about the kind of Unimog I wanted to make next. So I decided to make a platform that would support multiple versions. Features: Interchangeable platform Long and short wheelbase options Standard and Doka cabs, removable Manual control PF control (drop in) Front and rear suspension Steering 4x4 with I-4 fake motor Opening doors and hood Tipper bed options Feel free to check out thirdwigg.com to learn more about the build. Manual SWB with tipper bed. Manual LWB Doka with tipper bed. Power Functions (XL drive, Servo steering) LWB with cover. Manual LWB with canvas bed showing the suspension travel. You can find more pictures on my flickr. I have been adding instructions for the various versions here, and more will be added over the coming weeks. Someday I'll make a camper, because, everyone needs a camper. This was a fun project, and I loved the way it turned out. I have the LWB on my desk right now, and I keep getting distracted from work. I hope to add additional options for the system at some point, and will take other suggestions for versions to add. Hope you enjoy. -

[MOC] - Power Functions Joystick
Scorpion posted a topic in LEGO Technic, Mindstorms, Model Team and Scale Modeling
I was playing around with power functions remotes, trying to bash out a joystick-style remote control for my latest project, but all my efforts were unsatisfying to me. So I searched around for some designs and I came upon Technic Dragon's excellent design. Having found it to my liking, shamelessly ripped it off drew inspiration from it to make this remote. The design is practically the same, I only made small improvements to decrease the part count. I hope you all find it to your liking as well. Here's the LDD file. Hope you enjoy it! -
 I finally had time to play with the Powered Up elements from the new Train sets. They surely don't represent the complete PU system yet, but we can draw a lot of conclusions from them:
 -
.thumb.gif.ad7c8d88b264ee812194946c07404504.gif)
[AMS-2][MOD] Lego 9394 RC Dragster - Powered by a buggy motor!
mocbuild101 posted a topic in LEGO Technic, Mindstorms, Model Team and Scale Modeling
Yes, it's an airplane that can drift! (or rather do doughnuts) But first, I think the video is the best introduction: Cool, isn't it? I was actually very surprised how well it worked when I first tested it - especially considering how bad my previous MODs were.. (in fact, it's probably the only RC set MOD that I've done that worked at all!) It was quite a challenge to fit all the electrics in such a small body, and was actually the main reason why I only kept one of the original functions... Features: Steering - powered by PF servo. Drive - geared down 3:5 from fast output of buggy motor. Motorized wings (not RC) - powered by PF M-motor. Easy to remove battery box - if not using rechargeable battery. Other Specs: Weight: 650g (with rechargeable battery) Original functions kept: 1 (out of 3) Theoretical top speed: 14km/h (at least) Links: YouTube: https://www.youtube.com/watch?v=6pTW9vclg0c Bricksafe: https://www.bricksafe.com/pages/mocbuild101/9394-rc-dragster-mod Contest voting: https://www.eurobricks.com/forum/index.php?/forums/topic/162664-ams-2-dragify-your-set-voting More photos: Enjoy! And don't forget to vote! -
Lego Technic 9397 Logging Truck RC Mod with Sbrick
TmoneyTechnic posted a topic in LEGO Technic, Mindstorms, Model Team and Scale Modeling
Hey guys, sorry I haven't posted in a while. I've had the clips to make this video for 2 months now, but not enough time to edit. Anyhow, with that said, here's what I have done. I have rebuilt both of the rear axles so they can be driven by 2 L-Motors, and rebuilt the front axle so that it can be steered by a servo, and still be able to fit an engine and have room in the cab for other motors. I also rebuilt the front of the truck since it seemed too sparse to me, but I've left the rest of the truck (besides some of the internals) original. I decided I only wanted to use a single Sbrick, and I had only one port left, since there was already an M-Motor in the model to drive the functions connected to the distribution gearbox, so I built a custom sequential shifter that I could fit in the cab, and access the axles of the changeover catches in the gearbox, and thus shift through the functions sequentially. This is done with one M-Motor. All of the internal mechanics of the gearbox were left stock, besides the elimination of any white 24 tooth clutch gears. I did not change the rest of the model that much, though I did think having an inline-4 seemed kind of lame, so I put in a V8 instead. i will not release any instructions due to the extense of the modifications. Please enjoy the video and photos below, and feel free to leave a reply! -
First off, I would like to say that, no, I am not terrible at maths! All shall be explained! (Sorry, this may be quite a lot of reading!) The Back Story: First aspect: Some weeks ago, I was having a general look for sets that might be of interest to me. I stumbled upon a very good deal on the Lego City Bus Station (Set no. 60154). I decided in a spur of the moment purchase to pick up 2 sets, with no real plan… That’s what sowed the seed! Second aspect: In the not so distant past, I had purchased a huge Lego haul from eBay containing many train set items and accessories. In amongst this, was an incomplete copy of the Lego Freight Rail Runner (Set no. 4564) – (maybe 80% complete) – at the time I didn’t really know what to do with it. Over time I harvested the 9V motor, wheels, couplings, bogie plates, wagon parts and straight track – basically all the good stuff! Now, I’m a big fan of seeing people doing set combining! I have never seen anyone attempt something like this! (Correct me if I’m wrong!) The Hypothesis: “Is it feasible to make a decent looking locomotive of any kind, combining Sets 60154 and 4564? – Using minimal significant other parts, but in cases where necessary only using parts I currently have, and not resorting to ordering things. The locomotive should ideally use Power Functions with 2 motors, lights are not necessary. Also, the finished model should be sturdy, strong, and able to be played with by children.” Answer, Was It Possible? Yes, and in my opinion, it turned out rather well. What I attempted to build was a massively simplified Class 37, with much artistic licence! Here is the finished product: Thus, the idea for “60154 + 4564 = 37?” was born! What do you think? Any questions, thoughts, or criticism will be much appreciated. Regards, James :)
-
Found this Polish Pm36-1 on Youtube, think its worth looking at!
JEB314 (James) posted a topic in LEGO Train Tech
Just found this new video of a Polish Pm36-1 steam locomotive by Fasolic ( @solic ). I've not seen any coverage given to it, and it is a marvellous model, very much got LNER A4 vibes! Love the Dark Blue colour and the integration of full PF in the loco! Anyone know its history?