Search the Community
Showing results for tags 'PF'.
Found 253 results
-
[MOC] 1:7 scale RC model of old Unimog 401
Tamas Juhasz posted a topic in LEGO Technic, Mindstorms, Model Team and Scale Modeling
Hello all! It's been a while, I posted here anything, but now I'll try to upload my works more recently. I start with this Unimog 401, which is the oldest Unimog with Merecdes-Benz star. This one has also an "Ochsenkopf" (ox head) in the hood, which was later removed in the next generations. The building time took about 2 weeks at all, and this is my first model which got the special dark green color, to get close to the original's painting. I ordered several types of these bricks, more models will come in this color. I chosed for building the 1:7 scale, with the 108 mm RC4WD rock crusher XT wheels. They aren't Lego, but as far as I can see nowadays it's normal in tyres, and the look is better imho with these. Goals: Llooking and working authentically, as close as possible to the real thing, beside of off-road capabilities and remote control. Main functions: Motorized: driving, steering, gear change Automatic: steering wheel, piston engine, PTO in front and rear Manual functions: openable hood, doors, rear side Working: One Lego PF L motor drives, one M steers. The 2 speed linear gearbox is operated by a M motor. Steering wheel and suspension also works. The original has rigid axles with torque tubes, so I chosed also them. Four of 8466's springs were taken apart, so I got 4 coil springs to get the authentical look in machinery of axles. I also attached differential imitating disks. The rear view mirrors work a little. One L motor drives the whole thing, it's sliding in two axles, because of the 2 speed (1:3 and 1:1 ratios) linear gearbox. This way there is no need for driveshaft length adjuster between the driving motor, and the incoming axle of the gearbox, but the rear PTO has one from 6 holed pulleys. There is a PTO also in the front with a pulley, like in the original. The working L4 piston engine has mini pistons from 2L axles and half bushes. Details: I wanted to build as details as possible both inside and outside, like: detailed interior, steering wheel, stickers (for instruments too), gear change levers in the cab, handbrake lever, mudguards seen from inside, fuel tank, number plates, lights, seats, rear wood cover, detailed engine room, tanks for brake, exhaust, etc. Pictures I made it in the winter season, that's why you can see snow as background: https://www.flickr.c...157667176594155 http://www.brickshel...ry.cgi?f=563725 With dark green wheel covers: There are anti-roll bars to prevent rolling, the vertical 6L links connect them with the axles: The diff imitators: Of course I made a video, too: Hope you like it. -
Dear All, From the MTRkustoms train Factory i have the pleasure to announce my latest MOC, After some Spanish Train MOCs I wanted to make a Steam Locomotive, and I Started with the biggest and more powerful Spanish Steam, the “Santa Fe” 151 (French/Spanish) 2-10-2 (Whyte) This locomotive was able to pull a 450 tons train at 30km/h and a slope of 20mils The most difficult challenge was create a MOC that can run in R104 Blastemtrack, and R40 curves. To get the power I use a 9v dummy motor to pick up energy and 2 L PF Motors inside the boiler attached to the 9v pickup, is not a fast MOC, but is a very powerful Locomotive DIMENSIONS Locomotive length: 45 studs Tender length: 25 studs Total length: 70 studs Height: 9 bricks 7 wide Details To be a complete MOC I made some type of cars, 1 Closed boxcar, 5 open coal cars, and one caboose car. Details These 2 axle wagons have a flex hose coupling to be connected and allow Little turn of the axles. Also the coal wagons have an aperture system for the next project. All the pictures in Flickr Album And a little Video: Enjoy it
-
Nuclear Building is a round modular building whose shape resembles a mushroom cloud. Model characteristics: Building comprises 3 stories and has a height of 40 bricks. Fits into 32 x 32 modular standard and can be put near any other modular building not taller than 28 bricks. Building is equipped with a functional elevator. Model consists of over 4100 parts. Some of the architectural features: Model consists of 4 modules: The following picture shows how the modules are connected together: The building is equipped with a functional elevator: Despite its oversized top floor, the building can be put near any other modular building not taller than 28 bricks. The connection points are embedded in the fences. Additional links: Photo album on Flickr. Building instructions are available on Rebrickable.
-

42029 MOD w/Power Functions
DamonMM2000 posted a topic in LEGO Technic, Mindstorms, Model Team and Scale Modeling
42029 Lego Technic Customized Pickup Truck in highly modified form. Features include ultra-firm dual independent suspension. Motorized with Power Functions. -
Hello all fellow train folks, today I have another MOC but it isn't a train, it is a track piece that we haven't been able to get in 10 years. Here it is more info to follow. 1). It has to be the same size as previous tracks. 2). It would need to use minimal parts and be easy to construct. 3). It would need to be as quiet as possible or be as quiet as standard Lego tracks when the train rolls over it. 4). It would have to be stable and would not fall apart in use. I hope you all enjoy my MOC and this track piece. I you feel inclined constructive criticism is always welcome! If you thought It was brilliant you can support it here: https://ideas.lego.com/projects/131973
-
Hi all, I've been doing a bit of brainstorming about what to do concerning the current state of affairs for trains on Lego Ideas, and while I am currently working on a couple different solutions of my own, I finally landed on an idea that would include all of you as well. A bit of friendly competition, all towards a common goal: a better/more appealing train set offering for Lego fans. So, I am proposing we start a set design contest here on Eurobricks!! (maybe even get it up on the front page?) The Parameters: -A complete train set, not a standalone car, engine, or track-side structure. Generally an engine, 2-3 rolling stock, and one structure. -A 1000 parts count maximum, which must include necessary PF elements and at least 20 pieces of track (standard oval). -A self-contained engine, meaning no rolling stock can carry necessary PF elements. -At least 2-3 "play features", not including the operation of the train itself. -At least one alternate build. (Alternate models do not have to meet the same requirements as the primary model) -Must use parts currently in production, however new/different colors of said parts can be used. Some Suggestions: -Come up with a few stories about what the minifigs included in the set could and would be doing. -Try to avoid using generic flat cars and wimpy helicopters. -Use 1-2 rare/unique colors that haven't appeared in a train set yet, like azure, purple, dark red, etc. -Try not to make your train too regionally specific by using road names such as GWR, LNER, UP, CN, etc. Color schemes may be mimicked though. -Develop a play feature that hasn't been used in a train set before. -Try to have each element of the set be as interesting on its own as it is with the rest of the set. I'm not sure how much time should be given to a contest like this, but I'd reckon about 30-90 days would be about right? Then, about 2-4 weeks for voting? The top 3-5 projects (depending on the amount of participants) could then be refined a bit before submitting to Lego Ideas. If this contest receives frontpage support, maybe some prizes could be awarded to the top finalists...? Let me know your thoughts on my proposition, and also who I need to contact to make this happen! Thanks for your time, ~M_Slug~
-

[C-Model][MOC] 42008 Bus
Samer posted a topic in LEGO Technic, Mindstorms, Model Team and Scale Modeling
All of a sudden while at work, this idea came to me and I got so interested. Objectives: Bus as 42008 C Model Good looking as much as I can include bus details as much as I can pneumatic door and baggage driven by pump compressor motorized drive as a 3rd function (what else a bus has to offer?) manual steering easily removable battery Parts: approximately 930 parts out of 1276 Build time: around 3 weeks Limitations C Model, hence no parts outside 42008 allowed 42008 presents the folloing challenges: not enough lift arms to build a floor in the passenger area managing the available quantities of Green and Red beams to build the bus body and make a good choice where green and where red goes. weak pneumatics I'm new and this is my 1st serious try, I only built 42008 before this. In general I'm satisfied by the end product. Next are things I think could be better: hiding the pneumatic hoses, got lazy at that. sliding baggage door, (couldn't figure out how to do that) more sturdy/smooth steering two doors rather than one using the white gear I may try to enhance this later (as a free MOC), but for now I will go to build some car sets to learn more about vehicle functions. I will start with 42029. Thank you for having a look. Remaining parts (around 340) -

[APP] BrickController2
imurvai posted a topic in LEGO Technic, Mindstorms, Model Team and Scale Modeling
BrickController2 is an Android and iOS application that allows you to control your Lego models using a compatible gamepad. It supports the following devices: - SBrick - BuWizz 1-2 - BuWizz 3 (basic support) - Lego Powered-Up devices: Boost, PUP HUB and Technic HUB (or Control+) - PF infrared (on Android devices having infrared emitter). Features: - Multiple profiles for a single creation - Multiple motor (or output) assignment to a single controller event - Different types of devices can be used at the same time - The same motor (or output) can be assigned to multiple controller events - Different joystick characteristic settings - Different button modes: normal button, simple toggle, ping-pong toggle, carousel toggle, ... - Train mode on joysticks - Normal and servo mode for the new Control+ motors - Sequences (like for flashing light) BrickController 2 on the Google Play Store: BrickController2 android BrickController 2 is also available on the Apple App Store. BrickController2 iOS Video tutorial created by @kbalage (many thanks for this): And another great video by @kbalage: Older versions: BrickController Android application. It lets you to control Lego creations via Lego infra-red, SBrick and BuWizz V1 and V2 using any Android compatible game controller: Current version: BrickController 0.6 User guide: BrickController User Guide Minimum system requirement: Android 4.4 and bluetooth low energy support on the phone (or tablet) Video on the older SBrickController application: -

[MOC] 8x4x2 PF Medium scale truck
TomasHubik posted a topic in LEGO Technic, Mindstorms, Model Team and Scale Modeling
Hi guys, just finished my latest build after almost year long break from lego. It,s 8x4x4 truck inspired by Mercedes Actros. I know, another truck... But I ordered thouse weels and they seems to be great for trucks in medium scale. Features: 4x2 Drive by L motor 4x2 Steering by servo motor with different angle (great turning radius) Manual 2 speed gearbox Openable doors Liftable cabin I would like to build more trucks in this scale! Any suggestions, what to build? I was thiking cherry picker or dumper for start? I will propably also create LDD model if anyone interested? PS: Sorry for photo quality... -
Hi, Lego train lovers, this is, to the best of my knowledge, the first and only Ultra Agents (UA) Lego train, fully functional using Lego PF system. My grandchildren Laura & Filip and me adore UA sets (just discontinued this year, unfortunately) although they were not easily accessible in EU but somehow we found several sets. So we started playing from train cars and after three of them the engine to power the train was needed. The idea for perfect locomotive was found in the article on The Maglev Technological Revolution on the maglev.net web pages (http://www.maglev.ne...ical-revolution) where futuristic trains are illustrated by Ferdinand D. Ladera from DigitalHadz (second in the upper illustration on web page; I tried to contact Mr. Ladera by all possible e-addresses and networks but with no answer). Of course, our train model is not levitating as maglev one, it is using typical Lego train wheels. And here it is, the whole UA train (pictures with link to HR photo): (http://www.bricksafe...pg/1920x321.jpg), and UA locomotive itself (http://www.bricksafe...g/1920x1440.jpg) and (http://www.bricksafe...g/1920x1440.jpg), with Solomon Blaze’s hologram as a driver (lightened inside). There is (futuristic, of course) front door entrance to the engine (http://www.bricksafe...g/1920x1440.jpg) and when fully opened, you can see Trey Swift in inspection on anybody trying to enter the train. (http://www.bricksafe...g/1920x1440.jpg). From the back, Steve Zeal is appointed as a security guard (http://www.bricksafe...g/1920x1440.jpg). First UA train car (from right to the left from the first photo above) is one having anesthetic gas chamber with fully asleep most dangerous villains Sharx and Terabyte, including Sharx’s dangerous remote controlled shark (http://www.bricksafe...g/1920x1440.jpg). Second UA car is for prisoners (Toxikita, Invizable, Electrolyzer, and Antimatter) in chains and carefully observed by Mrs. Hydron and Max Burnes, (http://www.bricksafe...g/1920x1440.jpg) while Jack Fury is inside his shuttle (http://www.bricksafe...g/1920x1440.jpg). And the third UA car has secret chamber UAM/003 (http://www.bricksafe...g/1920x1440.jpg) with Caila Phoenix on armory when fully opened (can rotate and shoot to any direction) (http://www.bricksafe...g/1920x1440.jpg), and with Jack Fury’s twin brother in hyper vehicle and real Solomon Blaze in his headquarter with communication equipment to contact other UA officers (http://www.bricksafe...g/1920x1440.jpg). Short YT video is attached, as well ( ). Hope you like the train as much as we do. The next that we are just preparing to do is UA Train Station, of course. We will not be discontinued that easy. , &
-
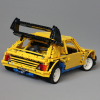
[MOC] Mark 1 VW Golf GTI
marceriusLV posted a topic in LEGO Technic, Mindstorms, Model Team and Scale Modeling
Hi! Wanted to share my latest RC car. So here it goes: Built for fun and for use in Latlug events. I used Nico71 Honda Civic chassis as a base, small modifications here and there (different placement of shock absorbers, reinforced servo motor with more brackets). The goal was to make something similar to Mark 1 VW Golf GTI Hope you like it :) More pictures here -
I've successfully completed my first 7-wide locomotive! Power is provided by two PF train motors, which are attached to the frame via Technic plates. The first version of this design was used at my LUG's display this year, but I changed up the internals quite dramatically based on performance issues; namely, it was very slow and couldn't keep up with standard 9v trains, and kept jumping off the track at the curves. The overall looks were improved drastically as well, in my opinion. I'm quite pleased with how this turned out, and I hope to build more locomotives in this style in the future!
-
Hello everyone! Here's my version of a suspended monorail train, hope you'll enjoy it I'm introducing it here because this forum has been quite helpful to me while building this, especially for the doors design. To see more of it please head to this page: http://www.moc-pages.com/moc.php/423851 You can see hi-res pictures and a short video here: https://www.flickr.com/photos/23071566@N02/sets/72157663217856521 Cheers!
-
[ MOC gallery] I am proud to present my take on the small train that was the first modern streamliner. Built in 1934, numbered 9900 and originally simply called the Zephyr (the last name in passenger comfort). After its success it was quickly joined by many more Zephyr's and was soon renamed the Pioneer Zephyr. There are many great articles on this historic train, e.g., here (note the PDF schematics that were incredibly helpful); here; and here. The Zephyr was the first lightweight train set, the first (or one of the first?) diesel electric powered trains, and the first stainless steel train. It was small and light, consisting of a motorcar that was a combination engine and RPO, then a combined express/coach, and a coach observation car. The entire train was articulated, with shared trucks between each pair of cars. I sought to reproduce the as delivered version of the train set. Several substantial changes were made over the first few years of the train's long life, including the addition of a 4th car (or 3rd car if you consider the motorcar a locomotive) and a large Mars light on the front and rear of the train. As such, my model might differ in appearance from many photos of the train after the changes were made. The train has been restored and is on display at the Museum of Science and Industry in Chicago, IL, USA. Another three of these train sets were built for the Burlington route, and the nearly identical Flying Yankee for the B&M. But enough history for now, first a quick image of the train itself, Look at all of those round curves... The nose was a challenge- how to get the rounded and sloped front. The above photo shows my solution. I would have liked to have gotten a little more slope, maybe one plate where I'm currently using half plate steps, but that would have only worked if there were curved sloped bricks of just the right shape/size. I was pleased with how well I was able to capture the distinctive air vents above the cab (including the small gap between the two vents, with room for the headlight), and also how I was able to get the right topographical shape from the rectangular slope bricks for the transition from the front to the top curves. At the end of the engine compartment is an abrupt narrowing and slow drop in height (again at half plate tall steps) to the roof of the cars. The photo also shows the IR receiver not so eloquently hidden. Some of the other shots show a "cap" built over the receiver. That was for the show this past weekend (which I'll post more about after uploading photos), and at this show, 10 ft away from where my trains were running, there were four stations for kids to run lego city train sets, with IR controllers and all. The cap blocked most of the IR, but you could still operate the train from 2 ft away. With that success, I rebuilt it again this morning and put the IR receiver completely under the 1x3 curved slopes so that it is now completely hidden. Again, it will hear the IR receiver from 2 ft away. I'll post photos of that update soon, but that will send the entire folder back for Brick Shelf moderation and I don't want to do that right now. Below the car you can see the skirting on the powered truck and along the body. This feature of the prototype also made it easy to hide a black PF train motor while blending it in with the model (similarly on the trucks, using standard PF train wheels in black, but more on that in a moment). Also of note are the doors with a half plate recess, the brick built mail catch, and custom decals using fonts from RailFonts.com The above shot shows a side view of the motorcar. The stark light does not do the step down in the roof justice. It looks much better with overhead lighting (as seen in some of the other shots). The above thumbnails show how I did the connections between cars. As noted above, the skirting on the wheels covers plain black PF train wheel sets. I got the idea for the 4x4 curves for the diaphragms from Swoofty's SP cars. The configuration in the photos is designed to run on R88 or better curves. The lenght of the cars lead to too extreme swings on R44 curves and the outer corners will knock together. However, with a quick rebuild of the trucks to add one stud separation, she will run fine on R44 tracks. Here is the middle car. The doors were another challenge to get the half plate offset with the profile bricks, and then quick turn from studs up to studs sideways. All sorts of fast brickwork in the intervening 6 stud width of the train. Needless to say, my brain is still hurting a bit from all of the hoops to get the offsets working. Although none of the photos show it, the coach windows offer a clear view across the train. Here's a shot of the observation car. More half plate offset doors, skirting, etc. The rounded observation end was another challenge... ... I started with my basic design from the North Coast Limited. I made a few quick improvements- the NCL had 1 brick tall windows on the sides and so I had to make the observation windows either 2.5 plates tall or 5 plates tall. The Pioneer Zephyr has 5 plate tall windows to help emphasize the small size of the prototype, which then made the transition to the snotted windows on the curved section a lot easier. But I also faced a challenge. The NCL uses a curved winshield to transition from the 1x3 curved bricks of the roof to the curves of the rear of the train. I did not have enough height to fit that same piece on the Zephyr. So I wound up using a wedge plate design to again capture the topographical form of the curved section. It works from a distance at least. Here's a shot of the train from the inside of a R108 curve... ... and a shot at speed at the show this past weekend. Note the bulb over the IR receiver (which as noted above, has since been smoothed over and the IR receiver can no longer be seen from the outside (I'll post those photos in a week or two). If that isn't enough, you can find more photos here in the full gallery. Comments, questions, suggestions, etc. are welcome...
-
Tonight I've modified my Horizon Express, to fit two rechargable battery boxes, two IR receivers, and two motors into one cab. It's rather heavy now... I do still need to put a #8869 Polarity Switch in there though, to get the motors running in the same direction. (I don't have one yet). It'll be a tight fit, but I'm pretty confident it'll go in. I had to pretty much gut the interior of the train in order to fit everything in. Although the outside looks superficially similar, it's actually quite different in places. Can you spot the changes?
-

Using two PF (Rechargeable) Battery Boxes with one IR Receiver?
Paperballpark posted a topic in LEGO Train Tech
Hi all, I'm wondering if anyone knows whether this is possible? I need to power a long train, which will need two train motors to pull it. The only problem with this is that it'll probably drain the battery box in about half the normal time, so I'm wondering if it's possible to connect both motors to an IR Receiver, then connect that to one battery box, and connect that battery box to a second one (using an extension cable mounted between the first battery box and the cable from the IR Receiver)? I assume it would work, as it would then be drawing power from both battery boxes, but I'm not an electrical engineer, so can't be certain. Thanks! -
Boxcab Shunter Hi guys, I've just finished a new Power Functions boxcab locomotive. I hope you guys like it. It was my first ever Power Functions MOC and I think it came out quite well. Here are the specs length: 16 bricks (with couplings) hight: 11 plates colour: yellow motor: PF train motor battery box: AAA weight: 314,1 gram But without further ado, Here are some pictures of it! Front view side view Motor How I hid the battery box And how I hid the reciever the only problem is that it doesn't have any wagons... And I have zero idea about what to build for it. I thought about some giant boat trailer or a flatbed but I scrapped those ideas. Bye
-

[MOC/WIP] Small-scale RC car
FvdB posted a topic in LEGO Technic, Mindstorms, Model Team and Scale Modeling
Hi all, This is my first post here, I'm not sure if the way I shared my pics works well. I've built a small-scale RC car, based on the 43.2x22ZR tires. My goal was to create a car at that scale, and still have full RC and suspension. The minimum width is determined by the differential and the steering pieces I used. I wanted the back wheels to connect to the rear axle through that double bush, so pulling at the wheels wouldn't mess up the gears in the differential. I have small kids, so the car needs to be sturdy. The result is the work attached. More pics can be found in this album: http://imgur.com/a/dw8jx. The springs I used are a little too soft. Since the car is not finished, this is not yet a big problem for the live axle, but the front already doesn't bounce up all the way because of the weight and position of the servo. I think I'm going to have to replace the grey springs with yellow ones. The steering wheel turns with the servo, but because I used the Arocs-mechanism for steering (no rack), the servo only has to turn a little bit. And this little bit is almost completely lost in the play of the two universal joints. I'm usually quite bad at building bodywork. I think this car should be a mustang-type, because of the current shape of the front, and because I based the rear axle on a Mustang. I've left plenty of opportunities to connect the bodywork, and I plan on making it easily removable. I've yet to think about which of my battery boxes I will use, so that will have some impact on the bodywork as well. Any remarks are appreciated. Filip -
 As some of you may know LEGO is running a Technic Building Competition with Mercedes-Benz. I was looking forward to participate and it took me a while to understand what future truck would look like. Initial idea of building truck driven by both front and back axles was quite simple to implement. Two L-motors have been used for that. Steering is performed by Servo motor and truck is controlled remotely. Fun fact - chassis without aerodynamic cover is somewhat reversible and can be used up side down. Final model is very sturdy thanks to slick and strong body. Unfortunately, due to selected width rear axle is somewhat less reliable and has gear grinding upon start but drives normally afterwards. This is something wasn't possible to completely solve having double wheels per each side. [/url] Below you can check my vision of a truck in year 2045: Few more pictures can be found on my Flickr Stats: 2 L-motors for propulsion Servo motor for steering Small non-rechargeable battery box 44 studs long 17 studs wide 24 studs tall weights 1098g. no suspension
 -
Hi guys, I have been trying to make some trains (generally diesel) and a problem that I have always found is powering. for a steam locomotive this is usually pretty simple because of the lack of articulation but wel, bogies are articulated and motors are mounted in the build itself. my question was, how does gearing react to this? and what is the handiest for compact solutions? vertical or horizontal? with vertical you get this: lego 6L train bogie by alterlegotechnic, on Flickr how could something like this be used in a locomotive? would the motor stick loosely in the chassis and what about a vertical motor like this (http://www.brickshel...16/cam06194.jpg) will there happen something in corners? like that the would go faster or some? and with Horizontal you get this Iowa Pacific SLRG 515/518 Mechanics by wildchicken_13, on Flickr how can gearing do this? i mean the rotating bogie, what happens to the gears in it? obviously could 2 M motors be needed for a small train (around 4 cars) or will it fail? I heard something about a V2 receiver? I have a V1 (I think) and that a normal one won't be able to give enough power to both? What is better? XL or M? when will a XL be needed? so in one sentence: vertical or horizontal? what happens to gearing and what is easier when using normal motors?
-
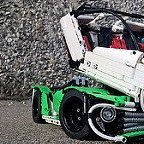
 Hi all! I finished this build yesterday, and am quite happy with the resulting model, so I took it out for some pictures today. Unfortunately the batteries in the model died out before I had a chance to film it, so I'll have to do that tomorrow (feel like I need to prove that all the functions actually do work on this one ) So here it is, the Tow Truck Mk II, a combination of a European truck with a typically American "rotator crane"(??) on the back (a Eurotator?) First some information regarding this MOC (of course, you don't have to read it ) As many of you might know, I built a pneumatic tow truck/recovery truck roughly two years ago, and a lot of you even seemed to like that model! When I finished that model, I wanted to make an RC PF version with the same functions and body, and I also wanted to make one powered by just one motor, with function switching gearboxes as the ones you see in most of the official non-RC PF sets released by TLG. Well, it only took about to years to get around to actually doing it! Due to the fundamentally different techniques building with pneumatics vs mechanical functions, some compromises had to be made, and some features could even be added! Firstly, this model has no suspension. The back of the model is pretty densely packed with axles and gears and functions, so fitting live axle suspension while maintaining a somewhat acceptable overall rigidity in the model was deemed impossible (for me) very early on. Also, du to the various functions going to the front, suspension there was not worth it either. Secondly, the swing-out outriggers of the original model from 2013 needed to be unnecessarily complicated, bulky, and not very strong, so I opted for an alternative solution. However, I did manage to make the fourth axle steered, something the 2013 model did not feature As you can see, it uses the genreal colour scheme and a lot of the stickered pieces from 8109. The model was initially all yellow, like the last one, but I wanted to spice things up a little, and am very happy with the resulting colours Okay, enough babbling, here are a couple of more pictures: In the above picture, everything is deployed/opened. The motorized functions are: 1. Tiltable cabin (small LA) 2. Front stabilizers/outriggers (small LAs) 3. Front winch 4. Middle outriggers (worm drives, self locking geometry) 5. Rear stabilizers/outriggers (small LAs) 6. Wheel lift elevation (small LAs) 7. Wheel lift extending (large LA) 8. Wheel lift tilting (small LA) 9. Crane rotation (worm drive) 10. Crane lifting (large LA) 11. Crane boom extending (worm drive/z8 gear/gear racks) 12. Crane winch Other features are: -Openable doors -Working V8 engine -Openable side- and rear panels (to access battery box, as well as some chains and attachments for the towing fork) -Proportional steering with Ackermann geometry on axles 1, 2 and 3. The crane superstructure has two gearboxes for the three functions up there. That means there is a constantly running single axle going through the turntable, and the cranes functions are selected up top. This allows for infinite rotation, with none of the cranes' functions being affected. Yeah, I know that bull barmight be ever so slightly overkill, but IMO it's not too bad It can even lift things directly in front of it Lastly, the underside shot: Also, for those who haven't seen them yet, here are a couple of quick renders showing the internals of the model: And with colour coding for the various functions All pictures and renders can be found in higher resolution in the appropriate Bricksafe folder. Overall I'm quite happy with the resulting model, but even though all functions work, at least one of them is not ideal (cabin tilt; I'm looking at you). Also, I feel the crane superstructure could be made more elegant. Anyway, hope to be able to make the video tomorrow! Comments, thoughts and criticism is as always appreciated!
 -

LDraw PF medium motor - crashes LDView?
djm posted a topic in Digital LEGO: Tools, Techniques, and Projects
I'm in the process of creating the build instructions for Akiyuki's Cup-to-Cup GBC module (refer to this forum post). I appear to have encountered an issue with the LDraw PF Medium motor, which is causing LDView to crash. I'm wondering whether someone would be willing to take a couple of minutes to run the following simple test to see whether they see the same behaviour and post their outcome of the test. Obviously the real build instructions are more complex than just a medium motor! I have simply distilled the build instructions down to the point to identify the part that appears to be causing the issue. My machine is running Vista (Business), SP2 Build 6002. 1) Use MLCAD to create an ldr file that contains only a PK medium motor (part # 58120). 2) Open the ldr file from step 1 in LDView. A screenshot of mine is show below: 3) Exit from LDView. It is at this point that I am seeing LDView crash: Any feedback will be appreciated. Regards, David -
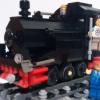
Hey guys! I don't do very many MOCs but I do like to do them when I have the time. This time around I wanted to do something that I have not done before, 1. being I have never done a steam engine and 2. a train that does not use a conventional train motor bogie, I would have to build by own and it couldn't be exposed. Keeping that in mind I dove in and started building, this is not based on any train in particular which gave me some freedom on what I could put in. I also wanted to keep some of the classic LEGO train style in my model along with some newer styles. So the only thing to say is Enjoy and constructive criticism is encouraged! MOC 0-6-0 Steam Engine. by Rail Co, on Flickr The main classic element is the 45 degree slopes for the boiler, honestly I love the shape and I am glad I implemented it. MOC 0-6-0 Steam Engine by Rail Co, on Flickr IMG_20150625_183803639 by Rail Co, on Flickr IMG_20150625_184207431 by Rail Co, on Flickr The whistle is made up of gold and silver 1x1 stud pieces The boiler uses A black minifigure head and a round 1x1 piece used for dumbbells in the Collectable minifigure series. I was able to find a chrome piece which looked good on the engine and I really like that. IMG_20150625_183926425 by Rail Co, on Flickr The Medium motor is hidden inside the boiler and behind the 2 side tanks on the engine making completely hidden from view on the outside I hope you like the train if you would like to see another view just ask. Enjoy! -RailCo
-
Hey everyone! Been fiddling around in LDD for a few days now, and finally have something decent enough to post. I am working on this project with the intention of proposing it on Lego Ideas, however I would much rather know what you all think first!! This project started as an attempt to place PF components into a model of a Midland 4F. The end result imho looks... boxy and generic to say the least, but that may end up being a good thing...? The dimensions in studs are: 34 long by 10 1/3 tall by about 7 wide, not including the side rods. Front: Midland 4F(v3) by Nick Jackson, on Flickr Back: Midland 4F(v3)2 by Nick Jackson, on Flickr The colored cables are: red= receiver, green= motor, yellow= lights. Below is a close-up of the frame setup. I REALLY like how this turned out, because: 1) it has space to mount an L motor! 2) I can change gear ratios from 5/3 (speed) to 3/5 (torque) manually! Midland 4F(v3)3 by Nick Jackson, on Flickr Please give me some feedback, all are appreciated!
-
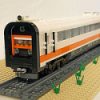
Dear all EB users, From MTRkustoms Railworks we have the honor of presenting the RENFE 446 Cercanias Electric units, This train has an import significant for me as is the train where i pass a lot of time in my life in my daily travel to work. 446 series was a specially designed train to provide a proximity service in the early 80s and the previous series, the 440s were insufficient for the huge amount of passengers in the big cities of Spain. This units have 2400kW of power and a maximum speed of 100km/h. both side driving units and 3 pairs of doors in each car MODEL SPECS Lenght: 180 studs / 144cm Wide: 7 wide Height: 11 bricks (13 bricks with raised phantograph) Weight: 2200g Others: Turns in R40 but looks awful, much better in R104 or smooth curves. Comparison with real model More pictures Chassis and 9v-PF connection (this model have a 9v motor connected to a PF motor in order to take current from 9v rails and increase the power and traction with no more expensive 9v motors) This train in 90s was frequently vandalized, so this is my personal tribute with a full graffiti side More pics and full resolution pics in Flickr Album Enjoy it