Search the Community
Showing results for tags 'PF'.
Found 253 results
-
Hello I'm combined trial truck and crane and I'm make Off road crane. Truck have 2Xl motors for drive each for one axle. Crane is pneumatic and work with hand pump.
-

ERF E12 Skip Loader
Makorol posted a topic in LEGO Technic, Mindstorms, Model Team and Scale Modeling
Hi guys! Today I want to show you my newest model - ERF E12 skip loader. erf-4 by Makorol, on Flickr I think that all information is in the video, so here it is: If you have any questions, ask :) -
 Well, I have been assembling my 41999 copy, which some of us kept it to certain date and didn't assemble once received. When I got to the point I had to use PF Battery Box I found its LED didn't switch on with a battery switch. It turns out BB is dead, as I have tested it with two sets of batteries which perform fine in a different BB. Ok, I wasn't disappointed here as I knew LEGO Customer Service is great and will definatelly replace it. So I used my other BB to finish building the model. Later I went to LEGO CS webpage and submitted required information, that was 23 days ago actually. I received confirmation email shortly, no updates after that. Today I made a call to CS on a different question, but also asked what is the status on broken piece. The guy on the call told me I should bring it back to shop where I bought the set to get it changed/swapped or receive a refund. I told him it isn't quite possible due to limited nature of the set I have (not to mention it should be transported to a different country) - "This is the only way, this part can be changed", he told. Well this is not what I expected. Please note, I'm from Lithuania (that's in EU) where we don't have official LEGO presence, just LEGO brand stores not owned by TLG. The best what I was hoping for TLG would sent me another BB to Lithuania. The worst - TLG would send it to any address in a county where their e-shop is shipping (that would still suit me). But advise I was given is quite shocking. Standard BB isn't expensive but still costs 7,99 € in TLG e-shop and a bit less on BL. I can live with this, as there are plenty of BB provided in different sets so I might end up having too much of them. But overal eperience isn't very good at this moment. Now I wonder what is the cause of such requirement and if there are known pieces/parts that cannot be changed alone, only with a complete set? Did anyone had similar experience?
 -
[MOC] 1:10 Lancia 037 Rally Car
Hrafn posted a topic in LEGO Technic, Mindstorms, Model Team and Scale Modeling
This is my first ever completed Technic MOC, originally inspired by Piterx' Lancia Fulvia but much simpler. It's not quite done, but I anticipate being able to spend very little time on Lego in the next year or two, so it's as finished as it's probably going to get. There is no gearbox or interior, and there are a number of things I'd change if I had the time - but overall I'm pretty pleased with it. The 037 was the last rear wheel drive rally car to win the WRC, in 1983. It raced in the infamous Group B category, which had few restrictions on vehicle design and engine power; as a result, the overpowered cars were in a number of fatal accidents, and ultimately Group B was abolished. While it lasted, though, Group B saw some spectacular driving and some extremely fast and loud cars. The Martini Racing stripes are done with washi tape (fancy Japanese colored masking tape), which works OK except where the tape crosses pin holes. It actually looks better in person than in photos. As in the original vehicle, the hood and rear lift up, and the doors open and more or less lock in place: Also like the original, the model is mid-engined. I used 1 RC motor geared 12:20 from the fast output. Until I put the bodywork on, the car could do handbrake turns and drift on wood floors, but now that the vehicle weighs 1030g, it can't drift and can only rarely do handbrake turns. I'm especially happy with the front axle, which includes a decent wheel lock, caster, unequal length wishbones, near-Ackerman steering, and a scrub radius of nearly zero. My thanks to all of those here who offered advice on suspension - I learned an enormous amount from you all. Steering is by servo, which offers return to center, reasonable speed, and high torque. I use a basic remote because the train remote is too slow for me to keep the car from crashing; the downside to that is that proportional steering is impossible. Wheel lock, steering, and scrub radius: Caster: The hub is held together by the 4L axle with stop (and the half bush on it), which turns out to be a more robust solution than I'd expected: The rear suspension is a modification of Thirdwigg's floating differential. It works well, with one caveat. Every once in a while, the 3L axle driving the 20t gear slips towards the differential a bit, and once when this happened a 3L u-joint got destroyed by torsion. The rear suspension is hard and has limited travel, and the suspension arms are tilted up even at rest; I would fix that if I had time. And of course the obligatory under-chassis shot: -

Pneumatic flow control mechanism
OzShan posted a topic in LEGO Technic, Mindstorms, Model Team and Scale Modeling
Hi all, Below is my first build of a flow control device to operate a bank of single acting cylinders. It's built on top of Sariel's dual output worm drive gearbox. In this application when the motor runs forward, air is delivered through the near set of valves and black loop to the cylinders on the right. Running in reverse drives the other pair of valves to drain air through the grey loop. Each pair of valves are offset 180deg so they can never be open at the same time. This way it doesn't matter when you start, stop or change direction nothing can get stuck open. The shaft turns counter clockwise and the valves are on a spring return. I've seen mechanisms that drive double acting cylinders but not single acting. Any suggestions for other examples I might be able to learn from? (Ideally it would be a lot smaller but this was as compact as I could make it). Many thanks, OzShan. -

Question about the PF Pole Reverser
fasterthanlight posted a topic in LEGO Technic, Mindstorms, Model Team and Scale Modeling
Hey there, I've got a question about the pole reverser, as I do not own any myself and haven't been able to find this info anywhere online... 1. I assume there is an "off" position (Center?) Yes? No? 2. Does it require 45º of rotation to operate the switch using an axle through the middle? -

Russian Technic contest "Trophy 4x4"
rm8 posted a topic in LEGO Technic, Mindstorms, Model Team and Scale Modeling
Hi, I organized contest "Trophy 4x4" at our russian language Technic community (vk.com/technic_club). It is at final voting stage. Dont wanna translate all the rules, but main rules are below: Contestants shoul build technic offroader. No cosmic design. Common rules: - AWD - body whidth - 15-17 studs - axle width between rims - 14-16 studs - Wheels can be from 62 to 83. two main discpilines: 1) Standart. You should build your car using reference chassis 4x4, instructiuon is available. Changes of this chassis should be minimal. But you can adjust wheelbase and middle part. Pf is not mandatory, but you should leave free place for it. Mainly design contest. 2) PRO You can build any chassis you want 4x4 or 6x6. PF and demo video is mandatory. For advanced builders who dont want to be limited by simple refence chassis. Author name should be a secret till the end of contest. Authors age is frrm 12 to 30. So dont be too critical:) Here I will post some photos of finalists and info about models. Links to full gallery will be below. You will not find any unique and new ideas below, cause main idea of contest was to create offroaders in similar scale and with real-look design (no copy). STANDART №1 - Trophy Truck 1 XL + 1 М Manual winch, fake engine https://plus.google....66583677/photos №2 - Pickup IP SUV 1 L motor + M motor Roof behind the cab is detachable https://plus.google....723461192701041 №3 - Expedition-Van 2х L motors, M-motor, L motor for winches front and rear motorized winches with gearbox in the middle. Fake V6. Openable doors. LED front and rear lamps https://plus.google....725666702750977 №4 - 1938 Raven HotRod ХЛ + М - motors working fake engine detailed saloon and opneable doors https://plus.google....721786115365745 №6 - Road car for active life L + М motors openable doors and trunk https://plus.google....721881213180289 №11 - Carston Hawk 2х L + servo Opnable hood, doors and trunk https://plus.google....723966591953649 -

[MOC] RC Flatbed Crane Truck
EvilEnderman posted a topic in LEGO Technic, Mindstorms, Model Team and Scale Modeling
Greetings to you! This is my first post, and would like some feedback on my new MOC. Built over the span of 3 weekends, I'd say I'm rather craned out. Nonetheless, 'tis a crane truck with flatbed, although the crane is mounted on the rear, unlike most models. It's not based on anything in particular, but let me know if it looks similar to a real vehicle x) Tried to make the front as detailed as possible, using studded elements, and I thought that looked extremely nice. Apologies for the atrocious photography skills, but I tried my best. If you want the pictures smaller and easier to see, go to the imgur link (http://imgur.com/a/cIeGk) They don't seem to want to come out at the correct size on Eurobricks. Rant over, I present to you: http://i.imgur.com/AjgAClX.jpg Observe the minifigure precariously dangling from that crane. x) http://i.imgur.com/MQSwSl3.jpg The rear section comes complete with a rotating crane, (Through 270 degrees) Functioning outriggers (They actually lift the truck) and features a pneumatic boom, with an adjustable crane hook. Aesthetics are quite crude here, but I feel it makes it look realistic. http://i.imgur.com/aDV3NP1.jpg It is evident I'm quite short on those 5x11 plates (I bought 8081) so had to improvise. You can see another view of the crane, too. http://i.imgur.com/Y1ip3qV.jpg Chassis. Nothing special here, but it all works. It is fully RC and controlled by 1 XL motor for drive, (at a 1:1 gear ratio) and 1 M motor for steering. If you want pics of anything else, just ask me and I'll happily provide (I won't edit them, though) Any feedback appreciated! Thanks! - Evil Enderman -

[MOC] CAT D7R LGP Bulldozer (with PF)
Dennis Bosman posted a topic in LEGO Technic, Mindstorms, Model Team and Scale Modeling
This is not one of my most recent builds but I never published a video of it. Now I took some more indoor shots as well. I started to build this dozer back in 2006 to be laden onto a Renault Magnum. First the model was driven by a RC unit, from set 8366. It ran OK but I didn't like the receiver and it took to much space in the model. Later I made my own control unit but that one was wired to make it possible to get the dozer blade operated by pneumatics. Later I decided to build in some PF stuff. My mate Barman helped me out with designing a compressor which is combined with the switch. I needed two of those and they just fit in the frame. I built in some PF receivers and gave the 9V RC motors another position in the frame. They're now put vertically. The looks are still the same as I was satisfied with it's appearance. Please check the videos: https://www.flickr.com/photos/51102529@N07/13354349433/in/photostream/ https://www.flickr.com/photos/51102529@N07/13354279655/in/photostream/ And the other pics I put in my Flickr stream: https://www.flickr.com/photos/51102529@N07/sets/72157642793053164/with/13354279655/ -
Better ways to lock RC transmitter?
JGW3000 posted a topic in LEGO Technic, Mindstorms, Model Team and Scale Modeling
I am looking for suggestions on a better way to lock one of the levers in the RC remote control. This older thread http://www.eurobrick...remote +control had one method, as shown in the first image, but is a bit bulky. I would like to be able to lock the lever position in a two-remote set-up, with one of the center remotes being the lockable one (second image, lime-colored lever). The function will be for lights on/off on a 4x4 with independant front and rear steering. Any thoughts would be appreciated. (Chewing gum and other non-Lego solutions are not preferred). -
Hi all, Currently im building a Lego City layout with PF trains. What i want is build a ramp for my trains, to get the trains to another level on the layout, which is around 13 bricks higher. There are some guides on ramps, but i don't have enough space for those layout, since then it will be longer then my actual table. When i did some test runs, i've noticed that my trains don't make it. The issue is not that they are not powerful enough, but they lose traction on the smooth plastic PF track, spin out and when stopped they roll down again. So what im interested in, is if someone has any ideas on how to add traction to the track (preferable without damaging the track). What is i thought of was: 1. use old 12v track, since its not smooth, but has compatibility issues. 2. Apply rubber to the track, but not sure how. 3. use sandpaper to make the track rougher, but damaging the track. Not sure if it will work Does anyone has any good ideas on this topic?
-
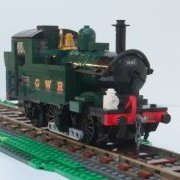
Hey folks! Well, some years ago I designed a model of an LMS (London Midland and Scottish Railway) Ivatt Class 2MT 2-6-2T engine designed in LDD. So one week ago I changed the livery to the one that was really used and reduced bricks (it just has about 580 for that detailed model). Furthermore I tried to incorporate Power Functions. There is enough room for them, the PF Small motor will definitely fit, but I'll try it with the PF Large motor first. Here is the design from LDD: Here is a pic where you see the PF components: I have built some of the model in real bricks, I just don't have all the parts yet( at least in the right color), though I nearly finished one side: The trailing wheels all clear nicely in curves. I also designed a model of the BR 9F 'Evening Star' which could be operated with Power Functions or 9v in the tender, maybe I will try my hands on that one sometime: I hope you enjoyed it, I will update the thread when it's more finished.
-

[HELP] RC Car with Two Motors
Commander Smith posted a topic in LEGO Technic, Mindstorms, Model Team and Scale Modeling
Hi! I know that these "I don't know what to build" topics are kind of annoying, but I have no idea how to build an r/c car with functional steering. I want to have it be 2wd. Thanks! -
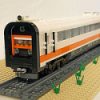
I am pleasant to present my EMT "Charleroi" Madrid Railcar This railcar was a typical railcar in the streets of madrid in the 40s This is the original: Datasheet: Lenght: 26 studs Wide: 7 studs Height: 9 bricks Pieces: 460 aprox, a bit more than expected in LDD File due to technical problems (i need more rigidity than i expected) Weight: 370g without battery PF powered with custom Li-Ion battery Detachable roof, for easy acces to battery Some pictures of the MOC: Detail of one rigidizer and the stairs: Detail of the boguie Detachable roof For more and bigger pics click here Pictures: Panasonic LX5
-

IR Scania dump truck 8x4
TomasHubik posted a topic in LEGO Technic, Mindstorms, Model Team and Scale Modeling
Hi guys, i created another "small" MOC. I choosed a scania 8x4 dump truck. I tried to make small, good looking and working dump truck Features: Drive 8x4 by 1 L motor Steering by first two axles, each in different angle using 1 Servo motor Dumping the truck by 1 M motor Last axle has suspensions Openable cabin Photos: (sorry for bad qualtiy) http://tomashubik.cz/temp/lego_scania/001.jpg http://tomashubik.cz/temp/lego_scania/002.jpg http://tomashubik.cz/temp/lego_scania/003.jpg http://tomashubik.cz/temp/lego_scania/004.jpg Video: (Also could be better quality) PS: Sorry for missing right mirror. I tore it in previous driving test. So, what do you think guys? -

PF UTV = Side by Side ATV
AndyCW posted a topic in LEGO Technic, Mindstorms, Model Team and Scale Modeling
Here is my most recent creation. Work, school, moving, and family time have limited my building time. https://imagizer.ima...90/546/ys4y.jpg Questions,Comments, Concerns? I'm having a devil of time embedding pictures, links, or videos in my posts. What's up with that? v/r Andy -

Lego TECHNIC Trial Truck
NXT45 posted a topic in LEGO Technic, Mindstorms, Model Team and Scale Modeling
Hi guys! I am new here so I wanted to show you my trial truck! http://nxt45.files.wordpress.com/2013/11/img_0705.jpg Full description & YouTube video on my blog: http://nxt45.wordpre...go-trial-truck/ (how do you post YouTube videos?) As always Happy building! NXT45 -
The very first Train MOC I did was a very small 0-4-0 Pannier Tank engine with Power Functions. It's ok, but fitting PF into it kinda threw the proportions off a bit, so I wanted to do a proper one which looked a bit more realistic in shape. So I set to work on one which was, and built it from the various different colour pieces I had, before placing an order for the parts in needed in specific colours. However, I couldn't decide on which colour scheme to have it in, whether to have the top half of it in Black or Dark Red. Eventually, I decided to do two of them, one in each colour. After placing nine Bricklink orders and an order with Big Ben Bricks in America for his Medium Driver wheels, I received all the orders this week, and built them both over the past couple of evenings. The Dark Red one has PF integrated into it, while the Black one can fit PF but doesn't yet have it, instead having brick-built 'placeholders' for the PF gubbins. I'm also waiting on a custom order from America for 13-long connecting rods, which should finish them off nicely. If anyone on here is in the UK, they will be on display (along with my other train MOCs) at the Bradford Brick Show on 8th/9th Feb, and at the Yorkshire Brick Show on 22nd/23rd Feb. So without further ado, to the pictures. Can you spot the differences?
-
Simple Rock Crawler for extreme terrain (PF RC)
Tamas Juhasz posted a topic in LEGO Technic, Mindstorms, Model Team and Scale Modeling
Hello! I present my latest crawler: http://www.brickshel...ry.cgi?f=538333 I wanted to make something totally new crawler construction. During the last months, some variation was made (little upgrades), this wast he first: My goal was to made a very simple and reliable crawler, which is able to take apart in competitions. It was succesful in Malug crawler races. Crawlers are relatively free-made, so the bodywork isn't made after a picture from reality. One important thing: you may noticed, it has a relatively large wheel base. To have the good wheelbase/ground clearance ratio, I also increased ground clearance. All depends on the terrain, it can be as good as short wheelbase. With a long one, it's more stable against falling backwards. It has "no" suspension, the chassis is strong enough but felxible to give articulation for the axles: (this makes it simplier) The next varation (V2) was made with longitudinal strenghtening to prevent the decreasing of ground clearance in the middle: The non Lego tyres: RC4WD 1,9" rock crusher XT. The chassis shows the innovation: It's driven with two XL motors (in the axles), on M motor steers. The additional M motor and ship weight in the front axle is only for weight, they have no functions. More weight on the front axle helps a lot in terrain. The bodywork in not too strong, but who cares with that in a crawler. Lightweight construction was important. In the video below, you can see some high-speed recording about a falling of a piece from the body. More pictures: In competition: http://www.brickshel...ler-No2/019.jpg http://www.brickshel...ler-No2/020.jpg http://www.brickshel...ler-No2/021.jpg Video: This is totally different than my previous videos. Was made with 30 fps (instead of 10) and 1080p HD resolution. I don't say, I will make every video in this way (requires a lot HDD space, sometimes unnecessary), but the more important or bigger mocs will be recorded similar. So the video: Hope you like it. -

[MOC] PF Buggy and Rock Crawler
Madoca 1977 posted a topic in LEGO Technic, Mindstorms, Model Team and Scale Modeling
Hello, I present my latest creations. Both are simple and have no special features. I intended to make good performance using basic PF elements. Building instructions and more pictures: https://plus.google....64977943/albums Hope you like them! -

88003 PF L and 88004 Servo finally sold at LEGO.com!
le60head posted a topic in LEGO Technic, Mindstorms, Model Team and Scale Modeling
Great news! The 88003 PF L-motor and the 88004 PF Servo motor are finally being sold separately at shop.lego.com! Thank you TLG! -
[TRIPLE] 7Ch IR Logging truck
Tech-nick posted a topic in LEGO Technic, Mindstorms, Model Team and Scale Modeling
Ok, here is my entry, got it finished this morning after all night build. My triple consist of truck, removable log crane and trailer. The truck and the crane work with remote PF. (except outriggers on crane are handled manually) The truck: The truck features forward/reverse (L-motor) and return to center steering by PF servo. In the truck are also located the cranes turntable and main boom motors (M&L). It uses maximum 500 parts, it was quite a challenge to do such large model with relativelly small part count. I used LDD trough all the build, so it shouldn't exceed the max part count. I learned a LOT on optimizing and utilizing special technic parts. I'm quite happy with appearance of it, and I like the cabin very much. All tho I had to tape few panels black cause I hadn't anough of them :( But I think you hardly notice :) The crane: The crane features main boom, second boom, and fully operational claw. They work remotely. (one channel not used) Motors are M. It has also manual outriggers. Crane also uses all 500 parts. The claw rotates using small turntable and claw closing action is fed trough it. The claw is synchronized so turning the claw won't affect much to closing action. The synchronization is done in the superstructure with system of gears and differential. In short, when the turning motor is driven, it also turns the the claw gears trough the stationary differential in opposite direction so the claw is almost unaffected (It was not possible to exactly match the gear ratios with small turntable). When claw motor is driven, is the differential turning and closing/opening the claw. Claw turning is not affected at all. I'm quite pleased with this brainchild. It could be used with any other application when turntable is causing undesired action. Below is the crane with out battery case, so the system is visible: (It's a poor picture, I don't know can you make any sense of it) The trailer: Nothing special there, other than it uses only 453 parts :) oh, and I'm also short of double angular beams in same color. All my Black and dark grey ones are in this triple. Finally, all working together: Short video clip: I think I will just copy this to entry topic. (Did it) Feel free to comment. -
In preparation for Halloween, I've added Power Functions to my Ghost Train. Ghost Train - Power Functions by dr_spock_888, on Flickr Replaced the front boogie with PF train motor: Ran the wire through the firebox. Installed a battery box in the prisoner car and IR receiver in the crew cab. Optional: A magnetic coupler can be added to pull other trains. More photos on BrickShelf: http://www.brickshel...ry.cgi?f=535567 (when moderated)
-
I've spent the evening building a Pannier Tank Engine. it doesn't run, as I haven't put an IR receiver or battery box inside it yet (I'd have to take them out of my Constitution train), but there are 'dummy' ones in there which I built out of bricks so I had something to work around. It's sat on top of the PF train motor (I removed my Constitution tender from the motor temporarily) to see if it would sit on it well, which I think it does. In the second photo you can see how it's meant to sit on it, and how most of the body is basically built onto the (dummy) battery box. There should be enough space for all the wires... What do people think? Can you see any potential issues or problems? Looking at it now, I'll probably lower the roof by one plate, and I might replace the windows with something else. I'll probably do other stuff to it as well, but for an evening's work, I'm quite pleased.
-
Yesterday I received two sets of PF train motor, but I found the axle 7 is too long so that I can't attach Motorbogie, Ornament. Then I tried axle 6 but it seems like too short, what can I do?