Search the Community
Showing results for tags 'moc'.
Found 5698 results
-
In the valley near the lake, lies a small castle. Lord Enzo is watching his son happily watching the animals near the small castle, the guards also keep an eye on the boy, to make sure he doesn't fall in the water. -- Made for the small castle category for CCC XX. -- Inspired by some Italian castles. Castel del Valle by Ids de Jong, on Flickr
-
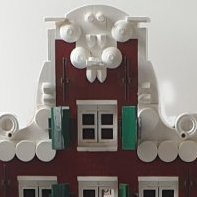
Constructed: 1633 Demolished: 1864 The Rijnsburgerpoort was a gate in the fortifications of the city of Leiden, Netherlands. It was one of the many gates that surrounded the city and served as a point of entry and exit, as well as a means of controlling access. The gate was located at the end of the current Steenstraat. Just after completing the new train station in 1842, traffic became increasingly intensive. The gate became more and more of an obstacle and finally it was demolished in 1864. Follow me: Instagram
-
The busy markets of the capital of Faldia, Rindael, are visited by many different people from Hellum and the northern islands to Felisia in the south, even as far as Sinar and Kadan in the east (see map at the bottom of the post). Because the grand market is such a busy place, it also attracts a lot of unwanted visitors. One such man is Waldor, the master thief. The Lady in white just alarmed the Royal Falcon guard of the robbery, he stole her golden ring. -- Can You help the guards to find Waldor. Apparently a multitude of Golden objects can be found, held by a person: - A golden ring. - Golden coins. - A golden trumpet. - A golden key. - A golden harp. -- If you follow my MOCs and figbarfs of the Whispering Woods, you may find a lot of familiar faces in the crowd, try to spot them all. If you're not yet familiar with my other MOCs, please take a look at the album: https://www.flickr.com/photos/the_inventor/albums/72157719446009410 The grand market square of Rindael by Ids de Jong, on Flickr On Friday, farmers and craftsman come from the country to the city of Rindael to sell their vegetables and fruit to the townsfolk and each other, it's also possible to trade livestock, such as cows. One such pair is currently in negotiation about a couple of cows. Friday market in Rindael by Ids de Jong, on Flickr For the Whispering Woods characters, see also: [MOC] Fantasy figs of the Whispering Woods - LEGO Historic Themes - Eurobricks Forums Map of the Whispering Woods: Map of the Whispering Woods by Ids de Jong, on Flickr
-
Welcome to The Little Post Office. The little post office is my newest MOC it is based on france bouwsteil, I designed the project for the Bricklink Designer Program series 1, if you like the project leave a smillie on bricklink if you want :) https://www.bricklink.com/v3/designer-program/series-1/377/The-little-post-office Please let me know what you think in the comments. I'm very curious what you all think of my project ground floor You can hand in all your parcels and letters at the post office or pick them up at the counter. The postman can weigh your parcel and then sort it into the post crates. The letters are sorted in a postal sorting rack with house numbers indicated in different colors, you can guess which buildings they are. Electric step charging station At the E-step charging point you can get a fully charged electric step to drive past all your favorite modular buildings. There is also an electrical inverter hidden under the stairs from the solar panels on the roof. In the Tech shop you can buy the latest technical gadgets including smartphones, telephone covers, computer with speakers, or an OLED TV. first floor The pharmacy is the place where you can get all your medication such as vitamins or pain relief. There is also a rack with bandages or plasters, there is also a cosmetics rack. In the office, every working day starts with a nice hot cup of coffee. The office contains an extensive interior including a. Copy machine Coffee machine Cabinet with folders Desk with two computers. second floor There are two apartments on the second floor. The left apartment has a kitchen, a dining table for two, a bed with bedside table and night lamp. In the apartment on the right lives a woman who likes to play games. In her apartment you can find a full bathroom, there is also a kitchen and a bed, but of course you should not miss the game chair and game station. The roof On the roof you can find three pairs of solar panels that can power the building. function All the balcony doors can swing open inwards. This modular building has a unique connection option. Normally you can connect a modular building as a straight street or in a corner of the street, this building has both options so that you can choose where you want it in your street.
-
Gold 5 was a BTL-A4 Y-Wing Heavy Starfighter, built by Koensayr Manufacturing, and serving as part of the Rebel Alliance. As was common with the rebellion's aging fleet of Y-Wing's, Gold 5 was stripped of it's armour plating by rebel technicians to allow for easier maintenance, and was heavily modified in order to improve performance and to keep it operational. Part of the venerable Gold Squadron, Gold 5 was piloted by Davish "Pops" Krail (according to Legends), an experienced veteran pilot. Gold 5 was destroyed during the assault on the first Death Star at the Battle of Yavin. My aim when I set out to make this MOC was to make a minifigure-scale rebel Y-Wing that was highly detailed, but more importantly, the details matched to the original studio filming model. What a high target to aim at... My decision on which member of Gold Squadron to make was largely influenced by what reference pictures I could find. In the end, I found the most pictures for the Gold 5/Gold 3 model (they were the same physical model used to film both), and so my decision was made for me. The reference pictures I used can be found here, if anyone would like to play a game of spot-the difference. In terms of details, I've done my best. Any suggestions would be appreciated though. A fair few sections in the pictures were pretty hard to make out, and so I had to go with my best guess as to what I thought I was seeing and what I should be trying to replicate. Admittedly, the engines were built by (somehow) managing to reverse engineer the engines used on Jerac's Y-Wing model. I couldn't help it, he absolutely nailed the design, and I couldn't think of any better engines to use. The Ion cannon on the top of the cockpit is in the same situation. Thankyou Jerac for the great designs, and sorry for pinching them! The rest however is all original. As of this post, the entire model is buildable irl as far as colour's go, except 4 pieces. I have used 2x 65426 in yellow (one on top, one on bottom) and 2x 65429 in yellow (again one on top, one on bottom). These are used to create the yellow detailing on the cockpit/head. I hope to come back to this model in the future and, among other things, rectify this by finding a solution that will work irl. If building irl, I would also use 30327pb05 as the windscreen, but unfortunately stud.io does not have this piece yet, so the pictures show a different print pattern instead. I mentioned earlier I plan to come back to this model. Hopefully soon, I will do this. My aims will be to rectify the unavailable pieces, and add (functional) landing gear that can fold up and away. I don't know whether I will be able to or not, but I am going to give it a go. After that, I plan to build it irl and test whether it's actually stable enough, or whether it will fall apart... 🤞 But now, the renders... Please feel free to share your criticisms, suggestions, or ideas! I also made a "generic" rebel Y-Wing which has more generic greebling and a few features that the Gold 5 model never had, but was essentially the same as this model with a few surface details changed. A BTL-B Y-Wing (the type flown by the republic during the Clone Wars, which has full armour plating) is also in the works, but has sort of been left and not touched for a while, but I will come back to it eventually. Anyway, I hope you enjoy, this is certainly my favourite MOC that I've built. I hope someone else can enjoy it too! -Binks
-
Welcome to The Little Post Office. The little post office is my newest MOC it is based on france bouwsteil, I designed the project for the Bricklink Designer Program series 1, if you like the project leave a smillie on bricklink if you want :) https://www.bricklink.com/v3/designer-program/series-1/377/The-little-post-office Please let me know what you think in the comments. I'm very curious what you all think of my project ground floor You can hand in all your parcels and letters at the post office or pick them up at the counter. The postman can weigh your parcel and then sort it into the post crates. The letters are sorted in a postal sorting rack with house numbers indicated in different colors, you can guess which buildings they are. Electric step charging station At the E-step charging point you can get a fully charged electric step to drive past all your favorite modular buildings. There is also an electrical inverter hidden under the stairs from the solar panels on the roof. In the Tech shop you can buy the latest technical gadgets including smartphones, telephone covers, computer with speakers, or an OLED TV. first floor The pharmacy is the place where you can get all your medication such as vitamins or pain relief. There is also a rack with bandages or plasters, there is also a cosmetics rack. In the office, every working day starts with a nice hot cup of coffee. The office contains an extensive interior including a. Copy machine Coffee machine Cabinet with folders Desk with two computers. second floor There are two apartments on the second floor. The left apartment has a kitchen, a dining table for two, a bed with bedside table and night lamp. In the apartment on the right lives a woman who likes to play games. In her apartment you can find a full bathroom, there is also a kitchen and a bed, but of course you should not miss the game chair and game station. The roof On the roof you can find three pairs of solar panels that can power the building. function All the balcony doors can swing open inwards. This modular building has a unique connection option. Normally you can connect a modular building as a straight street or in a corner of the street, this building has both options so that you can choose where you want it in your street.
-
Ahoy Mateys! I originally built this bad boy over a year ago, but after designing a few more MOCs I determined that it needed some upgrades. I went back to work on improvements after completing my larger Forbidden Island MOC. I hope y'all like it! If you like it enough to build yourself the instructions are available on Rebrickable! My original version had a much grainier look to it. I wanted to smooth it out by adding more curves and angles to the beach.
-

[MOC] Clone and droid vehicles - latest addition: Droid STAP
TeddytheSpoon posted a topic in LEGO Star Wars
Two of the first MOCs I created since diving back into the hobby a few years ago were an AT-RT and BARC speeder. Since they were designed mostly in a digital environment, and with considerably less practice than I have now, they were long due an upgrade. So now I've done that, I figured it was as good a time as any to share them here! Although these were my own design to start with, I don't think there's anything particularly revolutionary in the construction of the two. So to spruce them up a bit, I decided to add some lights! Fitting the LEDs didn't require much in the way of changes relative to my first attempts, which now look... Well, let's just say I'm much happier with these new versions. The AT-RT pretty much only had its front armour plating changed, but the BARC speeder went through three or four different iterations before I settled on the version you see here. Both were designed around the 501st colours to start with, since these have been the easiest to acquire recently. That said I made sure the colours could be swapped out for other legions, such as the 41st Elite Corps... ...Or the 91st Recon Corps. (yes, these photos do kind of suck. Sorry!) In theory, the 327th Star Corps (pale yellow) and 7th Sky Corps/212th Attack Battalion (orange) colours should also be possible. There are probably more colour options but these are the ones I'm most familiar with. Unfortunately I don't have the right parts in orange right now to equip my faves in the 212th, so instead I made them a Crab Droid to fight against. You're welcome, I guess, fellas... I have a few more plans for Republic and Separatist/Trade Federation army accessories, so I may add to this thread in future (read: I will necro-bump this thread when I eventually get around to it). But for now, I hope you like them! -
Hi, it`s time to share some impressions of Hildesheimer Steinewelten with you! It was the first time that I put up my train station. It is a fictional medium sized station featuring typical german architectural styles. It could be located anywhere in the middle of germany and should represent that kind of station where you drop off to start your holidays. As you can see besind the main building with the clock tower I added a restaurant with a beer garden to the right, a store house to the left and a second platform with an undercrossing. The hole setup is build modular and can be disconnected into 6 48x48 moduls. Maybe next year I will add a third track and some switches. http://Bahnhof LUG-Connected Der Plan Hildesheimer Steinewelten 2023 by Simon Jakobi, auf Flickr http://Bahnhof LUG-Connected Der Plan Hildesheimer Steinewelten 2023 by Simon Jakobi, auf Flickr http://Bahnhof LUG-Connected Der Plan Hildesheimer Steinewelten 2023 by Simon Jakobi, auf Flickr http://Bahnhof LUG-Connected Der Plan Hildesheimer Steinewelten 2023 by Simon Jakobi, auf Flickr http://Bahnhof LUG-Connected Der Plan Hildesheimer Steinewelten 2023 by Simon Jakobi, auf Flickr
-
http://P1110591 by Simon Jakobi, auf Flickr To be honest this is my 6th version of the german crocodil. Now she shares the drivetrain with her swiss sister. Each truck is powered by a PF-L-motor. All axles are driven. The third and fourth axle are blind. Therefore the trucks are completly new. I also worked on the fronts of the noses and the shape the roof. I hope, you like the result! Greetings from Hannover, Simon! http://P1110592 by Simon Jakobi, auf Flickr http://P1110593 by Simon Jakobi, auf Flickr
-
Fine dine and get some pictures taken at the Florentine Palazzo! How am I so bad at keeping myself promises. Last time out, with the release of Octan Avenue, I thought that a full year between modulars was long enough. Well... this one took two years . Anyway, I think it was worth the wait. The Florentine Palazzo is my twelfth modular building and my fourth corner modular. Free Instructions for this model available at Rebrickable! This model went through a gigantic number of changes. It started as two separate projects that I joined into one. On one side, I had project code name "Worcester" (yes, I give my projects code names ), a new modular building on two 16x32 baseplates (à la Pet Shop or Bookshop) with a distinctly English architecture. Base inspiration was this pair of building in the town of (you guessed it) Worcester. I still might pick up this idea sometime, but it wasn't quite working out then. The other project was a redesign of my second modular, the Italian Villa (my first EB topic I believe) to make instructions. My techniques then were not the most elaborate and the builds weren't exactly designed for stability. Upgrading the Italian Villa would have meant a whole lot of changes probably, so I scrapped that too. But then I thought about doing a brand new modular in a similar vein, which is the Florentine Palazzo! Since it was going to get instructions, I thought about what I really would like to have in modular town. A companion to the Parisian Restaurant came to mind immediately. None of the subsequent buildings match its elegance in shapes and overall refined look. In terms of overall size and details, I tried to get close to the restaurant's greatness. As of late, I prefer looking at drawings rather than real buildings for inspiration. They leave more to the imagination and make me feel less like a plageriser. Anyway, the main inspiration for the palazzo was a building in the Alsatian town of Colmar (drawing · real building). It is not really a building that through one of my usual Google Maps trips I would pick out as inspiration, but the drawing made the creative juices start flowing. Initially, I tried to recreate the building faithfully, but I soon found that joining the upper "towers" closer together made for a more cohesive and interesting façade, so I went down that route. These days I rarely do a full 32x32 baseplate as a single building and the space next to the staircase led perfectly to a completely different kind of architecture next door. One of the styles of architecture that I had been wanting to put in modular form for a while is the architecture of Malta. To me it just feels like the architecture one would find in Sicily but with delightfully colourful timber balconies dotted about to give it interest. As some of you may know, restrain in colour choices really isn't my thing ( *cough *cough Baseplate Alley anyone? ) so this was an interesting exercise in exactly that. Anyway, I had so much fun "carving" details in the plain tan façade to the point that I might prefer this bit over the entire model. I particularly like how the façade keeps sloping back as it goes up. The buuilding was inspired by the Palazzo Ferreria in Valetta. ================== Interiors: Interiors have never been my biggest strength and probably will never be at this rate. Still, I've tried my best to make them quite interesting. Have I succeeded? Hopefully 1. Ground floor: Initially, I wanted to build a post office, but before doing any of the interiors, I showed the building to a friend of mine and he told me something along the lines of "Are you crazy? You should definitely be building a restaurant there!". To be fair, it does look like a prime spot for a restaurant, plus it matches the Parisian Restaurant, so restaurant it was. On top of that, the alleyway I had built under the Maltese house could theoretically be used for bringing stock to the restaurant, so that too makes sense. I think it turned out rather nice honestly. 2. Middle floor: Part of the problem of doing the exterior before the interior is that sometimes one has to mould the interior concept to what is already there. Ideally, the restaurant would have taken up two floors, but the exterior stairs with the fountain underneath was way too cute to remove. And having waiters go up and down exterior stairs didn't quite feel right. That's when the idea of a photography studio came, mostly because there was a dark room on the attic which would be pretty much be perfect for a developing room. The middle floor includes the cameras on sale plus a studio for studio portraiture. 3. Attic: The developing room was fun to build. An enlarger, three trays for developer, stop and fixer mixtures, a cupboard full of chemicals and a sink. I also had a photo drying string, but, honestly, Studio (where I make the instructions) is so crap at dealing with flexible parts that I deleted it after much frustration ================== To see everything that I haven’t been able to explain in words, feel free to take a look at the model yourselves, many of the “how was this/that made” are visible! 3D MODEL And, of course, the free instructions that you can use to build this model for yourselves! FREE INSTRUCTIONS =================== Thanks for reading through and hope you like the model!
-

Motorised Johnny 5 MOC <Not an Alternative Build>
RJ BrickBuilds posted a topic in LEGO Technic, Mindstorms, Model Team and Scale Modeling
01 by RJ BrickBuilds, on Flickr Hello, Bozos! You can support Johnny 5 on Lego Ideas to turn him into an Official Johnny 5 Lego Set here: Johnny 5 on Lego Ideas Who is Johnny 5? Those who don’t know him, Johnny 5, also known as “S-A-I-N-T Prototype Number 5” or Number 5 for short, is a very lively and inquisitive military robot prototype who’s perpetually hungry for more “input”. He is the star of the 1980’s movies Short Circuit and Short Circuit 2 and a TV special called Hot Cars. He became sentient when he was luckily struck by lightning during a combat demonstration. Although he is designed to serve the military as a robot prototype, he has an adorable child-like behaviour and has a great respect for life. He is a peace-loving robot and refuses to use his military capabilities to harm others. Despite being very intelligent and inventive, his naivety and trusting nature has been taken advantaged of on several occasions. Design This model is fully motorised using Powered Up motors and hub and controlled through a mobile device using the Powered UP App. It uses Technic parts to ensure stability of the structure, and System parts to capture the look and form of Johnny 5. The following are the playable features of the model: Movement – This model can move around on tank tracks and uses skid steer to change directions. Body – Johnny 5’s body can tilt using a Powered Up L motor and controlled using a mobile. Arms – Arms can be raised and lowered individually using the Powered Up App. The fingers can be adjusted manually as well as the elbows. Head – The head can be tilted and turned using the Powered Up App. Eyebrows – Eyebrows can be manually adjusted to suit the desired facial expression. Laser – The laser at the back can be raised and lowered using the Powered Up App. Watch the YouTube video here to illustrate these functions better: Johnny 5 on Youtube Total Pieces: 2,711 Dimensions: Studs: W 68.4 x L 36.1 x H 73.5 Inch: W 21.5 x L 11.4 x H 23.2 cm: W 54.7 x L 28.9 x H 58.8 Weight: 99.8 ounces or 2.83 kg Johnny 5 MOC Pictures: 02 by RJ BrickBuilds, on Flickr 03 by RJ BrickBuilds, on Flickr 06 by RJ BrickBuilds, on Flickr 05 by RJ BrickBuilds, on Flickr 04 by RJ BrickBuilds, on Flickr 07 by RJ BrickBuilds, on Flickr 08 by RJ BrickBuilds, on Flickr 09 by RJ BrickBuilds, on Flickr 10 by RJ BrickBuilds, on Flickr -
Pirates of the Caribbean Disneyland Ride As my all time favorite Amusement Park Ride I have always wanted to represent Pirates of the Caribbean in LEGO. Lafitte's Landing and the Blue Bayou have always been such a great start to an awesome ride. Thank you for checking out my build! Pirates of the Caribbean Disneyland Ride by Nicholas Goodman, on Flickr Pirates of the Caribbean Disneyland Ride by Nicholas Goodman, on Flickr Pirates of the Caribbean Disneyland Ride by Nicholas Goodman, on Flickr Pirates of the Caribbean Disneyland Ride by Nicholas Goodman, on Flickr Pirates of the Caribbean Disneyland Ride by Nicholas Goodman, on Flickr Pirates of the Caribbean Disneyland Ride by Nicholas Goodman, on Flickr Pirates of the Caribbean Disneyland Ride by Nicholas Goodman, on Flickr
-
RC Monster Truck [MOC]
Daniel-99 posted a topic in LEGO Technic, Mindstorms, Model Team and Scale Modeling
Hello everyone! I want to share with you my Monster truck that I build for an outdoor winter driving. It has a lot things to improve, but even this imperfect build gives a lot of fun! Yes, this post is mostly not about technical aspects, but about the whole concept and the driving experience it gives! Some highlights: All wheel drive and steering Solid axle suspension with permanently locked differentials Planetary wheel hubs Strong transmission with metal U-joints and metal bearings Brushless motor 1000 kv 3S Li-Po for power 2 GeekServo for steering 120 mm RC wheels with great grip Removable body Together big wheels and powerful motor makes this Monster Truck a real beast. It has both torque and a decent speed. Planetary wheel hubs give enough reduction to obtain the precise control of torque (that is rather unusual for Brushless motors). All wheel steering with deferent steering modes (made as an option of my RC transmitter) bring more fun to the driving. It also increases the climbing abilities of the Truck (as it is shown in the video). -
The last few hours had been quite eventful. Harry was fighting a losing battle against the Basilisk until he received unexpected help from Fawkes (who brought with him the Sorting Hat). Harry reached into it and pulled out the fabled Sword of Gryffindor, which he proceeded to plunge into the serpent’s mouth. With Fawkes and the sword returned to their owner (and a certain house elf in need of freeing) Harry left Dumbledore’s office. The old wizard, now alone, examined the sword, which now seemed to be imbued with a unique power…
-
Hi all, After posting pics of my childhood hero Grendizer, I'm sharing some of his cousin Mazinger Z ! He's one of the most famous giant robots of Japan, and I tried to get his proportions right while maintaining great posing value, with joints on all the important places - it's been a challenging build ! I'm very happy with the result - so much that I made some adversaries for him, such as Doublas M2 : When the fight gets very intense, Mazinger can suffer - Here's what he looks like, inspired by the fight he lead in his final episode : And I'like to share a special version I made, inspired by the proposal seen on the Lego Car Blog to build in yellow and blue, which prompted me to make a symbolic gesture to support democracy : The fight is hard. War is ugly. But these cartoons - Mazinger, Grendizer - taught us life is more important than everything. And freedom is paramount. You can see more pics on my Flickr album ! Alexandre
-
I haven't built a MOC in quite a while, been a bit busy with work and everything else. And the inspiration doesn't come as often as it used to when I was younger. But this January I decided to sit down and build a really cool MOC for a contest. And I thought, I enjoy Victorian architecture a lot, why don't I build a Victorian cottage? (I mean, technically it's a house but cottage sounds a bit more charming). This was a really interesting model for me to design. I actually started with the balcony and the tower, and then built downwards from there until I reached the baseplate. From there, (because it was all in one step in the stud.io file at that point), I ended up separating the entire model piece by piece, and building it again from the ground up! I am definitely the type of builder who will build everything at once and organically flow into a completed model. Only to find it is in one big step with no indication of how I got there. Wasn't going to fly for the contest, since we needed to build instructions. When I started building, because it was actually going to have more of a rectangular shape with a porch in front of the tower, I made one of the gable ends longer. But that really made the roof angles wonky. So instead, I decided to make it more or less the same on either side, which worked out in regards to the gable ends. The shell design over the windows on the tower went through several iterations before I found the one I liked. To add further complication, the whole model was then split into three parts, built again from the ground up, and instructions were made for those three parts. There were a few part problems to work out along the way, this step was incredibly helpful. The submodels were then reincorporated back into the final model with an accompanying 628 page instruction component. And of course part problems cropped up everywhere which meant the instructions had to be formatted again a whopping three times! What a journey! I think I definitely know the model inside and out by now. The most challenging part for me was working on the roofs. I am definitely not the best at coming up with angles and figuring out how to make those work, it definitely took a lot of time and a lot of trial and error. There was also a hilarious mishap at one point realizing that the detailed, hinged roof that I intended to be able to open and close would not open at all, and instead it just crashed into the porch roof. Which prompted a redesign to a more doll-house open wall style build. Oh, and there's no toilet. Which is a bit of an inconvenience for whichever minifigs end up buying this house, but it's nothing a little redecorating can't solve. The furniture was pretty fun to create too. I'm not the best at coming up with fantastic unseen-before techniques, so a lot of it more basic. It was a great experience to be able to build this model. The idea was rather spontaneous, and I settled on the Victorian house theme because I've always loved Victorian architecture. I especially loved the Monster Fighter's Haunted House, and I wanted to create something that had somewhat close to the accessibility of a dollhouse while still having the stability and bulk to be a stand-alone display model. There was quite a bit of trial and error on the trim, some of the pieces clashed in ways that the program wouldn't detect until it was too late. But overall, I'm very satisfied with how the build turned out! This MOC I've currently entered into the Bricklink BDP Series 1 contest that's currently ongoing, and it has just entered the voting phase. If you like this model and think it would be a great set someday, I'd encourage you to vote for it here: https://www.bricklink.com/v3/designer-program/series-1/212/Victorian-Cottage Thank you for reading! :)
-

[WIP] Tamiya Hot Shot RC
msk6003 posted a topic in LEGO Technic, Mindstorms, Model Team and Scale Modeling
Last year I bought Tamiya's Hot Shot RC model. I think it's design is very good since when I was very young so I wanted to buy it and did in Christmas in last year. Of course not just for build and control this model, I wanted to build it as lego model so main reason is for comparison with model I will make. I started few week ago but posted in here now. At first I started on chassis. Surprisingly original model's rear tire can fit in medium racing wheel so I bought 2 set of those tire. I use BW3 and 2 BW motor for 4WD drive. And like original model, both front and rear use mono shock. I know this shock is more accurate with original model but I use those yellow hard shock which is little more common because I want make instruction and post on rebrickable. In this version, drive gear ratio is 16-28, 16-28 3.06:1 But when I test chassis gear starting to skipping on both front and rear. So I rebuilt gear train and make gear ratio 24-24, 20-28 1.4:1 but can change gear ratio to 8-8-24, 20-28 4.2:1 or 28-20-28 1:1 too. And add one more shock in rear for better stability. After fix gear skipping, I built remain body without bumper, wing and light. But now I stopped build more. Cause BW3 keep turn off when I drive model 1m. After lot of trying to fix this, I throw BW3 away and change to PF system with Sbrick.(2 L, 1 Servo, 1 rechargeable battery) Now it can drive more but to much slow and don't have much torque.(gear ratio is same 1.4:1) I need to find other way for drive this thing. Than I will finish it's bodywork. -
Apple Square Research Center is a 4-story 96x96 modular building conceived as a revision to my original Apple Square University. Designed entirely in Lego Digital Designer (Stud.io needs an update before I could adapt), this iteration is also influenced by a locale in a Japanese RPG (サクラ大戦3), the Antwerpen-Centraal Station in Belgium, as well as my ongoing career as an electrophysiologist. ASRC and ASU will be on display together at the next Brickworld Chicago (June 20-21, 2020). For more, follow me on flickr or instagram.
-
Hey All! I just wanted to share my latest MOC that I've finished, after over a year of tinkering on it. :) This is the Catapult mech from the Battletech/Mechwarrior Universe, specifically the model from the latest games such as Mechwarrior Online and Battletech the PC game. Its around a foot tall and consisting of 2200 pieces. I've also created free full instructions for it, which are available on my website for anyone whos curious about the details of the build. Thanks! :)
-
Hi all, I've not written to these forums for a while, however I was reading it, now after the new RailBricks Issue 15 came out, including my Stadler FLIRTs I'd like to introduce an another LEGO creation of mine from the last weeks. I spent a long weekend in Zagreb and got inspired by the trams running in the city. they were produced by the croatian Koncar company and are 100% low floor, in 2007 more then 140 of these trams were operating in the capital of Croatia. Additionally, the whole tram network in Zagreb is narrow gauge (1000 mm), which means more fun while designing this tram. I used some solutions from my previous narrow gauge MOC, my Stadler GTW. Pictures, please note, that this tram is still in WIP phase, so slight changes will be made on it: View from the side, only three cars have boogies, two other sections are suspended: Front design, original tram has lot of curves, to make it harder to build from non-curved parts: Reference pictures for the tram: http://www.brickshel...-2200-b-800.jpg http://www.brickshel...k2200-a-600.jpg the gauge is still question for me, the train is 7W, so I could set up "standard" LEGO narrow gauge (when two studs between rail elements, like indiana jones and alien narrow gauge curved tracks), but it fits better to IRL 760 mm tracks than to 1000 mm. To create 1000 mm narrow gauge track I'll need to create tracks for the tram, with 3 studs between rail elements. For driving the tram I plan to use the Power Funtions system, driving the middle section of the train. The distance between the axles is the same what the PF Train Motor has, instead of using gearing and M-motors to drive the tram I'll try to set up with SNOT technique the PF Train Motor above the middle boogie, connecting it with simple 12 tooth bevels, so there will be less energy loss, keeping the speed of the dedicated train motor. Moar pictures later, I hope I will have the money to buy all the things I need for this creation. :) Please leave comments and critics!
-
Hey everybody, I'm new to the community but I've been MOC designing for sometime now and I have finished my massive project. I've been working on it for just under two years, The ISD II The Eviscerator. It sits on a single removable stand measuring at 148 studs long with 19,225 pieces. I really wanted to capture that "It doesn't look like Lego" feel and try to give it a studio model vibe. One of my goals for this build was to have only one stand that the model sits on securely. This was an incredible challenge due to the size and weight of the model. In fact, it's what took the most time to develop through out the build. Overall, I'm satisfied with how the model turned out. This is more accurately representing an ISD II Destroyer. I tried to pay attention to every detail I could, based on a couple of star destroyer sources. It's a very modular build making it easier to assemble and disassemble. There is no interior in this model. Just pure structural integrity throughout the entire inside. Just the frame and stand are 6,000+ pieces, but this was my goal. Create as accurate of model as I could, displayed on one removable stand, and not having to limit detail because of weight and size. Anyways, enough rambling: You can view the rest of the photos here: Flickr Album Now here is some great news. If you want to build one yourself, you can! I have made instructions for this build that are available at https://www.brickvault.toys/products/imperial-star-destroyer
-
Futuron - Retro Space Solar Ship [Futuron] Retro Space Solar Ship by Horlack, on Flickr ================================== The beginning/Genesis : ================================== At the beginning of September, I re-watched the old animated as X-Bomber at 43 years old ! It was my birthday this month. Don't ask me what went through my mind at the time, I don't know at all! I wanted to go back to childhood, because I have the impression of having aged. I had to straighten "the bar", lol ! Seeing these old Retro solar boats literally “blew my mind”. I never realized that a lot of anime from that era had a "strange spaceship" conception, transforming old 14-18th century ships / galleons with engines for space. Yet it was so obvious! And it was there, that suddenly, I remembered Jayce, Cobra, etc ... In short, I saw all the ships of the anime of that time scroll through my head, like a comet in front of my eyes (which booms crashing into my head). And no one had done this in Lego. At least I don't remember. In itself, the beginning of an idea or impression that smelled good, and / or had potential. It was the very beginning of the inspiration and brainstorming in my head for Lego Classic Space ! ================================== The concept : ================================== I did something unusual, non-conformism, eccentric, disconcerting and crazy at the same time. I make a double combination and double ration, animated 70-90 which it was the fashion of space ships and Lego Space Futurons 87-90. For a good Retro nostalgia I combined elements of the Azuris ship from « Message from space : galactic wars », the Cephalus ship from Star Fleet X-Bomber, Glory of the universe of Jayce and the Wheeled Warriors, and the Solaris of the Mysterious cities of Gold ! 2 periods 70-90 in 1! Fashion Geek powa, total ! ================================== Animated Wikipedia source: ================================== https://en.wikipedia.org/wiki/Message_from_Space:_Galactic_Wars https://en.wikipedia.org/wiki/X-Bomber https://en.wikipedia.org/wiki/Jayce_and_the_Wheeled_Warriors https://en.wikipedia.org/wiki/The_Mysterious_Cities_of_Gold ================================== Youtube animated credits for the nostalgic: ================================== Message from space : galactic wars / San Ku Kai https://www.dailymotion.com/video/x3a7kge https://www.youtube.com/watch?v=Jfzb7kndOH8 https://www.youtube.com/watch?v=ev846CoLg1c Star Fleet X-bomber: https://www.youtube.com/watch?v=szZisbEQB_Q Jayce and the wheeled warriors : https://www.youtube.com/watch?v=y9K0SzFIf4A The Mysterious Cities of Gold : https://www.youtube.com/watch?v=enoK-1CW74Y ================================== I took again in inspiration: ================================== - The front and landing feet of Glory of the Universe. - Sails and propulsion reactors of the Cephalus. - The front spur and the hexagonal solar sail at the top of the Solaris mast. - Part of the sails and the structure of the Azuris. ================================== Remarkable elements, NPU, conversion of parts, techniques : ================================== I converted parts #4346 and #4345, in all directions, with levers, for the machinery. Part #44938 bionicle shield, with a "mechanical" aspect converted into an energy capacitor. Various parts of Droids (starwars) converted in the machinery and on the outer deck. Bionicle Shield #45275 converted into deflectors, on the deck of the ship. Kind of like "Viking ship/longship" shields. Big Trident Bionicle #40339 = excellent for large boat emblems in general. I used a slope technique for the sides of the hull. For the rear canopy in the hull, I used a SNOT technique with part #30249. ================================== Physical information : ================================== - 7,082 parts for 854 lots. - 2 weeks of brainstorming, intellectual reflection or "total blank" ...: passive or empty work. - 3 to 4 weeks of active work. - 60.8 studs width, 101.8 studs length, 78.7 studs height. - 48.7 cm width, 81.5 cm length, 63 cm height. - 5.77 Kg. ================================== Global : ================================== All Futuron figures, including the green Lego City minifigure and the lesser known "Educational & Dacta" minifigures. 9 crew members, 3 teams of 3 watch members. ================================== Exterior/outside: ================================== - Solar sails with 3 intermediate lookouts. They can rotate a bit. - Futuron logo, in stickers, on the sails. - 2 radars at the top of the masts. - Long electromagnetic barrel at the front. - 2 small laser cannon turrets at the front. - 2 large turrets at the rear, pulsed radius. - Wings with stabilizers at the end. - 2 small rotating turrets under the wings. - 4 landing feet. - Various elements of machinery on the deck of the Boat. - 8 deflector shields on the sides (Bionicle shield converted). - 2 large propulsion reactors. - Cockpit. ================================== Wheelhouse: ================================== - 1 captain / watch officer seat. - 1 seat Transmission of orders to machines. - 1 navigation control seat. - 1 communication control seat. - 1 alarm control seat. - Walkie-talkies, fans, fire extinguishers, binoculars, cups, etc. ================================== Interior/inside hull of the ship : ================================== - Small storage room at the front, with a ladder to grab onto the deck of the solar ship. - 6 beds with drawers below. - WC / toilet. - Sonic shower. - Kitchen / Cantina: sink, water, oven, cupboards, cups, bottles of food. - Table, bottles of food. - Machine room: control bar, control panel, turbines, fans, transformer, energy condenser, energy pressurizer, cooling circuit, heat transfer fluid, warning lights, ladder to climb to the cockpit, tool kit, tools behind the ladder. - Rear canopy - SAS by energy barrier. ================================== Conclusion: ================================== I built in a perspective of pseudo-realism, pseudo-likely and pseudo-consistency, with compromises with the Retro concept of the animated ones of the years 70-90's. I wanted something playable and fun at the same time. I had a lot of difficulty and trial and error, because I had never done a Lego boat. I worked several times until 4am ! I often work like this: as long as the inspiration is there, I must not lose it, and I work until I no longer see the time passing. But the opposite has also happened to me several times: several times the symptom of the "blank sheet" for 1 to 3 days, without knowing how I was going to build, find inspiration, think about the logic of the construction, etc. . This feeling of "emptiness", that you feel something is happening, and you have it on the tip of your tongue, but it does not come out! Annoying and horrifying sensation ! :) The inclination of the walls gave me intellectual problems. It took a long time to build the engine room. I had to redo it at least 3-4 times. I wanted a maximum of diversity and complexity at the same time. The confined space of the hull gave me difficulties: how to integrate "likely" elements in so little volume ? I have lost my hair several times. Just those damn shower and toilet, I had to spend 3 hours each, to do, undo and redo in all the sauces. Like a little monkey who tests all combinations. Shouldn't bring me a banana at this time, because I think I would have been screwed to make a monkey cry as a bonus .... lol [Futuron] Retro Space Solar Ship by Horlack, on Flickr (Zoom on Flick, picture Full-HD 9216 x 4608 pixels) [Futuron] Retro Space Solar Ship by Horlack, sur Flickr (Zoom on Flick, picture Full-HD 9216 x 6144 pixels) [Futuron] Retro Space Solar Ship by Horlack, sur Flickr (Zoom on Flick, picture Full-HD 9216 x 4608 pixels) Shiptember 2021 [Futuron] Retro Space Solar Ship by Horlack, on Flickr ================================== Source / reference on my project (progression in the time) : ================================== https://forum.brickpirate.net/viewtopic.php?f=31&t=25577 https://www.flickr.com/photos/horlack/albums/72157720062770130 https://www.facebook.com/media/set/?vanity=HorlackBricks&set=a.495422262040159
-
Hi All! I'd like to share with you my latest take on the Castle theme. It's called Castle of Lord Afol and the Black Knights. I tried to keep it classic in general appearance, modern in detail, playable and sturdy. The latter features are yet to be proven, as it's still only a digital MOC While it may look a bit modest compared to some contemporary MOCs, it is so for a reason - it contains "only" 3000 pieces, which is a limit for Lego Ideas entries. And while some of the MOCs around boast insane shapes, this one is quite solid and, despite the name, I think it could be built without a big problem by a 10-year-old with some practice with Lego. Tell me what you think about it and if you like it, please comment and support this project also on Lego Ideas: https://ideas.lego.com/projects/f588abaa-4dab-4a56-b7bc-a7e38d018711 Enjoy!
-

[MOC] Rope Braiding Machine
Hugolin posted a topic in LEGO Technic, Mindstorms, Model Team and Scale Modeling
Hello. New post in this new year to show you this: So what connection between this rope and Lego, you say? The machine that does it, of course !!! I start with the video. Edit : WIP vidéo : Now, photos and explanation. This braiding is based on the following system: to alternatively turn the trays. Although it uses 12 strands, braiding is relatively simple: The strands are braided in fact four by four. The blue plaques turn to the right and red on the left, etc .. Between each rotation, the trays are realigned by "jaws". To power, a motor M is more than enough. The lever to switch to manual. Here, the manufacture of the central party of the rope: This part can be replaced: Here two little winding mécanisme for the bobbin: A very important detail: the elastics that ensure proper tightening of the braid. Finally, different braids made by the machine: And also Happy New Year !