Search the Community
Showing results for tags 'Bridge'.
Found 87 results
-

St. Louis' Eads bridge (modular double track three-arch train trestle) - real life MOC
Murdoch17 posted a topic in LEGO Train Tech
Here is my final design of the St. Louis bridge, commonly known as the Eads bridge because of it's designer, James B. Eads. It uses Indiana Jones roller-coaster ramps for the arches, which looks pretty cool. The bridge is nine tracks total in length and 19 bricks high from base to track. (This means about fourteen bricks of clearance between arch top and floor, so some small ships could pass through!) First, a little background info from Wikipedia (which is also where this picture came from): "The Eads Bridge is a combined road and railway bridge over the Mississippi River at St. Louis, connecting St. Louis and East St. Louis, Illinois. The bridge is named for its designer and builder, James B. Eads. When completed in 1874, the Eads Bridge was the longest arch bridge in the world, with an overall length of 6,442 feet (1,964 m). The ribbed steel arch spans were considered daring, as was the use of steel as a primary structural material: it was the first such use of true steel in a major bridge project. The Eads Bridge, which became an iconic image of the city of St. Louis, from the time of its erection until 1965 when the Gateway Arch was constructed, is still in use. The bridge crosses the St. Louis riverfront between Laclede's Landing, to the north, and the grounds of the Gateway Arch, to the south. Today the road deck has been restored, allowing vehicular and pedestrian traffic to cross the river. The St. Louis MetroLink light rail line has used the rail deck since 1993." This is a rough representation, as it is missing a lot, (I.E. no car deck, missing tunnel under downtown, and lack of the East St Louis ramp approach.) A close-up view of the arches of one of the three identical spans. The bridge as separated out for transit. Here we see the modular connections for transporting dissembling the bridge for taking to shows and such, along with the older deck (the dark bluish gray line) for when the bridge was single track. The modular component of the bridge's design also makes it a LOT easier to carry as the whole bridge with the three sections weighs about 10 pounds total. 4/12/19 BIG UPDATE: Real life pictures / text updated to reflect the newly remodeled bridge. (it now is double track!) Comments, questions and complaints are always welcome! -
Six-track railroad locomotive transfer table - real world MOC
Murdoch17 posted a topic in LEGO Train Tech
I had a spare truss bridge model lying around and thought it could use a revamp. Then I thought of the turntable I had designed, and realized it could use a transfer table companion model. Thus, this transfer table was finished just today. The whole table moves on four wheels at the edges and three guide-ways in the center. The model sits on four vintage 32 x 32 stud base-plates arranged in a square. I'm currently thinking about slicing up what's left of a gray 48 x 48 into a strip for the leading tracks to rest on. The height from the track to the top of the truss-work is a hair shorter than 13 1/3 bricks tall, which is tall enough for most locomotives but not enough for cabooses, extra-tall double stacked container cars and double-decker lounge cars. The length of the table is four tracks long, which is plenty for any of my single-unit locomotives or official LEGO models. (Diesel cab and booster units will have to be split up to fit, however.) In progress shot of me loading a 4-8-2 steam locomotive onto the table. Lining up the tracks as perfect as can be is key to keeping the loco on the rails and steady! Moving any loco sideways is easy enough to do with one hand... lining it up and rolling the engine off, however, needs steady two hands and a good eye. A better pic of it lined up at the shed track after unloading the steamer. Please NOTE: There is a two stud gap (and a bit of incline) between table and lead-in track: It is NOT 100% flat! Comments, suggestions, complaints, and compliments are always welcome! -
In 2017, when LEGO presented the world with set 70922 Joker Manor, almost the entire AFOL community was crazy about the new coastertracks in this set. Finally, people could build the craziest rides for their theme parks. As I didn't see any other applications for these parts, I didn't dwell on them for long. Until images of 75889 Ferrari Ultimate Garage leaked and I got to thinking: if these rails can be used to make a finishline, can you also build other bow-like things with them? Could be a fantastic MOC if done right. So I ordered a tan baseplate, 4 railcurves, 3 roadtiles and a lot of dark tan slopes in different sizes and I got to building. What ultimately led to this MOC. I hope you like it as much as I do. Brick Bridge by TAFOL, on Flickr You can view more pictures on my Brickshelf and/or on my Flickr. And please like and share this MOC on Facebook.
-
This was my build for the 6th and final round of the 2017 Middle Earth LEGO Olympics. The category was ‘Switched Teams’; so someone who was a villein would now be a good guy, and a place like Rivendell would be evil, etc. I decided to do Minas Morgul, which is the fortress of the Witch King in the Lord of the Rings, so in my version the Witch King is now a noble leader with a valiant force of warriors guarding the splendid fortress. In order to make it look less scary/bad guy-ish, I opted for a white/grey colorscheme and changed the architecture to be slightly less pointy (though I did keep the buttresses and battlements rather spiky), while still keeping the same general layout. I’m quite pleased with the result, and although I didn’t plan on it getting quite this big, it’s now my heaviest build to date, weighing a smashing 31.2 pounds! There are also a few things you can try to find in this build, if you would like (though not many of them are very well hidden, I admit!): 4 frogs 1 bear 2 hedgehogs 1 bird in a birds nest 3 chickens 2 goats Lots more pictures on Brickbuilt. Thanks for looking, and as always, comments and constructive criticism very welcome!
-
Introduction; This MOC is my first attempt, specified in landscape, of this size. The Story; "... In a galaxy far far away, somewhere in one of its corners, there is an unknown and isolated planet. In the center of the area where life has been developed, lies its oldest structure. A stone column with unknown carvings. But this is not the only peculiar thing about it. Every year, it lights up on its own and an abrupt hum is emitted. The next moment, something magical is happening! It's like the whole planet is coming alive - a heady aroma is overflowing everywhere, the flowers bloom, animals wake up and everyone enjoys this magical moment. This day has arrived, and all three tribes of the planet have gathered to celebrate the day of life. Everything rolls pleasantly, until a clank and a thunder shakes the calm atmosphere that prevails ... " 1. Honoring the Monolith MOC by George Patelis, on Flickr 2. Crashing Site 3. Crash Crater 7. The Ceremony 8. The Stream I am looking forward for your comments! You can find more pictures of my creation on my FlickR
-
Western-style wooden / iron truss bridge (nine tracks long- double tracked railroad trestle)
Murdoch17 posted a topic in LEGO Train Tech
One of the major problems of using my Eads bridge at shows is it's only one track wide.... so, I devised a western double-track wooden and iron structure using instructions from an old instruction I found on my hard-drive. (Originally from a defunct website / magazine called Railbricks and in a more modern concrete-looking format). This double structure is about 300 less parts than my single track Eads bridge and sits at the same height / length, so it can fit in the same spot. There are no bricks above track level at the beginning of the bridge so it works with even 10 wide trains or curves / switches immediately off the bridge! (This is unlike the Eads bridge, which cannot have turns right after it.) This trestle has about a track and a half of space between bridge end and truss section for an engine to straighten out on. The 10-wide BTTF time train fits easily though the bridge with room to spare! (time train not included in LDD file!) The new trestle is the same height and length as the Eads bridge, but with double the width for 300 less parts. The Eads bridge is also modular in construction, while the new one is not. (Eads bridge not included in LDD file!) LDD file for the wooden bridge (NO time train or Eads bridge in file!) is available at Brick-safe. Comments, Questions and complaints are always welcome! -
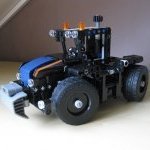
Hey all, At the last day of the year I want to show you my build for the bull-back contest. The motor is winded-up using the wheel and relaesed by pusing the axle beside it. From the motor to the clutch it is geared using a 12/36 and a 8/40 combination. After the clutch there is also a 12/36 reduction. If I turn the wheel 4 times around and release it, then the second 36 tooth gear turns almost half around. That is enough for lifting the road completely. I added the clutch for some kind of safety. In neutral I won't wind-up the motor when lowering the bridge. And a video: Next step is building something to slow down the motor. Comments are welcome! https://bricksafe.com/pages/nick97/tc13
-
Location: Cocovia Type: Minichallenge build The Super Precarious Bridge had been built to cross a gorge on Cocovia Super precarious bridge by North White, on Flickr The Plans had called for them to go at an easier crossing. Super precarious bridge by North White, on Flickr But The WTC is also awesome at building bridges for some reason FIN Just another entry to @Brickwolf's minichallnege. I was originally going to use these for the supports, but it made everything look too pink, and I'm not @Bodi . I didn't really have a story envisioned for this one, which is what most of you seem to come here for, so sorry. Maybe I'll rewrite it. This entry should be considered a 16x48, but if the powers that be otherwise, I suppose it could be reduced. C&C appreciated!
-
This bridge design was originally downloaded by me (I don't remember the name of the original designer who created the bridge) from the LEGO Factory / Design By ME page in 2010-ish and was never built in real life due to questions about it's strength. I came across it again while looking at my MOCpage account's older files and made it into the version seen above using newer parts and a longer frame. A big thank you to Wes Turngate over on Flickr for helping get the angle right to put the bridge supports in place. The LDD file is slightly different than the pictures as it is 2/3 of a brick taller to add in the proper parts to make it work. The bridge fits any of my trains, and should fit all official LEGO trains except for double stack containers such as sets 10219 (Maersk Train) and 10170 (TTX Intermodal Double-Stack Car). Side view of the bridge. The old design is on the left, new is on the right. (NOTE: The new bridge is in the LDD file, but the old one is NOT!) Here is the ldd file for the newer bridge: bridge link As usual, comment, questions and complaints are always welcome!
-
Dear All, my train layout is built “into/around” my home office, which is located in the attic. With the pitched roof area beginning at a height of about 60 cm (2,0 feet), there are not that many options for placing longer runs of LEGO track, as close to the walls in about 40 cm (1,3 feet) height. The floor area is 4,2 x 6,3 m2 (26,5 m2 = 285 square feet), whereas at 2 m height (6,6 feet) there is only a 40 cm (1,3 feet) width section … so beware of your head! Figure 1: Schematic views of my home office. Top: Room cross section. Bottom: Floor plan. All numbers in meters. [The most important question of course is: 2,3 feet? I simply used an online tool for the conversion – I am wondering, is the “,3” bit in the decimal system? Which would mean: 1 foot and 3 tens of a foot. That does not make much sense as there are 12 inches in one foot … and 2,54 cm in an inch. There are 30,5 cm in one foot (rounded) – so we have 3/10*30,5 + 30,5 cm = 39,7 cm which is close enough to 40 cm.] OK, I am just kidding – I lived for 4 years in the US – changed/added a good deal of things around and to the house and - it is absolutely no problem to adjust to the yard – feet – inch world. None what so ever. Because you have to; there are simply no “cm” or “m” in the US … Uhmmm – what did I want to show … sorry: Yes, bridges. When you live in an attic, there may be holes in the floor to get there via stairs. And maybe doors opening to another room. And furniture; certainly not only 60 cm high (I leave it in the metric world) … so you need to mount your track to the walls behind or even “through” furniture, under desks, and you need bridges – many. Essentially it is one large bridge - this post is about the brick- or semi-brick built sections on my train layout. Figure 2: Floorplan and track layout. Left: “Principal” track arrangement: Two main outer loops, two smaller independent loops around the chimney on the left and on the right. Right: Actual BlueBrick track layout. Note that there are two track levels. Red rectangles indicate bridges as referenced below. With respect to Figure 2, left: This was the principal idea: Two parallel main track sections going around the entire room (outer two red lines). Then one circle on the right and one around the chimney on the left. There are possible track levels, as indicated by the two stacked red lines in Figure 2, top left. Problem #1: The stairs (shown in green, top) to get up to my office; here only one section of track fits in between outer wall and hole in the floor. Solution #1: A long incline eventually allowing the two track sections to run “stacked”. Problem #2: The door (also in green, bottom) giving way to the next room stuffed with stuff that we regularly look for. Solution #2: A draw bridge, which is always in the “up” position when I am not playing. On the same image on the right, a BlueBrick generated track layout is overlaid. It actually consist of two “layers” – there is a good section of elevated track under my desk on the left and also behind some book shelves on the right. This is why the layout looks pretty congested in some areas. Most of the track running close to the walls is not visible (or is behind furniture) and is mounted on wooden supports which in turn are mounted to the wall. Some of these areas are rather complex modular constructions, as I need to get there from time to time. Then there are some regions covered with low-level “table” type areas (IKEA is your friend) – as well as supports mounted to furniture. The same is true for “tunnels” – they are all over the place as I have to run some track sections “through furniture”. Coming back to bridges: The red rectangles in Figure 2 on the right indicate the LEGO built bridge sections. I used all sorts of LEGO bricks: DUPLOs from my daughters (now 20 and 22 years old; asked for permission of course!) to swiftly gain elevation, combined with System bricks and plates to adjust to required heights/widths. And Technic stuff to secure things. Oh well and Monorail track … I guess Monorail enthusiast will not like that … BUT: This stuff is fantastic to structurally support bridges!!! Bridge 1 This one is lame – uses the Monorail straight tracks as main structural support – and DUPLO bricks mixed with System bricks and plates for the end-sections. Figure 3a: Bridge 1, location on layout cf. Figure 2. Figure 3b: Bridge 1. Bridge 2 This one is a little more complex. It is a fully automated draw bridge integrated into my PBrick control scheme (and here). The PBrick operating that thing is a Scout. It has its own ID address and understands 4 commands: “Up”, “Down”, “Stop”, and “Status”. Manual control is also possible; the switch to toggle the mode from “remote” to “manual” control is the light brick in combination with the built-in light sensor of the Scout. Further, there are two touch sensors to ensure that the Scout knows the status of the bridge. One detects the fully “up” and the other the fully “down” position. When both sensors are open, the bridge is somewhere in between. To make things a little more appealing, a slightly modified/extended #42042 crane is used as power source. I needed to extend and fix the boom to the ceiling as the load is fairly heavy. Furthermore, I used a pulley system apparently called “threefold purchase” (according to Fig. 6-21 on page 64 in Sariel’s extremely helpful “The unofficial technic builder’s guide” book (http://sariel.pl/2016/10/guide2/) to get a mechanical pulling power advantage of 6. This way the PF M motor used in #42042 manages to draw the bridge up from the fully down position, which requires the biggest drawing momentum, without hassle. Figure 4a: Bridge 2, location on layout cf. Figure 2. Figure 4b: Bridge 2, entire structure, “down” position. Top: Top view showing the track. Bottom: Side view with a “track lift” on the left, LEGO storage shelves on the right, and a door to the storage room, which remains clear in the “up” position. Figure 4c: Bridge 2, details of the sensor mounts (“up” sensor mounted to the book shelf, “down” sensor mounted to the underside of the bridge) and the pair of guide rollers. Figure 4d: Bridge 2, details of the Scout PBrick, the #42042 crane, and the pulley mechanism providing a mechanical advantage of 6 when drawing/releasing the bridge. This video shows a little more … Bridge 3 This bridge is fully LEGO brick-built and spans my entire “City” area. It also connects to the next bridge via a curved elevated segment, which was quite challenging (for me …) to give the supporting structure a “solid” appearance. Figure 5a: Bridge 3, location on the layout cf. Figure 2. Figure 5b: Bridge 3. Top: From the wooden shelf track support on the left an elevated two track segment travels behind the City buildings. Bottom: The two elevated tracks merge into a curved one-track segment. Figure 5c: Bridge 3. Bottom left: The curved one-track segment. Bottom right: There is a small pedestrian bridge providing access to the light house. Top: The curved segment continues with a longer straight stretch. A largely modified #10027 train shed (with an additional structure on top) serves (also) as track support. There is a small grating type secured elevated path, which allows the City train personnel to survey the City traffic situation and act properly … Bridge 4 This bridge is a semi-brick-built structure; however, as it spans the opening for the stairs to the story below my office, I wanted to be sure. There is a wall mounted main support which is “decorated” with a supporting structure consisting of Monorail curved track segments; on top though the long incline in the back as well as the elevated track segment connecting to Bridge 3 is entirely brick-built and self-supporting. Again with System and DUPLO bricks – there is even some DUPLO SNOT. With the addition of Technic beams, the pylons have become quite sturdy, so I may even replace the wooden “floor” sections with actual LEGO bricks and plates but that has to wait for a longer time, I guess … Figure 6a: Bridge 4, location on the layout cf. Figure 2. Figure 6b: Bridge 4. Bottom: Entire view of the bridge structure; on the right, the City bridge structure merges with the level 2 section of the outer loop (cf. Figure 2). Top left: In the front (barely noticeable) the inner main loop at level 1; in the back the long incline (sloped at 2 plates/ 9V track piece) of the outer loop main loop. The arrow points to the incline on both pictures. Top right: Last bridge section leading to a long stretch of track behind book shelves. Figure 6c: Bridge 4. View from the stairs giving access to the attic (cf. Figure 2), showing the curved Monorail tracks as supports along with the Technic cross bars. Figure 6d: Bridge 4. Some details of the Duplo-, Technic-, and System-bricks used for the support structure. Figure 6e: Bridge 4. Details of the last bridge section leading behind some book shelves using straight mono rail tracks and bridge support parts (#55767) as main structural elements. The pylons are made from Duplo and System bricks. Bottom right: Some Duplo SNOT on the main pylon. There are some more images on BrickShelf (http://www.brickshelf.com/cgi-bin/gallery.cgi?m=ThorstenB), just navigate to the “bridges” folder. These are pretty large in size though. Best regards, Thorsten
-
"I am really not too certain this will work", said Jake Forks, an experienced Corrish craftsman. "Oh I did the calculations, and it will. See the timber over there, holding the horizontal weight?", insisted Luca do Figino. "Sure, not it holds... yet still... how would it carry an ox or a horse, let alone a waggon filled with iron?", Jake asked further. "It will. See how the wood is attached down there at the rocks? It does not shake at all, not in the slightest. We did some great work down there. Now if we distribute the weight of the other planks properly, balance it further.", Luca replied. "Maybe in your country that will work...", mumbled Jake and turned away. He had never liked the idea that a young Terraversan would lead the construction for their small group near the village of Poi Poi. He had to admit though, that the construction of the rails had worked out flawlessly so far, even in difficult terrain. But constructing that bridge was the hard part. At least the natives had not disrupted them yet. But those two fisherman who had their hut closely just seemed to make fun of the workers all day. No, Jake really was in no good mood. "But as you wish, young Lord." "I am no lord", Luca replied. "And now let us get back to work. See over there? Fresh supply of wood is coming. The day is still young." And Luca do Figino from Terraversa smiled, as if Jake had just made a nice compliment. An ox wagon bringing fresh wooden supplies and looking at what will be the wooden bridge some day. The wooden bridge during its construction. The local fishermen really do seem to enjoy their sight of the workers struggles. On the other side of the bridge nature is still untouched. That beautiful wild cocoa plant will most certainly have to make way for the rails, though. #################################################################################### Thanks @Brickwolf for the great minichallenge! I tried to stick to the island style as suggested previously by mainly @Puvel and @Ayrlego. The wooden bridge is based on an original design by Villard d'Honnecourt. And finally the full layout visible in one shot:
-
A scene from one of the greatest comedy movies of all time Who's Singin' Over There? (Ko to tamo peva). The film tells a story about a group of passengers traveling by bus to Belgrade but on their way there they come across many problems, such as this shaky bridge the bus should drive over. I've also made the Moc into a project over at Lego Ideas, so if anyone would like to support it you can do that here: https://ideas.lego.com/projects/83f13efc-9885-48cf-9ebd-3abc197234fe Thanks in advance! 1 by legomanijak, on Flickr 2 by legomanijak, on Flickr 3 by legomanijak, on Flickr 4 by legomanijak, on Flickr 5 by legomanijak, on Flickr 6 by legomanijak, on Flickr 7 by legomanijak, on Flickr 8 by legomanijak, on Flickr 9 by legomanijak, on Flickr 11 by legomanijak, on Flickr
-
This pagoda scene was created for display in the upcoming Cactus Brick display in September. This MOC won first place in the club competition for creating Ninjago related creations. It also tied for most eye catching of the creations entered into the competition. Enjoy!
-

[GBW] - Troop movement - Erotema – Crossing enemy lines
sigpro posted a topic in The Great Brick War
GRID E4 STUDICA – GRID Q6 GENERAL MAP (APPROX) After the successful offensive movements of the COAC, it was time to seize enemy territory. This is a territory divided by a river. Erotema is on the left and Briolui on the right. Not a very wide and deep river, but enough to difficult the crossing without special means. A lonely combatant is searching the area, with his .50 sniper rifle. He doesn´t seem to wear the standard Briolui uniform. Maybe a mercenary? A member of a local militia? Who knows… 1 by green helmet spanish AFOL, en Flickr 2 by green helmet spanish AFOL, en Flickr A few minutes later, an EROTEMA MRAPv (Mine-resistant, ambush protected vehicle) arrives at the area. They are inspecting the border. 3 by green helmet spanish AFOL, en Flickr 3 1 by green helmet spanish AFOL, en Flickr 3 2 by green helmet spanish AFOL, en Flickr This vehicle features a quad 7.62 mm machine gun to provide support and self-defense, however other versions can carry a mortar, a TOW missile… Suddenly, the MRAP crew spot the sniper, who opens fire against them, so they have to do something... -Sierra 1, we are under sniper fire, we return fire, we return fire. 4 by green helmet spanish AFOL, en Flickr And the machine guns take no time in silencing the enemy. 5 by green helmet spanish AFOL, en Flickr After this small skirmish, the 2 members of the crew decide to inspect the river… 6 by green helmet spanish AFOL, en Flickr -We need the bridge layer tank, call the HQ. Call for an EOD team and the HUMINT cell, we need to get info from that fighter´s gear but there may be bobby traps or IEDs; however we will have to identify him and take his body for a proper burial. -Yes, Sir. They left the area and a few minutes later a bridge layer tank arrived. As many other armoured vehicles in Erotema, it shares the same hull than the previously seen SPH and AAA tank. 7 by green helmet spanish AFOL, en Flickr 7 1 by green helmet spanish AFOL, en Flickr 7 2 by green helmet spanish AFOL, en Flickr This model can save obstacles up to 14 metres long (approx). A future version will have a longer bridge (the real Leguan tank can save obstacles up to 24 m). The first thing the tank must do is lower the front support. 8 by green helmet spanish AFOL, en Flickr And after a short time the bridge is laid. The advantage of this sliding bridge is that it is difficult to be seen from longer distances, as the overall height is lower if we compare it with older bridge layer tanks. This model is inspired on the German Leguan bridge layer tank, in use in many European Armies. 9 by green helmet spanish AFOL, en Flickr 9 1 by green helmet spanish AFOL, en Flickr So the tanks can cross the river. Let´s slip the dogs of war!!! 10 by green helmet spanish AFOL, en Flickr Another member of the same-hull-family. The MBT has a 125-mm smooth bore gun, a coaxial 7.62 mm machine gun and a remotely operated 7.62 mm machine gun on the turret. 16 multipurpose grenade launchers (smoke or fragmentation grenades) complete the weapons array. As it has the engine in the front, it can be used as an APC. 11 by green helmet spanish AFOL, en Flickr 11 1 by green helmet spanish AFOL, en Flickr 11 2 by green helmet spanish AFOL, en Flickr 12 by green helmet spanish AFOL, en Flickr The bridge is left so other members of the COAC can enter Briolui with heavy vehicles. -
My entry for Round 3 of the Middle Earth LEGO Olympics over on MOCpages. My category this time was Amon Hen. My opponent’s homepage. I really enjoyed this build, and it was fun to do a decent sized landscape again. I was a little apprehensive about having to build so many trees, but they ended up going quite quickly. In total the build took 8 days to complete. A huge thank-you to Graham and Michael for all their support and critiques along the way, I know it wouldn’t have turned out as well without them! Lots more pictures on Brickbuilt. Thanks for looking, C&C welcome
-
[GBW] - CP 1 - EROTEMA – HOW TO PREPARE FOR AN INVASION
sigpro posted a topic in The Great Brick War
[GBW] - CP 1 - EROTEMA – HOW TO PREPARE FOR AN INVASION There is a meeting at the Erotema´s Army Headquarters. Two officers of the Army Staff give instructions to prepare Erotema against an invasion from Briolui, and there is an officer of the Combat Engineers Brigade and another from the Mountain Brigade. There are also orders to improve Refnor´s and Filace´s land defenses. PREPAR1 by green helmet spanish AFOL, en Flickr Combat Engineers have many main functions: provide protection for their own troops by building shelters and other useful structures; provide mobility by clearing mine fields or building roads or bridges; and impair enemy movements by laying mines or preventing the use of bridges, roads, etc. This is what our 4-strong Combat Engineers squad is doing today. They have to prepare explosive charges in a bridge that leads to the capital town of Erotema, located in grid D4. It will be not the only bridge being prepared for an eventual invasion, of course. All the main bridges are to be prepared for an invasion (in grid E4 also). IMG_20170401_095522 by green helmet spanish AFOL, en Flickr IMG_20170401_095541 by green helmet spanish AFOL, en Flickr This bridge can hold the weight of a 70-ton MBT at a time (no more than 70 tons at the same time), so it is strategic for the defense of Erotema. Here we can see the squad leader discussing where to place the charges and the amount of TNT to set. dialogo ingenieros by green helmet spanish AFOL, en Flickr They decide to go down rappelling. The bridge is completed and ready to be blasted if necessary. This other bridge is easier to sabotage, and they use the zodiac to set the charges. ZODIAC1 by green helmet spanish AFOL, en Flickr They are struggling with the water to complete their mission. zodiac2 by green helmet spanish AFOL, en Flickr Beaches must be prepared too, in grids C3-C4-B4-B5-B6-C6. They are laying an anti-tank mine. The Erotema Army has 2 types of anti-tank mines. Those which blast by pressure and anti-handling land mines. The latter can´t be moved and will blast if a heavy vehicle passes by very close. IMG_20170329_205909 by green helmet spanish AFOL, en Flickr Walls also provide protection. These group of builders have selected a place close to the border with BRIOLUI to raise a wall, in grids E4-E5 and in the borders of REFNOR with other RON nations (grids E5-E6-F6-F7-E7-D7). The wall also covers the borders of EROTEMA with the allies FILACE and REFNOR (C3-D3-D4-E4-E5-D5-D6). IMG_20170401_113817 by green helmet spanish AFOL, en Flickr The wall is very high, more than 3 metres, and has machine guns, grenade launchers and detection devices all along it. IMG_20170401_114058 by green helmet spanish AFOL, en Flickr In another part of the country we have a brave squad of the Mountain brigade. They have the order to set up an anti-tank sites in a hilltop, and this is only one of many. Grids G3 and E5 in Filace, Erotema and Refnor. HILLTOP1 by green helmet spanish AFOL, en Flickr HILLTOP2 by green helmet spanish AFOL, en Flickr One of them must climb first and secure the way for his comrades. HILLTOP3 by green helmet spanish AFOL, en Flickr Of course, it is a hard climb. HILLTOP4 by green helmet spanish AFOL, en Flickr It´s a hard work. Why? HILLTOP5 by green helmet spanish AFOL, en Flickr After a few hours they have finished. HILLTOP6 by green helmet spanish AFOL, en Flickr Another view. HILLTOP7 by green helmet spanish AFOL, en Flickr And they show us how to deploy in case of a threat. HILLTOP8 by green helmet spanish AFOL, en Flickr Close up on the Anti tank missile launcher. Inspired on the TOW, it has the same features, with a Night Vision sight and possibility to engage slow helicopters. The other weapon is a more conventional grenade launcher, with two types of warhead: HEAT and fragmentation. The first one is against “hard” targets (tanks, not able to destroy but able to cripple; APCs can be blasted) and the second is for “soft” targets (HUMVEES, trucks or similar). Without wind, they can target a slow helicopter too. HILLTOP9 by green helmet spanish AFOL, en Flickr -
I built my first Japanese themed MOC tp try out some ideas. It's just a smal scene, I hope you like it: Full album: http://www.brickshelf.com/cgi-bin/gallery.cgi?f=568715
-
"The Crash at Crater Canyon (part 1)" is a thrilling two-part episode of the 1950s / 60s TV series Woody's Roundup. In this episode, Jessie the yodeling cow-girl is knocked out by Prospector Stinky Pete, as she had discovered Pete's plans for Sheriff Woody and the town he protects via the mine tunnels under the town filled with dynamite and nitroglycerin, set to blow up high noon the next day to destroy the town in a giant sinkhole. Jessie is then placed unconscious on a steam loco which is uncoupled from it's train and sent hurtling uncontrollably through the wilderness to Crater Canyon, where it will meet the Cannonball passenger train on the bridge. (Thus destroying the only fast way to town and keeping Jessie out of the way for the town to explode with Woody saving Jessie and not in town to stop Pete's plan.) Naturally, Woody rides out on his horse (Bullseye) to save Jessie,who has at this point woken up and discovered the throttle lever missing and steam loco's brakes disconnected. This episode ends with this scene above: Jessie reaching for Bullseye and Woody while both trains are barreling towards each other and certain destruction, while the timer on the clock in town square ticks ever closer to noon. What happens in the next episode will never be known, as the show was pulled from the airways as the film office where the future episodes and unfinished scripts were kept burned to the ground, destroying all the un-aired episodes. It is assumed, though, that Woody rescues Jessie, stops the town from exploding, and jails Pete all before the credits roll. The real scene takes place on my Eads bridge with engines 2 and 3, plus the passenger train for the latter loco. The yellow steamer is not even finished: the side not shown is missing one wheel and moving piston and was carefully staged to hide this fact! The story behind the picture is 100% fake, as the Woody's Roundup only exists in Disney / Pixar "Toy Story" films. (specifically the second one) I tried using every to make the story sound believable for that era of TV it was set in, such at the middle 1950's to early 60s when Howdy Doody and Westerns in general were very popular. What do you guys think?
-
Usually I try build completely original mocs but once I saw this scene I could not resist. It is based off the main setting for the cinematic story trailer. I would have loved to use olive green but unfortunately I have nowhere near enough :P The characters where fun to make even though they may not completely resemble their original source. I don't play the game (because off our old family PC) but I would highly recommend it to anyone as it looks amazing. Hope you enjoy :D This is also a chance to try out the new peices from my first BL order. Mainly bley tiles :P
-
The landscape for this scene was built as a commission, and then I finished the build by adding some houses, the fences, and figure activity. After learning that medieval roads often had fences or walls to allow animals to be moved effectively, I wanted to include that detail here. Brother Steven inspired the woodwork on the water mill. This is an entry into the large miscellaneous category of the Colossal Castle Contest. Market day makes for a lot of traffic on the village road as animals are taken to be sold, or purchased and brought home. The watermill is also a popular location as villagers purchase flour and bring grain to be ground. As usual, there are more pictures on brickbuilt. Your feedback is always welcome
-
Hello again :) I built this MOC for competition in Polish forum. We should build MOC matching climate to any LEGO set, which was not spent years beyond 1997-2005. Our hero must go through the bridge which rotates clockwise when we draw Technic axle. Gallery on Flickr.
-
Mod note: Zombie-bumping this because of major updates to the structure and the possibility of really building this is pretty high. I hope this is ok. This bridge was inspired by Bad Cop's Pursuit (set 70802) and the short section of railroad bridge included with that set. When I first saw it, I thought it would make a great play feature for a train bridge that is actually usable by trains. Here is the result of all that working and reworking: 12 sections of PF / RC train track (It won't work with 9V, sorry!) with 1 section "failure point" plus 2 studs of space to separate the moving from non-moving items and allow the hinge to do it's job. The track leading up to the "failure point" as I call it, is raised ever so gently at an angle of (at most) 1 1/3 bricks high per 1 section of track. (The angle of ascent / descent depends on which part of track you are on, but for the most part it's consistent.) The design of the bridge is modular so that you can easily disassemble the bridge for transport. It disassembles into 2 lower ramp sections consisting of 4 tracks each and 2 flat sections placed onto plates with the 1 "failure point" module consisting of a hinged (on one end) two-track section in the middle. The bridge when the track is safe to cross: the pins are inserted and it should be stable. Naturally, a very heavy engine will snap the Technic rods in half, breaking the bridge permanently. Thus you can only use this engine with Small engines like my 2-6-0 + it's consist, (AKA the Lone Ranger train) the My Own Train series engines, or something of comparable weight. I don't think putting a articulated such as a Union Pacific "Big Boy" or even a non articulated Pennsylvania "T1" would look very good on this bridge, as these (among other large types) are longer than the bridge gap itself. This is how it works: Their are two hidden Technic rods under the track that should allow trains to pass by safely overhead. Pull the Technic connector and your bridge collapses. Lift the bridge up and move the rod back in to reset the bridge for the next adventure. To give you a bit of perspective on this mode's progression as a concept, here is the original idea from February 2015. It was a lot more complex with two rods and two break points, plus in all likely hood it would not have held up well if carried with the flimsy base-plate underneath. Nowadays we have only one drop point and reinforced regular plates! (this model is not in the LDD file, and is just for demonstration purposes) Updated LDD file for the newer bridge model: http://www.moc-pages...1472495977m.lxf As usual, all comments are welcome, be they questions, suggestions, or complaints. Thanks for reading!
-
This is a set 76057 (Spider-Man: Web Warriors Ultimate Bridge Battle) inspired model in single track train bridge form. It can be easily extended to make a higher or shorter / longer bridge, depending on your needs, but as it stands now it's 10 tracks long with two 6 track long ramps. The connector clips between the roadway and tower are not connected because they were crashing LDD with it's many rotation issues, though it works in real life the same way as in set 76057. Without the ramps attached. The deck has been lowered and the tower added some height to let a double stacked container train of 10219 style cars through, (those are the tallest cars Lego has made) The model has two towers, four deck sections, and four deck with connector modules, plus two ramps. (one left and one right) The (UPDATED) LDD file is available here: http://www.moc-pages.com/user_images/80135/1472311962m.lxf As usual, Comments, Questions, and Complaints are always welcome! NOTE: quote edited to remove my name and substitute it with my username "Murdoch17".
-
Having recently bought the Spider-Man Bridge Battle set, I thought it would be amiss not to display it and make a chaotic diorama out of it. IMG_9275 by J G, on Flickr I'm not much of a MOCer (at least not anymore), so there's not much modification apart from the Sandman's 'sand hands', taken from that awful Sandman/ Rhino set. IMG_9282 by J G, on Flickr I'm glad the bridge comes with a birds nest on top, so I could make this lame joke with the Vulture. IMG_9292 by J G, on Flickr Ben Reilly's having some trouble keeping this taxi out of the water below, though his troubles are far from over. IMG_9285 by J G, on Flickr Whilst Spider-Girl faces off against the Scorpion and Kraven, Deadpool follows in the footsteps of the Great Oily Lord Ainsley Harriott and gives his meat a good old rub. IMG_9280 by J G, on Flickr Here is an under-shot of the entire thing. I had a lot of fun putting this together, and I can't recommend this set enough. IMG_9293 by J G, on Flickr Link to the album here; https://www.flickr.c...157670900135582
-
This truss bridge's design was started a decade ago when I received CITY set 7900 (Heavy Loader) for Christmas 2006. I loved the truss part's Technic-y design, but it didn't work with my original black and red trains, so I shelved the parts, hoping that someday reality would catch up with my dreams. After about 4 years, I designed a workable bridge using most of the parts of Bionicle set 8995 (Thornatus V9) which was purchased for the parts alone in 2010. It looked bad and wasn't tall enough for most of my trains, so I tore it apart in 2012. (you can see it in the LDD screenshot above) I kept sitting on the idea for another year and a half until 2014, when I designed this current bridge. This bridge was just finished in Real Life yesterday due to constantly tweaking the design and perpetually fearing it wouldn't work right. The model is five tracks long, but the bridge itself is four tracks. The reason for the extra track is to give the engines preparing to cross the bridge room to straighten out from curves / switches. I still have another two pieces of flex track (not shown) before the bridge as well for evening five tracks out to six.... it makes layout planning so much easier when (mostly) everything is in even numbers of track. The model is not able to be doubled up to make a two track wide bridge without significant modifications. The model can fit 8 studs wide trains with ease, and is tall enough to let all my trains (and most, if not all, of the official sets) through. The bridge is even strong enough to be carried by the top grid-work, as long as you don't swing it around / slam it down hard. LDD file for the newer gray-scale bridge: http://www.moc-pages...1451924070m.lxf Comments, Questions, & complaints are always welcome!