Search the Community
Showing results for tags 'Technic'.
Found 1584 results
-
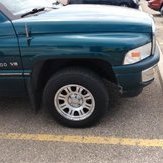
Link: https://bricksafe.com/pages/2ndgenguy/mini-skid-steer-it-was-meant-to-be. Just a little creation using the tiny skid steer, and an old city style S.U.V. Suspension on trailer, and truck, this set is always changing, but I have to say this one is my favorite so far. The skid steer is unchanged, but I do really like these little sets, they really spruce up small scale stuff. (I know opinions and as you know, belly buttons)
-
https://bricksafe.com/pages/2ndgenguy Getting there, any thoughts, good or bad. (not crazy about how low the actuator is). Still needing to run the axle up front for that, possible on both sides. Bit more progress, finally time to smooth out the details). Still rough, waiting for parts. New here, and hoping I understood correctly to post new projects here. (Images on Bricksafe). About 3/4 done a 66 by 25 stud tandem flat deck for the "newish" Defender (also modded, black on green colour scheme, with eBay decal sheet, lifted, solid hitch, bumper tow bar attachment points, and a few others). Has 4 wheel independent suspension, with about (2.5 to 3 studs changed), of travel at each wheel with springs, a fold down ramp using one short linier ram, and a fold up dolly wheel at the front. Still lots of little things to finish, any advice on scaling, or tricks of any kind are very much welcome. Edit: now 4 to 5 studs of travel. Trying to use as many olive green panels, and black beams I can, but still waiting on a few more parts, so it's a bit of a VW Harley Quinn. I'm hoping my image works, but haven't much lunch getting the format small enough to post. If this isn't the right place to do this, please let me know, but I'm sure I don't need to ask that. Happy to be here and thoughts and feed back would he fantastic. (Still trying for an image, think this should work)
-
.thumb.jpg.3f4deb19d1e4f36dfb3084a150286f74.jpg)
[TC22] Mining Truck
Jayden posted a topic in LEGO Technic, Mindstorms, Model Team and Scale Modeling
I want to build something inspired by this beast, although my yellow panel collection is rather light on, so it will be in black/LBG. Here is my progress so far: and under side shot: There is currently: 1 PU L motor for drive. 1 PU L motor for steering. And 1 PF M motor for tilting the bed using these pieces https://rebrickable.com/parts/32039/technic-axle-connector-with-axle-hole/71/ I am planning for it to powered by buwizz 3.0 -

Ford Transit based tow truck / Halle77
roxXx5 posted a topic in LEGO Technic, Mindstorms, Model Team and Scale Modeling
Hi folks, today i want to share with you my latest MOC. The towing truck from a car museum called Halle77 located in Dortmund Germany. It all started with me fiddling on a Frontaxle design with steering and drive and the question what to do with it back in february this year. I thought it would be perfect for a van / transportvehicle and while building an watching youtube the idea in my head was born to build the towingtruck of said location. The strange part about this partivular vehicle is the way it tips its bed. Instead of simply tilting the bed the whole truck bends its chassis. So the cabin and the bed tilt away from each other. This function is managed by this big linear actuator Between the rearaxle is a simple gearbox to switch to another function: extending the ramps from the bed Here is a picure from the belly And now more pictures from the almost finishid build. I've adjusted the position of the winch to be more inline with the real thing but i can't upload the pictures at the moment. Hope you liked / enjoyed it. If there's any questions feel free to ask. Thanks for watching! -

[FestivalofMundanity] Scissor Lift
Saberwing40k posted a topic in LEGO Technic, Mindstorms, Model Team and Scale Modeling
This is my entry for the Festival of Mundanity, a contest put on by The Lego Car Blog and BrickNerd. To be honest, Technic builds are made for this contest. Up until recently, Technic had many sets that would be considered by many people to be mundane vehicles. Yes, there are flashy vehicles like race cars and dune buggys and stunt planes, but there were also plenty of backhoes and tractors and excavators. Now, it's mostly pullbacks and pretty shells with minimal substance, basically turning Technic into Racers. But, that's a rant for another day. Initially, I had wanted to build a truck with trailer, and include the scissor lift as part of a 3 vehicle ensemble, but ultimately I decided to stick with just the scissor lift, because my depression intervened I decided to make one good model versus try to do three. Plus, the scissor lift is plenty mundane on its own. To really double down on the mundanity, this lift is in the color scheme of the ubiquitous blue Genie scissor lifts. Scissor lifts are really not that glamorous, even among construction vehicles. Like, people don't really see them as cool, and only really buy models or build them out of Lego for diorama purposes. Thus, a perfect fit for this contest. Now, in spite of the apparent simplicity, this model is deceptively complicated. Getting the steering to work to achieve the right steering angle was kind of hard, and the lifting turned out to be shockingly difficult. The lift, at rest. The work deck can extend and retract, just like the real thing. It is locked in place by a spring loaded latch, which is weirdly one of the things I am most proud of. It's a simple, but elegant solution. Just pull the lever... ...And the platform slides right out. The extension locks in both positions. There is an opening door at the back, with a working latch, and a ladder leading up to the platform. The bottoms step of the ladder folds, this is not a feature on the real machine, but a concession to allow access to the steering knob. The ladder folded, revealing the steering knob. The steering was actually somewhat hard to do, it was quite difficult to get the extreme steering angle. Real scissor lifts can actually turn the front wheels almost 90 degrees, to allow for a really tight turning radius. This model can't quite do that, but it's nearly as far, and getting the chassis to be both narrow and flat was hard. Also visible is the reversing box, this is so that the steering knob rotates in the expected direction. Maximum steering angle. The model will actually turn around the inside rear tire, much like a real scissor lift. I actually have firsthand experience with this, I used to work for a certain orange hardware store, in the rental department. Our store had some larger equipment, including scissor lifts, and at times I had to park them. Figuring out how to turn was interesting. Maximum extension. Technically, the lift could go higher, but I could not actually figure out a solution that would work, so I went with the big linear actuator. I originally had a mini LA directly pulling the bottom of the scissor linkage, but that proved to be not up to the task, the clutch kept slipping. The lift has about 19 centimeters of travel, going from a deck height of 8 centimeters to a height of 27 centimeters at maximum extension. The deck is about 15 centimeters long, front to back between the guard rails, and can be extended to 21 centimeters. The lift function is controlled by the 12Z gear at the front. This is really the only good spot for it. I thought this would be better than having both knobs on the back, which would interfere with the rear ladder. In addition, the steering and lift would never be used together. Technically speaking, this is in scale with Technic figures, sort of . The most common kind of Genie scissor lifts are only 32 inches wide, while this model to scale would be more than twice as wide. However, large lifts like this do exist, so I think it still counts. One last glamor shot. Building in blue is hard. Also, the gray connectors at the corners are not random, those are actually tie off points, like real scissor lifts have. I am very happy with this model. It looks right, has pretty much all the functions of a real machine, and was actually finished on time. Just as an aside, this model was inspired by something I had to do at my rental job. Usually, our scissor lifts had to be delivered to job sites, so we had a guy from the vendor that maintained the large rental equipment come out and pick up the lift using a special trailer. The trailer in question was made by JLG, and had a deck that could be lowered to the ground so the scissor lift, with its low ground clearance, could be driven on. I had initially want to replicate the full setup, of the truck, with repair tools, the JLG Triple L trailer, and a scissor lift. I scrapped the trailer because the ramp I built was ultimately still too steep for my scissor lift model to drive on, and there was no way to change that, so the entry is just the lift itself. Later on, after I do some digital work, I might post some pictures of the innards of this thing, it is tightly packed. Thanks for looking. -

[MOC] 42139 Alternate - 4x4 quadbike
TGBDZ posted a topic in LEGO Technic, Mindstorms, Model Team and Scale Modeling
When I first saw the 42139 set, I knew I had to get one. From the functionality aspect, the set for the relatively small price tag has a lot to offer, and it's an amazing parts donor as well. But I believe that I wasn't the only one that thought the 6 wheel ATV is quite an unconventional vehicle and it would look rather cool to see this as a more common 4x4 quadbike. So I made an alternate / mod that turns this into more classic looking quad. The front and middle part of the build remains almost unchanged (switched 7 long beams from white to orange to make better looking rear mudguards), also there is an extra part at the front to secure the winch hook. Almost no changes means that the functionality remains the same: winch steering Suspension 2 speed gearbox Working cylinders The cargo box on the back is fixed, so the dumping bed mechanism has been removed. To compensate for this there is a place to attach a trailer. Leftover parts are a great source material for the trailer itself, sadly no pins were left to make a proper trailer to complement the quad bike. Oh, and the best part is that it's still possible to assemble the chainsaw If anyone is interested. building instructions are available at REBRICKABLE Cheers! -

[MOC]◄ Cadillac Fleetwood Brougham 1994 ►[2022]
Michael217 posted a topic in LEGO Technic, Mindstorms, Model Team and Scale Modeling
Welcome to my garage LEGO!!! Hello! My name is Michael. I'm a Builder from Russia, I love muscle cars! Cadillac Fleetwood Brougham 1994 The last of the classic full-size rear-wheel drive Cadillac frame sedans! Description: - Drive - 2L motors - Steering - Servo - Power Supply - Small BB - Independent suspension - The steering wheel turns with the wheels - Open the doors, hood... - Well-designed interior and space under the hood - Weight 1910 grams Instagram: https://www.instagram.com/lego_muscle_garage/ Join my group in VK: https://vk.com/legomusclegarage All photos on the link: https://bricksafe.com/pages/Michael217/cadillac-fleetwood-brougham-1994- Enjoy your viewing! Rate, comment! Thanks!) -
Dear all, While the news went out that lego was designing a new liebherr crawler crane, I decided immediately to build my own version, with 6 PU motors, 3 L ones and 3 XL's. the boom will have 9X9 dimension. The body uses the turntable of the 42082 rtc. Untill now the body is more or less finished, but it needs still tweaking and further adjusting while the build advances. Now I'm waiting for parts for the boom including some weights for the hook. Here are some photos, including 1 with the previous 42042 crawler crane This is an early work in progress, the cogs are better reinforced and everything is working smoothly now Here the main body is more or less finished, including cabin and ballast (2 times 9 big panels) Here is an image from behind, I used the linear actuators for support of the ballast, and to connect the ballast directly to the axle of the pulleys. I thought it looked very cool a construction like this. The batteries of the batterybox can be easily replaced (no screws). You can also see part of the drivetrain, maybe this has to be geared down a little bit more, the crane runs still a bit too fast. And last but not least a photo for compairison of scale. I hope you liked it for now, as always comments or questions are always welcome
-

[WIP] JCB Fastrac Two
JLiu15 posted a topic in LEGO Technic, Mindstorms, Model Team and Scale Modeling
Here's a new project I'm working on. It is a model of the JCB Fastrac Two. https://www.autocar.co.uk/car-news/features/christmas-road-test-worlds-fastest-tractor A modified JCB Fastrac tractor, the JCB Fastrac Two is the fastest tractor in the world, and can reach 150mph. My model will feature drive, steering, an inline-6 fake engine, and a working steering wheel. The model uses the Control+ system and features 2 C+ L motors for drive and a large angular motor (from the 42114 set) for steering. So far, I have done some initial modeling in Stud.io. I've modeled the drivetrain and the front axle, and the C+ hub sits between them near the bottom for easy battery access. Photos: -

[MOC] Flatbed trailer w/ RC PF
Jude posted a topic in LEGO Technic, Mindstorms, Model Team and Scale Modeling
Hi! Here is small preview of my first serious Technic MOC. More info will come if this is good enough content for here. Here it is: Goal here was just to mod set 42043 B-model, but things got out of hand as always, you test ideas and then suddenly there is something to show for. Truck pulling this is my mod of 42043 B-model, drive by 2x PF XL motors geared 1:1 in drivetrain, then reduced by the new diffrentials, 1st axle is locked, 2nd axle with differential. Steering mechanish is modded from 'Ppung daddy' YT video. Trailer functions: - 3 axles with suspension, soft springs (might need to replace 1st axle with hard springs) - RC loading ramp, L-motor - RC leg support, L-motor - manual motorized winch, M-motor - rear PF lights, black tape is used to cover the extra shine Heres also a mod of Madoca1977's work: source=https://imgur.com/a/Sbmy1WX[/img] -
[C-model] 42137 - Race Truck
Tomik posted a topic in LEGO Technic, Mindstorms, Model Team and Scale Modeling
LEGO Technic set 42137 - Formula E Porsche 99x Electric was not received well so I decided to give it the second chance same as I did with set 42106. Formula E is equally priced as Mustang but it has 100 parts less and looks like its chassis. I wanted to build out of it something bigger and higher so I chose truck. This race truck is my first pure alternative model built out of set 42137. Why pure? Because I've already built another model from this set that I supplemented it with few gears to make it more "functional". I'm gonna show you it when video is ready. Back to race truck... It features two pullback motors with ratchet mechanism similar to original model. I had to build it just 13 studs wide (2 studs narrower than Formula E) because I ran out of parts. Building instructions are available for sale at rebrickable.com -
[MOC] App-controlled bus
mic8per_ posted a topic in LEGO Technic, Mindstorms, Model Team and Scale Modeling
After a half year of work I present you this bus.The goal was to make as functional bus as possible with least amount of motors.The result is fully RC bus with openable doors, propulsions and steering using only 3 motors. The steering angle is really good. Steered by Large angular motorPropulsion uses XL-motorDoors work smoothly & flawlessly. They are powered by L-motorPowered by C+ hub.Lots of interion & exerior details. Building and programming instructions for $9.99: https://rebrickable.com/mocs/MOC-100999 Video: -
Model of New Jersey Transit's 2020 New Flyer XD60 articulated bus. The model has roughly 5200 pieces. Features drive, steering, independently controlled doors, and custom stickers matching the real-life NJT XD60. Functions/features: Drive Steering Remotely controlled doors Custom stickers Instructions available on Rebrickable: https://rebrickable.com/mocs/MOC-100374/JLiu15/new-flyer-xd60-articulated-bus/#details In early 2020, the first New Flyer XD60 articulated buses began hitting the streets of New Jersey. The 3rd generation of New Jersey Transit's articulated buses, these buses replaced the aging Neoplan articulated buses that NJ Transit operated since 2004. A total of 110 buses, these buses are a common sight in the Newark area, as well as in Hudson County on routes to New York City. They are commonly used on routes 1, 13, 25, 39, and 70 in the Newark area, and routes 123, 125, 126, 128, 154, 156, 158, and 159 to NYC. The buses are assigned to four garages, with buses 20801-20828 at Hilton, 20829-20848 at Big Tree, 20849-20891 at Fairview and 20892-20910 at Meadowlands at the time of writing. The idea to model NJ Transit's New Flyer XD60 started when the buses were still under delivery in 2020. Work on the model started with the Stud.io model in December 2020, and the physical model in January 2021. The plan was for a 1:20 scale model using 49.5x20 tires. The functions are drive with a PF XL Motor, steering with a PF Servo Motor, and remotely controlled doors with 1 PF Medium Motor each. I initially thought of including a kneeling mechanism, but seeing as the bus kneels on its front axle, the mechanism was difficult to re-create in LEGO due to there being 3 axles, so I abandoned the idea. The seating layout on my model is identical to that of the real bus - thanks to photos posted in a NJ Transit Facebook group, I was able to accurately model the interior with all 59 seats. I wanted to make a bike rack for the model as well, but seeing as the bike rack on the real NJT XD60 has plenty of complex curves that would be very difficult to replicate while keeping it robust at this scale, I decided against it. In fact, on real NJT XD60s that have the bike rack removed (which is most of them), you can still see the holes in the bumper where it is attached. The bumper on my model has connectors where you can theoretically attach a bike rack, so I guess this is accurate. The model is built with a Technic chassis/frame and a System finish. I initially wanted to make it all Technic with some System details, but seeing as System gives a cleaner and more detailed finish, I decided to go with all System for the bodywork. In fact, this is my first model to have a System finish - all my previous MOCs were at least 80% Technic. The Technic chassis has a frame sitting above it to support the roof, as well as the motors for the door opening mechanisms. The doors are opened with mini linear actuators (1 in the front door, 2 in the rear door). The mechanism for the rear door is located in the upper frame, but because the front panel on the front door curves inward a little, as well as space taken up by the front destination sign, I had to place the mechanism for the front door in the floor, with the motor transferring drive to it via a vertical axle. I initially expected the bellows to be difficult to make and take plenty of trial and error, but after just a few tries I was able to come up with a well-working setup. The bellows are supported by a central section that keep the front/rear halves of the bellows symmetrical at all times, and rubber bands help the bellows maintain their shape, In fact, no matter how I touch the bellows, they will always fold smoothly. It added no extra friction to the model turning, and overall I consider this part to be a huge success. Prior to building this model I did not have many white System pieces, so thanks to Stud.io I was able to design the model digitally and be satisfied with everything before I ordered any pieces. Thanks to the NJ Transit Facebook group, I was able to get an image of the roof of the bus to accurately model the roof. The hardest part to model was the front roofline curve - the complex shaping is quite difficult to model with LEGO pieces. However, my final design turned out pretty well, and looks pretty much seamless. Because I'm using System pieces for the body, I had concerns of structural integrity as this is something I'm not able to accurately test on Stud.io, but after building it on my physical model it actually turned out to be very robust. Once the building process was finished, I created custom stickers based on the real NJT New Flyer XD60's details. In fact, most of the stickers were made from photos of the real bus's decals. The stickers are printed on clear glossy sticker paper, except for the destination sign stickers as the details on a clear sticker paper barely show up on a black surface. I initially wanted to replicate bus 20801, the first bus of the series, but that bus was later retrofitted with a grille in the rear so I decided to model bus 20818 with route 39 in the destination sign, as the real 20818 is a Hilton garage bus that operates route 39. I acquired a gray paper backdrop for the photos and video as taking photos on a white backdrop would not allow me to clear the background in GIMP due to this being a white model. I'm really satisfied with how the photos turned out, and there's no editing necessary so I expect the gray backdrop to become the norm for MOC photos from now on. I recently got a GoPro as well, and thanks to its small size, I was able to put it through the rear door to film the model driving from the interior, making you feel like a LEGO passenger on a LEGO bus. Overall, this has been by far my largest project to date. While it's not the most advanced, as it only has 4 motors, it has nearly 5200 pieces and is a revolutionary MOC for me as this is my first model with a System finish. The model took about a year to finish, much longer than any of my previous MOCs. I had lots of fun working on this project, the looks are accurate, and the functions all work smoothly. Given how well this model turned out and being a busfan myself, I definitely see myself making more bus MOCs in the future. Video: Photos:
-

[MOC] Lexus LC500 EV3 1:8
StudWorks posted a topic in LEGO Technic, Mindstorms, Model Team and Scale Modeling
After four years of on-and-off work, I completed my first 1:8 Technic car, a detailed Lexus LC500 powered by Mindstorms EV3. Why Mindstorms EV3? The project started before I purchased a BuWizz 2.0 along with PF motors, I also wanted to build the best car I could with EV3, as it first got me into Lego Technic almost 7 years ago. After those previously mentioned years of on-and-off, which were for designing the chassis, it took five months to make the exterior, as close to the real car as possible. The LC500 EV3 has opening doors, hood, and trunk, working steering and drive with working steering wheel and paddle-shift* 4-speed gearbox, retractable "Performance Package" spoiler controlled by a medium motor, full independent suspension, fake detailed V8 engine with moving pistons, DNR shifter, adjustable front seats*, rear seats, functioning glove box, and custom stickers. *Special thanks to @Jeroen Ottens for his great DB11 instructions! Greatly helped with the chassis, front adjustable seats, and paddle shifters. The LC500 EV3 is more of a display model than ideal RC car (due to popping cv-joints in the differential and stressed motors due to weight) so I decided to keep it as is. More pictures on Bricksafe: https://bricksafe.com/pages/StudWorks/lexus-lc500-ev3 Thanks to the EuroBricks community for helpful feedback along the way. -
Forklift, Xl-motor for movement, l-motor for turning the wheels, two l-motors for lifting and tilting the boom. Instagram: https://www.instagram.com/legov94/
-
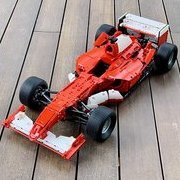
[MOC] Ferrari F40 1:10 Redux
lnteknik posted a topic in LEGO Technic, Mindstorms, Model Team and Scale Modeling
Ferrari F40The most iconic supercar from the edgy eighties. The last hardcore beast signed off on by Enzo. The absolutely definitive Ferrari. The legendFunctions- Working steering wheel- 5+R dogleg gearbox- Fake V8 working engine- Independent double wishbone suspension at all 4 wheels- Openable doors, front and rear clamshell- Manually operated pop-up headlights Design and InspirationThis creation is inspired by the fantastic work of @jorgeopesi from 7-8 years ago, reborn with contemporary Lego Technic pieces. I kept the gear shift mechanism of the original, and changed the gearbox to a modified version of @Rudivdk's 5+R manual transmission. Some exterior solutions also take reference from jorge's version, but everything else from steering, suspension setup to engine, body panels etc are my own designs. It's not a mod by any means, but hopefully a worthy remake. With the evolution of LEGO parts palette over the years, I have also managed to add more details to the model, such as: - cooling slots under the rear spoiler - exhaust manifold and a see-through rear grille - detailed interior and more representative racing bucket seats - detailed engine bay with all the bells and whistles (intercoolers, airboxes, etc) - as well as, the iconic line that runs across the entire car - also worth mentioning is the 3-piece rod hidden in the rear bumper that supports the rear clamshell when it's opened. Construction The car was originally built with parts from set 8145, 8070, and additional parts from my parts bin. However, 2x 42125 is also a great base, which provides 70% of the parts. The missing 30% is listed here. When making instructions, I have also tried to substitute expensive parts such as Red 14L soft axles, or Red 1x6 thin liftarms with more affordable solutions. The wheels used in the instruction are also from set 42125 to save cost, but if you want to use standard technic 56mm D wheels - part 15038, just need to use 7L liftarms instead of 6L as the rear wishbones. These wheels will stick out a bit and provide a slight rake, giving the car a more aggressive look. The wheels used in photos are third party/non-lego parts. They are great (provide a good offset between the front and rear wheel covers, making the rear wheels look "deeper") but perhaps not for the purists. You can send me a private message if you want to know where I get those wheels from, but note that I'm in no way affiliated with the seller. Neither can I guarantee the quality of the product nor seller's trustworthiness, so tread at your own risk. Instruction hereThe instructions booklet is 666-page long and contains 828 steps (talk about "Manifest" if you watch that show :D). You will find 11 modules and 10 assembly stages in between to combine the modules to form the final model. You can follow the instructions in the chronological order of the pages, or skip around, build all the modules first (in whichever order you like) and then follow the assembly steps, just like how real cars are built in the factory. Either way should bring you a enjoyable building experience. Thank you for reading this far. I hope you enjoy the write-up. Look forward to hearing your thoughts More pics here (bricksafe) Sneak peeks of my upcoming creations -

[MOD] 42132 Mods and improvements
Arioh posted a topic in LEGO Technic, Mindstorms, Model Team and Scale Modeling
42132 may be one of smallest sets of first wave of 2022, but still, its awesome tiny set. I created replacement engine for its B model, which just drops in on default attachement points without any alterings of the frame. I even tried to make it at least detailed... Empty frame, and new and old engine side-by-side New Engine on its place. LDD model of said engine - https://www.dropbox.com/s/wlkeqmghsg38m1y/42132 B alt engine.lxf?dl=0 -
[MOC] The Snow Racer
mic8per_ posted a topic in LEGO Technic, Mindstorms, Model Team and Scale Modeling
Skid steer off road vehicle. The PF elements are fully protected from snow, and it actually works on harder snow. Driven by two PF L-motors, one motor per side. As a power source can be used BuWizz or any other 4-port battery box (not in the parts list). Building instructions+parts list: https://reb.li/m/95837 -

[MOC] Working Icebreaker
KirTech LAB posted a topic in LEGO Technic, Mindstorms, Model Team and Scale Modeling
Hi! It's not a new MOC, but finally I was managed to film a video with English comments, so here you can find a piece of true winter :) The model is 73 cm long, weights 2.4 kg (without underwater stabilizer) and contains seven motors and 2x Buwizz receivers. The main feature of the model - it can really break the ice. Functions: buggy motor for the screw, working rudder, two drills and adjustable trim of the vessel. More photos you can find in the album: https://www.flickr.com/photos/141718063@N06/albums/72177720295371540 Thanks for watching :) -
Another simple modular building which uses my old idea of spinning gimbals. Video demonstration: Instructions are available on Rebrickable. Thank you for your attention!
-
.thumb.jpg.d2cf4e6d8ddf5d2fe408f3650c97ec9e.jpg)
[GBC] Philtech's GBC Modules
Philtech posted a topic in LEGO Technic, Mindstorms, Model Team and Scale Modeling
Philtech's GBC Modules Here I would like to present you my GBC Modules. First of all I want to show you my GBC Module - Slider. GBC Module - Slider (see below) GBC Module - Lifting Rim GBC Module - Slider It has a slider that pushes the balls up an inclined plane. Here a few images: Here you can see the mechanism: The io-file can be found here: https://bricksafe.com/pages/Philtech/gbc-module-slider This MoC at Rebrickable: https://reb.li/m/112266 Thank you for reading and I hope you like it! -
[MOC] Lifted Truck (with 3 Steering Modes)
JLiu15 posted a topic in LEGO Technic, Mindstorms, Model Team and Scale Modeling
Model of a lifted pickup truck combining Control+ and Robot Inventor electronics. Features 4x4 drive, 3 steering modes, a V6 piston engine, and full suspension. Functions/features: 4x4 drive Steering with 3 modes (normal, 4WD, crab) V6 piston engine Full suspension Opening hood Opening tailgate This MOC originally started as a side project back in the summer as I was waiting for parts to arrive for my New Flyer XD60 articulated bus model. I was initially gonna use the C+ L motors for steering and power it with the Control+ hub instead of the Robot Inventor one, but found that the Medium Angular Motors from the Robot Inventor set took less overall space in the axles if I place the rack sideways. So for the front and rear axles (which are identical to each other), I put the steering motor on top which drives a rack placed on its side, and used heavy duty differentials and planetary hubs. This gave the model plenty of torque, even without any additional gearing down in the chassis. At the heart of the chassis sits two C+ XL motors for drive and a Robot Inventor hub above them. Thanks to the abundance of pin holes on the Robot Inventor hub, I was able to use it as a structural element. The sides of the hub are covered by panels, as a teal hub on a red/black model would be an eyesore. The top of the hub is covered as well to conceal the screen lights, and to power on/connect the hub I installed levers that hit the power/Bluetooth buttons. They sit just below the cab/bed, and are pretty well hidden/out of sight. The front and rear ends of the chassis were reinforced well enough to withstand the force exerted on the shock absorbers, and the front also has a V6 fake engine driven by a C+ L motor. I had to rework the suspension a few times to make it work well and not be too soft or too hard, but I still feel like it could've been done a little better. Initially I was undecided on the bodywork for this model - I was debating between a car-like body (like the 41999), a cab-over truck, and a pickup truck. I eventually went with a pick-up truck, and initially used rims from the Land Rover. I decided to make the model in a red/black scheme, as I had a lot of black panels lying around but also wanted to give it some color. I feel like the bodywork could've been designed better overall, as the entire building process became pretty discouraging and I just wanted to get it finished. As I was working on the bodywork I just felt like the Land Rover rims weren't the best choice for a lifted truck, so in the end I went with the Technic Racing Medium rims in LBG for a more old-school look. Overall, this is a creation I'm not too happy with. Building around the Robot Inventor hub was quite a challenge as I had to cover it completely to conceal the teal and the screen lights. This also meant the charging port is not accessible on the finished model. The looks of the model also aren't the best. I feel like using a single color for the bodywork would've been better without the red/black color break between the cab and the bed, but unfortunately I don't have that many red flat panels and didn't want to use liftarm stacking. The model has plenty of torque and can easily climb over obstacles, but it also suffers from being top-heavy. Programming the control profile was pretty straightforward though, and the 3 steering modes worked well. After building this model, I feel like while the Robot Inventor hub is a good alternative to the Control+ hub (more ports, lower height, more pin holes, etc), it just feels harder to use in Technic builds, as the teal doesn't blend well with most colors IMO (which could be solved by using the yellow SPIKE Prime version of the hub as it's a more common color for Technic builds, but would cost a lot of money) and the screen lights need to be concealed in most situations. It's obvious the Robot Inventor hub is designed with robots in mind and not Technic builds, so in the future, I plan on sticking to Control+ hubs unless it's absolutely necessary to use the Robot Inventor one (e.g. a space constraint). Photos: Video: -
[MOC] BuWizz Baja Truck
Teo LEGO Technic posted a topic in LEGO Technic, Mindstorms, Model Team and Scale Modeling
Hey guys! I present my new model, a BuWizz 2.0 powered Baja Truck! It features: Independent double wishbone front suspension, with servo steering and positive caster for better return-to-center Live axle rear suspension, powered by a buggy motor and BuWizz 2.0 My goal with this truck was to make a small, lightweight truck with excellent offroad capabilities and smooth suspension travel, while also giving it a realistic look with the least number of pieces. Overall I'm quite satisfied with the result! Here's a video: And more photos: More photos can be found on the BrickSafe page: https://bricksafe.com/pages/Teo_LEGO_Technic/baja-truck Hope you guys enjoyed! -Teo -

42132 - Chopper
Ngoc Nguyen posted a topic in LEGO Technic, Mindstorms, Model Team and Scale Modeling
https://www.jb-spielwaren.de/lego-42132-chopper/a-42132/ 162 elements, 9.99 EUR with B model. Go erm nuts? -
Hi guys, after several years of silence and other distractions i finally finished a new build. It's an AMG GT3 racecar in the colors of the Octan corporation. The only thing missing i guess is some sponsor decals from octan. The features are: - Drive and steering with powerfunctions (2 L motors, 1 servo) - Independent suspension on all wheels - Fake V8 engine - Working steeringwheel - Chassis is detachable from bodywork - openable bonnet/hood and doors Lately i'm a little bit into simracing and love to watch GT3 racing, so i decided to build my favorite car from this category of racecars. My availability of parts decided the colorscheme. I hope you like it. Enjoy building and have a nice time everyone. Rolf