Search the Community
Showing results for tags 'Truck'.
Found 657 results
-
Hi everyone, this is my usual quarterly post here. ;-) Just kidding. Note to myself: Post more often on EB! Now to something completely different. I did a few new Mocs during the cold and dark december days. Let's start with something for my petrochemical refinery in my town: a dry powder fire truck with 6,000 kg of solid extinguishing agent in two huge tanks. The next one is also part of the petrochemical fire services. It's a huge tanker truck that brings 23,000 liters of foam to the scene. BTW, actual I'm not really happy with parts use of the ladder at the rear end. I have a few ideas, but the required parts are actual out of stock... As a feature it has a tiltable cabin. For those who wonder: the big pipe behind the cabin is part of a portable water/foam cannon. The third one replaces an old van used for technical assistances. This one features, beside an 4WD, a lot more space for equipment in the compartments. The volunteers of the municipal fire department features a special task force to light up scenes at night. Equipped with different floodlights, a power generator and portable lamp posts. The volunteers can be deployed all over the city and its surroundings. Another small truck of the logistics group And finally a small "Unimog"-look-alike truck that is now part of the FD's historical heritage. Built in the late 1960s (note the old paint scheme) to support the firemen in need of technical assistance, e.g. car accidents, incidents on and beside the water. The last point is the reason why it is equipped with wide sand tires. That makes the truck able to drive on loose terrain, like on sand, dunes or mud flat. Hope you like them a bit. Critics & comments are very welcome. Brit red regards!
-

Compact Independent Suspension with Servo Steering
1nxtmonster posted a topic in LEGO Technic, Mindstorms, Model Team and Scale Modeling
A little video showing a suspension concept: The suspension is tatra-style, not double wishbone. But it is simple and works well enough for my needs. Uses the lego rubber pieces in the place of shock absorbers to save space, and can be built onto a servo motor with as little hassle as possible. I am pleased that the pivot points are all aligned such that the wheels do not steer themselves when the suspension is actuated. Overall a neat concept that I hope to incorporate into my future small-scale MOCs. -
[TC6] Fire truck
super-jaschka posted a topic in LEGO Technic, Mindstorms, Model Team and Scale Modeling
Hi guys! I came back, thank you all for your support. Probably helped fists from the Russian Far East. And so. I watched a bit of the models that were submitted for the contest (TC 6). A lot of good work, but I have not met one fire truck. And it was my choice fell on this model. -1 L for driving and outriggers (manual switching function) -1 S for steering -1 M for turntable -1 M for boom lift -1 PF lights -2 IR receivers Look what I got ... Finally a short video ... -
Hello everybody, i'd like to introduce my newest creation! This is my minfig-scale ladder truck, based on a Metz L32A on Mercedes Atego Chassis. I hope you enjoy! 1 by hypo_fire, on Flickr 2 by hypo_fire, on Flickr 3 by hypo_fire, on Flickr 4 by hypo_fire, on Flickr 5 by hypo_fire, on Flickr 6 by hypo_fire, on Flickr 7 by hypo_fire, on Flickr 8 by hypo_fire, on Flickr 9 by hypo_fire, on Flickr 10 by hypo_fire, on Flickr 11 by hypo_fire, on Flickr 12 by hypo_fire, on Flickr With kind regards, Heiko
-
Hello! Two years after I posted my third tiny RC, the Mercedes Citaro ( ) I made my fourth one! It’s the replica of one of the most specific trucks. I’m sure you have already realised it on the small picture, before you opened its mocpage! The type of it is Renault Magnum. The idea of building this truck at this scale and with this brand method is quite old, but other projects and university stole the time. So I’m very happy, that it’s ready! Hope you like it, too! The length of the whole vehicle is 45 studs. The width of the tractor is 6,4 studs (16 plates), the width of the trailer is 6,6 studs (16,5 plates) without mirrors and other design elements. The scale is minifig scale. It has the two compulsory functions of a tiny RC, propulsion and steering. It contains approximately 820 pieces. The video: Because of two developments, the motions of the truck are absolutely lifelike. It’s possible to solve almost all extreme situations, which happen with trucks in real life! You may realised that the trailer is not exactly horizontal. If both axles are fixed, the front wheels don’t touch the ground. The weight of the trailer is on the front axle, the other axle and the wheels on it are only decorations. It was a real challenge to figure out the front! I used almost every direction. I'm very proud of the result Technical detailes: You may remember my yellow Daf truck, the grille of it is my body icon everywhere ( ). The Renault is similar to that, everything is in the semi-trailer, but it has two very important differences (the two developments). Propulsion The motor drove the wheels of the trailer at the Daf. It meant that the truck couldn’t move, the trailer couldn’t push the tractor if the angle of the trailer and the tractor was too close to 90 degrees. In this truck the rear wheels of the tractor are the driven wheels. You can see the method on the pictures, how I brought the spinning from the trailer to the tractor. The right angle is not a problem any more! Steering I used two cardan joints in this truck and in the older one, too. The difference is the aim of the joints. Two joints rotate the axles into vertical position in the Daf. One of them compensated the angle, which exists in bends. It means that the motor can’t rotate the axle, if the angle of the trailer and the tractor is smaller than 135 degrees. The cardan joint can’t spin above this angle. In the Renault two joints have the task of compensation. So right angle is not a problem any more! By the way we still have the with the steering. I tried to use servo motor, but it was a fail. The motion goes through a wormscrew, many gears and the two cardan joints from the motor to the steered wheels, so the backlash is big. The servo motor can’t bring back the wheels into middle position after steering. Servo motor is useful, if it is as close to the steered wheels as possible. For example in a bus. In a Mercedes Citaro… If you are technic fans, you may remember that we can find cardan joints between the wheels and motor in 9398. But that set is very big, so the same difference is smaller problem there, as at minifig scale.We are transporting something very dangerous! My previous tiny RCs: Daf, Routemaster, Mercedes Citaro The LDD file is avaiblable on Mocpages. It doesn't contain some elements of the steering mechanism between the two front wheels, it's the meaning of the lime plates. You can see these elements on the pictures or in the video. Thanks for visiting and I hope, it’s not too late to wish you a happy new year!
-

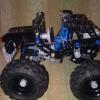
Mindstorms Motorized Ev3 Rear Wheel Drive Monster Truck
DamonMM2000 posted a topic in LEGO Technic, Mindstorms, Model Team and Scale Modeling
A LEGO® MINDSTORMS® Ev3 2WD/RWD rock crawler inspired trial truck with live axle suspension, 80 N.cm torque thanks to the special adder mechanism, and more. Built for off-road yet also for speed racing 74 feet in 26.49 seconds (2 mph). For the video please click here: PS-Could someone show me how to embed YouTube videos? Thank you! -

70813 Rescue Reinforcements alternate - Transformer firetruck
docmikeb posted a topic in LEGO Sci-Fi
MOC. Built January the 21th-22nd, 2015. The challenge was to use ONLY & EXCLUSIVELY the Lego movie set 70813 "Rescue Reinforcements" and ONLY the pieces of the fire mech (bags 1,2 and 3). So please keep in mind that my options were limited. My inspirations were the Transformers Inferno from Generation 1, his Classics/Universe version, and the TF3 movie Sentinel Prime. The vehicle mode is a big fire truck with a ladder (360 degrees of rotation and goes up and down). Thanks to the good amount of joints the robot is well poseable. It doesn't have an head because is driven by a pilot sitting in the cabin (enough room inside for a minifigure). The transformation is simple and relatively fast. All the steps here. http://www.mocpages.com/moc.php/405126 -

LEGO TECHNIC Small Truck
Matthewslegotechnics posted a topic in LEGO Technic, Mindstorms, Model Team and Scale Modeling
Hello Everybody! My first MOC's 2 functions: -HoG steering -Openable doors. This model made 100% of LEGO parts. The pictures: http://matthewslegot...s.wordpress.com (This is a HUN blog.) Thnx for reading. Sincerly: Matthew -
Taking camping to the next level with an eight wheeled off road camper/RV. Vehicle has the following facilities. Lounge/TV, Kitchen, Shower, Toilet, Computer, Skylight Bedroom, Generator, Motorcycle and Hoist. Includes 6 Minifigures, a picnic area and barbeque area. https://ideas.lego.com/projects/92226
-
Hello Eurobrickers! For a long time, walked behind me the idea to build a tow truck, the more so that more and more the tow truck appears in the BS gallery, so I decided to build it myself. However, my favorite version, americkan style. I long it goes down, but overall I'm happy with the results of their work. Of course, the tow truck will be fully motorized. I told myself that the car will be after 3 lockers for equipment on each side, flashing light beacons of his own design, active fake 8 V engine and, above all, the main functions of the tug, and so drive, steering, outriggers, winch, towing arm with folding and rotating fork and a tower with a sliding and lifting the boom, which is still under construction all the time. For photos I used so far, the boom of a set of 42009, although I admit that even quite well with the tow truck. The outriggers for now can lift a model, but as it's ready, I suppose it will be too heavy to support the tow truck. We will see in the future. Initially, it was the drive on 2 axles, but changed it to 3. The lifting arm of the towing I wanted to use a large Linear Actuator, but it took too much space, so it is on a small Linear Actuator. And so far it looks the effect of my building.
-
http://cargo_truck_V3m3 by blingblingbricks, on Flickr http://GOGOTRUCK_Back_Comp by blingblingbricks, on Flickr http://GOGOTRUCK_Back_Front by blingblingbricks, on Flickr
-
So a couple of people have asked for a more detailed look at some of my MOCs, and who am I to say no? Each gallery will come with the LDD file. Although the LDD designs are always my own work (unless otherwise stated), a lot of inspiration will have been taken from other people's work. I will endeavour to credit anyone who's work has inspired me. To make things easier, I'll provide a link to all my MOCs from this first post: Locomotives - Coaches - 6 Wide Pullman Wagons - More MOCs to come! 6 Wide Pullman The basic style for this build was very much inspired by youtube user technoandrew's Pullmans. LDD File: Click me! LDD notes: Roof is held on by friction alone. Turn tables fit into the smaller arched formed windows to make the toilet windows. The 2x4 black tiles (of which there should be 4, not 2) fit into the larger arch formed windows to represent the door windows (and hid the ugly stuff behind them). The frames under the coach are formed using some chopped 3mm hose.
-
Hello fellow Eurobrickers, I made this MOC some time ago, but as it's never posted anywhere, as most stuff I make, I believe it's good for this contest. It's C - model of very small set #42001, and it even uses the same chassis as A and B models. So I believe it's nothing exceptional, but I hope, you will like it. And I believe, as it's so simple, you can easily recreate it as well. I would say, it's sort of Dakar truck. The reason behind this design is that I didn't want to repeat the A and B models design backbone with part 32009, so I placed this part upwards, and had to make body around it. Eventually I even made the doors open, though they don't stay closed very well either. Anyways, here are some pictures. A nice pencil drawing of this MOC :) Comparison with Unimog gearbox, as I've started to build my Unimog (at last). Comparison with my upgraded version of #9398-B model Front, with doors open and minifig for comparison. Side view Rear Some more pics here: http://www.brickshel...ry.cgi?f=550318
-

[MOC] Truck, WIP in some way forever
HorcikDesigns posted a topic in LEGO Technic, Mindstorms, Model Team and Scale Modeling
Hi, Well, this is my first try to assemble truck with theese wheels (I finally bought them enough to make this ;) ) It features HOG steering that must be disassembled (axle-connector) when you want to pneumatically lift the cabin to see the fake motor, or do something with front independent suspension. It also features manually controlled outriggers with pneumatic cylinders on their end. It is also well (and it wasn't planned equipped for placing small PF BBs (Li-Po or AAA). However, I have not enough space in it and bricks and idea to finish the superstructure on the M-motor powered turntable. Non-working elements disassembled and more working showed: Two rear "axles", if I can call them so, are simple - rigid to support the rear of the truck, and in combination with the front soft and heavy-loaded front suspension, to tilt the whole truck in weird way... FULL ALBUM: https://www.flickr.c...57649089686517/ It has many bugs, it is not perfect, but it was fun to build, and I think I have learned a lot ;) (And I think that motorised version without many features (outriggers, etc.) is going to come in next weeks or years (? ), but I do not make promises ;)) Enjoy, and please comment to tell me what you think about it ;) -
Pizza Planet Truck from Cars by Oky - Space Ranger, on Flickr Hi everyone. This is just a quick build I did recently and thought I'd share it. It's a recreation of Todd the Pizza Planet truck from Pixar's Cars movies. Here's a reference image: Here's a picture of the back. It didn't really come out as detailed as I had hoped, but it was hard to do without decals at this scale. Pizza Planet Truck from Cars by Oky - Space Ranger, on Flickr I hope you like it. Feel free to comment.
-
Hello everyone, time for some retro again . I wanted to show you one of my latest creations. But it’s been a while since I completed it. Anyway. It’s a very special fire apparatus – a tanker truck. This one is in service for a refinery company fire brigade in the city of Farnheim. The trailer is filled with 23,500 liters of foam and serves as a logistic feeder or as a distributor into the water network at emergency scenes. This tractor-trailer is not able to start fire fighting operation on its own, because it hasn't any pump or a water cannon installed. You always need a pumper, too. I used the same building technique for the tank that I used for another small foam truck (shown below). It gives a sleek and clean design to the hull. It also allowes to put on a two-tone paint scheme with some intergrated details like lighting at the rooftop, flashlights a the rear end and side markers. As for a little personal touch I clipped on a german flag (a reminiscence of the Soccer World Cup back in July). And its little brother: Hope you like it. Thanks for watching. Critics & comments are welcome as always. Regards!
-

[WIP] Trophy Truck
TJoling posted a topic in LEGO Technic, Mindstorms, Model Team and Scale Modeling
Hi all, Here's the first moc from my side to present here. As the title says, it's a Trophy Truck, which is a known phenomena by now I guess, seeing all the technic trophy trucks appearing lately Mine however, is supposed to be a little different from the rest, since I like a small technical challenge. I let the pictures speak for themselves first: Trophy truck WIP by Thomas Joling, on Flickr The first mock-up with the initial design ideas visible: pneumatic suspension, 5 RC motors for propulsion. Proportions were out of sinc though; Trophy truck WIP 2 by Thomas Joling, on Flickr Pneumatic suspension discarded to be added again later on. Fixed the proportion issue by shortening the middle part. The front RC unit is now to high up and to much upfront to be properly hidden by any bodywork. The steeringoutput of the unit couldn't be connected to the gearrack either, so a servo had to be put underneath the unit, raising it even more. As it turned out later on, the RC units output wouldn't have been powerfull enough to make the thing steer anyway, due to the combination of the large caster angle on the front wheels and the weight of the unit itself. The large caster angle is achieved by tilting the whole suspension backwards. This was also the reason why the steeringoutput of the rc unit couldn't be connected to the steeringgear. Anxious to try if 2 rc units pack enough punch to power 5 rc motors together, I let the aesthetic issue of the front rc unit for what it was, figuring I could solve that later, and put the thing on the street. Turns out rc units are designed to power 2 rc motors, THAT'S It. The 5 motors caused some unexplainable behaviour from the rc units (sometimes it seemed like one of the units couldn't make up its mind whether it should drive forwards or backwards, regardless of me giving the signal to drive forwards ). This stuttering has caused some broken U-joints in the meantime. This made me try out different driveshaft designs, including springs to keep the darn thing in place; no success either Eventually I found that 2 POOP U-joints together with an extendible axle made of a portal axle hub and wedged belt wheels worked the best without having to use non-lego parts. Now I could definitely see 5 rc motors were really to much for the rc units; the thing could bearly start up without the power shutting down, and once rolling it could only just surpass normal walking pace (instead of ). I decided it would be best to remove 1 rc motor. This would improve reliability, (hopefully) performance and because I could build the middle part more compact, it would improve the aesthetics as well; the front rc unit could be moved backwards and lower down. I put on some unimog tires on 41999 rims for that actual trophy truck feel I turned the units and battery on, put the truck on the ground and slowly moved the joystick forward, and.... nothing! Apparently I already drained two sets of batteries while testing before (i bought them new) so I now have to buy new batteries before continuing.When I've done that, the story will continue -
A recent attempt at creating a small semi, twenty three by six studs. I am happy with how the front came out. The cab is just big enough for a fully dressed minifig. The trailer has retractable support legs and an opening rear hatch. The cab can detach from the trailer and be a full vehicle in its own right (although it honestly is kinda ugly). It finally gave me an excuse to use that exhaust piece I've had laying around. Originally it was to be a typical flat nose, but those are very common semi MoCs, and I wanted to do something different, this design fits better with my vehicle style too. UPDATE: additional wheels to the rear section image by austindhinton95, on Flickr image by austindhinton95, on Flickr image by austindhinton95, on Flickr
-

[TC5] Monster Truck
Dapper-D2 posted a topic in LEGO Technic, Mindstorms, Model Team and Scale Modeling
I present my Monster truck made out of sets 42026: Black Champion Racer and 42005: Monster Truck. Features are pull & go motor, shocks, reclining seat, and a flag. by Dapper-D2, on Flickr by Dapper-D2, on Flickr by Dapper-D2, on Flickr by Dapper-D2, on Flickr Video: http://youtu.be/mYMWJSB7VU0 Left over parts. by Dapper-D2, on Flickr Enjoy! Note: Technic is totally outside my comfort zone. -

[MOC] MAN M1001
MajklSpajkl posted a topic in LEGO Technic, Mindstorms, Model Team and Scale Modeling
Hi, I am presenting you my latest MOC – a mega monster, which I would gladly have it parked in my backyard (I would of course need a large backyard first) - MAN M1001! Since this creation was being built during a lot of night shifts since the end of March 2013 until the end of July 2014, me and this beast are almost in a kind of relationship and through that year and a half I have hated it and loved it again, almost left it, but returned to it... Now, as this saga of mine is soon to end (recycling), I'll indulge myself a little and also write something about the real truck and some creative adventures I've had building. I also want to present the MOC with a bit more photos, I hope it is OK, I haven't found any limit regarding number of photos in a post. If there is some violation, I'll gladly make it right. Those of you, who are not so much into reading, I suggest you just skip it and proceed to photos – no hard feelings. MAN M1001 / M1002 / M1013 / M1014 I haven't found extremely much data on the web. There is a lot more on younger M1001 relatives KAT I and KAT II. A summary of the data obtained is as follows: Those trucks' production started in the early eighties in Germany in the factory MAN AG for the needs of American armed forces and have been designed as a tactical 10-ton tractor units for transport and supply of tactical missiles Pershing II (MGM-31C) and Gryphon GLCM (BGM-109G). Through several versions and successors the MAN 100x series proved to be one of the best off-road tactical vehicles around the world. According to some data, it should not have any problems with fording up to 120 cm water, climbing slopes of up to 60%, sideways driving on slopes up to 40%, overcoming the 1.9 meter trench and overcoming step to a height of 0.6 m (depending on tire size and undercarriage configurations). American forces have used four versions of the basic truck that is powered by 400 horse (several data) V10 turbo-diesel. All versions are built on extremely torsion-resistant box section framework 8x8 chassis with steered front two axles. All axles are rigid "live" axle with rubber mounted springs and large shock absorbers. Basic models are the M1001 - a tractor with a crane, winch and even 30 kW power generator and the M1002 - "tow truck" or a wrecker with a crane, a small flatbed and a carrier for a bunch of spare tires. A little younger models are the M1013 which had a crane in addition to an even bigger flatbed, and the M1014 which is plain flatbed truck. All, except the M1002, which is longer due to towing equipment, are 8.57 m long , 2.5 m wide and only 2.75 m high (cab and lift), 2.85 m (spare tire) and 3.1 m (the generator). Sources: http://olive-drab.co...tos_man_8x8.php http://man.army-uk.c...quip.php?ID=333 http://www.truckspla...odel.php?id=646 http://heavycherry.c..._tarpaulin.html At the beginning of my research and modeling, I came across information somewhere (currently I cannot find the source), that the investors (U.S. armed forces) demanded the trucks to be low enough that they can be transported by rail. It is from this demand the trucks got the recognizable cab with trimmed top edges, so the loaded trains remained in the characteristic profile of the rail. With this same purpose the engine is not mounted under the cab, but behind and partially in the cab between the two seats. MAN M-MajklSpajkl Those of you who dug a little through the source pages of the above given description of the real trucks, have probably quickly noticed, that my MOC is actually neither one of the types described - it's a hybrid. At the beginning I fell in love with the M1001, I liked it’s silhouette by far the most and began modeling , but later I found out that because my axle design, the chassis came too high and that it does not look too good as a tractor - so therefore I camouflaged the chassis with a flatbed and of course the obligatory crane. I designed the flatbed and the crane without leaning to the actual models and therefore got a little strange formation of the crane and the outriggers. I tried to replicate the crane as closely as possible though. Modeling process began by obtaining blueprints and photo-material of the M1001 and scaling it to the size of 9398 4x4 Crawler tires. Scaling to these tires produced an approximately 1:14 scale, which already shows the size – but hey, building big was the main idea! In addition to the cross-sectional blueprint of the rear I also used an "en face" photo printed out in scale, so it was much easier to model the characteristic front of the truck. You are to judge, how I pulled it off. I must say that my MAN is not nearly as technically superior as I have described its big brothers above and that it is a beast only if you use a little imagination or see it on photos… I'll soon tell you why. But first,... 1. MOC DATA: Length: 79 studs overall (63.2 cm) – I had to lengthen the chassis for 2 studs due to drive train Width: 23 studs (18.4 cm) + rearview mirrors max. 4.5 studs on each side Height: 25 studs (20 cm - top of the cab without air vents), 31 studs (24.8 cm - top of the folded crane) Weight: 3680 g (truck) + 280 g (crane) + 640 g (4 power generator (cargo) only one with six AA batteries) = 4.6 kg Part count: ALOT! I will provide exact number when I disassemble it, I'm guessing about 3000-4000 pieces - update: after painfull disassembly I counted 4404 parts. Motorized functions: - 8x8 propulsion (reduction from the engine to the wheels 1:21 in 1st gear and 1: 12.6 in 2nd) - Front two axles are steered in first/second ratio 1:0.67 + working steering wheel - Two speed gearbox (1 - 1:1667, 2 - 1:1) - Differentials lock on axles 3 and 4 - Working windshield wipers - Automatic pneumatic valve for lowering / raising the outriggers Other features and details that I would like to highlight: - Rigid full-sprung axles (live axle) - three point hitch - PF LED headlights, on/off via the PF pole reverser - Opening cab door - Adjustable rearview and side view mirrors - Manually pulled out outriggers - Separately opening sides and rear of the flatbed - "Access" to the gearbox via a door in the bottom of the flatbed - Access to the imaginary controls for pneumatic or. "Hydraulic" pump through the side door on the flatbed - Access to power switch for the front light through the side door on the flatbed - Spare tire - Illustration of the engine behind the cab - Manually "driven" crane Atlas 4300 M5 with a double pull-out arm and winch - "Rich" dashboard - Seats and shifting stick in the cab - Protective grids for front and rear - Cargo – power generators (the idea was born out of a major sleet storm in our country past winter) - I must have forgotten something... PF components used: - 2 x XL motor for propulsion (engine coupled with the so-called "adder" differential) - 1 x L motor for steering - 4 x M motors (auto-valve, gearbox, differentials lock, wipers) - 2 x PF switch (on / off lights, pole reverser on one of the XL motors) - 1 x PF led lights in front - 3 x IR receiver (v2 drive and wipers, 2x the ordinary for the rest) - 4 x large BB (one for power, three for lipstick – power generators) - 1 x IR Speed Remote control (drive and wipers) - 2 x IR remote control (the rest of the motorized functions) - 1 x PF extension wire 20 cm - 2 x PF extension wire 50 cm And now some photos to take a breath during such a heavy reading… Looking mean… Ready to unload… The crane stood relatively well to the loads applied, due to much bending I have only tried it with the empty generators. High loads (kids) led to the main two LA snapping of the pins, since they were not transversally braced. Atlas 4300 M5 crane Flatbed with lowered and removed sides… The generators… I find them quite cute, so the lineup was necessary. For those who have yet to read themselves out of breath, I would have a little description of the "guts" of this birdie. Bare naked chassis (more or less) for starters: 2. CHASSIS AND BODY The truck was meant to be modeled as realistically as possible and so I decided for the chassis of two main studfull beams, which were laterally connected in a fairly robust box-section frame by the 5x7 technic frames. The beams were changed countless times, because in the course of construction a need for holes exactly where they were not would came up, or there were certain parts in the way, etc. The cabin is built from a combination of studfull and studless technic bricks, and even some sytem bricks were used for better looks. All other parts of the truck are in "full studless" technique, with some little system bricks add-ons. 3. AXLES and DIFFERENCIALS LOCKS As soon as I had the idea for a 8x8 truck, along came the idea of planetary reduction within wheels. There are very good solutions for this kind of reduction within the "large racing" wheels (ZBLJ), for "medium racing" I found none, well at least not such that would ensure that the technic turntable is as close to the wheel as possible. I thought of a solution shown below, which looks good, but has the disadvantage that it is necessary to attach the wheel to the turntable before attaching the turntable to the axle. The wheel is attached to the freely rotating 4L axle with stop, so it must be pushed next to the turntable well and in such a way that small technic bush and the free end of 2L red axle are caught between two spokes of the wheel. Of course, the wheel must be turned with the spokes inside. It was a little easier to push the wheel into place when I got some new axles 5L with stop... I find this kind of reduction very interesting, but it creates a lot of friction, which is fatal as you'll read further on. The trucks' axles were the first parts designed and they too, like the chassis, have seen many, to many variations. Back then, when I was designing the axles, I only had enough of the "new" bewel differentials. Locking those is a little more volume-consuming, and therefore such a fat boy for the axis, which you can see below. Differential is actually locked by locking a "by-pass" axis. Because I undertook this for the first time and because I spent all 9L links I had on suspension, it was a real hassle to find a solution for remote locking differentials. I figured out some kind of lever solution, where the mechanism mounted on the chassis practically just hugs a small lever on the individual truck axle. In such way both of the non-steered axles' differentials are synchronously locked. Unfortunately, the system worked well for the locking, while the unlocking of the rear axle was very hard or almost never unlocked -I blame the designer! On the photo below, you can see the transmission from the motor to the double "fork" from the bottom side of the truck and the »fork« hugging the lever in the detail in the lower right corner of the photo. 4. PROPULSION This is more or less a sad story - maybe mix of bad decisions and inexperience. Yeah, THAT THING WON'T DRIVE! As you will see in the video I’m preparing, it only works in the "air" mode. The reason? This colossus is heavy as ... and my enlightenment has insisted on feeding drive to all four axles from a single source. Imagine now half a meter long technic spindle full of universal joints and to ensure easy win, use two CV joints directly on the power source. Those babies sure can take some torque - NOT! Add another bunch of gear in each axis and in each wheel and you get a CV joint without the »joint« part. Anyway ... noted, written in the black books of things not to do! After many attempts, I decided to leave the matter as it will; it should be as an example for the future. 5. STEERING Again, things could not be much worse here, well I suppose it could fall apart completely. However, I like the concept that I tried to put to work very much, so it was again left to be represented in the "air" variant: Proposed design does not use the usual steering rack, but a system of levers, a bit closer to the real 4 axle truck steering system. One wheel hub is pushed forward and backward and this hub is linked to its own pair to the other side of the axis by a rod. The theory is, of course, one thing, and the reality is another. Please find below a display of described system, first the mechanism on the left side of the chassis where the motor is. The worm screws drive two lateral axles and steering wheel in the cab for which I've succeeded quite an interesting transfer with simultaneous reduction 1:8 of L motor speed (see the detail). Each of the transverse axis has a different reduction of rotation, so as to ensure a smaller turning of axis no.2 against axis no.1. Thus, the reduced rotation drives the levers, which steer the wheels. For this reduction, there is quite a simple calculation using geometry - for my MAN it should be 1:0,73. I spent some time looking for the most ideal relationship between the technic gears, but then again, a compromise, and I installed the ratio of 67% (1 - 12/24; 2 - 12/36), which is not very far off. The system, unfortunately, did not work under the weight of the cab and there was too much backlash in all these levers. In order to alleviate the matter, I connected the levers with technic friction pins, hence the axis are a bit jumpy when "air" steering due to overcoming the friction in pins. I know, I should change back to frictionless pins for »air« steering presentation, but… hmnjah… 6. WINDSHIELD WIPERS Motorized windshield wipers are one of the cutest and reliable functions of this little toddler, especially since they're controlled via the IR Speed remote control and thus can adapt to the amount of rain. It is a simple version of the system that drives wheels on steam locomotives - the rotation transferred to the oscillation. It only bothers me, that I somehow didn't manage to get the motor that drives the wipers somewhere in the bottom of the cabin and therefore there is a driving axle between the seats leading to the motor behind the cab, which is to me quite a fine mockup for the real engine. The reason that there is no room under the cab is in the fact that the main beams of the chassis stretch quite deep into the cab and that the suspension of the front axle is attached just below the seats. 7. AUTOMATIC PNEUMATIC VALVE and CRANE OUTRIGGERS When I was almost finished with the truck, there was only one free PF function left and the crane outriggers were missing. There was practically no space left, except behind the spare tire. Luckily, I managed to squeeze in there a modified version of the automatic pneumatic valve by My version is just geometrical adaptation to the space that was available and I think I succeeded well. For those who may not know (not many here I guess): automatic pneumatic valve (there is quite a handful of different types from several inventive authors on the web btw.) is a pneumatic valve with only one motor powering a pneumatic pump and switching the lever of the pneumatic valve at the same time. I had quite some difficulties and I spent some time looking for the right combination to attach the valve softly enough to work as it should. If it was too stiff, it would not change the valves position when changing the motors direction. From left to right you can see a pneumatic pump, driving PF M motor and worm with a pneumatic valve on the photo below. The solution for the outriggers manual extension is IMHO really a small piece of art. Well, a good idea at least. They’re mounted in 5x7 technic frames, through which two axles slide and are protected from falling out by a connector. Since the pneumatic tubes pushed the outriggers outside, I made a "lock" to hold them in place. Loading capacity of the outriggers is of course purely symbolic. CLOSURE, FINALLY And now to conclusion: I'm tired, and not of writing so much of my bad English. I will not start on such a vast (at least to me) and long lasting project for some time, if ever again. I'm really happy that I can finally fully present this MOC to you and I am pleased also that I insisted until it was finished, even though not completely succeeded, but managed to learn a lot of new in terms of design and construction of such a model. I am pleased with the level of small details, which I think for me is increasingly important for a MOC to have. Thanks to all who survived this long writing, as well as the rest of you who just looked at photos and grimacing at the amount of the text. No hard feelings, eh? For those curious, find at this link a number of additional photos, including some of those during the construction, which I didn’t include in the presentation. Best regards, here is another photo of my third child to conclude. Miha And finally - a video: -
My kids were watching the movie Rescuers Down Under one day and it gave me a little inspiration
-
Ricky Raccoon does plenty of odd-jobs around Fabuland town and his little truck takes him there with all the tools he needs. So, I just love the crate element. I love to use it in builds and when I got a lovely classic yellow one I just had to use it. The friendly yellow lent it towards Fabuland but I didn't want to lose it in a bigger vehicle and had envisioned it sitting above some little wheels. A lof of fiddling around later and I was happy. Thus this little truck was born
-
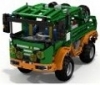
Hi All! You could figure it out from the title, i would like to build an artic truck. The idea came from the model of 2015: I will use 2 small sets: 9391 Mini Crane (218 parts) and 8259 Mini Bulldozer (165 parts). It is far from the 600 parts, but sometimes fewer parts is bigger challenge. UPDATE!!!! Sorry for late, I'm glad to introduce my C model of 9391 + 8259 an ARTIC TRUCK! It counts 342 pieces (80 pieces of track) from 383 pieces(118 pieces of track)(+extra parts). I used some of the extra parts. The truck has a lot of geared and non-geared funtions: Geared functions: Articulated steering front blade up/down boom up/down Non-gear funtion: boom rotating winch bed tipper openable bed tipper rear door Other attributes and details: seats imitation exhaust tips headlights on top and a small taillight the bed is covered, it doesn't loose the cargo Leftover parts: More pics soon! Thank you!
-

Stone Trailer Truck
squizz posted a topic in LEGO Technic, Mindstorms, Model Team and Scale Modeling
Hope Han dosen't mind me posting this on his behalf, i've been wondering what he has been up to? hope this works www.designer-han.nl/lego/stonetrailertruck.htm -
I have a problem with LEGO City sets. There aren't many buildings, and what are cities made of?? Well this one must be made of trucks, cars, cops, and robbers. WE NEED MORE BUILDINGS! The Creator line has more than City! If you have any comments or ideas or any other problems similar to this, be sure to reply!