Search the Community
Showing results for tags 'Technic'.
Found 1588 results
-
[MOC] AZURA LMP2 Racing Car
dls7223685 posted a topic in LEGO Technic, Mindstorms, Model Team and Scale Modeling
Hello everyone, this is the latest work of MTC lego studio:AZURA LMP2 Racing Car Designed by CrMo2001 Here are detailed introductions to this work: -Long 47,Wide 21 (Lego unit) -2 × “control+ L motors” for propulsion -1 × “control+ L motors” for steering -LEGO Bluetooth control module -Front and rear independent suspension -Technic parts build chassis, Brick parts build appearance When designing this car, there are two main points, one is the suspension, the other is the appearance. The size of CONTROL+ components is very large, while LMP racing car is very low, so the Bluetooth hub is put in the middle, the front bridge module is on the front side, the drive motor is placed on both sides, and the layout of the rear bridge module is on the rear side. Otherwise, the height will exceed the limit and the appearance production will be affected. In a real LMP car, the driver's seat is not centered but, by habit, left or right. So I put the driver's seat on the left and the steering motor on the right in a symmetrical position. The CONTROL motor has a built-in code disk, so the L motor can be used as a servo motor and can be customized with Powered UP. The motors on both sides drive the wheels on both sides respectively, and the transmission systems on both sides are independent. This also eliminates the differential. The power of the motor is first transmitted to the middle shaft through four 16-tooth gears, and then to the wheels. To prevent transmission interference, 16 teeth on both sides are staggered by 1 unit. For the design of the exterior, I pay more attention to the continuity of the lines of the vehicle. In some places, in order to better shape the curved surface, the Technic parts are used. Brick parts are not dominant in the construction of some complex curved surfaces, but cylindrical and flat surfaces are basically preferred. I made my first attempt to add a clear windshield to the MOC. The windshield comes from 76139 (1989 Bat Mobile), and a black printed vertical line in the middle is worn away. In practice, the windshield is slightly lower in height and the front is too steep. But I couldn't find a better one than to 3D print one. Here is a more detailed picture, hope you can enjoy it. The LMP race car has a drop-shaped cab, which I tried to recreate with Lego. Some airflow channels are left on the side. Front and rear The Building Insitructions will be released in the near future, so stay tuned! Thanks for browsing!Thank you! -

[MOC] Kalmar DCG180-330 Heavy Forklift
JLiu15 posted a topic in LEGO Technic, Mindstorms, Model Team and Scale Modeling
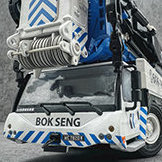
Model of a Kalmar heavy forklift controlled using SBrick. Features drive, steering, fork elevation, pneumatic mast tilt, kissing forks, tilting cab, 6-cylinder engine, and lights. Functions/features: Drive Steering Fork elevation Mast tilt (pneumatic) Kissing forks (manual) Tilting cab 6-cylinder engine Lights It's been a while since I created a MOC featuring pneumatics, and even longer since I created one with remote-controlled pneumatics. My last MOC with fully remote-controlled pneumatics was from 2015, and that was before I had an SBrick. Ever since I obtained an SBrick I had made two MOCs with remote-controlled pneumatics - a front loader in 2016 and a Volvo EC350E excavator in 2019. However, both projects were cancelled before I finished them. I realized the mast tilting function on a forklift would be a good choice for pneumatics, especially the 7L cylinders. I originally just wanted to make a generic heavy forklift, but when I came across Kalmar's heavy forklifts I was really intrigued by their design so I decided to make the DCG180-330 by Kalmar. My model maximizes functionality while minimizing the amount of moving parts. Most functions have their motors connected directly to their inputs, thus minimizing moving parts and optimizing chassis space. The drive motor is placed directly behind the differential, and gear reduction is done via portal hubs placed horizontally. The servo motor for steering is placed vertically in the chassis, connected directly to the steering linkage without a rack-and-pinion mechanism. This allowed for a large steering lock which is commonplace among forklifts, but this also meant that the chassis around the axle has to be thin so the wheels don't bump into them - in fact, the chassis is only 3 studs wide in the rear but is reinforced well nevertheless. I limited the servo's range of movement in the SBrick profile designer as the steering input can only turn about 45 degrees each way. Even then I still had to add towballs as limiters to the steering mechanism to ensure the wheels don't rub against the rear body panel when turning. In the end, I wish the wheels could steer a little tighter, but the end result is impressive nonetheless. The mast is built with a PF L motor near the top, which drives a worm gear mechanism controlling fork elevation. The section that lifts up is essentially a frame with two sets of racks that contain the fork module sliding freely within it. A single rope pulls the fork up, and the range of movement is pretty impressive. The fork module contains two manually controlled linear actuators that allow the forks to move closer to each other - "kissing forks", as the PDF for the real-life counterpart calls it. The pneumatic system for the mast tilt function is comprised of a PF L motor driving the compressor and a PF M motor controlling the valve. The L motor for the compressor is geared up slightly to allow rapid pumping, and the valve mechanism is placed at the very front of the model to minimize the length of the hoses connecting the valve to the cylinders. Other features include a tilting cab, a 6-cylinder engine with mini pistons below the cab, and lights connected directly to the 8878 battery so the speed dial on it can be used to control their brightness. The 6-cylinder engine is accurate, as one of the engine options on the real Kalmar DCG180-330 is a Cummins B6.7. The fake engine is connected directly to the drivetrain and makes a pretty cool noise while driving. The functions overall worked pretty well - it had decent driving speed, a really good turning radius, the fork elevation had sufficient torque without being painfully slow and the pneumatic mast tilt had good precision. There were some issues - such as the fork elevation mechanism skipping at the racks when under load and the pneumatics not being able to tilt the mast back when the fork is fully raised and the mast is fully tilted in the forward direction. The fork mechanism also lacked a clutch, so it was really important to stop the motor precisely at the moment the fork reaches the bottom to prevent it from stalling. Still, given how well the functions worked overall and how realistic and detailed the bodywork is, I feel like this MOC was a great success. Video: Photos: -

[MOC] Concrete Mixer Truck
KirTech LAB posted a topic in LEGO Technic, Mindstorms, Model Team and Scale Modeling
Hi! It’s time for new MOC :) I’m glad to show you my Concrete Mixer Truck. The project was started almost one year ago, but I’ve finished it only now. I used KAMAZ 6540 trucks as inspiration. Dimensions: 45 x 12 x 20 cm, weight 1570 g, 2492 pieces. There are no motors here, all functions are manual: - 4x8 wheel drive with working V8 piston engine - 4x8 steering, working steering wheel in the cabin - pendular suspension on rear axles - manual drum rotation - driving wheels drum rotation - cabin lifting - opening doors - opening roof hatch - folding ladder - high detailing: mirrors, lights, spare wheel, fuel tank, exhaust, seats, chocks, additional unloading gutter There are no working unloading system here like in 42112 LEGO set. I wanted to create the drum using only Technic pieces. Video demonstration: More photos on Flickr: https://www.flickr.com/photos/141718063@N06/albums/72157714975159431 Building instructions: https://rebrickable.com/mocs/MOC-46913/desert752/concrete-mixer-truck/?inventory=1#comments MOC review: Thanks for watching! -

[MOC] HONDA ACTY 1983 Dragster [2020]
Michael217 posted a topic in LEGO Technic, Mindstorms, Model Team and Scale Modeling
HONDA ACTY 1983 Dragster The inspiration for creating such an unusual hybrid was the car of a blogger from YouTube) Description: -1 Buggy motor -Servo motor for steering and steering wheel -Small power supply -Detailed interior All the photos on the link: https://bricksafe.com/pages/Michael217/honda-acty-1983 Instagram: https://www.instagram.com/lego_muscle_garage/ Join my group in VK: https://vk.com/legomusclegarage -

Lego Custom Kenworth Truck MOC (instructions)
CrazyKreations posted a topic in LEGO Technic, Mindstorms, Model Team and Scale Modeling
Hi, its CrazyKreations and we proudly present the new Custom Kenworth. This is our first post, we are very excited we have made a truck and wanted to share the instructions with everyone here it is. This beauty of a model is based on the Kenworth W900 purple edition of the truck. We would like to talk about this truck's features, dimensions and weight, optional configurations, part lists and the Instructions. Features Right here we would like to list the key features of this truck. Here they are; Opening Hood Detailed exterior and interior Working V6 engine Interchangeable Front Bumper Opening Doors Working Rear Differentials Virtual Pivot Steering Working Fifth Wheel (with lock) Large Sleeper with an opening rear door RC version (Coming Soon) Dimensions and Weight This strong and durable truck is nice and detailed with a lightweight of about 922 grams. Although the weight is light the dimensions are large for this type of truck. The dimensions are; a width of 48.3 studs (38.6 centimetres), a length of 21.8 studs (17.4 centimetres) and the height is 18.6 studs (14.9 centimetres). Optional Configurations and Part List This truck as a few optional configurations to match your build threshold perfectly. All the panels straight panels have to be the same colour to make a different colour scheme. In the inventory it mentions 2 L motors and 1 M motor, I have included these motors as they are required for an RC version of this vehicle. In the instructions it includes them but you don't have to place the motors inside the model, they don't take away any of the existing functions in this vehicle. If anyone wants a detailed part list for the RC version or the manual version please send us a message. For more information or details please send a message privately to us. Building Instructions We have created detailed PDF instructions for this model, they are generated from Studio and have been tested many times (It really did) and has been edited many times for the best building experience. The instructions are in the slideshow at the very top of the page, but we have included a rough sample of a few pages of the instructions in the video. All the parts in each step are outlined for a better building experience. Please check the brick safe for more pictures and sample instructions. The instructions are for advanced builders as the instructions contain 328 pages with 394 steps. The part list is included at the end. Any queries or questions please send us a message. (You don't have to have the motors, see configurations section of the description.) Link to Rebrickable https://rebrickable.com/mocs/MOC-43187/CrazyKreations/custom-kenworth-truck/?inventory=1#comments Any Questions Please Comment and for more photo's go to our bricksafe. Like and Follow CrazyKreations. There is a video on rebrickable -

42108 JCB Roto Telehandler
mpj posted a topic in LEGO Technic, Mindstorms, Model Team and Scale Modeling
Hello! Recently I built an alternative model using only parts from set 42108. It is a roto-telehandler, mainly based on JCB Hydraload. All functions are manual: - boom raise/lower - fork tilt - turret rotation - 4 wheels steering - stabilizers There are 2 attachments: fork and hook. It is in the same scale as my other models (1.21) and instructions can be found here: https://rebrickable.com/mocs/MOC-43871/technicprojects/jcb-roto-telehandler/?inventory=1#comments Functions summary: I hope you like it! -
 Hello All, Another new MOC using the XLAs, I'm giving the rotary drilling rig another go, My last attempt at it was not really succesfull and remained unfinished. So Here it is: the rotary drilling rig MKII Most parts come from the Liebherr excavator including all but one control+ motors, and it has 2 control+ battery boxes. The trackbase is borrowed from flybum's volvo excavator. Here are some WIP pics, any comments are always welcome Two XL-motors and 1 control+ receiver are situated in the trackbase 1 XL-motor is used for the normal LAs in the base frame 1 L-motor is used for swivel 1 L-motor is used for the winch and 1 L-motor situated in the frame is used to drive the XLAs to move the leader up and down For the paneling I'm recycling panels from the Liebherr excavator. Normally I'm going to install 2 extra motors with a conventional battery box and IR or sbrick receiver. Other pics will follow
 -

Lego GBC Lifting Sprocket Module
sawyer klegr posted a topic in LEGO Technic, Mindstorms, Model Team and Scale Modeling
Finally finished another one ;) This lego GBC module uses a large Lego technic sprocket on it's side to and lift the balls. It is a reliable module and meets the standard, it can hold over 30 balls in the input bin and runs just over 1 ball per second. The mechanism runs a lot smoother in real life then it look in the video, it also runs a bit better slightly slower. You may notice in the video that sometimes it doesn't pick up the full 6 balls. This could be fixed by changing the agitator design or running it a bit slower so that the balls have more time to roll into the sprocket I did not change the design because it is very reliable like this and still meets the standard. Rebrickable. Flickr. -
[WIP] Kalmar DCG180-330 Heavy Forklift
JLiu15 posted a topic in LEGO Technic, Mindstorms, Model Team and Scale Modeling
Hey guys, here's a new project I'm starting. It is a model of a Kalmar forklift. It will be controlled by SBrick, and it will feature drive, steering, pneumatically tilted mast and lifting fork. The wheels will be Unimog wheels (94.3x38 tires). https://www.kalmarusa.com/4ae438/globalassets/equipment/forklift-trucks/kalmar-forklifts-1852-ton-capacity/kalmar-dcg180-330-forklift-brochure-en-us.pdf So far I have the front axle and the rear portion of the chassis completed. The front axle is driven and is very compact - most of the gear reduction is done in the portal hubs so the drive motor is attached directly behind the frame holding the differential. As for the rear portion, it contains the steered rear axle. Note that the longitudinal beam supporting the chassis is only 3 studs wide directly below the rear axle - the steering lock is very large to ensure a minimal turning radius, and this avoids the wheels from rubbing the chassis when turning while also keeping the chassis sufficiently robust. I also have the compressor (driven by a PF L motor) and the SBrick installed. Note the vertical placement of the motors - I'm trying to make the model as compact as possible, and this avoids using too much longitudinal space. I was concerned that the servo motor might not have enough torque this way as it's driving the steering linkages directly rather than with rack and pinion (it will be limited to 45 degrees of rotation in the SBrick profile designer), but I've seen MOCs that use the servo like this and they work fine. If you have any suggestions for me, please let me know. Photos: -
Motorized model of a crawler crane with Mindstorms EV3. Features driven tracks, and superstructure functions controlled by an automated distribution gearbox. Functions/features: Driven tracks Boom elevation Boom extension Winch Superstructure rotation Ever since TLG released the rotary catch pieces from the Bugatti set I sought to incorporate it in a distribution gearbox so that I could control 4 functions with 2 motors. However, I did not want the play experience to be constantly interrupted by shifting the gearbox. For instance, if I used PF and installed a stepper mechanism to control the gearbox, I'd constantly have to count how many "shifts" I've done to ensure the right function is engaged. With that in mind, I realized Mindstorms EV3 is the perfect solution to this - by simply utilizing a touch sensor, the mechanism can detect how far the shifting motor has rotated thus automatically selecting the right function. The gearbox, which sits at the heart of the superstructure, features a cam attached to the shifting motor to hit a touch sensor. When a command is received from the remote, the shifting motor rotates until the touch sensor is pressed, then the EV3 tells the shifting motor to rotate a certain number of degrees to select the corresponding function. This utilizes a switch/case for the remote, and because it features up to 11 button combinations all superstructure functions are controlled from the same channel (channel 2 on the remote). This gives controlling the model a very natural feel, and sometimes I even forgot that I was controlling a distribution gearbox because the EV3 shifts it so seamlessly. As for driving, it too uses a switch/case for the remote. Because it's just a simple tank drive, the commands for this are much more straightforward compared to the gearbox functions. Driving is controlled from channel 1 on the remote. Additionally, there are sound effects that play while operating the crane. Pressing the left two buttons together in the 1st channel starts the engine (thus starting the program), and pressing the right two together stops it (thus ending the program). Because the PF IR remote uses levers instead of buttons, this effectively makes the model inoperable with only a PF remote. The EV3 remote feels more natural for controlling this model too, as some superstructure functions (boom elevation and superstructure rotation) involves pressing two buttons simultaneously. In the end, I'm pretty satisfied with how this model turned out. I was initially worried that this gearbox I had in mind won't work as smoothly as I imagined, but it turned out to work flawlessly. It often made me forget that I was even controlling a gearbox as the EV3 does the shifting for me. Of course, there's still areas that could be improved - for instance, the boom extension and winch operate pretty slowly. Not using a worm gear in those mechanisms probably would've helped, but that would mean the mechanism becomes "unlocked" as soon as the gearbox disengages it. Occasionally the gearbox would jam, making me restart the program, but overall the finished model met my expectations. Video: Photos:
-

WIP Kraz 255B with Gearbox (For Fully RC TMM-3 Attachment)
The Vooduist posted a topic in LEGO Technic, Mindstorms, Model Team and Scale Modeling
Hey y'all, First time I'm gonna try to do a WIP page... Been fiddling around with this Kraz 255b MOC by the one and only Ingmar Spijkhoven and figured out what attachment I'll build finally. In short, it's a mini portable bridge (called a TMM-3 or a scissor bridge). Functions of this add on attachment consist of- Actuator for raising and lowering the bridge Winch for deploying and retracting the bridge 2 stabilizers at the end of the truck to... stabilize the truck Propulsion has been swapped from 2 L motors on the sides to 1 one buggy motor under the hood. Now the replica engine can be put on display. The gearbox I really wanted to try part 35188 to make all the functions AND propulsion run on the one motor. Where I guess we can call the "transfer case" is at is right behind the cab, so here's what the result is for now. It was tricky since the tandem axle left no room for fit it in between the chassis rails. The rear shaft will actually hit the bottom of this when compressed all the way. It's as compact as could get it with Studio (kinda a LDD fan). It'll probably need to be reinforced even more, but wanna see how it mates with the buggy motor first. Never built a gearbox before and destroyed many other MOC's with gearboxes so don't have high hopes. Note- all of the motorized attachments will be ran with worm gears, so not to concerned with the gear ratios... buggy motor just gonna make everything super fast anyways with a Buwizz. Where buggy motor is planning to be in the future a bit more securely. Just seeing how a gearbox could be placed and how high it'll be. Part 87408 is now mounted securely below the motor with two 24t gears feeding it above (will get a shot of it soon). Getting the motor to fit underneath the hood was very miserable. Couldn't use a servo anymore since the buggy motor is so low it'll interrupt the travel of the front axle. (yes the fenders are mounted backwards when rebuilt...) Ordered the parts for the gearbox and will update once they come in. Planned order of the build- Gearbox Wheels Test drive Stabilizers Building the frame/chassis of the TMM winch Scissor bridge Survive the misery -

[MOC] Haas UMC-750 5-Axis CNC Mill
nwbricks posted a topic in LEGO Technic, Mindstorms, Model Team and Scale Modeling
Hey guys, first time posting in the scale model forum. Hope I've got this right I've been building various machine tools for a workshop on my layout. One of them was a Haas VF2-SS, a 3-axis CNC milling machine. I got this stupid idea to stick a motor in to get the spindle moving but it blew the scale way off, so I rebuilt a totally different model with a bit more bulk, the UMC-750 5-axis mill. Here's the full gallery, more video and images below: Front view. Doors slide open: Back view showing the motor. Currently uses a PF M motor but I originally had the old 4x5 motor running. The real machine runs at 8k+ rpm and those old motors push 4k, so not too far off. I'm not doing any actual milling so torque isnt much of an issue ;) Side view showing the movable control panel: Other side, showing the tool changer and cooling hoses. The real thing has a 40+1 tool capacity, which wasnt too feasible. I'm sure there's a better solution for this, but I'm happy with it for now Internal view showing the platter, chip conveyor, spindle, etc: And the real thing for comparison! Cheers :) -

8845 Dune Buggy Redux 2020 with Instructons
Cardboy posted a topic in LEGO Technic, Mindstorms, Model Team and Scale Modeling
As the 8845 was my first ever Technic model i decided to give it a redesign to modern stud less design. I have tried to keep it as much like the original as possible. This was awkward for the steering as that is 10 studs wide and steering for Technic is all odd, 7 long racks or limited like on the Corvett 42093 and the Race Kart 42048. The wheels are a bit oversized but i don't think Lego do anything closer. and the rear cargo area is a bit gappy. Hope you like it You can get some free instructions here -

Help with Lamborghini Aventador 1:10 MOC [WIP]
damian_kane_iv posted a topic in LEGO Technic, Mindstorms, Model Team and Scale Modeling
Hello Eurobricks Technic, This is my first forum post and I'm currently attempting a 1:10 supercar technic MOC. Its largely based off of the parts from the 24 Hours Race Car 42039 and the Formula Off-Roader 42037. So far, I've completed the main chassis, drivetrain, and a partial gearbox. I'm opting for a sequential 4-speed since I lack the parts for a more complicated transmission. Pics found here: https://bricksafe.com/pages/damiankaneiv/aventador-wip At the moment I have finished most of the chassis and underside and I am just starting to do bodywork for the car. At the moment I have limited parts due to the rest of my collection being in another state. Features include: 1 All-wheel drive 2 Partial sequential 4-speed Gearbox (inspired by Attika's design; gears are the same but altered housing)... still missing some parts 3 Independent suspension rear and front wheels (largely based off 24 Hour Race Car set) 4 HOG steering (planned) Planned features: 1 Scissor doors 2 Rear aero (deciding whether to invest in designing an active aero mechanism or static wing) I'm drawing a lot of inspiration from Stefan Birkefeld's Aventador design in terms of body work and scale. Let me know what you think and any suggestions or changes I should make. -
 Hello everybody, this is my entry for the Eurobricks Flower Show. Due to my lack of time I decided to challenge myself, to see what I could build in the timeframe of 60 minutes. You might be thinking: This doesn't look like a normal garden Well, I've had multiple problems. First of all, I dont own any green bricks, flower pieces or anything else that would be usefull for this contest, so I had to get creative. My brick collection is probably > 50.000 bricks, but I dont think there are even 100 green ones. I build technic Cars in 1:8 Scale, so building a normal Garden really isn't for me In the end I decided to create an entry with a bit of a deeper meaning. The colorful Flower surrounded by darkness represents our beautiful LEGO builds in these dark times yeah kinda r/Iam14andthisisdeep I know, but I dont care
 -
[MOC] Ford Model T 1908 by Isaac Yaw (with instructions)
Isaac Yaw posted a topic in LEGO Technic, Mindstorms, Model Team and Scale Modeling
Ford Model T 1908 by Isaac Yaw ( with instructions ) https://youtu.be/26kvGcIkWQw Check out the Video Review here^ Instructions: file:///D:/Ford Model T 1908/ford_t__technic_.pdf Rebrickable: https://rebrickable.com/mocs/MOC-11664/Isaacyaw/lego-technic-ford-model-t-1908/#comments -

[MOC] Pinball 2.0
dawidmarasek posted a topic in LEGO Technic, Mindstorms, Model Team and Scale Modeling
Two years ago I presented you my first pinball. Today I want to show the second version, with changeable boards and an interactive Mindstorms board. If you like it please add your support on LEGO Ideas page https://ideas.lego.com/projects/4025655b-7b86-4aeb-bc91-57aa33c862e7 -
LEGO Technic Bugatti Type35-C MOC by Isaac Yaw
Isaac Yaw replied to Isaac Yaw's topic in LEGO Technic, Mindstorms, Model Team and Scale Modeling
1925 Bugatti Type35-C MOC by Isaac Yaw Link to my youtube video: Description: Here are a few pictures of the newest MOC that I have made in about 2 months' time. I decided to turn back in time and bring back more antique builds from the past. One of my previous antique builds was the 1908 Ford Model T which is also posted on my Youtube channel. This newest build brings us back to one of the iconic Bugatti cars ever made, the Bugatti Type35-C. Features: -1:8 scale build -straight 8 engine -working steering system -every detail carefully replicated from the original car such as headlights, steering system, engine, exhaust, body shape, and etc. -
LEGO Technic Bugatti Type35-C MOC by Isaac Yaw
Isaac Yaw posted a topic in LEGO Technic, Mindstorms, Model Team and Scale Modeling
-
Hello I would like to share my first MOC Ferrari F1 SF90 in 1:8 scale. Making the MOC my main goal was display model so I decided to make it look as close as possible using all official Lego parts to real F1 car. But I wanted to have it all the basic features F1 car should have which are: - front and rear suspension - fake v6 engine (created by SuperKoala ) - removable front wing (I started all build from this element actually) - removable engine cover, - removable headrest system (this was added at the very end I didn't thought about this at all but it just came up naturally) - drs - steering The dimensions of the model : Dimensions 70 x 25 x 14 cm Weight 1,95 kg Pieces: 2186 My main donners at the very first stage were 42056 and 42000 which I already had and they had lots of elements I could use to try the concept. The first version was funny to watch as there were so many colors all over the place ;) I have used wheels and tires from 8674 as they are the best looking one and fit the best for design and don't have any labels on them (as unfortunately 8458 and 8461). The instruction has been done in Stud.io in PDF. Instruction build I also designed stickers sheet ready to print and I also will have printed version too. Hope you like it. Whole gallery Follow me: https://m.facebook.com/f1moc https://www.instagram.com/f1moc/
-
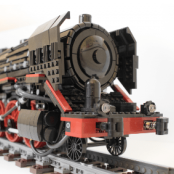
Hello Lego train fans, (I repost here the work I have done on a pneumatic locomotive. I really don't know where to post since my MOC belongs to Technic category and Train category. So I post it here too. Of course here maybe we can talk more about the design and reproduction of the details of the locomotive. If this other post is too much, I am sorry that I posted in two places (and moderators could remove it), but I think it's understandable why I did this. Anyways !) I am glad to introduce you my last big project : a pneumatic steam locomotive ! I think it's one of the firsts pneumatic locomotives, using only Lego parts. I love trains as much as you do on this forum probably, so I hope some steam lovers will enjoy the model ;) The model is based on a Mikado type locomotive, from the mid 20th century. It especially copy the design of 141R french locomotives (even they were apparently built in USA, for France). First of all, the YouTube video and some photos: The idea with this model is to replace the steam of a real Locomotive by compressed air, and this for as much functions as possible. Here are the main functions : Movement of the train : Using 4 pistons, 2 on the sides, and 2 inside, the train can move forward. It works like a classic LPE, with 2 pistons shifted 90° from the others. 4 pistons consume a lot of air, but they guarantee enough power to move the whole train. To make the rotation smooth, a free wheel is hidden inside the boiler part of the locomotive. Its rotation is 25 times faster than the wheels of the train (40t/8t x2). The train isn't moving very fast because the pneumatic elements aren't modified. However, it's fast enough to make it interesting to look at the connecting rods and wheels moving. The breaks : On a real locomotive, compressed air is produced by a compressor (powered by steam) and is used to press some brake shoes against the wheels. Here, the same technique is used : a small piston is filled with compressed air, and thanks to some rods, brakes shoes are pressed against the wheels. It's cool but...it's not enough. Plastic against plastic isn't very efficient to stop the train's movement. Therefore, another rod is connected to the brake system and press another brake shoe against the free wheel. Because its rotation is faster (and therefore, with a low torque), it's is way easier to stop it. The Whistle : A system that I love in this locomotive is the whistle. Currently there isn't any whistle produced by Lego that could be used in the locomotive, so I had to think a little for finding something working. I can give you more details if you want but I used some lego parts that are empty inside and have a small aperture. By blowing air on these parts, we can produce a noise that is a little similar to a whistle noise. This whistle is activated by a switch in the cabin. The Cabin : Nothing much to say except that in contains 3 switches for the 3 main functions (whistle, wheel movement and brakes). There is also a pressure gauge showing the pressure coming from pumps. The train moves with a minimum of 1 bar. A 2-2.5 bars, the movement is faster. The air supply : There are several possibilities for the train : we can directly pump with Lego pumps, or store the air into 6 to 8 airtanks or produce the air with Lego motors and small pumps. For instance I use 4 pumps side by side, linked to some air tanks, but I don't what the final model should work. Maybe some motors and pumps could be cool ? The design : The hard part was to make the boiler of the locomotive. It's a little hard to make cylinders with Lego technic parts but, with flex axles passing through Technic beams, I managed to make something satisfying. Some details are visible on the locomotive, I tried to make it look a little crowded like a real locomotive with fake air/sand tanks, fake compressors and mechanical elements. It's probably possible to make it look better, but for instance I am happy with it. The rails are "homemade" with Lego bricks. The locomotive is too big of course to work on Lego railtracks. The wheels aren't perfectly flat so the train is "blocked" in position inside the rails. Therefore, the train can move foward cur cannot go out of the railtracks (which is great for a train). Finally, as a bonus functions, there are some bumpers at the front and back of the locomotive to imitate the real bumpers used to absorb small chocs on a Locomotive. That's it for now, I hope the model is interesting to you and if that's the case, don't hesitate to support it on Lego Ideas ! Click here to support on Lego Ideas If you have any question or comment, please reply to the post, I'll be glad to discuss with you !
-
[MOC] Lego Pneumatic Steam Locomotive
alfredboyer posted a topic in LEGO Technic, Mindstorms, Model Team and Scale Modeling
Hello everybody, I am glad to introduce you my last big project : a pneumatic steam locomotive ! I think it's one of the firsts pneumatic locomotives, using only Lego parts. First of all, the YouTube video and some photos: The idea with this model is to replace the steam of a real Locomotive by compressed air, and this for as much functions as possible. Here are the main functions : Movement of the train : Using 4 pistons, 2 on the sides, and 2 inside, the train can move forward. It works like a classic LPE, with 2 pistons shifted 90° from the others. 4 pistons consume a lot of air, but they guarantee enough power to move the whole train. To make the rotation smooth, a free wheel is hidden inside the boiler part of the locomotive. Its rotation is 25 times faster than the wheels of the train (40t/8t x2). The train isn't moving very fast because the pneumatic elements aren't modified. However, it's fast enough to make it interesting to look at the connecting rods and wheels moving. The breaks : On a real locomotive, compressed air is produced by a compressor (powered by steam) and is used to press some brake shoes against the wheels. Here, the same technique is used : a small piston is filled with compressed air, and thanks to some rods, brakes shoes are pressed against the wheels. It's cool but...it's not enough. Plastic against plastic isn't very efficient to stop the train's movement. Therefore, another rod is connected to the brake system and press another brake shoe against the free wheel. Because its rotation is faster (and therefore, with a low torque), it's is way easier to stop it. The Whistle : A system that I love in this locomotive is the whistle. Currently there isn't any whistle produced by Lego that could be used in the locomotive, so I had to think a little for finding something working. This whistle is activated by a switch in the cabin. The Cabin : Nothing much to say except that in contains 3 switches for the 3 main functions (whistle, wheel movement and brakes). There is also a pressure gauge showing the pressure coming from pumps. The train moves with a minimum of 1 bar. A 2-2.5 bars, the movement is faster. The air supply : There are several possibilities for the train : we can directly pump with Lego pumps, or store the air into 6 to 8 airtanks or produce the air with Lego motors and small pumps. For instance I use 4 pumps side by side, linked to some air tanks, but I don't what the final model should work. Maybe some motors and pumps could be cool ? The design : The hard part was to make the boiler of the locomotive. It's a little hard to make cylinders with Lego technic parts but, with flex axles passing through Technic beams, I managed to make something satisfying. Some details are visible on the locomotive, I tried to make it look a little crowded like a real locomotive with fake air/sand tanks, fake compressors and mechanical elements. It's probably possible to make it look better, but for instance I am happy with it. The rails are "homemade" with Lego bricks. The locomotive is too big of course to work on Lego railtracks. The wheels aren't perfectly flat so the train is "blocked" in position inside the rails. Therefore, the train can move foward cur cannot go out of the railtracks (which is great for a train). Finally, as a bonus functions, there are some bumpers at the front and back of the locomotive to imitate the real bumpers used to absorb small chocs on a Locomotive. That's it for now, I hope the model is interesting to you and if that's the case, don't hesitate to support it on Lego Ideas ! Click Here to support :) If you have any question or comment, please reply to the post, I'll be glad to discuss with you ! -

[C-model] Buggy and helicopter from set 42061
Tomik posted a topic in LEGO Technic, Mindstorms, Model Team and Scale Modeling
I tried to build my own alternative model from set 42061 several times in past but all my attempts failed. When I was decided to sell this set I got idea to give it last try. My initial goal was to build some kind of buggy. After few hours I built working steering and in-line fake engine driven by rear wheels. Building car out of parts from set 42061 was painful (it has pretty bad assortment of parts) and I am not totally sutisfied with look of buggy so I call it "Ugly Buggy". By the way it fits to TC18 contest but I think it is too simple to submit it there. So I use it for TLCB Lock-Down Competition instead. When I finished building buggy I decided to build more - to build something easier. So helicopter was the best choice. I took little bit of inspiration from @BusterHaus - I like how he used gear rack for tail of his helicopter. My helicopter has both rotors connected by gears so you can spin them together by turning gear on bottom of helicopter. This is also my second entry to TLCB Lock-Down Competition. Building instructions for both alternative models are available at buildinst.cz Any comments are welcomed. -

[TC18] Retro Roadster
Kosmoss Lego Lab posted a topic in LEGO Technic, Mindstorms, Model Team and Scale Modeling
Hello! I decided to make a car for this event month ago, but then forgot about the Topic. So, here it is. I was running out of parts,so the car isn't very good, but it's my first time, I'll make something better for the next time. I started with chassis. -

[TC18] BMW E30 M3 bavarian dream
Peter_TEC posted a topic in LEGO Technic, Mindstorms, Model Team and Scale Modeling
Hello everybody. I'd like to present you my MOC car for the contest. Corona helps me to remember old hobby))) Here you can see a model preview. The most important information about functions : 1) independent rear suspension 2) dependent front suspension with steering 3) oppening hood. 4) detailed interior