Search the Community
Showing results for tags 'MOD'.
Found 469 results
-

[MOD] 75102 Poe's X-Wing Fighter - with a re-designed rubber band
Tyrell posted a topic in LEGO Star Wars
Hello all SW fans! It was the first time that I started to disassemble a set right after I put it together, I was so deeply dissatisfied with this model. The things annoying me the most were: - the way the thrusters (or engines? sorry for my English) are connected... oh my god. I can still not understand how TLC could release it that way. - the rubber band system. Not only the blue bands but the design of the system itself, with the bands on the back side, visibly deforming the wings when you see them from the side, leaving a gap on their front side - landing gears on the back, not only their lack but the solution for them... it is just ugly, very ugly and impractical. I am not keen on model accuracy so originally I did want to fix the wing problem (placing them behind each other) not to mention I also was convinced it was not possible to build them the way that they would remain stable (because you can attach them only on the top side without any strenghtening from the bottom). So originally I just wanted to place the wings back like LEGO did it. But during the experiencing process I saw a chance to at least to try it and gave it a go. When I finally got it right for the first time and took a look to the result I immediately fell in love with their look and there was no way back to the LEGO version. Fortunately they are sturdy enough this way as well, they do not fell off at all. (To be fair, I do not want to blame the designer of the set. This model is made for kids, not for adults. TLC has to produce sets which are easy to build, limited in brick count but still strong and sturdy enough. During my experiencing with the model I realized that every choice the designer took has a point, I can understand why the set is built that way. Only for the thrusters' attachment there is no excuse... ) My aim was also very clear: to create a rubber band system with rubber bands which are not visible from the outside and are placed in the middle of the wing mechanism preventing to deform the wings and also making a decent thrusters attachment possible. I also wanted to add landing gears on the back, if possible. During the re-designing process I saw in this forum that others are also working on mods for this model in order to fix the problems I listed above. I studied their solutions (Dameronian, khatmorg, Gouniaf, Vodnik - thank you for motivating me) as well but in the end I just went on my way. First I experienced with the blue LEGO rubber bands but after a while realized they length did not fit. So I looked around in the household and found some normal household rubber rings. (I have only white ones but blacks would have been perfect.) With them I was able to came up with a new rubber band mechanism: X_20151022_221341 by yatyrell, on Flickr X_20151022_221402 by yatyrell, on Flickr Built that way the rubber rings can held the wings (even the bottom ones) strong enough. Actually, it needs now much more force to open the mechanism than with the original LEGO mechanism. The challenge after that was to build the wings onto this base in a way that it has a one stud gap inside but still remains sturdy. I started to experience in several ways but in the end I chose to keep the L elements (http://brickset.com/parts/4539429) because they give strenght to the build. But in order to keep them I had to redesign the engine intakes too. And here are the wings, both 2 have the height of two plates and are totally in line behind each other. Of course I removed the missiles: X_20151023_162610 by yatyrell, on Flickr X_20151023_162615 by yatyrell, on Flickr X_20151023_162555 by yatyrell, on Flickr X_20151028_165853_HDR by yatyrell, on Flickr X_20151028_170108_HDR by yatyrell, on Flickr X_20151023_162746 by yatyrell, on Flickr X_20151023_162829 by yatyrell, on Flickr X_20151028_165751_HDR by yatyrell, on Flickr I thought for a very long time that it wass not possible to attach landing gears to the bottom parts, there was not enough place for them. But finally a found a solution (inspired by Dameronian, thank you again!). First they looked forward, then I changed their directions backwards because that way they are rectractable so that they are hardly visible: X_20151023_153627 by yatyrell, on Flickr X_20151023_153710 by yatyrell, on Flickr X_20151028_165819_HDR by yatyrell, on Flickr X_20151023_162722 by yatyrell, on Flickr I tried to reduce the color scheme to orange/black as much as I could. I also swapped some bricks (mostly greys) which were randomly put in the middle of orange or black areas. (There is only one place where it is not possible without jeopardizing the sturdiness of the model.) The set is also a goldmine for orange bricks (hidden in from outside not visible areas), so I disassembled the model and swapped these parts with parts of a different colour to get more orange parts to the outside. Fortunately I had a lot of black plates at home in different sizes, the MOD is based on them in a great deal. However, I tried to keep as many original bricks from the set as possible. Regarding the other known issues with the set the canopy has the mold number 3-01 so it was fine (has only a very-very tiny gap) but poor BB-8 has no clutch power. But that was easy to fix: X_20151023_153346 by yatyrell, on Flickr Now, 75102 is finally perfect for me. :) X_20151023_153904 by yatyrell, on Flickr X_20151023_154035 by yatyrell, on Flickr Thank you for your attention and sorry being so long. Of course any comment is welcome. But please spare me comments like "in the movie it does not look like this" because as I stated above model accuracy is not a priority for me. :) X_20151023_163427 by yatyrell, on Flickr -

[TUTORIAL] Modify your LEGO Tires for Performance
DamonMM2000 posted a topic in LEGO Technic, Mindstorms, Model Team and Scale Modeling
This tutorial shows how to increase the firmness of your LEGO tires! If your Mindstorms or Technic creation is pushing the tires down like a flat tire due to heavy weight, or if you want less rolling resistance from squishy tires, you've come to the right place! I hope this tutorial is a big help! NOTE: You will have to search around for the right size, depending on the tire. One size does not fit all. Typically, foam inserts from 1/16 scale RC vehicles should fit on tires from 42000 Grand Prix Racer, 8110 Unimog U400, or 9398 4x4 Crawler. -
I modded the Delorean set and added windows and made it more accurate in some places.
-
After having modified the old Y-Wing from 1999 (pictures at the bottom of this post), I had decided to proceed similarly with the more recent 9495 version. This time I applied a dark green color pattern and some light additional greebling. Y-Wing Green Squadron by Veynom, on Flickr Y-Wing Green Squadron by Veynom, on Flickr This pictures shows some of the details that were added to the model: Y-Wing Green Squadron by Veynom, on Flickr Y-Wing Green Squadron by Veynom, on Flickr Y-Wing Green Squadron by Veynom, on Flickr And the old blue modified version based on the official Lego set from 1999: Y-Wing Blue by Veynom, on Flickr Y-Wing Blue by Veynom, on Flickr The main reason for these variants is variety of course. When exposing during a Lego fair, you may decide to have 4 or 5 yellow Y-Wings or have some unique ships. I think tend to believe the later is better for the public. Comments welcome
-
Hi there, yesterday my son and I sat down to build the 75083 set... as always with the system scaled sets its basically a great model, that catches the essence of the vehicle nicely but could use an extra 50 or so parts to really finish it off. Thats what I did in the afternoon looking at the concept drawings and learning from other mods Here's my solution: I mainly focused on the pretty open backside of the "head" closing the nasty gaps and adding a little greebling to the engine area. Here's a shot without the added detail (brackets already attached on the sides) And two shots of the parts needed for this: I also added some detail to the underside of the engine to close it up and added some pipes to mimic hydraulic cylinders at the legs. Then the legs... they are far to thin on the top, so there had to be a way to "beef" them up a little: Again, the parts: As you might have seen I also toned down on the yellow parts... as much as I love those shiny bright yellow parts I think, they took it too far with the AT-DP, so toning it down a little only adds more realism to the model. The additional tile-piece here and there makes it less "studdy" and closes the technic beams at the lower legs. I hope you like my modifications and leave some feedback for my next project.
-
Hi guys, this is actually my first conversion of a City set-to-modular. I hope you like it! Here is the front side: http://www.brickshel...y.cgi?i=6325898 (I'm sorry if it doesn't appear embedded, this is my first time). Here is the back: http://www.brickshel...y.cgi?i=6325897 Here is the left: http://www.brickshel...y.cgi?i=6325903 And here is the right: http://www.brickshel...y.cgi?i=6325904 Here is the first (or ground) floor: http://www.brickshel...y.cgi?i=6325901 And here is the second (or first) floor: http://www.brickshel...y.cgi?i=6325899 Here is a little extra I decided to build after I finished the pizzeria. It's an alleyway!: http://www.brickshel...y.cgi?i=6325902 Thanks for seeing the photos. I really hope you guys like it. Well, now off to finishing modularizing the 60026 pizzeria and bike shop!
-
Edit: Please note that this thread includes a mixture of posts from the 2015 Pictures & Rumours which have been merged with appoah4's thread..... Thanks a lot for taking the time to respond. A lighter grey,in the palette as a compromise would indeed have been great, but you make do with what you have. Not that I'm second guessing your decisions, but I'd still like to point out that white doesn't look that bad on a transport ship like The Ghost, which isn't really that far removed from the Falcon as far as presentation goes.. I realize that it has a lot of bright colors to contrast with a bright white, but the white is also toned down with clever use of grey plating like it was done on ghost.. I guess I should just assemble the thing in white in LDD sometime and take a screengrab and see for myself :) EDIT: This is what it looks like at the end of Bag 6: Also, if I may ask one more question, was there ever an idea of giving The Ghost interior space a la Falcon? I promise, no more questions after this.
-
I was always very fond of this oddball Rebel Alliance starfighter... A very bold but also sleek and streamlined design. The system scaled version, I bought last year, was nice but didn't quench my thirst... I knew, there was an UCS out there, but I read very bad reviews and a lot of rants about it... and the cockpit area wasn't really "good" to say the least... I got an offer for a sealed set at 250 Euro shipped, which seemed decent, but I already had my mind set on doing some small and some major changes to the set, so the premium to get an original was imho wasted money! Bricklinking!!! I kind of like Bricklink and even if its tiresome at times you can always get great stuff from a lot of nice people sharing the hobby or the business... my last project was the UCS Deathstar Hangar... So I decided on getting the parts I needed which took about 3 months and I started looking for applicable mods, but there are only a handful... finally I found a great cockpit mod at fbtb that I wanted to integrate, and I made A LOT of smaller changes as I went along lengthening building time to about 2 full days. After all I got all the parts plus spares, original instructions, canopy and stickers for around 175 Euro... I really like the result, and think its a great rendition of this classic trilogy ship. See for yourself: What did I do? - the cockpit was completely reworked to get the look and the size about right... I put in Ten-Nunb to have a pilot working there, even if he's not in scale... - backside of the cockpit was worked on, some of the gaps were closed, the tan-colored parts were swapped for DBG - the neck was streamlined and plated and I added greeblies - the round parts in front of the engine, that are known to leave nasty gaps were closed with small technic pins and a clever plating design... - the topsides of the wings were plated (one sloped tile is still missing, because one of my BL-orders was short one piece...) I left the undersides without plating to keep the perfect shilouette of the wings intact... plating would make the too chubby, imho. - I tweaked a lot of fine details with small greebling parts, making it more interesting to look at - Used some old gray and old dark gray parts to give it that used-universe look - I switched all colorful parts that would be visible in the finished model to gray, which makes it much more realisic... (I kept some of the peeking parts in tan in, because I think it fits nice to have some discoloration here and there...)
-
In your hearts, you know I'm right!! PSM Steve says, hell yeah! More arms is more better! Soooo these are two Skull Slicers, somewhat modified. I removed the arms gearing for a more solid skeleton. They're going to make decent aliens in my Classic Space universe, I've got a few mechs of roughly that size. They're also both works in progress - I'm really new to Bionicle, suggestions are welcome!
-
MOD: Game-style Ekimu Those who have played BIONICLE: Mask of Creation will know that there has been an update to the game recently, which not only introduces Skull Warriors to the battlefield, but also Skull Slicer, Skull Scorpio, Skull Basher and Skull Grinder as four additional boss levels. Also, once you've fought and defeated all the bosses with their Toa of choice, you can also play as Ekimu, the Mask Maker! Now, those of you who are quite observant may have noticed something a bit off about Ekimu's in-game model. For those who haven't, take a look at his shoulders and arms. Ekimu has the same build as Narmoto, the Protector of Fire! The model uses 5M hinge bones and a 5M shell in trans light blue, which are versions of those parts which we do not have IRL. But, we can still build a close approximation - which I have done! What do you think of this version of Ekimu? Is he now more in line with the other figures of his size, or do you feel that he lacks a certain je ne sais quoi without a gearbox?
-
I've lit up the engine of my UCS Millennium Falcon: It's done using a cheap €2 set of 20 LEDs from a Euro store. I had to replace the 2x3 grey plates the trans-blue tile attach to with transparent parts (and as 2x3 clear plates cost a fortune, I built them out of 1x1s and 1x2s). After that, there was a bit of work to remove some parts that blocked the lights, and some internal parts to hold the wires in place. The battery box sits neatly under the top gun emplacement, where it's easily accessible to turn on/off or change batteries. For a fairly easy mod, I think the really adds something to the Falcon. James
-
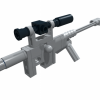
This is a tutorial detailing how to modify a LEGO 9V train motor so that it may be powered independently of the track. This effort is part of a larger project inspired by Thorsten Benter’s article in Railbricks Issue 7 titled “PF and 9V Trains: The Best of Both Worlds”. Step 1) Open the 9V motor. This has been covered elsewhere, so it should suffice to say you carefully remove the 12 tabs holding the bottom cover on with an xacto blade or something similar. There is enough friction to hold the bottom cover in place later even without the tabs. Step 2) Remove all internal parts. Ignore the fact that I took this photo after completing step 3. Step 3) Use a rotary tool with a cutoff disk to bisect the metal strips in the top of the motor enclosure. These strips are exposed in the top studs, and we will later use them to pull power from the track and apply power to the motor. Very important: Be sure to apply NO PRESSURE when using the rotary tool. Instead, just lightly touch the spinning cutoff disk against the metal strip, and let the tool do the work. It will take some time, so be patient and careful. If you apply pressure, the metal strips will heat up and deform the plastic. If the plastic deforms, it will be impossible to interface with LEGO bricks and PCB adapters (like the one in the upper-right corner of the picture). Keep it light and easy. You will thank yourself later when you haven’t ruined your motor’s plastic housing. Step 4) Desolder the metal pieces from the electric motor. I don’t have a picture of this exact step because I used the electric motor from a Power Functions train motor. If replacing the 9V motor with a Power Functions motor, open up the PF train motor using a T6 bit, remove the electric motor, and desolder it from the wires. Step 5) Solder a short length of wire to each tab on the electric motor (do this outside the housing to avoid accidently melting it). I used 32 gauge DCC decoder wire, but you can use whatever you have that will fit inside the motor. Reassemble the motor with exception of the wheels and the bottom cover. Step 6) Attach the wires to the outermost halves of the metal strips; the innermost halves are connected to the wheels through the wipers. I used a silver epoxy for this. I chose silver epoxy for two reasons: 1) I didn’t want to risk melting the studs by soldering the wires to the metal strips, and 2) silver epoxy has a lower resistance than graphite epoxy. Step 7) Reinstall the wheels and make sure everything is running smoothly. This would also be a good time to lubricate the gears if you want to. Make sure you don’t get any lubricant on the electrical parts! Press the bottom cover onto what remains of the tabs, and you’re done! If you ever want to run the motor directly from track power, simply use a PCB adapter with a loopback connector or connect a LEGO wire (9V or light gray end of PF). This is what a PCB adapter looks like when installed on the motor. (I’ve updated the design since taking the previous photo.) And here is a connector leading up to the electronics (currently just a Power Functions battery box, soon to include a Bluetooth receiver) in my Horizon Express. The connector plugs into the PCB adapter. The PCB adapter is attached to the electrical studs on the motor. And the motor is pinned to the bottom plate of the locomotive. Now I can charge the battery in my train without taking it off the track, run it indefinitely on a mixed metal and plastic layout, and have non-line-of-sight control when I add the Bluetooth receiver. It really is the best of both worlds!
-

[MOD] 42020 - twin rotor helicopter
syclone posted a topic in LEGO Technic, Mindstorms, Model Team and Scale Modeling
Good day! Today I would like to present my mod of the 42020 twin rotor helicopter. I changed the color scheme and added pneumatics for opening the cargo bay. Little update: Hidden the pump inside the model.Photos in the end of the post. Some photos: the original and my MOD The mechanism Pump update: More photos on Bricksafe: http://bricksafe.com...LXF/mod---42020 The Mod on my website:http://www.hoklywood.wix.com/home Instructions: http://bricksafe.com...0/42020 mod.lxf Video : -
 So, I wanted to have a display model in a shelf, and I asked myself; "what is the best looking set I have that is not too large?" The answer was obviously 8240 8420 Street Motorcycle However, as i finished building the model, I must admit I wasn't as impressed as the last time I built it. Some things had to be improved.. I'll just show the pictures of my modded model, and list the changes at the bottom. Hope you like it! Pictures are clickable for much higher resolution, or you can check out the Bricksafe gallery As was the case with the original; this is IMO the far worst angle to view it from So the most obvious visual changes I made were the following: -Sprung suspension on front wheel, while maintaining the dimensions of the original -Radiator in front of the engine -Some more panelling for the body, filling in the huge gaps there -Long, sleek panels along the seat area -Gas tank that doesn't leak as bad as the original -Large rear chain sprocket -More realistic and better looking exhaust (at least IMO) -Filled in the seat with some tiles -Reorganized the rear lights
 -

Mountain Rambler
filsawgood posted a topic in LEGO Technic, Mindstorms, Model Team and Scale Modeling
Hi everybody! Another MOC is buggy with a hybrid suspension - more precisely, on the wheel-tracks. I inspired to build my very first Lego Technic set - 8414 Mountain Rambler, which appeared in my back in 1997. In his own work, I kept from him only the general concept of the chassis and appearance, but now, in 2015, it’s controlled remotely for the movement in the space correspond to the following elements: XL motor - a movement Servo motor - steering IR V2 Receiver - remote control Large battery box - power Regarding the mechanics - the front independent suspension is set, the rear suspension is a two crawler track rigidly fixed to each other. The steering wheel rotates when you turn the wheel. Drive - rear, as a consequence of the model mostly bedroom. In appearance Mountain Rambler in the style of classic buggies, with a double cabin, roof rack, hellish exhausts, and a huge amount of fog lamps. -
If You enjoy building chassis more than designing body designs, this is one of the best building styles for you: Buying Lego sets and making them remote-controlled. I have modded almost every Lego set I got over the last couple of years and made some guidlines for the best possible outcome. PLEASE NOTE: This are the guidlines I like to use. Other people might have different and I totally respect theirs. That's the best part about Lego: Everyone can build how they want, and it should always stay like that. I just thought I'd share my guidlines, as they may inspire some to also mod official Lego sets. ✴Do not change the look. Your only goal should be to make the model remote-controlled, not improving the appereance. ✴Always hide electric components. This is the statement that bothers me thr most: "I'll simply put the motor outside the body because I can't find any space inside". That way you not only wreck the model's looks, but also fail at the challenge of fitting everything inside. ✴Make reasonable changes. Before you mod a function, figure out if it will be convenient to operate. For example, it would not make sense to remote control a gearbox' motor, but having to switch the gears manually. ✴Do not add or remove any functions. The final outcome should still feel like the original model, just remote-controlled. If you follow this guidlines, your result should be a fun to play with, nice looking model. You succedeed, when the following conversation happens when showing your model to another Lego fan: A: " Look what I built" B: "Oh, nice, you got the xxx set' A: "Yes, I even made it remote-controlled, " B: "What?! How did you fit all that stuff in there? O_o" If you now feel like modding a Lego set, I've prepared some tips and set recommendations for you: ✔Make a plan: Think about where to put what component before building anything. Also have a second plan, as it often turns out something wont work the way you thought. (I often make plans before even owning the set by looking at the instructions) ✔Lights are a nice, but simple addition. You sometimes have to change the way they are mounted, but it pays off. ✔If you run out of space, remove the fake engine, it doesn't hurt that much. ✔Wires need more space than you think, so keep some room for them. (Especially when using lot of Leds) ✔A common setup is the following: Steering & driving RC, lights & gearbox' motor attached to switches. ✔Mid-range sets are the easiest to mod because they have the most space unused. ✔Assemble the set yourself, because you get a better understanding of how things work and what you can remove. I highly recommend the 42008 service truck and the 42006 excavator for modding, as they both have plenty of space left. I modded both of them, so feel free to ask me for help if you're stuck, I would be honored to help you out! Personally, I really enjoy RC modding Lego sets, and I hope this post inspires some of you to try it out too. I would love to hear about your ways of doing it! Greetings, Technirus
-

42042 - Crawler Crane - Mods and improvements
kolbjha posted a topic in LEGO Technic, Mindstorms, Model Team and Scale Modeling
I really like this set, and even it has IMO a great gearbox, one of the first things I was thinking of after completing the build, was how to make it RC. I guess most of the six functions are straight forward, but operation of the claw is obviously more tricky. I tried to figure out if it was possible to operate the claw by the hoist string. I realized that it is possible to transfer motion to a pulley in the claw simply by pulling the string on one side of the pulley, and letting out on the other side. The claw should then in theory be kept at the same level, and the motion transfered to the pulley could be used to drive the m-LA. To achieve this, I have used two reels, each of them connected to the ouputs of a subtractor (geared down 1:3 with Z12 and Z36 double bevel gears). If using tracked vehicle implementation of a subtractor as a reference, the "drive" part is done with a M motor driving a worm gear that in turn drives a Z8 spur gear. The "turn" part is done by a XL motor, directly driving the differential housings. I probably could use a L motor as well, thus avoid the coasting of the XL. The string I have used, is simple string for packing purposes. I guess it is better (and more puristic) to use the thick LEGO string, as it looks better, is more solid and no twisting. Problem is, can I get a thick LEGO string that is long enough? Please don't judge from the aesthetics, the main goal for me at this stage was to demonstrate the idea, and I have not put a lot of effort in the looks, or making it compact. Link to video: Here is my own judge for the idea: Pros: IMO it looks more clean than a hanging motor with it's supplying wires. Both hoisting and claw operation may be done simultaneously. Able to operate two functions with a simple string. Adding mechanical complexity to the model, something I like. Cons: The torque delivered to the m-LA is limited, so the grip of the claw is not very strong. It should be apx. equal amount of string on both reals, to achieve claw operation without changing the level of the claw. Claw operation is depending on friction between the string and the claw pulley. If the the claw is resting on the ground or the object it should lift, it will not work. Probably not real-life-like implementation of claw operation. Another idea I have, still not tested, is to convert the hoist string into a closed loop. the claw implementation is the same, with a pulley driving the m-LA. On the tip of the boom, there is a pulley, driven by cross axles from the super structure (the reason for location on the tip of the boom is to reduce length of the string, and number of pulleys, to reduce friction). The hoist may then be done by two pulleys pulled along the boom, towards the super structure. One of the advantages of this implementation, if it works, is that "Con #2" above is eliminated. I don't know if this description makes sense to you, I will try to test this version also. Main problem is, how to make a long, closed loop of LEGO string, without any bumps. I appreciate any feedback, including cons. And I also hope to inspire some of you to come up with a better solution. PS: Somebody who knows how to embed a "visual" youtube link, like most of the others do (I didn't figure out)? -
Hello I would like to see the mods everyone has put on their cargo planes. I have installed flat tiles in the middle of the plane for there to be more room for the cargo. I have added winglets and moving levers in the cockpit for realism. So please share your mods. If you do not have this set you can share the other cargo planes and all lego city passenger planes. Thank you in advance. Some winglets for more realistic wings
-
A couple of weeks ago, I was browsing eBay and noticed several knock off Lego trains by a company called Ausini, some with wagons or coachs very clearly based on old Lego designs, some with random new design coachs, all with locomotives that are different to existing Lego designs. One in particular actually looked rather good, and being very cheap (£25 inc postage), I thought why not? I received the set, and was happy to see that, while the bricks were far from Lego quality, they were more than good enough to blend in with proper Lego, and that the set was a fun build. It wasn't, however, perfect. The main problems were the asymmetrical cabs, naff under loco detail, stunted pantagraphs, doors that were too far inset and lack of motive power. I briefly mulled over just using what I had, but I knew I'd need a lot more of certain green and blue bits, and that proper Lego versions would stand out for not being the same shade. So, I decided to buy a second set (irritatingly, it had gone up £5... but still a bargain, considering I was getting another couple of wagons too, oddly enough, I looked after I ordered, and sure enough, it had gone up again by £5... strange strategy by the seller). I already had most of the general Lego pieces I needed to add, and the PF battery box and receiver, but needed a couple of motor bogies (which I duly ordered). Before. Cheating! I like my locos to have 2 motors because I like big heavy trains. Unfortunately, I have yet to pluck up the courage to open up the motors and reverse the polarity, so have generally had to resort to having one end riding on it's wire, causing the loco to wobble at speed. I decided to try something different... I cheated! I left a gap in the floor of the slight overhang the cab is built on at one end, and cut a bit of plastic off of the middle of the end of the (not-Lego) trainplate, to allow the wire to pass into the loco without anything resting on it. Other than that, the construction was a fun and easy process that happily took up an otherwise rather useless morning. The Finished Loco. Notice the use of dark transparent studs to indicate lights that aren't lit, both on the cab ends, and next to the currently not in use pantagraph. I also needed to come up with a way to fit in the sensor and the on button into the roof, which took some modifying of the original design (a shame because I liked it). I fashioned a free floating block of Lego with the round and rounded upside down plate at the bottom to act as the switch.
-
Hello! Today I'm proudly present you my new MOD - 6x6 CUV, originally made by Madoca. His CUV impressed me so much when I built it, that I decided to build a modified version. Main targets was: impressive exterior, powerful drivetrain and different bodywork. Also I wanted it to have some serious off-road capabilities, so I decided to use larger wheels with custom tires. So final features is: - 6x6 drive - 4 L-motors (2 on each side) - 4 Li-Po BB (connected in parallel) - SBrick - Positive caster angle (front suspension) - Wheel reductors (3:1) and custom tires I tried to keep the original look, but front wheelarches was too small, so I replaced them with flex axles The rear part now looks completely different, it looks more like pickup. Special thanks to jorgeopesi for his wonderful fake engine idea! The only noticeable change in the cockpit - sticking BB The rest are hiding in the trunk Here is the teaser video: Thanks for watching! Hope you enjoy it Feel free to leave comments, your feedback is very important for me.
-

SUV - alternative model 42035
TREM posted a topic in LEGO Technic, Mindstorms, Model Team and Scale Modeling
Hi all. I'm new to this forum. Let me introduce my alternative model of 42035 Lego (Mining Truck). Hope You like it. :) Maybe some suggestions to improve. -

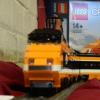
Diesel locomotive (7939 & 60098 style) with matching yellow expres
Murdoch17 posted a topic in LEGO Train Tech
I was messing around in LDD and looking at pictures of set 60098 (Heavy Haul train, not yet released for 2015. See it here: https://www.flickr.c...s-55973205@N08/ ) when I realized I probably could do a lot better using set 7939, the look-alike Cargo Train from 2010. I turned the electric locomotive into a diesel, and stretched the frame to allow for a beefier engine area. I didn't think about motorizing it with Power Functions until now, but I did make it build-able in two more varieties in case you wanted to color match 60098 with the red one, or maybe build you own engine with the black one. The cab still opens, and the driver can sit down and control the train from either end of the locomotive. This train was designed last year, but was unbuild-able until this year with the release of the back windscreen in trans-clear with a Marvel Superheroes set. The train consists of one baggage car, three passenger cars, and a observation lounge car. The rear car was based on the Milwaukee Road and it's beaver-tail observation cars. Here is the LDD file for the yellow 7939-style engine and the accompanying train cars: http://www.mocpages....1431959052m.lxf Here is the two other colors of the engine I was talking about earlier. The red one is supposed to represent 60098 (Heavy Haul Cargo train), while the yellow one is inspired by 7939 (Cargo Train). The black one is the only other color available for this type of engine. By The Way: the letters BRS should go on the three exposed studs on the sides of the locomotive, while the numbers for the engines should go on the sides of the fuel tank. 7939 for the yellow one, 7045 for the black one (because that's the only set that cockpit part comes in!) and 7944 for the red one, as it matches the other engines in sequence and was used in the 2007 set of that number. (Fire Hovercraft) ... or you could use your own numbering scheme. LDD file for the three different colored engines: http://www.mocpages.com/user_images/80135/1431958750m.lxf Thoughts, comments, and complaints welcome! -
Ok so im in the process of bricklinking the 10030 Star Destroyer but wanted to show the mods im planning on doing. As awesome as the original is i was always a bit disappointed in some of the details and greebling, anyway, enough talking and on to the pics. Hopefully the touch ups are noticeable but not enough to be in your face, all the greebling was redone, front of bridge reshaped, entire engine area redone and a few things changed and added. **LDD file in post #20**
-
MOC / MOD - Blue Bonnet AT&SF diesel - EMD F7 A + B units
Murdoch17 posted a topic in LEGO Train Tech
Climb aboard for the 13th anniversary of the LEGO Santa Fe Super Chief! (set 10020) This model combines an updated version of the EMD F7 engine with a new cab-less "B" unit AND in a different color. (blue instead of red) This model uses new parts and new techniques not available in 2002, including the windscreen from the 2014 Cargo Train. (60052) This Bluebonnet MOC is Eurobricks user raven1280's Bluebonnet MOD with a couple of my own twists inserted in some places. For example, instead of using custom stickers for the windscreen and porthole windows, I'm using regular Lego parts. Also, the undercarriage is black (not gray) on the bluebonnet engine because of this photo: (NOTE: this photo is not mine) http://images.mocpag...681_DISPLAY.jpg See Raven1280's topic here: http://www.eurobrick...c=97381&hl=blue Please note, the 1x1 tiles printed numbers "302" are missing from the engine's nose, and the letters ATSF are missing from the carbody sides, as they are not in LDD. The rear of the engine features crew walkways. Also, there is no inside of the locomotive and the roof does not come off. Semi-fictional background: Atchison Topeka & Santa Fe #302 is one of a very rare breed. Built in August 1949 as a “A” (cab) and “B” (booster) F7 diesel unit for the Atchison Topeka & Santa Fe Railway (AT&SF), This Electro-Motive Division (EMD) product was painted in a variant of the famous Warbonnet (red yellow and silver) color scheme called Bluebonnet (blue yellow and silver). The engine was intended for freight service and did so faithfully for 28 years. In late 1977 the two unit set was on the short list for conversion to an CF7 hood unit when the Wabash Frisco & Pacific (or WF&P for short) went looking for a engine to pull it's recently refurbished Merrimack River Runner. The Santa Fe gave them a two-for-one special on the tired F7 units, with the WF&P buying the A unit and getting the B for free. The new owner realized the historic meaning of this deal more than the old owner did: this was one of the last bluebonnet engines left, and one of a handful of AT&SF F7's not converted to the horrid looking CF7 hood unit. Needless to say, the WF&P snapped up the offer, and even sent the loco to the EMD La Grange, Illinois assembly plant for the motor to be replaced with a newer, more powerful and easier-to-maintain power plant. The units came back to the WF&P in 1979, and have since been teamed up with the recently restored Southern Pacific Daylight #4460 (owned by the St. Louis-based National Transportation Museum) for trips up and around WF&P system. This story is somewhat rooted in truth: EMD did build AT&SF a F7 numbered 302, but it probably did not carry the bluebonnet scheme and was most likely scrapped or turned into a CF7 in the 1970's. The Wabash Frisco & Pacific is a 12 inch gauge mile-long ride-on railroad, and although they have diesels, they only have a Alco PA lookalike, not an EMD F7. They are based in Glencoe, Missouri, and their website is here: http://www.wfprr.com/WFPRR/ LDD file for the bluebonnet diesel units: http://www.mocpages....1430676420m.lxf (Also, I've posted this engine before, but not in it's own topic. Sorry if i did something wrong by posting it again!) -

RC MajklSpajkl's Dawnbreaker by PKW
PKW posted a topic in LEGO Technic, Mindstorms, Model Team and Scale Modeling
Hi to all! Proud to present you my latest MOC… ops, sorry, my latest MOD! First I have to thank MajklSpajkl that made an awesome MOC, but he has also made my work possible, so I decided to put some link to his creation: original topic, (where you can find instructions)second here is my MOD: important pieces I've add: -lipo BB (same size of the AAA one) -M motor -L motor -receiver -16M axle (EDIT ) -yellow shocks -U-joint I built this in more or less 30 minutes but it is a really funny creation! is has also a particular return-to-center steering based on an old force: GRAVITY! how it works it is simple (hope I can explain it as simple as it is ahaha): the car has an high caster angle, this angle auto-center the wheels while running forward, I've put the M motor directly linked to the steering 5,5 axle and it works well! in fact when the motor move the steering it forces the mechanism so when you release the command this elastic force make the motor turning back more or less at the center, it is not important that it is perfectly centered, because the high play of the steering make the caster angle center it with more accuracy :3 here are some photos (it has different colors because i've not built it from the two original set)