Search the Community
Showing results for tags 'WIp'.
Found 314 results
-
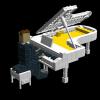
Green Schooner WIP Redux I am editing over the old post as I found it wanting. I suppose I could start a new post but that just seems wasteful. I also don’t want to discredit the support which has already been shown. Below is my attempt at a better, more informative, if verbose, WIP topic. If you’re taking an interest, you’ll likely have lots of questions as to how or why I made a lot of the choices I have. For those of you, here it all is. For those less inclined, enjoy the pictures. If anything is still unclear, you have a truly helpful suggestion, or just want to show your support, please feel free to comment. Thanks for your interest in advance, and trust me it’s worth getting all the way though. When I started this project, about a year ago now, I set forth with a few goals in mind. For one I wanted to frame the entire project within the idea of making an all-out pirate ship based on Skull’s Eye Schooner of Classic Pirates fame. Hither too I had always favored good-guy/hero types with my creations and figured it was about time I provide my mini-verse with some bad-guys to keep ‘em busy. When I was a kid, playing with my Lego ships it always bothered me that SES wasn’t anything like a schooner. I suppose even at that age I already preferred that the intersection where fiction converged with history be more in the neighborhood of realism over fantasy. I used this as inspiration and resolved that whatever came of it, I’d make this next MOC in the style of SES but as an actual schooner. My other goals involved further refining the “Bent Brick” method I had adopted and adapted (credit to Henrik Hoexbroe). My previous MOC, Ramcat, was rather experimental and in parts suffers from a lack of pre-planning. Though the basic elements are all there and the goal of an all-working-parts-model can be said to have been achieved, much was omitted for space while some things remain historically dubious. Knowing better the demands of this style of building I would be more well prepared with each step to make a more complete and inclusive model this time. Many of the things, like fife rails, left out or left peculiar to that previous venture would be rectified in this construction. Also important to me was to include elements from other builders which could enhance my own effort as well as incorporate other elements from real world examples I had previously shied away from. The final element I’d insist on incorporating would be homage paid to the American privateers of the early 18th century. In my youth I had considered such vessels to have occurred far too late in history to be truly relevant to my own interests or Pirate lore in general. As I matured, learned and branched out I came to appreciate these historic vessels, and the contemporary replicas thereof, a great deal more. Now, aside from perhaps Frigates and their daring crews of the same era, these are perhaps my favorite over all. For reference I’d look to Lynx and Pride of Baltimore II. The initial renditions of the project were less than stellar. It seemed that marrying my concept to the parameters of SES likeness was going to be a handicap. For one I didn’t want to destroy any previous builds to reuse parts and change the color scheme but at the same time did not want to go forth and acquire new or more bricks either. On the one hand I felt it a violation of my principal of “use what you have” vs. “order, just, what you’ll need”. On the other it would take some creative budgeting to afford the colors I’d need to do it right. Before I was done, however, I’d commit to both. After trying several different configurations of color, I decided that green should be the predominant color on the hull accented by gray, rather than the other way around as of SES originally. As for the red elements, I just couldn’t seem to rectify them on my version and abandoned them entirely. The shade of green was the deciding factor in my decision to order parts. The standard Lego green, that bright green of prefab foliage, was just too vibrant for my taste and didn’t give the feeling of pirate ship at all. Instead I had to go with a darker, drabber green which I could afford, but had to be ordered in sets and cannibalized. The gray elements would have to be dark gray and/or blay to compliment the darker green as well, but that I had in stock, abundantly enough. The rest of the ship would wind up black instead of wood colors. While “blacking” was a common practice for practical vessels of this era I also figure it would lend the schooner a more sinister look. This time around I built the ships sides in a “ribbon” like fashion, flat on the deck then tested it again and again around an armature. After a lot of trial and error of both elements, the ribbon and armature, I came up with a hull shape I found pleasing and accurate (enough). Astern I expounded on a concept I added to Ramcat as more of an afterthought which made attaching the ribbon to the armature particularly difficult. Though I am a little ashamed to admit I do not know the name of, nor can I find any reference to it; I found the lack of curve on the underside of the hull near the stern disenchanting. Even heavily laden ships have a small portion of their hull’s underside above the water line as it narrows to the stern post. On this model I wanted to make this effect more pronounced and better well incorporated in to the transom. Though not entirely successful, I think the scale to small to really work well, I find her stern profile passable. Since the dynamic shape I had envisioned escaped me I took advantage of the increased space and added elements for a working rudder. Only the rudder head and till actually exist as the rest would be below the water line, but all the same, working elements were established early on as a primary goal. Up forward another working element was integrated when inspiration struck. I always considered the idea of a functional windlass/capstan fundamental. Any round part on an axle will coil a cable. Going years back to Snake, though, I wanted to make something of a more practical model than just round bricks on pins. While looking over pictures of schooners for inspiration I took a closer look at the more advanced, metal, windlasses of 19th century vessels as such. I saw a lot of similar shapes in common with technic parts and started building. Digging though my bag of gears and such, I found a lot of useful parts and cobbled together some designs that would very much look the part but still not quite work. What I was missing was a ratcheting action. To function it would need cat’s paws but on that scale, how? I found a gear which worked well with a cheese wedge to lock in place but needed a spring. (Purists prepare to cringe) In one rendition I actually tried to use the spring from a retracting ball point pen but it was impossible to keep in place. The smooth surface of Lego bricks failed to create enough friction. After that I tried pieces of flexible material, like card stock and balsa wood, but none of it had the necessary tension. Then out of the blue I thought of closed cell foam. Over the years I had saved plenty of the stuff from the likes of video game console packaging for myriad uses. I even had black which would blend well into the schooner’s décor. With a cheese wedge attached to a clip to make a hinge and pressed up against a wall, the foam acted like a spring and the ratchet worked. I now had a truly functional and practical windlass for my schooner. If I could bring mini-figures to life, they could use the windlass just like the real thing! See Video Amid ships there was much more work to be done. Mounting masts was nothing new, the same methods from Ramcat would be used over but the railings and deck were going to be a challenge. The belaying pin system I developed for Ramcat would work well, but I would need a lot more pins this time and the same standard would be needed on the new fife rails as well. In this system a clip holds a pin firm in place, rather than loose through a board like the real thing. This is so that a rope to be belayed in place need be only wrapped around the pin once to hold its place while reaching through the web of lines on the model. Then the clip and pin can be removed as one, the line still held in place, and belayed properly; free of the ships rigging where the modeler can work more easily. Once properly tied off the assembly can be replaced on the rack to resume proper tension, taking full advantage of the Lego system. Then next thing to be incorporated were deck housings. In my previous works I shied away from such construction for lack of deck space. Instead I had tried to compensate for the small scale by leaving hatch ways and gratings flat or even flush. For a basic interpretation this works well enough but is a characteristic more appropriate for much larger vessels. On schooners of this type, raised deck housings helped compensate for a distinct lack of space below deck and are a key characteristic of those ships. The first rendition of these was rudimentary by comparison, but served to develop the hatch ways I kept on the later version. Though they do not open and close freely, these covers and doors can be configured to remain either open or closed. Since the type of model (waterline), scale and construction technique make a below decks space impossible, I figured this is a nice way to allude to one for certain scenes. I also wanted to take this model to the next level with a planked deck, never much enjoying the studded decks of my previous efforts. A tiled deck may have seemed easier at first but it would have made for a lot more spacing conflicts with the armature and the tiles as planks would be just too wide. Instead I tried out something I had seen here on Classic Pirates. I assembled gray plates on their sides and staggered them to resemble the planks. I feel it worked out rather well. I picked gray over beige or brown, not only because I have no abundance of those other colors but because I wanted to serve that sinister look. Wooden decks not regularly sanded and scrubbed, nor sealed and coated will turn gray when exposed to the weather. Unfortunately I didn’t have enough of any one gray to do all of the deck, so I took a queue from castle builders and started throwing in other grays randomly. My hope was that the different colors would resemble damaged, well worn and/or repaired sections. I think the overall effect worked, but worry that some particular sections may still be distracting. Still to be worked on: The wheel, I copied Ram cat’s design but, this time with the intention of actually attaching the line to the till to work the rudder. I had planned on using relieving tackles below deck to give the wheel a more realistic feel. After completing the deck from what was on hand, plates of every dimension from 1 to 4 studs wide, I’m not sure I still have the space. I may have to settle for a direct connection. The gun flaps are currently held in place with strips of tape. I tried many different configurations of bricks to make a hinge but found none that worked ad still fit the size/scale of the ship. I came up with this idea while pondering how the actual hinges were attached. Purists may cringe, again, but after seeing how well these work and look my intention is to print stickers to replace the taps and look like iron hinges. I actually don’t feel that this is too much of a purism violation, not that I am very much concerned. After all though not for articulation, even Lego uses stickers to decorate their creations at time. Mine will just be a custom sticker. Belaying pins have been something of a struggle on this build. On Ramcat I simply turned dowel against a file in my hands and that worked well enough. The shape was simple but served the purpose. Purest may again take umbrage but there simply are no parts in the Lego catalog that will work just right. This schooner has so many more pins than Ramcat (26 vs. 44), that I decided that old method would be remarkably impractical. I attempted to makeshift a lathe with my Dremel tool. It worked well enough but I found it difficult to produce consistent shapes. Perhaps with practice or a proper tool, I could do better but that would simply be far more of an investment than I’d like. Instead I tried to design 3D belaying pins to print with Shapeways. My efforts there have hit a hurdle in the form of my lacking experience as well. There are problems with my mesh which will take an investment in self education all its own to correct. On this front, any assistance the community can offer would be appreciated. There are still scale miles of rigging to be rove, though the masts and spars as complete and ready. Sails will be their own adventure as I moved on from Ramcat before ever making her suit. Though it will require some experimentation, both vessels will likely get their suits at the same time. I figure at this point that my end goal for this project cannot be reached in the remaining time. I had resolved to complete the project by October 31st in order to utilize it in a Halloween appropriate scene. After that I had hoped to use her in conjunction with Ramcat and some of my other MOCs in a number of vignettes and perhaps even on display at convention(s). Between changing jobs and getting married, though, I simply haven’t been able to keep up. At this point I fear the project never being completed let alone dragging on any longer. Though I still hold out hope for a finished Ramcat, it was much the same situation and still she collects dust. I may very well be able to broker some free time in the near future I can use towards this cause though. I still don’t’ find the end of the month realistic but I don’t believe any of the local (Philadelphia area) conventions occur till the New Year. If you made it this far, thanks for your investment and interest. I do appreciate the encouragement I’ve received (most of the time) from this community over the years and that’s probably why I keep coming back. Please leave your comments, but in mind of her incomplete status.
-
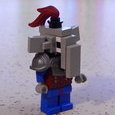
Yes, I'm starting another WIP. This time, I'm working on the humongous snake that was the focus of Ninjago's second plot arc. And as with the Tiger Widow, I'm trying to make it show-accurate. The eye. I'm trying to keep this simple but effective. I'm not entirely satisfied with the pupil, however. Any ideas on how to approximate the fang-like curve better? Here's the fang, with a minifig for scale. It's a big snake . Since I'm not going for buildability and instead trying to pretty much make a LDD puppet, it's going to have joints everywhere, mouth, frill and incredibly long and noodle-y body. Expect 35+ points of articulation . Comments and criticism appreciated! Gallery
-
Can you guess what I'm making? I'll give you a hint: it's a real animal... Just a project I decided to work on to test my skill at building non-CCBS action figures.
-
[TC9] Log Skidder/Unable to confirm at this time
A Gallifreyan Cat posted a topic in LEGO Technic, Mindstorms, Model Team and Scale Modeling
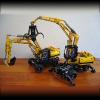
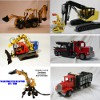
Here is the progress so far on my TC9 entry, at least the A model: The A model is log skidder with articulated steering, a movable arm, and a closing/opening claw. I do not know what I will do for the B model, but probably something else with articulated steering, because I don't have many steering elements incorporated into the A model. The arm is controlled with the middle knob, the steering with the knob on the corner, and the claw with the gear attached to it. Here are a few more pictures: -

[TC9] 5 Axle Truck + Attachments
Saberwing40k posted a topic in LEGO Technic, Mindstorms, Model Team and Scale Modeling
Well, I've had this thing in a good state of WIP for some time, so I may as well share it. I'm really motivated right now, because of the fact that I missed out on pretty much every competition between TC5 and now. I came close to entering TC6, but didn't enter TC7 due to lack of motivation, and same thing for TC8. So, I am back, with a vengeance. My entry is a five axle truck. Its loosely based on my [TRIPLE] contest entry, or at least the truck part, but this model is an improvement in every way. The steering works better, the engine works better, and now the chassis sports a lift axle. That middle part was quite difficult to design, but I ultimately got it right, after 3 revisions. The two rear axles drive a fake six cylinder engine, which works far better than the old truck with its V8. The steering, as I mentioned, has been dramatically improved. It still uses Ackerman correction, but the actuation is accomplished by levers and Pitman arms versus the complicated and difficult to use gearbox and racks of the old truck. Getting the two axles to turn at different angles was quite a difficult process, but I found a solution that is robust and simple, after about 4 revisions and a few hours of frustrated facepalming. The truck is not quite finished, but when it is, the chassis will be the same for both A and B models. This solution, I feel, is a bit more suited for this competition than having to rebuild the whole model. Instead, part of the model will be rebuilt, in the form of two attachments to the truck, using the same parts; This is similar to how 8421 works. One module will be an Effer style knuckle boom crane, with the other one being... something else. In spite of appearances, the truck does fit in a bounding box 15x13x48 studs, resulting in a volume of 9,360 cubic studs. The only exception is the steering axle, which will be shortened. The fenders are also not final, and will be changed. The truck in the bounding box: Inabox by Saberwing007, on Flickr The truck: Truck by Saberwing007, on Flickr Lift Axle in action. The lift is controlled by the 12z gear ahead of the axle. Lift Axle by Saberwing007, on Flickr Maximum steering lock. Steering by Saberwing007, on Flickr There will be more to come, as the cab, and then the crane are added. -
I'm hoping I've posted this in the most appropriate forum location. My son and I have been playing Garden Warfare quite a bit lately, and I've been a fan of PvZ for some time now, so I figured it was time to make some large scale lego versions of the characters. These are still a work in progress, and I've so far only built 4 out of the 8 playable classes (I'm just doing the base varients of each class, at least for now). So far I've built the Cactus and Sunflower for the plants, and the Foot Soldier and All Star for the zombies. I'm currently working on the Chomper plant. I will be re-doing the Footsoldier's gun as it's not very good. The Foot Soldier's body needs a bit of work also. Sunflower probably needs to be a little taller too. Zombie All-Star joins the PvZ team by Sam Wright, on Flickr Comments and suggestions are welcome. Thanks :-)
-
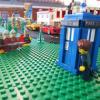
It has been a while… Some of you know me from my previous layout. This layout has been taken apart and the new version is now under construction. I made my plans for this new layout early March. Planning by UrbanErwin(EPJL), on Flickr A big thank you to scruffulous for the BlueBrick files he sent me once. I had a small list of things I really wanted to have in my layout: - long or large curves as described by Railbricks and Cale Leiphart. - a turntable, better looking and functioning than my previous design - it has to be modular for easy transport - it has to connect properly to the other layout builders at LowLUG. I first laid the basplate and added track to see if my idea actually fitted, it did! Next where some tiles to mark the edge of the areas which should be tiled to support the track: Then the fun really began, building actual modules: Layout V5.0 work in progress 8-4-15 by UrbanErwin(EPJL), on Flickr Layout V5.0 work in progress 9-4-15 by UrbanErwin(EPJL), on Flickr Work in Progress update 13-04-2015 by UrbanErwin(EPJL), on Flickr After a couple of days building I made a start with the turntable: Some more foundations and landscaping Update 20-04-2015 by UrbanErwin(EPJL), on Flickr And this is the current state of progress: Work in Progress update 21-04-2015 by UrbanErwin(EPJL), on Flickr Work in Progress update 21-04-2015 by UrbanErwin(EPJL), on Flickr I will try to add updates every time I added something.
-

(WIP)(LDD)LEGO Technic Train
Imanol BB posted a topic in LEGO Technic, Mindstorms, Model Team and Scale Modeling
Hello everyone, some time ago i got amazed when i saw the lego trains, and after a long time watching thems i wondered, if there was any lego technic train, so i decided to search, and i didnt find any one,i ve just found some trains on internet, but none really a technic model, so i wanted to make one by myself, so here it goes: This is the main idea its to have a fully working lego technic train, i wanted to make it to work without rails (because it would be to hard to make or buy them), it would work like a crane like movement. The whole model isnt very good because i had almost no time to make it, the idea its to have 2 bogie motors, both powered and steerable, i have used normal wheels with tires, because normal lego train wheels arent enough big or grippier, also the profile and the look wouldnt work, so i made this: The bogies would be powered by XL motors in the frame (from the green part) and rotated by servos, the drivetrain its like a normal truck rear transmission (but without suspension), differentials are to prevent damage to the axles during turning: And this is a picture showing how it would work: I know this model is really ugly and simple, but is because i hadnt time and im first designing the working parts, there are obviously some strength problems, but i will do my best and i will keep working on it to make it better (and maybe bigger), any suggestion for an improvement or ideas are welcome (sorry if i have a wrong spelt or misused word). Thanks. -
I'm starting to work on a Mcdonald's MOC and I just got done finishing the M logo. The red panel in the bottom center would have the sticker from 3438. I was just hoping for some feedback and if there is a better way to make that M. Thanks!
-
Its been a looong time...
-

[TC8] [WIP] Liebherr LTF 1045
Kiwi_Builder posted a topic in LEGO Technic, Mindstorms, Model Team and Scale Modeling
Hey all, This is the crane I'm making for the TC8 competition, a Liebherr LTF 1045 truck mounted crane, mounted to an 8x4 Scania P380 chassis. The Liebherr LTF 1045 is a crane which is factory fitted to either an 8x4 MAN, Scania, Mercedes or Volvo chassis with the crane fitted on a Kenworth T800 in the USA. It has a lifting capability of 45 tonne and a 52m boom height when fully extended. My MOC is in scale 1/16.5 and will be fully RC. The crane's boom will be approximately 1.5 metres long when all two stages are fully extended. The RC functions are: Drive: one XL motor Steering: Servo motor Stabilizers folding/unfolding: M motor Stabilizers extending/retracting: M motor Superstructure rotation: M motor Boom elevation: L or XL motor depending on space Boom extension: L motor Hook raising/lowering: M motor Other functions: Stabilizers lowering/raising: Independently controlled using pneumatics Opening cab doors Tilting cab (probably) Straight six engine Full suspension Enough chat, time for some progress photos: Chassis with the stabilizers retracted And stabilizers extended and lowered A closeup of the stabilizer setup The main boom at its full length of 71 studs, with two stages going inside of it \ What I have of the first stage so far, not the actual design but just an indication of the extension length from just one of the stages. That is my progress so far and I am currently working on improving the stabilizer design because at the moment they are too high and bulky. I will start making better progress once I get the parts I need this weekend. I'll update this thread regularly with my progress as it comes along. As always feedback is appreciated, Cheers -
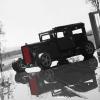
Hey guys , My first MOC when I came out of my late dark ages one and a half year ago was the Batmobile from the first two Arkham games ( well , technically it also cameos in "Origins" ) . It was ok for a first creation after years of absence I guess , but not that great . Some days ago I stumbled upon the LDD file , and I thought " Why not revisit it , make it great and actually build it with real bricks as well this time ". I'm posting this as a WIP because I've finished 80-85% of it but I'm kind of stuck and I need some opinions and suggestions . Here is what I have so far : The tooth piece is supposed to go between the 1x1 plate and 1x1 tile right behind the "tubes" , LDD won't let me put it there but I think I'll be able to squeeze it in there when I actually build it . The tubes / hoses will be flexed so that they're closer to each other and have the angle like the "real" model . As you can see ,the front part is complete , but the back , specifically behind the driver's seat is only a rough draft . So here comes the part where I need your help . I've created two versions of the back "afterburner" area as well as I need your opinion on which looks more accurate , and as many ideas and suggestions as possible for the part behind the driver's seat . Here is the second version of the back area . And , since 2D screenshots can never truly express the 3 dimensions , I'm attaching the LXF file . The one on the right with Batman next to it is what I've been showing so far , the one in the middle has the second version of the back area and the one on the left is the one on the right without the roof , whatever you see there is "complete" ( but of course can be changed if needed). Note : I know some parts don't exist in the colours I use , but I don't like to be limited by the colours TLG produces their parts in , so I'll probably paint them . Also , you may find some "silly " bits in the LXF file , like three 1x1 plates on top of each other instead of an 1x1 brick etc , obviously this won't be the case for the final model , just didn't pay attention to this kind of things and concentrated only in replicating the vehicle's look . Thanks for viewing and please leave a comment of your opinions/ suggestions , it will help a lot .
-
Patria AMV 8x8 WIP
Doc_Brown posted a topic in LEGO Technic, Mindstorms, Model Team and Scale Modeling
Hello everyone! I started work on this, with the goal of having independent suspension and gearing down after the differential. I have hit a snag, hard to see, but the gearing "cracks" after the diff, because it can move from each other. Its really bad and when geared with 12t and 20t will not even move on level ground under its own power! When geared with 8t and 24t it will move but slightest bumps will cause it to grind gears. There is just no room between the gears and universal joints for reinforcement. You will also probably spot the plastic washer I made to stop the diffs from being torn to a pulp. Many wont approve of this, but I only have 2 good ones left! And need to protect them as they are a little pricy to replace. This does work very well tho. Has anyone succeeded in gearing down after the diff on independent suspension before? Any ideas or advice would be greatly appreciated, at this point I'm going to scrap this and start again, perhaps forget about gearing down after the diff. Thanks -
Hi all! I present my work in progress spaceship for the SHIPtember challenge on Flickr. (More info: https://www.flickr.c...57654284609753/) Everything on the frame by Péter Ittzés, on Flickr The new panels mounted by Péter Ittzés, on Flickr Engine pod greebles by Péter Ittzés, on Flickr Keep an eye out for updates! P.S. If you like big spaceships, you should definitely give this contest a try. EDIT: UPDATE on the bottom of the page
-

[WIP] Offroad SUV
Block_Smarts Lego Technic posted a topic in LEGO Technic, Mindstorms, Model Team and Scale Modeling
Hello EuroBrickers! I am working on a Offroad Suv (NEEDS NAME!) Here are some WIP Pictures, sorry for the flash, it was at night! Here is a better picture, TMNT Cup for scale Still needs batterybox and a better roof. AND A NAME! I will accept name suggestions! More updates soon! -
Good afternoon everybody! Ah, Slizers. One of Bionicle's two predecessors from the late 90s. A gaggle of diminutive, poseable robots who could throw disks and combine with each-other, on a world separated into 8 elementally themed factions. Certainly an interesting line, but sadly very short lived - two waves of toys, and it was gone. One other sad fact is that not much is known of the Slizers story. Many older fans have theorised as to the true story, and I'm sure countless kids have figured out their own stories for their Throwbots to engage in... But otherwise, the presence of story material for Slizers is indubitably scant. Now, I'm a quite the fan of the Slizers in regards to their design and concept, and have always wondered what a fully fledged Slizers story could look like. I always liked the idea that the Slizers were planted on the planet in an act of experimental panspermia, and the asteroid that came later on was simply a freak of nature that corrupted said scientific endeavour. So, I wanted to tell that story, but from a 1st person perspective. And this is where Tremor comes in. This humble little 'bot was to be the main focus of an adventure on the world of Slizeron, meeting 'bots both familiar and fresh, trying to discover his identity and place on this new, mysterious world, after crash-landing in a most unfortunate manner. I began writing Tremor's story a couple of years ago on my phone, only to leave it abandoned for quite some time. Eventually, I transferred it to my computer, and it now sits in my Google Drive. Since then, I have added two short chapters, and I intend to in future add more. To start your adventure with Tremor, click here. I've set it up so that, if you have a Google account, you can leave comments on the document itself. If I make further updates to the story (which I intend to), I shall notify you all in this thread. Thank you for your interest. Enjoy!
-
My oldest son has really gotten into legos like I did as a kid, and we have pulled out all of my old legos from the 80s and 90s which includes a few ships like the 6271 Imperial Flagship, Renegade Runner, and Imperial Trading post. He got into the Pirates of the Caribbean so we have the Black Pearl and Queen Anne's Revenge too. My son told me that he has lots of Pirates, but not enough imperial/British ships to make it a fair fight! We have recently built quite a few custom kits from http://www.brickmania.com/, so I thought there might be custom ship builders out there or at least instructions to buy. I thought that something like this http://www.ebay.com/...=item2eda5a3ad8 might be a good solution, but it turned out to be way too big and fragile to be playable, and I wasn't happy with the lack of the tumblehome technique that I saw while browsing these forums. 20150703_111506 by adam_beck_bell, on Flickr I found Sebeus's masterpieces to be absolutely perfect and his HMS Marianne has become my goal. http://www.eurobrick...showtopic=71195 So I've taken apart the monstrosity I had built, and I'm trying to figure out how to replicate some of these amazing techniques from Sebeus and others. Being completely new to doing this without full instructions, it is a steep learning curve. Sebeus suggested that I make my own thread to get some pointers from the community so I can reach this goal of a playable and sleek Pirate killer. Here are a few pics and some comments on what I'm struggling with. Please feel free to offer critiques of my building work and posting. I am trying to build each section independently and then attach it to the hull. I've had to go back and completely break down sections and build it in place to get things to line up. I'm not entirely settled on what approach will work best for me here. 20150703_210350 by adam_beck_bell, on Flickr Tying together these gaps in the structure are really stumping me at the moment. There is a little gap between the sides of the ship and the interior deck and a big section i need to figure out between the very front which ended up at a higher elevation than the rest of the deck. 20150712_191039 by adam_beck_bell, on Flickr Overall, I'm liking the shape of the tumblehome but I'm a little worried about there being too much of a gap. 20150712_191030 by adam_beck_bell, on Flickr Once again, please help push me in the right direction... I'm a big boy and can handle it, I just want to learn. Thanks, Adam EDIT: Here is the (initial) completed ship! 20150816_163144 by adam_beck_bell, on Flickr
-
[WIP] 42043 - 8258 hybrid
Cumulonimbus posted a topic in LEGO Technic, Mindstorms, Model Team and Scale Modeling
I am working on some MODs for my 42043, so I build a copy of the front and rear axle of the Arocs and made a new chassis around them. In order to get a feeling for the correct proportions, I placed the 8258 cabine, front outrigger module and crane on this chassis and this is the result: Note that this is a mock-up, so none of the functions are connected to anything at the moment. What do you think, is this something worth pursuing? Should I focus on modding my 42043 or continue with this 8258 derivative? If so, what should its cargo be? -
ETF HTX-380 Mining Truck.
Saberwing40k posted a topic in LEGO Technic, Mindstorms, Model Team and Scale Modeling
A work in progress version of a 400 ton ETF truck. More info soon. Edit: some quick stats: 28 wheels, 14 L motors, 14 turntables, and 2438 parts as of right now. So, yes, it's really big. When I started this project, it was smaller, scaled down to the only type of wheels I had the right quantity of. Much to my dismay, they were far too wide for scale. I tried literally every other tire in my collection, and got the same result, except for these tires. Even so, building the axles was a pain, I'll tell you why tomorrow. Update: The axles were a major pain in the butt to build because of the fact that I had to include a differential in a module only 5 studs wide. However, this first iteration (shown above) was not strong enough, or geared down enough. So, I modified it, keeping the same torque tube design , but with the c bracket turned on it's side in order to accomodate portal axles. I also moved the motor from on the axle to a spot within the chassis. My model is currently roughly the same size as the one efferman is making, but since I have more motors (14 versus 10) and hopefully less weight overall, mine will be far more powerful. It also helps that these motorcycle tires are very, very grippy. The chassis was also updated, with the frame rails now being 5 studs apart, providing room for the steering servo motor, and steering reduction gearboxes. Also shown in this picture is the power module, with 6 receivers. 4 of the six will be slaved together, and provide power to the L motors. the remaining 2 will control the rotation of the bed, the tilt of the bed, and trafficators. Yes, it's going to have turn signals, and likely flashing warning lights. And, thanks to the fact that this model has a lot of internal room, I can include several engines, likely two supercharged v8s The red beams on the chassis merely mark the outlines of the cab and dump bed, and will disappear by the time this is finished. The bed is currently in the prototype stage, as I am still working on the bed lift, and how the whole shebang is going to connect to the chassis. March Update: This project is moving forward, albleit slowly. The mechanism for the turn signals is complete, but I have no photos. I'm actually building the truck as 3 sub models (the front, the rear, and the dump bed), due to the fact that the computer can't really process LDD models above 2500-600 parts. The engines have been incased, and will be lit from below. P.S. Does anybody know if you can slave an M motor to the same channel as the servo motor, and have the M motor continoulsy rotate even if the servo stops? And, it's update time. I've started on the cab, which will have seats, and house the trafficators. No, the yellow and black colors aren't a mistake. Those will be the final production colors. Rear view: this view shows the trafficators. The bottom motor is slaved to the steering channel. (I hope that it is possible to do that with an M and servo motor.), and the top motor is slaved to the drive mechanism, giving the model flashing warning lights. If you all are wondering what happened to the rest of the truck, I had to divide up the model so that the computer would stop freezing. The dump bed has also been rearranged, and has the linear actuators, but not their drive motors or shafts. Still to do: Finalize dump bed frame. Finalize turntable connection, and add motor. Add motors to control bed lift. Add bed front and back walls, and dump gate. Finish cab. Mount Trafficators Finish bulking up frame. Colorize. Real life testing. Make instructions. So yeah, lots to do, since this is a school project, I can afford to work on this a lot. Should hopefully be done by late April/ early May. -
So, some of you may know that I have a Lego Pirate web-comic, and a point is coming up where I will need a port, and since the old port has long been demolished, I am starting a, rather large, project. After a week, this is what I have so far: Hurricane Bay 001 by Elephant-Knight, on Flickr The whole thing. Hurricane Bay 004 by Elephant-Knight, on Flickr The six sections that will make up the wharf. Hurricane Bay 005 by Elephant-Knight, on Flickr Yellow Frog Tavern. Hurricane Bay 007 by Elephant-Knight, on Flickr I really don't like this little fort. Will definitely need to redo it. Hurricane Bay 006 by Elephant-Knight, on Flickr Just half of MMV expanded. Hurricane Bay 008 by Elephant-Knight, on Flickr Currently working on the Magistrate's office In case you didn't notice, the whole thing is modular, for a variety of reasons. First, easier to store and even build. Second, if I need to access a certain building for inside photos, I can simply remove the desired section, instead of trying to work around buildings. Thirdly, it is much easier to add or destroy a building. Need a buidling which I don't have? Build one? Need parts from this one? So long, sucker! And Fourthly, maybe I could make it a stander (Like Moonbase, but for pirates!) and use it at a con. Well, thanks for looking! EKnight
-
[WIP] C4 Corvette
timslegos posted a topic in LEGO Technic, Mindstorms, Model Team and Scale Modeling
Hello Eurobricks! I dont usually start WIP threads but given that I am venturing into unknown realms, I decided I could definitely use the help of the Eurobricks Community. As the title states, I am building a 1/8th scale fourth generation corvette. This is likely my last project before I go off to college and my "dark ages", so I would like to end with a bang. I have always loved the corvette line and ever since I started driving one I knew I would like to build a replica. To start I have a rough version of the frame. Using a blueprint I found, I constructed the frame to the correct scale. I think I will construct the frame out of studded pieces for maximum rigidity, still haven't decided about the body though. While developing the frame I have also been working on the rear axle. The original car has 5 link suspension in the rear, with both a regular spring and a leaf spring. In this photo you can see my progress. The wheel has slight camber in it to counteract the slight flex when the suspension is compressed. The leaf spring will be attached to the blue connector. Finally I have been determining the propulsion system. I know I would like have a 4 speed gearbox along with pf drive and steering. While thinking about solutions I came up with this idea. By coupling both a pf m motor and a buggy motor, I think it would combine the best of both motors; high speed as well as torque. The black gear coming off the differential would go directly into the gearbox after passing through a flywheel. Theoretically it would seem like it would work to me, though I dont actually know if it will or not. For all the experts out there, will this solution actually work? Thank you for taking the time to read my post and help me out! More progress will follow. tim -
[WIP] Mitsubishi Eclipse (1999)
Block_Smarts Lego Technic posted a topic in LEGO Technic, Mindstorms, Model Team and Scale Modeling
Hi everyone! Its that time again! MOC time! This isn't the chick car Eclipse, the older one is manly! It will hopefully have -FWD -Suspension -Opening doors -Opening Doors and trunk -Lights -Engine -RC Gearbox (Piterx, I need your help ) Updates coming soon! Feedback, help, and critics appreciated ! -
[TC7][WIP] The Boom-Dozer
veryrusty posted a topic in LEGO Technic, Mindstorms, Model Team and Scale Modeling
So it took me a little time to figure out what I would do for TC7. I'm still not sure, but at least I have a concept. Presenting the Boom-dozer My tc7 work in progress by Russell Murphy, on Flickr The basic concept is that the base stays the same, and the top transforms in some way to become a tank. Maybe the bulldozer arms could become some sort of armor. Who knows. Hopefully I'll figure it out. I've used the subtractor from Sariel's excellent unofficial lego technic builder guide (http://sariel.pl/201...-available-now/) as a base. My 42048 bulldozer and crawler have provided donor parts. Not sure which functions will be automated, except for propulsion. I think at this stage I'll be an enforcer, but depends on how far my white parts extend. I'll update as I get further. -
[WIP] Baja Truck
TheNextLegoDesinger posted a topic in LEGO Technic, Mindstorms, Model Team and Scale Modeling
hy i just started with a new moc, and it will be a baja truck. ( : another one? Me: Yes, i'm sorry) This will be my guideline but i think i'll get a different body work don't know yet. https://41.media.tumblr.com/0bcb8b46ab9d817442e1165be4ea83d5/tumblr_mw31eiXRQl1t0matto1_500.jpg It will feature: - RC steering (servo) - RC drive (2 L-motors) - suspention: - Front: duble whisbone - Rear: live axle I already made my rear axle DSC_0007 by thenextlegodesinger, on Flickr DSC_0008 by thenextlegodesinger, on Flickr DSC_0009 by thenextlegodesinger, on Flickr now i have to figure the front axle out. any help would be nice also is it really necessary or better to have a positive caster angle? thanks and i'll keep you updated To Jim: can i if i want still enter the contest with this moc or can't i? -

[WIP] Supra Yacht - NXT boat
syclone posted a topic in LEGO Technic, Mindstorms, Model Team and Scale Modeling
Good day everybody and let's continue with the boat mania!!! Today I would like to post my experimental NXT project- The Supra Yacht. It uses two Nxt motors for propulsion , but I disn't tested the propulsion system yet. It is built on top of two 1l plastic water bottles , and all electronics are on top.Because every NXT component is on the rear of the boat I built a long mast on the front for maintain the balance. The mast is connected to one Nxt motor. Here's the video: