Search the Community
Showing results for tags 'Power functions'.
Found 368 results
-
 Hi, Forget 41999, just look at this beauty build by Madoca! The best middle scale I have ever see!:) Perfect! Sorry Madoca, if you wanna post it by yourself...cant wait to share my emotions:))) instruction is here: https://plus.google.com/photos/117021167471864977943/albums/5901503914497924817/5901958760391507362?partnerid=gplp0&pid=5901958760391507362&oid=117021167471864977943
 -

lightweight power functions buggy
nnamhcab posted a topic in LEGO Technic, Mindstorms, Model Team and Scale Modeling
I've refined this model many times and this is the final version. a simple buggy powered by two medium motors rear wheel drive with diff its pretty fast and does alright off road a simple modification to the design could allow for an xl motor to be put in and geared up. in the model the steering rack sits in the slot at the front of the vehicle and connects to the 1x6 links and the two 1x8 axles connect in the front to form the tube body frame. i also couldn't find the ir reciver it attaches to the pins that are on the roof of the buggy and hangs upside down and inside the frame work. other than that its complete. buggy.lxf -
simple lightweight rally car
nnamhcab posted a topic in LEGO Technic, Mindstorms, Model Team and Scale Modeling
so i've been reading around on the forums trying to find a design plan for a simple lightweight rally-ish car and i decided to just try it myself i just finished tonight and ill have pictures uploaded soon if there are any other topics that meet these criteria post them below thanks -
Land Rover Series I RC model
Tamas Juhasz posted a topic in LEGO Technic, Mindstorms, Model Team and Scale Modeling
Hello! After some weeks there is my newest publication, a Land Rover Series I model. I'm planned to make a real off-roader long ago, with this I wanted to build a realistic one with realistic looking chassis. It could be another famous off-roader, but this is the first Land Rover, and it matters me a lot. So the moc: http://www.brickshel...ry.cgi?f=531411 Wheels, motor, gearbox: This wheels are made from the 81,6 mm tyre and from the 56 mm wheel. This is enough narrow yet to make this model with it. The model has the standard four speed gearbox with my definite control (see my other topic for more). This model was built a few month ago, that time I didn't have my improved gearbox with the same function, but this also did it's job, at last it didn't came so much load, there is a gearing after the gearbox. One RC buggy motor is there for propulsion (the noise is it's noise - don't ask me about that, this is the standard noise of this high rpm motor). I used that because of it's high rpm, there is a lot of gearing after that including the low gear/high gear gearbox. In this model, my goal was to make a realistic looking car with a realistic looking chassis and technic, performance was secondary. With the secondary gearbox there is in all 6 speed (two is the same). Sometimes in low gear, but it goes everywhere. Chassis, suspension: The chassis is a single ladder type one, with strenghtening beams an plates. The chassis itself contains every working mechanism: The suspension is made from technic axles, to be like leaf springs, and it works like that. There are positioning links to hold in the right place the axles. A small 6 L link holds transversely the front axle. I made the housing of the differential in the rear axle: http://www.brickshel...y.cgi?i=5898328 The steering, as in the real one isn't made with gear rack, but with a linkage-like machanism. The suspension performed surprisingly good on terrain. Has handbrake, it prevents roll down in forward direction. All function is remote controlled, the on/off switching of the low gear and winch also, by two micromotors. Under the hood I placed a 4L "fake" engine: http://www.brickshel...y.cgi?i=5898334 Body, etc.: Basically the body is a simple plate body with some liftarms and bricks. Of course, the front part was the hardest section. This front look means the Land Rover itself, very easy to recognize. I tried to add many details to the body, like mirros in the left side, turning lights, number plate, door handle to be less monotonous. Inside there is a big cover from a western set, we can find under that cables and technical parts. The steering wheel works, with these old bushes: It has an advantage: the turning is smoother than U-joint drive. Except this it's only an interesting technique, typically for applications which aren't require much torque. Video: (intro is also off roader-like, I didn't find a flat surface) Main specifications: Weight: 1555 g Speed: high gear: 1: 0,50 km/h 2: 0,82 km/h 3: 1,25 km/h 4: 1,67 km/h low gear: 1: 0,19 km/h 2: 0,32 km/h 3: 0,56 km/h 4: 0,92 km/h Length: 387 mm Width: 192 mm Height: 198 mm Scale: 1:9 -
Another larger project is under way and the first part of it is the rail turntable. An essential part of railway infrastructure in the era of steam traction but unfortunately not very common these days. The concept is fairly basic - a bridge for rotating the engines, or in this case to direct them to one of the rails leading to the roundhouse. Side view The drive is hidden under the rails. The turntable is powered by M motor which is powerful enough to rotate the bridge with Emerald Night on it. A video of turntable in action is shown . The entire thing is built on six 32x32 baseplates and the pit is 58 studs in diameter.
-

Custom Lego Hot-rod Hearse
octavspot posted a topic in LEGO Technic, Mindstorms, Model Team and Scale Modeling
This is a bit of an older MOC I did last Halloween - (it's long scrapped now) but I thought I'd share this here as well - especially for those with a small taste of the macabre. Just after building Lego's Vampyre Hearse, a new, slightly-morbid-yet-cool idea spawned in my mind; what if I build a bigger, RC version of this? At first, I wasn't quite sure what it'll end up looking like, since I couldn't figure out what to model it after - a Cadillac? a Rolls-Royce? a Lincoln? - so, I went with all three - sort of, lol. Hearse Front by Octav_spot, on Flickr What's interesting is that the headlamps are actually yellow elements, but mixed together with the blue from the LED's, it came out green. I liked the look so much, I kept it as is. Hearse Rear by Octav_spot, on Flickr The side-lamps idea came to me in the last moment - I wish I'd of made them look closer to actual lanterns (since that's what original hearse carriages had.) To my surprise, the light came out looking almost purple, which seemed strikingly accurate. Hearse Profile by Octav_spot, on Flickr Two Hearses by Octav_spot, on Flickr Just the V8 engine itself was literally half the Vampyre Hearse. I laughed. Hearse Speed by Octav_spot, on Flickr To see it in motion, here's the video. I thought the reaction from my cat was pretty funny, so I kept it in the clip Currently working on an actual Rolls Royce... just haven't decided what model year yet... In any case, enjoy! -
Hi everybody, Here is my light remote controlled buggy motor powered trophy truck:) More photos and description in my blog. Http://Brickgarage.blogspot.com English translation of description by google here: http://translate.google.com/translate?hl=ru&sl=auto&tl=en&u=http%3A%2F%2Fbrickgarage.blogspot.ru%2F2013%2F06%2Fsunset.html
-
flickr ~ "See you at Brickworld Chicago!"
-

Arduino and PF Motors
peter_m posted a topic in LEGO Technic, Mindstorms, Model Team and Scale Modeling
Hello! My Rescue Helicopter (9396) is about to be delivered ( ) and I have this idea to put enormous amount of LEDs in it. I have a plan to use Arduino to program proper blinking sequence. I was thinking about mounting also 2 M-motors to motorize rotor and functions. I would love to control them via Arduino but I do not have an idea how to connect motors in a proper way. Has anyone ever done it? Thanks in advance for any tips! -
I have submitted a new project to LEGO Cuusoo, an inductive charging system for Power Functions trains etc... The idea is that the train would stop over an inductive pad, similar to the ones available for phones etc... but tailored to fit between the rails. It could be placed out of sight in the through-sidings of a fiddle yard so that one train would run while the others charged up. I would like this to become a single LEGO piece similar in size to an IR Receiver i.e. 4x4 with a flying lead. The same coil device would be used under the track and on the train. This is the simplest possible form and probably the cheapest too. I would equip all the sidings in a fiddle yard with coils (perhaps 10 on my layout) and each train (maybe 16), so 26 coils in all. I hope each one would not cost any more than an IR Receiver. It would also have application for Technic and Mindstorms, so making the same piece work in all markets makes it most viable. Please follow the link, support, leave comments and spread the word! Thanks, Mark
-
Attention all Brickworld train enthusiasts... We are pleased to have a Train Technology presentation at Brickworld Chicago on Friday, June 14. Name: "Building Techniques: Train Technology: Realistic Ballasting, Switching and Operation" Presenters: Steve Jackson, Cale Leiphart, Nate Brille Description: The PennLug team will present advanced techniques for Ballasting track, Remote Power Functions decoupling in a locomotive, NXT trolley control, and Prototypical Yard layout and operation. Samples of ballasted track and working locomotives will be available for viewing. Please join us in Chicago if you are coming !
-
As models are now starting to get finished for a show in a few weeks time, thought I'd share them here. This is my first model using Power Functions. Its been made to allow quick easy access to everything needed and despite in theory the fact the rods "should" throw themselves off after a minute or so of running, they dont! No idea why but its been working fine. I suppose any real problems will arrise at its first public event, as Murphy's law states thats when they always happen! I'm still undecided about the rod colour, hence a rough red sticker is covering one until I make a final choice. Link to Flickr set and more details:
-

Super fast off road RC car
bartneck posted a topic in LEGO Technic, Mindstorms, Model Team and Scale Modeling
I build a second version of my race car, surprisingly called RACE2. Here is a small with lots of slow motion action shots. See it break going down the stairs. :-) Building instructions and more photos are available here. What do you think? -

The Texas Tornado (4spd crawler)
AndyCW posted a topic in LEGO Technic, Mindstorms, Model Team and Scale Modeling
After my last truck with a two speed transmission and air lockers, I decided to try more gears in my transmission. I searched for transmission ideas and came across the regular four speed transmission. The common wisdom is that driving rings cannot handle any torque. This is accurate. I had to increase the gear reducton in the axles and step up the motor on the transmission input to reduce the torque that the transmission "felt". I also maded the linkage from the servo to the driving ring incapable of being backdriven. It still pops occasionally, but reengaging the driving rings with the servos clears it up. It also has a neutral gear and this allows it to roll after the throttle has been released. Eliminating any extra gear exchanges to improve efficiency, reducing weight, and maintaining a rigid structure for the transmission to operate within became critical. I tried to get rid of the knob gears connected to the rc buggy motors outputs, but was unsuccessful. 12t to 12t ground the gears down 20t to 20t also ground the gears down 24t to 24t crown would not fit. Caster angle on front axle is accomplished by less angle on the lower links. I tried a wider version of the LPE power unimog axle that has kingpin inclination. It worked and did not fall apart, but its turning radius was larger than a traditional steering axle and so it was discarded. It still is assembled, just not mounted on the truck. I made air lockers based off of the new 3 stud wide differential, but ended up discarding them because they added unnecessary complication. I killed several u joints on the driveshaft before I moved up to 9:1 reduction in the axle. The u joints that are installed have wax string wrapped around the ends and a small piece of heat shrink tube over that. This is a repair because all of my joints are now cracked. If a tire becomes blocked in first gear with the steering turned, this design can quickly destroy u joints in the axle. There are a couple of altered pieces. 3l bars have had a couple of mm ground off to secure the towballs on the chassis and there is a 4.5 stud axle going to the knob gear on the transmission input. Both elements could be done without. It would require some redesign though. Moving to a 9398 style suspension and increasing the wheelbase would eliminate both of these issues. I used 4l bars to secure the towballs in the axles. They fit into the back of the towball and prevent it from popping out of the lift arm. Questions, comments, concerns, relevant war stories???? v/r Andy -
Three state remote controlled pf switch without using the pf train rem
jacobkristensen posted a topic in LEGO Technic, Mindstorms, Model Team and Scale Modeling
jjjjjjjjjjsaaaaaaaaaaaaaaaaaaaaaaaaaaaaaaaaaa jjjjjjjjjjsaaaaaaaaaaaaaaaaaaaaaaaaaaaaaaaaaa jjjjjjjjjjsaaaaaaaaaaaaaaaaaaaaaaaaaaaaaaaaaa jjjjjjjjjjsaaaaaaaaaaaaaaaaaaaaaaaaaaaaaaaaaa jjjjjjjjjjsaaaaaaaaaaaaaaaaaaaaaaaaaaaaaaaaaa jjjjjjjjjjsaaaaaaaaaaaaaaaaaaaaaaaaaaaaaaaaaa jjjjjjjjjjsaaaaaaaaaaaaaaaaaaaaaaaaaaaaaaaaaa jjjjjjjjjjsaaaaaaaaaaaaaaaaaaaaaaaaaaaaaaaaaa jjjjjjjjjjsaaaaaaaaaaaaaaaaaaaaaaaaaaaaaaaaaa jjjjjjjjjjsaaaaaaaaaaaaaaaaaaaaaaaaaaaaaaaaaa jjjjjjjjjjsaaaaaaaaaaaaaaaaaaaaaaaaaaaaaaaaaa jjjjjjjjjjsaaaaaaaaaaaaaaaaaaaaaaaaaaaaaaaaaa jjjjjjjjjjsaaaaaaaaaaaaaaaaaaaaaaaaaaaaaaaaaa jjjjjjjjjjsaaaaaaaaaaaaaaaaaaaaaaaaaaaaaaaaaa jjjjjjjjjjsaaaaaaaaaaaaaaaaaaaaaaaaaaaaaaaaaa jjjjjjjjjjsaaaaaaaaaaaaaaaaaaaaaaaaaaaaaaaaaa jjjjjjjjjjsaaaaaaaaaaaaaaaaaaaaaaaaaaaaaaaaaa jjjjjjjjjjsaaaaaaaaaaaaaaaaaaaaaaaaaaaaaaaaaa jjjjjjjjjjsaaaaaaaaaaaaaaaaaaaaaaaaaaaaaaaaaa -
This may have been posted already but I have come across other people searching for a remedy to adding an extra PF boogie to there existing setup. Having one PF motor will work for short length lightweight trains but most people like to run lots of rolling stock and the designs are becoming heavier with the more details being added to the design. So we need more power! You can simply add another PF Boogie, Right?! Yes and No. The additional boogie in most cases will face the opposite direction of the already installed one. This means the boogies pull in opposite directions! the simple solution to this is a switch to change polarity of the current on the new boogie. I picked up the part at Toys-R-Us. It was the Power Functions starter kit, came with a switch lights and small motor. I did this project on my latest locomotive and was pleased with the results. Fortunatly there was plenty of space in the frame to hide the switch and having the additional powered boogie allows me to hook up additional cars with little to no signs of strain or wheel slippage. Below are pics and you can refer to my Flickr page for additional pics. Feel free to add feedback or ideas to this tip. Previously I was splicing wires and soldering connections to fix this problem. This is much easier and cosmetically appealing.
-
Greetings gang, I have decided to post a modification that I have made to my Emerald Night Locomotive that may help others. The problem I was having was with the PF XL motor and rigid train frame the EN would get stuck on dips and rises throught the track surface. This was primarily an issue going over switches or minor grades changes. So my initial plan was to remove the XL motor and build a passenger car that was equipped with motors to push the engine. I changed my mind on this one and challenged myself to incorporate the XL motor in the engine and then an additional motor in the tender along with the battery. So after the assistance of fellow enthusiast on this site and the Railbricks magazine, I created a boogie/truck to mount on the tender with minor modifications to the original tender design. Keep in mind this is still a work in progress but what I have completed thus far has made a huge difference and resolved alot of traction issues with this particular locomotive. Pictures are below feel free to copy and I am always looking for additional feedback to better a design :-) http://flic.kr/p/e7AJX7 Check out my Flickr page for more pics. I also added the modification to the front rod which fixed the locking up issue and smoothed out the engines driveline. As you can see I only geared one axle on the boogie, this is due to me running out of gears and not having enough to gear the other axle. I have ordered the additional parts from bricklink and will update accordingly. I have tested this design and even with only the one axle powered it helps a whole lot. Does anyone have advice for adding weight to the tender or even the engine to further improve the traction?
-
I got some rubber tracks from BrickLink here the other day, and to my pleasant surprise they fitted nicely over the Wheel 30.4mm D. x 20mm ! As I am waiting for the last parts for my Container Stacker MOC, I thought I'd make something else in the meantime, and decided to try to make something like a smaller edition of the 8043 B-model tracked loader, using these new rubber tracks. Although it is somewhat similar to the aforementioned 8043 B-model, it is built from the bottom up using just my imagination, in the course of a couple of days. (My girlfriend is celebrating easter abroad with her family, so I have plenty of time to be creative ) This is the first time I've used studded construction in a MOC since I came out of my dark ages (Albeit just in the lower chassis), and a lot of memories came back to me from doing that! Anyway; this is the result: The yellow bucket is from my old 8862 Backhoe from way back in the day. Both the driving and the other functions are quite quick, and a lot of fun to play with. It uses PF-M motors for all four functions, and PF LED lights for playing at night when the power is out, The construction is very sturdy, if you for instance push down on the bucket, the mini LA wil start to slip before the rest will start to wobble or bend noticably. The back end comes off easily, and hides a lot of the wiring. The battery box can be removed after pulling out two Axle 4 with stop from below. I "cheated" a little with the digger apparatus, by making the entire arm a sort of four bar linkage (or whatever it's called), so the geometry (and thereby the bucket) stays the same for the entire travel of the LAs. This is probably not very true to real life, but it is a lot easier to create. When I made my Swingloader, I think 50 % of the time I used building that thing, was figuring out a good linkage for the tipping function. As you can see, the tipping works really well. A view from the bottom. You can see the axles for removing the battery box, as well as the gear train. Different speeds can be achieved by using different gear ratios. I spent a couple of hours yesterday to build the entire model in LDD, and it turned out 99,9% accurate, I used "illegal" building techniques on two occasions. One you can see in the above two pictures (attachment of the rear mudguards. The other is where the IR Receivers are attached (I had to use one of these in LDD, instead of one ot these , which is used in the real life model. If anyoneone wants to build this, just shoot me a PM with your e-mail, and I will send you the .lxf file. The model has just over 600 pieces. And here is a video of it in action:
-
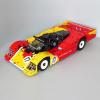
Hi everyone, This is my Lego 42000 Grand Prix Racer full RC mod Features: - 2 L motor for driving the rear wheels - 1 servo motor steering with working steering wheel - 1 M motor for wing adjustment - 1 M motor for opening the engine cover http://www.brickshelf.com/gallery/imurvai/GrandPrixRacerRCMod/img_20130325_211618.jpg sorry, I accidentally post the previous one only with one picture. so, here are some more: http://www.brickshelf.com/gallery/imurvai/GrandPrixRacerRCMod/img_20130325_211802.jpg http://www.brickshelf.com/gallery/imurvai/GrandPrixRacerRCMod/img_20130325_211651.jpg and a short video:
-
RC Peterbilt 379 + trailer 1:16
Tamas Juhasz posted a topic in LEGO Technic, Mindstorms, Model Team and Scale Modeling
Hello! In January 2013 I built this ~ 1:16 Peterbilt 379. The truck is 540 mm long, weights 2185 g (with trailer: 3413 g). The trailer is 690 mm long. http://www.brickshelf.com/cgi-bin/gallery.cgi?f=524252 Functions: remote controlled driving, steering, gear change(1 - 4), turn signals. The truck has a classic ladder chassis, rigid enough to pick it up by holding in the middle with one hand. It was very important to me to be realistic, every axle has leaf springs - a single axle is used as spring: In the rear axles, the suspension is rigid and strong enough to hold and drive with a 2 kg weight. Besides the leaf springs, the rear axles have links, they can equalize in light terrain. There is two XL motor at the front of the drivetrain, with separate IR receiver for more power(I don't have V2 yet). On Xl motor is under the hood, another one in is in the sleeping cabin. Then we can see the four speed gearbox: http://www.eurobricks.com/forum/index.php?showtopic=77000#entry1458898 . With this you can change gear fully comfortable. After the gearbox there is a spline shaft: http://www.brickshelf.com/cgi-bin/gallery.cgi?f=505117 . Inside there isn't a lot of space, and it's full with PF components. One AA battery box, 2 XL motor, 5M motor, 4 IR receiver, 3 PF switch, 3 PF led, an some converter cable are built in. I put a black sticker near to the windscreen to cover them(the Peterbilt logo is my own "painting"): The turn signals also work, with two leds on each side(in the rear bumper and on the cabin door). In the video below you can see it. The working method is simple: one M motor turns a white 24z gear, which enables the led to light with the PF switch. You can adjust very precisely the limit state with the 3L bley axle: It took me for a while to find out, because I need a small turning light operator which fits in the sleeping cabin, where was a very limited space after the gearbox and other parts. The front lights are also working. Everything can be opened(video: from 2:58). Ok, the mudguards aren't together with the bonnet, but I can't do it other. I built in some engine imitation(I know, the real one has different - L6 -, but this can be ~ a V8): It's a trailer truck with this trailer: This one also has an Ir receiver, so the coupling can be full remotely. The support legs can lower/rise the trailer: The suspnesion is adjustable on both axles. The video shows it well from 4:20. You can put even 5 kg of load over the axles. The truck's rear axles also can hol 2 kg, so the total load can be maximum 7 kg. With this, the camion's total wight is more than 10 kg. With this load, it can go in every gear, but it's in 4th of course very weak. In second gear it performs quite well, 0,27 km/h(with 7kg load). Of course, with the full load it can go only on relatively flat surface. The adjustment of suspension can be done with these racks: http://www.brickshelf.com/gallery/mbmc137/92--Peterbilt379/049.jpg Without load and trailer, maximum speed is 1,1 km/h, with trailer and 2 kg load is 0,5 km/h in fourth gear. The video: Hope you like it. -

LEGO Human Go-KART
Burf2000 posted a topic in LEGO Technic, Mindstorms, Model Team and Scale Modeling
I built this over Xmas as a way to use up my yellow studded LEGO. Just forgot to release it! Powered by 16XL motors and an NXT -
Hi, hope it's ok to start a new topic about this but I searched a didn't find a suitable, current thread related solely to trains. The best PF battery threads are several years old now and are mostly geared toward Technic. I'm mulling over whether to get the 8878 Rechargeable Battery Box (US$ 50) or use the 88000 Battery Box (US$ 13 and included in many sets) and then use rechargeable batteries in that. I have a young child so I don't want to use LiPo rechargeables in 88000 (because of possible safety issues) but from what I've read, Lego has protection circuitry built into their 8878 LiPo Rechargeable Battery Box. If I go with the 88000 then those 3rd generation Eneloop NiMH rechargeables seem to be the way to go. I don't really mind swapping out batteries but they only deliver 7.2v. Apparently Lego claims that their 8878 Rechargeable Battery Box delivers 7.4v so that seems to be a selling point but is it noticeable in any way? What are your thoughts on this? What do you use for your PF trains? Do you use both 8878 and 88000 with NiMH rechargeables and do you notice any performance differences between the two? Personally I'm not planning on having any monster-long trains or hills but who knows what the future has in store? Ok, thanks in advance, Joe
-
So after a week of tinckering and improviments on the new portal hub assembly I give you the Titan! For now I have only these 2 pictures, but more will follow soon: As you can see, its powered by 4 XL motors, each wheel has one geared down 5x, giving it teh highest total torque in any of my models. The motors are also structual parts, holding the axles together. For steering there is a mini LA for each axle, capable of steering angle of 30 degrees. Due to the way axles are built I wasnt able to use the 4 parallel links to stop the axles from swaying side to side, but instead used a small panhrod. Suspension allows for a total of some 60 degrees of flex and even though I used the hardest springs, its still pretty soft. I will give more info tommorow when I eill record the Titan in action. Cheers!
-
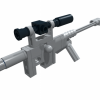
 On his "Sheepo's Garage" website, Sheepo posted Building Instructions for his Lego Technic Remote Controllers. The Power Functions controllers are comfortable to hold, and are versatile. He's counting the number of downloads, so go there for the PDF file! Thanks for sharing, Sheepo! The instructions were made by him and Jurgen Krooshoop.
 -
Here's my new rather simple MOC. Because doing a simple dump truck is well....simple, I decided to spice things up by adding suspension and using only 2 motors to do 3 functions. So how can you use 2 motors for three functions? The answer is rather simple. I used a differential connected to steering system. As soon as the steering rack reaches its maximum position, the power is diverted to the LA, which lifts the bed. In order to make sure that the steering will always work before the LA i Used some friction pins parallel to the LA functions, to make sure the differential will always steer first. The brown gears are from the drive motor. The red ones are froms teering motor. The green diff splits the power where it is needed. After building this central gear system, there was another problem to solve. The LA is stuated in such manner, simply pushing agaisnt the bed would be very inefficient when trying to lift heavy loads. After some trial and error i came up with this special linkage, which follows the circular path of the bed, therebye helping it lift, instead of just pushing against it. The LA in green pushes the brown link, which in turns lifts the bed. The small blue and yellow links are used to make the brown link follow a certain path in which it not only pushes, but also lifts the bed, therebye creating more force. After adding a tiltable cab, battery box and suspension the truck was done: I used independent suspension for first and rear axle, whilethe second driveaxle uses double tyres and live axle suspension. The second axle is also configured in such way to carry most of the rear weight. The cab can be lifted to reveal the receiver. And a short video of the truck in action: http://www.youtube.com/watch?v=R9wvAlX7Z-U All in all its a nifty little truck and very fun to drive arround and dump stuff out, especially bricks. Also by just using 2 motors and only one IR channel, this allows for more RC models to be driven at once like on exhibitions, etc,... I also made the model in LDD if anyone is interested: http://www.brickshel...ruck/dumper.lxf P.s. MOD its dump truck, not Sump truck, please correct the topic name.