Search the Community
Showing results for tags 'building'.
Found 367 results
-
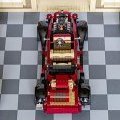
I've, for some time, been making modular buildings. But I feel they haven't ever been posted as a whole, so I thought, why not do it. I'll try to give to background information and all. This might be updated if I create more! Hope you enjoy! My Flickr, just in case!!: https://www.flickr.com/photos/138575523@N07/ 1. Magic Shop Magic Shop was my very first trial at a modular building, believe it or not. If you take a closer look, the first floor could be the base for any other building above, that's because I had no idea what to build on top of that first floor. About a month later, (while in Ikea for some reason) I remembered a trip to the Black Forest, Germany and all its houses, and that's the result. This Magic Shop is absolutely perfect and that's what I love about it. In my first attempt, I nailed shape, proportions and colour. And that triangular roof is incredibly iconic. Such a wonderful modular! Eurobricks Topic: Building Period: Nov 2015 - Jan 2016 Pieces: 2598 on a 32x32 baseplate 2. Italian Villa Oh, god this one's exciting! The Italian Villa (or better said: The Tuscan Villa - that doesn't sound as catchy, does it?) is an ode to the highly underused Flame Yellow colour. The design for this beast mostly comes from a scale model of a Vineyard Villa I own - shape and colourwise, but the detailing and the whole rooftop is absolutely original and wonderful. As a fact, I had this design stopped for some weeks as I didn't know how to make the windows on the middle floor right. While visiting a univeristy campus, I found the solution! This has to be one of my two favourite modular buildings of mine, as a funny note, on a Chinese Lego enthusiasts fan page they marked it as Spanish Villa. As I am techinically from Spain I found this rather funny. And Unikitty's tail in white at the roof! Eurobricks Topic: Building Period: Jan 2016 - Feb 2016 Pieces: 2148 on a 32x32 baseplate 3. The Iron Horse My dear Iron Horse... I totally adore this modular. After two highly-successful modulars, this had to at least match the others' quality. Not only I think I managed it, but I also created (again) a very unique modular. By the time I designed this thing, I had all the tools and techniques mastered (no weird bricks showing and all) and I could make this trully the result of my imagination. Although its name and basic structure comes from a restaurant in PortAventura theme park, I translated it to Lego and made the façade even more striking than it was in real life. I also took Brick Bank's colour scheme and exploited it at the max. Not many people know this, at the porch's roofline there are rollerskates used in sand green. A detail I've kept for myself for a long time. Eurobricks Topic: Building Period: Mar 2016 - May 2016 Pieces: 1886 on a 32x32 baseplate 4. Old Ben's Gallery Old Ben's Gallery, the Lego version of Barcelona's Casa Amatller and Casa Batlló is my most bizarre approach to a modular. I tried to make the best of Pet Shop's concept, and this was the result. Although a great looking modular without a doubt, it still is my least favourite of them all, there's so much competition though! This was my first trial at making custom printed pieces for completing totally the façade. This was also my first attempt at making smaller windows with porticos, if you look closer at my previous modulars, they all have insanely huge windows. It's good for a change! Eurobricks Topic: Building Period: Aug 2016 - Nov 2016 Pieces: 3148 on two 16x16 baseplates 5. Sweets & Co. Oh my!! This absolutely beautiful 45-degree corner modular is the favourite of mine. So many nice shapes, nice colours, nice piece usages. You can tell I adore this thing, don't you? The idea of a 45-degree building came from seeing the corner buildings in Barcelona, where two houses share the corner. The one on the left is inspired by Casa Batlló's patio (see that gradient going up in Aqua against Royal Blue background, so cool right!?) The building on the right went under four rebuilds. Initially is was supposed to be Venice's Palazzo Ducale. When I noticed it didn't fit, I built a white thingy which looked terrible. Next some sort of castle-like thingy, also terrible (thanks brother for pointing out is was terrible!). And finally I created this pattern, so good! Btw, yes, on the pattern the darker blue is the sorta discontinued Dark Turquoise <-Outdated!, why not!? On this modular, I snuck some nice part usages, for instance, Indy's whip as dragon tail on the right door's wrought iron fence. Also the dragon head is a discontinued piece from 2003 which only found its way in some Orient Expedition and Knights' Knigdom II sets! Btw, that fence is in copper, also a discontinued colour. I also got to experiment a lot with rooflines on this bad boy. The one on the right is directly inspired by Venice's Palazzo Ducale, a reference to what the building was supposed to be! I would love to build this thing one day, but you know it's hardly impossible with all the discontinued colours and non-exisiting parts in certain colours. Eurobricks Topic: Building Period: Jan 2017 - Mar 2017 Pieces: 2994 on a 32x32 baseplate 6. Piazza San Marco Once I finished Sweets & Co., I went on a trip to Italy and one of the stops was Venice. The fact that I couldn't turn the Palazzo Ducale into a modular was still rattling my mind, so I set to build the most faithful recreation of the Campanile and the Palazzo in the modular form. Said and done. This is a huge over-the-top crazy piece of architecture. In fact the tower of the Campanile is 76'8 cm or 30' 2" tall! About the same as the Disney Castle for comparision. Although not my favourite modular it definetely is one of the dearest to my heart. All the details throughout the porch (something I'd wanted to revisit since I finished The Iron Horse, but with arches) are absolutely wonderful, in fact each capital is different from the other. As a reference to the original Italian Villa, the section inside the porch is Cool Yellow. Although hard to see in this picture, the whole façade is covered in a printed pattern (best seen in the section in-between the tower and the palace). Btw, two Sand Green gold ingots are there representing marble, so cool! The rooftop details are incredibly fun to build, surprisingly, and these were the best to build! Eurobricks Topic: Building Period: Apr 2017 - May 2017 Pieces: 3700 on a 16x32 and a 32x32 baseplate (same as Assembly Square) 7. A Summer in Tuscany Summer holidays are long, the desire to build a model are high. But what? Something daring, interesting, but with a warm feel to it (the heat was striking hard then!). Heck, I like italian architecture (easy to say... erm... out of eight models, three are entirely dedicated to the country ). So off I went trying to build something in the lines of Assembly Square (that year's modular), but closer to my heart, and let's be honest, less of a mix-match. The model came together pretty quickly, but then DISASTER! While rendering, my computer stopped, and dumb me had not made a copy of the file! Summer was long gone then, but the high spirit made me plough on to finally have it all wrapped up by Februrary of 2018. Having to do the modular all over again obviously means I had extra time to snuck details even the most eagle-observers fans won't find. Has any of you seen a little statuette representing one of those little virigins on the streets? I bet not! (Checks if it's actually there in any of the pictures). Yes. Eurobricks Topic: Building Period: Aug 2017 - Feb 2018 Pieces: 4434 on a 16x32 and a 32x32 baseplate (same as Assembly Square) 8. Klee Corner Klee Corner! Pop! A collage of hundreds of different buildings glued together by the man behind the keys (yup, me). If The Iron Horse was a result of my imagination over two years ago, this is me jumbling up together Berlin, Hundertwasser, Bilbao, Gaudí and the postmodern architects with him and U2. Can you turn music into architecture? Ermmm... Sure! No official 32x32 modular has ever had three buildings. Did that stop me? No. No official modular has ever had a curved façade. Did that stop me? Of course not! As a fun fact, I messed up the colouring of one brick of the model and realised the issue after rendering. I edited and covered it up in Photoshop. Can you even spot it? Very difficult, btw! Eurobricks Topic: Building Period: Feb 2018 - May 2018 Pieces: 4481 on a 32x32 baseplate 9. Disco 2000 Vinyl Store It had never occurred to me that I hated how a model I made looked. After some hours of working on it, it would look wrong. This happened again and again and again. This was because the image in my mind of the final product kept on changing, an extremely dangerous thing to happen. I'm not sure if it's better than my two previous corner models, The Iron Horse and Sweets & Co., but I'm really happy that I managed to make three unique buildings (getting really tough after nine models and thirteen from Lego!) look awesome. I used some awesome colour combos, dark red and sand green; white, yellow and blue which are surprisingly unique. As for techniques, Disco 2000 is by a long shot the most complex model I've built. I have a library of techniques I might use (especially for cornices) and there's still many on the waiting list; one has been waiting for over half a year (didn't fit neither in KC nor in D2000) and I'm dying to use in a model. At least I have an exuse to start a new one Eurobricks Topic: Building Period: Apr 2018 - Sep 2018 Pieces: 3743 on a 32x32 baseplate 10. Baseplate Alley The lack of physical time to build this model (it took me over a year to complete fully) was on one hand frustrating but at the same time inspiring. I have a visual dictionary in my mind of concepts and ideas I like and want to try out; one that was fed slowly but surely all those days without building. In the meantime, I discovered many inspiring designs and my inspiration became rougher, broader. Both a Rothko and Art Nouveau cornices would sit next to the sausage Lego piece as things I wanted to find a way for in in this model. I struggled quite a bit trying to find the layout of the building. The idea of the two angular façades poking out came to me in a Basque town near Bilbao. I already had the one in the right in place and was finding it hard to complete the model. I tried curved designs, not dissimilar to those in Klee Corner of Disco 2000 but just seemed to make the already-complete right building worse. It was around then that I realised I could use what I now call the "School of Athens" effect (surely other people call it different things). I could duplicate the existing design, keep the structure and change the details and colours. The same thing goes for Raphael's School of Athens: it's structurally symmetric (the architecture and the patterns on the floor marble are so) but the figures and the details on the façades differ. That's where the building on the left came from. You can see the different details differ between both façades. I'm very passionate about colour. I find it fascinating how two or more colours can transform one another to create strakingly different effects. Matisse is undobtedly a (or the) big name in the history of colour in art. His daring colour choices are extremely appealing to me. The orange-on-blue colour scheme is one I had wanted to use for a while and I'm glad that I found its home here; and on my tenth finished modular, something super special! Side note: when I began with Magic Shop in November of 2015 (jeez, 4 years ago) I thought I would completely run out of ideas before ariving here. Truth is, I've become a much more cultured man in the process of coming to where I am and all that knowledge I now have is what has allowed me not only to keep going but to bring real innovation to the table. I feel like I'm breaking new ground with every model. Ideas that I hope you'll want to further explore yourselves. I most of the times work from what my gut induces me to work in. I find it particularly interesting that thanks to this odd "mental visual dictionary", I barely look up actual architecture for inspiration. Most of what is shown here is a mix of the real-world architecture knowledge I've acquired over time and other arts: painting, filmmaking and music, among others. It's hard to explain; it feels like I'm building a façade I'm reminiscent of while looking at the building from a Fauvist point of veiw, for instance. Weird, I know. Anyway, I feel like I'm guided by something bizarre when designing. The eyes of experience, I guess. Eurobricks Topic: Building Period: Sep 2018 - Sep 2019 Pieces: 3581 on a 32x32 baseplate Why Am I Writing This? I've always wanted to have my modulars be seen as a unit, as something that one builds upon the other. They're on a Flickr album all together, but I want to use this space as more of a personal diary of what makes a design of mine come to life. Hope to hear from you guys! Leave your comments, please note this is the work of almost 4 years, so take this into consideration! Thanks!! Pau
-
Well, after a long period of not doing much besides the giant Eleitian Central Command model, I present to you my newest model, The Cliffside Villa! The idea came about last Sunday, I was procrastinating on doing stuff I was supposed to, as one does. I decided to expand on the bridge, which I had been building as a standalone concept but couldn't figure out what to do with. I was going to build a fairytale castle on the cliffs that I eventually made behind the bridge, but then it morphed into an entirely different building altogether! The porches, stained glass window, and other elements of the actual pavilion came about next, after I'd laid the groundwork (literally) in the form of the cliffs. I then decided to make it into a combination of my previous Temple of the Moon Maiden MOC and something more open to interpretation. So it could be used, (it sits on a baseplate totaling 32 x 48) as an addition to a modular city! Perhaps a large city park with a pavilion, or some form of garden! From my official description: It's a fine spring day at the Cliffside Villa! The Moon Priest contemplates the deep questions of life on the porch, while his daughter strolls the elegantly appointed walkways of the garden. Two guards stand sentry by the staircase, protecting the inhabitants of the Villa from harm. Explore all the secret nooks and crannies of this large set, from the bell tower to the fish pond to the stained glass window behind which the statue of the Moon Maiden is placed! Set features: - 2568 Pieces - 7 Minifigures: The Moon Priest, Moon Priest's Daughter, Statue of the Moon Maiden, (2) Garden Statues, (2) Guards - Villa features a large stained glass window, metallic Statue of the Moon Maiden on a raised pedestal, and two spacious porches. Upper story features a movable bell! - Elegant bridge crosses a large frog pond filled with lily pads and other aquatic plants. See if you can spot the frogs hiding down there! - Statuary adorns the garden, which is built onto the cliffs with beautiful brick-built birch and cherry trees in full bloom. - Relax on the small bench set below one of the statues! - Features multiple unique pieces, such as the Ornamental gold fish adorning the roof, the Moon Priest's staff, and much more! - Spacious basement level beneath the Villa is perfect for placing hidden treasure or whatever you need for added suspense! But don't just follow that one story for this model, use your imagination to make it your own! This model, on baseplates totaling 32 x 48, can be placed as a standalone model or a complementary model for your modular city! Use it as a pavilion, a city park, or a historical monument in your LEGO town. This MOC is now on LEGO Ideas! If you want to, please help support it, I'd love for it to be one of the lucky few that makes it! The Cliffside Villa: https://ideas.lego.com/projects/4bfda07a-beb1-440e-bcfe-d9742e9d3746 Feel free to leave any comments below, and keep on building, everyone! :)
-
I started this a little into the new year and let me say the good thing about a building site MOC is it doesn't have to look finished to be so. Woohoo! I realised then that I had never made a building site MOC which seemed a dereliction of duty considering building buildings is what us AFOLs do right? Being firmly stuck in the past when it comes to LEGO dimensions (the mathematical measurement method, not the game console games) I like to build 4-wide vehicles and so generally build buildings to a slightly smaller height than is common these days. Way back in 2007 or thereabouts I picked up the Tower Crane set (#7905). Looked great on the box but to be kind to it it looked terrible when included into my city at the time (like the Eiffel Tower did). Size of course was the big problem, too high and too wide, detraction. Conscious that the scale needed to fit be appropriate to the style of my city and also that the road needed to connect to another road the building site area was quite restrictive at 24x34 studs. This made it a little tricky to fit in everything (actually I didn't include any external scaffolding or portable cabin as a result of having no space to put it but in the end I added a further 16x48 baseplates to accommodate the roofed hoarding and side lane) but I find the restrictions made the build overall more enjoyable as there a little challenges here and there. The tower crane is 5x5 studs which itself introduces a few problems mainly related to the attachment of the ladders and boom. Two counterweights for the boom are used, one the official weight black brick but seeing that in reality you usually see grey concrete slabs (or things that look like concrete slabs) being used I tried to replicate this look. The big problem here was the simple fact that my counterweights combined were not heavy enough to support the boom with any significant load. So off I went to raid the tool box and filled a revised hollowed counterweight with nails (see here). Speaking of booms, the builders built this in record time to cash in before the next crash. Hope you Town fans and 4-wide loyalists out there like this build. Happy to hear people's thoughts or comments on it! I will look to replace these waste shoots with a white or another colour version at some point, just to add a splash of colour, not that too much LBG is bad or anything. Would like the 1x1x2 cylinders used for the streetlights not to have cutouts. Got the calculator out and the office area is accurate. Made a little microscale version of the 'finished building' for this billboard. The construction company logo is the jumping frogs. Maybe because they jumped legal hoops to avoid being prosecuted on health and safety grounds? Finally can get that Welder to work! Also you can look down the dry riser. Someones's not happy. Fact. All tower crane operators end up with glasses due to eye strain despite in cabin cameras. Just made that up.. The view from above. Please make sure your figs are not afraid of heights before looking down.
-
Hi everyone I'd like to share with you my second MOC which I have been working on over the past few weeks. For this project I decided to tackle a subject very close to my heart - the Great British Pub! So without further ado... Grab yourself a pint and join me for a guided tour of The Queen Bricktoria! As you can see this is a modular style corner building with 3 floors built on a 32x32 base plate. The design is intended to be reminiscent of British town centre pubs or more specifically the style of pubs we'd see in London. The Minifigures There are 7 minifigs with the model. The 3 characters below are the pub workers. From left to right we have the Owner/Landlord and his daughter the barmaid. The guy with the guitar is a local singer who has been booked to play a gig at the pub. The 4 figures below are the pub regulars. The guy with the beard is the typical sort of old gent we find in many pubs propping up the bar and boring everyone to death with their stories of the good old days. The guy in the green top and the girl are boyfriend and girlfriend. Level 1 - The Bar Outside the building we have a busy street corner. I've included an iconic British red phone box and an outside covered seating area. There is also a sign board advertising events etc at the pub. The main entrance leads us in to the bar/lounge area. Inside we have a well stocked bar and a cozy fireplace. There are also tables and bar stool for the minifigs to sit and enjoy their drinks. Brown carrots make pretty good beer pump handles. At the back of the bar is a staircase leading us up to level 2. Level 2 - Pool and Darts Room On the second level is a games room featuring a Pool table and Dart board. There is also a pool cue rack and a shelf with trophies won by the resident darts team. At the back of the room is another staircase that leads to level 3. Level 3 - Live Music Room Level 3 has a stage for Live Music gigs and Karaoke. On the stage we have a keyboard, guitar, amps and microphone. Also on this level is more seating for the minifigs and a door that leads to a small balcony seating area. Oh dear!!! The singer seems to be a bit of a hit with the ladies. The Finished Model Here is a picture of the Queen Bricktoria next to my first MOC design, The Convenience store, as you can see my new MOC is much much bigger. Another picture below shows the pub next to one of the official modulars, to help give a sense of the size of the model. Thanks very much for reading and I hope you like my newest MOC. There are more pictures of it on my Flickr page so feel free to check them out and let me know what you think.
-
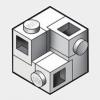
Head to Baseplate Alley and have a blast! Here it is finally, my tenth modular building! Almost a full year after my previous (Disco 2000 Vinyl Store), I’ve put together enough ideas to fill a whole 32x32 baseplate. Architecturally, I believe this is my most complete model. The designs throughout are not only daring but also well-balanced and complement one another, something I used to struggle quite a bit with. Both buildings are almost identical in shape and proportions and vary in details and colours. In fact, originally there only was one building: the striped one on the right. I loved it so much, but I was struggling to find something that would complement it well. In the end, I thought. “If I love how this turned out, why not repeat the already existing motifs to create a grander picture?” (almost like you would in a song; the chorus and the melodies are often repeated various times). The building on the left is my favourite of the two. The orange and bright blue colour scheme of the model is taken from Henri Matisse’s “The Dance” painting and I think it looks marvellous. Both buildings sit on a rather peculiar angle. I was looking for a way to offset the model from the usual 90-degree grid and found that two of the piece 54384 (https://brickset.com/parts/design-54384) turned at about 20 degrees filled about 12.5 studs and that allowed me to build an angled façade without any seams! Duplicating that didn’t solve the slight error, but some handy trickery helped hiding it. The rest of the model is completed with Medium Nougat façades on top of a Sand Green ground floor. I especially like how the windows in Sand Green (inspiration from my own previous model) work with the façade with yellow windows on the side. My favourite bit to build of modular are cornices and rooflines; it’s quite amazing how they can transform the look of a building. The one for the striped building is one that I’ve wanted to put on a model for a really long time; I think it’s really elegant and that it suits the building nicely (I’ve had it built for roughly a year and a half). The one for the blue building is a brand-new design especially designed to both enhance the other building (this one’s set slightly further back in some areas) and make the blue building have an almost castle feeling. The roofline for the nougat part is the minimum expression of the same concept of the white roofline. Using the new arches from the large Hogwarts Castle and the 1x1 bow pieces also found to top off the black box on the ground floor of the blue building, I’ve created this wave design. It’s rather simple to be honest, only impossible for a very long time. ================== Interiors: Interiors have never been my biggest strength, but I’ve put extra effort to make them really pop in this model (it’s my tenth, I should start getting better, shouldn’t I? ). The nature of the façade makes this modular way more modular than any of my previous models. Both top floors detach into three parts, one for each façade and one for the actual interior. This was not intentional but makes this model way more playable. Beyond that, I’ve also added an open ventilation shaft to add more interest to the interior and more light to all the rooms. Here’s a 3D view of the model with all its sections: https://www.mecabricks.com/en/models/Geje68pxvKX. 1. Ground floor: On the ground floor are two art galleries. They have interpretations of real-life works (I will admit that some of them are not particularly easy to identify), but you can find a Picasso, a Manet, a Botticelli, a Mondrian and a Matisse. I bet you’ll see the last one. They’re telling me that Matisse himself has decorated the façade of the left building using the colours from the piece he’s presenting here… Who knows, maybe it’s the art gallery that is running low on cash! I really like how this rendering turned out, it really tells a story. 2. Middle floor: Both the top floors are dedicated to the publisher of the ABS-famous newspaper “Stud Times”. Today’s edition is a packed one! The Iron Horse is closing because of chef Emma’s death, the celebrity detective Ace Brickman is seen eating in Jim’s Diner rather than at the usual Chez Albert, news about battered leg assemblies and even a front cover advert of face transplants! On the middle floor we have the machine printing out the newspapers with all the needed tools and equipment. There’s also a hidden little play feature, there’s a little rotating crank for extra movement (it doesn’t actually do anything). And before you say it, yes, the windows on the back are copied from Downtown Diner. 3. Top floor: Piles and piles of newspapers, typewriters (the design is the same one @Bricked1980 used in his Police Station), four clocks to check what time it is in the various parts of the globe, phones, coffee mugs to swallow the sweat, a fax machine and, of course, a paper bin to throw away texts with mistakes! ================== To see everything that I haven’t been able to explain in words, feel free to take a look at the model yourselves, many of the “how was this/that made” are visible! From here I encourage all the digital builders to upload their models to Mecabricks, there's hardly anything more enriching as a builder than seeing how others are building! 3D view of the model: https://www.mecabricks.com/en/models/Lkj9DgqB2Ap 3D view of the interiors (+ how the façades are built) https://www.mecabricks.com/en/models/Geje68pxvKX =================== Thanks for reading through and hope you like the model! PD: Please, could you comment on the various things I've changed in presentation. Mainly rendering engine and format of the image (now a squarer 3300x2550 format rather than the wider 3840x2160 format). Please say someone got thejokes in the newspaper
-
Hi, I'm new here and still trying to figure this all out! I wanted to post pictures of my project but only very low resolutions can post here. I am linking my Lego Ideas page and Flickr for better images. Flickr Photosteam Lego Ideas Project Page
-
Hi everybody, After a long period of works at my home (swimming pool and rehabilitation of a barn...), i found a bit of time to make a little MOC. So this is a building with a leonidas store and chocolate bar, it's one of the best brand of belgian chocolate (i had a lot of brown bricks to use). You have also an architect office and a loft on the third floor. Enjoy Leonidas store by Jean Macou, sur Flickr Leonidas store by Jean Macou, sur Flickr Leonidas store by Jean Macou, sur Flickr Leonidas store by Jean Macou, sur Flickr Leonidas store by Jean Macou, sur Flickr Leonidas store by Jean Macou, sur Flickr Leonidas store by Jean Macou, sur Flickr Leonidas store by Jean Macou, sur Flickr Leonidas store by Jean Macou, sur Flickr Leonidas store by Jean Macou, sur Flickr Leonidas store by Jean Macou, sur Flickr Leonidas store by Jean Macou, sur Flickr Leonidas store by Jean Macou, sur Flickr Leonidas store by Jean Macou, sur Flickr Leonidas store by Jean Macou, sur Flickr
-

Building Desk And Storage Shelves [Now Finished]
MxWinters posted a topic in General LEGO Discussion
The other day I posted a reply to the Stroage and Sorting LEGO thread showing my plans for a building desk and storage shelves for my LEGO collection. Considering that this is a big DIY project I thought I post a seperate topic showing my progress. Incase you didn't see my post in the other topic and due to some of the details in my other post having changed from my original plans, I figured I would repost the updated details in this thread. The desk will be made from 18mm plywood and will be 1650mm long, 533mm wide and 660mm high. The shelving will be made from 12mm ply and will have 28 shelves, each shelf will be 801mm long and 150mm wide. Total height of desk and shelving unit will be 2262mm. I am also going to build a wall unit to give me extra shelves which will be 825mm long, 150mm wide and 1120mm high. The main shelving unit on the desk will hold 168 plastic food containers and the wall unit will hold another 60 containers giving a total of 228. Each shelf on the desk and wall unit will be angled at roughly 15° and they have an edging strip to stop the containers sliding out. I have added a piece of offcut in the centre of the desk shelving unit at the top that sticks out to fit a worklight as this unit will be in the corner of my living room which isn't that well lite. My Dad had a spare LED batten light fixture that will be screwed to this bracket. I have also added a L-shaped section under the desk for my 1x1 storage bricks that I have all my Power Functions stuff in. This image shows the SketchUp drawing of what I'm building. Ignore the different coloured textures in this image, I have coloured them like this as the SketchUp file also contains a cutting plan of each sheet and the different colours help me to know which part is what. The desk, shelves and wall unit will be painted gloss white to match my computer and electronics desks. The image shows part of my LEGO collection stored in plastic food containers which will be placed on the shelves and wall unit. Still have loads of parts that still need sorting as you can see to the right of the photo. Hope you don't mind me creating a new topic but this is a big DIY job and I felt it should have it's own thread. Plenty more updates to come. -
Hello Eurobricks! Today I present you the review of an unusual, very playable and exciting old LEGO set - the Aero Tube Hangar. 01 by Farseer Eldar, on Flickr Set Name: Aero Tube Hangar Set Number: 7317 Year of Release: 2001 Number of Pieces: 706 Number of Minifigures: 5 (all Martian) Price: $ 90.00 ($ 0.13 per brick) Life on Mars was a short-lived, but interesting LEGO Space theme. It explored the world of Martians, who are surprisingly friendly to human astronauts, which is rather unusual for LEGO and science fiction in general. The Aero Tube Hangar is the main base of the Martians. It was the dream of my childhood, but I got this set only in 2013, when I was already an AFOL. So, let's get started. Box The main box is large, what fits this set. The front side depicts the Aero Tube Hangar in all its glory: 02 by Farseer Eldar, on Flickr On the back side the functions of the set are shown: 03 by Farseer Eldar, on Flickr Old-type boxes with flip covers are great for storage: Box by Farseer Eldar, on Flickr Different parts of the set were sorted into three additional boxes which are not cool as the main one, but useful: 04 by Farseer Eldar, on Flickr Instruction Booklet The instructions start with the same image as seen on the box: 05 by Farseer Eldar, on Flickr Next there are the minifigures (note the misspelling of Arcturus) and the hypersleds with a warning: 06 by Farseer Eldar, on Flickr The first model to assemble is the mech: 07 by Farseer Eldar, on Flickr Note that this is an old instruction, and there is no list of required parts on each step. The last pages show how to connect the tubes and how to use them and some ads (I will put them under a spoiler): This set also has a small advertising booklet: 13 by Farseer Eldar, on Flickr There are sets from other series on another side: 14 by Farseer Eldar, on Flickr Unfortunately, almost all that themes (Alpha Team, Studios and LoM itself) didn't live to this day. Only Star Wars do. Minifigures This set includes five minifigures. All of them are Martians, and there are no humans: 15 by Farseer Eldar, on Flickr These Martians are, very much like Blacks from Harry Potter, named after different stars and constellations. Perhaps their names sound differently in Martian language, and here the human equivalents are given. Riegel (note the misspelling - the star is called Rigel) is the leader of Martian people and the general of the Aero Tube Hangar. He does not like laziness and disorder. His favourite food is space slugs. Unlike other Martians, he has a different skin tone and wears some sign (maybe honorific) on his chest. Cassiopeia is the daughter of Riegel. She does not look like her father, but very likely looks like her mother. Later she visited Earth with the austronauts. Mizar is a Martian technician. He wears something like a gas mask. Vega is a scientist who specializes in excavation. He likes sandwiches. Arcturus is a spy from another tribe of Martians which tries to still energy-rich biodium ore from the Hangar. In 1930s he was the leader of Martians, and his invasion of Earth and subsequent defeat were described by Orson Welles. All these figures are exclusive except Vega (who also appeared in 7316, 1195 and 7320) and Mizar (who also appeared in 7321). The Martians have the same bodies and hands with Trade Federation battle droids: 16 by Farseer Eldar, on Flickr Except they are sturdier due to different legs and (in my case) shorter use. The Martians move through the aero tubes using hypersleds molded especially for them: 17 by Farseer Eldar, on Flickr The white hypersled glows in the dark. Mech This small mech is used for scouting and defense: 47 by Farseer Eldar, on Flickr The mech's limbs are very mobile, which is rather good for early LEGO walkers: 48 by Farseer Eldar, on Flickr The only flaw is the lack of knee joints: 49 by Farseer Eldar, on Flickr The right hand holds a cannon to repel enemies, and the left hand has a hook to lift meteorites: 50 by Farseer Eldar, on Flickr The cockpit is open and has a holder for a Martian pilot, and a printed control panel: 51 by Farseer Eldar, on Flickr Flyer Another vehicle in this set is a flyer (or convertiplane, to be precise). It looks similar to Scorpion from James Cameron's Avatar and Banshee from Starcraft II. 55 by Farseer Eldar, on Flickr The propeller engines rotate freely: 53 by Farseer Eldar, on Flickr The pilot is interestingly attached to the cockpit - only their arm is attached to a lever which is connected to one of the flyer's cannons: 52 by Farseer Eldar, on Flickr Transportation Now it's the time to review the most noteworthy feature of this set. The Martians can be transported through aero tubes using this pump: 42 by Farseer Eldar, on Flickr The pump is one very big part with some adjustments. It looks like some futuristic storage house or power plant. The black upper part, which is made of rubber, can be rotated to shange the direction of air flow. The aero tubes are flexible, transparent and not perfectly round. They should be plugged into purple solid connectors very tightly, so they will be disconnected with a click: 43 by Farseer Eldar, on Flickr This system was used again in two sets from Mars Mission line (7690 and 7691), but there the tubes were orange and human-built. And the aliens were hostile and didn't come from Mars, so this was a completely different theme. Unfortunately, humans (or other non-Martian minifigures) cannot ride or even get into the tubes - their arms are too large: 44 by Farseer Eldar, on Flickr Mizar needs to get to the red mech bay. He lies in a hypersled at the main station: 18 by Farseer Eldar, on Flickr To suck him into the tube, we should rotate the upper part of the pump counterclockwise until it stops and then squeeze it: 19 by Farseer Eldar, on Flickr Now the Martian can be seen within the tube: 20 by Farseer Eldar, on Flickr Then, we remove a stopper and place the tube in the required direction using gears and the steering wheel: 21 by Farseer Eldar, on Flickr 22 by Farseer Eldar, on Flickr There is another fork on Mizar's way, and here we also should set a course by moving the tubes: 23 by Farseer Eldar, on Flickr The stopper is removed: 24 by Farseer Eldar, on Flickr And then the tube can be moved on rails: 25 by Farseer Eldar, on Flickr The drawback of this process is that the supports are constantly shifting and can hang in air. Next we rotate the pump clockwise and slam it. Now the air pushes the hypersled from the rube, and Mizar rides to his destination. 26 by Farseer Eldar, on Flickr 27 by Farseer Eldar, on Flickr That's it! Mizar has arrived and is ready to work! 28 by Farseer Eldar, on Flickr 29 by Farseer Eldar, on Flickr Now Riegel must lead an excavation expedition, and he prepares to depart: 30 by Farseer Eldar, on Flickr But wait... He is stuck within the tube - probably due to his medal: 31 by Farseer Eldar, on Flickr In reality there is nothing to do with the medal. Sometimes Martians get stuck in tubes and cannot be launched. Nevertheless, the construction is made very soundly. We turn the pump counterclockwise, suck Riegel into the tube and place it to the left side: 32 by Farseer Eldar, on Flickr Next we turn the pump clockwise, push the Martian ruler forward, and he is now ready to lead the expedition: 33 by Farseer Eldar, on Flickr Buildings Let's take a closer look at the hangar buildings. Here is the biggest one: 34 by Farseer Eldar, on Flickr The "umbrellas" with tools and control panels are attached to the sides via bridges: 35 by Farseer Eldar, on Flickr At the top there is a tower from which Riegel oversees his domain: 36 by Farseer Eldar, on Flickr The flyer can be hung on axles: 54 by Farseer Eldar, on Flickr The tower holds a turning crane which is used to put meteorites to the site for further dissection and processing: 37 by Farseer Eldar, on Flickr This meteorite contains biodium - a substance used by Martians as energy source. They collect meteorites especially to obtain biodium: 38 by Farseer Eldar, on Flickr One purple "umbrella" (or "mushroom" if you like it more) has some control panels: 39 by Farseer Eldar, on Flickr These Martians should be really cold resistant - they walk bare-handed and bare-headed in the open air at -50 degrees Celsius (or -58 Fahrenheit). Under the second "umbrella" they store their equipment, which unfortunately does not suit their hands at all: 40 by Farseer Eldar, on Flickr 41 by Farseer Eldar, on Flickr Walkie-talkies (there are two of them!) and circular saws are common, but the grey wrench is a valuable acquisition. The aero tubes lead to mech bays: 45 by Farseer Eldar, on Flickr Each is painted in colors of different Martian mechs. The blue one corresponds to the heavily weaponized Red Planet Protector (7313), and the pinkish-red one - to the Recon Mech RP (7314). The light-grey studs are used to connect the mechs. It should be noted that the entire Life on Mars theme is rich in colors and non-standard parts. It had the first appearances of rare "sand" colors, such as sand purple, sand red, sand green and sand blue. Unfortunately, only two last colors are still produced nowadays. The bays can be disconnected from the tube ports: 46 by Farseer Eldar, on Flickr This set has only two bays, but three ports. The third port is supposed to be connected with a tan bay coming in 7316 - the Excavation Searcher. In conclusion, I will show the extra parts of the set: differently colored droid arms (both Martian and mechanic), another Riegel's medal and transparent studs: 56 by Farseer Eldar, on Flickr Pros/Cons Pros: + Tubes + Tubes + TUBES!!! + Rare colors + Non-standard parts + Martians + Mech and flyer + No stickers! Cons: - Martians sometimes get stuck in tubes - Supports not always stand firm - Tubes are not compatible with traditional minifigures - Primitive build - Not so many Martians - No humans Thank you for reading! And what can you say about this set?
-
This is render of a commissioned model I am working on. 90% of the bricks are already ordered so building can soon start. The model has about 50k bricks and is 2m75 x 1 m in size
-
Hello! So, I am starting to create a realistic LEGO City Layout, based off of metropolutan areas like New York City or Hong Kong. I want to have billboards in my city to add the feel of Corporate America and commercialism in my city (which are defining features of cities like NYC). I abhor stickers, because I would rather have a brick-built sign than a sticker (I reserve stickers for things you can't build, like a menu sign within a building). Any tips on making realistic brick-built billboards? I see all these cool images online, many of whom use SNOT, but I don't know how they specifically built it. I am quite new to MOC building in general, so I appreciate any and all help! Thanks
-
This MOC is my representation of the Motorbike of the "Classic" Ghost Rider (Johnny Blaze and Dan Ketch) from The Marvel Univers. It's inspired by "the Spirit of vengeance" of the terrific builder called Ben Cossy on flickr and MOCS based on the LEGO Marvel video games. The MOC has 111 pieces... X6 and it's the devil's number ! The Showcase video is online on YouTube and the Building Instructions are available on Rebrickable ! The Building Instruction is a PDF file : https://rebrickable.com/mocs/MOC-25824/BricksFeeder/ghost-riders-motorbike/#comments More shots below : I hope you enjoy the build! Let me know what you think about ! If you have some remark or problem with the instructions, let me know and I will correct. Don’t hesitate if you have questions!Moreover, could you post pictures of yours when you finish to build it and write a comment below please? Thanks ! :)
-
What are your favorite MOC genres to build within, admire others' work from, or aspire to hopefully build within in the near future if you'll ever have the opportunity? Whether they be based upon past or present preexisting themes, licenses, or product lines already covered by Lego (Star Wars, Classic Space, Ninjago, etc.), or perhaps they've never been truly touched upon by Lego (Steampunk, Post-Apocalyptic, Licensed Franchises never yet partnered with TLG, etc.), discuss your favorites here and share creations from those genres built by yourself or others.
-
Hey all, here's the 4th skyscraper in the Wasabi District - The Vybe Hotel. With 10 stories tall, 6000+ pieces, this is a 3/4-star hotel aimed at and caters to the younger demographic. Follow @wooootles on Instagram to see the WIP pics, and browse my Flickr page for more finished pics! Let me know what you guys think!
-
Dear Lego fans. I present you my new modular project on lego ideas. The project includes an amazing treasure quest with clues, secret places, hidden maps and hidden room with treasure. More pics of this project you can find here: https://ideas.lego.com/projects/bbe8e709-b049-4501-8266-39ea6a3f4c0a If you like the project please support it on LEGO ideas website.
-

Use LDD as Building Instruction,Fully control steps,no generate time
Nachapon Lego posted a topic in Digital LEGO: Tools, Techniques, and Projects
I found a new way to use group function that turn LDD LXF file into easy to use digital building instruction. Authors can manual fully control steps and building order. No more confuse, no more long time waiting for big LDD file to auto generate LDD BI. Group & sub-group bricks by building order -> hide all -> hide each group icon then undo(ctrl+Z)to make bricks show up in building order. For simple way. Just select groups icon in order to make LDD highlight each brick step by step. Below is topic link of Realistic Helicopter Rotor Head Swashplate (Cyclic & Collective). There are three Youtube video and many rendering pictures. http://www.eurobricks.com/forum/index.php?showtopic=90047 -
Hello! After a few months of hiatus, some updates from my town :) Here we are the latest update of my construction site, with a more realistic tower crane, partially insipired by set #7905. Enjoy the pictures and I hope you'll like!
-
Hi everybody This is my latest creation, a special Christmas edition of my MOC modular building, "Brick Square Post Office". Hope you like it. Twas the night before Christmas... ... and all the kids at Brick Square were getting excited, building snowmen and putting up the Christmas tree. The children had been busy writing their lists for Santa. They handed their letters to the postman, who was loading up his van ready for the last mail run of the day. He set off in to the snowy night with his precious cargo, but by now the snow was falling thickly. Then there was trouble! The post van hit a snow drift much bigger than usual. Stranded in the snow, the quick thinking Postman grabbed his phone and telephoned ahead. Meanwhile back at Brick Square everything was silent and the children were feeling anxious. It was getting late and the Postman should have returned by now. Just then a friendly whistle sounded in the distance and the air was suddenly filled with the sweet smell of steam It was Santa. He had ditched his reindeer and sleigh and instead opted for good old fashioned steam power, courtesy of The Old Workhorse Traction Engine. Don’t forget The Old Workhorse is on LEGO Ideas. https://lego.build/2vRfVGL Please spare a couple of minutes to give it your support if you’d like to see it made as a real LEGO set. Anyway, shameless self-promotion out of the way, lets continue the story ... The Old Workhorse arrived at Brick Square carrying Santa himself and all the presents for the children. And just in case you wondered what happened to the Postman. Don’t worry, he made it back home in time for Christmas Day! THE END! I hope that you've enjoyed reading this and looking at the pictures. I'd like to take this opportunity to wish everyone on Eurobricks a very happy Christmas, and all the best for 2019.
-
Hey everyone! Here is a MOC of a Georgian style mansion which took me around 2 years to build. Not sure how many pieces it is but it is well above 2,000 at least. Georgian House by Adam Hickey, on Flickr There are 3 floors to the house. The Ground Floor, which houses the kitchen, dining room, living room and grand staircase. The Upper Floor which harbours the master bedroom, connecting bathroom, upper grand staircase landing, a balcony, corridor and a study. The third floor is an attic space, which contains lots of junk, the butler's bedroom, and a resident g-g-g-ghost... called Fred. Each floor is connected with a staircase and each room has its own colour theme. Some pics for you! Georgian House Staircase by Adam Hickey, on Flickr This is the grand staircase, which has some abstract paintings decorating the walls. Georgian House Dounstairs by Adam Hickey, on Flickr Ground Floor layout Study by Adam Hickey, on Flickr Study on the second floor Living Room by Adam Hickey, on Flickr Living Room Living Room by Adam Hickey, on Flickr Living Room - featuring a piano and shelves G-G-G-Ghost by Adam Hickey, on Flickr G-G-G-Ghost!!! Georgian House by Adam Hickey, on Flickr Overview of the house Let me know what you think! More pics on the way :)
-
Not just trains, but train related. I built a big blast furnace with 13k bricks a while ago. It took several weeks to build it all in LDD. I tested the stability of the pipes i.r.l. with random bricks to be sure. When I posted those pictures, quite a few people asked for instructions so I decided to make a small blast furnace instead and enter it at Lego Ideas. It comes with all the main process features except the storage bunkers and crane. If you are interested in more pictures, please have a look at the linked page. https://ideas.lego.com/projects/7e689689-cd51-4f10-9e9f-ead01adae6b8 blast furnace by Yvonne Strijbos, on Flickr Blast furnace front by Yvonne Strijbos, on Flickr Blat furnace real built 2 by Yvonne Strijbos, on Flickr Blast furnace real built 1 by Yvonne Strijbos, on Flickr
-
Here's a new modular MOC, the Brick Hotel: It has a full interior with everything a hotel needs, check out the Flickr albums for pictures: https://www.flickr.com/photos/30639040@N02/sets/72157678281583948
-
My Name is Ryan Taggart. I design my modulars using LDD, and source bricks through Bricklink & Brickowl. This is my third completed MOC Modular. The Crane is a redesign of the 2006 set 7905-1 (the tower, controls, and rear end are new - the boom is like the set [hard to improve on] ) It also features a home for the 'portaloo' from Service truck 60073-1 The custom printed elements were done by FAB Bricks UK. For details and for the design and thought process visit me @ MOC Pages. http://www.moc-pages.../moc.php/424271 NOW LIVE ON LEGO IDEAS https://ideas.lego.com/projects/129250 UPDATE - 18th Feb 2016 24 DAYS IN 5000+ SUPPORTERS! THANK YOU EVERYONE I've added more images: hope you like it.
-
This was one of my first large-scale MOCs, that came before the Orient Express Thriller or Winterfield Academy were even conceived! (back in 2014) I had watched the miniseries for "The Shining", and I've always been enamored with National Park lodges. So, the product was The Glacier Falls Lodge, the official lodge for Brickler Mountain National Park! A perfect getaway destination/luxury hotel catering to any minifig's vacation needs! This MOC went through at least six different iterations, before finally being pared down to a (very) downsized version fit for LEGO Ideas. At its prime, though, the Lodge contained an enormous lobby, full dining room and kitchen, and several guest rooms upstairs, with two bathrooms per floor (kind of in the style of Chico Hot Springs in Montana). The first iteration was built in 2014, during that summer we had a major fire that caused us to evacuate. This hotel was thrown in a box and taken with us in a car at night fleeing to Seattle. Later, when the fire season was over and we returned, the hotel sat on the desk for several months without being worked on. The Second Iteration had a change to the tower, it was more octagonal and separated from the roof. And I used the Town Hall Skylights for the Lobby. The Third Iteration sadly has no pictures, as my computer had crashed and we lost them. But it was pretty ugly. I had the idea to try and make octagonal towers on either side of the main doors, with the idea not turning out very well. That iteration was fragile, and fell apart easily. The Fourth Iteration was a HUGE model, with an upgraded, fancier porch and a sign out front! This was also when I made it into more of a Victorian style hotel, with a large wrap around porch, and the two towers on either side. These were half-octagonal towers, which made it a lot easier to stay together. (I had actually figured out how to build them, and gotten the pieces for it). The roof was a major challenge, but we made it work! This iteration also had an enormous, well thought out and beautifully built dining room, as well as a large kitchen with three to four walk in freezers! The Fifth Iteration was downsized in terms of length to make it fit through the door, lol! The basic hotel structure remained the same, however, with the exception of a large rearranging of the rooms inside. This was the first project that I submitted to LEGO Ideas, before having to downsize it again for it to be accepted. This was by far the best iteration of the six, and the only one we have interior pictures of. 5th Iteration furniture and Grand Fireplace 5th Iteration First Floor Porch Detail Lobby Facing the Dining Room Lobby picture 2 Piano Music Room Lobby Picture 3 The cool part was that the interior walls of the 5th Iteration were removable! 1st/2nd floors This was also the first iteration to have major interior decorating and fancy chandeliers! The 6th and Final Iteration of this MOC kept most of the basic structure, subtracting much of the width, in order to make the 3000 piece LEGO Ideas limit. This unfortunately was at the cost of sacrificing the entirety of the interior minus several pieces of furniture. This iteration currently, sadly does not exist anymore. It was torn down and the pieces used for Winterfield Academy (pictured below) However the 6th Iteration is still up on LEGO Ideas right now, and currently has 2036 Supporters! If you would like to give your support as well, I'll include the link here. We would really appreciate any support given! :) https://ideas.lego.com/projects/66655f37-9622-4836-a2cb-797e916f4e2b Anyways, that's the whole story on the MOC! This was by far (not counting my disastrous attempt at a county courthouse when I was 15) my first successful MOC that I thought looked relatively decent! Please tell me what you think, anything you like about it, etc., in your replies! I'll finish with a couple shots from last December and our promotional Winter Photoshoot! :) Thanks for reading! :)
-
 Hi Eurobricks ! Building instructions of my pneumatic quick coupler (See on my Volvo excavator) are available on Rebrickable. https://rebrickable.com/mocs/MOC-20641/TeClem8/pneumatic-quick-coupler/#comments Hope you like my design :)
 -
The concert's on, come have a listen! Disco 2000 Vinyl Store is my (I think) ninth modular and the closure of the A Summer in Tuscany - Klee Corner - Disco 2000 trilogy. I was dying to do a new corner building, mainly for three reasons: First, Lego's doing one this year, so I figured... why not? Second, because I hadn't done a pure 32x32 corner building since Sweets & Co., almost a year and a half ago! And third, because I wanted to. Without further ado.... It may not be apparent at first glance, but this modular has easily been the most time-costing and hardest modular to build. The ground floor was built up fairly quickly between May and June 2018, but creating something worthy on top is what took me all summer to figure out. So the model began on steady wheels. The brightly-coloured "boxes" on the ground floor take direct inspiration from both my own Klee Corner (the pizzeria had a similar idea) and the London Undergound. In fact, the dark red ground floor used to be an entrance to an undergound station that was closed down some years ago that has now been transformed into a state-of-the-art vinyl store. The dark red ground floor is almost a copy of those entrances that can be found in the Tube's Northern Line, covered in those beautiful blood-coloured tiles. Even in my Lego interpretation, I was able to add the beautiful sand blue lights. Outside there's a sign, "Disco 2000", it says. The old-fashined font and style of the sign is totally on purpose. Wait, there's people singing and dancing on the street... A paparazzi on the roof of the dark green glass box... Is he famous or something? Both the white windows of the tube entrance and the dark green windows are lying on their sides. In the case of the green ones, it's not quite so obvious, so it's pretty cool. There's some albums outside, which (if you can guess which they are you're a real god), but I'll talk about architecture first. The Architecture: Architecturally speaking, this model is very interesting. Just like in Klee Corner, this has three different buildings onto a single baseplate. The advantage being, of course, that I have two full façades to split them up. The final building is almost colour-coded. Every part of the build has a colour associated to it. The central and most important part of the building, kind of the "eye" of the building, is constructed using a similar method to the one I used for the façade of the lounge on Klee Corner, only this time using a 2-stud-wide pillar going up rather than a 1-stud-wide one. There were so many different iterations for the central part, even one being sort of a peacock-coloured flimsy spaghetti (maybe at building 8 out of the 15 built). I got that bug of wanting this building to do so many things at the same time that I had to chop down things that I'd done which no longer fitted the image I chased. The final result is way simpler than some previous ones and has a lovely Belle Epoque feel to it. This final iteration is inspired by the gorgeous entrances of the Paris Metro (metro entrance over underground entrance, that's kind of hilarious ). I retook one iteration of Klee Corner for the shape of the roof, so it has a perfect triangular balance with the two side pieces. The Iron Horse+Klee Corner+Paris Metro, I think the result's pretty cool! I had already done the first render when I realised the façade needed some more dynamism. Initially, the windows were totally aligned. I then changed that static feel by breaking the lines and making them follow the curvature of the escaling roof. I love the double curve that the escalating windows and the curvature of the building itself have. creator saying stupid stuff. The brown building on the right scared me a little bit, as I'd never been able to pull off a good dark building, brown, for instance. Dark Orange, when rendered in Pov-Ray, though has this chocolate colour which is just delightful. In fact, this side building was not part of the plan first, as a whole building covered the whole "London undergound" ground floor. Then, for quite a while I had a cool texture for a brick wall that was just six studs wide which helped me figure out the measurements for the central building. That idea stuck, but in the end, due to the central building being shrinked, this brown building grew. I gave it some windows inspired by those of a school that I walk past every day and the greatest of rooflines. You really have to look at this: there's pieces looking in four different directions. The right way up, upside down and to both sides! The white/blue/yellow building on the left has a bit less of a tumultuous story to it. It began as a version of the Met Breuer, as the central building was to be something along the lines of a Gehry work. Once I'd settled for a much more colourful design on the other two buildings (after a looooong while), that grey thing looked as terrible as a stain on a red dress. Therefore, I reused on of the ideas for the central building for this side one, adapted some earlier window designs, changed the colours, added the sign, and voilà! There it is! The Interiors: Cross the gates to the awesomeness of the world of music. Because this was done in LDD, I couldn't build those racks full of vinyls, so instead I covered an entire wall of the best-selling vinyls. Note: All the covers are Lego interpretations of real albums! In fact, there's the entire discographies of two bands! Have a guess! The pattern on the floor, funnily enough comes from a "Where's Wally?" book which had a similar one. There's turntables and hanging vinyls on the window shop. On the opposite side, there's a nice Dalí-inspired coach with... again the same special guest!? Now, that can't be a coincidence, can it? The floor above has a magnificent concert stage for artists to play. I really like the atmosphere I captured in this area. I can easily imagine a songwriter playing his/her songs on that stage, as the city lights shine bright behind the sand green building. There's a small bar for guests to take a drink as the concert's on. The room's, though, not big enough for all the audience, so some of those left outside have to climb outside the window and listen from there. Be careful! The interior is built in a Brick Bank kind of way, all the different buildings share one same interior. Finally, the top floor is... A music shop! Couldn't be anything else, could it? 1 Assembly Square can start to tremble as there's a new neighbour next doors with much better instruments and at a better price. The widest range of guitars in all the imaginable colours and shapes, keyboards, amps, synths, drums and pianos. They say the owner of the Magic Shop built this drum kit and his grandchildren have put it on sale. They also say that both pianos, those of Magic Shop and Klee Corner were bought here and that's why they don't have one on stock right now. This drum kit, they say, is so loud that it was able to distort time and make the owner of Magic Shop live over 170 years. Maybe it was his potions what kept him alive. Again, who's that guy? He's everywhere! One Last Image: Disco 2000 Vinyl Store, surrounded by its two new friends, A Summer in Tuscany and Klee Corner. I think that Disco 2000 may even look better surrounded by other models than alone, unlike the other two, which definitely look better alone. Hope you like this modular! Pau