Search the Community
Showing results for tags 'MOD'.
Found 466 results
-
This topic has a lot of photos inside, to make it easier for everyone to see the latest version of my MOD, I have editted this first post to show version 5, 14th Nov 2020. Your feedback is welcome or share your MOD ideas Please! Port View by R Y, on Flickr Bow by R Y, on Flickr Stern Starboard by R Y, on Flickr My Lego collection consisted mainly of SW sets and its MOCs, I was tempted to get the 21322 Barracuda Bay when it came out in April but decided to save up for the UCS A-Wing, which I still haven’t got around to build yet, I have been modify the 75175 A-wing. A-Wing Mod by R Y, on Flickr I wasn’t too keen on the 31109 Creator Pirate Ship when I first saw its photos, especially the brick-built sails. During the Queen’s Birthday long weekend, I was reading posts on OZLUG of buying multiple sets to make it a bigger ship; that grabbed my attention as I mod all Lego sets where possible after I figured out Bricklink. However, at RRP of $160 AUD each, I might as well just buy the 21322 for $300 AUD; then again thanks to OZLUG, I realised that they are $119 at Kmart, meaning $238 worth of investment, no brainer! I quickly read up on reviews from Brickset and Brother’s Brick, how the completely brick-built design is its selling point, instead of using specialized boat hull pieces. My local Kmart had no stock, so I went to the next nearest one, nothing on the shelves again and a store girl told me all they have is already on the shelfs even though the online stock check shows limited availability. Disappointed, I was about the leave the store empty handed before I talked past the customer service counter, there was only one person in line so I decided to wait and check. The service girl was very helpful and checked the stock room for me, it turned out they do have three at the back, which I gladly picked up two; she told me apparently people try to steal Lego all the time, so they keep the good stuff at the back. I had to wait for my baby to settle and sleep before started building that night. As the original model is built in 3 sections: bow with forecastle, waist, stern with captain’s cabin; I decided to build 2 x waists sections and have 3 masts. I always build repetition sections step by step simultaneously instead of finishing one section and start another, personally I find this method quicker. My aim is to stick to the original Lego design and finish the hull asap, redesign the masts into foremast, mainmast and mizzen mast, and use the remaining pieces to touch up and make the 2 waists transition smoothly. 31109 Long Side View by R Y, on Flickr I wanted to rig the ship from the bowsprit to the stern flagpole, I had to move the “Plate Round 2 x 2 with Pin Hole and 4 Arms Up” to the mainmast beneath the lookout so the arms are equal distance to the diagonal spars from the foremast and mizzen mast. I spent more time on the foremast and rigging than any other sections. I tried a few different arrangements before settled down on the current layout, where the rigging goes down to the bowsprit from the upside-down diagonal spar. I used light bluish grey Technic Bush instead of the yellow ones provided. The hose piece is still slightly short and the bowsprit is pulled upwards, but the jib sail hides most of it. Overall, I was happy that I achieved my goal. Masts and Rigging by R Y, on Flickr I added a 1 x 2 red brown plate to each of the gun port openings so they are not too close to the waterline, I initially wanted to add 2 pieces per opening, but they were too high and affected the guns inside. You can tell where each of the section ends with the breaks from the 3027 6 x 16 plate in dark tan secured with 2 x 2 blue round tiles. I made sure the 1 x 4 special plates overlap the gap to secure the sections. The alternating red and light orange strip along the deck worked out perfectly, I was initially worried that I may get a double up of same coloured plates with my MOD. Joins of the Sections by R Y, on Flickr As Lego only gives half the number of guns compare to the gun ports, having 2 sets gives me 4 guns to fill up the front gun deck, squeezed 2 minifigs inside with torches. Gun Deck with Baboon by R Y, on Flickr I plated over the opening next to the gangways on the 2nd waist, to make it look like a quarterdeck, but not really raised due to the limitation of my skills in the mod. I really like the brick-built rowing boat from the alternative Skull Island bult, I made it longer using 2 x 2 slopes at the stern and made other changes as certain parts were already used in the main ship built. I also built a boat rack with 4 cheese slopes and some plates. The rowing boat fills up on the empty quarterdeck perfectly, I really like how it turned out. Rowing Boat by R Y, on Flickr With the 2 sets of 3 human minifigs, I swapped around their outfits, brought in a pair of black legs to swap out the peg leg. Now I have 6 different minifigs, I left out the epaulette for the officer to differentiate him from the captain. a9 by R Y, on Flickr a8 by R Y, on Flickr I built the red/green parrot and blue seagull according to the instructions, again had to use some different pieces due to availability. Lastly, I added the pet baboon hanging off the shroud, it’s a really fun build where its arms and waist are twistable to get a good pose. Baboon by R Y, on Flickr I really liked how this MOD turned out, this is probably the cheapest and easiest way to get a Lego 8-gun full-rigged-ship (three or more masts), even the 21322 only has only two masts. It’s around 58cm long from the tip of the bowsprit to the edge of stern flag, around 36cm tall from the tip of mainmast to the bottom of the hull, 19cm wide at the horizontal spars. With the elongated waist, it makes the forecastle and poop deck seem small in comparison, a bit out of proportion to be honest; but at this stage, I don’t have the skills to design and make them bigger. Side Front View by R Y, on Flickr Top Front View by R Y, on Flickr Back View by R Y, on Flickr
-
Hi Folks, my name is Friedie, I'm from Bonn, Germany and this is my first posting here. I was born back in 1967 and I allways was a big Starw Wars Fan. In the last years I followed all that Lego Star Wars Creations on the Internet but never took part in building Lego myself (what I did when I was a child of course). In 2017 I thought of buying the new UCS Set but I was was a bit disapointed, that the Interior was not complete and they used these "Sticker-Hallways". I know, it is not a play-model, but even a Display Model should be "complete"in my oppinion, even more when you consider the high price. But The Falcon allways was my favorite ship, as Han Solo was my favorite charater of the series. so finally I wanted to have a Lego Falcon at home, so I decided to buy me the 75257 Edition. It was fun to build but the outcome is so much different from the original thing. So I first decided to mod it and got me some more parts from bricklink. Corona came leavin me working at home and having much more spare time. I looked up a lot of mods and mocs on the Internet, and I also found this site of course. There are brilliant works (stifos!) that inspired me from the start ofmy building efforts. Finally I finished my work and it evolved from some simple mods to a fullgrown moc of the Millennium Falcon witha detailed interior. First some Numbers: Length: 53 cm (75257: 44) Width: 37cm (32) Hight: 17,5 cm (14) Weight: 3,2 kg (2,1) I don't know the number of parts, cause I just build the thing together, so sadly I don't have instructions or part lists to offer. But here are the first pics I want to show you... The "Corona" Falcons Overall Exterior:
-

4 Privet Drive house 75968 MOD with garage and rear half of house plus 1962 Ford Anglia in dark blue
Murdoch17 posted a topic in LEGO Licensed
Here is my heavy MOD of 2020 set 75968, 4 Privet Drive. The car is a dark blue version of the Anglia in 2018's Hogwarts Whomping Willow set (75953), and fits inside the added garage. Here is the front of the house. I added a visible chimney flue, as I didn't like how the set kept the one hidden inside the wall. The rear of the building features a greenhouse and back door to both the house and garage. The greenhouse folds up and open to get at the inside of it, which at this point holds only a telephone. On the lower floor of the inside is the living room (with record player, couch, and fireplace), kitchen and dining area (stove, sink, table and two chairs). The upper floor features a lamp on a table and a bed. This 1962 Ford Anglia 105E is based off set 75953 (Hogwarts Whomping Willow), but in dark blue. (and no, it does not fly!) The rear trunk opens slightly. Two of this part are missing in dark bluish gray, and four of this part are missing in dark blue to finish the car. The LDD file is available at Bricksafe here. Any thought, comments, complaints or suggestions? -

[MOD] UCS Millennium Falcon engine vents rotate align without increase height
Nachapon Lego posted a topic in Community
My small tricks: Lego UCS Millennium Falcon engine vents rotate align modify without increase height (clone band). Blue plane: Oxford band brick, Korean air home made stickers + engine support MOD. Hope you like it -

[SR - FB 4 - April 620] The hunt for Red Oktober II - The story of doctor Thaum
Professor Thaum posted a topic in Brethren of the Brick Seas
Back in March 620, Prio Sea, North shore of Tortuga... precisely at Dr Thaum's pied-à-terre The young Iauln is up the tower, searching the horizon with his telescope, the trusted Callaghan is manning the grill, and the doctor... PSHHHHHHHH ! PSHHHHHHHOUUUT ! SHHHHHH ! SHHHH ! KLANG ! Dr Thaum : EUREKA ! It works ! Callaghan, my steam engine is working ! The wheel is turning !! YEEEEEHAAAAA ! TJ Johnson : Excuse me doctor, your parcel... Dr Thaum : I don't give a sh... of that parcel Callaghan, you're a bonehead, Callaghan ! TJ Johnson : This is not Callaghan, doctor... Dr Thaum : UH ?! Oh, sorry, TJ, which parcel ? Errr... OK THE parcel ! You've found him ! Well done TJ ! Here I come ! Dr Thaum : Wonderful guys ! Bring the coffin in my pantry... CALLAGHAN ! Show them in ! And then offer them a drink ! XXXXXXXXXXXXX Dr Thaum : Dear professor, you're finally back to me ! TJ Johnson : Allright doctor, can you explain me what's going on ? I terminated about twenty persons for bringing that corpse back. Dr Thaum : Of course Mr Johnson, You've just brought back to me the corpse of my estimated mentor, the professor Oktober Sippio, he teached me most of my knowledge... TJ Johnson : Talk, talk ! Why should I bring it back untouched and eliminate all witnesses, the 2 altonian captains and some of the crews ? Dr Thaum : OK, OK... many years ago, the war between Oleon and Corrington was in full swing, and with this war, its share of destruction, orphans, famine and diseases, notably the leprosy. The lord-chambellan came to the professor Sippio and asked for a terrible disease, ready to take a heavy toll on the Oleonese ranks and he asked for a cure too, for Corrington, of course, for a stated price... Something as terrible as leprosy. I just defended my thesis and became doctor, with my friend Henry, under the direction of the professor Sippio, and all 3 began to work on this scourge. Callaghan : Wait a minute ! You got paid for that !? For a disease ready to rampage the world !? Dr Thaum : You're a bonehead Callaghan ! I get paid for my care ! The death is offered ! Anyway, the research, especially for the cure, needed a vast amount of money the lord-chambellan was hesitating to provide, and there were suddenly changes in the royalty and the lord-chambellan was dismissed for womanizing, but this red leprosy... Callaghan : This leprosy ?? TJ Johnson : Finish your story doctor... Dr Thaum : This leprosy was good and ready. The cure was ready too, but we barely had only half a dozen unit dose, we do not have fully tested. A cleaning up was then initiated in the ex lord-chambellan business, our lab was destroyed, Henry and I escaped with few samples (including some of the cure) and books and the professor was captured as he was burning the last flasks of Red Oktober. Nethertheless, the professor was the only one to have the complete formula of the cure, but just before I vanished with Henri, he had time to say " I will point to the solution". Since then, I have done all that I can but the professor died in jail and his body ended up in a mass grave. After years the mass grave was found and under my instructions and with some money the coffin was loaded in the LaCrosse, a ship hired for the Sea of Thieves sea link. Unfortunately the ship sank near Terraversa, and it took me almost a year to find the sinking localisation. But when the LaCrosse wreckage was found, that was only to realize that 2 altonian ships found the coffin, probably floating on the sea near the wreck, and take it with them to Ulric. This is where you come in, TJ... Callaghan : Why Red Oktober, doctor ? And were are the flasks you runaway with ? I hope destroyed !? Dr Thaum : Red Oktober... because of the red color of the substrate, and destroyed... No. Have a look around you Callaghan Callaghan : Reuuaaargh !!! This is the Red Oktober ? Dr Thaum : Indeed... Callaghan: And the cure samples ? Dr Thaum : Already consummate Callaghan Callaghan : Let me develop a bit... This is the reason why Henri, Barney, Hadvice, Oggy you and I boarded the Leper Messiah and the Leper Crusader ? You and Henry tried your cure ! And it didn't succeed ! We now have 2 doomed ships storming the seas with full crews of infectious demons !! That's an outrage ! You're a fool ! You lost your best friend and even your son ! And you aren't seeking a solution anymore ? Dr Thaum : Shut up Callaghan ! The cure is a success, as you noticed it, Barney, Oggy, Hadvice, you and I are well, right ? and... TJ Johnson : Why did you give your last dose to me ? Dr Thaum : Some flasks were broken in the skirmish as the lab was destroyed and the professor captured, there was a mini leprosy outbreak after this in the city, and the professor died of his own Red Oktober in jail. So the last dose was for you, as you perhaps have to touch the corpse and bring the last sample back. And Callaghan, the solution is here ! That's why I hired TJ for bringing the the coffin back. The cure formula comes with the corpse of Oktober Sippio ! "The professor point to the solution" Callaghan : You administer me the cure ? When ? Why ? and Henry ? and Hadvice ? Dr Thaum : Enough Callaghan ! Enough ! You have a drink to offer ! Callaghan (leaving) : You smutty old fool! Dr Thaum : Look, TJ, for the cure, "the professor point to the solution", look at that right arm and the index finger... TJ Johnson : A false finger ! How did you notice that ? Looks like a true one ! Dr Thaum : Henry and I made this false finger, the professor asked us to amputate him and replace the real one with this prothesis this is an empty one and he probably hid the cure formula inside. That's why I wanted you to bring me the body back or at least the right arm ! Dr Thaum : All our efforts are rewarded ! I now have the cure formula ! This is designated to be the Doctor's residence in Tortuga, should be licenced as a medium one with court approval @Bregir @Capt Wolf @Bodi @Ayrlego (because of being only a MOD of the old fishing store official) I hope you enjoyed the story... all is not revealed, there is lot more to come ! C&C welcome as usual, bonus pics (of all that was MODed later on ) -
MVIMG_20200409_100237 by Loslyn Loslyn, on Flickr This is a MOD of Set 40292 Christmas Gift - accessorised with lots of bunnies!
-
The recently released Jaguar i-Pace really looks like that rare vehicle seen in that rare town, a long time ago… ;-) Yeah, there’s plenty of room at the back of this i-Pace ! Bonus - My version of the Audi
-
I got 71044 set for myself and it looks great. However I felt like train station was half finished. Yes, it is build for play-ability, but looked half finished. Since I was never going to play with it and didn't really like all the Disney logos and associations next best thing I could think of was to modify it. First thing the station was missing is, obviously, the back side. My idea was to use the actual train station which is located one of Disney parks, to build the missing back, but strip it from any Disney logos. Most of the build is quite easy since it replicates the portions of the existing set. However getting around to build those windows at the bottom floor was a bit tricky. Last thing original set was lacking is a platform. There's nothing fancy here as it is built on top of two baseplates. These can be separated though, as well as the train station. This makes entire model to be easy to move in three pieces. This is my first train station. So I would be glad to hear reasonable suggestions how could I improve it or its surroundings.
-
Here’s my attempt at modifying Poe Dameron’s X-Wing from The Rise of Skywalker! I think Lego did a great job with this latest X-Wing, I really like the refined wing mechanism and orange/white patterns and I love the new engines, but when viewed from above or the side that boxy nose is no good and the barely offset wings obviously need sorting out. I also put together some instructions, more on them later... https://rebrickable.com/mocs/MOC-35800/ron_mcphatty/mod-poe-damerons-x-wing-t-70-set-75273-mod/#info Rather than adding the same removable lid from my last X-Wing mod I instead built a hinged hatch, it’s a much simpler mod to build in and to use too. I took that landing axle out when first building the set but if you like that play feature then the wing mechanism still works with it left in. The main modifications are the rebuilt wings, I stripped them back to the engine structure and attempted to make them close in a 100% movie-accurate way. That didn’t pan out so well, the connection of the lower wing to the body was always too weak, so I settled for them overlapping by one plate to balance strength, limit the number of extra pieces and also to keep those blue accents in. I also tried modding the sides of nose, adding a line of tiles on modified bricks to bring the width out a bit. I added some extra plates on top too, hopefully giving the impression of the gentle slope towards the nose. I built in some very simple landing gear and details to the end of the lasers, and that’s it! Overall I used more pieces than I’d’ve liked, about 80, but they’re all common parts and the cost is fairly low at about £5. I’m really enjoying using Stud.io, even the instructions feature. Clear mod instructions are much harder than from-scratch instructions, this time I’ve tried to incorporate references to steps in the original instructions for clarity and completeness. I’m hoping the familiar chunks will help you easily see where my mods start and finish so that stripping back the original set is an easy job. https://rebrickable.com/mocs/MOC-35800/ron_mcphatty/mod-poe-damerons-x-wing-t-70-set-75273-mod/#info I’m always happy to get criticism and suggestions and very grateful if you point out any mistakes in the instructions! I plan to do instructions for my old 75218 X-Wing mod next and then, taking inspiration from @LEGODrongo01’s recent 75213 recolour, apply these mods and new engines to Poe’s old black X-Wing! My old set might need a good dust first, I can hardly believe that came out five years ago now. I hope you guys like the mods, and just for fun here’s Poe and a micro X-Wing :D
-

MOC/MOD - 4-6-0 Hall Class "Olton Hall" - aka The Hogwarts Express
Phil B posted a topic in LEGO Train Tech
As already shown in a preview in my Hogwarts Express Carriages thread, I have completed my rendition of the "Olton Hall" steam locomotive, famous for pulling the Hogwarts Express in the fictional wizarding world of Harry Potter. Here she is in close-up: [ Hogwarts Express by Phil B, on Flickr This is a model that started as a Mod of 75955, but has progressed far enough from the original set that you can call it a MOC I think. Here is a list of all modifications I made: Lengthened the entire boiler by 6 studs and placed the middle section under a one-plate angle to better capture the shape of the real Hall Class. Widened the engine to 7 studs (almost 10 across the pistons and driverods). This allowed me to accurately model the forward facing windows in the cab, and allowed me to create openings for the wheel flanges to accommodate a larger wheel size, Upgraded the wheels to Big Ben XL Drivers and Big Ben Medium pilot truck wheels - I like how they have true spokes vs the printed spokes on LEGO's regular train wheels. The model works with standard LEGO Large and regular train wheels as well. Extended the pipes from the side to around the nose of the boiler. Redesigned the front buffer beam. Gone is the "lock" from the original model, but it features the same details as the real-life Olton Hall. With the change to 7 wide I widened the cab, but kept the original firebox and gauges from 75955, which was quite an "offset" challenge to do. Completely redesigned the tender to house a LiIon LEGO battery box and a Power Functions IR Receiver, though the model can work with PFxBricks as well. The tender is 6 wide, with one pivoting axle and a fixed PF train motor. On the pictures she is pulling my consist of 5 BR Mk I coaches - 2 First Class, 2 Second Class and a combined First Class/Baggage/Brake coach. Each carriage has a fully detailed interior and is 7 wide. Progress on these carriages has been documented in my Hogwarts Express Carriages thread. Here are the picture and drawing I used for inspiration: More pictures of the engine: The full consist: And the coach interiors: -

[TCM1] 8081 110 Pickup
Thirdwigg posted a topic in LEGO Technic, Mindstorms, Model Team and Scale Modeling
Another MOD of the fantastic 8081 set is done! Styled after a LR Defender pickup, this MOD features the following: 4x4 drive. Steering Front and Rear live axle suspension with Panhard rods Opening doors and tailgate Seating for four V-8 fake engine Roll cage Fischertechnic 80mm tires. Full album is here. Driveline From the left Articulation I'm still working on the sport pickup, but this should be good for now. -
I really loved 75055 when it came out. Good balance of play and display. But I hesitated to do anything further with it for a long while, and then when the UCS ISD was announced I wanted to wait for that. But with the price and all the visible studs damping my enthusiasm for the UCS model, I decided to look again at 75055. So what bothers me about 75055? First, what’s up with the chunks of dark grey? That’s not right, and they need to go. Then, why did they use the wheel parts fo the big engines? Kinda lazy. It’s also too short. It needs to be extended in the back. The guns are cool, but why are they all the same- one of them should look different. And where is the reactor dome on the bottom? Then more fundamentally, what if we could tile up this version? Well here we go. Most of the modifications were used with parts I had sitting around, supplemented with 50 bucks of a ‘mixed light blue grey tile’ lot and the purchase of 3 half barrels for the engines. Tiled top and bottom. Couple of sand blue tiles in there as a tribute to the Monarch. :) ISD-Front2 by Peter Foster, on Flickr Small cheat on the front- that middle 1x4 centre bit is just sitting in place not connected. ISD-Front by Peter Foster, on Flickr Dome added to the bottom- was worried the extra back weight would make the stand fall over, but still seems to balance. ISD-Dome by Peter Foster, on Flickr New gun design. ISD-Guns by Peter Foster, on Flickr Half barrel engines- way way better- and extending the back plates makes a real difference. ISD-Engines by Peter Foster, on Flickr Built a little Tantive to go with this. IDS-back by Peter Foster, on Flickr I think we are scr*wed! ISD-Trouble by Peter Foster, on Flickr So not saying this is a classic or anything, but amazing how much better it looks with just a few mods and some tiling. I think the top would look better with smaller tiles-more 1x2's 1x3's and 2x3's. And I would like to redo the whole set up of the engine bay. But for now, I think this is pretty good, and fits on the shelf.
-
Since I started LEGO Star Wars in 2015, I wanted to own a Tantive IV. The sets from 2001 and 2009 were far too expensive on the secondary market. That's why I was really happy when a new version was announced. There was a lot of discussion about the set. Everyone had a different expectation. I am glad that it has become an improved version of the 10198. Nevertheless, there were a few things that bother me. The biggest criticism for me is the cockpit. I do not like stickers. In a few years they will take off and then the model looks bad. That's why I built it with bricks. The role model was the @Kit Bricksto UCS Tantive - CR-90 Corvette. More improvements: - Removed the stud shooters!!! - Removed the handle - Colour matching - Facing the bottom with inverted bows - Extension gun turrent on the botton - Radar turett mirrored down - Brickbuilt upper wings between conference section und radar tower My next goal is to change the inside of the cockpit, because at the moment, Captain Antilles can’t sit inside. Maybe you have more ideas for improvements. Then like to post here. Here are the pictures. Tantive_IV-01, on Flickr Tantive_IV-02, on Flickr Tantive_IV-03, on Flickr Tantive_IV-04, on Flickr Tantive_IV-05, on Flickr Tantive_IV-06, on Flickr Tantive_IV-07, on Flickr Tantive_IV-08, on Flickr Tantive_IV-09, on Flickr
-
Here are some of my modded Series 19 Collectible Minifigures along with minifigures that have benefited from S19 parts and thematically related minifigures. All of them are undead, so just in time for Halloween! ? I should have included a picture of the back of the violet vampire: she has a spider crawling up her cape. ? Questions? Comments? Creeped out?
-
Hi all! I'm new here, but I've lurked for a while. My first exposure to LEGO was the first two games from Traveller's Tales, and I always found it interesting how the creators took time to design their own versions of ships that hadn't yet gotten official sets. Now, much older (and with a love for the first/second generation LEGO sets) I'm trying to get into reverse-engineering and building a fleet of similarly-styled ships. My question is, has anybody here tried this out themselves? And if so, what ships? My first crack at it (and one of the comparatively easy ones) is the Naboo Starfighter, based on the UCS set from 2002 but now able to set a single minifigure. (I also did a palette swap for the two different versions of Player 2, though these two are unfortunately impossible to build). I'll be willing to trade the stud.io or ldr file with anyone who wants it!
-

[MOD] Lifted and motorized 42110 Land Rover Defender
Zerobricks posted a topic in LEGO Technic, Mindstorms, Model Team and Scale Modeling
Here is my take on the motorization of the 42110. Basically the whole model was lifted to accomodate the bigger wheel, motors and BuWizzes. Model is powered by a total of 8 motors, 4L motors for RWD, 2L motors for FWD, one servo and one M motor. Total gear ratio is 1:3. It uses custom portal hubs in the front which have a pivot even closer than normal ones thanks to the new rims. Rear uses normal hubs and wheels, since they are sturdier. Axles use the original suspension's upper arms as mounting points along with a pair of 9L links for each axle. The original gearbox is connected to the rear drive, so it works normally. Steering is also connected to the original links, so steerign wheel and HOG also turn when steering Winch is motorized using an M motor. Video coming soon. -
Welcome aboard the Astro-train! This futuristic stream-liner was a mix of the 1950's Earth train called the "Aerotrain" but redesigned specifically for use by Nexus Force personnel as a high-speed, high-security ground transport between the northern-most city of St. Nicklaus and north-pole-hugging outpost of Ice Station Odyssey, around 590 miles away. (this all takes places on the ice-bound planet of Beta Polaris, which orbits what we here call the North Star, far away from Earth.) Thus this makes it a space train! Unlike the original Earth version, the Astro-train is super-streamlined, and can go up to speeds of up to 230 MPH on special track, with super-elevated curves and long straight-away's of hundreds of miles, all while using Positive Train Control (PTC) on the the mostly double-track mainline, where all vehicle crossings are flyovers and switches virtually non-existent once out of St. Nicklaus city limits. This train runs along with Seven identical versions of itself on the route with up to five in running order on the route and at least one in the maintenance shed at any one time. Also, please NOTE: The train is authorized to make 15 minute stops in the icy wastelands at native villages as requested before continuing on to it's destination. Signal boxes are provided at certain spots to stop the train at the correct spot to en-train, with only village elders having the keys. To de-train, you must pull the cord at least full 10 minutes before you wish to disembark to allow the train to slow down. Only five stops are marked on the route, but several unmarked villages are springing up, so the schedule has gone out the airlock recently. (In actuality, this is a heavily modified version of 2018 Star Wars set 75217 (Imperial Conveyex Transport) mashed up into an 8-wide version of my 1950's Aerotrain model. The model also features inside details and Jacobs bogies besides the lift away side panels of 75217 and removable cab roof.) This loco is missing five printed pieces: (1) slope of this type for the front of the nose, right below the third headlight. It is the Nexus Force's logo. (4) of this round tile for the roof engine exhaust vents. Fold up the walls so you can look underneath at the powerful diesel engine. The roof of the engineer's cab comes off to place a figure at the controls. Each of the four cars can hold four seats each behind the two fold-up side walls. These are the four passenger cars, which are linked together in pairs of two by Jacobs bogies. They can have more two-car sets dropped in or out, but the rear-most car set is the minimum. (as the last car carriers the four tail markers) I thought about adding another two cars, but the price was too prohibitive right now. Anyway, I think this might become a real brick built model sometime around Christmas to go with my Nexus Force space base... as seen in this horribly out-of-date picture from January 5th, 2019 and this topic here. We will just have to see what the future holds!
-
 Greetings, i want to introduce my MOD of official set 8081, made for @Thirdwigg's and @rm8's fan contest. Warning, pictoral heavy post ahead. We all know about bug hit in SUV market - Daytona Extreme Cruiser - city suv with v-4 under hhe hood, stylish body and good offroad perfomance, while being rwd only. We heard that new generatiopn is under development now. Soon maybe we see spy photos of prototypes on their test drive... But lets look back, in the past, to see what lies in roots of Extreme Cruiser. What allowed Daytona automobiles to test new ideas and engeneering soutions... Meet the Daytona Omnis R2 It was produced in early 80-es in small quanities and today it become a rare classic. Underrated, but classic. View from all sides: As it sucsessor, it features openable hood, doors and trunk Under the hood supercharged v-4 engine could be found. Also unique front suspension can be seen too. Rear suspension is regular live axle. Car have spartan interior which aside of front seats has also small rear bench, making car 2+2 seats formula Lets look on Omnis from below You can see vehicle's 2+N synchronized transmission and suspension, which has long travel and soft shock absorbers, ensuring comfort and smooth ride even on off-road. Examples of suspension travel Hope that you enjoyed our little demonstration. LXF file with model - https://www.dropbox.com/s/4vdrwnp95aj45ta/8081 Daytona Omnis R2.lxf?dl=0 Really hoping to see your comments and suggestions on my mod.
 -
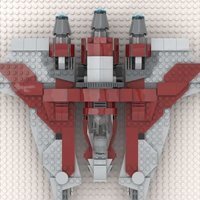
I picked this set up last year, I have tried many ways to modded the wings, this is the latest version which remained unchanged for around 6 months. The biggest problems for this set and the black/orange version is that the wings overlap, I have to fill up the each top engine nacelles with 1 x 3795 Light Bluish Gray Plate 2 x 6 , 1 x 3023 Dark Bluish Gray Plate 1 x 2. Move the existing parts around to rebuild the front wings, swapped the position of the 2 slopes (3298 and 3297). The end result is that each wing is 3 studs thick, when closed the whole wing combined is 4 studs thick. Additional parts required below, I apologise in advance if I missed any, I have tried so many different combinations overtime that I have to refer to the original building instructions to what the wings look like originally. For the nose 1 x 3069b sand blue 1 x 2 tile 1 x 807079 Light Bluish Grey 2 x 4 tile For the wings 2 x 3795 Light Bluish Gray Plate 2 x 6 2 x 3023 Dark Blueish Gray Plate 1 x 2 4 x 3024 Dark Bluish Gray Plate 1 x 1 Cannons 4 x 3713 Light Bluish Gray Technic Bush 75149 Mod by R Y, on Flickr 75149 Nose by R Y, on Flickr 75149 Wings Closed Front by R Y, on Flickr 75149 Wings Close Back by R Y, on Flickr 75149 Wings Open Front by R Y, on Flickr 75149 Wings Open Back by R Y, on Flickr 75149 Back Wing Topside by R Y, on Flickr 75149 Back Wing Underside by R Y, on Flickr 75149 Front Wing Topside by R Y, on Flickr 75149 Front Wing Underside by R Y, on Flickr
-
I really like the new city space line and 60229 is my favorite of the line. But there are two aspects of it that I thought should be improved to live up to the name of the set. The crane needed more range of motion and the truck needed to be longer to actually carry more of the rocket components. I extended the truck by one axle and the length of the bed, so that it can properly carry the shuttle portion and single rocket boosters (they still hang off though). The most serious mod is adding another axis of motion to the overhead crane, built on two baseplates. I used the new rollercoaster tracks for this which worked well. I also built a ramped platform for the truck to bring its bed height closer to the bed of the rocket transporter. Lastly I added a cab and supporting railings and ladder to the crane so that it can actually be operated by someone instead of mysteriously moving on its own. Enjoy and comments are appreciated!
-
Hello Community, I would like to say hello ... I read this site over a year now and before I post something, I should introduce myself ... Well, I am made in Germany, my age is something about 50+ years and I am interested in Lego Star-Wars models. Here are some pictures of my Star-Wars spaceship interpretations (MOD) ... Thank you very much and best regards Miller LEGO Star-Wars Set Fury- Class Interceptor 9500: Link to the picture (^) Link to the picture (^) Link to the picture (^) Link to the picture (^) .
-
Pretty much as soon as pictures of the City Space 2019 sets appeared online, AFOLs were pointing out their conceptual similarities to Classic Space. I have taken that a step further by recolouring one of the 2019 sets, 60224 Satellite Service Mission, making it consistent with the Classic Space sets of the early to mid-1980s. It is not a true retro mod as the parts and building techniques are those of today, not those of 35+ years ago. So it should really be called Neo Classic Space. I replaced the minifigure with one more in keeping with the earlier period. The repositioning of the wingtips, if you're wondering, was not to make the ship more retro. I just think they look better attached underneath than on top. Here is the 2019 set: And here is my mod: I like to think that the satellite to be deployed by the ship will be communicating with the Classic Space mobile station (and ATV) I recreated a few years ago and still in my display collection: I haven't yet decided whether I will retro mod any of the other 2019 City Space sets. If anyone wants to post below their own mod of 60224 or indeed any other of this summer's releases, please do. I would be most interested in seeing what is out there. Questions, comments, classic colour confusion?
-
Here is the Bio-containment Armoured Transport - Mobile, or "B.A.T. Mobile" for short. It is based on set 76112 App-Controlled Batmobile, with aesthetic changes to fit the M:Tron style. Instead of being only black (and sometimes very dark grey), it adopts the lovely M:Tron red-and-black with trans-neon-green colour scheme. I also extended the wheel axles to allow the addition of disks for a more futuristic look. Some of the changes were dictated by the lack of versions in the correct colours of some of the parts, most notably the black Tilted Corners 4X4 W/Angle (design ID 43708) in the front and the trans-red Cockpit 6X6X2 (Design ID 35331). Since this is M:Tron we're talking about, obviously I also had to remove the stud shooters. Other changes were mandated by the parts I had at hand... The bio-containment unit window at the top glows when the vehicle is loaded and ready to roll. I intend to bring it to Skærbæk Fan Weekend this year, for you to see it if you're interested.
-

[MOD] 42088 - Fire Truck and Drilling Rig
KirTech LAB posted a topic in LEGO Technic, Mindstorms, Model Team and Scale Modeling
Hi! Today I’d like to show two small models. I’ve modified 42088 set. 1. Fire Ladder Truck: 2. Drilling Rig is more interesting. We can rotate the drill and also all drilling shaft moves down. If you like it you can download instructions on http://rebrickable.com Also I've filmed short video with English subtitles: Thanks for watching! -
 I picked up this set recently and really like it, it’s pretty iconic and unique! I wasn’t happy with how high up Obiwan’s starfighter was positioned in the ring though, like everyone else I guess, so I’ve made a few simple changes which I hope improve the overall look. I lowered the ‘cross bar’ by about two bricks by first building up to instruction step 179 (leaving out the black pins in step 116 and skipping all the plate building steps 143 to 162) and then in step 180 connecting the upper trans Technic arms so that the 4L axle slotted in two holes lower down than in the instructions, see the pictures. Now the cams at the end of the cross bar still connected to the rim in step 182 but importantly hanging below those two LBG technic axle pin connectors (at 3 and 9 o’clock on the ring, built in steps 101 and 103). Then I added a single layer of bricks to the cross bar and built the plate docking area on top (following steps 143 to 162 missed earlier). I didn’t like those flappy panel pieces so further modified the dock area by taking them off, rearranging the curved slopes and adding a couple of new wedge plates on hinges that fit snugly either side of the fighters wings. For the whole mod I only added 22 new pieces and repositioned a few others; the white 2x10 plate and dark red inverted slopes under the fighter that get reused in the front of the dock, as does the dark red 1x6 tile and the 1x2 white tile (plus two white 1x1 plates) replaces it to support the fighter. Here’s a link to the Stud.io file showing those changes and how the trans-clear Technic pieces fit together, for clarity all the extra pieces are shown built blue and repeated spread out. https://www.dropbox.com/s/l4l4s4f68h1t5dl/MOD 75191 Jedi Starfighter.io?dl=0 And here’s a few more angles, because my description was probably as clear as mud! The mod is a long way from movie-accurate but I think the set definitely looks better with the starfighter closer to the centre of the ring and fitting more snugly in the dock. Getting the fighter to connect below the cross bar will require a big rebuild which I don’t really want to do but I may try to get it positioned further back, like in the film. I may also add more pieces to the docking area to smooth it out but for now this is an easy and cheap mod with a big visual effect. If you’ve got any other suggestions I’d be happy to hear them!