Search the Community
Showing results for tags 'moc'.
Found 5699 results
-

For those that modify sets what's the best/easiest way?
murtaughf3 posted a topic in LEGO Technic, Mindstorms, Model Team and Scale Modeling
I've always loved the technic sets and have been purchasing and stock piling some of the sets, now it's time to build. I'm currently in the process of building 42029, a set I've wanted for a long time. I'm wanting to modify this set, got a few ideas just not exactly sure which direction I'll be going. With that said and being new to building technic. I'm wondering if it would be better to build it and then modify it a little at a time keeping the base model in tact and replacing and modifying accordingly. Or would be it best just to modify from the beginning? For those that modify lots of sets and build lots of mods what do yo think my best course of action would be ? Either direction I decide to go I'll mostly be only changing the color, truck bed, and maybe a few other areas. The vast majority of the frame will remain stock. -
The M4 Sherman, officially Medium Tank, M4, was the most numerous battle tank used by the United States and some of the other Western Allies in World War II. The crew. We salute you!
-
After building and lurking in the various Bionicle communities since day 1 of the theme, I decided to start posting some of the stupid things I build. You can find larger pictures on my Flickr stream. Enjoy! "A deranged old Turaga who devoted his life to herding rams. Occasionally he rambles incoherently about some great escape that almost cost him his arm." "A not-so-bright looking ram with suspicious face paint."
-
Here is a brick-built version of a MOC based on the MKI version of the excellent TIE-Emancipator from GuyDudeMan27. Compared to the original design, I made the following modifications: - The read body has been redesigned to be symmetrical; - Extra details have been added here and there; - Some color swapping depending on available parts in my stock; - Printed parts have been used for the cockpit or parts with stickers for other areas; - Wings supports have been re-enforced for playability & swoshability; - Some structural details were modified for sustainability and resistance to kids. (I know, resistance is futile) TIE-Emancipator by Veynom, on Flickr Front view ... nasty beast. TIE-Emancipator by Veynom, on Flickr A top rear view offering insight on the details. TIE-Emancipator by Veynom, on Flickr Lateral views. Sadly with black on black parts, details are not very visible: TIE-Emancipator by Veynom, on Flickr TIE-Emancipator by Veynom, on Flickr And more pictures... TIE-Emancipator by Veynom, on Flickr TIE-Emancipator by Veynom, on Flickr So special thanks again to GuyDudeMan27 for his design. I really like it and it is a killer once built.
- 7 replies
-
- moc
- TIE-Fighter
-
(and 2 more)
Tagged with:
-
Hi everyone, This is my first post in the in this forum (usually I'm in Historic or Action & Adventure). As a kid, I was a big Bionicle fan, but my interest in the theme subsided over the years. However, when I saw renders the Mask of Creation, I knew I had to pick it up. I bought it loose via B&P several months ago and now I've made a decent display pedestal for it: I think I may have seen similar mask pedestals, but I'm not sure. This design is easy to build and customize, I could easily swap out some parts and fit on a different mask. I'm planning on doing this for the Mask of Control, once I get it. This build consists of only 30 pieces and has a straight-forward construction. Inside, the big black wheels are connected with a 3-long pin in the middle and the hexagonal top part is secured with two 1x1 bricks on connector pegs, one on either side of the central pin hole. Thanks for looking! C&C always appreciated!
-
"Very good! You are now in possession of the Aperture Science Handheld Portal Device." — GLaDOS from Portal. Hope you enjoy, any comments are welcome!
-
Porco Rosso, The Crimson Pig, the bravest of the bounty hunters of the Adriatic Sea. More on Cyclopic Bricks.
- 7 replies
-
- MOC
- Bricks of Character
-
(and 2 more)
Tagged with:
-
Hey Guys,i made a new futuristic Vehicle to fit my Lego City Future Theme. This Time it is a not so ordinary Police Cruiser. The Design was heavily inspired by pretty much every Movie that has flying or hovering Cars. I`m very satisfied with my Build,the Car can be swooshed around easily,is very sturdy and has a nice Weight.All i have to do now is to add a red Hovercar so the Cop inside the Policecar (yes,a Minifig with Police Hat fits easily in there) has something to chase around. As you will see in the Pictures,i also made a good Use of those pesky Super Jumper Thingies.They might be bad for your Minifigures,but they are perfect Stands for a Hovercar.... So,what do you think of my newest Build?
- 6 replies
-
- moc
- futuristic
-
(and 1 more)
Tagged with:
-
As soon as I started modding the Model A Hot Rod that comes with 75875, I knew I couldn't stop there. I decided that I needed to hit all of the different body styles for a Model A (Coupe, Sedan, Roadster, Pick up). This was an interesting challenge because there were some serious part limitations, but some of the best results come from that type of challenge. Here's a link to the black with flames coupe: http://www.eurobrick...howtopic=134717 Other Speed Champions Mods: 2016 cars http://www.eurobrick...opic=122188&hl= 2015 cars http://www.eurobrick...36#entry2154620 As I built them, I experimented with different ways to handle the front bumpers, headlights, engines/exhaust and tail light treatments. Each one also has a different solution for the windshield. So here's the coupe for quick reference: Model A Sedan This one uses a "suicide style" front end treatment that puts the wheels farther out front. It also incorporates the little visor look that Model A's have over the windshield. Model A Roadster I opted to slam this one so the body is almost on the ground instead of the "hot rod rake" stance of the others. It also is intended to look like a Buick Nailhead V8 with a roots supercharger. Model A Pick Up The main thing for this one was to get away from basic primary colors and go for something that looked more vintage. To spice it up I went for Hemi gold accents on the engine and a wood plank bed. The air cleaner is made from a wheel and I used extra white border from the sticker sheet of 75875 to mimic an air filter element. Lastly, some shots of the Hot Rod garage.
- 8 replies
-
- Speed Champions
- MOC
-
(and 1 more)
Tagged with:
-
Here's my latest creation, something I've always wanted to do since I was... 8 years old? I'm getting it ready right for Brickworld 2016. With 18 stories, measuring over 6 feet tall and more than 9,000 bricks, this is by far my largest creation. Since it's an absolute hassle to move around, the interior shots will come in later (though you might have seen a few already in my WIP thread). But for now, enjoy the exterior shots. Stay tuned for the interior shots! And this won't be the last skyscraper in the Wasabi District; I'm already planning a second tower adjacent to the One Azure!
-
Once again, I just couldn't be more pleased with this year's Speed Champion sets. As some of you will recall, I've been widening the standard Speed Champion cars to be 8 studs wide. I just prefer the aesthetic, and now my drivers aren't centered in what is supposed to be a 2 or 4 seat car. 2016 cars http://www.eurobrick...opic=122188&hl= 2015 cars http://www.eurobrick...36#entry2154620 The Model A was a special case because while it surely wasn't the scale that would necessitate 8-stud width, I didn't think it needed to be 6 studs either, so I went with 5, which keeps it a small old hot rod size, but is still more to scale than the tiny 4-stud configuration that comes with the set. In addition to the change in width, I've done a lot of detail work, from the engine to the back of the car. I didn't change much on the Raptor but did add to the garage pit area. This was so much fun I immediately began building more hot rods in this style and scale. Edit: Here's a link to the other hot rods. http://www.eurobricks.com/forum/index.php?showtopic=134719 Enjoy! For comparison, here is the stock version:
-
- Speed Champions
- Hot Rod
-
(and 2 more)
Tagged with:
-
For this build I wanted to combine the classical Ralph McQuarrie desgin with some dieselpunk aesthetics from the 1930s and 40s, giving it an elegantly curved and streamlined look. Just think of the wind-tunnel designed cars and trains – and of course airplanes – of that era. It was also pretty clear to me from the beginning that the only possible colour this fighter can have is red. It just works so well with emphasizing its lines and gives the whole build a vibrant dynamic I wouldn’t have gotten in – say white or grey really. Oh, and my affinity for the biplanes of the great war played quite a role too. So see it as the Red Baron in space basically! I see the landing gear as provisional, so it can be easier put on display (and to make it easier to find a place to land^^) I really want to make it more elegant, while not sacrificing its stability. Sadly there isn't really much space where it is - but I'm sure there will be a decent solution coming up Anyway, apart from that I am very happy with it. It is stury and very swooshable and is a nice display piece For more pictures and musings about its design and stuff feel free to visit my blog!
-
The first build for a new faction! Full size on Flickr Struggled finding a decent angle to shoot this moc, couldn't quite capture the overall shape of the model in a single photo. Oh well, this will have to do for now...
-

RANCHER 4x4 or "how to modify the set LEGO 10248 Ferrari F40?"
filsawgood posted a topic in LEGO Technic, Mindstorms, Model Team and Scale Modeling
Hi guys! Today I am pleased to present new MOC - RANCHER 4x4. The basis of this model was a completely new chassis, the creation of which took me almost two months. The model is based on the support frame mounted with its two L motors, and a small battery pack. To fasten the frame of continuous two gantry axles - which significantly increases the reliability of the transmission. Servo motor is mounted directly on the front axle. As I chose the stake so beloved by all, but it is quite rare on the Tumbler wheel - 81,6x44 mm. I think this is one of the best wheels from LEGO, along with 94,3x38 from the Unimog. And I'll show you how to use it to modify the set LEGO 10248 Ferrari F40 :) Specifications and features: Four-wheel drive, portal axles uncut; Tires 81,6x44 (Tumbler) 2L motors - the drive motor; Servo motor - steering; 3xLED - lights; Small battery pack; Modular design - a body attached to the chassis by 4 points; Opened doors, hood and door body -
Micro Eastern Palace The difficult part of this creation was getting the thin columns between the windows and the larger column. I had to turn some panel pieces on their side and create some interesting internals to get the pieces to stay together. To me this build isn't the most exciting but I did have to use some crazy building techniques to get the different setup. Comments on the technique?
-
Hey Guys, i recently finished the new "Rescue from Ra`s Al Ghul" Set. I really like the Minifigs and the Building,but i don`t really like the Batmobile in this Set. So i thought about "hey,why not designing your own Offroad Batmobile?" And a few Minutes later in LDD,the new Offroad Batmobile was born.Kinda looks like a Tank or an APC.I was inspired by the Hydra Tank from "Hydra Fortress Smash" but made the Vehicle smaller.The Design is very sleek but the Car still looks sturdy enough to burst through ancient Walls or Concrete. I reused the Stud Shooters from the Original Vehicle. So,what do you think of it?
-
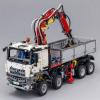
42043-D Mercedes Benz Unimog U4000
madsen1997 posted a topic in LEGO Technic, Mindstorms, Model Team and Scale Modeling
So this will be my second topic on eb beside my 42043-C Zetros topic. This time it will be a D-model for 42043 Arcos set, and like the C.model I will continue the Mercedes Benz theme. The D-model will be an Unimog U4000 only build with parts from the 42043 set. facts: Mercedes Benz Unimog U4000 (4x4) 4 Inline engine Lenght: 5410 mm wide: 2336 mm Height: 2612 mm tyre size: 335/80 R 20 so if the model should be in a perfect scale of the IRL unimog, it would be a 1:16 build acording to the 62.4/20S lego tyres, because those are the one we have in the 42043 set. that means the 42043-D Unimog U4000 will be Lenght: 34 Studs (+-) Wide: 19 Studs (+-) Height: 20 Studs (+-) Pictures of my "don't think or calculate, just build" progress below Update will come....- 62 replies
-
- moc
- Pneumatic V2
-
(and 5 more)
Tagged with:
-
FN-2187 working on his maintenance-duties before the events of EP VII took place :) Finn working maintenance - before EP VII (2) by Andreas Lenander, on Flickr Finn working maintenance - before EP VII (3) by Andreas Lenander, on Flickr Finn working maintenance - before EP VII (4) by Andreas Lenander, on Flickr Finn working maintenance - before EP VII (5) by Andreas Lenander, on Flickr Finn working maintenance - before EP VII (1) by Andreas Lenander, on Flickr
-
Who does not know Leonardo da Vinci? Probably the greatest genius of all time. Passionate about everything from astrology to painting, writing to weapons, invented and built the most diverse machines. He was responsible for the most incredible inventions and genius of history. I present these are the summary of the passions that characterized Leonardo: the technological innovations in the military and civilian spheres The Hammer, the Tank and the Ornithopter The hammer was created as an aid to the blacksmiths of the time, thanks to a rotating mechanism, he was able to deliver powerful blows with the hammer that rose and fell on the workpiece The tank is on top of my preferences regarding Leonardo's machines... together the helicopter ... Pushed (manually) from 4 independent wheels positioned inside that allowed to rotate on its axis, was equipped with cannons on 360 °, was equipped also have an observation tower and accessible by stairs. As regards the model the wheels are functioning and are equipped with handles for easy rotation. Protection is totally removable to find out what is hidden inside. In the Ornithoper model you can move the wings up and down as you want. Here you can find the complete album: https://flic.kr/s/aHskAzngrZ
-
Hi All, Here is my latest build based on the final battle scene from Age of Ultron. I tried to put a lot of detail into the different battles taking place throughout this build to keep it interesting (including Spiderman inside the building waiting for the next movie). I've also made it a bit more colourful than the movie since most of the buildings in the movie scene were grey and dull. Thanks. Overall Park Road Ruins Section Some of the superhero close-ups
-
A "fancier" steampunk-version of Reys speeder. Hope you enjoy it! Steampunk Rey's speeder (6) by Andreas Lenander, on Flickr Steampunk Rey's speeder (5) by Andreas Lenander, on Flickr Steampunk Rey's speeder (4) by Andreas Lenander, on Flickr Steampunk Rey's speeder (3) by Andreas Lenander, on Flickr Steampunk Rey's speeder (2) by Andreas Lenander, on Flickr Steampunk Rey's speeder (1) by Andreas Lenander, on Flickr
-
Okay Gang,meet the Fleet: The Ronnel Goblin was a small Vehicle that was very popular in the 50s and 60s.Mostly by People in rural Areas but also in Cities when People didn`t have the Money for a "real" Car.Well,the Goblin really tried to be a real Car with a Cabin With of other Compact Cars at the Time but it just can`t hide it`s Origins.Ronnel was a Manufacturer for Mopeds and small Motorbikes which had it`s only Factory in an Industrial Area in Lego City. The Engine was a quirky little two-stroker with roughly 25 HP.Sounds not like much but the Goblin was very light,thanks to the used Materials like Aluminium,Plastic and Wood. The Goblin could be ordered with various Configurations and Attachments. The Threewheeled Base and the high Center of Gravity made the Car a bit unpredictable at high Speeds and in Curves. The End of the 60s also Set the End for the Goblin.New Safety Laws and plummeting Sales were the last Nail in the Coffin for this Car. Well,today you can still see them here and there and a large Fan Community still moves those little Threewheelers. More Variants are in planning.Any more Ideas?
-
Just a quick entry for a contest over on MOCpages.
- 6 replies
-
- Robin Hood
- Little John
-
(and 2 more)
Tagged with:
-
My little red caboose or cabin car in Pennsylvania Railroad terminology. Bobbers were simple wooden frame cabooses built in the 19th century. PRR made theirs with steel frames. That permitted their bobbers to be used in pushed service without being crushed. Their choice to use steel allowed their boobers to last well into the 20th century. PRR Bobber Caboose by dr_spock_888, on Flickr They were called bobbers because 2 axles gave a bobbing ride. I guess the modern ride equivalent would be of the U.K.'s Pacer railcars. Bobbers have a child's toyish feel to them. Maybe because many little children toy caboose designs are based off them.

