Search the Community
Showing results for tags 'suspension'.
Found 156 results
-

Volkswagen Beetle (Type 1)
Sheepo posted a topic in LEGO Technic, Mindstorms, Model Team and Scale Modeling
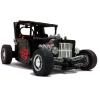
Here is my lastest car. The classic Volkswagen Beetle, officialy called Type 1, or informally in some places around the world the VW Bug. This car received a lot of modifcations and improvements along the years, I have built the 1967 model. This car is made in scale 1:7.8. The total size is: 65 studs of length, only 25 wide and 23 of high (50x20x18 cm) The weight is 2.5 kgs, with around 3000 parts and 5 motors. As always it includes some remote controlled functions: - Steering (M motor) - Drive (2 XL motors) - Sequential gearbox (PF Servo motor) - Brakes (M motor) The sequential gearbox is a modified version of the Mustang's gearbox (3rd Gen V2), with 4+N+R speeds and as always with auto-clutch. The speeds ratio: R - 1.25:1 1 - 1.25:1 2 - 1:1 3 - 1:1.33 4 - 1:1.67 The max speed in 4th speed is 4 kph (~2.5 mph) It has a gear indicator in the interior, between the front seats. Boxer-4 fake engine under the rear bonnet. The bodywork Also you can disassembly the bodywork removing only 5 pins, do it is very easy and fast. A complete bodywork with openable doors, front trunk bonnet and and rear engine door. Also the doors have lock, you need turn the door handle to open it. It has 4 full size seats and folding front seats. The suspension is based in the real one: front rigid beam independent suspension axle and rear swing axle. Also the front axle has stabilizer bar. The steering has ackerman geometry and working steering wheel. The car also has working brakes in all wheels: disc brakes in the fron and drum brakes in the rear. In addition it includes functional brake pedal. Now the "most wanted" picture for technic fans. Like the Mustang the instructions will be available coming soon Finally as always a little video: As always for more info visit my website: sheepo.es -

Trailer Tr2 MkII with instructions (Trailer T2 revised)
2LegoOrNot2Lego... posted a topic in LEGO Technic, Mindstorms, Model Team and Scale Modeling
As mentioned with the release of US Truck MkII instructions for a trailer to go with this truck would be available. I am happy and proud to present them to you. Here is my latest creation: Trailer Tr2 MkII (with instructions). What was true for the revised version of the truck might even be more true for this trailer. Believe me when I say this revised version and the original design are poles apart. In the looks it may not even be changed that much, but don't be fooled by its appearance! This all together brings forth Trailer Tr2 MkII and I am happy with both achievements: The revised trailer itself and the instructions for anyone else to build this trailer. Check mocplans for the instructions and rebrickable for the parts list! Cheers, Ingmar Spijkhoven LEGO® model Trailer Tr2 MkII with LEGO® Power Functions® which is a rebuild and revised version of Trailer 2 I finished back in 2009. Like with all my models this is build in scale 1:17,5, which makes them to be combined!!! This specific model comes with building instructions available at mocplans.com plus the inventory list available at rebrickable.com. This model features: full solid axle suspension, LEGO® Power Functions® remotely controlled landing gear and parking brake and three sets of Power Functions® lights. As with the rebuild of US Truck T2 this writing starts with a little history on how this trailer came in to existence. Because of so many improvements and changes this trailer evolved into Trailer Tr2 MkII and suites absolutely excellent with US Truck T2 MkII. After finishing US Truck T2 back in 2009 I started working on a trailer to go with it. I have always been intrigued by those big American trucks out in the open with all kind of loads on those very easy to use flatbed and drop deck trailers. One other very important concern to me is the playability of the truck and trailer combination so less weight would increase this. From day one of building truck and trailer models I always go for implementing as many realistic features as possible. So this build features full solid axle suspension, LEGO® Power Functions® remotely controlled landing gear and parking brake and finally three sets of PF lights. After finishing the build of the semi-truck or tractor the build of the semi-trailer that goes with it could be launched. Like I do with all builds, first a couple of design decisions had to be made: A) Like with US Truck T2 (and MkII) I choose not to build this trailer after a specific brand or type. What I knew is that it had to be a typical US style trailer. Because of the way I was building back those days I had to give this trailer a drop in the deck. B) Since the scale was set because of the build of US Truck T2 the scale was not an issue. What was an issue is what wheels to use. Even though most trailers used in the Netherlands (Europe) have so called super singles, I prefer to use the same tires as with the truck itself. C) Setting these parameters was a nice start, but more quests had to be conquered. For example what color scheme would work best for this model especially because it had to fit US Truck T2's color scheme. The color of the frame would undoubtedly be Red. Bringing back the Blue would be obvious too. D) One detail that really caught my eye is the alternating Red and White retroreflective strips. Its role is evident and it really breaks the color and the looks of the trailer in a very positive way. E) The final call would be what to use as deck, the floor itself. Most straightforward would be the use of plates in any suitable size. I ended up using modified plates 8 x 8 with grille and hole in center. Describing US Truck T2 MkII did unfold why it was rebuild, allow me to do the same for this trailer rebuild: Since the build of the original version of this trailer my building skills develop and so did many solutions used. Likewise the truck this trailer model could be so much better if I would have build it these days. So I did! Rebuilding this MOC made me decide to name this updated version Trailer Tr2 MkII (it is based on Trailer T2, but revised in so many ways). The process of creating instructions for this trailer as well essentially forced me to rebuild it in total. Not just implementing some improvements. No, there is not much left of the original design. Besides all this the perspective has changed totally because I wanted to create instructions for this build too. So in the looks it may not even be changed that much, but believe me when I say this revised version and the original design are poles apart. My first attempt back in 2009 was to build a flatbed, so a trailer with a one level deck without a drop in it. Because of a lot of decisions I made while building the truck itself with its frame, suspension and fifth wheel, the fifth wheel ended up quite high. To give the flatbed good looks too, it should not be to high on its wheels. It would have been if I would have build it with a leveled deck. So I had to change my mind from building a flatbed to this drop deck. All of this mainly because of limitations I experienced back in 2008/2009 because of my lack of knowledge. I had to learn how to build with LEGO® all over again because of so many great new parts. Even though I am able to build a flatbed these days I sticked with the original drop deck. Since there is quite a lot of it I wanted the floor of the deck to be nice to look at. Functionality is important to me simultaneously as you might know right now, so that counts too. The overall width of the trailer is 18 studs, minus two tiles one on both sides leaves me 16 studs for the floor itself. Divid this by two makes eight studs on each side which gave me a range of opportunities. Quickly it was narrowed down to only two: The most obvious would have been to use plates with a length of 8 and a width of any needed size. Not bad to start with, but not really appealing to me so I continued the search. I ended up with the use of modified plates 8 x 8 "with grille and hole in center". These are available in very nice colors, it has great looks, light in weight and not that expensive. These plates suites the job just perfect, the studs make them what I call "sticky" this to prevent the load from sliding and it could further more be used to attach loads. The trailer's total length and both main and upper deck had to be adjusted to the use of these 8 x 8 plates. Still can't figure why, let me tell you: For the truck I came up with a very nice and realistic functional suspension system. Which I still use in all current projects and I will use in future ones. For some reason I had to use a rather simple suspension system for the trailer. Not that it wasn't sufficient, no it was, but not realistic for this type of trailer. The system itself is not as impressive as how it is referred to: longitudinal pendular axles! In the real world, I mean in the situation it is not a model, this type of suspension would cause a lot of damage. Damage to both trailer and load this because not enough stress is absorbed going over bumps or other obstacles. This rebuild trailer utilizes the same suspension as US Truck T2 MkII it uses LEGO® rubber belts and LEGO® rubber axle connectors. It occurred to me that it would be amazing to make this trailer what I call stand alone. With this I mean that it has a power source of its own. This results into the need of giving it a battery box. Please realize back in 2009 the much smaller battery box that holds 6 AAA batteries was not available. Both beams of the trailer's frame consist of two rows of Technic Bricks stacked with two layers of plates. The main reason to build it this strong was to avoid the trailer to bend under its own weight or load. Because of this approach it was very easy to hide all mechanical stuff and LEGO® Power Functions® in between both beams. Hiding the Battery Box on the other hand seemed almost impossible. So here is what I did: I knew that the part of the trailer from the kingpin to where the wheels are attached to needs to be sturdy, it transports stress caused by the weight of the trailer itself and its load to both king pin and rear axles. The tail part of the trailer could be weaker so I decided to lower the beams at this part. This allowed me to hide the Battery Box and by accident because of its location it could easily hold the rear impact guard. The super singles I referred to are a little larger which would force me to use the wheels as in the Black Cat LEGO® set 5571. These I don't have before all else and I don't want to invest in as well because of the excessive price. Further more I really love the impressiveness of how a semi-truck and semi-trailer combination might be referred to in the United States: An eighteen-wheeler. So four super singles is not an option at all, four dualies had to be mounted! Some following trailers I build after I finished the first version of this trailer in 2009 had smaller wheels mounted. The largest advantage of the use of these smaller wheels is that it reduces the trailer's total weight and frictions. All of this makes it easier to be towed by the tractor and therefore the playability is expanded. As suggested before the alternating Red and White retroreflective strips had to be on my model as well, but without the use of stickers or decals. It just had to be replicated by adding Red and White 1 x 2 plates, but without compromising the trailer's strength. In between every set of Red and White plates a Blue plate 1 x 2 "with handle on side" is located. Real live drop deck trailers are usually equipped with fixed or sliding winches to secure loads. These are used to tie down the load so that it won't move during transport. So there the Blue plate 1 x 2 "with handle on side" became very handy. These are used to tie down the load with the use of LEGO® Chains 5L or 21L or any kind of rubber band. In my judgement a model comes to live by adding details. The more the better, but don't over do this, it will finally work against it. Finally I installed running lights which are on both sides of this trailer. The purpose of course is to increase the trailer's visibility and its looks. The landing gear it self was not that hard to came up with and I started with a manual operated version. It didn't take that much to decide to make it remote controlled. The beams on the trailer do have this space in between of four studs, so hiding the M motor and the IR Receiver are not that hard. Even though the IR Receiver does have two connectors I forced my self to combine both parking break and landing gear. The first version of this trailer had a landing gear that swings up and down. Nice concept, but not flexible when it comes to connecting to trucks with different fifth wheel heights. The trailers front end can be raised or lowered to make it connect to the fifth wheel. Developing the truck's fifth wheel I used a 3L axle with stud as kingpin. The kingpin does not only keep the trailer attached to the truck horizontally, but vertically as well. This means going over a bump should not make the driver loosing the trailer. From the very beginning of building truck and trailer models I planned on being able to combine any truck and trailer I build. With my first approach of the landing gear as described in this topic it was harder. It had to be achieved by making sure that all trailers king pin, landing gear and suspension are all on the same height. As well as making sure the fifth wheel is at the same height. Now the trailer can just be aligned with the truck easily. To give you an idea of how the instructions for this model will look like here is a preview. Creating these instructions both quick progress on your build and being easy to understand were the main goals. Early in the building process you will see what it is that you are building. You will be very excited from the moment you start the build of Trailer Tr2 MkII till you finish it with a total number of parts of about 1100 pieces. To achieve this a lot of floating items are used, with added arrows to show where these items are suppose to be. Together with a lot of so called call outs (the smaller windows within a step that shows the assembling of a smaller sub part of the build) together with multi part steps (not only one part at a time) the build will be in a flow. Check mocplans for the instructions and rebrickable for the parts list! -
US style spread or split axle flatbed Trailer Tr10 with instructions
2LegoOrNot2Lego... posted a topic in LEGO Technic, Mindstorms, Model Team and Scale Modeling
I have been releasing a couple of rebuild in the last couple of months. This has been very satisfying also because of the building instructions I released with them. So many enthusiastic people all around the glove are building my MOCs. Never the less, here is a completely new build: Model "Trailer Tr10" is build with LEGO® in scale 1:17,5 and motorized using LEGO® Power Functions. It is not build after a specific brand or type of trailer. This build represents the well known typical US style spread or split axle flatbed trailer. Another custom design that comes with building instructions and inventory/parts list! Never did I hide my preference for flatbed and log trailers. Basically because this adds the most playability to a build. Once I build this refer and even though it was much fun building, there was no fun running around with it. The weight of this model exceeds the limits of what my semi-trucks are designed to haul. So that I why I build another flatbed, this time without a drop in its deck. Again does this build feature full solid axle suspension on both axles, three sets of lights, kingpin, remotely controlled landing gear and parking break and many details, but it also features toolboxes and a remotely controlled liftable rear axle. Even though it is not very common for this type of trailer to have a liftable rear axle I implemented it anyways. Mainly because of two reasons: A) One channel of the PF IR Receiver is used to operate the landing gear which engage/disengage the parking brake simultaneously. One channel was left to be used. Obviously the second one is used to raise and lower the liftable rear axle. B) The more tires means more rubber equals more friction. To reduce the drawback of it when it comes to playability the most rear axle is liftable. What basically happens is this mechanism forces the suspension to bottom out. Where normally weight would engage the suspension to act now there is this lever that does the work. For this reason this axle is sprung soft, but the the first axle is sprung hard. With the second axle lifted the first axles has to be stiff enough to bare the trailers empty weight. The axle setup of a spread axle trailer is not just randomly picked. It really has a purpose and it all is related to weight. Commonly this axle configuration is mostly found on flatbeds, car haulers and refrigerated trailers. As described this is a typical US style trailer. Cheers, Ingmar Spijkhoven -
[MOC] Off-road racer
sm 01 posted a topic in LEGO Technic, Mindstorms, Model Team and Scale Modeling
Hello everyone, I’ve just bought RC motor and I wanted to make a relatively simple and fun to drive off-road vehicle. Here is my first off-road MOC: Video of driving outdoors with basic info: Short review and indoor action (jumps and drift): Basically, I tried to make it as light as possible – it weighs 502g. It is 35 studs long, 19 studs wide and 16 studs high. Drive: 1 RC motor (outer output) directly connected to the rear wheels - RWD only. Relatively long travel suspension (front independent, rear dragged axle), and decent ground clearance. 8878 battery is in the middle, set lowest possible, for better weight distribution. Also there are few details in the interior. The IR receiver is hidden between battery and the servo (to save space, it partly goes under the servo motor). Servo motor for steering (with 4 round plates at each side also acts as a fake V8 engine under the hood). Doors and hood can be open, they come with safety locks to prevent unwanted opening - very often on rough terrain For sense of scale, here it is next to my 9398 Crawler: At the end, I really need to share my impressions about RC motor. It is really impressive, especially after I got used to the characteristics of the PF motors and tried almost every combination (PF motors&batteries) to achive better performance Of course, I knew it is fast, but nevertheless, you should've seen huge smile on my face on the first test drive. I wish I could turn back time and buy it earlier! More photos can be found at: MOCpages - http://www.mocpages.com/moc.php/397115 Flickr - https://www.flickr.c...57647629179022/ All in all, this turned out to be very fun to play MOC, hope you'll like it… -

Mini portal axle (R)evolution and more...
Zerobricks posted a topic in LEGO Technic, Mindstorms, Model Team and Scale Modeling
Few years ago I made the first big scale portal axles... Now its time to do same at small scale! Here's the result: The axle has a 1:2 portal gear ratio and uses the CV joints for steering. Steering is done via 7 stud long steering rack. Its meant for lighter smaller scale models, like the ones Madoca77 is famous for. I also made some variations of the axle and to top it off I also added the mini 8x8 tatra chassis. You can download the LDD file here: http://www.brickshelf.com/gallery/zblj/Ideas/MiniAxles/mini_drive_axles.lxf Some video footage: So what model should I make with these? Please vote! Thanks! -

[HELP] Large scale suspension
z3_2drive posted a topic in LEGO Technic, Mindstorms, Model Team and Scale Modeling
Hello, I have been busy this summer and haven't done much building, and the offroad project on my desk will most likely be taken apart because of some doubts of the eventual performance. After spending some time in Silicon valley with NSLC, I noticed the many Tesla vehicles in the area, and was inspired to make another road-going vehicle. This time I want to focus on making a proper suspension setup based on either the Tesla Roadster or Model S, as well as a slightly different drivetrain in order to make room for the rear axle setup. The reason I made this topic is to get some useful info about parts I could use in order to recreate these setups as realistically as possible while still retaining strength, as I hope to use them in an RC MOC capable of 19+ kmh. Here are the photos: Lotus/Tesla Roadster front suspension: Model S front suspension: It doesn't have to look exactly the same, but rather perform the same functions. As for scale, the shock absorber I plan to use is this one: -
[MINI] Supercar
Tamas Juhasz posted a topic in LEGO Technic, Mindstorms, Model Team and Scale Modeling
Hi all! This is my first idea/entry for the mini contest. It's a supercar with the color variation of classic technic sets. First I make it in LDD to see the parts count, now it's exactly 200. Two 1x4 red plate is missing from the LDD model, they connect the 11 and 15 L liftarms. They will also give the rigidity of the body. I tried to put in all of the regular supercar functions: - independent suspension (front&rear) - steering with working steering wheel - two speed gearbox - rear wheel drive - V6 fake engine There are some more little features. The front suspension's bottom swingarm is longer than the upper one, this means more reality in the front axle. The gearbox is linear, the two dkblgray pulleys are responsible for extension in the drive line. They look like clutch plates in real cars. The suspension works with original Lego rubber bands. It's nearly finished, but maybe some improvements (like instrument panel decal) will be done in the next weeks: More pictures, video, part list is coming soon. -

(MOC) Toyota Hilux 4x4
unimog123 posted a topic in LEGO Technic, Mindstorms, Model Team and Scale Modeling
Hi Eurobrick members, I would like to show you my latest MOC, a Toyota Hilux off road pickup: Uses 2 L motors, Servo, and Lipo battery and V2 receiver. The body can be taken, but not very easily: More info and pics at my website below. Also a video will be coming as soon as possible. -
Dodge Challenger 1970 RC
tibivi posted a topic in LEGO Technic, Mindstorms, Model Team and Scale Modeling
Hello, Last summer, I build some MOC's that I haven't posted here yet, due to school. Well, here is one of them: The dodge challenger 1970! http://farm6.staticf...83caab960_z.jpg This scale model of the Dodge has following features: Remote controlled independent suspended Lights (2 pairs in front, 1 in the back) with switch hidden under the rear Rc motor for drive medium motor and hockey spring for RTC steering All pics can be found in my flickr set: http://www.flickr.com/photos/tibivi/sets/72157637671354815/with/11066720816/ Hope you like it! Best regards, Tibivi -
 I was trying to figure out if this part could be used with or , or if the ball is too close to the tile for there to be much (if any) movement possible. LDraw suggests that it doesn't work well, but CAD can be misleading. Could someone who has that part try it? Thank you!
 -
So here it is, my Baja Truck: It's good for indoor and outdoor use, and was built in about a day or so. Uses an L motor, Servo motor, Rechargeable battery box, and V2 receiver. More info and pics at my website. http://legotechnicunimog123.files.wordpress.com/2014/04/img_5869.jpg
-
(wIP) Jeep Wrangler 4x4
unimog123 posted a topic in LEGO Technic, Mindstorms, Model Team and Scale Modeling
Theres been a lot of activity lately on this forum so I decided to share my latest build: A Jeep Wrangler 4x4- in a rock crawler kind of configuration. Here's what I have at the moment: I used a similar idea to what efferman had on his Mercedes G, by using the L motor as the supporting linkage to the chassis directly. And that means NO UNIVERSAL JOINTS leading to the axle itself, only for the front axle steering pivots do you need them, which if you ask me is the biggest restraint on rock crawlers made of lego as well tires. Now I've test driven this all over the place today and it crawls amazingly with a gear ratio of only 12/20 with no diffs and 2 L motors. The problem is that the front axle is too weak, the drivetrain is perfect, but the axle itself is not strong enough to keep the steering rack and axle/hubs from being pushed apart by the Servo. The U-joint and CV joint are also positioned a certain distance apart and this distance is not an ideal length for an axle to connect the two joints which causes me to lose steering after sometime. This is what happens- the 2L red axles are the only mounting point so once that looses connection the top part of the axle rotates over on itself including the steering rack. And even after all that I've had the wheel and hub come off on me twice so far while driving. Despite all these annoying problems it crawls exceptionally well and does not have to be geared down several times so it drives on flat ground at about walking speed. The body will be mounted pretty low, so the top of the hood will be right above the shocks to keep a low-ish center of gravity. If you have any solutions to these problems they would be appreciated, thanks. Just realized after posting that the WIP is wIP, Jim if you read this could you change it to (WIP) when you get the chance? -
Four years ago, in this galaxy (as opposed to that one far, far, away ), I made a model in LEGO Digital Designer called the MX-2 Rover. Shortly thereafter, I ordered the pieces to build it via LEGO's ill-fated Design byME program. This year, the realization hit me (like an asteroid crashing into an uninhabited planet ) that the steering mechanism was too weakly mounted to the chassis. So, I made several attempts to rebuild the chassis, eventually starting the entire model over from scratch in LDD. Even the shuttle on the back got a revamp. When I felt my design was satisfactory, I took apart the old rover, ordered the additional pieces I needed from Pick A Brick and BrickLink, and built them into... MX-2 Rover - eXtreme eXpedition Edition Now there is suspension on all six wheels and a folding communications dish that is independent from the steering mechanism (on the old model, it was connected to the steering). I also added glow-in-the-dark headlights in the front. Click (or tap, if you're using a touchscreen-enabled device) any picture to see a larger one. Headlights aglow! That gear on the back controls the steering. Here you can see the suspension in action. In addition, the communications dish has been unfolded, rotated, and aimed skyward. The shuttle has been detached from the rover and is "flying" on clear bricks. Browse the Brickshelf gallery, or download the LDD file. This model was designed by Toa Of Justice.
-
Hi everyone, today I am going to present to you my most recent MOC, it's an inverted trike with an old design, and motorized with RC and servo-motor. I built it to improve the way how a small RC takes curves at high speed and accelerates. So it has two wheels on the front, with drive and steering and a single wheel on the back. It also has full independant suspension. I'll make a video soon, just need to find the time :)
-
[WIP] Kamaz 4326 4x4
unimog123 posted a topic in LEGO Technic, Mindstorms, Model Team and Scale Modeling
Hey everyone, I've been working on this trial truck for 2 and 1/2 weeks now, and I am nearing completion. At first I wasn't going to make a WIP topic, but I need some advice for the cab design. So this is what I've been modeling mine after. My problem is the V8 engine, because the engine is too far back I had to make the cab longer as well. This totally throws off the proportions and makes the wheels look to small and the chassis too short. I also thought I would be able to make the cab in the new green and I have enough of the panels, but not enough liftarms. So I am open to color scheme suggestions. Just to let you know though, I could probably do it in Black, Red, Yellow, and possibly White with Blue. Here's what I have so far: As you can see I also have to accommodate for a tilting cab. It has full live axle suspension and an XL motor for drive and a Servo motor for steering. -
MAN TGA Racing Truck
unimog123 posted a topic in LEGO Technic, Mindstorms, Model Team and Scale Modeling
Hey guys, its been a few weeks since my last MOC and now I'm back with a MAN TGA racing truck. To start let me just say that this MOC is most likely replacing my idea for a large Scania flatbed truck. So the idea is to make a large racing truck and make it go as fast as possible with Lego Power Function motors, in this case 4 L motors and a Servo motor. I do want to give this truck some advanced geometries for the best handling as well, possibly caster angle and kingpin inclination. I will also be giving it all around independent suspension. Here is what I am modeling: I am actually basing mine off of the truck in the back, the photo that I originally used was to big. Here is a summary of the intended specifications: Propulsion: Rear wheel drive 4 L motors which will also drive a piston engine (# of cylinders is undecided) Steering: 1 Servo (possibly connected to steering wheel) Suspension: Independent with caster and kingpin inclination (hopefully) Rear Spoiler: Might be operated by a small pneumatic cylinder to tilt it Power Source: 2 Rechargeable battery boxes Lights: 2 or 3 pairs of LED's Here is the rear axle so far: At the moment the hubs are not secured yet because the part of the chassis to which I will secure it has not been made yet. It also has limited suspension movement, just like in the real trucks. And in the background you can see the tires I will be using. Altogether I hope to finish this beast by the middle of March, since I will need to order some parts (particularly in blue). Edit: By accident I forgot to say this is a WORK IN PROGRESS topic, so if a moderator could change it to (WIP) MAN TGA Racing Truck that would be great, thanks. -
Hi everybody, Here is my light remote controlled buggy motor powered trophy truck:) More photos and description in my blog. Http://Brickgarage.blogspot.com English translation of description by google here: http://translate.google.com/translate?hl=ru&sl=auto&tl=en&u=http%3A%2F%2Fbrickgarage.blogspot.ru%2F2013%2F06%2Fsunset.html
-
 IMHO the suspension of 8448 is too soft. so my idea is to replace the original shock absorbers with the hard springs of 8458 silver champion (the yellow ones). before i dismantle the affected components ow my question: has anybody tried this? Does it improve the suspension of 8448? Thanks a lot in advance!
 -

[MOC] Mercedes-Benz W108
jtlan posted a topic in LEGO Technic, Mindstorms, Model Team and Scale Modeling
Hello everyone! First-time poster here. Here's a model I built of a Mercedes-Benz W108. I built this with the goal of putting as much mechanical functionality in as small a space as possible. The resulting model is 14 studs wide (not counting rear-view mirror) and features: 4-wheel independent suspension Moving inline-6 engine connected to the rear wheels Hand-of-god steering which also turns the steering wheel inside The scale is roughly 1:15. It's kind of chunky partly because I was going for an "old-style" technic feel, and also because the actual W108 is rather boxy. As on the actual vehicle, the front wheels feature double wishbone suspension and the rear wheels use swing arms. Because the model is so narrow the differential isn't located between the rear wheels, but rather connects to them through a pair of shafts: You'll notice that the universal joints don't seem to correspond to any hinged parts; they're there to accommodate misalignment between Technic beams! There are a few locations in this model which feature sub-millimeter precision; if people are interested I can write a post later about alignment and why it's bad to pass an axle through more than a pair of beams. Speaking of sub-millimeter precision, the front steering depends on the fact that a lift arm is slightly narrower than a stud. Here's a view into the steering mechanism with the engine removed: The dark grey and black lift arms in the center of the image form a parallelogram linkage, so the dark grey steering links get actuated in sync. You can also see where I put the differential... Speaking of the engine, here it is: It's based off the excellent "fake engine" by laixEngineering. I highly recommend this engine for smaller models; not only is it better scaled than the massive engines built with the actual piston parts, it also makes a pleasant diesel rumbling sound when spun. Due to the relatively small size of the model I didn't have room to model some features, such as a gear shift or the rear seats. It's actually possible to motorize this model, although the steering/drive motors take up all of the interior space and the battery box looks rather silly sticking out of the trunk... Full gallery here. Thanks for stopping to take a look! I'm happy to answer any questions about the construction, precision alignment, etc. -

Damped Shocks, suspensions and suspended weight
aol000xw posted a topic in LEGO Technic, Mindstorms, Model Team and Scale Modeling
Hello I was watching Jm1971' s http://www.flickr.co...N08/9644835806/ from the Rock Crawler course thread and I noticed that albeit the crawler can adapt it's geometry to terrain the suspension does not seem to work at all. I got the feeling that Lego models seldom achieve right suspended weight/shock hardness balance, 8110 and 9398 feel more like tumbler dolls on wheels than proper suspension designs. A model shouldn't have full extended shocks when static right? Also I was wondering if anyone tried ever to use those damped shocks as suspension shocks. I know they are too damped and slow, just wondered if a crawler type (read: slow) can use them. I am not sure there is any benefit at all as in my experience only at speed dampening and shock speed make a difference, be it due to terrain, breaking behaviour etc. At crawler speed it looks just a matter of geometry and making ground contact and sometimes Lego shocks feel like all or nothing. I am curious about it anyways. Usually the videos I see when running over a small bump, the full model tilts instead of the shock compressing/extending at least partially to adapt to it. I reckon a really heavy model could work properly. I wish a slow mo video showing a lego suspension working properly. Anyone taking the callenge? Regulable shocks (precompression nut) even if not damped would help a lot with suspensions I guess. -

[HELP] Steered, Driven, Independent Suspension
Canmorite posted a topic in LEGO Technic, Mindstorms, Model Team and Scale Modeling
Is it possible to create a steered, driven and independent suspension (without the use of special ball-joint parts) that is closer than 3 or 4 studs to the wheel? I've tried searching but every design I've seen the pivot point is at least 3 studs away from the rim. Thanks! -

Trailer suspension
Stephen Provoost posted a topic in LEGO Technic, Mindstorms, Model Team and Scale Modeling
Hello, I want to make a trailer for a truck to transport my Swingloader (designed bij D3K) or my New Holland excavator (gathering the pieces and must buy the instructions). I have seen some trailers from "2LegoOrNot2Lego" and I must say they are incredible. Now I have some questions: How does the suspension works, I've tried many times but I didn't succeed in making a good one. (example: http://www.brickshelf.com/cgi-bin/gallery.cgi?i=4632413 Does anyone have some pictures or drawings for a detachable gooseneck? (like this trailer: http://www.mocpages.com/moc.php/221783) Thank you in advance! Stephen -

Need help with importing wheelhubs in rear suspension.
jesse66058 posted a topic in LEGO Technic, Mindstorms, Model Team and Scale Modeling
Hello everybody, One day my nephew asked if we could make together a car. I started the project last christmas and have actually not made so much progress at the car, but i learned in the meanwhile a lot! I started with zero experience and haven't played a while with lego. Nicjasno was a good person that was very helpfull. The first suspension i made, was very bad according to nicjasno. After watching his video's, i was really ashamed of myself =P. How could i let see such a bad designed suspension to nicjasno! My nephew loves the Ford Mustang GT, and actually i love it to! The scale has in the meantime changed alot. Following nicjasno it was a good idea to build from the wheels. I started with the (http://www.bricklink....asp?P=44772c01) wheels. I followed the idea of sheepo's MacPherson idea. But after some testing i was not convinced enough. When you steer, one side of the car gets lift up because the length of the spring variates. Also an unexpected thing happened. The Powerfunctions XL Motors peforms bad, really bad. (even coupled). After some research i saw you could make your own engine with the lego pneumatics. I started with the one-cylinder from nico71. When i saw it for the first time actually working. The excitement really killed me! I was so excited i wanted to go to the next level. To directly build the biggest, bad-megablocks megablock engines was for me not a good idea. So the next choice was the SYS I3 from nicjasno with all the modifications. After the succesful build. I thought i was ready for the LpePower v8! =O. I have both models kept in my closet and have traded 3 yellow cylinders for 11 transperant blue cylinders. But i'm stil waiting for them. So the next wheelchoice was (http://www.bricklink....asp?P=44772c04), but they were to small to fit the big v8 engine block =P. So we went on to the biggest wheels lego has made: http://www.bricklink....asp?P=44772c03. In the meanwhile i had builded many idea's for the car, but parts broke every time. So we went to the 'heavy duty' category. Nicjasno had tipped me about his HDA. So i had made my own copy of it, but it was really to big! It was such a beautifull designed gearbox. So now, where my question comes from: I started building a rear suspension nicjasno made for his own Ford Mustang GT, but i don't use non-lego wheels with all the extra coming items such as the turntable and the custom adapters. So i had to do it with nicjasno modified wheelhubs (i follow his buildshow). But after many designs that are to big or to wobbly, i ask some advice from the experienced builders on this forum. The thingy that proposes nicjasnos modified wheelhubs and the headpart of the rear suspension (live axle) The wheelhub needs to fit the arms that are coming out, but has any a good idea how? Another photo Nicjasno's models without the cylinders. (I also want to say i appreciate the help of youtuber OOOONeoGamerOOOO with the modifications. I am still learning to do it my own.) Sorry for the bad photo's (original huh?) It is night and i have only a mobile i can acces at the moment. I'm new to this forum so if i do something wrong, i will hear it. Any idea is welcome! Greetings from Jesse, The Netherlands -
Evo X-suspension ?'s/ideas
z3_2drive posted a topic in LEGO Technic, Mindstorms, Model Team and Scale Modeling
I've been looking at different cars lately and one I really like is the Mitsubishi Evo X. An idea of mine was to create suspension models as small MOCs, similar to how lego made engines as sets a long time ago. But with limited photos it's pretty confusing, but here are some: ^The way I see it, there is one wishbone on top, a pair of separate links at the bottom, and a last link visible in the next photo. Also there is a swaybar, shock, and driveshaft. ^the last link is easily seen here (in the back), and the front is a MacPherson Strut setup. What I wanted to ask is for some feedback on what parts (technic or bionicle) that I could use the replicate this. When I get some decent progress in, I will post photos here. Thanks! -
Hello I tryed my hands on two motorcyles: the little yellow one: Actually a tablescrap from the meeting yesterday. Was challenged to use the Track Switch ;) And a moped: 100% Lego. The hole Scene. I hope you like them. Jonas