Search the Community
Showing results for tags 'rc'.
Found 538 results
-
A few days ago, LEGO has started uploading episodes of "Beyond The Instructions" on their YouTube channel. The idea is that they show an official set and then modify it, often using 3'rd party parts like RC drone equipment, helium balloons, cameras, laser pointers, IE things that are obviously not made by LEGO... wait, isn't that "against the instructions"? Sure is! Now the question is: Is LEGO promoting non-purist thinking? Are they doing it to rattle the brand-loyal builders? Or is there anything positive that you see in these types of experimental videos? PS: The idea is not to endlessly debate if "purism" is good or bad, because that never ends anywhere constructive. It's just to discuss what intentions LEGO might have and what effects there could be in the way MOCers and MODers carry out their hobby.
-
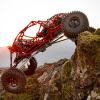
[MOC] American Tractor Truck
Aleh posted a topic in LEGO Technic, Mindstorms, Model Team and Scale Modeling
Hey fans! Today I'm gonna to share with your my latest project. This is middle or even small scale American Truck. It's all RC. Also I/m planning to make a white cab for it from suitable parts. HD photos: http://bricksafe.com.../american-truck It has the next functions: XL- motor for driving M - motor for steering M - motor for gear shifting. It has 4 speed Sariel's sequental gearbox M - motor for the pump A Pair of front and a pair of rare lights. Openable doors and hood Pneumatic PTO for the trailer. PLease enjoy the photos, click to enlarge. Video coming soon... Openable hood PTO for pneumatic, Fake Manometer (Air pressure meter), fake lights to light connecting trailer in the dark Now here are some photos with trailer. Loaded and not. As you can see, all wheels in the trailer are simply but suspended. Very expensive loading, though)) - Brothers? - Definitely not -
Good day! This is a quick idea I had , it uses a mini turntable as a pivot point between the two "halfs" what enhances it perfomance over obstacles. 2x m-motors 1x IR receiver 1x 9v battery with custom adapter LDD file Bricksafe I hope you like it, have a wonderful day
-

[MOC/2016]Mercedes-Benz G500 Cabriolet
moonein posted a topic in LEGO Technic, Mindstorms, Model Team and Scale Modeling
Based on the Mercedes-Benz G500 Cabriolet design, and carried out a more radical modification. Two L motor drive, one servo motor steering, four-wheel drive, remote control. Using two special parts, one is above the 42043 logo, and the other is x85 (lamp bowl). Rear bumper design is still in the adjustment. http://www.moc-pages.../moc.php/430479 http://ein.cc -
Hey there guys! I finally got myself an S-brick, i wanted to test it out so i built this go-kart. Functions: - 2 gears gearbox - auto clutch - braking system - differential The vehicle turned out to be pretty fast and with a great handling, unfortunately i need to wait some better weather to shoot a video of it and a bigger place as well. Like in a real kart there's no reverse gear so i'll probably need something like a parking lot to test it out. The gearbox is working great with the buttons of the S-brick operating the M motor I hope you'll like it!
-

[MOC] RC Airboat (that doesn't float!)
Chade posted a topic in LEGO Technic, Mindstorms, Model Team and Scale Modeling
Hi there! For my next MOC I wanted to do something different. I chose a RC Air Propelled Boat as it has some interesting functionality with the big propeller and the flaps at the back. As I love building things that move around, the boat can drive and steer as well (on wheels). Steering while going forwards works like a car driving backwards. Thus steering while driving backwards is a bit unrealistic for a boat. Everything is scaled around the propeller, so I built the propeller setup first, then steering, drive & clutch, battery & lights then bodywork. I started off by using a lot of gears throughout the boat, however it was creating issues so I streamlined it as best I could using chains. I was also happy to finally add a clutch to one of my builds. Please note that this model doesn't float or is actually air powered. It would sink like a stone and destroy all PF components :) Features - 2x L motors at 1:1.67 - 1x Servo - functional propeller when driven - functional flaps when steered - functional door - clutch - battery access on side - working lights - 42Lx19Wx24H (in studs) - 1003g The design is fairly basic and there's no interesting connections throughout the build, but it ended up looking half decent. It's not based on anything specific, which made the design process easier. I would have preferred running the L motors at 1:3, but it was struggling a bit to move. The servo stopped working halfway through this build so I have no video to show yet. I need to wait for lego to send a replacement. Instructions will be up on Rebrickable eventually. EDIT: Video is now complete Hope you like it. Any feedback is appreciated. Thanks. -

[MOC] Small Blue Trophy Truck
paave posted a topic in LEGO Technic, Mindstorms, Model Team and Scale Modeling
Hey, Let me introduce my new MOC – Trophy Truck: Video: Features & Functions: Buggy motor for drive M-Motor for steering LiPo for power IR-receiver V2 Independent front suspension Twin beam steering system Dependent simple rear suspension So basically it's just another trophy truck, but I put a special steering system which is used in trucks with twin beam suspension. Building instructions: -

[MOC] RedBull RC Buggy
Anto posted a topic in LEGO Technic, Mindstorms, Model Team and Scale Modeling
For this MOC, the difficulty was to insert the electric components but to have a light and good design. The choice of a buggy was chose because the design is quite light, and it is more simple to have a good performance. I have made custom stickers to have a better look. Steering is done by a servomotor. Driving is done by 2 L motors. It is better performant than just 1 XL, because 2 L have a better acceleration and more power. And they were easier to place Inside the chasis. The suspension is very efficiency. It is smooth and reactive. At front, there is independent susension. At rear, there is a suspended axle. The chasis is very, very light. The basis is done around just 4 beams. The complete buggy (train's battery box included) weights 495 grams. -

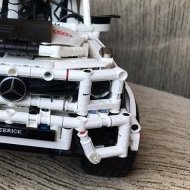
[WIP] 42043S (RC Arocs 3245 with SBrick)
Sphexish posted a topic in LEGO Technic, Mindstorms, Model Team and Scale Modeling
Greetings! After coming out of my Dark Ages and tackling both the excellent Ultimate 8043 & 42009 (see below) designed by Jurgen Krooshoop, I was hungry for another Lego Technic challenge. But I felt rather lost at this point: without a large collection of loose Technic pieces at my beck and call, motorized MOCs which weren't heavily based on existing Lego sets would require some hefty Bricklink investments from my part. Fortunately, a fifteen-percent-off-everything anniversary sale at a local toy store with an expansive Lego section made the choice for my next project a lot simpler: they had the 42043 Arocs set that had already been calling out to my wallet since way back in oh-fifteen. They also had a certain little gizmo called an SBrick in stock, which I had heard quite a few things about. My previous builds had involved standard PF receivers and remotes, so it seemed like an interesting new challenge to incorporate this new-fangled blue-toothed thing-a-ma-jig into my already-slightly-more-challenging attempt at "RC-afying" the Mercedes. I'm already a little way into the project, but I've already made a few false starts and moronic missteps, so I figured it might be educational for others to document my frantic flailing about experiences, so that they might avoid my (myriad) mistakes. The first thing I did, of course, was to order the necessary PF components: a Servo Motor, an L-Motor, an 20cm extension cable, and a couple of PF lights. In hindsight, this already turned out to be my first mistake: I hadn't done my research properly and hadn't realized that the SBrick requires an extension cable to be hooked up to a battery box. This meant I was probably going to be one cable short, since I didn't think the cable for the L-motor used for drive would reach. While I waited for these crucial parts to be delivered, I began preliminary work on the Arocs proper. After completing most of bags 1 to 3, I had three loosely connected main sections of the truck - the cabin housing the 6-cilinder engine and the L-motor that came with the set, the gearbox with the outriggers, and the rear section with the dumping bed and the differentials. In my mind, I could already see a problem arising: there was a drivetrain going from the rear wheels all the way to the engine in the front of the truck, which would obviously make the pistons move as you move the truck along. I already guessed I would be severing this connection by remove the driveshaft with the CV joint and attaching an L-motor in the center somewhere. Which would render the engine, the drivetrain, etc. utterly useless. This was not acceptable - not in the last place because my kids had unanimously decided that seeing the pistons in my 42009 mobile crane move was officially The Coolest Thing Ever™. So I fiddled about a bit before connection these three main sections, and eventually came up with this: Might be a bit hard to see, but... Basically, I placed an additional small gear directly in-between the L-motor and the gearbox, which allows it to power the axles and gears connected to the piston engine when in use. So, it wouldn't be connected to the drive anymore, but at least there could be some motorized eye-candy when one swung back the cabin and fired up the main engine. It wasn't long before my motors and such arrived, so the first I tried to accomplish was to connect the L-motor for the drive somewhere. One nifty solution I'd found involved replacing the engine in the front and using the long drive-train to power the rear wheels -- a technique I thoroughly rejected for several reasons: It seemed inefficient, and COOLEST. THING. EVER. So I figured I'd just bolt the bloody thing directly to the rear diff, as I'd also seen in this fascinating and classically scored tutorial vid by RC-master PPUNG daddy: It didn't sit right with me to just attach the motor with two pins like that though, so I have attempted to support it a little bit better without messing up the way the rear suspension works too much. Right now, it looks something like this: Not exactly perfect, but it seems to work well enough, even when I give the suspension a bit of a work-out. Next came the steering. My first attempt was based on this extremely helpful Youtube video by yu shine: Basically, this involved just connecting the Servo directly to the standard HOG steering mechanism for the Arocs, just below the two orange lights-slash-knobs at the top which you're supposed to turn. It seemed the most simple and elegant and -- being but a simple soul -- this naturally appealed to me greatly. It also didn't require the purchase of any additional parts, and left the mechanically unique way the steering on the Arocs model works intact. At this point I was able to put together a sort of prototype for the RC driving, by dangling the SBrick from the battery box and just hooking everything up in a makeshift manner. After installing the app, setting up the official 42043S profile, and playing around with my handiwork for a bit, I discovered the following issues: The L-motor was supplying quite a bit of power, making the truck actually pretty hard to control. Of course, there was a lot of weight left to be added at this point, so I was willing to reserve judgement for the time being, but given that my kids no doubt want to play around with this thing as well it'd be nice if I could prevent them from semi-accidentally ramming a massive Lego vehicle into, well, practically everything. Not sure how I could address though, other than from the software side. Placing the Servo motor where it was, behind the battery box, didn't actually fit all that well. The battery box itself actually pushed up against the servo when inserted, bending it back by at least a stud, which also frustrated my attempts to secure it in place a bit further. The steering was a bit... inadequate. The problems regarding the steering I recalled Sariel already mentioning in were only exacerbated here. It felt imprecise and rather unresponsive, and it didn't help that there was quite a bit of play in the wheels even with the Servo hooked up, meaning they weren't necessarily centered even when it was. So in the end, I stripped the away the steering mechanism and the wheels up front until I was left with this: After that, I decided to pony up and order the parts which -- after careful visual inspection of PPung's tutorial -- I figured I'd still need to mount the servo at the bottom, between the two sets of front wheels. So, mostly a set of gear racks and gears, in addition to some beams and various connectors used for bracing. This also gave me the chance to simultaneously order an extra extension cable from the same supplier, since it was pretty clear I was going to be needing it if I wanted to have any hope of hooking up the drive motor to the SBrick up front. And now, we wait... Although, to pass the time, I busied myself with rebuilding the back of the cabin, which I had previously taken apart to place the servo motor. I didn't need all the gears used for the steering mechanism, of course, and I figured I'd be better off trying to mount the SBrick in this space instead. For the moment, I came up with the following: I did notice the two black Technic pins still sticking out back there, and peeking ahead in the manual revealed that these will be used to help brace the pneumatic crane, once the time comes to attach that beast. As far as I can tell, that should still be possible even with the SBrick where it is, but no doubt I'll have screwed up somehow. We'll find out in the next update, hopefully! (Assuming, quite optimistically, that there is actual interest in such a thing. ) -
[MOC] Top Fuel Dragster
sm 01 posted a topic in LEGO Technic, Mindstorms, Model Team and Scale Modeling
Hello everyone! This is my newest creation: It is a result of a strange process - I usually know what I want to build before I start building, but with this one it wasn't the case. I was tinkering about limited slip differentials – trying to find some compact solution, one that can fit regular LEGO differential. Then I needed some vehicle to test it… One thing led to another and I had this top fuel dragster on my desk. It is build for speed - has great power (RC 5292 motor) to weight ratio (weighs 450g). It is rather simple creation. The only function, besides motorized driving and steering (servo motor), is manually adjustable rear wing. Dimensions: 48cm long, 12 cm wide, 14.5 – 16 cm high I hope you'll like it! More photos: http://www.flickr.co...157669238024110 Please check the video to see more about its speed - after all, it is the main feature of this model (I filmed it in my building's garage - my apartment is too small for that thing ) and tell me what you think about that limited slip diff. Also, now I'm wondering, do you always know what are you going to build from the start or did you have similar experience like me with this MOC? -
 Hi everyone! I'm happy to present my newest Lego creation, the completely remote controlled K.I.T.T.! I'm still young, but old enough to know and like Knight Rider. It's the reason, why I recreated K.I.T.T., the main character of the series. Of course with a huge amount of Power Functions! Driving, steering, working scanner and headlights. Six motors, two extenision wires, two pairs of leds, two switches, two IR receivers and an AAA battery box. As many electronic parts, as possible! :D It is my third model at a bigger scale. The building was very interesting. There were a lot of technical challenges with the chassis and the body shaping was difficult, too, because usually I make smaller models. Hope, that I can make more MOCs at similar scales in the future. There are a lot of Lego replicas on the net. For example I found out, that I use the black minifig shields for the wheels. After it I saw, that Firas has already done it! The working scanner and headlights aren't new, too. But! As far as I know, this is the smallest K.I.T.T., which contains these functions! At first please watch the video! Below I tell some things about it, and later there are information about the fuctions and technical detailes! Hope you like it! :) At first I send a huge thank you the three persons, whose names are at the end of the video, for lending me some PF parts, a camera tripod and making the music! It's the first time, that I don't use downloaded music, so I'm very happy! :) Kitt has an enemy, called Karr. Karr was the first car, but he was evil. I built at first Kitt, but later it came into my mind, that it would be more interesting and unusual to build Karr. But almost everyone likes Kitt, and almost noone likes Karr. So finally I decided to put more Kitt scenes into the video and upload the car, as Kitt. I started shooting. I brought out to the street two reflectors, the car and the camera. There are scenes, where you can see two cars together. The truth is that I have only one. After every scenes I exchanged some parts of the body, and continued shooting, without changing the position of the camera. Later I cut the pictures near each other. And it was shocking to watch the scenes on the computer! I thought, that the red light in the dark night will be very impressive and will look very cool. But Karr looks much better. The overall look of him, and the yellow light definitely win against Kitt. I went out again, to make some scenes about Kitt, but the result wasn't better I don't know why, but my camera likes the yellow light better, than the red light. The appearance of Kitt is not so strong, as I thought at first. It is weak But the screenplay allows you to decide, who wins! :) Despite the difficulties, I really liked to make this movie and like the result. Hope, you like it, too! Driving: The car is drived by an L Motor, with a gear ratio 1:1, through a differential. Steering: It is very simple, too. I used a Servo Motor. The other two functions are more interesting. Working headlights: I used two M Motors. If I push the button on the remote control, I start to operate both ones. One of them opens the lights, the other one switches them on. It is impossible to push and release the button fast enough, so I had to use slippery mechanisms. For the opening I used a clutch gear, you can see it on the bottomview picture. But at this level of cramming, there isn't enough place for a clutch gear everywhere, so I found out a new solution. Between the two connectors, there is a small piece of rigid hose. If the switch reaches its end position, the hose can rotate calmly further in one of the connectors, and the mechanism waits my reaction time. Working scanner: Two M Motors again. One of them switches on the light and the other motor, which starts to move the light. The switching mechanism is very similar to one of the pneumatic autovalve. After it changed the position of the PF switch, it rotates further and doesnt cause damage. The construction, which transforms the rotation of the motor to the linear motion of the red light, contains three liftarms. More pictures on my MOCpage! Thanks for watching!
 -
 They call those who ride them "rednecks". But while you may ponder whether the setup like this is an overkill or not, a pickup mounted on 10' wheels is a thing to remember no matter the circumstances. Features: ► forward/reverse drive ► separately-driven L6 turbocharged Diesel engine with moving pistons and cooling fan ► steering ► differential and gearing for speed ► simplified cockpit with steering wheel and IR-receiver seats. ► opening cab doors and hood ► exhaust stack ► details such as radiator with grille, front and rear lights, bull bar and reinforced bumpers, roof rack with extra floodlights, rear view mirrors, desert safety flag and fenders 42030 C-model, uses more than 80% of set's parts (loose assumption). 42 studs long and heavy. Despite its weight and only one XL motor as means of propulsion, it has a quite decent speed - it picks up (pun intended) a huge momentum - and an impressive turning radius. Engine is separately powered by L motor. Steering is much like in a video game, where both reverse and brakes are controlled by the same button. Unsuspected bonus: by accident, the bed is perfectly shaped to hold the RC control unit which consists of two RC pilots with a standard RC-car additions. The set's M motor lies dormant, waiting to be used on some extra function I can't currently come up with. It'd be hard to craft the instructions in LDD, but I'll try one day.
 -

[MOC] Speed of fun, Build the Porsche of your dreams entry
Jeroen Ottens posted a topic in LEGO Technic, Mindstorms, Model Team and Scale Modeling
Hi, Here is my entry for the build the Porsche of your dreams contest. It is a remote controlled, lightweight Porsche of an undefined type (unless someone recognizes this instantly as a particular Porsche type). The model weighs 1.5 kg of which 300 g is 12 AA batteries. It is powered by 2 L-motors that have each their own batterypack. Steering is done with a servomotor. The steeringwheel inside is functional as well (as in, it turns also when the servo turns): I tried to minimize weight as much as possible, so I used both the motors and the battery packs as structural elements in the construction. Changing batteries is now not something you want to do . I always wanted to make a model without paneling and since this model needed to be lightweight it was the perfect excuse to finally build a completely open model. I particularly like the top view. Here you can really see how the lines flow on this model. Something that I find difficult to capture in the other shots. As usual comments and questions are highly appreciated. Leg godt, Jeroen -

Yellow Buggy – A tiny and robust RC LEGO car
bartneck posted a topic in LEGO Technic, Mindstorms, Model Team and Scale Modeling
This is a very small, robust, reliable and easy to maintain buggy. It is ideal for letting your kids play with all day. The design goal was to make a robust car as small and simple as possible. This means most of all no suspension system since that would require the use of CV joints. They are known to break and while they work nicely in LEGO super cars that you carefully push around the floor, it does not work with kids trying to race and crash their RC cars. CV joints will break. Of course it is possible to create a LEGO RC car with suspension and even four wheel drive/steering, but then you end up with LEGO’s own RC Crawler. The goal was to keep it small, simple and robust. One of the problems I encountered when letting kids play with the RC cars all day is that the axles in the differential tend to slip and move out. I hence build a differential assembly in which the axles are completely locked in and cannot move. The worst thing that could still happen is that a wheel comes off which is easy to fix. The car uses only one L-Motor and is pretty fast for that. The turning radius is very tight and the car is just fun to drive. The differential makes it perfect to drive around tight corners. The heavy battery pack is right on top of the back axle, giving it the best friction. Well, it does not accelerate like an F1, but it might still make a small difference. Building instructions, LXF, and further information are available. -

Ice18 ACC Style Car
Saberwing40k posted a topic in LEGO Technic, Mindstorms, Model Team and Scale Modeling
So, a long time ago, I decided, on a whim, to make a small, fast car. Inspired by Mahjqa's Ice9 racer, I built something similar, but with 5 years of parts advances, namely the L and servo motor. Ice18 by Saberwing007, on Flickr it is similarly compact, but I was not able to make a nice shell for it, and lost interest in the project. As a matter of fact, this just goes to show that I don't really like fast things. Controlling them indoors, in a tiny apartment, on carpet, is a pain in the rear. Not helping is the fact that using stock PF outside is impossible, and then you have control delay, which all in all makes the experience no fun, at least for me. Maybe if I had an Sbrick... Anyway, let's go into some technical details. My version uses an L motor for propulsion, and due to the new diff, has a slightly lower gear ratio,3.57:1 vs 5:1 on Ice9. However, the rpm at the wheels is actually faster, due to the speed of the L motor, 971 vs 730 on Ice9. You do need quite a run up to use that speed, however. Because of the servo and L motor having more mounts, I was able to use them, as well as the battery pack, as stressed members. The chassis is quite floppy without the battery box, in fact. But hey, it adds lightness. Ice18 by Saberwing007, on Flickr Versus the above view, there is not really a whole lot to see that's different on the bottom view, but most people want it. Ice18 by Saberwing007, on Flickr The gears are braced on all sides, there is no way for them to skip. There is no way for axles to walk out, for that matter. Ice18 by Saberwing007, on Flickr Steering lock is good, there are no restrictions, or chassis rubbing. And, of course, my inspiration. Ice Nine views by mahjqa, on Flickr I might be able to build small, but I sure can't do stylish designs, or photography, like Mahjqa can. I also have an .LXF file, it has a canopy, which is optional. It will also be posted to Rebrickable, and I will add that link when it is moderated. LXF:http://www.brickshel...Ideas/ice18.lxf Rebrickable:http://rebrickable.com/mocs/Saberwing/ice18 Thanks for viewing. P.S. There is not going to be a video, there isn't really anything to show, and I need the servo for a project that's a contest entry. -
[MOC] Gas Service Truck (UAZ-452)
paave posted a topic in LEGO Technic, Mindstorms, Model Team and Scale Modeling
My new creation – Gas Service Truck based on UAZ-452, known as 'Bukhanka', which translates as 'Bread Loaf'. You can guess why. The goal of this creation was inventing the smallest 4x4 chassis using standard springs for suspension. Features & Functions: - 4x4 - XL for drive - Servo for steering - LiPo for power - IR-receiver - Live axle suspension - Panhard rod for each axle - Openable doors with locks - Telescopic ladder Video: More images: -
Hi im new and was needing help with my project I cant seem to get the steering on my build to work it. the steering servo keeps meshing with the rack or it skips it altogether and wont stay centred. please help
-

Hi ppl, new to the forum, mainly technic fan willing to dig around and
dasjones posted a topic in Hello! My name is...
Hi all, i've just arrived at the forum, very nice place. I'm mainly into building and customizing lego tecnic, got 42008, 42009, 42035, 42043, also i've build some parts to build 42009 ultimate (haven't arrived yet, looking forward to this) and planing on getting a 42006 and some parts to fully motorize and rc it. I'm also looking for some custom builds using those sets and to motorize and rc them, will dig around the site, to get a nice idea on customizing, and them i'm planning on starting trying my own (looks pretty difficult at the start, hope to get the hang of it). Goog luck all, plz don't hesitate to contact me if i can be of any help, or if you have anything to share related do rc and motorizing these and other related models, i'm looking for some free manuals and tips to have some fun, but i'm also willing to pay for some good instructions that will help tune those babes, as well as help get experienced in modding. Regards, cya all. -
[MOC] Baja Buggy
Epic Technic posted a topic in LEGO Technic, Mindstorms, Model Team and Scale Modeling
This MOC was an idea that i had revisited after a year. I originally made the chassis to be a stand alone model, but then I added a very simple body. The bodywork is not modeled after any buggy in specific. Specs: -2 XL motors -1 servo -1 receiver -1 aaa bat-box -RWD And the two XL motors, one for each wheel, they are not connected. Any feedback would be dearly appreciated. -

[FAIL] Mini Fast car
Technic Jim posted a topic in LEGO Technic, Mindstorms, Model Team and Scale Modeling
This car was a quick build (no pun intended ) that would follow in the footsteps of my first car with RC motors (http://www.eurobricks.com/forum/index.php?showtopic=124143#entry2503279). It is powered by 1 RC motor geared down 1.4:1 and has a theoretical top speed of ~11kph. It would have all worked fine had the car not been so top heavy and had a tight steering lock. The result was that the car couldn't steer without flipping over and was almost impossible to control because I made the mistake of putting gears on the servo's output so neutral position on the motor wasn't dead straight with the front wheels. It also didn't help that today was very sunny so the IR control kept on getting interference! There is a short video I made though: This car itself was a failure, but I think my next step will be to use a minizip and change the servo positioning. I can't post any pictures today, but I will soon and an LDD file may present itself as well. Thanks for reading and please leave any feedback, Jim -
Hey, It is time to present you my next MOC: Trolleybus, based on ZiU-9 (ZiU-682). Hope you enjoy! Features & Functions • XL-Motor for propulsion • M-Motor for steering • L-Motor + 5 mini linear actuators for opening doors • Working steering wheel • Movable trolley poles • 2x IR Receiver • 1x LED lights • LiPo battery for power And the video:
-

[MOC] Jeep Wrangler
legomarat posted a topic in LEGO Technic, Mindstorms, Model Team and Scale Modeling
RC driving and steering. All wheel drive and Live axle suspension Lifted with Mickey Thompson tires: Internals More on my Flickr Youtube video (I know doesn't work in some countries, you can find it on flickr too) -
[MOC] RC Scania R730 V8 with Topline
shineyu posted a topic in LEGO Technic, Mindstorms, Model Team and Scale Modeling
Hello everyone, This time to introduce my new MOC RC Scania R730 V8 with topline, I had the chance to interview for Scania company, it is particularly produced this enhanced version of the R730. It uses two XL Motor for driving, and 1M Motor for steering. speed: 40cm/s weight: 2550g width: 21 -

[MOC] 6wd RC Lego Mindstorms NXT Log Skidder
Mantarri posted a topic in LEGO Technic, Mindstorms, Model Team and Scale Modeling
Hello. This is my first MOC I've uploaded, but I've made many. :) So this is my RC, 6wd, LEGO Mindstorms NXT Log Skidder. For It I have one motor for driving the 6 wheels, another for steering, the last motor for lifting up the logs, and then a manually operated claw. EDIT 1, 16/5/01: I only have about 5-6 hundred LEGO Technic pieces so forgive me for any styling, look issues. :) Here are some pics (Click here for the full resolution images). A pic highlighting the re-designed log pulling arm (it can swivel around 360 now) A close the actual grabbing part of the log pulling arm. a closeup on the re-designed cabin. A picture highlighting the gullwing doors on the cabin. A picture highlighting the fact that the cabing tips up, and showing some of the (fake) machinery in the log skidder underneath the cabin. Another picture highlighting the titlting cabin, and showing some of the (fake) machinery in the log skidder underneath the cabin. A back view the the Log Skidder and the "engine" (NXT brick). A picture showing the whole model. One last picture showing the whole model. -

[MOC] Mazda Race Car with SBrick
KevinMoo posted a topic in LEGO Technic, Mindstorms, Model Team and Scale Modeling
EDIT: Building Instructions Available: HERE ________ I’m a big fan of Japanese cars, mostly because of its reliability. In the city I live in, there is a car factory which manufactures some models of Toyota and Mazda cars for the Chinese market. Among them is the Mazda 6 Atenza, the latest model of Mazda 6 series. (via Internet) I like this car a lot. A family sedan beautifully shaped like a supercar. Also you can choose hatchback or wagon configuration, but you don’t see a two-door race car model in this series. So I decided to build one out of LEGO. After a long winter, now I present you my latest MOC: A Mazda Race Car with SBrick. This project started with this iconic front grille. I don’t have a concept of the overall scale for this MOC, everything was decided by the scale of the grille. Ironically, I didn’t realize part 32192 in LBG is rare until the prototype is finished in LDD, and I don’t have a single one of it. Finally got my hands on it after quite a long time. Let’s have a look at a video first. (4K @ 30 FPS, watching in full screen is recommended) Weight: 1130g Dimensions: 350mm (L) x 160mm (W) x 127mm (H) Parts count: 1390 pcs Working headlights / taillights Servo motor cable has to go between the two seats due to length concerns, otherwise I can put more details in that area. A tiny fake engine for a tiny space. I must say I’m not a big fan of soft axles and I don’t use them too much. But they look great when used to shape wheel arches. The car is heavy towards the back, so rear suspension looks kind of weird. It gets the job done, though. Drivetrain is quite simple. Also you could find some inspirations from Madoca’s Supercar and Corvette. :thumbup: More photos: Building instructions is on the way. It will be available very soon. SBrick can be easily replaced by PF IR receiver. Enjoy and stay tuned!