Search the Community
Showing results for tags 'WIp'.
Found 314 results
-
With the recent release of The Force Awakens, the seventh installment to the Star Wars Franchise (If you haven't heard of TFA, I wouldn't be surprised, almost no advertising and no merchandise was made for the movie), fans have been in love with the newest droid, BB-8. The new look to the droid caused many Lego builders to desire their own, and HenrikLego did just that. Totaling at nearly 11K pieces, Henrik built an enormous droid for a local theater of his, and even included the local community of AFOLs with an LDD file for it. His original topic for this MOC is here: http://www.eurobricks.com/forum/index.php?showtopic=116949&st=0 After seeing it, I immediately wanted one of my own. After an incredibly long and difficult debate with my wallet, I decided to pursue my own BB-8. Using the LDD File, I generated a parts list for bricklink totaling 10,909 pieces. I looked over the parts needed for this and took note of some of the nuisances. White Brick 2 x 4 (1184 needed) - The part itself is not all that rare, but getting it in new condition (Getting White Bricks in used condition is a nightmare) in that quantity was a challenge. It ultimately ended up costing me 25 cents per brick. White Plate 1 x 2 (1385 needed) - Also very difficult to get in large quantities, but I managed to find it for about 10 cents per piece. White Plate 1 x 3 (527 needed) - It always seems like 1 x 3 plates are a pain to obtain, this was the case here. About 15 cents per piece. Orange Plate 1 x 8 (25 needed) - I did not imagine this piece being very rare, but I ended up placing about 5 orders for it, despite it being cheap. About 10 cents per piece. White Plate 4 x 10 (24 needed) - The large quantity drove the price way up. 48 cents per piece. White Plate 2 x 2 Corner (374 needed) - Once again a hard to find piece that I never would picture as rare. About 12.5 cents per piece. That rounds out the worst bricks and pieces for me, the rest are not very difficult to find, but prepare yourself for about 11 cents per piece, I optimized smaller amount of orders over saving a few cents per piece because shipping charges really drive up the final price. To date I am glad to say that I have ordered all 10,909 pieces, just waiting for them to arrive. However, I have not started designing a desert base for BB-8, I need to work on this ASAP. Once the pieces come in, I of course will have to count them (I am not looking forward to this at all, but more and more it seems that bricklink sellers don't have the ability to count) and check off that everything is in my possession, including parts for a base. I hope to keep you guys updated as much as possible throughout this process, but for now I need to explain to my wallet why an enormous chunk was taken out of it.
-

[WIP] Technic Airport Catering Truck [DONE!]
BrickbyBrickTechnic posted a topic in LEGO Technic, Mindstorms, Model Team and Scale Modeling
Here's a vehicle that I believe has never been done in Technic before: An airport catering truck. This MOC intends to combine pneumatic and power functions. Here are the functions I have planned: -4 outriggers (PF) -Drive (PF) -Lifting the container (Pneumatic) -Opening front door (Pneumatic) -Opening rear door (Pneumatic) -Suspension, steering, fake engine Here's what I have so far: BTW, it is (loosely) based on this real truck: Leave some comments please! I need suggestions for battery box placement and gearbox reinforcement. Thanks! BrickbyBrickTechnic -
[WIP] 42043 Car Transporter (C model)
BrickbyBrickTechnic posted a topic in LEGO Technic, Mindstorms, Model Team and Scale Modeling
My next 42043 C Model! This is gonna be a big one! I will have 3 power functions and 4 pneumatic functions. Power functions will be for the truck, pneumatics for the trailer. Here's what I have so far: In case you're wondering, that's the immediate front of the truck. It is built for the 42043 cab, which I will be using. Seen above is the frontmost car lift. Here's the master gearbox. Some mechanics for the frontmost lift. That's a video of the mechanism for the front lift. Like the other lifts will, this uses variable axes to control the movements. (NOTE: CLICK ON THE VIDEO TO PLAY IT) P.S: This is based on the Eddie Stobart (video of it below): More pictures should be coming soon. Hope you enjoyed, and leave some comments so I can implement them in this MOC. Thanks for your time! BrickbyBrickTechnic -

[WIP] Longnose tow truck in 42008 scale - design question
Erik Leppen posted a topic in LEGO Technic, Mindstorms, Model Team and Scale Modeling
I'm building a tow truck, and I'm running into a problem with the design of the functions. First, let's do an image of what we're talking about. As you see, it's a smaller-scale version of a tow truck similar to 8285, but with an extra axle. The wheels will be those from 42024 and other sets. Because of the scale, there is probably not enough room to add PF. So right now I'm aiming to have it manual. As far as I can see now, there will be the following functions: steering main boom raising/lowering main boom extension main boom winch car lifter raising/lowering car lifter fold out/in outriggers The steering is done and controlled by the gear on the roof. The car lifter fold in/out will be manual with a knob at the back. Remaining are 5 functions. The question I'm having now is, how to drive those. Of course, with the model being manual, I could just add a knob for every function. But this doesn't sound like the most technically challenging option, so I am thinking of adding some kind of switchbox. But, 5 functions is kind of an unwieldy number, ecause it requires 3 switches with 1 being half-used. Currently, the outriggers are driven by knobs on the side, and I could leave it that way and have 4 functions running from the switchbox, but this feels kind of incomplete as well. So I'm unsure about where to go from here. So I'm looking for some advice. What do you think? Are there other options? What would you do? -
[WIP] Ram 1500 with 8-speed transmission *TIPS NEEDED*
BrickbyBrickTechnic posted a topic in LEGO Technic, Mindstorms, Model Team and Scale Modeling
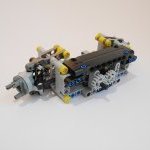
Here's my latest WIP, the Ram 1500. This is mostly based on my desire to do a vehicle with 8 speeds. Ram 1500 has an 8-speed transmission in reality. The model has several functions in place already: -Steering -Drive (4x4) -Suspension (Front has positive caster angle, rear live axle) -8 speed transmission with 90-degree shift (Not done yet) Here's a picture: Drive is with 1 xl motor right now, but it will be changed to 2 as 1 does not have enough torque for gears 6, 7, and 8. Steering is with 1 m motor. The front suspension has a positive Caster angle. It was built by angling the suspension beams and securing them to the chassis. The rear axle is incredibly weak right now. PLEASE LEAVE A SUGGESTION FOR OW I CAN IMPROVE IT. Here's the gearbox up close. The entire section of the chassis is extremely dense, but the is no gear slipping when driving. Please leave a suggestion, and I will update the thread soon! Thanks for your attention. BrickbyBrickTechnic -
We had been posting updates to our Inferno HQ separately and it was suggested that they might be easier to follow in a single thread. We agreed, so we're making this new post to consolidate everything into a single location. Each post/update will be started with its own heading showing the date. We've just cut and pasted the existing posts into this thread and eliminated the repetitive links to our pages on Flickr & MOC-Pages. Please click away if you'd like to see more of any particular update but as this continues to grow we'll leave those out as they're right here at the top if you need them. As always, we certainly appreciate you checking in on our progress and invite any comments and thoughts you may have. Enjoy! FIRST POST - 7 APR 2016 Godwins Hollow (our LEGO City) was originally started strictly as background for the ongoing struggle between the Agents and Inferno's henchmen. Over the many years that we've been working on our city we always pushed the actual Agent's HQ and Inferno HQ aside in favor of further fleshing out the city itself. However, after years of fiddling with it in LDD and a handful of proofs of concepts we have finally started building the Inferno HQ. We've started with the lowest level and hope to eventually have fully developed floors underneath the mountain and a partially transformable castle/attack post on top of the mountain. This is still in the VERY early stages but there are places to park the mechs and the hover jeeps. The interior of this hangar bay will be a mix of interior rock facing and more standard 'hangar bay' walls. Anyways, just wanted to throw this out here. UPDATE 1 - 25 APR 2016 These images never made it into a post but adding in these updates show a bit more complete picture of the project's progress. 161024 - WIP - Inferno HQ161024 - WIP - Inferno HQ by Stewart & Sydney, on Flickr 161024 - WIP - Inferno HQ161024 - WIP - Inferno HQ by Stewart & Sydney, on Flickr 161024 - WIP - Inferno HQ161024 - WIP - Inferno HQ by Stewart & Sydney, on Flickr UPDATE 2 - 3 SEP 2016 These images never made it into a post but adding in these updates show a bit more complete picture of the project's progress. 161024 - WIP - Inferno HQ161024 - WIP - Inferno HQ by Stewart & Sydney, on Flickr 161024 - WIP - Inferno HQ161024 - WIP - Inferno HQ by Stewart & Sydney, on Flickr 161024 - WIP - Inferno HQ161024 - WIP - Inferno HQ by Stewart & Sydney, on Flickr 161024 - WIP - Inferno HQ161024 - WIP - Inferno HQ by Stewart & Sydney, on Flickr UPDATE 3 - 19 SEP 2016 These images never made it into a post but adding in these updates show a bit more complete picture of the project's progress. 161024 - WIP - Inferno HQ161024 - WIP - Inferno HQ by Stewart & Sydney, on Flickr 161024 - WIP - Inferno HQ161024 - WIP - Inferno HQ by Stewart & Sydney, on Flickr 161024 - WIP - Inferno HQ161024 - WIP - Inferno HQ by Stewart & Sydney, on Flickr 161024 - WIP - Inferno HQ161024 - WIP - Inferno HQ by Stewart & Sydney, on Flickr 161024 - WIP - Inferno HQ161024 - WIP - Inferno HQ by Stewart & Sydney, on Flickr UPDATE 4 - 22 OCT 2016 These images never made it into a post but adding in these updates show a bit more complete picture of the project's progress. 161024 - WIP - Inferno HQ161024 - WIP - Inferno HQ by Stewart & Sydney, on Flickr 161024 - WIP - Inferno HQ161024 - WIP - Inferno HQ by Stewart & Sydney, on Flickr 161024 - WIP - Inferno HQ161024 - WIP - Inferno HQ by Stewart & Sydney, on Flickr 161024 - WIP - Inferno HQ161024 - WIP - Inferno HQ by Stewart & Sydney, on Flickr UPDATE 5 - 15 MAY 2017 So this has been a REALLY long-term project of ours but we're finally making some progress. Godwins Hollow was originally conceived as the place that the LEGO Agents would defend from the menacing henchmen of INFERNO! All respectable evil-doers need a secret lair and this is the start of theirs! Once it's completed we're hoping to have two full levels underneath the mountain, trap doors revealing weapon systems, launch bays, and all of the other despicable stuff an Inferno HQ should have. Once you scroll thru the pics below you'll be able to see we've made some significant progress on the base level both inside and out. The main hover jeep garage, mountain exit, and repair bay are all in place. There is a personnel elevator to take you to the command center and eventually on to the next underground level, and two mech bays for the Inferno mechs. So please take a look at what we've done so far and feel free to leave any feedback you'd like. Enjoy! UPDATE 6 - 21 MAY 2017 Our Inferno HQ is still moving along. The ground level to the mountain base is almost finished and we've moved on to one of the key areas of the second level - the hoverjet launch pad. The face of the mountain will open up to allow the launch pad to extend outside of the main bay area so the hoverjets can launch and be retrieved. There is a small control deck immediately adjacent to the launch pad and the hover jets themselves are stored vertically on automated transport drones. UPDATE 7 - 26 MAY 2017 Today's update is a little proof of concept for the transforming towers that will make up the castle ruin on top of Inferno HQ's mountain. This is our first castle build of any kind and while we are pleased with the result it may be fiddled with before the castle is finalized. As you can see the tower conceals the Inferno cannon which could easily hold Godwins Hollow ransom if the Agents don't keep things in check. Again, thanks for taking a look and your thoughts and comments are welcome. 170526 - WIP - Inferno HQ, Castle Tower by Stewart & Sydney, on Flickr 170526 - WIP - Inferno HQ, Castle Tower by Stewart & Sydney, on Flickr 170526 - WIP - Inferno HQ, Castle Tower by Stewart & Sydney, on Flickr
-
Project Air Pocket (WIP) [gearbox installed]
Aventador2004 posted a topic in LEGO Technic, Mindstorms, Model Team and Scale Modeling
current: the bodywork was the downfall of this car, i do better with gaps and holes. the chassis is my strong point, bodywork is not my strong point with legos. dont expect an update for a few days. this car will not have instructions. sorry i disappoint this time, this next car i have good experience with the bodywork for. a insight: this is not my only project...... le mans... prototype...... power functions..... concept: Air Pocket this is my project i have been working on the last 2 days, project Air Pocket. the aim of my current project is to make the most light, easy to make, simple, and durable car i can. the current car has a simple Rwd, hog, setup. those work fine, but not enough. the plan is to finish before the 24h le mans race, or on that day (17–18 June 2017) as a car to celebrate. some photos.. suicide doors.. for now.. underbody. it is not final of course, just a test chassis. color vomit is there on inside as much as possible. -
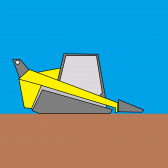
One of the several projects and great MOCs to come, which I have been designing recently in LDD—the AT-ST walker. In brief, this project was initiated after I was inspired by the original design of the waist by anothergol for his articulated AT-ST. Specifically, I was impressed with his subtle utilization of paint brushes and mudguards to easily recreate some of distinct details and features on this region. In addition, I as well, implemented the 5 x 5 scala dishes as the mounts for the support cannons. Then interestingly, I did not notice this until recently, but structure of the feet are designed similarly, with significant use of bracket elements—what a coincidence! However, mine will most likely not accommodate minifigures. Since there are different models of the AT-ST used in the movies and many illustrations of the AT-ST, the principal image I reference is the blueprints of the walker from ROTJ, which was a hybrid of the model actual seen in that movie with a boxy head and the one featured in ESB that had elongated legs. Regarding the design, I took quite a bit of liberty with some of the proportions and details. Specifically, the legs are thicker than should be for a minifigure scale AT-ST, which is lightly attributed to the available elements, but to also an exceptionally sturdy design—it is sophisticated yet simultaneously subtle. Likewise, the waist significantly thinner as compared to the legs and head importantly. This is reason to the length of the mudguard used as the carapace being 2 x 4 rather than conveniently being 2 x 6. Besides the absent connections in the head, as I have yet to design that, the fragmented legs is because those elements are not available in LDD. Lastly, since I could not utilize BlueRender, because I happen to not know how to operate it on Macs, even though I read the tips, I alternatively made an LDD photo box that is comprised of 48 x 48 base plates, hinge plates, and curved bricks :-) Forward view: Rightward view: Rearward view: Leftward view: Downward view: Dramatic view: If you notice for the main cannon, I used the flexible bars, which are hollowed at the ends. Leg details: Brackets are the fundamental element for durable legs. Foot details: Waist details: Brackets are also fundamental here.
-
GT3 Racer (wip)
Aventador2004 posted a topic in LEGO Technic, Mindstorms, Model Team and Scale Modeling
Current. Plasma GT3 Racer, in the velocity racing garage work is being done on the Plasma GT3 car. they have after many tests and months the chassis is finished. the suspension tuning is good and steering works ok . the engine is a l motor producing 194.3 rpm and 9.07 ncm of torque. enjoy and comment your thoughts!!! -

[WIP] Ultra4 Buggy + Black Edition
offroadcreations posted a topic in LEGO Technic, Mindstorms, Model Team and Scale Modeling
Hello all! Today I am presenting my newest project, an Ultra4 buggy. I know it isn't an exact copy, but I based it off one I saw and added my own details, like fake injector stacks. All that is left is an interior and working on the front suspension some more. I'm not very good at making them (suspensions), so it usually takes a while to finish them. Oh, and there's one more thing... I need to test it! I haven't been able to, because it is using broken motors as stand-ins, because my working ones are in something else. I will replace them with the real 2 L-motors and 1 Servo. I plan on using an SBrick. Tell me what you think of it so far, and what else I should add later. Thanks for taking a look! Edit: Here is the video of the completed model. LDD: http://bricksafe.com/files/Offroadcreations/competition-buggy/Ultra.4 FINAL.lxf Rebrickable: http://rebrickable.com/mocs/MOC-7815/offroadcreations/ultra4-buggy/ -
I'm currently building a larger sized mech. I have acquired 3 turntables. Now these two next images are spoilers for my upcoming mech build. So if you don't want to spoil the surprise of seeing the finished thing first, don't open these. But if you need to see the scale of reference for the shoulder then check them out. And here is the shoulder i'm using: I'm using a blue stud/axle pin to create friction so the shoulder doesn't just plop down from the weight of the gun turret i'm attaching to it. But my question is. How do i make this turntable into a fully functional shoulder for a mech? How do i attach it to a gun so it can also turn sideways. Only thing that is finished are the legs so since this is a WIP the upper half of the whole torso will be subject to change. I'm using Hero factory IFB cockpit + pilot in this since it is very effective and easier to build around. Any tips? Should i use balljoints or technic pieces? I haven't decided what type of guns i'm attaching for the arms. But there will be lots of missiles at the back. And lasers in the front torso around the cockpit.
-
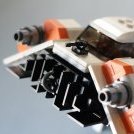
Hey everyone, Was just browsing the board and noticed @Forresto asking about Rebels style Tie Fighters, so I pulled up the ones I designed a little while back that I hadn't posted yet. I haven't had time to build them in real bricks yet, but once I get some free time I'll probably give it a go. First up in the Standard Rebels Tie Fighter; I combined multiple techniques from different builders from here and on Flickr to get the ball as round as possible, I can't remember who right now, but if I remember I will try to add names. Changing the wing size from the standard was a bit of a pain but this seams to hold together. Next is my version of the Inquisitor's Tie Advanced Prototype; The wings were also a pain to build on this one, I tried to keep them as thin as possible, which unfortunately means they aren't the strongest design, but they will work for now. Hope you all enjoy, I realise tie fighters are a dime a dozen, but I tried to go in a different direction with my design to better fit the Rebels aesthetic.
-
[TC11] Wimbledoom
Erik Leppen posted a topic in LEGO Technic, Mindstorms, Model Team and Scale Modeling
I guess it's time to share my works for TC11. To be honest, I started building almost on day 1, so this means I tried out a lot of things that didn't work, and that I won't show all. Anyhow. So, my first plan didn't work because it didn't fit the box (remember the diagonal question? It was a long thin design.) Secondly, I didn't want to do a spinner. A spinner seemed boring to me. I wanted to do something bit more technical. A lifter? A slammer? I built a lot of (non-functional) battlebots back in the studded age, when I was still a nerdy teen, but I don't have those photos anymore (which is a shame). A few bots I do still remember, so I chose a design from those that I always liked. The concept is this: So, it's a "horizontal dual hammer" bot. I think there are very few horizontal slammers, and I think it's cool. The original was named "Wimbledoom" because it had a flat top with some sort of a stadium with two figs and a tennis net (white fence) and some minifig audience. So let's use that as a working title for now (even though the tennis theme won't return) The idea is that there will be some sort of force built up and then released to slam the hammers forward into an enemy that's in between. The high speeds and sharp ends of the hammer will damage the enemy. Then, a slow return mechanism should bring the hammers back in their original positions. So, how to build up force? The frist thing I thought was "wprings are too weak, I want something better" and I was thinking about a flywheel approach, where a motor tries to let a wheel spin really fast and then somehow make a sudden connection with the weapon. This idea got quite far: The idea was that the orange axles move the gear racks so the green gears mesh with the red gears. If slid back, it meshes with the blue gears, which would be the return mechanism. It didn't work. It had far from enough force, and most energy was lost to the drive train anyway. I tried mechanisms with fewer gears (and using tires as gears) but they all didn't work. So I went back to the idea I originally rejected: Springs. These are all long springs I have except for some black ones from a motorbike set. As if it was meant, the dark-gray ones are half as strong as the other ones, which are about equal. Which means this is the perfect spring: As energy is distance times force, this spring, with a distance of 6 studs and a force of two 8466 springs, should store quite some energy (remember, this is the suspension from three large sets added together). So, now the hammer itself. Of course, this is a mock-up. It needs to be strengthened with plates and tiles, because, well... one particular piece didn't survive a test version... (it was already slightly damaged) OK, so I needed a mechanism to rotate the hammer about 180 degrees (preferably slightly more), and a frame to hold it. For the frame, I learned: if it needs to be strong, make it triangular. This is not exactly Pythagoras correct, because the straight sides are 7^2 + 24^2 = 625, where the diagonal is 25^2 + 1^2 = 626 (due to the 2x2 corner plates at the pointy end), but this difference is so small that noone will notice. To rotate the hammer more than 180 degrees, you can't just attach the spring to the hammer directly - you need a system of beams to amplify the motion in some way. This was a long puzzle and I eventually came up with (the red axle is where the spring will attach) The idea is that this is one half of the bot. It will eventually look like so: which gives plenty of space in the center for PF material and a drive system for some wheels. Doubling the frame gives which, as you can see, stays in place without me having to hold it, so it has an automatic locking mechanism due to the geometry of the beams (it locks over center). Moving the yellow part a little makes it blast away with quite some force. I'm happy! Dimensions of this unit so far: Width 17 (which is half, so width will be 35 or so) Depth 34 Height 8 Well within the limits. Next challenges are: fitting some drive mechanism, finding a way to trigger the mechanism, and maybe most importantly, building the return mechanism (which is where the 40t gears come in). -
[WIP] Technic RC Oceanographic Vessel: Rebuilding 42064
BrickbyBrickTechnic posted a topic in LEGO Technic, Mindstorms, Model Team and Scale Modeling
NOTE: THE FINAL VIDEO WILL BE POSTED IN THIS THREAD SO C&C PLEASE! Here's a WIP which is meant to be a 2-3 day build. As of now it's getting done, so here are the pictures of the building process. It has 6 RC functions controlled by 3 motors and a gearbox. The crane can slide 6 studs along the deck, it can slew, and it can go up and down (of course). Sorry for the bad picture quality. Finished model should have much better pictures. Here is the first instance of the wheelhouse. It has a helipad and sort of looks like a box, but it is not even close to done. Video of the crane: Thanks! C&C PLEASE! BrickbyBrick -
[WIP][MOC] Technic Car Inspired by the Lexus GSF
miobricks posted a topic in LEGO Technic, Mindstorms, Model Team and Scale Modeling
Hi Everyone, I would like to share my WIP MOC which I am currently working on. It is inspired by the V8 sedan Lexus GSF. Oh, and this is my first ever MOC project. It will have: - front mounted fake v8 engine with rear wheel drive. - manual transmission with H pattern shifter - separate modules, it can be easily put together / taken apart back to individual modules, mainly because I like to tinker with them. For example if the suspension is not working, I can modify the front axle / rear axle and hopefully it will still fit in with the rest of the build Things still undecided: - PF / Remote or fully manual - how to build the body >> this is where all the other threads are great for inspiration! The modules I have done so far in LDD are front axle, back axle, fake v8 engine, transmission/gear box, and frame. There will be more modules for dashboard + steering wheel, and body. Here is the LDD screen shot of all the modules together. Screenshots of the Individual modules are in flickr. step 6: put all components together by Andy Tanuwidjaja, on Flickr I spent a lot of times on the gear box, it is scratch build because I want it to as flat as possible as it will sit underneath the seats. Then, I move on to real bricks (this is where the fun begins), and so far I have front axle, v8 engine and gear box. There was a lot of modifications which I did on the fly as there are issues with the LDD design, like the gears won't connect properly or there wasn't enough bracing. P1190753 by Andy Tanuwidjaja, on Flickr P1190761 by Andy Tanuwidjaja, on Flickr P1190763 by Andy Tanuwidjaja, on Flickr Currently I am working on the frame: P1190767 by Andy Tanuwidjaja, on Flickr There are some more photos on Flickr, I didn't want to make this post too long. Questions/comments/inputs are greatly appreciated. -
[MOC][WIP] IVY Buggy
offroadcreations posted a topic in LEGO Technic, Mindstorms, Model Team and Scale Modeling
Here's my newest WIP, the IVY Buggy. I started it after getting the idea for this suspension: use the A-arms backwards on hubs, and it worked. I immediately got to work on a full MOC, and this came out of it. Last night I made some stickers by using official Lego ones and combining and recoloring them. Today I worked on it some more and fixed some problems. I don't know what I will do with the fake engine, since it doesn't work. Please tell me what you think and have a great day! -
[WIP] Which should I build: 42043 crawler edition or the "boom" supersonic jet?
BrickbyBrickTechnic posted a topic in LEGO Technic, Mindstorms, Model Team and Scale Modeling
Not sure which to build: 42043 crawler edition or the "boom" supersonic jet from virgin airlines. Reply with a choice if you can and thanks for the help in advance ? BrickByBrick -
(wip) pf 1:10th warrior supercar
Aventador2004 posted a topic in LEGO Technic, Mindstorms, Model Team and Scale Modeling
may i introduce my latest wip supercar the WARRIOR SUPERCAR it was going to feature 4ws but was very hard to make without taking out the diff i so far has steered wheel in cabin, suspension, 2 xl's geared up 2:143:1 through the diff as my first supercar on this site it is not too advanced however it is not my first..... full gallery here tell me your thoughts aventador -
Hello. Presented to you my latest big MOC: The Windmill. Having gathered a collection of books that cover LEGO sets of the past and visited the museum in Billund at the EB event, I came to rather like the simple red and white of the vintage town builds. This Windmill is inspired by the look, with more modern techniques and parts used to create an updated building. This is tagged as WIP as I hope to create a surrounding terrain with a few more smaller outbuildings and a vehicle or two, also inspired by the vintage era. Though, I am also looking to build it as something that could have been inhabited back in the 50s. I also hope to motorise the sails, the tower has space and modularity to allow this at a later date. Thanks for taking a look. Comments and critique are appreciated.
-
Hello again, Eurobricks! I decided for my second MOC I'd dive in the deep end, the easiest way to learn, right? So I thought that the hammerhead would be a good choice being such an iconic ship in the canon Star Wars universe now. I will be updating this topic when any noticable progress is made, which may be a while because this quite a large project for me. This is where I am so far...I've taken a break due to the rear section being the most difficult. Any comments and suggestions are welcome! Thank you!
-
Hello all! As promised in some of my status updates, here is my WIP Arkham Asylum MOC!! (Read the italics in a Batman voice ) Welcome to Arkham Asylum. Walk through the large wooden doors. (The clips holding the rails are skeleton legs. There is a security camera above. But first, take a look at the balcony above. (The grey tile should say "Arkham Asylum", but there's no such print ) Let me show you an aerial view of this place. This is what the inside of Arkham Asylum looks like. But before you walk in, you have to walk through the X-ray. All set. Now see that guy up there, on the second floor? That's Aaron Cash. Here are the two cells which hold the Riddler and Scarecrow. Here's a closer look at the Riddler's cell: And a closer look at Scarecrow's: The other side has two more cells. They hold Two-Face and Catwoman. Here's a closer look at Two-Face's cell: And a closer look at Catwoman's: And here's the eating area. You can catch a bite later if you want, except that the builder of this MOC hasn't built the kitchen yet. So that's my Arkham Asylum WIP MOC! I hope you like it! I do have one request. I don't know what to put in this section. I'm currently considering some crates. Any ideas would be most welcome! C&C welcome too! See you next time! VaderFan2187 out!
-
Hi there everyone so I'm going to try to get around to uploading pictures of my Batcave inspired by the LEGO Batman Movie. I've put the Batcave suit display where I'm planning on expanding it larger to fit all the Batsuits I have. I was hoping that you guys could help me and make sure that I order enough parts for all the suits and so that I don't miss any suit slots. 1. Cave-Bat 2. Glam-Metal Bat 3. Scu-Bat 4. Clown-Bat 5. Disco-Bat 6. Tutu-Bat 7. Com-Bat 8. Kiss Kiss Batman 9. Zoolander Batman 10. Bat-Pack 11. Raging-Bat 12. Arctic-Bat 13. Electric-Bat 14. Classic-Bat (Navy Blue) 15. Classic-Bat (Light Blue, Juniors) 16. Regular Black 17. Tartan-Bat 18. Excali-Bat 19. 1966 Batman 20. Dark Rises Suit 21. Dark Knight Suit 22. Scuba Batman 23. Space-Bat 24. Haz-Bat 25. New 52 26. Dawn of Justice 27. BvS Battle Suit 28. Buccaneer-Bat 29. Beware the Batman 29. Justice League Space Filler 30. Secondary Justice League Space Filler? 31. More LBM suit(s) I don't know should I include Lobster Lovin' Batman and Vacation Batman? Also I'm not really too familiar with Technic, so if you guys have any tips on extra parts I should purchase in order to make it more sturdy. Thanks for your guys help!
-
Hey guys. Today I've started work on my Darth Vader transformation MOC. So far I've got the operation table done. I should have an update tomorrow. I'm working on the floor, having some trouble. I'm not sure how I'm going to do those lights on the floor in that angle. Any tips and/or criticism are welcome. Peace, -JD
-
I am working on a MOC of Scarif from Rogue one but I have been unable to find any reference material for the Citadel Tower, which is sort of a key part of the Scarif base. If anybody knows anywhere were i can get good reference for the Scarif base in general, that would be much appreciated. Thanks in advance.
-
Trying to model the old firestation n°7 from Portland Oregon. It's not in use as a firestation anymore but I really like the building's look. Just not able to find pictures of the interior how it was when still in use. Developing it as a sort of very large modular (so it'll be standing on a corner, and at each end a modular building will be able to connect) Still a whole lot of work (and then I'll still need 4 engines for it, as there are 4 bays) The original it is based on: http://emerick.thisisthebrigade.com/projects/sketchbook-fire-station-no-7/ WIP Portland firestation n°7 by Barduck12, on Flickr
.thumb.JPG.3c74c0d405dc1afb04b2fa216ebc79e6.JPG)


.thumb.jpg.d9cbab8618b55e76a6b011927032a695.jpg)