Search the Community
Showing results for tags 'TRAIN'.
Found 774 results
-
Hi everyone, We (me and my brother) have been busy for the last 5 months. We created a landscape with scenes and locations of the Harry Potter series. The landscape is 8 meter long and 1.25 meters deep. The landscape contains the Hogwarts Castle, the Burrow, London with Diagon Alley, Private Drive and Hogsmeade. The Private Drive, London and train station are built by my brother. I have built the Hogwarts Castle, Quiddith field, the Whomping Willow and Hogsmeade. The Castle was already shown at another event and was also posted on Eurobricks. Hogwarts Castle The Whomping Willow can move three branches and is powered by PF. At the Whomping Willow is scene from Prisoner of Azkaban, where Lupin turns into a werewolf. Very close to the Whomping Willow is Hogsmeade and a platform. More towards London, there is graveyard with the duel between Harry Potter and Voldemort with the presence of the Death Eaters. The Burrow is close to the graveyard. London is one street with the Diagon Alley behind it. There is a small alley between the two. At the street there is a train station with a parking lot. In the Diagon Alley there are several shops and the Gringotts Wizarding Bank. Close to the Diagon Alley is the Private Drive with three houses and a playground. At the backside of the castle, there is a boathouse. The confrontation with the Hungarian Horntale is behind the greenhouses. The Quiddith field and the Forbidden Forest are at the other side of the castle. On the Quiddith field there is a match between Slytherin and Gryffindor. In the Dark Forest there are several Threstrals and Aragog are present. In the corner of the forest, there is a confrontation between Harry Potter and Voldemort as a reference to the last part. Here is a picture of an overview of the backside of Hogwarts. Here is a picture of the Hogwarts Express and the Burrow. Here is an picture of London. Here is a picture of an overview of the countryside. In the front is the Whomping Willow. At the left is Hogsmeade and in the back is the London. More pictures you can find in my Flickr album World of Harry Potter Questions and feedback are welcome. Sander
-
I've been too busy to build much in the last couple of months, so my latest build is actually pretty small. Due to space restrictions, I limited myself to build something modular on multiple baseplates, so I could built on one or two baseplates at the same time, and keep the rest in storage. Another problem was my semi-sorted brick collection, which affected building time a lot. The biggest challenge was to find all the small parts needed. And despite the small size, there is a lot of parts used in the display. I started experimenting with some houses first and then built the rest. Then I continued with the outskirts, the river, the train tracks and a lonely farm on the other side of the river. At this point, I was running low on most of the parts needed to add more details, so I round it up. Some of the details are not in the perfect scale with others, but I think they're still recognizable. This is how the display looks like from a distance. The idea is to extend this display further. While this part was largely unplanned, I need to plan more for the extensions, and most importantly order some of the parts I almost run out. If you're interested, you can find high-res pictures on my Flickr.
-
10254 Winter Holiday Train Ages 12+ 734 pieces US $99.99 - CA $129.99 - DE €89.99 - UK £69.99 - DK 799.00 DKK Euro pricing varies by country. Please visit shop.LEGO.com for regional pricing. Climb aboard the magical Winter Holiday Train! Gather the family for some festive LEGO® building fun with this charming model featuring a full circle of track, boarding platform with bench and lamppost, a Power Functions upgradable train engine with brick-built smoke bellowing from its stack, coal tender, flatbed wagon with a rotating holiday tree, toys and gifts, and a red caboose with a detailed interior and table. The train engine also features large and small red-colored locomotive wheels and the train is decorated with green wreathes, string lights and white tree elements. This LEGO® Creator Expert set includes 5 minifigures. Includes 5 minifigures: a locomotive driver, ticket collector, grandmother, boy and a girl. The Winter Holiday Train includes 16 curved pieces of track, engine, coal tender, flatbed wagon with holiday tree, toys and gifts, caboose, boarding platform, bench and a lamppost. Decorate the tree and drive the train to see the tree rotate. Join the ticket collector in the cozy caboose for a delicious cup of cocoa. Includes dual building instructions for a perfect family build. Accessory elements include green wreathes, decorative lights and white tree pieces, plus wrapped gift elements and tiny brick-built toys, including a micro train, wind-up car, fire truck, remote controlled robot, sailboat and a spaceship. Upgrade with LEGO® Power Functions (not included) for a motorized engine. Special elements include small and large red train wheels, dark tan windows, train buffers, cow catcher, white tree elements and roller skates. This set includes over 700 LEGO® pieces, including 16 curved tracks. The Holiday Train in total measures over 4” (12cm) high, 20” (52cm) long and 2” (7cm) wide. Curved rail track diameter measures over 27” (70cm). Available for sale directly through LEGO® beginning October 1, 2016 via shop.LEGO.com, LEGO® Stores or via phone: US Contact Center 1-800-453-4652 CA (English) Contact Center 1-800-453-4652 CA (French) Contact Center 1-877-518-5346 European Contact Center 00-800-5346-1111 LEGO, the LEGO logo and the Minifigure are trademarks of the LEGO Group. ©2016 The LEGO Group. All rights reserved. Media Here are some great pictures for you to enjoy. Click this link to see the hi-res versions.
-
I've uploaded few images and a short video from my town layout presented these days at one of my RLUG (Brickenburg) events. brickenburg 01 by Severus A, on Flickr brickenburg 02 by Severus A, on Flickr brickenburg 04 by Severus A, on Flickr brickenburg 05 by Severus A, on Flickr Train Journey @ Brickenburg Town by Severus A, on Flickr More pictures could be seen here: https://www.flickr.com/photos/138300538@N03/albums/72157675277228335/with/30244018522/
-
This is my latest project: a 4-6-4 Hudson Dreyfuss inspired stream-liner and it's corresponding train. It was heavily inspired by pictures from Anthony Sava's photo-stream from 2008 and 2007. No instructions were used to build this model. The railway name on the sides of the tender will read Legoredo Northwestern Railroad. The sides of the engine shall have the number 7444 written on it in official printed 1 x 1 tiles. The engine number comes from the screenshot number that was the first WIP shot that I took and coincidentally is near Mr. Sava's 7244 number on his Hudson - type. Here is a link to his model and the only picture I worked from: https://www.flickr.c...s-55973205@N08/ The rear of the engine has a ladder, two hand rails and a red marker light. Here is a close up of the nose of the engine. Fictional engine background: These fifteen 4-6-4 (4 leading, 6 driving, 4 trailing) streamlined steam locomotives were designed for fast passenger work on the Legoredo Northwestern Railroad. The three best riding locomotives of the batch were shrouded in a streamlined, aerodynamic casing, and were assigned to “the Rocket”. This meant they were usually flying along at top speed from New York City to Seattle, with one train going one way and another going the opposite direction. The third engine was held in reserve in case of breakdowns, ready to go at a moments notice. Fictional train background: Here we see the Dreyfuss Hudson pulling a passenger train called "The Rocket", heading from New York City to Seattle via the most northern transcontinental line in the USA. The train is run by the Legoredo Northwestern Railroad and gets it's name from the very fast speed of the train, and for the originator of all modern steam engines, George Stephenson's "Rocket" of 1830. This new train started being run exactly one hundred years after that famous engine began the era of the Iron Horse. The train consists of one baggage car, three passenger coaches, and one observation car. (these coaches are not in the LDD file) NOTES & LDD FILE: Here is the original NYC loco I was inspired by. (picture from Wikipedia) I have found over 500+ parts for this train, so this Art Deco loco and ti's consist will be (hopefully) finished by the end of this year. I also have the LDD file for the engine by itself here ( Hudson locomotive only ) comments, Questions and Complaints are always welcome!
-
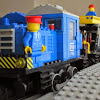
I present you the model of the American locomotive Milwaukee Road U23B, made strictly in the style of Lego City. Model motorized, width - 7, used home-made labels for the greater detail, all the nice view.
-
Winter Village Station_4 Introduction Lego have released two trains and a lot of nice buildings for the winter village, but it still misses a nice place to stop. This is a station with a nice clock tower with two bells so that the citizens can keep track on the time during the Christmas shopping. Inside the station building there is a waiting room, full ticket booth and a small workshop in the tower for maintaining the clock and the bells. On the right side of the station you have a nice fountain and the train schedule. As you can see in the pictures this would be a very nice supplement for the old holiday train (10173) and this years new winter village set (10254). Basic Info Approx Dimensions: Length 62 cm x Width 12.8 cm x Height 37,4 cm Number of pieces (with minifigs, without track): 1200 Clock print: 17038 Input and support will be appreciated. https://ideas.lego.com/projects/154973 Winter Village Station_with Train Winter Village Station_Detail
-
Hello, I ordered the purple 6556 windows via Bricklink. When they came I realised that they got ugly circles/points on the right side (molding connection points?) Do the older 4033 look the same? Do they got also this ugly relicts? Max
-
Hi everyone! Fortunately I have the time to share here my newest creation! It's a train and it's the model of an ICE 3. It is 196 stud (157 cm) long and contains more than 3300 pieces, two IR receivers, two battery boxes and two train motors. Hope you like it! Oh, and another important information is, that it will be visible on Zusammengebaut 2016 in November and on Bricks am Meer in April 2017 in Germany!At first please watch these two videos! The first one shows a crash. The place, where I made the video, wasn't horizontal, and on the slope the train got a too high speed The records of the second one were made after I repaired the train. Well, I can say it is quite stable construction, despite the building techniques of the front. During the crash, only the boogies fell down! I'm really happy, that it is ready! It took me almost a year to build and become satisfied with the result. You may know, if someone build a train, the front is the most important thing. If it's not good, it's unnecessary to build the other sections. Everything started with an LDD model from a front-idea. I built something in the program, but I didn't like it. Later it came always into my mind and didn't allow me to be calm. So I started to develope the construction. Some month later it looked nice enough to order some parts and make it in real life. It contained so many interesting and strange techniques, that it was a real challenge to put the bricks together in the program, and with real bricks it was hard, too. And the real 3D model was ugly! But I said, that it has to be possible to find out something, which makes the model better. So I made some changes, and some more, and some more, and finally I liked it, and I thoght that I found the maximum! I stored the train (only the front section) and some other parts on the table in the middle of our house. And one night, I couldn't sleep. I woke up and went out to the table to do something. And I don't know why, but I put an element into the middle of the front. And I said 'wow'! It was perfect (for me of course, for you, I still don't know, but I will read the comments :) )! Some gaps disappeared, some sections got new positions. That element made so big changes on the overall look, that it was incredible! I felt high, but next day I was very sleepy. :D More pictures are available here: http://www.moc-pages.com/moc.php/433076 Thanks for watching!
-
Several years ago I posted about my project to build the Windhoff MPV. I updated the post last month with a few pics of the almost completed models. The models depict the electrification of existing train track for running of electric trains. The whole build project has been inspired by the electrification of the Great Western Trail Line in the UK using the Windhoff MPV. Last weekend I attended the Brick Event on the Gold Coast (Queensland, Australia). The table was a bit cramped but by talking to the public they were able to see the design and function of the machines. By the end of the first day talking to my table neighbour he convinced me that the 2 tables wasn’t enough for the display so to the floor I went. Originally I was going to build two MPV’s, but during the process I increased the build to three with the third having a container style build with some nice snot construction techniques for the drivers cabin. I was quite happy how this turned out. The Windhoff MPV’s were fun (even if it took me a while) to build, especially since I went 8-wide therefore creating the scale of 1 stud = 1 foot. This gives the models great detail and sense of scale. I coupled the MPV’s with a wagon using the same scale. The MPV’s feature ISO locking points at 10’ intervals and a small knuckle boom crane at the trailing end. The substructure detailing was fun to create, trying to get the detail right balance between ease of build (using the parts I had), Lego geometry and accuracy. I was able to get during the build a couple of 1x4 light grey tiles with a text on them looking like a serial number or build plate. At 70 studs long (buffer to buffer) I was unable to get the bogie set to rotate as it is fixed to the sub-frame structure, so running it around the track is a no go for me. The coupled wagons are 70’ (buffer to buffer) long at have ISO coupling points for 3x 20’ or 2x 30’ containers/pallets. I’m not 100% on the real world bogie spacing but again they are fixed and offer no rotation. As part of the display I had previous built MOW equipment (trucks and the work wagons created by other talented individuals) showing the electrification process. I designed my own catenary system and while I’m happy it has room for improvement. Stage 1 – footings The Robel Bullok and trucks prepare the site and the footings. Stage 2 - mast MPV #1 is configured for mast installation with a stylized cab, 10’ tool room, a frame for mast storage and a long reach crane. Stage 3 – minor structures MPV #2 is configured for minor structure installation with a stylized cab, 10’ tool room, a 30’ pallet with an elevated work platform, and knuckle boom crane. Coupled to this is a wagon which holds plenty of catenary structures and a knuckle boom crane. Stage 4 - Wiring MPV #3 is configured for wire installation with a snot container style cab, a 30’ pallet with an wire dispenser spindles and a knuckle boom crane, a 10’ section for more spindles and again a knuckle boom crane. Coupled to this is a wagon which has a 30’ pallet with an elevated work platform, and a 30’ pallet with a 24’ scissor platform. Stage 5 – testing The Plasser & Theurer MTW100 measure test and adjusts. As can be seen in the pics I used twisted wire. It was a great idea that didn’t pan out as I expected with too much twist and rigidity and the real stuff is held under tension which isn’t possible with my display. I have brought some other wire which will stay straight thanks to the youtube video hack.. There are plenty of small improvements to be made, but then no one is ever 100% happy….LOL None the less please enjoy the pics and let me know what you think. Video: <iframe width="560" height="315" src="https://www.youtube.com/embed/vU1z_H10LF0" frameborder="0" allowfullscreen></iframe> 2016 Brick Event Gold Coast by Aaron Coghill, on Flickr 2016 Brick Event Gold Coast by Aaron Coghill, on Flickr 2016 Brick Event Gold Coast by Aaron Coghill, on Flickr 2016 Brick Event Gold Coast by Aaron Coghill, on Flickr 2016 Brick Event Gold Coast by Aaron Coghill, on Flickr 2016 Brick Event Gold Coast by Aaron Coghill, on Flickr 2016 Brick Event Gold Coast by Aaron Coghill, on Flickr 2016 Brick Event Gold Coast by Aaron Coghill, on Flickr
-
The German BR119 was developed in 1937 by AEG, Siemens Schuckertwerke. At that time it was the most powerful electric locomotive in it's time. With the outbreak of world war 2 these engines couldn't be tested and developed further and speeds where then limited to 140km/h to keep them in use. The engines were really reliable and have been used up to 1968. Many liveries of this engine excist, I choose the dark blue livery with red wheels which I think really stands out. I really love these old electric locomotives with their big wheels and huge pantographs. First of a picture of the real engine; And my version (in the picture it somehow looks shorter then it really is); Making the sloped front with the 3 windows was not that easy; I choose to add the wind shield wipers to make it less plain, if only there were dark blue levers; Detail on the roof and pantographs; Apart from some rigid hose the model does not have cut or painted parts, for me this was really a must. I used some old 12V Lego stickers to add the logo's and numbers. Due to the complexity of the build it does not have an engine or lights (yet). I suppose our resident train experts would find this an easy task, but for me this is still challenging. The idea is to ad 3 coaches in the same livery, one of these will have two 9V motors. So there you have it, I hope you like it!
-
Hello all, this is my first post to the EB forums! I've recently unearthed my childhood collection of Lego and am doing a little refurbishment on my 6990 Monorail Transport System. Since I was pretty OCD about my sets at that age, and since my parents packed things away pretty attentively during my Dark Ages, the set is in outstanding condition. I thought I'd share some of the experiences I've had, and some questions that arose, as I've been rehabilitating it. Parts There was only one missing piece in the set, a simple white 1x2 plate, so no problem replacing that. Also, the set has only 7 of the large supports, enough to build the main model—but the online inventories say there should be one extra, for a total of 8. I don't recall there ever being an extra; was this included in later editions of the set? Right now I am considering the set complete with 7. In building the set, I broke one of the white antennas because of the very tight fit of the trans-red dish onto it. Again, this was easy to replace (I got two in case the other one ever breaks.) Other than the 8th support, I have all the various extra parts that came with the set: the different 1x1-size parts, trans-blue minifig visor, trans-red light cover, etc. I even have an extra white 1x4 brick for some reason. Was this a genuine extra part, a factory packing error, or did it just get mixed into my set by mistake? My biggest challenge is with the electric connector wire. This set came with the rare plate-sized connector, which has small clips on the underside of its plate ends that cover the electrical solder as well as providing the clutch power for the bottom. The tab that holds this clip onto the plate itself is very tiny, and with age the plastic seems to degrade so that these tabs break off and the clip becomes loose. It will often be pulled off by the act of disconnecting this part from the battery box studs. (The same degradation results in tiny cracks forming in the plate ends, which must be why so many of these listed for sale have corners or edges missing. My part has the beginnings of these cracks, but so far the damage is minimal.) This photo shows the underside of the part, both with and without this clip: I am currently sourcing replacements for this, but there are very view for sale and most of those seem to be in worse condition than my own. I'm wondering if I'm better off just gluing the clip back in with a plastic cement; has anyone else ever dealt much with these vintage pieces? Yellowing As you'd expect, many of the white and grey parts in this set had yellowed, but I've had good luck reversing this. After reading about numerous un-yellowing methods of varying complexity, I'm glad to say I've had good success with a simple 3% peroxide solution in direct sunlight—no added OxyClean or higher strength peroxide solution—and most parts have returned to white in a few hours. I'm using clear plastic containers, and I'm sure it helps that I have a white table outside to put them on. I made a quick cornstarch & peroxide paste for the battery box, since it can't be submerged, and the large baseplate, which is too big to dip. A few parts showed more resistance to de-yellowing: the webbed radar dishes needed some extra time, and for some reason the 1x1 cones as well. The soft plastic of the flexible hoses did not respond to the treatment, but the end pieces did, so these are now a two-toned affair. I'm currently re-dipping the long Technic rack pieces; these almost look like they turned more yellow. Are they a different plastic, and should I be using a different technique for these? Meanwhile, a couple of parts (the rack winder and the motor housing) never yellowed and are still completely bright white—they must also be a different plastic—and so I'm using them as my color comparison to the treated parts. EDIT: One of the straight track pieces, which was significantly more yellowed than the rest of the track, ended up suffering some fading and is now a bit of a chalky white on the top and one side. I knew this was a possibility with light grey parts, but even though I was getting the yellow out within a few hours of treatment, I somehow assumed that the bleaching problem wouldn't happen that quickly. Of course, it had to be the relatively rare (and thus expensive) straight track, so it will cost I bit if I decide to replace this part. :-( Packaging As far as I can tell, I have the complete packaging save for the original polybags. I have the outer box top and bottom, red inner box, four plastic inlays and a plastic inlay lid. I even have the cardboard space backdrop and the original catalog that came with the set. The instructions are in excellent shape, too: only the outer leaf (cover and fold-out back page) has separated at the staples, but the booklet itself is otherwise undamaged. Overall Of course I checked the electrical function and everything works perfectly—although I went through three 9v batteries that I had in my drawer before realizing that every one of them was dead; it wasn't the monorail! A trip to the store and one new battery later, all was well. I have not yet decided if I will try to sell this set or keep it in my collection. I believe I can get quite a good price for it as the condition is excellent and the set is 100+% complete. Then again, I might hang on a bit and see if the price goes up a bit over time. :-) Thanks for reading, and I'd love to hear about others' experience restoring this set or with some of the issues I've found. Meanwhile, my next project will probably be the 6285 Black Seas Barracuda, arr!
-
Hi all! I've been a long time guest and always appreciated people's detailed and helpful posts on topics I've researched. I am a long term 12v fan and have a fairly decent collection, which unfortunately stays packed away most of the time. I do hope to set up and will hopefully be able to share some stuff on here. Anyway, I'm on here for some advice regarding the 60051. I've recently decided to get my little boy started on Lego trains and managed to secure 2 sets for him. I thought this would be a really good starter set for him as he is only 4 at the moment and he loves inter-city trains! I was thinking of keeping the tracks from both sets and adding some points to make it a more interesting layout and adding the additional carriage. What I was wondering is what I can make with the two engines? Do they turn into more carriages easily enough/ with not many more additional parts? I was hoping to get as much out of the additional set as possible and maybe selling the PF parts to help fund more sets for him. Thanks in advance!
-
[MOC] RC Caterham & Lotus 7 powered by RC Train Motor
JamesJT posted a topic in LEGO Technic, Mindstorms, Model Team and Scale Modeling
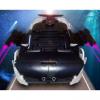
I made a RC Caterham and a Lotus 7 version using 2 RC train motors. I borrowed a steering design by Anto (from his Ken Block Fiesta) that makes the car lift its inside rear wheel when cornering. It means the car can do without a differential and produce roll induced oversteer. The Lotus has narrower front and rear axels. Caterham.lxf -

The Great Train Robbery of 1888 - a comic told in real pictures
Murdoch17 posted a topic in Brick Flicks & Comics
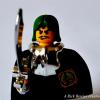
(Mods, please note I wasn't sure where to put this, as it's a train / western / comic starring a few licensed Disney characters. Please put it where you think it should go!) In this thrilling tale of 60 miles-per-hour high speed adventure, the outlaw Blackheart Gang) switches a weapons-laden military train onto the same track as a unscheduled special, with disastrous consequences! See each sequence of this horrifying tale in colorized photographs and you too will ride the midnight train to Adventure! 7:07 PM - Denver Colorado: The military train pulled by engine 1 is heading out of the yard and onto the main line towards San Francisco. It is crewed by a small group of soldiers, plus fireman Samuel McGee and engineer Joseph W. Jackson. 8:00PM - Carson City, Nevada In another rail yard, the crew of the unscheduled special charter train pulled by loco number 3 is making sure the engine is spotless and ready to pick up it's party of potential railroad investors. The train is supposed to pass trough Fort Legoredo at 9:30 that evening, where it will let the military train pass by on a side track. 8:40PM - Fort Legoredo While making his hourly rounds, the station master of the Fort's railway station is ambushed by three Blackheart Gang members, and he is relieved of his switch keys. While trying to escape, he trips on an exposed rock and falls, where upon he is then shot dead. 9:23PM The switches are set for the freight train to fall into the hands of the gang, when a different whistle is heard from the other end of the track causing the bandits to hurriedly switch the tracks back to allow the special to pass by. 9:30PM With both train approaching the same switch at the same time, the gang works quickly to allow the passenger train pass by, but still diverting the convoy train. 9:32PM The engineer and fireman of the military train see what is about to happen and jump to the ground with the iron steed still powering on towards the switched track! 9:40PM The train reaches the end of the side track and derails, with steam and steel flying everywhere. Horses and cannons are sent scattered across the tracks, and the sleeping soldiers on-board will never wake again. 10:20PM After stealing all they and their horses can carry, the Blackheart gang set the steam engine to explode, then set off into the darkness. A posse rides out later that night from the local village to check out what made the explosion and they discover the gristly wreck. Meanwhile, out in the desert, the Blackheart gang begin to plan their next move. THE END Any and all thoughts, comments, complaints, and questions are welcome. This non-moving picture was shot on three 6 x 3 foot tables with a cell phone camera and no special effects... just so you know. Thanks for reading!! -
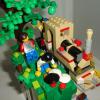
Hi all ! After working on a set of steampunk vehicles ( you can see them here : http://www.eurobrick...howtopic=134635 ), i came up with this little train and the station coming with it. It's a part of the complete universe i'm working on, a complete steampunk town. The train: i came up with something minifig sized, that can be used easily and build quite easily. It's definitely much more a subway train, as it has open sides. It is reloaded every time it comes to the station. The station: It is built in two separate buildings, and once assembled together it's a 2400 parts build. Fully detailed exterior and interior, and again minifig scaled. On the last pic you can see one of my cars on the side, just to compare. Hope you like it ! Comments and critics welcome
-
Hello there! Recently I have taken my time to wash and sort my old inventory of Lego pieces. Parts from way back in the 70s (which were donated to me when I was about 5), parts and complete sets from my childhood (including the wonderful Set 740) up to my last Lego Technic Set (8868). After that last technic set, my Dark Age set in and lasted until 2016, nearly 23 years... and I just came out of my Dark Ages because of my little son, as I am preparing to get a hold of the old sets (hopefully complete) to give them to him as presents over the next years. Well, it didn't take long to completely draw me into the fascination of building with Lego again. When I gathered the pieces to put together my Metro Liner (4558) and, after a sleepless night, I had my Railroad Crossing (4539) complete as well, I suddenly ended up buying some extra tracks, points and even a crossing. Some of that extra track came with two very, very incomplete sets: No 1, the Load and Haul Railroad (4563) and No 2. Freight and Crane Railway (4565). Basically, there is no single engine or rolling stock anywhere near complete. 20% of the pieces are existant at best. At the moment I am trying to restore those as possible with my limited inventory. So, that's how I ended up here, searching for clever tips and tricks to somehow finish those two sets with my limited amount of bricks and trying to get some insight to what is new on the topic of Lego trains. And maybe build some MOCs too, while I'm at it Thanks for reading and have a good time building, Capparezza
-
Mod note: Zombie-bumping this because of major updates to the structure and the possibility of really building this is pretty high. I hope this is ok. This bridge was inspired by Bad Cop's Pursuit (set 70802) and the short section of railroad bridge included with that set. When I first saw it, I thought it would make a great play feature for a train bridge that is actually usable by trains. Here is the result of all that working and reworking: 12 sections of PF / RC train track (It won't work with 9V, sorry!) with 1 section "failure point" plus 2 studs of space to separate the moving from non-moving items and allow the hinge to do it's job. The track leading up to the "failure point" as I call it, is raised ever so gently at an angle of (at most) 1 1/3 bricks high per 1 section of track. (The angle of ascent / descent depends on which part of track you are on, but for the most part it's consistent.) The design of the bridge is modular so that you can easily disassemble the bridge for transport. It disassembles into 2 lower ramp sections consisting of 4 tracks each and 2 flat sections placed onto plates with the 1 "failure point" module consisting of a hinged (on one end) two-track section in the middle. The bridge when the track is safe to cross: the pins are inserted and it should be stable. Naturally, a very heavy engine will snap the Technic rods in half, breaking the bridge permanently. Thus you can only use this engine with Small engines like my 2-6-0 + it's consist, (AKA the Lone Ranger train) the My Own Train series engines, or something of comparable weight. I don't think putting a articulated such as a Union Pacific "Big Boy" or even a non articulated Pennsylvania "T1" would look very good on this bridge, as these (among other large types) are longer than the bridge gap itself. This is how it works: Their are two hidden Technic rods under the track that should allow trains to pass by safely overhead. Pull the Technic connector and your bridge collapses. Lift the bridge up and move the rod back in to reset the bridge for the next adventure. To give you a bit of perspective on this mode's progression as a concept, here is the original idea from February 2015. It was a lot more complex with two rods and two break points, plus in all likely hood it would not have held up well if carried with the flimsy base-plate underneath. Nowadays we have only one drop point and reinforced regular plates! (this model is not in the LDD file, and is just for demonstration purposes) Updated LDD file for the newer bridge model: http://www.moc-pages...1472495977m.lxf As usual, all comments are welcome, be they questions, suggestions, or complaints. Thanks for reading!
-

My 1500km road trip in the name of Lego . . . . some pics and commenta
Breakdown posted a topic in Community
There's probably a couple of you who saw just the 1500km round-trip part in the "Shameful Confessions" thread. For those who don't know I'm from Canada. Tariffs are a pain here, and 12V lego is virtually non-existent anywhere in the Americas. If you spend 48 hours, you are permitted $800, so I managed to grab a few outer rails for my blue 12V stuff, a few cross overs and managed to snag a great deal on a pair of monorail points. Ever since seeing pictures on social media from a friend I've had the abandoned turnpike on my bucket-list. The key has been finding a legitimate reason to go there. An auction winning from just inside the Virginia border would finally be the catalyst - stated on E-bay local pickup only. After much back-and-forth between the sellers and myself, along with a friend's house that I stayed at - around the Pittsburgh area. We settled on a date, and then it was just me my car, my friends and 1500km on the road. (For those with a keen eye for violations, my car was in park while taking pictures in juristrictions where there are laws against that kind of thing. I also had some help in the car. It's about an hour an a half to the US border. I selected the "Rainbow Bridge" because it was the long weekend. The picture, and by far the clearest I've ever seen in my lifetime at that location, is the duty free store, just prior to hoping on the bring. It's usually more time efficient to cross at the Peace Bridge, but inbound visiting the US, it's usually the worst or near worst of the three options. In all I spent about 30 minutes in queue awaiting customs. It's a pretty spectacular view. This is the view just prior to entering Grand Island. There's not much on the island, other than a small them park of sorts, which looks very dated. There's a $1 toll to cross into the island. This view, you can see the Skylon Tower, Minolta and the Casino down by the Falls. Obviously the bridge to the island. I look some Panoramas, and eventually I'll get around to processing some of those. I love the blue on these bridges. I was just weirded out by these patterns, it's as if they wanted to prevent walking on grass at all costs. You can't really walk in a straight or perpendicular line at all, this is from the lookout, where the pic of the bridges was taken. Bridges leaving the island are more attractive. But man are they skinny!! Welcome to PA!! This was the 10 minutes of driving on the way out where it rained, not hard, just just got a little rain. PA is the northern border of where we can get this stuff and OMG!! That sweet, sweet nectar. I was so hungry but it was totally worth waiting for Pennsylvania for the Sweet Tea. I can't get this at home and every day without it I die a little inside. -
Hello all, It has been a bit silent from my part, but I have built something new: NS 1217 by Erwin, on Flickr The NS (Nederlandse spoorwegen/Dutch Railways) 1217 was part of the 1200 series which was a joint effort of Dutch and American designers as part of the Marshall plan. It was built in the fifties and have been in service until 1998, they were then sold of and repuposed at other transporters, with some still in service today. NS 1217 by Erwin, on Flickr NS 1217 by Erwin, on Flickr I have built a total of four carriages to accompany it, I will take some video's of them all running when I finish tweaking their designs. NS 1217 by Erwin, on Flickr My model has working lights in the front and back and 2 9V train motors. Thank you for reading/watching! As always, more pictures on my Flickr
-
[WIP] RC car with Train Motors
JamesJT posted a topic in LEGO Technic, Mindstorms, Model Team and Scale Modeling
So another day playing with train motors. Here is L motor vs RC train motor in version 1. train vs L by James Tillson, on Flickr Skip a few generations (videos are on flickr) and I have something faster than 2x L-Motor (gear up x3). RCT Car V4 by James Tillson, on Flickr -
Blue track 12V score . . . . . any thoughts on Blue vs. Grey?
Breakdown posted a topic in LEGO Train Tech
Recently I came across an interesting ad for some 12V odds 'n ends, and decided to travel 85km or so, to make a purchase for $50. The person who sold this appeared to be a student, I was planning on asking how this ended up in Canada, as I cannot find any proof that any of the 12V stuff was ever sold here, but with her being younger I kinda gave up, she seemed eager to have her money and close to door transaction over before I could realize that some of the stuff wasn't in the best of condition. Here's what I got: - 90% of a 721 train (this is the engine only variant, and all of the unique parts) with a working 12V motor, and original instructions to build the train (I was missing much of the black section where the driver would go at the back). - A bunch of other 1969 era original instructions. - 2 transformers (one of the two had broken plugs wedged in it, the other had the european plug end cut off (I think that they were powering this with a car battery or other source) - 7 12V track switches - 8 Remotes for the 12V track switches. - 2 Track power pickup (not sure of the technical name, but they power the tracks and go to the transformer). - Random lego bricks that have nothing to do with this stuff, but are old - One broken 12V motor with a pair of power pickups. - 63 Straight 12V power rails - 63 Curved 12V power rails - 1 level road cross over piece that someone decided should match the track and coloured blue with a crayon or marker - It looks horrible!! Everything (aside from the wires) is in decent shape considering it's about a half century old. Absolutely no blue outer rails, I happened to have some because I have a 182 kicking around that I had purchased mistakenly from a newspaper ad around 1992 or so - not knowing that there was even such a thing as blue-era trains (I was kind of confused and disappointed when I got to the door and saw the set, after being very excited over the phone about it at the time). So I was able to test the track and trains (I only have a full circle of blue curves). My first attempt was using my grey era 12V transformer, and then the Blue era one after using pliers and working the broken plugs out of the switch power area. I'm not sure if anyone else has tried this, but I didn't think that the switches worked as well using the grey era transformer, and the train was most definitely faster at top speed forwards and reverse using the Blue era transformer. I'm assuming that you were intended to put the switch remotes on the top of the Blue era transformer, not sure??? They look good up there & fit perfectly. Definitely a purchase which has me scratching my head. I probably would have paid much more if they were asking it for this. It's very interesting to go back in time and try and work with this stuff, feel blessed to have gotten this lot. -

Updated Santa Fe train - what features would you want?
Lego Dino 500 posted a topic in LEGO Train Tech
Right now I'm designing a updated Santa Fe train consist, hopefully to scratch the urges of the original without the hefty costs, but I want to ask a few questions before I start working on it. What parts from the original are the most expensive and difficult to buy? What are some better methods to tackle the nose without the expensive parts? I'll be posting updates and images, with LDD files as I work on this and at the end will upload to my Rebrickable, where I already host an old project. -
Hello everyone ! I"ll present you one of my last MOCs. It is my version of famous 4547 Club Car: As original, it has doors on both sides: Details of exchange door: Details of wagon: For easier approach for the interior , it is possible to remove "glass" cover: The upper floor can be removed: There are two beds inside with taps and airconditions: This Club Car is part of my MOC passenger train. In this video you can see 4 wagons and train engine previuosly made. This Club Car will be great addtion to it. See you soon
-
After the last boxcab, Commander Wolf and I figured we had to go smaller. And slower. So we decided that both of us should build a motorized model of a GE 23-ton boxcab. We agreed to build them models independently, then meet up and compare approaches. We started with the same scaling image: Since there was some variation among the prototypes, choice of details was a matter of taste. I took most of my references from here. Here's my finished model: The original locomotive is really tiny, so I tried to keep the model about 7 studs wide. There's a lot of SNOT in this model: The main chassis is upside-down, the deckplate and frames are held against that using Technic pins, and the body attaches to some jumpers on the deckplate: The battery box is mounted sideways in the body and the power switch is reached by jabbing an antenna through the window. The roof is actually only held on by gravity: Originally I wasn't sure if I was going to put the caution-stripe tiles on the frames, but codefox421 vouched for them. You can see the full Brickshelf gallery here. So, what did Commander Wolf do? Read on...