Search the Community
Showing results for tags 'MOD'.
Found 469 results
-

[SR - FB 4 - April 620] The hunt for Red Oktober II - The story of doctor Thaum
Professor Thaum posted a topic in Brethren of the Brick Seas
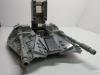
Back in March 620, Prio Sea, North shore of Tortuga... precisely at Dr Thaum's pied-à-terre The young Iauln is up the tower, searching the horizon with his telescope, the trusted Callaghan is manning the grill, and the doctor... PSHHHHHHHH ! PSHHHHHHHOUUUT ! SHHHHHH ! SHHHH ! KLANG ! Dr Thaum : EUREKA ! It works ! Callaghan, my steam engine is working ! The wheel is turning !! YEEEEEHAAAAA ! TJ Johnson : Excuse me doctor, your parcel... Dr Thaum : I don't give a sh... of that parcel Callaghan, you're a bonehead, Callaghan ! TJ Johnson : This is not Callaghan, doctor... Dr Thaum : UH ?! Oh, sorry, TJ, which parcel ? Errr... OK THE parcel ! You've found him ! Well done TJ ! Here I come ! Dr Thaum : Wonderful guys ! Bring the coffin in my pantry... CALLAGHAN ! Show them in ! And then offer them a drink ! XXXXXXXXXXXXX Dr Thaum : Dear professor, you're finally back to me ! TJ Johnson : Allright doctor, can you explain me what's going on ? I terminated about twenty persons for bringing that corpse back. Dr Thaum : Of course Mr Johnson, You've just brought back to me the corpse of my estimated mentor, the professor Oktober Sippio, he teached me most of my knowledge... TJ Johnson : Talk, talk ! Why should I bring it back untouched and eliminate all witnesses, the 2 altonian captains and some of the crews ? Dr Thaum : OK, OK... many years ago, the war between Oleon and Corrington was in full swing, and with this war, its share of destruction, orphans, famine and diseases, notably the leprosy. The lord-chambellan came to the professor Sippio and asked for a terrible disease, ready to take a heavy toll on the Oleonese ranks and he asked for a cure too, for Corrington, of course, for a stated price... Something as terrible as leprosy. I just defended my thesis and became doctor, with my friend Henry, under the direction of the professor Sippio, and all 3 began to work on this scourge. Callaghan : Wait a minute ! You got paid for that !? For a disease ready to rampage the world !? Dr Thaum : You're a bonehead Callaghan ! I get paid for my care ! The death is offered ! Anyway, the research, especially for the cure, needed a vast amount of money the lord-chambellan was hesitating to provide, and there were suddenly changes in the royalty and the lord-chambellan was dismissed for womanizing, but this red leprosy... Callaghan : This leprosy ?? TJ Johnson : Finish your story doctor... Dr Thaum : This leprosy was good and ready. The cure was ready too, but we barely had only half a dozen unit dose, we do not have fully tested. A cleaning up was then initiated in the ex lord-chambellan business, our lab was destroyed, Henry and I escaped with few samples (including some of the cure) and books and the professor was captured as he was burning the last flasks of Red Oktober. Nethertheless, the professor was the only one to have the complete formula of the cure, but just before I vanished with Henri, he had time to say " I will point to the solution". Since then, I have done all that I can but the professor died in jail and his body ended up in a mass grave. After years the mass grave was found and under my instructions and with some money the coffin was loaded in the LaCrosse, a ship hired for the Sea of Thieves sea link. Unfortunately the ship sank near Terraversa, and it took me almost a year to find the sinking localisation. But when the LaCrosse wreckage was found, that was only to realize that 2 altonian ships found the coffin, probably floating on the sea near the wreck, and take it with them to Ulric. This is where you come in, TJ... Callaghan : Why Red Oktober, doctor ? And were are the flasks you runaway with ? I hope destroyed !? Dr Thaum : Red Oktober... because of the red color of the substrate, and destroyed... No. Have a look around you Callaghan Callaghan : Reuuaaargh !!! This is the Red Oktober ? Dr Thaum : Indeed... Callaghan: And the cure samples ? Dr Thaum : Already consummate Callaghan Callaghan : Let me develop a bit... This is the reason why Henri, Barney, Hadvice, Oggy you and I boarded the Leper Messiah and the Leper Crusader ? You and Henry tried your cure ! And it didn't succeed ! We now have 2 doomed ships storming the seas with full crews of infectious demons !! That's an outrage ! You're a fool ! You lost your best friend and even your son ! And you aren't seeking a solution anymore ? Dr Thaum : Shut up Callaghan ! The cure is a success, as you noticed it, Barney, Oggy, Hadvice, you and I are well, right ? and... TJ Johnson : Why did you give your last dose to me ? Dr Thaum : Some flasks were broken in the skirmish as the lab was destroyed and the professor captured, there was a mini leprosy outbreak after this in the city, and the professor died of his own Red Oktober in jail. So the last dose was for you, as you perhaps have to touch the corpse and bring the last sample back. And Callaghan, the solution is here ! That's why I hired TJ for bringing the the coffin back. The cure formula comes with the corpse of Oktober Sippio ! "The professor point to the solution" Callaghan : You administer me the cure ? When ? Why ? and Henry ? and Hadvice ? Dr Thaum : Enough Callaghan ! Enough ! You have a drink to offer ! Callaghan (leaving) : You smutty old fool! Dr Thaum : Look, TJ, for the cure, "the professor point to the solution", look at that right arm and the index finger... TJ Johnson : A false finger ! How did you notice that ? Looks like a true one ! Dr Thaum : Henry and I made this false finger, the professor asked us to amputate him and replace the real one with this prothesis this is an empty one and he probably hid the cure formula inside. That's why I wanted you to bring me the body back or at least the right arm ! Dr Thaum : All our efforts are rewarded ! I now have the cure formula ! This is designated to be the Doctor's residence in Tortuga, should be licenced as a medium one with court approval @Bregir @Capt Wolf @Bodi @Ayrlego (because of being only a MOD of the old fishing store official) I hope you enjoyed the story... all is not revealed, there is lot more to come ! C&C welcome as usual, bonus pics (of all that was MODed later on ) -
Hi Folks, my name is Friedie, I'm from Bonn, Germany and this is my first posting here. I was born back in 1967 and I allways was a big Starw Wars Fan. In the last years I followed all that Lego Star Wars Creations on the Internet but never took part in building Lego myself (what I did when I was a child of course). In 2017 I thought of buying the new UCS Set but I was was a bit disapointed, that the Interior was not complete and they used these "Sticker-Hallways". I know, it is not a play-model, but even a Display Model should be "complete"in my oppinion, even more when you consider the high price. But The Falcon allways was my favorite ship, as Han Solo was my favorite charater of the series. so finally I wanted to have a Lego Falcon at home, so I decided to buy me the 75257 Edition. It was fun to build but the outcome is so much different from the original thing. So I first decided to mod it and got me some more parts from bricklink. Corona came leavin me working at home and having much more spare time. I looked up a lot of mods and mocs on the Internet, and I also found this site of course. There are brilliant works (stifos!) that inspired me from the start ofmy building efforts. Finally I finished my work and it evolved from some simple mods to a fullgrown moc of the Millennium Falcon witha detailed interior. First some Numbers: Length: 53 cm (75257: 44) Width: 37cm (32) Hight: 17,5 cm (14) Weight: 3,2 kg (2,1) I don't know the number of parts, cause I just build the thing together, so sadly I don't have instructions or part lists to offer. But here are the first pics I want to show you... The "Corona" Falcons Overall Exterior:
-
Inspired by some of the other excellent threads on this forum, I decided to have a go at lengthening my First Order Transporter: I've added an extra 16 studs, twelve of them in the troop compartment: it can now take a total of twenty stormtroopers. I have rebuilt a lot of the details: I have also shortened the cockpit and moved it back. It is accurate in profile and still fits a minifig. Finally, I've lengthened the engines and added some greeblies to the space between them. Sourcing another 16 stormies was fun but expensive: Battle of Takodana + 2 batle packs + 2 Bricklink orders. Special thanks to our very own Lobot for his rapid and friendly Bricklink service. Many thanks also to Vodnik, deskp, Veynom & Solscud007 for their inspiration. If anyone wants to build this mod, I've created a Lego Digital Designer file: (LXF) This file is slightly different to my "real bricks" version, due to Lego Digital Designer being a crotchety old block. Bonus fun - Spot the differences! To build the version in the LXF, you will need a 75103 First Order Transporter and about 470 extra parts: (XLS). Having an extra 75103 on hand (£40 on ebay with no minifigs) cuts that down to 300 parts: (XLS).
-
Hi all! I've been trying to mod some of my older sets and after watching the new clone wars trailer, it showed a landed ARC 170 with landing gear, which i don't think we've seen anywhere else. It gives us a glimpse of the front landing gear but not the back. I have a simple solution for the front landing gear but the back is much more complicated. I have tried multiple options but none seem to work. This way the model will look nice but there isn't a way for the landing gear to support the heavy weight at the back. Also the landing gear doesn't fit in the middle as there is a gearbox that takes all the space. Does anyone have a solution?
-
Update: The finished MOD along with instructions and parts list, all on Rebrickable, with new photos to follow... https://rebrickable.com/mocs/MOC-36569/ron_mcphatty/red-5-x-wing-t-65-set-75218-mod Thanks for your help guys! Original post- My kids bought me the new X-Wing for Christmas, they’re the best! I’ve wanted one in Lego form since I was a kid and hung on to the idea of a new set since I got back into Lego five years ago. Initially I was disappointed with how this set looked due to that ugly lever on top and similarities to Poe’s X-Wing. However, I recently saw a friend’s set and between us we worked out a few easy mods to improve things on a budget. Starting at the front we added a few plates to the nose to combat how flat the top looks, then added dishes and pins to the laser tips, also replacing the blue pins inside the roots with with black pins plus 4L lightsaber bars to reduce wobble. We added landing gear and a couple of modified plates either side of R2 to box him in. Most significantly took part of the S-Fool lever off and added a removable lid with some detail. I was thinking of adding internal gears connecting to a handle at the back but I really like that rear greebling so for now the lid comes off to to open and close the S-Foils. (Edit: I also added the extra cylinder length to the engines, thanks to Richpepperell for the design and Jerac for the suggestion) Bricklinking the extra parts costed about £6 including delivery, the skids for the landing gear weren’t common but cheap enough as used parts. Hope you like it and happy modding in 2019!
-

[MOD] UCS Millennium Falcon engine vents rotate align without increase height
Nachapon Lego posted a topic in Community
My small tricks: Lego UCS Millennium Falcon engine vents rotate align modify without increase height (clone band). Blue plane: Oxford band brick, Korean air home made stickers + engine support MOD. Hope you like it -
MVIMG_20200409_100237 by Loslyn Loslyn, on Flickr This is a MOD of Set 40292 Christmas Gift - accessorised with lots of bunnies!
-
42069 - Extreme Adventure - MODs and Improvements
Imanol BB posted a topic in LEGO Technic, Mindstorms, Model Team and Scale Modeling
Hello everyone, as i didn't see any Mods topic for this set, i decided to start it myself, and to start, i would like to share with you the LDD file for the official set (not sure if there was one already), there are some parts missing and some pieces are not fully connected (could i have used developer mode to solve this? yes, but for some reason i decided just to place apart the pieces i couldn't fit in), here is the model: Missing parts: -x4 24118 Panels in Dark Purple (Brick-built and grouped in the model) -x11 6167281 (I didn't add any substitute) -x1 6187734 (The rope) LDD file:http://bricksafe.com/files/imanol/42069/42069.lxf And next is my modifications for this set so far, the first thing that i wanted to do was to put wheels and tires, and because this is an snow-themed set, i decided to put tumbler tires, and i knew that these tires didn't look good in those very wide axles, with these tires the vehicle would look silly, but after narrowing the axle a little bit, i think it is looking like an authentic snow expedition vehicle (it even looks like an JLTV from the sides), i also changed some colors, but is just a test (the model is still WIP): The goal is XL-Motor for drive, Servo Motor for steering and M or L-Motor for the winch (and possibly some lights): I hope you like it, i will try to make more improvements, and i am looking forward to see more modifications by any other member, have happy modding. -
The recently released Jaguar i-Pace really looks like that rare vehicle seen in that rare town, a long time ago… ;-) Yeah, there’s plenty of room at the back of this i-Pace ! Bonus - My version of the Audi
-
I got 71044 set for myself and it looks great. However I felt like train station was half finished. Yes, it is build for play-ability, but looked half finished. Since I was never going to play with it and didn't really like all the Disney logos and associations next best thing I could think of was to modify it. First thing the station was missing is, obviously, the back side. My idea was to use the actual train station which is located one of Disney parks, to build the missing back, but strip it from any Disney logos. Most of the build is quite easy since it replicates the portions of the existing set. However getting around to build those windows at the bottom floor was a bit tricky. Last thing original set was lacking is a platform. There's nothing fancy here as it is built on top of two baseplates. These can be separated though, as well as the train station. This makes entire model to be easy to move in three pieces. This is my first train station. So I would be glad to hear reasonable suggestions how could I improve it or its surroundings.
-
Here’s my attempt at modifying Poe Dameron’s X-Wing from The Rise of Skywalker! I think Lego did a great job with this latest X-Wing, I really like the refined wing mechanism and orange/white patterns and I love the new engines, but when viewed from above or the side that boxy nose is no good and the barely offset wings obviously need sorting out. I also put together some instructions, more on them later... https://rebrickable.com/mocs/MOC-35800/ron_mcphatty/mod-poe-damerons-x-wing-t-70-set-75273-mod/#info Rather than adding the same removable lid from my last X-Wing mod I instead built a hinged hatch, it’s a much simpler mod to build in and to use too. I took that landing axle out when first building the set but if you like that play feature then the wing mechanism still works with it left in. The main modifications are the rebuilt wings, I stripped them back to the engine structure and attempted to make them close in a 100% movie-accurate way. That didn’t pan out so well, the connection of the lower wing to the body was always too weak, so I settled for them overlapping by one plate to balance strength, limit the number of extra pieces and also to keep those blue accents in. I also tried modding the sides of nose, adding a line of tiles on modified bricks to bring the width out a bit. I added some extra plates on top too, hopefully giving the impression of the gentle slope towards the nose. I built in some very simple landing gear and details to the end of the lasers, and that’s it! Overall I used more pieces than I’d’ve liked, about 80, but they’re all common parts and the cost is fairly low at about £5. I’m really enjoying using Stud.io, even the instructions feature. Clear mod instructions are much harder than from-scratch instructions, this time I’ve tried to incorporate references to steps in the original instructions for clarity and completeness. I’m hoping the familiar chunks will help you easily see where my mods start and finish so that stripping back the original set is an easy job. https://rebrickable.com/mocs/MOC-35800/ron_mcphatty/mod-poe-damerons-x-wing-t-70-set-75273-mod/#info I’m always happy to get criticism and suggestions and very grateful if you point out any mistakes in the instructions! I plan to do instructions for my old 75218 X-Wing mod next and then, taking inspiration from @LEGODrongo01’s recent 75213 recolour, apply these mods and new engines to Poe’s old black X-Wing! My old set might need a good dust first, I can hardly believe that came out five years ago now. I hope you guys like the mods, and just for fun here’s Poe and a micro X-Wing :D
-

[MOD] 42037 Ultimate *Now with Instructions!*
Leonardo da Bricki posted a topic in LEGO Technic, Mindstorms, Model Team and Scale Modeling
This was just a quick weekend project. I am fond of the 42037 set, as it was one the sets that got me interested in Technic. So, I decided to try to do it some justice, and I motorized it, first with an L-motor, which wasn't great, then with an XL-motor, which was about the same, then with 2 L-motors, which was the best. Then, I got a buggy motor. And since I had just taken apart a failed battlebot, and the buggy motor was lying there, begging to be used, I decided to use it. I rebuilt my 42037 Formula Off-Roader, with a few changes, which are as follows: 1. Changed the colors from light bley/med blue/lime/black to black/white/lime. 2. Removed the inline-4 fake engine. 3. Added full motorization, buggy motor for drive, servo for steering, AA battery box with a V2 receiver. 4. Bodywork changed a bit to fit the new colors and cover the gap left from removing the fake engine. And a light bar was added, because I didn't like the round spotlights. 5. Very minor, but I changed the rear shocks attachment point on the rear suspension arms, they were moved out one more stud than shown in the instructions, in order to have better travel and not be under compression, which was an issue in the original model. If anyone is interested, here is the LDD file instructions! Anyway, I know you're all tired of my rambling, so, with out further ado, I present to you the 42037 Ultimate Racing Buggy! 42037 F 42037 FQR It has easy access to the battery box, both to replace it and to turn it on and off. 42037 FQL The suspension is great, one of the best parts of the original set, which I kept and slightly improved. 42037 Mod 42037 FQR-s The source of power and speed! The almighty BUGGY MOTOR! 42037 Rear The required photo of the underside. The wheelbase and chassis are the same dimensions as the original set, though the buggy motor hangs out the back by a couple studs. 42037 Chassis I hope to make a video soon, but it started raining after I took photos, so maybe in a few days. But finals are coming up, so it may take some time. I will also add some cutaway photos soon, for anyone who wants to replicate my mod. Or, use the LDD file instructions. Thanks for looking at this, please give C&C, ask questions. More on my Flickr. - Leonardo da Bricki -

[MOD] 75102 X-wing S-foil, rubber band, and landing gear fix
Flandy posted a topic in LEGO Star Wars
Hi all, be kind, this is the first time I've actually started a topic here, and shared pics of my lego fumblings. I've been away from lego for 20 years, and then my GF bought me the lego millenium falcon for christmas, and it's totally rekindled my love (for Lego, not the GF, I loved her already...). Like many, I found the S-foils on the most recent T-70 X-wings rather underwhelming. The X-wings in the movie look so cool, aggressive, dynamic, and the new engine pods and the way the wings fold to become one single plane in cruise mode is very slick indeed. The Lego version is significantly less slick in this regard, and this bothered me. As is well documented, the wings don't even meet, let alone combine into one, the lower wing is studs down, which means the ugly plate underside is on show, and the dreaded blue rubber bands, both look out of place at the back of the engine pods, and pull the wings at an angle. I will say that I like the folding mechanism as a play function, and did not want to loose it. So first off, the closed position: When they're closed, there is no gap, no angle difference, and to all intents and purposes, it appears as though it's one single wing, just as it should. And now, open Again, no angle change due to rubber band tension. The bands are still being used, but I found a way to integrate them such that they pull the wings closed as they should, but not unevenly, and within the forward profile of the wings so that they're not obvious. In fact they now look like some kind of power cables on the engine undesides. Here's some close ups: I'll go into more detail on this tomorrow if anyone's interested, but essentially the now studs up lower wings have some 2x1 modified plates with pin loops with pins going into 1x1 technic bricks as the method of attaching them, with one of the pins sticking out for the bands to locate on. The bands then go around the back of another pin that replaced a cream coloured short pin on the body of the ship, then go up inside the upper wing engine where there's one of thes guys for them to hook on to: It has as much tension as the original system, but looks alot slicker, though i will admit it is a bit trickier to put together. the bands also seem to hold the lower wing onto the engine a bit too, which is nice. The rear landing gear is rubbish on the original, and i wanted something that would retract cleanly. The real ship has landing gear that emerges from the slopes between the curved engine and the wing. This seemed impossible to duplicate at this scale, and with the stuff for the new folding mechanism, so did landing gear on the engines too, so i mounted it to the body, at its widest part. It folds up and becomes part of the body curve at the back, which is nice. I apologise for the crappy lighting, again, I'll get better pics if there's interest. I may swap the grey part for black, but I don't have any at the moment. Elsewhere on the ship, I moved the cockpit back one stud, and started playing around reprofiling the nose a little. This is the next area for my attention and is a work in progress. Please feel free to comment, I'm open for any constructive criticism! -
Inspired by set 5984 (Lunar Limo) but with the firing missile and stickers removed. The gold and purple parts have also been removed for a subdued color scheme. This limo was originally Black Hole Gang leader Brick Daddy's limo, and as such was passed onto his second in command, Mister Gray upon his death. The limo's purple and gold were removed, and a subdued gray color scheme added instead. The limo remains Mister Gray's personal transportation now that he is retired, but this is a ruse to keep the Space Police off his tail. The real work that he does is helping rebel cells fight the Space Police IV forces, either by smuggling oppressed people around in his spacious limo, or using the secret panels to covertly transport gold or cash around to rebel hideouts or stops on the underground railroad to freedom in the galaxy's central core, where sensors can not penetrate and big ships cannot enter due to the increased gravity and many asteroid chunks. The limo's obvious weapons such as missile launcher were removed when Mister Grays went clean, but the secret is that he kept the EMP generator and code scrambler as a precaution. these would prove to be most helpful in his new role as founder of the resistance network and underground railroad to help oppressed aliens and techno-mages to freedom. The limo can seat one figure at the drivers seat and figure in the back. The trunk and roof open up via hinges. The rear of the ship. The trunk can also hold a figure to smuggle them out of harms way. After the death of the Brick Daddy, a criminal power vacuum caused war to erupt between Squidman and the mysterious Mister Gray, who was Brick Daddy's shady accountant and a corrupt lawyer. As Mister Gray slowly took over the Black Hole Gang from rival Squidman, he forced the Space Police III (who were at war with Blacktron 3 at the time) to regroup into the totalitarian Space Police IV by way of joining sides with Blacktron 3 forces. This proved critical to anti-alien leaning leaders of the Space Congress' plan of eradicating both the Blacktron scourge and Black Hole Gang. In the end, the Blacktron retreated to the edges of known space, and the Black Hole Gang was 100% destroyed save two major members: Squidman, who was no longer a Black Hole Gang member when the Gang declared war of the Space Police, and Mister Gray, who sold out the gang's location to save himself. He is sometimes now called Mister "Grave" instead, but never to his face, as he alone was responsible for the saturation bombing of the Gang's hideout. This bombing killed most members and blew up it's ammo dump, thus destroying any evidence of Gray's complicity in any past crimes. After this, he decided his clean slate was not worth the blood on his hands, and thus helped found the resistance network to fight the Space Police IV forces. His immense wealth helps out those in need, and he personally smuggles people around in his limo. Here is the LDD file for the ship and it's owner link. Comments, questions, suggestions and complaints welcome!
-

[TCM1] 8081 110 Pickup
Thirdwigg posted a topic in LEGO Technic, Mindstorms, Model Team and Scale Modeling
Another MOD of the fantastic 8081 set is done! Styled after a LR Defender pickup, this MOD features the following: 4x4 drive. Steering Front and Rear live axle suspension with Panhard rods Opening doors and tailgate Seating for four V-8 fake engine Roll cage Fischertechnic 80mm tires. Full album is here. Driveline From the left Articulation I'm still working on the sport pickup, but this should be good for now. -
Hello, So I've wanted to re-create some of those older trains for Power Functions, but, the obvious problem is the size of the PF elements. After browsing this forum for a while, I've learnt couple of tricks though (mainly trick from @Brick Pirate's small shunter), so I decided to check whether it'd be possible to fit PF elements into the engine of 4564 set. My other goal is to be able to bricklink it cheaply, so I've also replaced some rare parts. The result would be pretty great, if not for the fact that I was not able to hide battery box fully - and I'm not sure if I'd try, I'd like to not make it taller - as it currently stands, it's only 1 plate higher than original. Any ideas on improving it are welcome! More images at: https://imgur.com/a/vQZ11 And the LDR file: https://drive.google.com/file/d/1v7jF9eCikgKt2e8_MWJCFB_9QrPpmGVz/view Enjoy!
-
I really loved 75055 when it came out. Good balance of play and display. But I hesitated to do anything further with it for a long while, and then when the UCS ISD was announced I wanted to wait for that. But with the price and all the visible studs damping my enthusiasm for the UCS model, I decided to look again at 75055. So what bothers me about 75055? First, what’s up with the chunks of dark grey? That’s not right, and they need to go. Then, why did they use the wheel parts fo the big engines? Kinda lazy. It’s also too short. It needs to be extended in the back. The guns are cool, but why are they all the same- one of them should look different. And where is the reactor dome on the bottom? Then more fundamentally, what if we could tile up this version? Well here we go. Most of the modifications were used with parts I had sitting around, supplemented with 50 bucks of a ‘mixed light blue grey tile’ lot and the purchase of 3 half barrels for the engines. Tiled top and bottom. Couple of sand blue tiles in there as a tribute to the Monarch. :) ISD-Front2 by Peter Foster, on Flickr Small cheat on the front- that middle 1x4 centre bit is just sitting in place not connected. ISD-Front by Peter Foster, on Flickr Dome added to the bottom- was worried the extra back weight would make the stand fall over, but still seems to balance. ISD-Dome by Peter Foster, on Flickr New gun design. ISD-Guns by Peter Foster, on Flickr Half barrel engines- way way better- and extending the back plates makes a real difference. ISD-Engines by Peter Foster, on Flickr Built a little Tantive to go with this. IDS-back by Peter Foster, on Flickr I think we are scr*wed! ISD-Trouble by Peter Foster, on Flickr So not saying this is a classic or anything, but amazing how much better it looks with just a few mods and some tiling. I think the top would look better with smaller tiles-more 1x2's 1x3's and 2x3's. And I would like to redo the whole set up of the engine bay. But for now, I think this is pretty good, and fits on the shelf.
-
I just couldn't resist to post a couple WIP pictures of my improved Sandcrawler. I purchased two of the new light bricks from B&P and incorporated them into the design. There are still some orders pending to arrive to finish the interior and some features but the lights look really nice. For the exterior I just performed the usual gap filling and increased detailing of surfaces. I will post more pictures once it's finished but feel free to ask if you want to see any specific area.
-
Here are some of my modded Series 19 Collectible Minifigures along with minifigures that have benefited from S19 parts and thematically related minifigures. All of them are undead, so just in time for Halloween! ? I should have included a picture of the back of the violet vampire: she has a spider crawling up her cape. ? Questions? Comments? Creeped out?
-
Hi all! I'm new here, but I've lurked for a while. My first exposure to LEGO was the first two games from Traveller's Tales, and I always found it interesting how the creators took time to design their own versions of ships that hadn't yet gotten official sets. Now, much older (and with a love for the first/second generation LEGO sets) I'm trying to get into reverse-engineering and building a fleet of similarly-styled ships. My question is, has anybody here tried this out themselves? And if so, what ships? My first crack at it (and one of the comparatively easy ones) is the Naboo Starfighter, based on the UCS set from 2002 but now able to set a single minifigure. (I also did a palette swap for the two different versions of Player 2, though these two are unfortunately impossible to build). I'll be willing to trade the stud.io or ldr file with anyone who wants it!
-
Imanol BB´s MOCs and MODs (And possibly good ideas)
Imanol BB posted a topic in LEGO Technic, Mindstorms, Model Team and Scale Modeling
Hello people, as i have seen some topics made by some members were they share their creations, modifications and ideas, i thought it was a good idea to start my own topic about that, this way i can avoid filling other topics with too many information by saving all that information here and just posting small texts in those other topics. To start, i would like to share some creations which i worked on: Model Team Nissan Frontier. This is one of my oldest models, i made it even before i knew about Eurobricks, and i would like to share it with you because you might like it or modified it: This model features front independent suspension, rear leaf spring suspension using 5.5 axles, HOG steering, working doors, bonnet and tailgate, 5 seats and a towing hitch; its very possible that some parts are with wrong colors or there could be outdated building techniques, but i think that is not too bad for one of my first LDD models (i am no sure, but if i have enough time and inspiration i could make it in real Technic parts), The LXF: http://bricksafe.com/files/imanol/nissan-frontier/Nissan Frontier.lxf. Model Team Paramount Group Marauder MRAP. Again, one of my oldest models, it is made at a pretty small scale but it could still be considered as "model team" (i think), it has pendular suspension in both axles which are damped by cross-axles which act as leaf springs, it has HOG steering, working winch and doors, a spare tire and 2 turrets that can be mounted on the roof: The LXF: http://bricksafe.com/files/imanol/paramount-marauder/Paramount Group Marauder.lxf Technic Unimog U500 Long Chassis (I have called it UNI-MOC) You might have seen it in the latest posts at 8110´s Mods topic ( http://www.eurobricks.com/forum/index.php?/topic/57543-8110-unimog-mods-and-improvements/&page=78 ), it is a 64 studs long and 24 studs wide model which i started to make because the modifications in the 8110 got to a too high level and i wasn´t satisfied with the whole model, i created this new model to hold all of my wanted functions and details, this model has some designs from other builders: Madoca´s Tatra 2-speeds gearbox (slightly modified to fit in this new chassis), Efferman´s planetary rims, a modified version of Didumos knob gear driven axle and a 3-side dumping system and dropping sides inspired by Kumbbl´s modifications, it was also made by some help and inspiration by Pat-Ard: This Unimog has 4 M-Motors, 2 L-Motors, 2 XL-Motors, 3 IR RC Receivers, 2 AAA Battery Boxes and 3 PF Switches (brick-built with ugly colors), why so many motors? well, as you might know, the 8110 had only one M-Motor inside it, which was meant to drive the 3 main functions of the set (front PTO, rear PTO and the pneumatic pump) the problem was that the functions couldn't be used simultaneously, you couldn't power front and rear PTO´s at the same time or with the pneumatic pump and because this system uses a gearbox and axles to engage and transmit the power to the different parts, this results in a lot of friction and power losing (other of the reasons of why i started this MOC), other thing that bother me about the 8110 was the proportions of it, it was very tall with lifted wide axles, but very thin cab and bed which made it look silly, the chassis had no space for all the functions that i wanted, i couldn't place enough motors or functions on it, and the axles were another problem, the steering pivot and angle was a disappointing, the tires couldn't steer too much with the half pins, and if you removed them, the mudguards and the surrounding elements needed to be placed far away from the tires to avoid them from colliding, these are few of the reasons of why i started to make my own version of this UGN class of Unimog (which are U300, U400 and U500). Some of the good features of this model are: Improved steering pivot (2 studs closer to the wheels compared to standard portal hubs) Wheels and portal hubs can handle more torque without jamming parts The axles are more compact (less tall), so the chassis can move even lower for a more realistic performance Front steering by L-Motor Rear steering (By M-Motor) with the same axle design as the front one Anti-roll bars in both axles, which help a lot to handle with weight and give a lot of stability, and they can be easily removed for serious offroading Remotely shifted 2-speeds gearbox by M-Motor Directly driven pneumatic pump (L-Motor) and PTO´s (M-Motors) for less power losing 3-side tipping 37 studs long 23 studs wide dump bed with dropping sides using a V2 large pneumatic cylinder Drive by 2 XL-Motors So, these are some of my models, i hope you like them, and i hope to upload more of them, i will try to do my best with all them, let me know what you think about this topic and the models, and any suggestion is well received Thanks. -
Welcome aboard the Astro-train! This futuristic stream-liner was a mix of the 1950's Earth train called the "Aerotrain" but redesigned specifically for use by Nexus Force personnel as a high-speed, high-security ground transport between the northern-most city of St. Nicklaus and north-pole-hugging outpost of Ice Station Odyssey, around 590 miles away. (this all takes places on the ice-bound planet of Beta Polaris, which orbits what we here call the North Star, far away from Earth.) Thus this makes it a space train! Unlike the original Earth version, the Astro-train is super-streamlined, and can go up to speeds of up to 230 MPH on special track, with super-elevated curves and long straight-away's of hundreds of miles, all while using Positive Train Control (PTC) on the the mostly double-track mainline, where all vehicle crossings are flyovers and switches virtually non-existent once out of St. Nicklaus city limits. This train runs along with Seven identical versions of itself on the route with up to five in running order on the route and at least one in the maintenance shed at any one time. Also, please NOTE: The train is authorized to make 15 minute stops in the icy wastelands at native villages as requested before continuing on to it's destination. Signal boxes are provided at certain spots to stop the train at the correct spot to en-train, with only village elders having the keys. To de-train, you must pull the cord at least full 10 minutes before you wish to disembark to allow the train to slow down. Only five stops are marked on the route, but several unmarked villages are springing up, so the schedule has gone out the airlock recently. (In actuality, this is a heavily modified version of 2018 Star Wars set 75217 (Imperial Conveyex Transport) mashed up into an 8-wide version of my 1950's Aerotrain model. The model also features inside details and Jacobs bogies besides the lift away side panels of 75217 and removable cab roof.) This loco is missing five printed pieces: (1) slope of this type for the front of the nose, right below the third headlight. It is the Nexus Force's logo. (4) of this round tile for the roof engine exhaust vents. Fold up the walls so you can look underneath at the powerful diesel engine. The roof of the engineer's cab comes off to place a figure at the controls. Each of the four cars can hold four seats each behind the two fold-up side walls. These are the four passenger cars, which are linked together in pairs of two by Jacobs bogies. They can have more two-car sets dropped in or out, but the rear-most car set is the minimum. (as the last car carriers the four tail markers) I thought about adding another two cars, but the price was too prohibitive right now. Anyway, I think this might become a real brick built model sometime around Christmas to go with my Nexus Force space base... as seen in this horribly out-of-date picture from January 5th, 2019 and this topic here. We will just have to see what the future holds!
-
 Greetings, i want to introduce my MOD of official set 8081, made for @Thirdwigg's and @rm8's fan contest. Warning, pictoral heavy post ahead. We all know about bug hit in SUV market - Daytona Extreme Cruiser - city suv with v-4 under hhe hood, stylish body and good offroad perfomance, while being rwd only. We heard that new generatiopn is under development now. Soon maybe we see spy photos of prototypes on their test drive... But lets look back, in the past, to see what lies in roots of Extreme Cruiser. What allowed Daytona automobiles to test new ideas and engeneering soutions... Meet the Daytona Omnis R2 It was produced in early 80-es in small quanities and today it become a rare classic. Underrated, but classic. View from all sides: As it sucsessor, it features openable hood, doors and trunk Under the hood supercharged v-4 engine could be found. Also unique front suspension can be seen too. Rear suspension is regular live axle. Car have spartan interior which aside of front seats has also small rear bench, making car 2+2 seats formula Lets look on Omnis from below You can see vehicle's 2+N synchronized transmission and suspension, which has long travel and soft shock absorbers, ensuring comfort and smooth ride even on off-road. Examples of suspension travel Hope that you enjoyed our little demonstration. LXF file with model - https://www.dropbox.com/s/4vdrwnp95aj45ta/8081 Daytona Omnis R2.lxf?dl=0 Really hoping to see your comments and suggestions on my mod.
 -
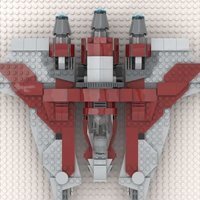
I picked this set up last year, I have tried many ways to modded the wings, this is the latest version which remained unchanged for around 6 months. The biggest problems for this set and the black/orange version is that the wings overlap, I have to fill up the each top engine nacelles with 1 x 3795 Light Bluish Gray Plate 2 x 6 , 1 x 3023 Dark Bluish Gray Plate 1 x 2. Move the existing parts around to rebuild the front wings, swapped the position of the 2 slopes (3298 and 3297). The end result is that each wing is 3 studs thick, when closed the whole wing combined is 4 studs thick. Additional parts required below, I apologise in advance if I missed any, I have tried so many different combinations overtime that I have to refer to the original building instructions to what the wings look like originally. For the nose 1 x 3069b sand blue 1 x 2 tile 1 x 807079 Light Bluish Grey 2 x 4 tile For the wings 2 x 3795 Light Bluish Gray Plate 2 x 6 2 x 3023 Dark Blueish Gray Plate 1 x 2 4 x 3024 Dark Bluish Gray Plate 1 x 1 Cannons 4 x 3713 Light Bluish Gray Technic Bush 75149 Mod by R Y, on Flickr 75149 Nose by R Y, on Flickr 75149 Wings Closed Front by R Y, on Flickr 75149 Wings Close Back by R Y, on Flickr 75149 Wings Open Front by R Y, on Flickr 75149 Wings Open Back by R Y, on Flickr 75149 Back Wing Topside by R Y, on Flickr 75149 Back Wing Underside by R Y, on Flickr 75149 Front Wing Topside by R Y, on Flickr 75149 Front Wing Underside by R Y, on Flickr
-
Hello Community, I would like to say hello ... I read this site over a year now and before I post something, I should introduce myself ... Well, I am made in Germany, my age is something about 50+ years and I am interested in Lego Star-Wars models. Here are some pictures of my Star-Wars spaceship interpretations (MOD) ... Thank you very much and best regards Miller LEGO Star-Wars Set Fury- Class Interceptor 9500: Link to the picture (^) Link to the picture (^) Link to the picture (^) Link to the picture (^) .