Search the Community
Showing results for tags 'MOD'.
Found 469 results
-
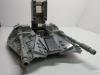
Hello all, my very first post here on the forums. I recently purchased the Ghost from Star Wars Rebels and felt the set didn't really do the ship justice, hence I played around with modding her. I decided to extend the cockpit section longer by 2 stubs, and smoothening the slope on her dorsal side. Also made big changes to her under belly, basically covering the big holes in the under hull and making the landing pad housings taller. Lastly i removed the detachable feature of the Phantom, and modified her aft hull to fill up the space on the Ghost. Pls do leave some comments on what you guys think. Am kinda new to this :
-
[MOD] Technic Mercedes Arocs
SNIPE posted a topic in LEGO Technic, Mindstorms, Model Team and Scale Modeling
Hi, I modded the mercadees benz arocs so that it has steering and suspention and drive on the two front axles as well as acenter diff between the two, RC steering, and a drive motor for the wheels. The flat 6 is in the same place roughly and the gearbox motor is roughly in the sam place too. Now I'm trying to add the same sort of outriggers that the 42009 has, but to the mercadees benz arocs, I ALSO am trying to have the steering axle going through this assembly to the rear wheels as well as a centre differential underneath. the outriggers. This sounds like a lot yes but the pnumatic pump can be moved to the back and there is new connectors now to make more compact assemblies. The gearbox would still have two clutches, the only difference, is the pnumatic pump is connected to the same output as the turntable, which frees up one output for the small linear actuators of the outriggers. Does anybody have any ideas on building this? I have been trying but I cannot seem to put my ideas into actual assemblies. I think it is a good idea to use the black 12tooth 13L gear strips like in the 42009 because the arocs outriggers are much too cumbersome. I did manage to fit a centre differential under the original arocs outriggers which is good. The purple axle is for the tipper, the green axle is for the turntable , the orange and brown axle are for the outrigers. -
This is my first moc made after my dark ages ends. I used parts from set 31024 only. DSCF1329 DSCF1328 DSCF1330
-

1960's UK car (Anglia 105-E Super) real life 4728 inspired MOC
Murdoch17 posted a topic in LEGO Town
This model was originally by Hachiroku24 as the flying car driven by the Weasley's in Harry Potter and the Chamber of Secrets. In real life, the car type used in the film was made by Ford for sale in the United Kingdom and was called the "Anglia". This particular version (a 105-E Super) was built from 1959 - 1968. I've wanted a accurate version of the flying car driven by the Weasley's in Harry Potter and the Chamber of Secrets. I have been doing this cycle of building, revising with newer parts, tearing apart, and repeat since 2002 when the original set 4728 (Escape from Privet Drive) was released. I changed the color from the original medium blue to black around 2004 and revised the wheel size around 2011. Now I have added a new style front end to the car via a design by Hachiroku24. Oh, and the mini-figure in the picture is my sig-fig, which is NOT included with the car in the LDD file. The car without my sig-fig. The car can seat two mini-figures on jumper plates, and also features opening doors and trunk with plenty of space. The rear of the car features a license plate and a jumper plate to represent the exhaust pipe. As I said, the car fits two mini-figures comfortably. (The steering wheel is in the wrong spot for UK driving, but I live in the USA so I changed it for right-side driving here in the States.) Here you can see the original Hachiroku24 model, which inspired me to revamp my car. If you want to build one of these according to the original designer, follow the instructions in video form in this topic here on Eurobricks. Comments, Questions, and Complaints are welcome, though any praise for the blue model and front bumper design should go to the original designer ( Hachiroku ) in his topic, as linked to above. If you are looking for the LDD file for my car, here it is. -

[42043 MOD]: Service truck, Ultimate 42008!
BrickbyBrickTechnic posted a topic in LEGO Technic, Mindstorms, Model Team and Scale Modeling
The ultimate 42008! After watching the video, do you want to build your own? Follow the rebrickable link below! https://rebrickable.com/mocs/BricksLEGOHovel/42043-mod-service-truck-ultimate-42008 Thanks as always for checking it out! Stay tuned for more! Brickbybrick -
MOD of the LEGO 40158 Pirates Chess Set to Redcoats versus Bluecoats. It seems like a logical chess set to do. Redcoats vs Bluecoats Chess by dr_spock_888, on Flickr I limited myself to use only parts I had in my collection. No Bricklinks were harmed in the making of this chess game. Let the Tournament of Retribution commence.
-
Nothing fancy, just wanted to add a little texture to the rear: Not that it is that necessary in this case, but the .lxf file is available here
-
Hey guys, Quite a long time ago I posted my IF Mods here on these forums. I mentioned that I was able to make the SNOTty section just as sturdy as the rest of the ship, but I didn't show how. Well today I got a little less lazy and decided to take the photos and explain what I did. The modifications are quite minor (so much so I don't know why TLG didn't do it from the get-go), and they don't seem to affect the look or style much at all (the best mod I did was "under the hood" so it could look almost exactly the same). At any rate, you can see my bow mods Here :). Anyways, just thought I would share so let me know what you guys think!
-

[MOD] RC Nitro Menace 8649
syclone posted a topic in LEGO Technic, Mindstorms, Model Team and Scale Modeling
Good day! When I finally got this set, I knew that I had to put a RC buggy motor in it For more than six month it only was a dust collector, but now I present to you the modded Nitro Menace . The exterior is exactly the same, and I tried to conserve as much original interior as I could. Now it has an independent front suspension , return-to-center steering with m-motor and RC Buggy Motor for drive. Unfortunately my poor receiver gets hot extremely fast and the play time is limited ( can be solved using 3rd party receiver or possibly the v2 official receiver). Powered by a 9v battery. NOTE: This was a quick Saturday project, so it isn't as I would like it to be ( No positive caster angle , no rear suspension , no working steering wheel...) -
Hi! This is an old MOC of mine - strictly speaking a MOD of Larry Lars' excellent snowspeeder model, which I urge you all to take a look at. He has provided instructions, and they are a masterclass in advanced SNOT techniques. I put the LXF file on Brickshelf in July. I notice that someone else on this forum has picked up on it: so rather than clutter up another topic, I thought this might be a good time to take some photos and do a full post. As I said: most of this is lifted straight from Larry Lars' design. However, I was never completely satisfied with the accuracy of Larry's MOC. The changes I made were: The sides slope all the way up to the canopy: The heatsink/grille at the back is angled slightly: The engines exhausts are positioned closer to the centre-line of the ship: The underside is as accurate as I could make it. One of these days I might SNOT it, but for now: The LXF is very similar to the physical model, but four pieces at the back would not attach, no matter what I did: To aid anyone who wants to build this model, here is a photo of one of the missing parts in place, with the top of the housing removed so you can see how it fits: More photos are available in my flickr set. EDIT: Brickshelf keeps on disappearing, so I've put the files in my dropbox folder: White: LXF XML Grey: LXF XML Thanks for looking!
-
A very very simple MOD: the Bridge of Sigh must be between buildings!.
-
Hi everyone, I'd like to show you my first MOD. As I already own two corner buildings, I have rebuilt my Palace Cinema as a non-corner building. The ground floor is now equipped with a bathroom, a back entrance and a grand staircase. The movie theater on the first floor includes more seating and is separated from the window front by a small hallway. Comments & suggestions welcome, thanks for looking! Originals on Flickr.
-
Ok so im in the process of bricklinking the 10030 Star Destroyer but wanted to show the mods im planning on doing. As awesome as the original is i was always a bit disappointed in some of the details and greebling, anyway, enough talking and on to the pics. Hopefully the touch ups are noticeable but not enough to be in your face, all the greebling was redone, front of bridge reshaped, entire engine area redone and a few things changed and added. **LDD file in post #20**
-
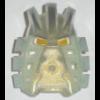
Umarak the Destroyer is an ok set but he wasn't bulky enough for my liking. So I've made a few changes to him. They are as followed 1. Completely redesigned the torso so its much bulkier 2. Bulked up legs slightly 3. Removed claw gimmick so he can have poseable wrists. 4. Changed up the horns on the mask. I didn't like how Umarak's horns went away when he put on the Mask of Control so I combined them with the Mask of Control's horns. Umarak's horns are now gold. 5. Moved the jaw up so its not hanging down so far. With that out of the way here are pictures. View from all sides http://www.brickshel...destroyer_1.jpg http://www.brickshel...destroyer_2.jpg http://www.brickshel...destroyer_3.jpg Comparison with my Umarak the Hunter mod. (I've made some more changes to Umarak the Hunter since the topic I posted about him) http://www.brickshel...destroyer_5.jpg Version with the original horns the set had in case someone wanted to see him like that http://www.brickshel...destroyer_6.jpg Lastly two poses. One of him screaming from his transformation. The other holding the trans orange and gunmetal version of his mask http://www.brickshel...destroyer_4.jpg http://www.brickshel...destroyer_7.jpg Comments and criticism appreciated.
-
Hello everyone, I am about to start building a mod of the Pet Shop. I plan on turning each building into 24 studs wide instead of the normal 16 and hopefully have enough spare bricks to also add an additional floor to each building too. The big question that I had for the community today is if anyone knows if you can fit the normal bay window on each side and the door in between them, this is not an issue on upper floors but you obviously need a front door to get inside. If anyone has attempted this or happens to know how many studs wide the bay windows are that would let me figure it out. Each window can have 10 studs in width since a door will only take up 4. Once I get this all put together I will share the pics with everyone. I also plan to make the Pet Shop sign actually say Pet Shop since it will now have the space. I've looked all over and can't find any examples of a 24 wide townhouse or pet shop. If I don't have enough bricks from the sets for an additional floor I will most likely brick link whats necessary since my Cafe Corner and Green Grocer both have an additional story. Thank you to anyone that can answer the 10 stud allowance for the bay windows.
-
This car was mostly inspired by the 1969 Chevy Z-28 in set 75874 (Chevrolet Camaro Drag Race) and partially by my orange first car for Bob from 2014. (That first model was taken from the LEGO City Undercover video game.) Oh, and set 75912 (Porsche 911 GT finish line) also has a bit of say in how this model looked with regards to the middle of the car. This is Bob's car, so of course he gets at least one picture with his car. As you can see, the car features a orange paint scheme with black bumpers. The rear of the car features two tail-lights, spare tire, and the Neo - Nexus Force logo (actually the re-purposed CITY arctic logo) on the roof. The inside of the car can fit one mini-figure as the driver. Here is Bob's original car from 2014. Thoughts, questions or complaints are always welcome!
-
hi everyone in this topic I'll show my collection of trains to start, a moc I made using pieces I had laying around
-
I bought 21128 The Village and have now the set assembled on my desk. Now am I wondering how I could build it together with other Lego Minecraft sets (I already got the Cave, the Dungeon and The End Portal). The idea is to build the village atop of the others to get 2 levels; The Village on the top with underground structure beneath. In the future I can complement with the Mine, which also is a model of the underground in the overworld and a crafting box too. Have you guys seen or build any kind of Minecraft display like this?
-
MODS 2016 Bionicle Summer Wave "Canister" Sets It’s that time of year again! Here’s my first batch of modded 2016 summer Bionicle sets. One more will be unveiled soon ;) Ekimu the Mask Maker Ekimu features a more streamlined gearbox build, more comfortably positioned shoulder pauldrons, and a port on his back to attach a clear stand for his trusty falcon. Oh, and toes. Gotta have toes. Pose, Falcon Overhead Front, Falcon perched Back, Falcon perched Pose, Falcon perched Skeleton, Torso front Skeleton, Torso back Lava Beast I loved this guy initially, but I was desperate to fill out his torso and improve his legs. He also gets a full Shadow Trap, much like his brothers. Front Back Front, Stood straight Detail, Lower legs Skeleton, Torso Front Skeleton, Torso back Storm Beast Not much has been altered aesthetically with this fella, but his mechanism has been modified slightly to accommodate some traditional friction gears. Front Back Pose, Slashing Skeleton, Torso back Skeleton, Torso front Quake Beast Quake Beast received quite the aesthetic overhaul, along with a more standard gear function for his crystalline clubbing arm. Front Back Detail, Crystal Club Detail, Clawed hand Detail, Shadow Trap Detail, Bracing for attack Skeleton, Torso front Skeleton, Torso Back Skeleton, Crystal Club
-

Big Ekimu revamp (new way to connect torso with gearbox)
PrimoUltimo posted a topic in LEGO Action Figures
I really liked big Ekimu, but he had few issues that I decided to fix (mainly a little too much of trans blue color and strange pads): rebuild legs; rebuild torso (a little rough method to connect, in better way gearbox with new torso), rebuild hammer; added cape from polybag; Big gallery (also pics with gold version of mask, and other torso armors) -
[MOD] 42036 Super Sport
syclone posted a topic in LEGO Technic, Mindstorms, Model Team and Scale Modeling
Good day ! Two days ago I finally got the 42036, but was dissapointed. The reasons were the enormous gaps in the bodywork, horrible looks without the stickers and missing details. So I decided to make it in white and fix it in general. After some hours of work I got this modded model. List of modifications: brakes levers and discs filled gaps in the body changed to white&black added chrome changed the yellow shock absorber part for a LBG one added a grille + some tubes rear lights numberplate decent seat tensor for the chain neon underlights Bricksafe Enjoy! LDD file coming soon LDD -
I've done a mod of the Mystery Machine (75902) so it fits all 5 of the Scooby gang. I made the wheelbase 2 studs longer and rearranged a few things inside. I thought the original design was pretty good so didn't want to change too much, just make it a little larger. A few more photos in my Flickr album https://www.flickr.c...157668544812966 I also made a stop motion animation of the build
-
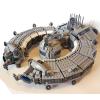
Five years ago when the Super Star Destroyer 10221 came out, I couldn't dream of buying it. In Canada, with taxes and possibly shipping combined you were looking at around $600.00 for it - which I'd already dropped on the Death Star playset and that was, I felt, the maximum I would ever spend on Lego. I simply decided that the SSD wasn't happening in this lifetime and that was that. But after MOCing the rest of the major OT locatons/ships, five years later this one slot remained empty into an otherwise comprehensive collection. I had to have that Executor, I thought. Checked out some listings on eBay, Kijiji and of course Bricklink. The markup would have made me spit coffee at my screen - if I drank coffee. The prices were lowest at $1400.00 CDN. There was one complete and assembled going for $1100. Unreal - but understandable. It's a limited edition high demand item. A compromise was made and I started to Bricklink Pellaeon's brilliantly designed Midi Scale Super Star Destroyer found here. It would cost me about $70 to get the parts I needed for it on Bricklink. It is a beauty of a design and TLG would be smart to adopt this kind of scale for such a distinguished and iconic OT Star Wars ship. But it nagged at me - in the back of my head - if I did build this, would I be satisfied with the scale? Despite already ordering parts for the midi scale, I started to sink deep into the abyss of Bricklink and multiple blogs, posts and threads on the subject of Bricklinking large sets. I was hooked on the idea of this huge set I couldn't afford. But I also discovered some very important information - the UCS Super Star Destroyer contains no super special, highly priced parts that only appear in that set, 10221. Encouraged by this, I found a great price on replacement stickers and that was that - I was invested and there was no turning back. The goal was to get this half price. If I got the price down to $300.00 ($200-250 USD?) I could do it. It wouldn't break the bank so to speak and the full size SSD could be realised. It would just take several long nights alone working out which pieces to buy, who from, and what sets I had that I could cannibalize for parts... ...especially wedges. There are over 100 wedges of the 3x12 type in this model. It ended up being mostly a scramble to see if I could get the right number of the right color and how cheap. Here's where it got weird: the light grey wedge pieces are very common in both Star Wars and non Star Wars kits. They are, for that reason, highly in demand because people want them to build all manner of MOCs. This was reflective in the prices. So what I ended up doing was only using those more valued light grey wedges for the top and the absolute bottom layer of the base. The rest of the build I would use dark grey 3x12 wedges, of which they were much more available and cheap. So if you are willing to cut costs down with a bit of color changes, I'm sure the choice saved me close to $100.00. The build of this thing was very exciting. There are 4 main stages, the base, the spine, the "cityscape" on top (with the bridge) and the perimeter neckline that gives the SSD its distinctive shape. Building these stages, I was serious about getting the base and spine as accurately built as possible, lending some flexibility to the top bits which are arguably more cosmetic. Lots of rainbow colors came out to help put the base together. Sadly this resulted in a lot more work near the end, as I had to rip apart the whole thing to replace some of the rainbow bits that were visible from the lateral strips that hug the sides of this giant beast. Most of the rainbow bits were contained but I was surprised how deep into the ship you can see once you've got a lot of light coming in to the display. The spine was tricky - I had used a bunch of smaller beams in my haste and once the Bricklink shipment with all the long technic beams came, I was compelled to replace some but not all of them. The stability was and still is decent. I'm proud to say that it ended up being rather swooshable (with a firm grip of course!) Once I got to the cityscape part of it, I started taking a few minor liberties. There were a couple of areas where I got lost, in particular with the intricacies around the recessed bridge scene. In the end, I took a leap of faith based on assembly videos and was invaluable. Even though it didn't show every step (the instructions were good for that) it was super helpful to see everything in real three dimensions. I spent a lot of time reviewing and pausing Brickbuilder's helpful video to check the build. I'm sure it wasn't made to assist in a build but it certainly did.One area that I went completely "off book" was the triangle-shaped bit that brings together the front taper of the ship with the back end - I hadn't ordered enough 4x4 wedge plates and I was getting impatient. I just rammed together some bits to make it work and so far it seems perfectly sturdy and I have no plans to revisit it. The discrepancy might stick out to owners of the official kit, but no worries for me. Finally I had one last Bricklink package arrive with dozens more 2x12 plates and 2x4 plates to help fit together the two large strips that make up the outer edges of the top. Since I'm still not 100% finished with it (it's done but I plan to work more on it when time allows) so for that reason I haven't anchored down the two strips using those 12 door hinge plates on the undersides. So those parts are a little loose - with too much shake the end plug can pop out and send the two strips flying off. So I reinforced them a bit more to survive ejecting to the floor. That's why there are a few extra wedges attached to the underside of these strips. It may look a little wonky but the reinforcement it provides is well worth it. As for the figures, Bossk is a major holdout. I will buy him eventually. For now, I'm satisfied with the stand-in involving the Chima croc head. It's certainly worth mentioning that I didn't bother with the stands (or the plaque) but I plan to build them someday. My shelf actually allows it to be displayed without the stands. The only issue is it cannot be displayed flat on a table - it needs to dangle off part of the table to avoid ramming the engines into it and have an engine array collapsing on the floor in a million pieces. That only happened once, so far. There are a few bits on the underside that use the wrong dark grey. Those will be swapped out eventually. I'm surprised there wasn't more. We've got some stand-ins for 4-Lom and Zuckuss, too! Thanks for reading this. I am super thrilled with it. It was a satisfying build that I managed to pull off within budget and about three months of spare time. What a satisfying and mighty sight. Although I regret not getting it an retail, having one slightly imperfect at half price is a great thing. Questions, comments, etc welcome. Oh yes, of course, the obligatory "no disintegrations" scene!! "You are free to use any methods necessary, but I want them alive..."
-
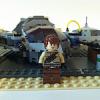
Hello all. I recently picked up a Microfighter ARC-170. it is a great little build, but I am wanting to get rid of the hole in the middle of the ship, and loose the chibi look, while still keeping the microfighter size and simplicity. Any tips on modding it?
-
A LEGO Wind Turbine MOC and MOD of the LEGO Vestas Wind Turbine 4999. The original 4999 sets are not only hard to find today but expensive so we worked with what we had in our inventory and bricklinked most of the key structural parts which were the 9 x White Slope, Curved 8 x 6 x 2 Double part #45411 and Curved 8 x 6 x 2 Inverted Double part #45410. Since we were starting from scratch we changed the original scene of the restaurant into a modern seaside house. The modern and modest seaside house features minimal interiors with PF lights for both interior and exterior Here's a full overview video of our LEGO Wind Turbine MOC in detail with all it's Power Functions in action. Enjoy!