Search the Community
Showing results for tags 'executor'.
Found 8 results
-
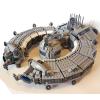
Executor Instruction by one case, on Flickr The Executor class Star Dreadnought Instruction is now available. Brick count-7264 Size-132x49x20cm Weight-4kg Instruction by Legolijntje The package includes: -940 PDF pages of professional instruction manual -complete LDD file -5120x2880 High-res Desktop wallpaper images -complete parts list https://rebrickable.com/users/Legolijntje/lists/26966/ contact namaskaar@naver.com for purchase. you can also use rebrickable.com: https://rebrickable.com/mocs/MOC-15881/onecase/executor-star-dreadnought/#comments some minor errors can be found during the process. please feel free to comment them here. Thank you! Executor Instruction by one case, on Flickr Executor Instruction by one case, on Flickr Executor Instruction by one case, on Flickr Executor Instruction by one case, on Flickr Executor class Star Dreadnought by one case, on Flickr Executor class Star Dreadnought by one case, on Flickr Executor class Star Dreadnought by one case, on Flickr Executor class Star Dreadnought by one case, on Flickr
-

13 foot 50,000 piece Lego Star Destroyer (in progress)
Kieganlenihan posted a topic in LEGO Star Wars
This is my 13 foot long Executor Star Destroyer! I started this project on June 27th and paused construction on August 20th 2017. The model is supported on an aluminum frame and surrounded by over 2000 technic bricks. This combination represents the frame of the entire project and this is where the thousands and thousands of grey pieces are connected to form the aestethic of the model. This model obviously has two sides, a bottom and a top. I decided during the planning of the model that I would build the bottom half first, flip it over using wires from the ceiling to suspend the model mid air and then I would build the top. The goal is to have this model free floating by about 4 or 5 strong wires. Already the model is 13 feet long, weights 120 pounds and has over 50,000 pieces. When completed, it will be 6 inches, 70,000 pieces and 100 pounds bigger. Please view my flickr albums where you can see a detailed look at how I constructed this beast! https://www.flickr.com/photos/157987175@N04/albums -
[MOC] Exécuteur Super Star Destroyer 1,85 m (73 pouces - 6,1 pieds - in progress)
Pierre Augustin posted a topic in LEGO Star Wars
Texte original en anglais: Bonjour, c'est mon MOC du Destructeur Super Star Executor en lego, commencé en juillet 2016. Je l'ai réalisé en partie avec les pièces du modèle collectionneur 10221 plus une très grande mesure pour atteindre 1,80 m de long. Je n'ai utilisé aucun logiciel et l'ai construit de manière semi-empirique (avec un travail de réflexion préalable, cependant). Du coup, je n'ai pas le nombre exact de pièces, pour l'heure, mais sans doute entre 6 et 7000 briques. Sans compter qu'il est encore inachevé. Pour l'heure, le château arrière et les réacteurs n'ont pas encore été montés. J'ai toutes les briques et sais comment je vais plus à la réserve pour le parfaire. D'ailleurs, il m 'Arriver encore de reprendre et de corriger quelques détails. Mais, dans l'ensemble, et sur le principe, et sur l'essentiel, il est "réglé". _________________ Traduit: Bonjour, ici, vous pouvez voir mon MOC de Super Star Destroyer Executor dans lego, je n'ai pas commencé à construire en juillet 2016. Je l'ai fait en partie à partir des pièces du modèle 10221 UCS, mais l'ai un Changer lourdement Pour le faire 1, 80m de long. Je n'ai utilisé aucun logiciel, je construis tout semi-empiriquement (avec un peu de planification à l'avance, bien sur). Par conséquent, je ne sais pas maintenant que la seule pièce compte à cet instant, mais c'est sans aucun doute entre 6 et 7000. C'est sans tenir compte du fait qu'il n'a pas été encore fini. Actuellement, la ville à l'arrière et les réacteurs n'ont pas encore été ajoutés. J 'Ai toutes les briques et je sais comment je vais continuer, mais je prendrai mon temps de faire tout simplement. Je dois encore revoir et corriger quelques détails. Mais dans l'ensemble, -
Hi, this is onecase. I'm glad to introduce my newest moc 'Executor class Star Dreadnought'. Brick count 7312, 132cm long 49cm wide. I am aware of that many great moc builders have already done fabulous jobs on the Executor, but I wanted to make my own version anyway. took me about 6 months from designing LDD to completion. enjoy. Executor class Star Dreadnought by one case, on Flickr Executor class Star Dreadnought by one case, on Flickr Executor class Star Dreadnought by one case, on Flickr Executor class Star Dreadnought by one case, on Flickr Executor class Star Dreadnought by one case, on Flickr Executor class Star Dreadnought by one case, on Flickr Executor class Star Dreadnought by one case, on Flickr The Empire Fleet by one case, on Flickr Executor class Star Dreadnought by one case, on Flickr
-
Just want to share to all lego star wars fans my mini sized Death Squadron for those with a limit on bricks.(the executor is a bit too big in bricks but the right proportions in size) And the whole of Death squadron. The ISD Devastator that's all!
-
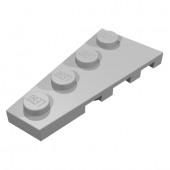
Five years ago when the Super Star Destroyer 10221 came out, I couldn't dream of buying it. In Canada, with taxes and possibly shipping combined you were looking at around $600.00 for it - which I'd already dropped on the Death Star playset and that was, I felt, the maximum I would ever spend on Lego. I simply decided that the SSD wasn't happening in this lifetime and that was that. But after MOCing the rest of the major OT locatons/ships, five years later this one slot remained empty into an otherwise comprehensive collection. I had to have that Executor, I thought. Checked out some listings on eBay, Kijiji and of course Bricklink. The markup would have made me spit coffee at my screen - if I drank coffee. The prices were lowest at $1400.00 CDN. There was one complete and assembled going for $1100. Unreal - but understandable. It's a limited edition high demand item. A compromise was made and I started to Bricklink Pellaeon's brilliantly designed Midi Scale Super Star Destroyer found here. It would cost me about $70 to get the parts I needed for it on Bricklink. It is a beauty of a design and TLG would be smart to adopt this kind of scale for such a distinguished and iconic OT Star Wars ship. But it nagged at me - in the back of my head - if I did build this, would I be satisfied with the scale? Despite already ordering parts for the midi scale, I started to sink deep into the abyss of Bricklink and multiple blogs, posts and threads on the subject of Bricklinking large sets. I was hooked on the idea of this huge set I couldn't afford. But I also discovered some very important information - the UCS Super Star Destroyer contains no super special, highly priced parts that only appear in that set, 10221. Encouraged by this, I found a great price on replacement stickers and that was that - I was invested and there was no turning back. The goal was to get this half price. If I got the price down to $300.00 ($200-250 USD?) I could do it. It wouldn't break the bank so to speak and the full size SSD could be realised. It would just take several long nights alone working out which pieces to buy, who from, and what sets I had that I could cannibalize for parts... ...especially wedges. There are over 100 wedges of the 3x12 type in this model. It ended up being mostly a scramble to see if I could get the right number of the right color and how cheap. Here's where it got weird: the light grey wedge pieces are very common in both Star Wars and non Star Wars kits. They are, for that reason, highly in demand because people want them to build all manner of MOCs. This was reflective in the prices. So what I ended up doing was only using those more valued light grey wedges for the top and the absolute bottom layer of the base. The rest of the build I would use dark grey 3x12 wedges, of which they were much more available and cheap. So if you are willing to cut costs down with a bit of color changes, I'm sure the choice saved me close to $100.00. The build of this thing was very exciting. There are 4 main stages, the base, the spine, the "cityscape" on top (with the bridge) and the perimeter neckline that gives the SSD its distinctive shape. Building these stages, I was serious about getting the base and spine as accurately built as possible, lending some flexibility to the top bits which are arguably more cosmetic. Lots of rainbow colors came out to help put the base together. Sadly this resulted in a lot more work near the end, as I had to rip apart the whole thing to replace some of the rainbow bits that were visible from the lateral strips that hug the sides of this giant beast. Most of the rainbow bits were contained but I was surprised how deep into the ship you can see once you've got a lot of light coming in to the display. The spine was tricky - I had used a bunch of smaller beams in my haste and once the Bricklink shipment with all the long technic beams came, I was compelled to replace some but not all of them. The stability was and still is decent. I'm proud to say that it ended up being rather swooshable (with a firm grip of course!) Once I got to the cityscape part of it, I started taking a few minor liberties. There were a couple of areas where I got lost, in particular with the intricacies around the recessed bridge scene. In the end, I took a leap of faith based on assembly videos and was invaluable. Even though it didn't show every step (the instructions were good for that) it was super helpful to see everything in real three dimensions. I spent a lot of time reviewing and pausing Brickbuilder's helpful video to check the build. I'm sure it wasn't made to assist in a build but it certainly did.One area that I went completely "off book" was the triangle-shaped bit that brings together the front taper of the ship with the back end - I hadn't ordered enough 4x4 wedge plates and I was getting impatient. I just rammed together some bits to make it work and so far it seems perfectly sturdy and I have no plans to revisit it. The discrepancy might stick out to owners of the official kit, but no worries for me. Finally I had one last Bricklink package arrive with dozens more 2x12 plates and 2x4 plates to help fit together the two large strips that make up the outer edges of the top. Since I'm still not 100% finished with it (it's done but I plan to work more on it when time allows) so for that reason I haven't anchored down the two strips using those 12 door hinge plates on the undersides. So those parts are a little loose - with too much shake the end plug can pop out and send the two strips flying off. So I reinforced them a bit more to survive ejecting to the floor. That's why there are a few extra wedges attached to the underside of these strips. It may look a little wonky but the reinforcement it provides is well worth it. As for the figures, Bossk is a major holdout. I will buy him eventually. For now, I'm satisfied with the stand-in involving the Chima croc head. It's certainly worth mentioning that I didn't bother with the stands (or the plaque) but I plan to build them someday. My shelf actually allows it to be displayed without the stands. The only issue is it cannot be displayed flat on a table - it needs to dangle off part of the table to avoid ramming the engines into it and have an engine array collapsing on the floor in a million pieces. That only happened once, so far. There are a few bits on the underside that use the wrong dark grey. Those will be swapped out eventually. I'm surprised there wasn't more. We've got some stand-ins for 4-Lom and Zuckuss, too! Thanks for reading this. I am super thrilled with it. It was a satisfying build that I managed to pull off within budget and about three months of spare time. What a satisfying and mighty sight. Although I regret not getting it an retail, having one slightly imperfect at half price is a great thing. Questions, comments, etc welcome. Oh yes, of course, the obligatory "no disintegrations" scene!! "You are free to use any methods necessary, but I want them alive..."
-
Hello. My most recent MOC and a new addition to the Galaxy Command Universe I created. This frigate was developped after Earth's liberation war. With the nebulons vanquished and with so much tech lost in the debris, that could be used, the HUN (Humanity's United Nations) developped a new kind of ship capable of defeating nebulon capital ships still roaming the emptiness of space. Each ship has two pilots, 8 marines an one Inquisitor or an Executor :D If you wanna know more just ask! Bricks: ca 2300 360º turntable in cockpit and wings two spring shooter hidden in hull compartment Let me hear your thoughts The link for ideas - If you could also help reach 10000 voters, I'd appreciate that - https://ideas.lego.com/projects/82734 Thanks! Cheers!
-
Up next in my series of Kenner Mini-Rigs from the 80's, is the ISP-6, Imperial Shuttle Pod. This is basically a mini version of the Imperial Shuttle seen in Return of the Jedi. The ISP-6 Imperial Shuttle Pod, was a small air/space vehicle used by the Imperial forces. A single-seat vehicle with a tri-wing configuration reminiscent of the larger Lambda-class shuttle, the ISP-6 was probably designed by Sienar Fleet Systems or Cygnus Spaceworks. It was a fast, compact transport, designed to be deployed from larger shuttles, and it was armed with two defensive blaster cannons for operations in combat zones. It also possessed a rear-view mirror to spot Rebel fighters from behind. After building is and getting the proportions about right, I looked and there was enough room for Vader as well as some cargo. I put a passage behind him, but, that may change when I build this early next year. Then again, I may have an Imperial Pilot fly this and have Vader kick back and relax while he does all the work. Going back to my MLC-3. The proportion of Lego mini-figs and Kenner Star Wars figures is way different. This design may fit an old Kenner fig, but, it's Lego so I may go with 2 figs in it. Wings up, landing gear down. Roomy?! There are 2 hinges on the top canopy, to access the whole interior of the ship. Wings fold up and down. Landing gear doesn't fit in the ship, it's too small of a build, they need to be taken when swooshing this around. I'm not completely happy with the nose. I may work on this later, but, I like it and think it fits in with the rest of the Kenner Mini-Rigs, thus far. I attacked the file to this if anybody would like to look at it or try to build this. This model is the second largest Mini-Rig I built, with 332 pieces in it. The MTV-7, has the highest pieces count, the MTV-7, Multi Terrain Vehicle will be posted tomorrow. Thanks for looking, Jamie 9 - EU - Mini Rig - ISP-6 - Imperial Shuttle Pod.lxf