Search the Community
Showing results for tags 'RC'.
Found 538 results
-
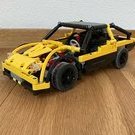
[MOC] EAGLE an RC Trophy Truck
Daniel-99 posted a topic in LEGO Technic, Mindstorms, Model Team and Scale Modeling
Hey, guys! After a 3-month brake from Lego, I am glad to show you my new RC trophy truck, called Eagle. I apologise for the quality of photos and I will try to improve them later after I will get myself a studio light. I will also make a proper introductory video when I will get enough outdoor footage. Features Responsive long-travel suspension with 4-link live-axle at the rear and double wishbone at the front Brushless motor A2212 1200 kv for propulsion, Geek Servo for steering, 1500 mAh 3S Li-Po for power Strong and efficient transmission with metal U-joints and metal bearings. Great ground clearance for outdoor use, 95 mm RC wheels Light-weight bodywork Experience and Inspiration I guess that nobody will be surprised If I would make a confession that I have a deep passion for Trophy trucks. This type of vehicle suits the best for the role of a fast RC Lego cars which are build for outdoors. Indeed, outdoor environment is always rough and "bumpy" for Lego cars. I took my inspiration and first experience form several well-known Lego builders, such as: Sariel RM8 ZeroBricks GooberReboot Through the last 3 years of intensive engineering I made a few attempts in building myself a "proper" trophy truck. Each of them had it`s own features and technical problems: Heavy-duty Trophy Truck: RWD, 2x BM, 2x Buwizz 3.0 units, 95mm wheels. Problems: "big scale" which caused a serious load for motors, over-tilted front caster. Phantom: RWD, 2x BM, Leshy control unit, 85mm wheels, mid scale. Problems: lack of power from Leshy unit, lack of articulation at the rear, plastic wearing in the wheel hubs. Wilde Beast: 4WD, 4x BM, Wixy RC control + 3S Lipo, 95mm wheels. Problems: "big scale" which caused a serious load for motors, indep. susp. with a questionable geometry. Falcon: 4WD, 4x BM, Wixy RC control + 3S Lipo, 75mm wheels. Problems: indep. susp. with a questionable geometry, overheating of motors at the maximal RPM. About a year ago I switched from Lego Buggy motors to a Brushless motor (for the reasons which will be covered later). This was not an easy switch for me and I had to learn some RC electronics theory and find the proper ways of using brushless motors with Lego. My latest RC cars with Brushless motors was: Unimog trial truck Pathfinder SUV Hornet 4x4 buggy With pathfinder and Unimog projects I studied the 4-link live-axle suspension geometry, while with Hornet project I found the way to achieve a proper suspension and steering geometry with my custom wheel hubs. With this projects completed I get myself all cars I need. - What should I build next? With such question in mind, I faced a deep burnout from Lego, so I decided to take a summer brake. Hot summer days returned me my passion for Lego, and I had a plenty of time to plan a new project. I felt myself ready to make another attempt in building myself a "proper" trophy truck. That is how the story begins. Electronics With my latest truck Falcon I reached the limit of what Buwizz motors could handle. Some time ago there was a discussion about efficiency and power-to-weight ratio. I would not resist that with the growing number of motors and Buwizz units, one could get a better power-to-weight ratio, though such a way faces the problem of plastic-weariness quite soon. With the growth of the number of motors, also grows the size of the car and it`s total weight, which get distributed to the four Lego plastic wheel hubs! I faced the plastic-weariness problem of Lego hubs with my Phantom truck, and solved it by purchasing custom wheel hubs with metal bearings, which I were used in the Falcon truck. Moreover, there was no gearing in the transmission of the Falcon truck: each wheel was connected to it`s own motor via driveshaft with metal bearings. With 4x Buwizz motors on board, powered by strong 3S Li-Po battery, Falcon had a great power-to-weight ratio. Through multiple tests I found that It can not handle full throttle for more than 45 seconds due to the rear motor overheating. It was pretty clear to me that RC Li-Po could easily overfeed 8 or even 12 motors with power, so there was no sense in adding more BM motors. Likely to me, one Russian AFOL developed a 3D-printed housing for Brushless A2212 motor which allowed to use it with Lego. I purchased two sets from him, and mot I have 100% RC setup. There was no problem with the lack of power or motor overheating anymore, but it was a real challenge for me to overcome this energy! Transmission With BM motors it is very natural to distribute the torque among axles \ wheels, by having separate transmissions to each axle \ wheel. But with Brushless motor I had to use "realistic" transmission, since there is only one output with a plenty of speed and torque. Despite the fact this motor is a baby-motor in the world of RC cars, It has enough power to twist Lego axles with instant reaction to the throttle. Custom 3D-printed housing has a 4:1 planetary reduction, but the speed of the output is enough to cause gear-melting. That is why the following decisions were made: use metal U-joints all around, most of them have a 3L lego axle glued from one side to prevent them from falling off. use silicone grease to lubricate the planetary gear in the motor housing and some external gearings. use custom parts with metal bearings to separate the transmission from the car frame. use carbon-fiber axles in the central driveshafts. The new Eagle truck has a very simple RWD transmission with a single "external" 14:23 gearing in the differential. Recall, that the 3D-printed motor housing has a 4:1 gear reduction. So the motor is connected to the differential via carbon-fiber driveshaft. From the differential power translates to the 95 mm RC wheels via half-axles with metal U-joints. The whole transmission sit on the metal bearings (custom wheel hubs with metal bearings, custom 5x7 frame with metal bearings for differential housing, motor output passes through the connector with the metal bearing). Surely you have noticed that I lifted the central differential by one stud over the wheel axle in order to achieve a higher ground clearance! Which differential to use RED or YELLOW? RED differential has a 28:12 reduction which reduces the load from the driveshaft and the motor. Moreover, such gear ratio is more realistic. On the other hand, YELLOW differential has bigger teeth so it is stronger. But more importantly, is that YELLOW differential is 125% more efficient than the RED one, since it has bigger gears and does not scratch the 5x7 frame under the load. In fact, I am using a custom torsen differential with 23-tooth gear. It also does not scratch the 5x7 frame and hold half-axles much stronger than the original YELLOW diff. Suspension Trophy truck is all about suspension, and it was the most challenging part for me! Non of my previous trophy trucks has a proper suspension: it was either rear live-axle without articulation (Phantom, heavy-duty trophy truck) or independed rear suspension (Wilde Beast, Falcon). As I found from multiple driving tests of Phantom, rear axle need an articulation, cause otherwise RWD car loose the speed on bumps. IRS give the desired articulation and stability, moreover it is very simple to build and it has a low unsprung mass. Despite that IRS has a limited articulation and it is not presented in real Trophy Trucks either! Lego engineers designed a ball-joint connection, which is used in many Trophy trucks. It gives a single-lever suspension (with it`s simplicity and stiffness) and desirable articulation. Well, I did not use it, since it has no metal bearings for the U-joint inside the ball. So I had to replicate the 4-link live axle. 12-long reinforced suspension arms, invested upper triangle, 9.5 L springs, attached to the mid of lower suspension arms, Anti row-bar with a carbon-fiber axle, Now let`s move the the front suspension. Surely, real Trophy Truck has a complex front suspension, which is impossible to replicate with lego bricks. Though lego-ish version share important principles with real prototypes: double wishbone with 8L suspension arms (9L was too wide here) Positive caster angle Reinforced lower arms Shock is attached to the lower arm closer to the center of the car Steering rack is located in the front of the car Again I use custom wheel hubs with metal bearings. They have an inverted lower arm mounting point, though it is possible to use Lego hubs instead. With hart 9.5 L springs the front suspension has a long travel, moreover it has a great balance btw softness and responsiveness + side-way support. Bodywork & Frame In order to achieve a positive caster angle I tilted the lower part of the frame. At the same time, the upper part of the frame. At the very front of the car upper and lower parts of the frame meets together which form the "almost right-angle" triangle with lengths: 13+1, 14+1 and 5+1. (right-angle triangle has the following lengths: 12+1, 13+1 and 5+1). Second time I use the Pythagoras theorem to make a force triangle for the rear springs attachment points. I tried to keep the frame of the truck in 13-15 studs wide, to use 15L liftarms for cross braces. I was Luckily to me I was able to squeeze all electronics into cockpit. This give the model 50:50 weight distribution and a "low" (for such high car) gravity center. Well, one would prefer to obtain 35:65 weight distribution for the RWD truck, but It would raise the gravity center and would require extra structure over the rear axle. The whole bodywork consist of 24 panels and a few bricks, so it does not cause much weight to the truck. -

[MOC] Dune Buggy RC - 8284 Redesigned
cyberdyne systems posted a topic in LEGO Technic, Mindstorms, Model Team and Scale Modeling
Good day/night/whatever everyone! I want to share with you a little experiment of mine that got a bit out of control. I hope, you remember set 8284 and its really unique looking b-model. At least I do. Furthermore, it is one of my favourite b-models and I really wanted to pay tribute to it. Obviuos thought was, of course, to make it RC with the new Control+ elements. After half an hour I got something that could drive and steer. I even tested it in the local park, but... something was off. It just wasn't enough. However good looking this buggy is, its transmission wasn't created with electromotors and speedy driving in mind. Wheels tended to fall off. Gears in diff broke at least once. And offroading capabilities were...em... on the small side of expectations. And I got an idea! I decided not just to motorize this buggy, but completely redesign, reimagine it from technical point of view, keeping exterior close enough to what it was before. You know, like these like-oldtimer-outside-but-modern-inside tribute cars which car companies sometimes make. Also I wanted to make transformation function more interesting and useful. So, I started on the blueprints... And here it is! All modern all new Dune Buggy! With familiar face which got a facelift. Literally. New version of transformation not just shortens the car, but lifts all front section up While cockpit raises up, special levers make sure that headlights between wheels always stay horizontal. And not only that. Another special lever in the rear section locks the differential using new orange shifter. This way buggy becomes most offroad. And now - to the video! (With the new intro btw) -

Mini RC/Manual Euro Semi Truck with Free Instructions
SaperPL posted a topic in LEGO Technic, Mindstorms, Model Team and Scale Modeling
I started playing around with the idea of European style semi truck again. I built a prototype to test the chassis design with motors side by side. The core idea here is that both motors are oriented towards back so you can put the medium Technic frame on top of them as well as have cables managed up front. EDIT: final version of the semi: Instructions: https://rebrickable.com/mocs/MOC-90482 (RC Semi Tractor) https://rebrickable.com/mocs/MOC-90484 (Box Trailer) Update: https://rebrickable.com/mocs/MOC-152433 (Manual Semi Tractor) The first iteration/prototype: Prototype showcase: It'll take some time before I'll finish the whole semi truck build, but I prepared the instructions for the chassis so you can build it. Instructions are available for free on Rebrickable: https://rebrickable.com/mocs/MOC-86118 Sneak peek of the instructions: -
.thumb.png.116032e930e483fb4ebbfdc62183bd34.png) I would like to present the result of my Winter-project. A big thank you to everybody who supported me in the corresponding WIP-topic and of course to @DugaldIC for challenging me! Instructions are available on Rebrickable. Features: Turn-table-based wheel-hubs with minimal slack 4WD by means of 4 L-motors powered by two BuWizz 2 units Fully independent suspension Steering with Servo-motor 30 degree steering angle with Ackermann geometry Caster angle Fake V8-engine driven by M-motor Can handle a rough ride Liftable by roof, nose and tail Everything in-system Stats: Parts #: 1844 Weight: 1980gr Length: 54 studs Width: 35 studs Height: 23 studs I hope this will pull @Blakbird back into Technic . Some stills from video-material. And finally a few short videos.
I would like to present the result of my Winter-project. A big thank you to everybody who supported me in the corresponding WIP-topic and of course to @DugaldIC for challenging me! Instructions are available on Rebrickable. Features: Turn-table-based wheel-hubs with minimal slack 4WD by means of 4 L-motors powered by two BuWizz 2 units Fully independent suspension Steering with Servo-motor 30 degree steering angle with Ackermann geometry Caster angle Fake V8-engine driven by M-motor Can handle a rough ride Liftable by roof, nose and tail Everything in-system Stats: Parts #: 1844 Weight: 1980gr Length: 54 studs Width: 35 studs Height: 23 studs I hope this will pull @Blakbird back into Technic . Some stills from video-material. And finally a few short videos. -
[MOC] RC Ripsaw EV1, 8 buggy motors and 4 BuWizz
Marxpek posted a topic in LEGO Technic, Mindstorms, Model Team and Scale Modeling
This is my attempt at building a proper and most importantly; fun to drive ripsaw with somewhat realistic performance. The 8 buggy motors and 4 BuWizz seem to do the trick.. I tried to replicate as much as i could from the original design, obviously the drive-train works differently; the real EV1 has 1 motor with a clutch system in the rear differential to power the tracks from the rear alone, which i did try to replicate by adding the fake V8 and rear diff, which does function, but i disconnect it most of the time while drive outside because it has a habit of getting jammed by leaves, rocks and twigs, the gears used to connect to the fake V8 are all exposed. Here the sprockets are powered in the front and rear and each is connected directly to the slower output of 2 buggy motors, giving this thing crazy speed and torque. The suspension is set up like the real EV1 and works fine, but does require a track tension system, the real thing has a suspended front sprocket to keep tension on the tracks, in this case it would mean loosely suspended buggy motors, an idea i did not like and did not try, yet. I am using a simple lever, spring and wheels to keep tension on the track but it works fine and looks ok. For the body i tried to capture the look and feel of the real thing, using as little as possible panels and using beams for the boxy look with just the exposed framework seemed the right thing to do, i am sure it is filled with illegal connections, i go by the rule: "if it fits without force, it fits". The body is surprisingly solid, it can be lifted from several positions and it can take some abuse from driving, and abused it, i have.. The are 2 seat for Technic figures and the electrical wiring functions nicely as a seat-belt for them. I have added 2 sets of LED's on the top bar, i do not think the real EV1 had that, but it seemed the most "natural" position to me and it works nicely since they are aimed down a bit. And here you can see it in action! please leave a like if you can and help out my tiny channel: I hope you like it! -
 Hello everyone! Before I start I want to wish all of you to stay healthy, survive and win the disease! Today at my birthday I decided to share with you my latest MOC. This is a brand new Liebherr LR 11000. From the previous model, it took only some boom sections and proportions. The chassis and superstructure built from nothing and were rebuild several times. Below please let me share with you some dry specifications of the model: - Crane is about 2 meter high - weights 5 kg - requires at least 5 big battery boxes for been fully operated - can be managed by 3 sBrick units. - has 10 PF motors (4 are in the chassis) - Has 9 pneumatic cylinders + a pump - Has a full-size V6 diesel fake engine like the real crane - Has 6 winches, 3 of them are installed to the boom like in the real crane, but none of the motors are on the booms. - Crane is able to assemble and disassemble back from horizontal to working condition without any human help. - Has 4 pneumatic features, three of them are operated from the cabin, two of them are operated from the operators work seat Now is hte time for it's features: - Driving and steering - one XL motor per each track. Torgue increased 1:25 - Slewing by 2 M motors - L Motor for SA Frame winch - L Motor for the Main boom winch - M motor for the luffing jib winch - M motor for the secondary hook winch - L motor for the main hook winches - Pneumatically adjustable operators cabin - Pneumatically adjustable derrick counterweight horizontally - Pneumatically adjustable derrick counterweight vertically - Pneumatically rising chassis for (dis)assemble. - L motor for the pump and V6 engine - Individual Sbrick custom profile - 3 Pair of lights: - Front LED - Cab LED - Main hook winches LED Here is the link to photos, I'll post some directly here: https://bricksafe.com/pages/Aleh/2020-lego-liebher-lr-11000 Bonus: Here is the performance of the superstructure stability without boom and without counterweight(!), only one battery box insalled for fotors activity. Boxes are full with batteries (24 pcs) Easy to fix the front suspension: https://bricksafe.com/files/Aleh/2020-lego-liebher-lr-11000/IMG_2983.jpeg/800x600.jpg 1,5 kg load. Please enjoy and feel free to ask any questions.
 -

[MOC] Armored Trophy Truck [free building instructions]
keymaker posted a topic in LEGO Technic, Mindstorms, Model Team and Scale Modeling
Hi, It lasted a bit, but I managed to finish this project and here I am. I would like to share with you my latest MOC - Armored Trophy Truck. It was designed mostly to test new Buwizz 3.0 unit and Buwizz motors. I also wanted to increase my own experience in building fast MOCs this time. As there are many trophy trucks out there created by many great builders I tried to take some different approach. So to protect cabin and motors, I put armor on my creation :) Thanks to panels both motors and cabin are protected from dirt, dust and stones. I also added roll cage to protect the driver. More details and presentation how fast this truck is you can check on the video below. Instructions are free of charge, I hope many of you will be able to build it and have fun playing with it outdoors as I did. Link: https://rebrickable.com/mocs/MOC-94026/keymaker/armored-trophy-truck-rc/#details Details and main functions: • dimensions LxWxH: 36x16x14.5 cm • weight: 1.22 kg • RWD drive (2xBuwizz motors) • steering (C+ L motor) with positive caster • double wishbone suspension at front • live axle suspension at rear • additional suppressors in rear suspension to protect frame during high jumps • high ground clearance • front, rear and whole truck chassis are protected against dirt, dust and stones • roll cage • rear wheels are connected via portal hubs - gear ratio can be adjusted More photos: https://bricksafe.com/pages/keymaker/9.-armored-trophy-truck -

Remote Controlled Tower Crane - MOC
Timorzelorzworz posted a topic in LEGO Technic, Mindstorms, Model Team and Scale Modeling
Hello everyone, this model of a Tower Crane is made only with 1166 pieces and controlled with either smart device or physical remote. In order to all functions of that model, you get a complete overview in this article how to build and how to control this crane. You can find instructions here if you're interested in building this model. Summary of Functions & Features remote controlled with PoweredUp 2-way-gearbox to select between functions motorized hook, trolley and 360° crane rotation Hub with batteries as counterweight modular building with extendable tower Minifigure scale to fit City layouts openable cabin 83cm superstructure length 70cm tower height Impressions Electronic components The crane uses the newest PoweredUp electronics to power all the functions. In order to remotely control this model, a physical remote pad is not mandatory because the crane is also controllable with optional smart device and PoweredUp app. Shaped with some system pieces, the PoweredUp 2-port hub with batteries included fits perfectly as counterweight and is easily replaceable. Simply turn on the hub by finger press and connect them to either PoweredUp app or physical remote to let the fun begin. The official set 76112 Batman RC Batmobile offers all electronic PoweredUp components they are needed to control this Tower Crane. Trains (60197, 60198, 60336, 60337) from the City theme are also nice and welcome starting packs for electronics, because they all include one PoweredUp hub and a physical remote pad, which then requires only 2 additional medium motors. Controlling the crane Heart of the design and probably the most interesting part building this model is the controllable gearbox behind the cabin. Where motor A controls the movement of the trolley, the functions of motor B are selected through gearbox. The following configurations are possible when playing with this crane and two motors together: Motor A - Motor B Trolley - Hook Trolley - neutral Trolley - 360° rotation For the crane it is very important to have a neutral position for rotating the superstructure. In case this function is unselected, the crane can freely rotate and prevent from falling. This is a feature that can be also seen on real Tower Cranes. All functions are secured with clutch gears to prevent damage. The winch for the hook has also a safety mechanism included. This holds the cargo even when the function is unselected. Controlling the crane is thinkable easy. In the PoweredUp app it just requires a profile with two slider - one for motor A and one for motor B. That means that this crane is controllable with a custom profile or even with the available one from Batmobile. Keep in mind that controlling the model does not require a smart device by using the physical remote pad. Building the crane Splitted in separately parts, building this Tower Crane feels like constructing the real thing. Official strings (part 37597, 56823) are used in this model that are widely used with many lengths in other Technic sets. Of course you can use any other strings you want. The crane uses a modular building style where each part of the tower fits to each other. The inventory includes all parts that are required to build exactly one middle section, but it is still possible to omit and to create a crane with a lower height of the tower. Furthermore the height of the tower can be extended by replicating a middle section stacked to each other. A higher tower then requires a longer string for the hook for sure. The following inventory shows only the parts they are needed to build one more middle section: Made with Minifigure The cabin can be opened to put a Minifure (without hair or hat) inside. Since this Tower Crane is made in Minifigure scale, it matches perfectly each layout with Trains or Construction vehicles also in the City theme. Instructions Premium instructions for this model consists of 283 pages with high quality images and building steps very close to the Lego Technic ones. The instructions helps alot on how to connect strings and wires correctly. Following are some example pages to show the quality of instructions: Goal with this model was to create a Tower Crane that is not that big and expensive and buildable for everyone. Tons of hours are spent to experience with balancing and stability. The end result is pretty neat, the crane works just perfect but dont expect too heavy loads on it. The model fits all standards for easy building and color-coded components. If you're interested in building this model, you can buy instructions here and support me and my future work. Have fun with this Remote Controlled Tower Crane. Follow me on Instagram for updates and news -
[MOC] Hornet 4x4 Baja Buggy
Daniel-99 posted a topic in LEGO Technic, Mindstorms, Model Team and Scale Modeling
Hello Eurobricks! A few months passed since I shared with you my creations. Well, I was working hard on two RC projects and now I am proud to introduce you one of them! It is called "Hornet" and it is an Ultimate 4x4 Baja Buggy. Technical specs: 4-wheel drive, open differentials Full independed suspension Brushless motor, 3S Li-Po, GeekServo Custom wheel hubs with metal bearings Carbon-fiber axes, metal U-joints Transmission sits on the metal bearings Positive caster angle, kingpin inclination, Ackerman Anti-rowbar at the front axel 98 mm RC wheels understeering Light tubular frame A story behind the build. Half a year ago I bought myself a Brushless setup adapted to Lego. It can provide a strong and stabled stream of power to my RC Lego cars. In two days after the motor arrived I build a first project with it to test its capabilities. Of course, this was a buggy! The main goal was achieved, I was able to test the new system and it performed greatly! Though I was not happy with the car itself. It had technical problems with both front and rear suspension, steering, overview and proportions... During the winter holidays I found a great set of RC wheels on AliExpress. They looked ten times better then all the other RC wheels I had, so I bought them and at once started a new 4-wheel drive project (which will be revealed in my next post). All I will say now, it has solid axle suspension and no planetary wheel hubs. So it appeared to be quite fast and somewhat unstable due to the soft suspension and high center of gravity. I decided to postpone that project and build a fast and more stable Baja truck with the front in-depended suspension and the solid rear axle. The fist prototype can be seen of the picture below (half-way dismantled) and it looks totally weird, especially the placement of the Brushless motor! With such layout I tried to load the rear wheels, but did not succeeded. Despite a completely failed project, I get two important ideas from it. 1) My custom wheel hubs allows to build an advanced front suspension and steering with king-pin inclination, positive caster angle and Ackerman geometry. Also I learned how to use a half stud off-set for the attachment points of the lower suspension arm. 2) The placement of the Brushless motor behind the rear axle greatly load the rear wheels. I was not ready to give up, and decided go bigger next time and use my favourite 98 mm RC wheels. By widening the wheel base significantly I decided to solve the front wheel drive problem! It is well-know that steering rack is usually interact with a differential. Also the steering rack must be placed behind the front axle to achieve the Ackerman geometry. So I decided to move the front differential one stud to the front. The first sketch of the front axle looked very promising, so I decided to "copy" it for the rear axle. Well, to keep the same wheel base as at the front i needed to use the half-stud off set once again and this time on both lower and upper suspension arms. That is why the rear differential is covered with a mess of connectors and beams... Solving all problems with axles, I connected them together via central driveshaft and had to decide how I should place the Brushless motor. The problem is that the motor has a size of a PF XL motor, and so it requires a 24 to 24 tooth gear combination to connect it to the central driveshaft (and place the motor on a side or on top of the driveshaft). I was not happy with it because big gears would stick out from the flat bottom of the chassis. The brilliant idea came right in time! I decided to place the motor behind the rear axle and place the another driveshaft over the rear differential. This allowed me to use a 12 to 20 tooth gear combination! In addition it loaded the rear axle to achieve the understeering feature. It took me another day to finish up the first prototype, and I took the Buggy to an extensive driving tests. These tests took me over a month to complete, since they were interrupted with a melting of the snow. The following improvements were made (one by one): Reinforcement of the upper suspension arm. First version of the front suspension was falling apart on each big bump. Lowering of the suspension by one stud. This was made to increase the stability on the straight line and make the overview of the buggy closer to references. Also I widened the tubular frame for the same reason. Playing with gear ratios: differential swap and swap from 12:20 to 16:16 gear combination in between the driveshafts. Adding an Anti-rowbar with a carbon-fiber axe to the front axle. It was added to increase the stability on the fast corners. Making 3.5 L axes to solve the problem of the front U-joints falling off from the differential. The results. A tremendous efforts had been applied to finish this Buggy. A lot of hard work, tricky decisions and big regrets... Does the Hornet worth it? - NO! As a result I build myself a balanced RC car with a precise control, decent speed (about 15 km/h), enduring transmission and good-looking bodywork. But I would not suggest anyone to follow my way, because it will cost you a lot! If you want to get a good driving experience you would better buy an RC car! LOL. -
 Hi everyone! I want to create an off-road vehicle with these functionalities: - Speed around 13-16km/h - Positive caster angle - Good steering radius - Covering bottom of the car - Vehicle must be as versatile as possible (on-road, off-road, climbing capability) - that is why it is called Frontliner - No melting/damaged axles(or other parts) or at least minimal wear - this is with usage of brushless motor A2212 1000kv - Weight around 1,2 kg - Big wheels 100-110 mm (provide additional ground clearance) - Two-speed gearbox (optional functionality, may be implemented in the future) - Total gear reduction set to approximately 12:1 (including differentials reductions, etc. This still provides good speed of the model with usage of brushless motor) - Pendular suspension (optional functionality, currently implemented and it's very useful) What I will be using (non-lego): - RC setup (DumboRC X6FG - provides gyro stabilization) - Geek-servo motors (those works simply as servo-motor, but with 6 channels of the receiver I might use additional geek-servo motor as switch for gearbox) - A2212 1000kv brushless motor (I was previously using different BL motor, but this one is 14-pole, which means it has shorten rotating angle per-pole and is more precise in working with the throttle than 2838 3200/4500kv BL motor) - Metal universal joints (those are simply more robust than Lego ones) - Lucas oil white lithium grease (used to lubricate gears and axle holes) - 35A ESC - 3s li-po battery This is the first time I am seriously using Bricklink Studio to create a MOC. I had few attempts before, but this time I really pushed myself to at least design front and rear axle in it. Front axle: I used Geek-servo motor to steer the model (the front red weird stack of liftarms is actually it, dimensions 3x3x5). It also features planetary hubs, reinforced steering joints and planetary hubs. Rear axle (heavily insipired on @gyenesvi 42129 C model): We can see here the new differential (knock of part for now. I am soon gonna buy 42157 set to replace it with original Lego one). The yellow UV joint symbolizes metal version of it. Middle section: The yellow stack of gears symbolizes A2212 brushless motor. Between two 5x7 frames I hold battery and on top of that all RC components. This provides placement of all RC components in relatively small place. A2212 motor can rotate around 11100 RPMs at max throttle, then it is gear down 20:28 (differential gear). The differential distributes the power between the front and rear axles, which in my opinion creates less axle load than with just regular 28-tooth double-bevel gears. After joining above components into one setup I received the first prototype: I bought third-party wheels just out of curiosity and I have found that they weight slightly less than Lego ones, with pretty much same radius - 103mm. The body is just something I come up with in one day, I do not worry about that part for now as it is just prototype. At first I wanted to use 23801 steering hubs, but after few test runs with above model they simply couldn't stand the pressure. Other than that, the small steering joints were popping out from wheel hubs during steering on bumpy road. So that left me with only two solutions. Either I will use old portal hubs or new planetary ones. The first ones are more suited for big trucks, at least for me. So the choice was to go with the second option. (We need to wait for the Lego Audi set 42160, hope it will have good steering hubs, that support CV ball joints and are without planetary reduction) With that setup I was afraid that main shaft will have too much speed (around 7900 rpm at max throttle) and axles will start to melt. I was surprised when I took apart the model after hard run, because parts were in perfect shape! Those positive results are I believe because of light weight and short driveshaft. I am far from over with this model, that is why I submitted this topic. There is still room for improvement in those areas (at least :D): - Steering radius is simply poor. I thought that If I will put servo on the front and steering rack as close to the center of front axle it will solve the problem, but appareantly no. If you guys have ideas how to solve that or know any good front axle solutions I will be more than happy. - I need to cover bottom of the car. Shouldn't be problematic, but needs to be pointed out. - Body will be totally new. With 42157 set going soon into my arms and 42136, 42149 already in my hands I will be going with one main color and I believe you know which one I am aiming at. :) - Two-speed gearbox, but It will probably change overhaul look of middle section - Extending rear section. This is tricky one, current solution do not put much stress on axles, but with longer rear driveshaft it would give more "Trophy truck" vibes into it (and I love that :D). Other than stress on axles, this modification will actually shorten steering radius even more, so I am really thinking about implementing it. That's it. If you survived this wall of text I am more than happy. Here is GALLERY for you. Do not hesitate to write under this topic as I am open to suggestions and questions about this MOC.
 -

[MOC] RC Superbike series - Releaseday of the FREE base chassis!
aFrInaTi0n posted a topic in LEGO Technic, Mindstorms, Model Team and Scale Modeling
Hey folks, I want to share with you one of my current projects, the RC Superbikes. It is another of those self-balancing motorcycles, but has some nice additional specs which might have considered to not work in the brick-universe. Unluckily I couldn't finish the superbike project this summer, final highspeed runs will have to take place in the next summer to have some warm tarmac again for giving some additional grip. RC Superbike Series - FREE Chassis - RELEASED in v1.0: https://rebrickable.com/mocs/MOC-150157 Specs Scale 1/6.5 Weight ~650g Single swingarm construction for the rear wheel Working transmission via chain Powered by Buwizz 3 Two buggy motors 1x Custom 5L Liftarm made out of aluminium with a ballbearing included Theoretical topspeed should be astonnishing 62 km/h, basing on the 2500 rpm with BW3 at 12V peak (which by its scale would translate into 403 km/h) Real world maximum speed may be lower due to physics kicking in (wobble, weave) Pictures All together Kawasaki H2R - black/chrome Kawasaki H2R - white/green (tuned BuWizz Edition) Ducati Panigale V4R Honda CBR1000RR FireBlade Videos Videos related to the RC Superbike Series can be found in my Youtube playlist: What are your thoughts? -

In-wheel 4WD LEGO car (iWD4)
janssnet posted a topic in LEGO Technic, Mindstorms, Model Team and Scale Modeling
For those not afraid to mix LEGO with RC components, you might like this one: iWD4. A 100% LEGO chassis and body, driven by 4 brushless drone motors placed inside the wheel hub. In-wheel drive or independent wheel drive. The result is spectacular. Great speed, great control, and hardly any wear-out, since there aren't many moving parts. The rims are LEGO compatible and 3D printed, the electronics are drone based, steering is done by a LEGO compatible Geek servo. Rest is all LEGO, including suspension and removable body. Please have a look at this short intro video. Happy to share more details. -
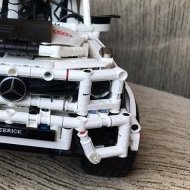
Mercedes Unimog U4000 [MOC]
Daniel-99 posted a topic in LEGO Technic, Mindstorms, Model Team and Scale Modeling
Hello everyone! I am glad to introduce you my Mercedes Unimog U4000. I made it last autumn for trial competitions and it became my first successful RC Lego model with Brushless RC motor. Technical aspects: - Brushless RC motor 1000kv with a custom 3D-printed planetary gear. - Custom 3D-prined planetary 2-speed gearbox with remote control (by Geek Servo) gear ratio 1:1 or 1:5 - RC remote control - 3S Li-Po for power - Geek Servo for steering - Transmission with metal bearings - Planetary wheel hubs - 4-link live axe suspension at the front - 3-link live axe suspension at the rear with free articulation - 85 mm RC tires - Light-weight bodywork, total mass is about 1.2 kg I tested this car on various terrain both indoor and outdoor. It reaches about 8 km/h on normal speed and about 1,6 km on low gear. Since the transmission has several reduction gears (made with planetary gears) Brushless motor feels good in this trial car. It gives the truck more power than it will ever need, so the truck can take a significant weight on board (if one change shocks to the hard one). Oscillating real live-axe and grippy tires provide a constant contact with road, so the truck climbs rocks easily both with closed and open differentials. Due to the reference, the gravity center of the truck is moved to the front, so it struggles a bit with going down the hill, but appears to be a great climber. It can beat Lego Zetros both on low and high gear! -

[MOD] 10317 Land Rover Defender Remote Controlled
Cyrix78 posted a topic in LEGO Technic, Mindstorms, Model Team and Scale Modeling
How do you like my motorized Land Rover? I have tried to hide all electronics completely and keep all original functions. I would really have liked to make it 4WD with diffs, but there is not that much space to hide motors and other stuff in this model even if it is quite big. So for now it is only rear Wheel drive with a straight axle without diff. I might try with a Buwizz instead of Powered Up and add some more functions. Maybe a working winch and some lights? Video available at Youtube Instructions available at Rebrickable -
[MOC] Off-road truck Gaz 66[instructions available]
keymaker posted a topic in LEGO Technic, Mindstorms, Model Team and Scale Modeling
Hi, I would like to present my newest creation – off-road truck Gaz 66. It is my interpretation of small, old and very popular truck, which has a lot of off-road capability. Someone can ask why next similar small scale off road truck? I would say I like this type of vehicles, the scale and challenges they bring. And with every build I try to test something new, which I wasn't try before. Here the main goal was to go below standard for those wheels width of the model - 15 studs and prepare narrower axles than standard - 11 studs ones. Which I did. Gaz 66 has 13 studs width body with 9 studs (from rim to rim) front axle - stereed and driven. Thanks to that size of the body is more proportional to used wheels. And you can also use tractor tires provided with cargo for even better effect (you can see such modification in real Gaz 66 on one of polish off-road YT channel - LINK). I also tried to add as many details related to real truck as possible, in this scale, I hope there are here some fan of original Gaz 66 and they will recognise some elements I added. Below you can find video and list of features and details. Enjoy. Instructions: LINK General details scale: 1:20 dimensions LxWxH: 30x10,5x12,5cm weight: 946g Features: RC front axle steering (C+ L motor) RC 4x4 drive (C+ L motor) RC winch with place to lock the hook (C+ L motor) 4-link live axle suspension for all 4 wheels three studs ground clearance (with "KrAZ" tires) openable doors and easy access to spare tire working V8 engine with fan located in cabin, plus grill via which working engine can be watched detailed two seats cabin powered by Buwizz 3.0 but also prepared to be powered by standard C+ Hub can operate with "KrAZ" tires included in cargo Photos: LINK My Gaz 66 is powered by Buwizz 3.0, but there is no problem to use standard C+ Lego battery box: Internals of the MOC, so drivetrain connected with V8 engine, steering and the winch: -
Hello, i like to show you my version of a drifting G-Class. Bodywork design is by https://rebrickable.com/mocs/MOC-111437/_.lego._.technic._/mercedes-benz-g-class/#details i just did some modifications to fit my 4wd chassis with rc components. propulsion: buggy motor steering: geek servo receiver: Radiolink battery: 7.4V LiPo here are some pictures: and a clip: Hope you like it 😊 Cheers, Friedl
-
Pathfinder RC SUV [MOC]
Daniel-99 posted a topic in LEGO Technic, Mindstorms, Model Team and Scale Modeling
Greetings, Eurobricks! I am proud to introduce you my longest and most complicated project! It took me over 2 months to fix all the technical problems revealed in driving tests. Pathfinder is the universal off-roader built for regular outdoor driving. Features: all wheel drive with remote-control 2-speed gearbox Triangulated 4-link live-axle suspension both at the rear and front Brushless motor 1000 kv, 3S Li-Po, GeekServo, RC LEDs Strong transmission: carbon-fiber axes, metal bearing all around, metal U-joints. Realistic 98 mm RC wheels Underbody protection and custom mudguards Every Boy Dream I guess every Lego boy dreams about technic RC car to play with, at least I did. Since 2014 with a release of a legendary set 9398 Rock Crawler, I wanted to build myself a working and "playable" RC Lego off-roader. I was only fourteen at those days, so it took me a while to save money for a 9398 set. The day of joy turned for me to be the first regret in Lego... I was not satisfied with 9398 performance. I spent a lot of time trying to improve the set, but nether succeeded. Every time I felt the lack of power in my car. At the same time the Lego technic community has been growing in numbers, and many RC Lego off-roaders were shown by technic pioneers. I was inspired the most by Sheepo`s Land rover Defender and RM8`s Toyota Hilux. I decided to build Sheepo`s Defender chassis due to the strict limitation of parts available. Well, that car never moved even with wheels attached. Every time i pushed the gas U-joints in the driveshafts got broken. I guess it was caused by some mistakes I made in the chassis. Anyway, the second regret in RC Lego technic caused me to abandon Lego for 3 years. Time passed and Buwizz brick was presented to the community. It provided more power than the PF battery unit. This bring back my hopes of building and RC car with Lego bricks. My first successful project with a BW2 brick was an RC mod of Chevrolet Corvette. Through the couple of years I upgraded my technic parts collection, which allowed me to try bigger and more ambitious projects. With my RC version Jeep Wrangler the dream come true... A true RC off-roader driven by 4x PF L-motors and powered by BW3 unit provided a good speed and torque. Well, if my goals were achieved with jeep Wrangler, than I should stop my story here... The increased power and speed, revealed another problem: the transmission was struggling from plastic dust and hard outdoor conditions... With my next three project I ensured that there is no pure-Lego solution for this problem. Before going further let me explain the goals I wanted to achieve: Performance over details Efficient and durable transmission protected from dust and axle-wearing Max speed over 8 km/h Rigid chassis, capable to survive big bumps Precise handling (caster angle, proportional steering, physical control) Ground clearance over 3.5 studs, off-road geometric passibility 2-speed remote-control gearbox RC setup adapted to Lego and custom parts It was clear to me that plastic Lego parts would not allow to achieve my goals. The key components that required an upgrade were the wheel hubs and the 5x7 frames which hold differentials. Luckily to me I was not the only person on Earth who had this problems. Few AFOLS in Russia developed their custom wheel hubs and 5x7 frames with metal bearings! I ordered them without asking a price! These parts reinforced the weakest components of Lego cars, which allowed me to build several RC projects, such as: Blue Mamba V2, Wilde Beast and Falcon. This project used not only an improved transmission but also a new RC power and control system, which was able to feed PF motors with a constant stream of power. In fact, the system was so powerful, that PF motors started struggling from over-heating. Since I was in a mood of using custom parts, I get myself a Brushless motor setup adapted to Lego. It was designed by another Russian AFOL: a brushless motor A2212 1000-1200 kv placed in a custom Lego-compatible planetary housing. With a new purely RC electronics I started a new phase of advanced Lego technic engineering. Before challenging myself with a big project I decided to test Brushless motor to see its capabilities. I built a Dragonfly buggy V2 with brushless motor and a Unimog trial truck. Both projects proved the power of a Brushless motor. General layout By gaining experience with a Brushless motor in the Unimog project I decided to build a proper off-roader, which I was dreaming off for many years. Since the brushless motor has the dimensions similar to PF XL motor, I decided to use a classical chassis layout with a steering motor attached to the front axle, Brushless motor placed right behind the dashboard and a battery box in the trunk compartment. My Unimog had a similar layout, so I used it as a reference, though some changes were required. The first and most important change I had in mind was the scale. Since I wanted to drive my SUV outdoors, It should be capable to deal with natural terrain, so It should have a decent ground clearance. This can be achieved with bigger wheels and as a result a bigger scale. The choice of wheels As all of you know, the development of a new car starts with a choice of the wheels, which I have a plenty of. You will joke on me, but a plenty does not mean I have the one I need! Let me explain why. Lego has two most common rim diameters: 1.7 and 2.2 inches in diameter. Unimog used 85 mm RC tires placed onto 1.7 inches rims. Such wheels has a great proportions but they was not big enough for my new project. All bigger wheels were based on 1.7 inch rims. As a result they were disproportionally wide. The two sets of 95 mm RC wheels did not fit the future project as well. I surfed trough the net and found a great set of RC wheels, which you can see now on my Pathfinder. It was another win for me! Transmission Since I wanted to use an RC wheels I had to swap the planetary hubs to to the custom hubs with metal bearings. This swap changed the driving characteristics of a car dramatically as well as caused several crucial problems in transmission. Indeed, planetary hubs took a lot of stress from the transmission away, so I had to reinforce the whole transmission in all possible ways. Firstly, I used the reinforced differentials with 12:28 gear reduction. Further I used carbon fiber axles and metal U-joints. Finally, I used custom parts with metal bearings to divide the transmission from the other car components. This prevent any gear skipping and axle melting. Since I wanted to build a fast SUV but not another crawler, I decided to use open differentials both at the front and rear axles. However, I added an auto-lock system to the rear axle at the beginning of the project, which were removed later for practical purposes. Two drive shafts meet together in the middle transfer box. On the upper end transfer box is connected to the motor through the custom planetary gearbox. Gearbox is remotely controlled and has 1:1 and 1:4 ratios. Transfer box had 24:24 gear combination at first, but after driving tests I decided to slower the car down by putting 20:28 gear reduction instead. It turns out that both planetary gears in the motor and in the gear box require lubrications, otherwise the fast spinning satellites get melted. I learned this lesson in a hard way by having two serious breaks during driving tests. I had to order new parts, that costed me both money and time... Front axle The overall geometry of a front axle was taken from Unimog. I kept the upper suspension 6L links, but changed the lower suspension arms to the brick built one. I still do not understand why, but such combination of links provide a great geometry allowing decent flex angles and a slight positive caster angle (then the suspension get loaded by the weight of a car). At the same time the front axle is well protected from side-to-side wobbling. Reinforced lower suspension links provide a great protection for the front driveshaft. In an unfortunate scenario when springs can not absorb all bump energy, lower links prevent the front axle from being pushed backwards, which saves the driveshaft. The wheel hubs were made specifically for live-axle suspension. In combination with inverted 6L suspension arms they allowed me to build a sturdy and compact front axle. Luckily for me, they fit into the rims of my new wheels perfectly: the pivot point of the wheel sits inside the wheel contact patch. Rear axle Unlike the front axle, the final version of the rear axle differs a lot from the one used in the Unimog. Unimog has a 3-link free-swing rear live-axle, which would not fit a faster SUV with the gravity center moved closer to the rear axle. This was easy to fix by attaching springs to the live-axle itself. The real challenge for me caused the geometry of a rear live-axle. Similar to front axle I wanted to use brick built lower suspension links. I made them few studs longer but the 3-link set up did not work at all! Even without the springs rear axle refused to flex normally. I changed the lower links to the 9L Lego links, which gave me a normal flex angles, but this only revealed another problem. I found that with a 3-link setup the driveshaft moves significantly from side to side as well as changes it`s lengh. This might work for crawlers, but it was totally unacceptible for a fast car, so I had to redesign the rear suspension from scrach. In order to keep the driveshaft from unwanted movements, I made it parallel to the lower suspension links. From one side links have a ball joint and from the other just a regular pin connection. Such construction resists the side-to-side wobbling quite nicely, but uses an admissible plastic deformations to flex (since one end of lower links has a pin connection). The single upper arm was changed to a pair of triangulated links. As a result I achieved a decent geometry of the rear axle. Probably one may ask me why I did not use classical solution for the rear axle, given in Toyota Hilux by RM8? Well, because of scale and my main goals of rigidity. That solution worked greatly for 1:14 scale cars built for indoor trial. As long I was building a bigger car which supposed to achieve higher speeds, I had dial with much higher kinetic energy and thus potential load on suspension and transmission. Thus I had to reinforce the suspension as much as possible as well as reduce any unwanted wobbling. The resulting rear live-axle securely hold the drive shaft and does not cause any load on it. Speed VS off-road capabilities After I finished front and rear axles, I had to choose the spring setup. Lego has a very limited springs variation both in length and hardness. The common solution of this problem is to play with the mounting points. One principle I understood very clearly: the closer springs are attached to the wheels, the better responsibility is achieved. Further, the responsibility of suspension fall down significantly if the springs get attached incorrectly, so they bend with the suspension flex. Further I had to decide how soft I want the spring setup to be. The softer it is the better off-road capabilities, but it does negatively affect overall control and stability on high speed. Since the real SUVs are oriented on the speed and control, I decided to do the same choice. My favourite hard 9.5 L springs come very handy for that. Do not get me wrong, with a proper geometry of the suspension, Pathfinder has a great suspension flex (comparing to the real cars), but it clearly can not compare with mad Rock crawlers. To be honest, I would prefer the springs to be a bit softer (0.8 x current hardness) but Lego does not bother about making good suspension kits. Bodywork My favourite real-live off-roaders are Toyota Land Cruiser Prado and Mitsubishi Pajero sport, but I did not build their replicas due to the low skills in modelling. The shapes of the car appeared naturally for me. Firstly I found that 15L wheel arches perfectly fit to 98 mm wheels. The only 15L wheel arches I had came from Lego set 42069 Extreme adventurer. One of my old projects came in my mind shortly. Once I tried to build a Purple Pickup with parts from 42069 set. Well, I was not happy enough with the overlook of Purple Pickup, but I modified the front part of it to use if the next project, namely Wilde Beast. Now I wanted to modify the front part once more to fit my current project. I wanted to build the car in purple colour once again, but Lego does not produce many parts in purple. I found a great 3-d party set containing a plenty of purple! Namely this was a Sembo Technique 701028 set. Summary Before saying my verdict I want to mention the driving tests I made for Pathfinder. All the following tests are presented in the video. Max speed test: max speed is about 10.5 km/h Turning radius test: 0.86 m Stability and handling test: I tried to dive between cones in Zig-Zag trajectory on max possible speed. After 10 minutes training I was able to drive it with average speed over 5 km/h. Low speed suspension test: The car did not performed good here, to pass it a softer springs required. High speed suspension test: Suspension absorb high speed bumps greatly. High stair test: Due to off-road geometric passibility and high torque Pathfinder passed the test even with open differentials. Almighty hill test: I tested the maximal backward roll-over angle, and car was capable to climb into 60 degree hill. You might say that crawlers can do better, but come on guys, this not a crawler, but a short wheel base SUV! Multiple driving tests showed that such placement of a motor protects it from dirt and dust. However I made an underbody protection and custom mudguards to protect the transmission and the cockpit of the car. Now I can give you the conclusion: This project costed me a lot of money and time to finish, but at the end I get myself a robust RC Lego car, which is very fun to drive around. With this project I showed to the community what is not possible to achieve with pure Lego bricks. -

Tracker RC - 8369 Dirt Crusher MOD
braker23 posted a topic in LEGO Technic, Mindstorms, Model Team and Scale Modeling
I see [TC6] has heated the atmosphere quite a bit, so I propose a run in the snow, for relaxation purposes :) One of the best choices for this activity is my Dirt Crusher MOD, a snow-ready half-track beast that I named Tracker, for kicks. It's based on the amazing Prowler (RC), built by the one of the best Lego tank creators in the world, Tommy Styrvoky! Thank you, master ;) Photos of the beast after some test runs: YouTube video of it's first run on snow: The 2nd video, filmed closer, and after reinforcing the treads: I still have no clue how to embed a video on these forums, who can help me out? :) You will notice Technic bricks flying off in a spectacular fashion, it seems the half-stud pins are not the best choice for this powerhouse. But I do need some way to increase traction on soft or thick snow, so if anyone has any idea what to replace them with, please let me know, thank you. -

Tamiya hot shot RC - instruction now available
msk6003 posted a topic in LEGO Technic, Mindstorms, Model Team and Scale Modeling
Finally finish front bumper and fully tested. So I made box art. This is original model's box art. Without bumper, I added ARE YOU HOT plate on backside of wing. Final model spec 2 Buwizz 3.0 2 Buwizz motor with 4WD drive 1 C+ L motor for front steering Monoshock both front and rear like original model 3 speed gear ratio can choose while building(include in instruction) 4.2:1, 1.96:1, 1.4:1 Instruction link -

[MOC] CLAAS Torion 1914 Technic/System
mktechniccreations posted a topic in LEGO Technic, Mindstorms, Model Team and Scale Modeling
Dear all. Allow me to introduce my latest MOC which was in development long time now, its supposed to be scaled replica of CLAAS Torion 1914 wheel loader from CLAAS company in 1:17 Scale. The reason why i chose this moc was due to lack of other "colour" machinery in this segment and also being kind of specific wheeloader for agrocultural sphere which i love. Claas Torion 1914 is colaboration with Liebherr on joint wheelloader project, Liebherr version is L550 and up. Model is combination of technic chassis and functions with system easthetics. Over 2000 pieces and 4 motors of Control + type allows for good looks and good playability, althrought a bit limited by weaker PU motors compare to PF, i chose PU to get in new wave of tech + easier and cheaper accesibility on market as the PF functions are getting more expensive. Functions are provided by 3x L PU motor and 1x XL PU motor Driver 1x XL Steering 1x L Pneumatics #1 1x L Pneumatics #2 1x L Each L motor serves for pump and switch together by sariel pump/switch combo, but modified to suit my needs in this build. there are two 6L pumps connected to each motor without any air tank so the actions are not so snappy and responsive and it all depends on the power of motors and batteries. due to this i am seriosly considering upgrading to Buwizz 3.0 to see if it will make it perform better and faster. I don't usually know what more to type about the MOC so i will answer every question in comments section if i will be able. Enjoy the photos (video later today) -
LEGO-ish RC RIB Powerboat
janssnet posted a topic in LEGO Technic, Mindstorms, Model Team and Scale Modeling
Bit reluctant to post this, since this boat is made of a 3D printed hull, the RIBs are made of insulation tubes, the electronics are all RC parts and the motor is a brushless drone motor. NEVERTHELESS ..... It looks like a LEGO boat, don't you think?! And it works great! Happy to share more details if there is interest, happy to remove it, if it's too little LEGO for the forum. -
Hello and welcome to the page! One of my favourite sets ever! It became a part of my collection in a veeery long and hard way several years ago. I was thinking to motorize it several times. Simply install several motors was easy deal, but I wanted a suspension also. This requires fully rebuild the chassis. So, initially I built a completely new scale RC chassis, then adapt it for 8285 outriggers, that adapt it for the 8285 crane then adapt it again for the 8285 cab. I tried to keep as much from original iconic 8285 as possible. None of the 8 PF motors is visible One BIG battery box + 2 sBricks OR two sbricks 2.0 can be used to manage al 8 channels. The only manual feature is a pneumatic polarity switcher, because it would be a 9th channel. Full suspension, rear based on 42043 Arocs set. Servo for steering 2 XL for drive M for outriggers L for pump M for winch L for crane raise L for boom extensionin Please enjoy! https://bricksafe.com/pages/Aleh/liebherr-lrb-355/rc-8285-rescue-tow-truck Truck now uses 6 soft shock abosorbers. To keep it higher it will be enough to replace first rear axle to yellow shock absorbers.
-

Motorised Johnny 5 MOC <Not an Alternative Build>
RJ BrickBuilds posted a topic in LEGO Technic, Mindstorms, Model Team and Scale Modeling
01 by RJ BrickBuilds, on Flickr Hello, Bozos! You can support Johnny 5 on Lego Ideas to turn him into an Official Johnny 5 Lego Set here: Johnny 5 on Lego Ideas Who is Johnny 5? Those who don’t know him, Johnny 5, also known as “S-A-I-N-T Prototype Number 5” or Number 5 for short, is a very lively and inquisitive military robot prototype who’s perpetually hungry for more “input”. He is the star of the 1980’s movies Short Circuit and Short Circuit 2 and a TV special called Hot Cars. He became sentient when he was luckily struck by lightning during a combat demonstration. Although he is designed to serve the military as a robot prototype, he has an adorable child-like behaviour and has a great respect for life. He is a peace-loving robot and refuses to use his military capabilities to harm others. Despite being very intelligent and inventive, his naivety and trusting nature has been taken advantaged of on several occasions. Design This model is fully motorised using Powered Up motors and hub and controlled through a mobile device using the Powered UP App. It uses Technic parts to ensure stability of the structure, and System parts to capture the look and form of Johnny 5. The following are the playable features of the model: Movement – This model can move around on tank tracks and uses skid steer to change directions. Body – Johnny 5’s body can tilt using a Powered Up L motor and controlled using a mobile. Arms – Arms can be raised and lowered individually using the Powered Up App. The fingers can be adjusted manually as well as the elbows. Head – The head can be tilted and turned using the Powered Up App. Eyebrows – Eyebrows can be manually adjusted to suit the desired facial expression. Laser – The laser at the back can be raised and lowered using the Powered Up App. Watch the YouTube video here to illustrate these functions better: Johnny 5 on Youtube Total Pieces: 2,711 Dimensions: Studs: W 68.4 x L 36.1 x H 73.5 Inch: W 21.5 x L 11.4 x H 23.2 cm: W 54.7 x L 28.9 x H 58.8 Weight: 99.8 ounces or 2.83 kg Johnny 5 MOC Pictures: 02 by RJ BrickBuilds, on Flickr 03 by RJ BrickBuilds, on Flickr 06 by RJ BrickBuilds, on Flickr 05 by RJ BrickBuilds, on Flickr 04 by RJ BrickBuilds, on Flickr 07 by RJ BrickBuilds, on Flickr 08 by RJ BrickBuilds, on Flickr 09 by RJ BrickBuilds, on Flickr 10 by RJ BrickBuilds, on Flickr -
RC Monster Truck [MOC]
Daniel-99 posted a topic in LEGO Technic, Mindstorms, Model Team and Scale Modeling
Hello everyone! I want to share with you my Monster truck that I build for an outdoor winter driving. It has a lot things to improve, but even this imperfect build gives a lot of fun! Yes, this post is mostly not about technical aspects, but about the whole concept and the driving experience it gives! Some highlights: All wheel drive and steering Solid axle suspension with permanently locked differentials Planetary wheel hubs Strong transmission with metal U-joints and metal bearings Brushless motor 1000 kv 3S Li-Po for power 2 GeekServo for steering 120 mm RC wheels with great grip Removable body Together big wheels and powerful motor makes this Monster Truck a real beast. It has both torque and a decent speed. Planetary wheel hubs give enough reduction to obtain the precise control of torque (that is rather unusual for Brushless motors). All wheel steering with deferent steering modes (made as an option of my RC transmitter) bring more fun to the driving. It also increases the climbing abilities of the Truck (as it is shown in the video). -
[WIP] Tamiya Hot Shot RC
msk6003 posted a topic in LEGO Technic, Mindstorms, Model Team and Scale Modeling
Last year I bought Tamiya's Hot Shot RC model. I think it's design is very good since when I was very young so I wanted to buy it and did in Christmas in last year. Of course not just for build and control this model, I wanted to build it as lego model so main reason is for comparison with model I will make. I started few week ago but posted in here now. At first I started on chassis. Surprisingly original model's rear tire can fit in medium racing wheel so I bought 2 set of those tire. I use BW3 and 2 BW motor for 4WD drive. And like original model, both front and rear use mono shock. I know this shock is more accurate with original model but I use those yellow hard shock which is little more common because I want make instruction and post on rebrickable. In this version, drive gear ratio is 16-28, 16-28 3.06:1 But when I test chassis gear starting to skipping on both front and rear. So I rebuilt gear train and make gear ratio 24-24, 20-28 1.4:1 but can change gear ratio to 8-8-24, 20-28 4.2:1 or 28-20-28 1:1 too. And add one more shock in rear for better stability. After fix gear skipping, I built remain body without bumper, wing and light. But now I stopped build more. Cause BW3 keep turn off when I drive model 1m. After lot of trying to fix this, I throw BW3 away and change to PF system with Sbrick.(2 L, 1 Servo, 1 rechargeable battery) Now it can drive more but to much slow and don't have much torque.(gear ratio is same 1.4:1) I need to find other way for drive this thing. Than I will finish it's bodywork.