Search the Community
Showing results for tags 'Crawler'.
Found 113 results
-

[MOC][MOD]Crawler Crane, my modification of 42042 set
legosamigos posted a topic in LEGO Technic, Mindstorms, Model Team and Scale Modeling
Hello Eurobrickers! Today I would like to show you my modification of 42042 set. When I saw this set, I thought: “must have”, so I bought it. Unfortunately I don`t like this version, so I built my own creation. I wanted to motorize a cabin by PF, but I have not enough space to put one more a motor and 4th IR receiver. Weight of crawler crane it is almost 2.2 kg Power Functions: 2 x PF L motor 4 x PF M motor 2 x PF battery box 3 x PF IR receiver 3 x PF IR remote control 1 x PF extension wire 20 cm BS gallery (after public) -

[MOC] Lego Technic Chilli Crawler
PunkTacoNYC posted a topic in LEGO Technic, Mindstorms, Model Team and Scale Modeling
I present to you my Lego Technic Chilli Crawler! This is a complete makeover and overall improvement from my previous Carrot Crawler: http://www.eurobrick...howtopic=112037 Yes, I know. This is the second crawler that I named after a vegetable; expect more! Features: - Triangulated 4-link live axle suspension using 4 soft, black shocks. - 4x4 with one PF XL motor mounted parallel* to each of the two axles. A final gear ratio of 1:5.001, yes this may seem slow, but the enormous Super Swamper tires make up for it. - Speaking of that, 4 RC4WD Super Swamper tires. No, they are not Lego, I got them from a nearby hobby shop. - One L-motor for steering in the front axle, geared down via worm gear to 8 tooth gear, then a 12 tooth gear to a 40 tooth gear. The 40 tooth gear drives another 12 tooth gear that moves a 13L gear rack. - Portal hubs for all four wheels. Standard Lego Unimog for the rear axle for rigidity; custom triangular plate portal hubs on front axle for a steering pivot point closer to the center of the tire. - Good articulation, about ~55-60 degrees. - Controlled with an SBrick. - Powered by a Lego rechargeable LiPo battery. - Green Chilli Stem** * The mounting of the drive motors parallel to the axles was a must for this crawler. By doing so, I have not only eliminated gear slippage as there are no perpendicular gears, but there is also a ton more ground clearance in both the front and rear axle. The rear axle especially as the motor is actually on TOP of the axle. Crazy, huh? ** Makes the crawler look so much cooler. Challenges: - As with all 4-link suspension setups, the mounting and placement of both the links and the shock absorbers proved to be a rather annoying, tedious part of the process. I have, however, managed to make a VERY rigid triangulated setup where the shocks are not bent or warped in any way. - The mounting of the two lower links on the front axle was also difficult as there was virtually nowhere I could mount these links onto. I was able to (somehow) securely mount both the lower links and the shocks of the front axle onto 7L and 9L beams on either side of the motor. - Mounting the motors parallel to the axles proved to be hard, but actually somewhat straightforward when it came to the rear axle. I had been so used to having drive axles perpendicular to the axle like on my previous crawler. The mounting of the front drive motor was difficult in the fact that its power is transmitted through various gears and the motor itself is connected to the axle by two plate beams and a pin or two. Although the front drive motor is still not completely rigid, I have had no problems with gear slippage whatsoever in either axle. Some pictures: And finally, here is the youtube video: I welcome any suggestions or comments you may have. I will, however, say in advance that I DO NOT plan on making a body for this crawler as I designed it for performance purposes mostly, a Lego "comp-crawler" as you may call it. Thanks, pt -

4x4 crawler ''Spider''
Toni-23 posted a topic in LEGO Technic, Mindstorms, Model Team and Scale Modeling
Hi! Today i would like to show you my rock crawler,but first characteristics: 1 L motor for drive(geared 1:9) 1 M motor for steering 1 AAA battery box 1 Receiver V2 4 link suspension custom shocks Angle of elevation:51 degree Angle of side tilt:55-57 degree photos The real ptototype and of course good suspension travel Video : (video on russian,but all characteristics i show here)Waiting for your comments -
4X4 crawler
TheNextLegoDesinger posted a topic in LEGO Technic, Mindstorms, Model Team and Scale Modeling
Hy i'm back with another crawler saidly i'm not that good at making good astetics, lukkely functionallity is much better. here some pics DSC_0064 by thenextlegodesinger, on Flickr DSC_0065 by thenextlegodesinger, on Flickr DSC_0067 by thenextlegodesinger, on Flickr at first i wanted to make a crawler with positive caster but it was the worst steering i had ever seen so i remade the axles so they are now negative. the front and rear axle are identical. What i wanted to make was a crawler with good power and steering which is achieved. now i have to make a body around it. ideas are welcome. TNLD -
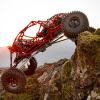
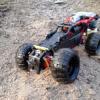
[MOC] “ShowTime” Crawler with Red Tubular Body
SevenStuds posted a topic in LEGO Technic, Mindstorms, Model Team and Scale Modeling
This MOC is inspired by Tim Cameron's 700HP rig called "ShowTime". A one-off custom built rig made specifically for "Southern style Rock Bouncing" events. These machines are all about insane horsepower, near impossible climbs and pure strength. The chassis design uses over 60m of steel tubing as is often criticized as being ugly and "excessive", but the design is exactly what keeps this rig together after repeated crashes, rolls and torque-driven rock bouncing. The LEGO version is made to closely resemble the original at 1:10. It features a powerful driving and climbing ability from 4 XL motors, geared 1:3. It uses 2 SBricks for control and, just like the original, it includes 4 wheel drive, 4 wheel steering and 4 link suspension. During the outdoor driving, the MOC was very enjoyable to drive. Let's start with the video: Control: 2 SBricks Drive: 4 XL (1 independent motor per wheel) Gearing: 1:3 Steering: 1 Servo (4 wheel steering) Batteries: 2 AAA battery boxes Length: 60 studs Width: 30 studs Height: 28 studs Ground clearance: 6 studs Weight: 1.6kg (with batteries) Tires: Interco IROK 1.55″ from RC4WD The 3'rd party tires gave very good climbing traction over rock and loose dirt. The motors had no problem with torque. It was only the batteries that lost power very quickly with the high drain setup and the cold weather. The suspension could also benefit from harder springs in the front as the center of gravity is placed between the front tires and seats. The tires performed beyond expectation on the climbs, but did put strain on the single servo motor. The tread pattern having grip on the sides also makes them grip the body if there is not enough clearance provided when they reach steering lock position. The biggest challenge in this build were the axles. 4 wheel drive and 4 wheel steering was a requirement, as well as a look that resembled the original. After several attempts to include the motors in the chassis, a compromise was made to have 1 L motor directly driving each wheel. This gave the "compact" look I was looking for but performance was disastrous. After finishing the build, I decided to restart the axles using 1 XL motor per wheel and a portal hub with 1:3 gearing. The results in the end gave good clearance and enough torque to overcome some steep rocky climbs. The most exciting part of the build was the fully tubular body, in red! Since I didn't want to convert the colour scheme to blue, grey or black, I had to find 3'rd party hoses compatible with LEGO. The build ended using 3.5m of hoses, all cut to standard LEGO lengths. All the hose connections as well as the rest of the build was made using 100% LEGO parts. Hope you like it. Feel free to comment or ask questions! Thanks, Mik -

[MOC] Coyote 4x4x4
Zerobricks posted a topic in LEGO Technic, Mindstorms, Model Team and Scale Modeling
So after building the jaguar 4x4x4 I got an idea to make a lighter, less part destructive version. The main idea behind it is to combine motor placlement of the fox 8x8x8 with doble wishbone suspension of the jaguar. This kind of setup enables the model to use only 2 gears/wheel and keeps the wheels always parallel relative to the body. Here are first preliminary pictures: Compared to the fox and jaguar, here are the improvements: - The servo motor is placed closer to the steering rack, therebye more-than-less removing steering flexibility - I am using two steering racks per axle for aditional steering system stiffness - Suspension is now almost horizontal and takes little room - Angle of the suspension travel is 30 degrees/wheel - Foxes's proven concept of the motor gearing eliminates the possibility of breaking gears/joints - I plan to use V2 receivers for that extra bit of juice - Shorter wheelbase allows for better steering radious and offroad performance - less likely to hang on an obstacle - Lower, more stable design - more room left for interrior UPDATE: Its been a while... But here are the new pictures and the video I improved model a bit, raising its ground clearance and removing some parts on the underbody, so its harder for it to get lodged As usual I also made an LDD file, which you can download here. And for rebrickable click here. -
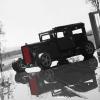
Gaz 66 trial truck with RC system and 1,9" tyres
Tamas Juhasz posted a topic in LEGO Technic, Mindstorms, Model Team and Scale Modeling
Hello! After a while, I'll post mocs again, and for starting, I choosed one of my latest creations, a Gaz 66 trial truck. This is my third Gaz66 Lego trial truck, now with 108 mm RC4WD custom tyres, as many technic vehicle has. Equipped with two RC buggy motors for propulsion and one PF M motor for steerig, built in the front axle. The two RC motors are linked together with a central axle, however, they are located separately near to the front and rear axle. With this technique, they can help each other to move this truck over obstacles. I tried to get close to original Gaz66 with the body, but angles and others, like ground clearance were also important. It can be precisely driven, thanks to the RC throttle with 3 levels and linked pendular suspension. This was made first of all for a Lego truck trial competition, organized by HUNLTC in Hungary: Gaz66-024 Gaz66-023 Gaz66-022 Gaz66-021 Gaz66-020 Gaz66-019 Gaz66-018 The RC unit is also part of the frame: Gaz66-016 Gaz66-015 Details: Gaz66-013 Gaz66-012 Gaz66-010 The power transmitter axle between the two motors: Gaz66-011 Gaz66-009 Gaz66-008 Gaz66-007 Gaz66-006 Yes, some scratches appeared after a long run on rocks and others, but I don't care, it's an outdoor built moc. These angles can be done by suspension: Gaz66-005 ... and steering: Gaz66-004 Gaz66-003 Top view: Gaz66-002 Nowadays I have a new semi-pro camera, so from now, you can watch 1080p good quality videos, in my new creations. (but for old mocs, which are waiting for publicizing, I still only have the 480p videos). The slow motion parts were filmed with 1080p60fps and 320x240 at 240fps. Video: -
[MOC][WIP] 4X4 expedition Crawler
TheNextLegoDesinger posted a topic in LEGO Technic, Mindstorms, Model Team and Scale Modeling
Hy guy's Here I'm presenting my first Crawler MOC DSC_0001 by thenextlegodesinger, on Flickr This time I wanted to go with as less fuctions as possible and an as low center of mass but as much groundclearance as possible. I know those last two don't go together so i have put the battery box under the steering motor. The functions that it now has are: - 4X4 drive (as the name sujest)(XL motors) - front wheel steering (M motor geared 1 to 27) - lights It also has: -extra long suspension (groud clearance from 12.5 studs to 5 studs) - Roof Rack - door to reach the battery box (AA batteries) - easely removable cabin weight: 1.45KG wheelbase: 30 studs - 42 studs height: 32.5 - 25 studs with roofrack and 30.5 - 23 without roofrack widht: body 13 studs axle (without wheels)20 studs The reason why it is still a MOC is that it needs an interior but I'm not good with that so maybe someone of you guys wants to help me. it has to be 16X11X9 DSC_0002 by thenextlegodesinger, on Flickr DSC_0003 by thenextlegodesinger, on Flickr DSC_0011 by thenextlegodesinger, on Flickr DSC_0010 by thenextlegodesinger, on Flickr here you can see the battery box is under the steering motor Now the suspension setup DSC_0008 by thenextlegodesinger, on Flickr 12.5 studs DSC_0009 by thenextlegodesinger, on Flickr 5 studs the roofrack and lights DSC_0013 by thenextlegodesinger, on Flickr DSC_0014 by thenextlegodesinger, on Flickr thanks -
[HELP] suspension for crawler
TheNextLegoDesinger posted a topic in LEGO Technic, Mindstorms, Model Team and Scale Modeling
Hi I'm going to start making my first Crawler. i have sorted out everything exept the suspension system. What this supension has to be/have: -good flex of the suspension -possible with 6 long steering arms -good for a crawler thanks -

Mini Lampson LTL-2600 crane.
Saberwing40k posted a topic in LEGO Technic, Mindstorms, Model Team and Scale Modeling
A long, long time ago, back when the [MINI] Technic contest was being run, I decided to build an entry, which would have been a replica of the Lampson International LTL-2600 crane, which was, for a time, the largest mobile crane in the world. My model was actually more inspired by it, and is not a straightforward replica. The primary reason why I did not enter this was due to the fact that, at least according to LDD, I had 230 pieces in it, even though I myself counted only 200. This model also had some major construction flaws, which will be detailed later. This thing's been sitting around forever, and I just want to post it so that I can take it apart. So, without further ado, here it is. Lego Lampson LTL-2600 by Saberwing007, on Flickr Eagle eyed viewers may note that it is not blue, but red. Well, the truss pieces are only available in black, gray, and red, and I only had them in red, so that dictated the color scheme. I guess that would make it more like a Manitowoc crane, but I digress. The crane features, like the real thing, luffing of the main boom, hoist, 2 independent crawler units, 3 cabs, and a large counter weight. My model also has a feature that I don't think the real crane has, but many similar ones do, and that is adjustable radius, which will be shown below. Front Cabs by Saberwing007, on Flickr Rear Cabs by Saberwing007, on Flickr My model, as mentioned above, has 3 cabs, 2 for driving, and one for the crane operations. Even though this thing would be very slow, maybe topping out at 2 miles per hour, having two people driving could be an absolute nightmare. There's probably a good reason for this configuration, but I cannot think of it. The pictures show how the radius can be adjusted, although the real crane can not do this. Minimum Radius by Saberwing007, on Flickr Maximum Radius by Saberwing007, on Flickr The last two pictures show how the winces are configured, and how far down the crane can luff. Winches by Saberwing007, on Flickr Maximum Reach by Saberwing007, on Flickr Finally, the major structural flaw I alluded to earlier: Some connection in the turntables is not that sturdy, so the crane lists pathetically to one side or the other. Leaning by Saberwing007, on Flickr As a last thing, here is an LDD render of what this machine would look like in blue, if the parts existed. Ltl2600blue by Saberwing007, on Flickr And finally, the LXF file: Link -

[WIP] 1:50 NASA Crawler Transporter
OzShan posted a topic in LEGO Technic, Mindstorms, Model Team and Scale Modeling
I am getting close to the end of this long term build and it's time to share some pictures and a bit of the story. Even before I had finished putting together 10231, I decided I wanted a Crawler to go with it. Being a Technic fan it had to at least drive around and lift the launch platform and shuttle. Those two basic goals spawned a project that has lasted a little over 2 years so far. Some ideas have stuck around since their inception, others were a bit optimistic (like building a peristaltic pump and hoping I could find a way to control the pneumatics hydraulically). February this year marked the 50th anniversary of when the two crawlers went into service, so recently there has been extra motivation to finish. The base equipment; - 16x M-motors (drive) - 4x L-motors (pneumatic jacking and leveling) - 4x IR Receivers (V1 as the V2s do not like driving multiple m-motors on a single channel) - 4x NXT servo motors (steering) - 4x RCX rotation sensors (measuring jacking level between truck and chassis) - 2x NXT bricks (one master and one slave. The master communicates with the Android Tablet and coordinates itself with the slave. Programmed in LeJOS) - 1x PF IR-Link sensor (link between master NXT and all PF motors) - 2x PF Battery boxes (with thermal overload removed) - 1x Android Tablet Future add-ons - Accelerometer (automatically detect the crawler is on a gradient and adjust the leveling to suit) Bricksafe folder is here: http://www.bricksafe.com/pages/OzShan/Crawler Firstly, a couple of my favorite reference pictures; The build itself started with the trucks, thinking that the pneumatics and LAs would dictate the scale. First proof of concept - build a coupling to give height, pitch, roll and yaw to the truck. The pneumatics need to be on their own gimbals too. The reinforced 2x2 rounds slide and rotate in the 4x4 macaroni's. It is on the limit of what will hold together without glue, but it does hold. The two 1x2 technic bricks at the base of the 2x2 column are helped a little by a string (not pictured) which runs up through the 2x2 rounds with the axle. Initial prototype of the drivetrain. I would have liked a higher ratio but there was just no room at this scale. When the gearbox was married with the truck chassis I had to juggle positions, so you will see in later pics the crown gears are facing in not out Best laid plans.... Marry studded and studless they said. It will be easy they said... Showing what will eventually be the steering between chassis and truck. The guide tube and pneumatic cylinders are all on gimbals with the pneumatics coupled together. The average height is preserved during any tilting. With prototypes sorted, it's time to bricklink some parts and quieten down the colour scheme! (thank you 42030 for providing 5L thin liftarms with axle hole in LBG color) You can see the relationship between "guide tube" and cylinders here. The pneumatic system was overhauled too many times to remember but this is what it arrived at. It is all controlled by the direction of the motor. Running forwards drives the pump. When running backwards, the lobes operate the pneumatic valves in series, letting small amounts of air escape each rotation. This lowers the chassis in a slow and controlled manner. The motor can be turned on or off and run in either direction at any time due to the valve timing. Early attempts with PF Servo and NXT servo just couldn't park the valve reliably and after a few operations I would hear a slow leak. I have been trying to keep up with the LDD but it's hard to stay motivated when I know I'm just going to have to suck it up and move over to LDraw if I want to include all the motors, pneumatics and LAs Works so far; (I'll make the files available if anybody would like them). I found LDD essential in the early days to plan ahead and simply find parts, but later on the build overtook it. Original 'box' pump. 1x PF XL motor, 4x 6L pumps running at 90 deg to each other. Very smooth but bulky. Flatter attempt in the same vein. The truck itself. The final design for the height control modules. I hope you enjoy the build so far. More pictures to come of chassis, steering, leveling and interior details. I'll leave it to others to decide what 'theme' it belongs to . -
 Hi folks, Just found this cool crations on Levi Movie channel. Looks like chassis and axles are based on 9398 model, may be i am wrong... And those bodies are detailed copies of real cars
 -
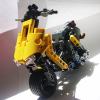
Hi everyone! Having been inspired by Matthias Riedel's Blacktron MOCs, I've been making some builds using the same colour scheme. Namely Black, Dark Bley and Trans Neon Green, which is inspired by the Rench minifig from Raid VPR (5981-1) and the Space Villain minifig (8803-6). I want to say in advance that I was very unhappy with my photography. Sorry about that! Some Notes! - The halftrack is originally by Matthias Riedel: http://www.flickr.com/photos/mr_blacktron/ - The crawler is based on a Nova Crawler, which is an alternate build of the Exo-Force kit, Supernova (7712), inspired by Matthias Riedel's blacktron MOC of same: http://www.brickshelf.com/cgi-bin/gallery.cgi?f=412775 - The racer is a recolour of the Agents kit, Infearno Interception (70162). - The walker is an updated Sub Orbital Guardian (6878-1) from Blacktron II. - The fighter is a recolour of the Ice Planet 2002 set Blizzard Baron (6879). - The submersible is a MOC with it's main design forms coming from the Aquazone set, Crystal Scavenger (2160-1). Many more pics in my Flickr album: I've also ordered components for 8 more Neo Blacktron minifigs, and am eagerly anticipating their arrival! Comments welcome!
-
[CONCEPT] Hubless Shock Absobring Wheels
SNIPE posted a topic in LEGO Technic, Mindstorms, Model Team and Scale Modeling
Hi all After getting the 42038 Artic Truck, I played around with the track links and noticed that if you make a loop with all the tracks inverted, it can compress, but spring back to its original shape, and so I figired if I had the tracks jammed between some rollers on the underside and on the topside is a sprocket, it will have a motor per wheel and very high ground clearance. I have made a mockup of 1 wheel, it is fairly smooth running but needs stabilizing a lot, the wheel wobbles around. I think having two sprockets on the top then a roller in the middle on the underside might be better (like a triangle shape). The good thing is the wheels change shape depending on the surface it is driving on, the wheels in the mockup are quite hard to compress so just add more links to it. Heres the pics: Now since i'm too busy to start building this I'm just gonna leave the idea out here and see what happnes, I have my 42029 project on the go already... I'm sure somebody willl make something cool out of it, post ideas and builds below!. Regards, Snipe -

Broken (?) technic servomotor 88004
Anomander posted a topic in LEGO Technic, Mindstorms, Model Team and Scale Modeling
Hi all, I'm new here, but been an AFOL for a few years after my "dark ages". I'm a collector - I like the big cars and constructions machines, so recently I decided to get the Crawler 9398 before it goes out of production and get ridiculous prices... I really liked the suspension, looks and the possibilites with the PF parts that we get in this set. So I got a new one, and unfortunately the servomotor (the one used for steering) seems to broke after just 6 days (I still used the 1st set of batteries on it, it wasn't used in any hard conditions or abused in any way, used only indoors). The servo does not autocenter anymore after releasing the controls. This is my first IR remote set, so I don't have many ways to troubleshoot if it's the servo or the IR receiver fault (tried both channels, new batteries, didn't help). Wrote to lego support, but I don't have any proof to show that I bought this set recently (lost the docket), still didn't get any reply from them (it's 4 days). I took a look inside the servomotor, there was a lot of white grease inside it, removed most of it and it started working again after reassembling, but then finally broke the next day (again no autocenter, this time for both directions). I made a youtube movie that shows how it behaved before I took it apart - has anyone seen something like this, is there any fix? I must say I'm a bit disappointed with this set and lego quality - my previous 'flag ship' 42009 came with 2 missing parts, and now this... -
ZERO.F.G. Crawler (WIP)
Epic Technic posted a topic in LEGO Technic, Mindstorms, Model Team and Scale Modeling
Here is my most extreme crawler yet this is why it is not on my main topic. It will have 8 wheel drive so AWD, tatra suspeension on all axles, and steering on the first two axles. I call this my extreme crawler/offroader on a budget. Some pics: More updates soon!! -
Okay.... I am already super-backed up on projects and cannot take on another....but someone absolutely needs to make this machine! in LEGO!
-
Hey everyone, I have finally finished the crawler. It took me awhile and a lot of versions till I liked something. So lets get right into it. Features: 1 XL motor for drive 2 Servo motors for steering 2 IR Receivers LED lights 2 Speed gearbox with M motor for remote changing 1 Lego Lipo battery Images: I took some ideas from Madoca1977 and Nico71(which are some great builders) I hope you guys and gals enjoy!
-

9398 4x4 Crawler Mod - Aura's Edition
Auranapse posted a topic in LEGO Technic, Mindstorms, Model Team and Scale Modeling
Yet another modification of the 9398, a 4x4 crawler that I just got as a birthday present just a week or two ago (as of 03/10/2014). So mod after mod it ended up becoming a somewhat MOC. This has been widened by 2 studs, has hightened ground clearance and has been given a new body. Compared to the original 9398 it has a much lower COG and better clearance, and climbs better too! Differentials are fitted with rubber, to act as much as a limited slip diff. VIDEO: Old stuff More old stuff -

[MOC] Two Crawlers based on 9398
ddimkin posted a topic in LEGO Technic, Mindstorms, Model Team and Scale Modeling
Hi Guys. Here are my first two 9398 based crawlers. The tracktor is my personal favorite - it is 20g lighter then the Evil Crawler with netweight of 770g. (excluding battery - 200g and balancing weights - 100g). Using a DC/DC converter to keep a constant voltage of 11.8V and a 8.4V third party Li Ion battery. A second 9398 set is on its way and I hope to be able to build more complex models then :) 1. Evil Crawler: https://www.facebook.com/daniel.dimkin/media_set?set=a.10203101167862642.1073741830.1009723444&type=3 2. The Tracktor: https://www.facebook.com/daniel.dimkin/media_set?set=a.10203101020698963.1073741829.1009723444&type=3 -
[MOC] The Demon 4x4
Doc_Brown posted a topic in LEGO Technic, Mindstorms, Model Team and Scale Modeling
Hey, here's my latest attempt at crawling. The Demon 4x4. I'm not happy with the body at all, but was very rushed to finish it due to my "play ground" being turned into a pond! Also underestimated how much red I had, ahha. Well the main experiment was to test the chassis, which I think held up really well. The dual steering really helps get over obstacles when needed. The axles are basically what I used on my reaper as they perform really well, but always wondered what steering front and back would be like. The weakness in this moc was how the shocks were attached to the body (poorly) and as a result popped off a few times. An easy fix I think, but not with this body, something better I think. Thanks for checking it out and wait for the crashes! I have an LDD file, but not sure how to upload it. -
RC off-road track test in Hungary
Tamas Juhasz posted a topic in LEGO Technic, Mindstorms, Model Team and Scale Modeling
Hi all! In June 2014 we made a little trip to test an off road RC track, thanks for it to the Home-Road R/C Team. It wasn't a race, just a test. Pictures can be found here: https://www.dropbox....palya-teszt.rar Video: download link: https://www.dropbox....t-kis-meret.mp4 I recommend the end part from 28:00 to 29:00, some interesting and funny moments can be seen. We used two crawlers, a 6x6 test chassis, and two trial trucks. I hope we can use the track in the future, a cooperation with the RC team is in process. If we had more time, the video would be better, but because it was together with the RC team, we had limited time before their race. The main test vehicle was a crawler, has also topic here: http://www.eurobrick...showtopic=97878 Hope you like it. Feel free to ask or comment. -
Blue Rock Crawler
Tamas Juhasz posted a topic in LEGO Technic, Mindstorms, Model Team and Scale Modeling
I present my latest crawler: http://www.brickshel...ry.cgi?f=545871 It's main concept is similar to my previous crawlers: nothing unnecessary part and weigth, as simple and reliable technik, as it can be. The chassis is enoug flexible to do this: http://www.brickshel...Crawler/021.jpg - so you don't need more advanced suspension in this concept. Two XL motor drive, one M motor steers the vehicle. For power supply there is one LiPo battery and a V2 receiver built in. The front part is heavier, thanks to the small wheels in the front rims and the ship weight. The chain holds the weight in position. This crawler also has the usual rock crusher tires, in my case, from RC4WD. The body is partly from the 8437 official model: http://www.bricklink...em.asp?S=8437-1 http://www.brickshel...Crawler/001.jpg I lookde around my room in the beggining of body building time, and the 8437's body in my showcase just gave himself to connect with the chassis. I wanted to make a tubular body/frame. Has a fake L6 motor in the back too: As video, there is the first part (from 00:40 to 20:55) of this video: (720p) This was an RC track test, for more information see this topic: http://www.eurobrick...showtopic=97879 I made it in LDD, this is the instruction: http://www.brickshel...crawler-no4.lxf Feel free to ask or comment. -
Small 4x4 off roader
piterx posted a topic in LEGO Technic, Mindstorms, Model Team and Scale Modeling
Hi guys! I'd start saying this thread is more to ask you some suggestions than to show you the model itself :P I think i already told you that the shop wich is sponsoring me http://www.mangiobricks.com asked me to build something that they can sell as a custom model right? At first, they wanted the fiat panda i made last year but i wasn't satisfied by it due to its untidyness... so i made something that i think it's better and wich performs better than every expectations i had As it's made to be sold (hopefully) i couldn't call it with the real counterpart name....but i think it should be quite clear where i took inspiration from :P it's really simple and it's made trying to use the less amount of pieces possible to keep everything clean and tidy performances are really good, even if the most of the weight is in the back of it, it crawls really good having some nice ground clearance and good speed as well! i don't know how many of you could be interested in buying something like this as many of you are great reverse engineers :P but let's say you have the chance to buy a custom model, how would you prefer it? i mean, do you think i should make it with motors or just ready to be motorized? what else could i change to make it more attractive? should i add more functions or just stay on "less is more" concept? ill wait for your suggestions guys! in the meanwhile have a look at some pictures of it! hope you'll like it :) -

Motorized Rock Raiders Crawler Drill
LegoMathijs posted a topic in LEGO Technic, Mindstorms, Model Team and Scale Modeling
Hello, Several month's ago, Ive created this crawler drill, but haven't post it on Eurobricks until now The crawler is an heavy machine with masive drill power to deal with the roughest terrain. Two chrome drills, two mining lasers and a radar are the equipment for this vehicle to research the dangerous dark caves. Information about the crawler: The crawler is motorized by two Power Functions M motors The drills rotate when driving Two working lights on front side Removable battery box for easy replacement of the batteries Pictures: Crawler Drill by LegoMathijs, on Flickr Drills and lights. Drills working when moving the vehicle by LegoMathijs, on Flickr Crawler Drill by LegoMathijs, on Flickr Easy assembling battery box by LegoMathijs, on Flickr Chassis by LegoMathijs, on Flickr More pictures on Flickr: https://www.flickr.c...157636283392954 Hope you like it