Search the Community
Showing results for tags 'pov-ray'.
Found 29 results
-
Shackleton's Endurance in Minifig Scale In August 1914, Sir Ernest Henry Shackleton started an incredible expedition to the Antarctic.This voyage is also known as the Imperial Trans-Antarctic Expedition. Endurance was the name of the ship in which Sir Ernest Shackleton sailed for the Antarctic. On board were 28 men and 69 dogs. Shackleton planned to cross the Antarctic on foot. But shortly before its arrival in the Antarctic the Endurance became locked in ice and was finally crushed. Thus the legendary survival of Shackleton and his crew began. Length 166 studs (131 cm) / Width 50 studs (39 cm) / Height 103 studs (81 cm) Built with LDCad 1.6 alpha 4 / Rendered with POV-Ray Shackleton's Endurance by Papacharly by Papacharly
-
LDD/MLCad 15D The Black Pearl Project - A joint venture by Courleciel and Papacharly EDIT April 1st 2015: Black Pearl mpd-file is available now. Please also note the relevant post #15 below! End of last year I had been invited by Courleciel to join a project he already started. The goal of this project was to virtually build the Black Pearl from the Lego video game “Pirates of the Caribbean” and, in a second step, to “make great renderings”. At this time the ship had already been built by Courleciel in real bricks. Starting point for this project was an “old” lxf-file (Lego Digital Designer) by captainjack. The virtual model was significantly optimized by Courleciel so as to make it more accurate and complete. A lot of parts have been repainted, some new elements were added (such as anchors, bell, grating, cannons...), and some were adjusted or rebuilt (like the capstan, figurehead, lanterns, masts...). After the model was nearly completed, the LDD file was converted to the LDraw format and my job started. According to Courleciels conceptual work I added rigging, rails, ropes and strings by using SR3D Builder and MLCad/LSynth. Sails were directly created in povray. Additionally it was necessary to manipulate some original LDraw parts (e.g. # x1609 batarang, see stern) to make them authentic with regard to the video game. Finally we decided on all setups for being rendered. All renders have status “as rendered”. There was no “photoshopping” applied, aside from scaling down and anti-aliasing. I have not counted all the hours I spent working on this project. But doing all the work Courleciel and me had a lot of fun. So we hope that you also will enjoy our work and have some fun too. High resolution “technical renders” showing the conceptual work of Courleciel can be found here. For high resolution images of the movie scenes click here. And here is the outcome of our project:: First we have some technical renders of the Black Pearl. Then we show some movie scene remakes. For all those which are not familiar with “Pirates of the Carribean”, please find the original movie scene respectively an original video game screenshot below each rendering. Here comes a remake of a video game screenshot: Two movie scenes from part 1 "The Curse of the Black Pearl": Movie scene “Pantano River” from part 2 "Dead Man’s Chest" Two movie scenes “Locker” from part 3 "At World’s End" Last but not least we have an atmospheric and maybe kitschy sunset render which is not related to any movie scene.
-
 I've editing in a glow effect in Photoshop up until now, which works alright, but I'm not really satisfied with it. Selecting individual parts with the lasso tool is kind of a pain in the megablocks. I don't actually know anything about POVRay beyond what LDD to POV-Ray Converter lets me do, but I imagine maybe I could do something by mucking about with the "materials". That's a thing, right?
 -
Hi, folks. During last SHIPtember, Ryan Olsen created a SHIP based on Babylon 5 - the EAS Agamemnon. I stumbled across it at the time thanks to some Lego blogs, and at the end of the year decided to build one for myself. Credit for the original Lego design goes to Ryan, of course! I took his WIP pics (here) and final pics (here - awesome photography & Photoshopping!) and reverse-engineered it in LDD to understand how it all held together and what parts were required. Then I used Rebrickable to figure out what parts I needed. To build it, I used the "hide" tool in LDD - hide bricks in reverse order, then undo to play back the build as you follow along. Much more helpful than the absurd LDD-generated instructions... Here's the end result (Flickr album here) - my pics & lighting are not studio-quality, unlike Ryan's! The middle section rotates (manually) and stays put at any angle, so it's well balanced and the turntables provide enough friction to keep it stable. Stats-wise, it's about 95cm (~117 studs) long, 35cm tall and 15cm wide, using ~4700 bricks, weighing-in at just over 3.7kg (8.2lb). I made some guesses as to internal structure (e.g. the turntable connections in the rotating section) and the greebles on top & bottom are my own, but it's very close to Ryan's original design and some reference images of the original. Ryan was kind enough to share the image files he used for the stickers, so I was able to complete the model. I couldn't connect the front & rear side plating in LDD - as I learned here, the connections are just illegal as there's not enough clearance between the side plates and overhanging top & bottom plates in software - however, it obviously works in the brick. I converted the LDD to an LDraw file (using SylvainLS's updated parts mapper here) and used LDCad (which can ignore collisions) to place the plates in order to use POV-Ray to make the renders you can see in my album. I learned a lot doing that! Note that I made some tweaks in-the-brick but haven't re-done the LDraw file or any renders to reconcile the minor differences. It was a fun, frustrating at times, but very rewarding journey, and I'm really happy how it turned out. The SHIP looks awesome on display in my living room. Thanks for the inspiration, Ryan, and thanks to those on this site who helped with the digital stuff! Here's a 360 degree render: https://photos.app.goo.gl/caouE0BlHzarD6C42
-
One year ago I presented a virtual version of submersible JAGO (see here). Now I am able to proudly present a real life brick built version of JAGO. And some new renders (Pov-Ray, based on LDraw) too. For the brick built version I had to manipulate some original parts: Dome 4x4 #86500 and Round Plate 6x6 #11213 are not available in yellow. So I had to re-color these parts by using a color spray can. JAGO is a submersible primarily dedicated to exploration and research in marine sciences. See homepage JAGO. Hope you enjoy it. Regards Papacharly
-

Datsville community LDraw project
Dilvish posted a topic in Digital LEGO: Tools, Techniques, and Projects
Some of you might be aware of Datsville, a ~20 year old community project aimed at creating a multi-user town in LDraw. There's a historical page dedicated to it at LUGNET, and a GitHub project with recent activity. There are also a Facebook page and a Flickr photo stream. Some recent discussion has appeared on the LDraw.org forums and LUGNET. What we need, however, is more submissions! If you'd like to create and submit a new model please drop us a line. Note that all submissions need to be licensed under a Creative Commons BY-SA license or public domain. There are high resolution 8192x4096px versions of the above images on Flickr if you click on the download link and select "Original Version". -

[Guide] Rendering LDraw models using POV-Ray
C3POwen posted a topic in Digital LEGO: Tools, Techniques, and Projects
I was asked to put together a tutorial on rendering LDraw-produced models in POV-Ray in as clear and simple a way as possible. Although the following might seem a bit lengthy, I have tried to keep it clear, which is what caused it require a lot of explanation. I plan on updating things and changing things as time goes on and as people give me their input, so as to create a useful guide for everyone here on Eurobricks. NOTE: To give an idea of how long these images can take to render, I will be adding the render time of each image to the tutorial. As I don't rely on POV-Ray's anti-aliasing, I have rendered each image at 2880x1620 with AA set to off, and then crop and resize the image afterwards. For computer spec comparisons, I use an Intel Core i5 running at 2.67 GHz, with 4GB of RAM running at 1333 MHz and an NVIDIA GeForce GTX 460 with 1GB of RAM. I'm also using POV-Ray 3.7, which can take advantage of more than one CPU core. Contents Introduction Requirements MLCad (including LSynth and SR 3D Builder) Special files LDView Setting up POV-Ray Rendering your model in POV-Ray (including lighting and effects) Downloads More information Version history 1. Introduction Unlike LEGO’s own Digital Designer (LDD), which can currently only output an image of exactly what you can see within the LDD window, LEGO models created using LDraw can be turned into high-quality and, in some cases, photo-realistic images. This brief tutorial covers some of the basics of converting files created in LDraw and other compatible programs into something that looks almost real. As an example throughout this guide, I will be using a model I made in MLCad of the tipper from 4201 Loader and Tipper, which can be found here. 2. Requirements Regarding operating system, I currently use Windows 7, so this tutorial will be written to mainly accommodate Windows users, and I shall assume you are using a 32-bit version of Windows with the default installation path for LDraw. For anyone using a 64-bit version, when referencing folder paths please use “C:\Program Files (x86)” instead of “C:\Program Files”. Firstly, if you do not have it installed already, you need to install the LDraw All-In-One Installer, which contains the following programs required for this tutorial: The LDraw parts library MLCad, used for building the models LSynth [optional], a system for building flexible parts within MLCad LDView, used for converting models into a POV-Ray file LGEO, a parts library built specifically for POV-Ray POV-Ray, a ray-tracer that can render 3D models in high-quality You can find the installer here: http://www.ldraw.org/ This will install everything within the "C:\Program Files\LDRAW" folder, although POV-Ray will get its own installation folder. More information on this installer can be found at http://www.holly-woo...w/aioi1-en.html At the moment, the installer seems to install POV-Ray 3.6, but if you're using a computer with multiple CPUs then it would be worth downloading and installing beta version 3.7, as this can make use of more than one CPU. This can be downloaded from http://www.povray.org/beta/ and is installed in the Program Files folder, but installs the "ini" and "include" files in your My Documents folder. Although it's still in beta, I've had no issues when using this to render images. 3. MLCad MLCad is a user-interface for the LDraw system, and makes it easier to create virtual LEGO models than hand-coding the location of each piece. It’s not as straight-forward to use as LEGO Digital Designer, but the parts list contains a greater number of “older” pieces, you ultimately have complete control over brick placement as LDD-style collision is ignored, and (if you’re feeling adventurous) you can even recreate LEGO elements yourself, if they have not been created already, and submit them to the LDraw parts lists. It is missing a number of more recent parts, but new elements are always being submitted and can be downloaded and installed fairly easily. There are many excellent tutorials on how to use MLCad, so I won’t cover that here. However, there are a few settings within MLCad that I use that you may find useful. Firstly, under Settings → General → Change... and then on the Step, Grid, Snap tab, I set the values as below: The coarse settings are left at MLCad’s default setting. The medium settings are changed to 1 unit per step, and the rotation angle is set to mimic the rotation of the new-style locking hinge pieces, which can be set at angles of 22.5 degrees. 11.25 degrees gives you slightly more freedom when using the old-style hinge pieces, but the correct angle is easily set for the locking hinges, which can be reproduced in sets of two rotations. Finally, the fine settings are set very low, so that I can accurately place items that have been rotated. Of course, if you find MLCad’s default settings enough, then they can be left as they are. I then set up the parts tree to something more useable, under Settings → Parts Tree → Tree Configuration…, although this can be quite time-consuming and if you accidentally reset the tree you cannot easily get the settings back, as the information is stored in your computer's registry. For ease of use, I have created a group file that automatically adds the values for you, an explanation of which is available in the “Downloads” section. 3.1. LSynth If this is installed alongside MLCad, it will allow you to render flexible elements, such as hoses, and store these within your LDR and MPD files. It has a bit of a learning curve (pun not intended), but once you’ve got the hang of it, it can really improve models that contain flexible parts. A modest example of what it can do can be found here in a Technic model that I’ve rendered. A good guide can also be found at http://www.holly-woo...utorial-en.html 3.2. SR 3D Builder A lot of people use SR 3D Builder as an alternative to MLCad, as it uses a system that is a little more like LDD. It uses a file format called L3B, which is essentially the LDraw format but with a bit more functionality. These files can also be opened within LDView, but certain special elements created within SR 3D Builder (such as rubber hoses) cannot be displayed using LDView, and therefore cannot be exported to POV-Ray for rendering. As far as I’m aware, SR 3D Builder does not recognise the LSynth library of parts. 4. Special files There are a few special files that are installed with the All-In-One installer which need some adjusting before rendering your model in POV-Ray. LGEO.xml This file contains all of the colour and element definitions for when LDView is exporting a model to the POV-Ray format. The default version is missing some colours, so I have created a more complete version, which can be found in 8. Downloads. Simply replace the default version with this one, and you will have more of LDraw’s colours available to render with. This needs to be saved to “C:\Program Files\LDRAW\LDView” lg_color.inc This file is installed into LGEO's program folder, in the "lg" sub-folder. It contains definitions to all of the colours of the bricks that POV-Ray uses, as well as information on element finish (transparency, reflection, etc.). The default one does not render accurate LEGO colours, so a replacement for this one can be found in 8. Downloads. This needs to be saved to "C:\Program Files\LDRAW\LGEO\lg" 5. LDView Once you have completed your model in MLCad, open LDView and locate the model file (either an LDR or MPD file, or L3B is you have used SR 3D Builder). Depending on how good your graphics card is, you should see a representation of your model that looks better than the one shown in MLCad. As LDView also displays the LEGO logo on element studs, you can use this to check to see if they are set to your desired rotation, as this will carry through to the POV-Ray render. Settings-wise, there is little that needs tweaking here, as it is mainly just for visual effect. However, you can set a better default angle, as LDView’s default is more top-down than the default one in MLCad, and when you export the model to POV-Ray, it will use the angle you currently have your model rotated to. Select View → Viewing Angles → Specify latitude/longitude, and enter your desired values. As I said, I like the default MLCad 3D angle, so I use latitude 23 and longitude 45, although latitude 30 works well with some long, low models, such as cars. Click OK and then go back to View → Viewing Angles and then click Save Current as Default. Now, when you open any model within LDView, it will always be initially displayed at this angle. The model I will be using as it appears within LDView: Render time: N/A 5.1. Exporting to a .pov file Now that you have your file open in LDView, click File → Export. This will bring up a dialog box which allows you to specify where you wish to save the exported file. It also has a button called Options..., which allows you to define various parameters. This is where you can set the aspect ratio for your render, and gives you some specific options: 5:4, 4:3, 3:2, 5:3, 16:9 and 2.35:1. I tend to go with 16:9, as that’s the ratio that modern widescreen TVs and monitors tend to use. It’s important that you remember which one you use, as you will need to set up another file in POV-Ray to account for this. There are a few other options to choose from here, and I use the ones shown below: Once you’ve chosen your settings, click OK and then from the Export window click Save. This will create a .pov file at your chosen location, using your chosen file name (by default this is the filename of the model you were looking at in LDView). 6. Setting up POV-Ray 6.1. Image resolution presets The first thing to set up is the file that contains the default resolution presets. If you are using POV-Ray 3.6, this will be located within the “C:\Program Files (x86)\POV-Ray for Windows v3.6\renderer” folder and will be called “quickres.ini”, and this cannot be edited from here, so you may need to copy the file to your desktop first and then open it from there. If you’re using POV-Ray 3.7, this can be edited within the program itself, as it stores it in you user area, so you can just open POV-Ray and select Tools → Edit resolution INI file. Open this file with a text editor and you should be able to see a list of screen resolutions, listed in this format: [1280x1024, AA 0.3] Width=1280 Height=1024 Antialias=On Antialias_Threshold=0.3 The first line is the name of the preset, and this is displayed in a drop-down box within POV-Ray. The following lines are the actual settings themselves. Copy and paste one of these settings to another location in this file, so we can create a new preset. You can leave both Antialias and Antialias_Threshold alone, as these are best left at default. If you wish to create an image that matches the aspect ratio set within LDView, this is where you set it. As I prefer to render in 16:9, then I need to make a width and height that matches this. So, for example, an image that is 1280 pixels in width must be 720 pixels in height, so you need to change this for your new preset, resulting in something like this: [1280x720 16:9, AA 0.3] Width=1280 Height=720 Antialias=On Antialias_Threshold=0.3 I add the 16:9 comment to the preset’s title, just to make it easier to see the ratio. If you’ve had to edit this from your desktop, then just copy it back to the original location. 6.2. POV-Ray INI file (3.7 only) This file is the one that contains the paths to the LGEO pieces that POV-Ray utilizes in rendering. If you’re using POV-Ray 3.6 it should already have the right paths in it. However, if you’ve manually installed the POV-Ray 3.7 beta, then it needs to be set up. Open POV-Ray and go to Tools → Edit master POVRAY.INI, and this should open the file within a text editor. At the bottom of the file, you need to insert three lines to ensure that POV-Ray can locate the right files. These are: Library_Path="C:\Program Files\LDraw\LGEO" Library_Path="C:\Program Files\LDraw\LGEO\ar" Library_Path="C:\Program Files\LDraw\LGEO\lg" Don’t forget that if you’re using a 64-bit operating system to make sure that the path uses "C:\Program Files (x86)". -
How to apply custom decals on LDD renders
BEAVeR posted a topic in Digital LEGO: Tools, Techniques, and Projects
You may have encountered it: you built a nice model in LDD, but it looks surreal because it lacks decorations on e.g. the minifigs. This tutorial is here to help you with that. In this little tutorial, I will try to explain how you can enhance the POV-Ray renders of your LDD models with custom decorations. You can design entirely new figures for example, or you can apply the decorations that aren’t available in LDD. My example in this tutorial will be a stormtrooper minifig. This figure lacks all decoration in LDD, and is commonly used in digital Star Wars builds. It gives me the opportunity to explain how to decorate surfaces that aren’t directly accessible in LDD, how to fit custom decals and explain the general principles. This method doesn’t involve any hacking and doesn’t require any sick programming skills (although the custom decorations might need your artistic talents…). And the best of all: all programs I use here are entirely free! I’ll be using Lego Digital Designer, LDD2POV-Ray, POV-Ray and Inkscape. So let’s get started! Decorate the target pieces in LDD LDD2POV-Ray, the program that will eventually place your custom decorations, can only replace already applied decorations. So firstly, you need to give the pieces you want to decorate a replacement decoration in LDD. Make sure to use different decorations for each surface, so that you later can keep track of which filler to replace with which substitute. Also, taking a screenshot for reference is not a bad idea to support your memory. But wait a minute… Some parts don’t allow for any decorations at all in LDD! Minifig torso’s are not a problem at all, but things like helmets are a whole different story. But luckily, there is an easy way to apply decorations that will work in most cases (no guarantees though!). You have to export your .lxf file to the LXFML format (File -> Export Model). This .lxfml file is actually a textual representation of your model. Among others, it contains a list with the placed parts, including their color(s) and decoration(s). To find your part, use the search function (Ctrl + F / Cmd + F) and type in: in which you replace 30408 (the designID of the storm trooper helmet in this example) with the designID of the part you desperately want to decorate. You can find this ID by clicking on the part in LDD and looking at the bottom left corner. If multiple of these parts are available, you can give the specific part a different color and check for the one that says materials=”26” in which you replace 26 with the number of the color you used (you can find this number by hovering over the color in the color menu in LDD). The key part is then to change the part that says decorations=”0,0,0” in which the amount of zeros dictates the amount of surfaces that you can decorate. If the line isn’t present at all, you’re out of luck and won’t be able to decorate your part. Otherwise, replace the zeros with valid decoration ID’s. It’s best to take decorations that are square and detailed (I will explain why later), so I suggest using the decorations of the 2x2 flat tiles. You can find these ID’s by placing some of these decorated tiles in your model, and check in the LXFML file what number is filled in in the decorations line of those parts. To make it easier for you, here are some handy decoration ID’s you can use: 73023, 63708, 99825, 55350, 63404, 601245 Then, save your file, and open it with LDD. You’ll see your parts are looking very ugly with those random decorations, but you’ll be happy to have decorations. You can copy these parts to a ‘normal’ .lxf file, and get rid of the parts you used to find the decoration numbers. Now we can move on to step 2! 2. Open your model with LDD2POV-Ray LDD2POV-Ray is a program that converts your LDD model into a file that can be rendered with POV-Ray, a ray tracer that simulates the behaviour of real light to simulate a realistic effect. You can set lighting etc, but more importantly, you can set your own decorations. To do this, go to the “Decorations” tab, and check the box “Use custom decorations”. A list will appear at the bottom, showing all the decorations you used. Clicking on them will reveal a thumbnail. Now you’ll be happy that you used different decorations to know which is which. You’ll notice that the decorations (unless they are square) are a bit stretched out. That’s because the program only accepts square decorations. So to load your own decorations, you’ll have to make sure they are square. Otherwise, they won’t cover the whole area you intended. If you already have your decorations (you found them on one of the indexes of the customisation forum here, for example), you can skip to step 4. Otherwise, I’ll give a brief account on how to make your own decorations in step 3. 3. Create your own decorations Personally, I make my decorations with Inkscape. It’s an easy to use vector based program. That means you can easily create very clean, smooth and crisp shapes. I’ll leave it to others to educate you in this nice software, but I’ll show you some general strategies to make accurate decorations. When working on complex curved shapes, like the storm trooper helmet, you won’t know for certain how your image will be mapped to the surface. That’s when the screenshot you took comes in handily. Because you have used decorations with a lot of detail (if you’ve been following properly!), you can easily see how the image is deformed and placed on the surface. You can identify the regions where you want your details to come, look to what part of the placed decoration it corresponds, see what it looks like in its flat state (you can see this in the thumbnail in LDD2POV-Ray), and place your detail in the according place. So in the example of the storm trooper helmet, you can see that the mouth should somewhere at the center of the graph. LDD2POV-Ray shows that that graph is a bit above the, so now you know you have to place the mouth around the center of your decal. When you’ve finished your decoration, you have to make sure your decoration is square. This will most certainly occur when you’re designing decorations for minifig torsos. If you leave it in its actual proportions and plug it in LDD2POV-Ray, you’ll see that the image doesn’t fill the whole area, compared to the stretched out decoration you have to replace. So you resize your decoration. In Inkscape, simply go to the top, where you can enter dimensions. Then you go to File -> Export Bitmap and a dialogue box will pop up. Make sure to select ‘from selection’, and that the amount of pixels of your image is high enough. Otherwise it will look pixelated in the render. Finally, chose .png as file format, and remove the background color of your decoration. Because it might look like the right color in Inkscape, but in your render it will look like the decal has a different color than the body, which isn’t what you wanted. So now you have your parts temporarily decorated, and you got your custom decorations ready. So time to replace them and render them. 4. Render your decorated model Firstly, you have to load your new decorations in LDD2POV-Ray. There are multiple ways to do this, but the easiest method is to select the decoration you want to replace and then click on the empty canvas. A window will pop up to allow you to select your decoration. Just select it. Repeat for the other decorations, making sure you replace the right decoration with the right replacement (that screenshot will come in handy now, especially since you can’t have both LDD and LDD2POV-Ray open at the same time at this moment!). Then you can fiddle around with different settings like lighting etc. For test renders I suggest to place in the first tab the slider on the lowest positions: ‘LDD geometry’. This will result in slightly less good, but much faster renders, allowing you to quickly get feedback about your decorations, so that you can adjust placement and proportions. For flat parts this won’t be necessary, but it can help for curved parts. That’s why I included the TIE pilot in the render. You can see the ensignas are slightly deformed. That’s not my intention, but I already predeformed the circles in the decal, so that it looks more or less round on the surface. You’ll have to experiment a lot with these ones. Anyway, when you're satisfied and feel the need for a more glamorous render, you can turn 'render with visible bevels' on in the slider bar, and wait for some time. You'll get something like this. Hopefully now you know all about rendering your custom minifigs, making your models more realistic. I hope to see some around! Anyway: happy rendering of your minifigs! If anyone is interested in downloading the decorations I designed for the stormtrooper (for now without back printing) and the TIE pilot (torso printing already present in LDD), have a look at this page. Hope you've found this useful. -

688 Stormtrooper Minifigures
pennyforge posted a topic in Digital LEGO: Tools, Techniques, and Projects
A recreation of popular design using 688 stormtrooper minifigures. It uses a mosiac function and a Lego crowd generation system that I created in python - hope you like it. -
I created a few test renders in POV-Ray to experiment with blurred reflections. Which of the following five images do you feel are the most realistic? The least? Also, note the transparent pieces. Is the reflection right for them too? IMO they look a bit too frosty. Thanks!! [edit] I just noticed that if you use desktop DPI scaling in Windows, these images will look extra grainy/blurry in Google Chrome. You might want to try a different browser temporarily. wrapper_townview_close_01 by Michael Horvath, on Flickr wrapper_townview_close_02 by Michael Horvath, on Flickr wrapper_townview_close_03 by Michael Horvath, on Flickr wrapper_townview_close_04 by Michael Horvath, on Flickr wrapper_townview_close_05 by Michael Horvath, on Flickr
-
.thumb.gif.ad7c8d88b264ee812194946c07404504.gif)
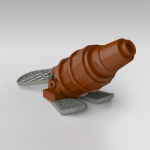
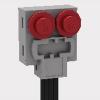
[TC13] Wind-Up Box Pusher - POV-Ray animations added
mocbuild101 posted a topic in LEGO Technic, Mindstorms, Model Team and Scale Modeling
For my entry, I decided to make something nice and simple... And this is what I cam up with: It's a wind-up motor inside a 6x6 box, that moves the legs of the Technic guy, creating the illusion that he is pushing the box. Video: As mentioned in the video, I have also made instructions for this, which are available for free on Rebrickable. POV-Ray render: Some LDCad animations - rendered with POV-Ray: -

Stud.io, exporting POV-ray files: POV-ray files edition.
cosmocaos posted a topic in Digital LEGO: Tools, Techniques, and Projects
Hello all, I'm a beginner in rendering LEGO models in a mac OS system. I discovered that Stud.io makes its renderings using POV-ray (a software for rendering) and that you can export .pov files for render externally in the POV-ray software itself. The POV-ray 3.7 has not graphical user interface (GUI) for mac OS X, and can only be executed in the command line. The render is controlled in a text file with the .pov extension. I installed POV-ray 3.7 with the sotware mac ports: [ The command is: sudo port install povray @3.7.0.0_2 ] Then I modified the file /opt/local/etc/povray/3.7/povray.ini adding the path to the LGEO libraries, which were already installed by Stud.io. Library_Path="/Applications/Stud.io/povray/LGEO" Library_Path="/Applications/Stud.io/povray/LGEO/lg" Library_Path="/Applications/Stud.io/povray/LGEO/ar" Also modifying the Width and Height parameters. Then in the mac terminal I ran: povray Nova_AlexandriaFrontal_10.pov The result is similar to what I have obtained in Stud.io renderings. Now I want to improve the renderings learning to use POV-ray. First step learning about lights. Which I will update in this post. Any advice will be greatly appreciated, which will be included here. Solution Update: .pov files exported from Stud.io give me some trouble, so instead, from stud.io I export a .ldr file, which then I open in LDView, and from there I exported the .pov file. This also allow me to select the perspective of the model, and automatically translated to the .pov file (Which I could not do it in Stud.io). At first time the .pov file exported from LDView has mismatch colors, that was fixed updating the file /Applications/LDView.app/Contents/Resources/LGEO.xml. NOTE: I will eliminate this topic to create a new one with the focus on mac OS related issues of POV-Ray Rendering. Working with a iMac 2.7 GHz Intel Core i5, 8 GB 1600 MHz DDR3, Intel Iris Pro 1536 MB. -
Another one fictional loco. Retrofuturistic locomotive by Sunder_59, on Flickr
-
Got inspired by Miracle of Sound's song "Man and Machine". * * * Now folks remember, if you like what I do and you want to see me create your OC, a favorite Bionicle Character, or something else, feel free to look up my Commission Info! I also now have a Patreon page, so please consider supporting!
-
Ever wonder what those little voices inside your head are? Meet Joy, Fear, Anger, Disgust and Sadness, the emotions that guide you through your daily life! Riley is a happy, hockey-loving 11-year-old girl who, like all of us, is guided by her emotions. The emotions live inside the control center in Riley's mind dubbed Headquarters. This is also where all of Riley's memories are created and where her core memories are stored. From here, the emotions advise Riley through everyday life, led by Joy. But Riley's world turns upside-down when she is uprooted from her Midwestern life and she and her parents move to San Francisco. Riley's emotions try to guide her through this difficult, life-changing event. However, the stress of the move brings Sadness to the forefront. Will the emotions be able to get Riley through this challenging part of her life? You decide! About this Project: This is a Lego Ideas project that I designed using LDD, POV-Ray, and Photoshop. Based on Pixar's 15th hit animated movie, Inside Out, this playset depicts the inside of Headquarters. It includes minifigures of all five emotions and several key features of Headquarters such as the control console, the memory recall system, the core memories container, the tower, the memory shelves, and a couch with two footstools. Play Features: Take control of the situation with the control panel! Propose an idea to Riley by placing an idea lightbulb from the shelves at the base of the tower onto the stud on the console! Place core memories into the spinning core container! Recall memories by placing them on the translucent pole over the tube. But watch out! Don't let Sadness touch them! Roll the memories down the shelves! Turn the knobs at the back to redirect them to the next lower shelf! Take a break on the couch and rest your feet on the footstools! When Riley goes to sleep, have the emotions rest in the room at the top of the tower! Accessories include a flame piece for Anger (for when he gets really angry!), a notepad for Fear, a newspaper, a mug, and several memory orbs in the colors of each emotion. This project has been selected as today's staff pick! If you would like to have a LEGO version of the emotions and headquarters from Inside Out in your home, please support and share this project. It would bring lots of Joy to me and many other Pixar fans if this becomes a real set! Support this project here: https://ideas.lego.com/projects/109759 Thanks, and stay positive!
-

Animated airship in POV-ray
Exolothon posted a topic in Digital LEGO: Tools, Techniques, and Projects
Here is an animation I made for my Lego Ideas project, Air Galleys, using POV-ray: See more renderings and the full project at: https://ideas.lego.com/projects/108617 The most difficult part to animate was the flapping motion of the wings. At first I considered using a simple sine curve for the angle of the wings but the results were unsatisfactory. I ended up modeling the physical constraints of the model; as the wing shafts rest on the bottom of the ports they protrude from, their bases rotate with the gear they are connected to. As their contact point on the gear drops beneath the ledge of the port, the wings rise slowly and then quickly fall again as the opposite occurs. Here is a diagram: -

LDraw files of Jon Halls aircraft / render artwork “Great shot, Blon
papacharly posted a topic in Digital LEGO: Tools, Techniques, and Projects
I love the aircraft builds of Jon Hall, as well as I highly appreciate that he shares instructions. So I am able to virtually rebuild his aircraft and use it for rendering. Many thanks to Jon! Here please find some LDraw files of his aircraft models: E-11 Liberator Crimson Storm Skyhammer Patriot Scarlet Fury E-73 Wyvern In this context I proudly present my latest render: A group of E-11 Liberator getting attacked by some Crimson Storm. Please note: This is not a real air fight. It’s an airshow! So definitely no Lego Minifig was harmed or even killed while being engaged in this “air combat”. Pov-Ray render. Props, muzzle flash and smoke, as well as sky and fog also generated with Pov-Ray (no “photoshoping”). Aircraft built with SR3D Builder. High Resolution Image of "Great shot, Blondie!" Have fun! Papacharly -
[MOC, digital artwork] Spaceman Spiff (Calvin & Hobbes)
papacharly posted a topic in Special LEGO Themes
I love Calvin & Hobbes comic strips. From time to time I still have lots of fun reading this great literature. One of Calvin’s alter egos is Spaceman Spiff: Spiff is an "interplanetary explorer extraordinaire" who explores the outermost reaches of the universe "by popular request" in a red flying saucer with a bubble canopy. So here comes my digital artwork “Spiff shot first”. Built with SR3D Builder (LDraw), rendered by Pov-Ray. Spiff_shot_first by Papacharly, on Flickr And this is the original Spiff, stranded on an unexplored planet, uses the Death Ray Blaster to defend himself from aliens: Spiff pulls his Death Ray Blaster: Spiff_Blaster by Papacharly, on Flickr Hope you will enjoy it. regards papacharly -
A project by Courleciel, Papacharly and Ssorg We’d like to present you our new project based on the huge RMS Titanic built by Ssorg in 2012 (project has just reached the 10k supporters on Lego Ideas!). Dock, tugs and iceberg have been built by me in LDD, then transfered in LDraw. We optimized the model by adding all the portholes on the hull (not really an easy deal, but it was worthwhile!), the lights on the masts, the flag and the letterings (bow and stern). All renders have been made by Papacharly. Click here for high resolution images. First post will be edited with a new render each day up to April 15th. So don’t forget to come back there to take a look on other amazing renders ! We hope you will enjoy our work. ------------------------------------------------------------------------------------------------------------------------------------------------------------------------------------------------------------------- Wednesday 10th April 1912 : Early morning, Titanic was docked. Passengers had not embark yet. Titanic_Southampton by papacharly24, on Flickr Inspired by this painting Titanic_Southampton_BW by papacharly24, on Flickr Four hours after leaving Southampton the ship arrived at Cherbourg (France) to pick up new passengers. Titanic_Bow by papacharly24, on Flickr Thursday 11th April 1912 : Titanic was going to reach Queenstown (now Cobh, South Ireland) and tenders brang some passengers aboard. At early afternoon, Titanic departed on her westward journey across the Atlantic. Titanic_Stern by papacharly24, on Flickr Friday 12th April 1912 : The ship steamed at full speed in the direction of New-York. Titanic_Bow_Side by papacharly24, on Flickr Saturday 13th April 1912 : Titanic sailed through calm waters. The temperature was getting colder as the ship came more and more closer to the Grand Banks of Newfoundland. Titanic_Sunset by papacharly24, on Flickr Sunday 14th April 1912 : Weather is clear, calm and very cold by this evening. Despite a serie of messages from other ships (such as SS Californian) warning of drifting ice, the ship struck an iceberg on starboard and the impact produced a huge opening in the hull. Titanic_Iceberg by papacharly24, on Flickr Monday 15th April 1912 : Water was pouring into the lowest levels of the ship. The first lifeboats were lowered into the freezing water. At 02 :20, Titanic disappeared from view. Titanic_Sinking by papacharly24, on Flickr
-

POV-Ray Question: Possible to Merge LDD Files into a Single Render?
Kolonialbeamter posted a topic in Digital LEGO: Tools, Techniques, and Projects
Hello everyone, I'm sitting on a couple of large lxf-files that I'd like to create a single rendered image of. More specifically, I created a baseplate that I saved as one file, then continued to create a building (so in relation those two should be 'in place', if that matters) that I saved as another file. Each is around 37.000 bricks, so there's no way to consider the import game... Question now is, is it possible to use LDD2POV-Ray and POV-Ray to create a single rendered image of the two parts combined? And if so, could somebody explain to me, how? I remember reading something about merging them by copy/pasting the POV-Ray scene data... I just have no idea how that works. Another thing I stumbled upon was this idea by bbqqq. Any help on this would be very much appreciated :) Best regards -
Ruk by The Mugbearer, on Flickr General Sargas Ruk is the final boss of the Saturn system. The head of one of the Grineer Artifact extraction projects, Sargas Ruk was targeted by the Lotus for annexing Tenno-controlled dig sites. Ruk enjoys Grineer augmentation, even going as far as replacing the lower part of his arm with a flamethrower and replacing his normal vision with a single augmentation in the center of his helmet. Source
-
[Render] XV104 Riptide by The Mugbearer, on Flickr The XV104 Riptide Battlesuit is one of the latest Tau Earth Caste innovations, designed to combat the most dangerous enemies of the Tau Empire. Powered by an experimental Dark Matter Nova Reactor and equipped with an arsenal of highly advanced weapon systems, the XV104 Riptide is the pinnacle of Tau Battlesuit technology. Standing twice the height of an XV8 Crisis Battlesuit, the XV104 is the epitome of Tau ingenuity and technology. Its long, back-jointed legs hold up a heavily armoured torso that houses the Riptide’s Dark Matter Nova Reactor -- an experimental power generator that can be activated should the Shas’vre pilot require extra power to sustain his heavy rate of fire. The XV104 carries a sleek Riptide Shield Generator on one arm and a Heavy Burst Cannon, which can be exchanged for an Ion Accelerator, on the other. To provide manoeuvrability, the XV104 Riptide Battlesuit is also equipped with a large Jetpack that juts out from its shoulder blades. Source
-
I have a decent sized Lego fire department that I and supplementing with LDraw apparatus to fill in for missing trucks. My question is what is everyone's preferred angle to view these in LDview? Do most people just stick with the standard 2/3 view or change the lat/long of thier renders? This angle just seams unnatural to me. Maybe because when I shoot them, I shoot them like I would an actual fire engine, and expect that angle of view. Thanks.
-
I am doing some rendering in POV-Ray, and I am overall pleased with the results. Most parts have nice reflective surfaces; however, I found that non-reflective parts, especially tires, are rendered as shiny objects. Is there a means to have only tires rendered in a matte-finish, so as to give a more realistic appearance?