Search the Community
Showing results for tags 'railroad'.
Found 69 results
-

Gravel loading facility for railroad hopper wagons - set 733 inspired real world MOC
Murdoch17 posted a topic in LEGO Train Tech
This model was inspired from this set-733 like MOC by @AFOL7777. I turned it into a railroad-served industrial track ballast loading facility to have the crane load dark bluish gray 1 x 1 round bricks into the crane's bucket. Then you can drop them into train hopper's when they arrive with the pull of a sliding plate. You may have noticed I had to extend the height of the model 1 brick, to allow for Diesel 10 to fit underneath, as he is the primary engine to work the ballast facility. (His claw made him too tall, but it's okay now.) The tan tile parts under the crane are the pull pins to make the coal fall into the hopper cars. Inside of the crane with "controls" for the bucket motors and the crane itself, which travels along some narrow-gauge tracks and can swing from side to side. In reality, the "hand of god" method is used to make the crane move, with a rope extending to the roof of the crane cabin which I can wind and unwind to load and unload the ballast into the train cars. The office of the owner of the ballast operations. The reason for the odd footprint is the factory MOC I made earlier this year resulted in a base-plate piece (dimensions 16 x 48 studs) that I was looking to use somewhere.... enter into the picture this model, and now I've nearly solved that little issue. This 6 wide BR "Warship"class with hydraulic claw (AKA Diesel 10) model has been heavily modified by me from a old Class 37 file by LazarusBricks to have new removable roof sections for the cabs with seats for figures and cab controls. As you can see, I chose to leave off the face to keep the engine more in line with the rest of my locomotives. Diesel 10 works the ballast facility most of the time, so I included him here. I'm going to have my Diesel 10 model pull 6 of these coal cars plus a brake van inspired by the 1980's 12v era red/ yellow sets to my gravel facility. The 12v era model and Diesel 10 are already built, and the plank wagons are on order as of 1/11/2020. NOTE: All credit for the six dark grey wagon models seen in the picture above goes to @Pdaitabird, who designed them. See here on Flickr for the awesome tutorial by him for the construction of the BR plank wagon. BUILDERS NOTES: The ballast facility is now done, but the trucks to be filled with the crushed rocks are not (yet). More pictures to come soon! -
Classic western rural train depot "Legoredo" - (finished 12-16-19)
Murdoch17 posted a topic in LEGO Train Tech
I originally got this basic model from a page on Bricksafe by user @sed6 as seen here. I revised the freight door to be movable, changed the roof color to dark red from black, building color to sand green from tan, plus I added a "cast iron" heating stove and it's chimney flue to the model for late-1800's period look. This station will go along with my western stuff on my layout as seen in this topic here. The platform side of the station. There is plenty of outside seating on both the left and right sides, yet they are still under the roof awning to be protected from rain. (three seats per side) The model features the separate entry doors to the station premises for cargo and people on the both the street and track sides. Inside we have the freight area (on the left) and the passenger area (on the right) with a connecting door between the two. The passenger section also has the heating stove which currently is keeping the coffee hot. (or is it boiling the water for tea?) This part of the station also has three inside seats for weary passengers and a cash register for ticket dispensing. The station is modular, and comes apart in four sections: - Left platform end - Right platform end - Station roof - Station building I was originally going to build the Disney station in blue, but the projected price was out of my budget, so I settled for this one. This is is just as good, if not better, because everybody's got a Disney station now, but nobody but @sed6 has one of these custom depots. (and mine is different from his to boot!) - Real life pictures to come: December 25th, 2019.- Real life pictures added, 12-16-19! Thanks for stopping by, and if anyone needs bigger versions of these pictures, they are view-able at my flickr feed. Comments, questions, and suggestions welcome! -
"I've been working on the railroad, all the live-long day!" This train consists of a ALCO diesel locomotive (specifically a RSD-12 type) and six cars: - a (working!) crane car - depressed-center rail wagon - a (working!) ballast hopper - tool / worker bunk car - weed killer tanker - wide-vision bay-window caboose. The train model features several neat printed pieces found in several Juniors sets and and seven generic track workers. (as seen below) ...while the roadbed crew consists of: -Bucket-lift truck from set 3179 (Repair truck) -Dump Truck from set 7789 (Lotso's dump truck) Drill vehicle MOD from 7936 (level crossing) Front end-loader from set 7630 (front end-loader) ...and a official's inspection car MOC - not yet built This model was originally a ALCO MRS-1 built by Anthony Sava, but has been so severely modified that it no longer looks like the prototype loco. So I went searching And found another ALCO locomotive, a RSD-12 that looks like my loco. Both my model and the prototype have the six wheels, and the same basic hood and cab design. The long hood of the loco has been designated the rear with a double red light. (no picture taken yet of this car) This car is not your ordinary tanker car - it contains weed killer for use on the ballast the train lays down. This stream crane model was heavily inspired by Whoward69's instructions for a set of crane and match truck train cars. I modified the original model seen here. I originally meant for the crane to have ropes to move the boom, but it got confusing on which rope went where so for now it's moved by the H.O.G. (Hand Of God) method. The crane can spin around in 360 degrees and lift anywhere up to 90 degrees straight up. (Their is a double set of pins keeping the boom from going too low, as well.) Here we see how the crane is hooked up to the depressed center flatcar most of the time. The heavy-duty depressed-center wagon has brick-built arms to secure the cargo of railroad track in place. This model was inspired by a coal hopper on an older website called LGauge .com. I tunrned the old finger hinges into new pin-orientated ones and colored the car yellow to match the MOW paint scheme. The hopper's bottom door open and can dump 1 x 1 round plates / bricks onto the tracks for ballast. (no picture taken yet of this car) This is the workers tool car. In reality it's empty, but it's supposed to have rows of racks for tools, and a special box for broken tools to be fixed when they get back to the division HQ. The caboose features two ladders (one per side) and more of those fancy printed 2 x 4 tiles. This is where the job site foreman has a little office. The med kit is also located here. This is the headquarters for my Maintenance of Way operations for Brick Railway Systems. I was inspired by set 60009 (Helicopter Arrest) from 2013 for most of the building, while most of the inside details came from set 10027 (Train Engine Shed) in 2003 a whole ten years before the other set was even produced. As for the billboard on the roof, I borrowed the letter's design from my brother's model (with his permission), and put them on a billboard to spell out OCTAN. The tracks on the side of the building are for my ALCO RSD-12 and it's accompanying six car work train to sit and await their next task. The inside on the lower floor is furnished with a lathe, drill press, fire extinguisher, oil drum, and a vise. The upper floor (the break room) has a table, a few chairs, coffee machine (with paper cups!), fireplace, and a recycle bin. I will be updating this with the two missing pictures soon. As for the digital items, I will built them as funding allows. As usual, Comments, Questions and Complaints are always welcome!!
-

[MOC] GWR "Hall-Class 4900" / Hogwarts Express - Bricks-on-Rails
Bricks-on-Rails posted a topic in LEGO Train Tech
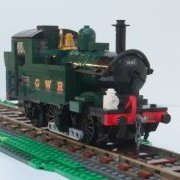
Good evening, everyone, Since I promised you in the last topic to design more international models besides german models, today I would like to present you the model of the "Hall-Class 4900" of the "Great Western Railway" from Great Britain. The "Hall class 4900" were tender locomotives, which were built between 1924 and 1943. A total of 259 units were built and the locomotives were used for passenger and freight traffic. The locomotive with the railway number 5972 "Olton Hall" achieved special fame. It is the locomotive shown in the Harry Potter movies, which was specially repainted for this in the well-known red coloring. The model consists of approx. 1090 parts, is approx. 66 studs long and about 10 studs wide. A Power-Functions L-motor can be installed in the boiler. The IR-receiver and the battery box find comfortably place in the large tender. Most of the decals or printed components correspond to the original LEGO parts. Furthermore, the model is equipped with numerous striking details, such as the piping, the chassis or the detailed cabin. This model is also a little bit of a premiere, because for the first time not only LEGO standard components are used, but also railway wheels in XL and M by Big Ben Bricks. I also tried the Bricklink Part-Designer for the first time. Currently the manual is available in two different versions. One as GWR "Hall-Class 4900" in dark green and one as "Hogwarts Express" in known red. I hope that you like this version in particular, because there are already some versions, even directly from LEGO. Praise and criticism are very welcome. Kind regards Martin Further pictures in the flickr-folder or on our homepage -
This through-truss bridge design was originally downloaded by me (I don't remember the name of the original designer who created the bridge) from the LEGO Factory / Design By ME page in 2010-ish and was never built in real life due to questions about it's strength. I came across it again while looking at my MOCpage account's older files and made it into the version seen above using newer parts and a longer frame quite a while ago. (and as to those original questions about it's strength: It's built like a safe, yet I can pick it up with a single finger by the top..... just don't drop it, because the reddish brown parts won't survive the landing!) More recently, I revised the deck where the track goes to be able to take the RC track up and be able to put down 9V down more easily. (We run 9V trains at shows in Gateway LUG.) In short, the track is now more easily removable to become 9V, 12V, or even a road bridge. The bridge fits any of my trains, and should fit all official LEGO trains except for double stack containers such as sets 10219 (Maersk Train) and 10170 (TTX Intermodal Double-Stack Car). Comments, questions, and complaints are always welcome! Many more Wild West items can be seen in my Historic sub-forum topic here.
-
Hi! I haven't been very active here for a while, but I was busy "working" on some LDD models and revising them. Some of you might have seen them already on my flickr photostream. I also got to render my models for the first time Ok, I'll show you the pics My revised BR Standard Class 9F "Evening Star" I borrowed codefox421's coaches to try on the 9F (all credit for the coaches goes to him, here is the link to his topic: http://www.eurobrick...showtopic=97927 ) I also revised my GWR 14xx, but that'll be part of another topic soon Then I also rendered and (re) designed some rolling stock: From top left to bottom right: Cattle Wagon Tank Wagon Well Wagon Vent Van GWR 16 Ton Toad Brake Van BR 20 Ton Brake Van (brown livery) BR 20 Ton Brake Van (grey and yellow livery) I also designed a water tower: and a modular train station. This is one section: You can make it bigger: and build a pretty decent station: The station has too many parts to be rendered And another station building: I hope you enjoyed it Comments and criticisms are welcome! Greetings, Nick P.S.: You can see higher resolution pics on my flickr: http://www.flickr.co...s/94645638@N07/
-
[MOC] Locomotive DR E 94 - Bricks-on-Rails of iron pigs and crocodiles
Bricks-on-Rails posted a topic in LEGO Train Tech
Dear Community, The week has passed very fast once again and like promised I would like to present a model for the start of the weekend. But first a little text. Some of you may have already seen it while browsing through my Flickr channel. It's the "German Crocodile", the DR E 94. It was built from 1940 and was mainly used in heavy goods traffic in Germany and Austria. 200 units were built. The nickname "German crocodile" was given to the locomotive because of the optical similarity to the "Swiss crocodile, the SBB Ce 6/8", which comes much closer to a crocodile. But the real nickname is not "crocodile" but "iron pig". They were designed for freight trains with up to 2000 tons. This heavy electric locomotive fascinated me already as a child on our domestic model railway layout. Apparently effortlessly she pulled the at that time seemingly endless coal train over our 4m² plate. The model is approx. 43cm long, 8.5cm wide and approx. 12.5cm high, with extended pantographs even higher. The locomotive can be motorized with two Power-Functions M motors, one of which is housed in each "crocodile snout". The IR receiver and battery box fit easily into the spacious cab. Inside, it was even possible to design both cabs. The detailed roof can be removed for easy access to the interior details and electronics. The two chassis, each with three axles (all driven) are pivoted and also very detailed. Here were not the "standard railway wheels" used, but the large spoke wheels of the Emerald Night, as these fit much better to the scale. By the way, the size of the model fits perfectly to the already introduced "SBB De 4/4". What has always bothered me with this locomotive, as well as with the "sister" from Switzerland and other locomotives of similar design, is the relatively large gap, which is between the driver's cab and the two " mouths " (also to be seen with the crocodile from LEGO set 10183). This gap is usually quite large with LEGO models, as the available curve radius is very small compared to the scale. In the real model, however, the gap is hardly noticeable. My goal was to "develop" a system that allows cornering but keeps the gap as small as possible. The solution is relatively simple. Below the cab there is a kind of rail system which is attached to both " mouths " and thus enables the three elements to be pulled apart if necessary, e.g. in curves. On a straight line, the elements are pulled together again by means of an attached rubber band. The assembly attempts have left a good impression on me. Unfortunately also a long, heavy train causes, that the elements can pull each other a little bit apart when driving straight out. As with the "SBB De 4/4" it is possible to build the locomotive in three different colours: - dark green (still my favourite) - grey - blue (DB colouring) And now have fun looking at the pictures. Criticism welcome. The example (Source: Wikipedia) More pictures in the flickr album With kind regards Martin | Bricks-on-Rails -
1950's Rust-eze modular factory with boxcars and semi-truck - real life MOC's
Murdoch17 posted a topic in LEGO Train Tech
Introducing the Rust-eze factory, which is where they make the rust remover / chrome restorer product Inspired by / not quite the same as the one seen in the CARS & PLANES shared universe from Disney / Pixar . I have set this building in my transition-era layout, which means the 40's through the mid-1980's, as the steam / diesel mix era continued longer on my alt-timeline. Their is a small 0-6-0ST switcher that services the factory as seen above and here in it's own topic. The factory without the train in front. The rear of the factory, with the ladder to the top of the chimney flue. The detachable roof can be removed, however I never really finished the inside part, and probably never will as I haven't a clue what to put in there machinery-wise. The loading doors do open, and were modified from the original arched doors as they couldn't fit a forklift... then again, these doors might not either! I was inspired by this photo by JB Lego to build these boxcars as seen here. They are made to haul pallets of cargo, specifically Rust-eze chrome restorer in 55-gallon drum containers for commercial packaging at another facility into smaller containers. This model was heavily inspired by set 8486, (Mack's Team Truck) from 2011. I changed the model to seat one mini figure at the wheel, added new headlights and license plate plus revised the fenders and enlarged the cab. The rear of the semi features a opening door and fold-down trailer stand, while the cab has two moving driver's doors. The trailer no longer has opening sides, but it does have two opening rear doors and folding stand for when the cab pulls away. Speaking of the cab, the roof of the driver's compartment comes off and both doors open. I hoped this factory would be of some use for some people, as the original always has been gathering dust in the basement since it was built, as seen below: This is the original factory that was by my Dad around the years 2000 - 2004. it was built with parts from several Sand Red supplemental packs available at that time. It does not feature any interior, nor does it have a removable roof. But this thing is built STRONG: you have to really put your weight on it to press the roof together. Here is the rear of his model. Comments, questions, suggestions, and complaints are always welcome! EDIT 4/9/19: added real life photos of the factory. -
This bahnhof (train station) is based on a number of hauptbahnhof (main stations) throughout Germany. It also uses parts from 60050, but not much. The major inspirations are Bremen and Frankfurt am Main. It has three tracks for trains with an overhead bridge to gain access to 2 & 3. Signals are at the ends of the platforms for tracks 1 & 2. As seen from the internal view, the shopkeeper and the bäckerei are present, but additional areas have been added. A ticket agent, locker area, and WC are new. The station has plenty of windows, allowing for good lighting as seen when illuminated from inside.
-
In rail transport, the U.S. DOT-111 tank car, also known as the TC-111 in Canada, is a type of unpressurized general service tank car in common use in North America. Tank cars built to this specification must be circular in cross section, with elliptical, formed heads set convex outward. They have a minimum plate thickness of 7⁄16 inch (11.1 mm) and a maximum capacity of 34,500 US gallons (131,000 L; 28,700 imp gal). Tanks may be constructed from carbon steel, aluminum alloy, high alloy steel or nickel plate steel by fusion welding. The black car carries petroleum products and has a capacity of 30,110 US gallons (113,979 L; 25,071.8 imp gal), a tare weight of 65,000 pounds (29,500 kg) and a load limit of 198,000 pounds (89,800 kg). And the internals:
-
Classic Space Astro-train - Benny's space-train, space-train!, SPACE-TRAIN!!
Murdoch17 posted a topic in LEGO Train Tech
Welcome aboard the Astro-train! This stream-liner was a mix of the 1910's Earth train called the "Bipolar" built specifically for use by Classic Space forces as high-speed, high-security ground transports for senior level officers such as Benny. Unlike the Earth version, the Astro-train is super-streamlined, and can go up to speeds of up to 400 MPH on special track, with super-elevated curves and long straight-away's of tens of miles.\ BUILDER'S NOTES: In reality, I liked my original take on the Classic Space Aerotrain, but it can't be built due to design and motorization issues. thus, I stretched the design into the model you see here but with my Super Bipolar at the head. This will be able to allow the engine to pull freight cars, (such as Benny's road car on a flat car) too. This model was inspired by both a 1999 version of the original, real-world Bipolar engine built by user Legosteveb and by a digital-only design by @Sunder to create the Super Bipolar you see in my picture above. Note, the two 4 x 2 slopes should have this CS print while the four white 1 x 1 tiles should have this "60" print. Also, a bonus for this engine model is if I ever show off this train at a LEGO show, I can replace the middle wheel-set on the loco with another person's 9V motor swapped in to power the train. This is the baggage car, and like the rest of the train, all the doors open. (Although there are no interior details, so it can be whatever you want it to be inside!) These are the two passenger cars. The observation car. This is the complete train. I'm planning on building this in 2019 in real bricks, at some point, hopefully. Anyway, comments, questions, complaints, and suggestions are always welcome! -
Ever since I've finally managed to get a pile of the small train wheels, I've been building, or at least designing not only new narrow-gauge locomotives, but also narrow-gauge rolling stock, and I figured I'd just make a single thread for all of it (both completed & LDD images of planned builds), and update it whenever I get new designs finished or complete actual builds & post pics of them in the original post. EDIT: I have decided to just start new threads for additional narrow-gauge train stuff, and then link those topics in this thread, which will be linked in my signature, rather than bumping this thread every time I finish a new narrow-gauge MOC. Therefore, from here on out, this is basically a library of all my narrow-gauge stuff, including locomotives, so enjoy! So without further ado, first up is the Balin & Sons Mining Co Heisler locomotive & ore carts I made back in 2011 & posted about early 2012: NG Loco by Ben/Laura Bonebrake, on Flickr Next on the locomotive roster is the Balin & Sons Mining Co RR 8-ton Plymouth biofuel switcher: Plymouth 8-Ton Right-Side by Ben/Laura Bonebrake, on Flickr Next up is an Inter-Modal/Flatcar (it's used as a flatcar when it's not hauling shipping containers). I've included a pic of the Inter-Modal Car with one of my "standard" shipping containers & an updated version of the Heisler Locomotive I made almost 7 years ago to show how it compares with the more or less standard sized locomotives I use for my narrow-gauge stuff: Empty Intermodal Front Quarter View by Ben/Laura Bonebrake, on Flickr Here's a design for a narrow-gauge hopper car, which is a 6-wide modification of a 4-wide version I had designed in LDD 6 years ago, then just kinda shelved. It's based on the narrow-gauge coal hoppers that are on the East Broad Top Railroad, although I could only make these 2-bay hoppers instead of 3-bay due to space constraints. EDIT: Thanks to discovering that LEGO made 1x1 black letter & number tiles with white print, my 2-bay hopper is no longer inspired by the East Broad Top Railroad's 2-bay hoppers, but it now IS an East Broad Top RR 2-bay hopper, complete with EBT reporting mark & typical hopper car numbering scheme: EBT Narrow Gauge Hopper Side by Ben/Laura Bonebrake, on Flickr This is a narrow-gauge tank car I came up with last night (after pulling my hair out repeatedly trying to come up with something that looked reasonably decent & wasn't too flimsy). While the ladder attachments on the current build are pretty flimsy, I'm planning to use BrickArms U-Clips to clip the 3rd rung up from the bottom to the railing in order to stabilize it. Of course the nice thing about this here design is that the main tank body is made entirely from really common parts which are available in many different colors, so I could easily make a small train entirely of white, black, yellow, green, etc tank cars: Narrow Gauge Tank Car WIP by Ben/Laura Bonebrake, on Flickr And Last for now (but not least) is a workable narrow-gauge train car I came up with earlier this week (and modified 2 times since then) in the Balin & Sons Mining Co RR livery (of course it is entirely possible to make this in different colors, but part of the reason I went with mostly black with red highlights is that black train doors are the easiest type to acquire on BrickLink, especially thanks to the new Grindlewald's Escape set having a matched pair in it). The slightly elongated bogie is one I'll be using for all my narrow-gauge passenger stock & I'm planning on using a variation of it for when I try to model the East Broad Top RR's 55-ton GE Center-Cab Diesel that they got about 15 years ago from the Algoma Steel Works in Saul Ste Marie. Also of an interesting side note is that for standard gauge trains, for the most part, I use the 26L train base plates for passenger cars/coaches, and the 24L train base plates for freight cars & medium diesel locomotives. EDIT: After messing around a bit, I found a way to make some workable 6-L narrow-gauge bogies that work with a standard 6x24 LEGO train car base plate & are held on by 2x2 turntable plates. I already tested it & it can handle any standard LEGO narrow-gauge curved track configuration, so here's the improved version: Narrow Gauge Coach WIP v2 by Ben/Laura Bonebrake, on Flickr Anyways, I hope you all like these narrow-gauge cars & are inspired by them. Like I said at the beginning, I'll update this post whenever I come up with or build more narrow-gauge rolling stock.
-
Railroad locomotive XL turntable - 12 outlet tracks and modular control tower
Murdoch17 posted a topic in LEGO Train Tech
Here is my XL turntable, which has 11 dead-end stall tracks and one outlet track. (though it can be reconfigured to be as many or as few tracks as needed). It is spread out over a 64 x 64 XL make-shift base plate size made up of of 4 regular (32 x 32) curved road plates with quite a bit of overhang due to the outlet tracks and tower. The re-purposed signal tower is now being used to control the turn table. This control building is modular, and has a roof and second floor that come off to reveal inside details. The studs on the sides of the building are supposed to spell out the the yard's name, but I haven't decided on a good name yet. If you have any suggestions for a name with 10 letters or less, please post a comment with it below! This table can handle a 4-track long engine (around 64 studs) with a bit of overhang at the ends, such as with my Frisco 1522 4-8-2 steam locomotive as seen above. Diesel A + B unit sets would have to be separated and moved independently, but that's okay and actually accurate for some real world locations / railroads. The basic workhorse of the turntable is this four track long framework you see here. The table's modular control tower features a lower floor that's empty except for the staircase. The upper floor features a machine to control the turn table, a wall clock, and a old-fashioned rotary telephone. The table easily glides on an raised outer ring of tiles, and turns on a central 2 x 2 pivot point. This whole thing can be mechanized, much more easily than a transfer table, but it still needs fine tuning to make it work right. The outer ring of tracks is only attached to the base plates at two certain points: every other spot is held on by gravity. (plates on tiles) This is basically a very much enlarged version of this model here. I was working on a seven-stall shed in the same style as the tower to connect to the turntable, but the angles and hinge bricks weren't working out due in LDD. I guess it will have to wait until the turn table is built in real life.... if it is ever built in the real world. Comments, questions, suggestions, and complaints are always welcome, as usual and thanks for stopping by! -
Six-track railroad locomotive transfer table - real world MOC
Murdoch17 posted a topic in LEGO Train Tech
I had a spare truss bridge model lying around and thought it could use a revamp. Then I thought of the turntable I had designed, and realized it could use a transfer table companion model. Thus, this transfer table was finished just today. The whole table moves on four wheels at the edges and three guide-ways in the center. The model sits on four vintage 32 x 32 stud base-plates arranged in a square. I'm currently thinking about slicing up what's left of a gray 48 x 48 into a strip for the leading tracks to rest on. The height from the track to the top of the truss-work is a hair shorter than 13 1/3 bricks tall, which is tall enough for most locomotives but not enough for cabooses, extra-tall double stacked container cars and double-decker lounge cars. The length of the table is four tracks long, which is plenty for any of my single-unit locomotives or official LEGO models. (Diesel cab and booster units will have to be split up to fit, however.) In progress shot of me loading a 4-8-2 steam locomotive onto the table. Lining up the tracks as perfect as can be is key to keeping the loco on the rails and steady! Moving any loco sideways is easy enough to do with one hand... lining it up and rolling the engine off, however, needs steady two hands and a good eye. A better pic of it lined up at the shed track after unloading the steamer. Please NOTE: There is a two stud gap (and a bit of incline) between table and lead-in track: It is NOT 100% flat! Comments, suggestions, complaints, and compliments are always welcome! -
Barretts vintage 1901 railroad depot - Brick City Depot real life MOD
Murdoch17 posted a topic in LEGO Train Tech
The model seen here is originally based upon the Brick City Depot "Winter Village Train Station", which can be seen here. I recently (2018) updated windows and doors to be white to give better contrast to the other chosen colors, and I extended the platform clock away from the wall and double-sided it so both ends of the station can see it. The following is a fictional backstory on Barretts station that I have written. (Their is a real Barretts station in Missouri, but it looks nothing like this an is not as old as my model is supposed to be. That station's history is nothing like this one!) This station was built in 1901 in Barretts, Missouri for use by Brick Railway Systems. It stands on the old Pacific Railway of Missouri right-of-way, which first ran through the area in the mid-1850's. The station is a wooden structure with a stone fireplace, indoor waiting area, and a freight storage room that was added to the station in 1928. The upper floor is for the telegraph operator, which as of 1977 the telegraph has been replaced with a computer for the dispatcher to locate any train in his sector at any time using advanced software. Here is the street side, with the date the depot was built proudly displayed. The upper floor has the computer for the dispatcher. In true Lego City style, their are no stairs to the top floor. (Though I still need to add the coffee machine up here.....) This is the lower floor, with a waiting room and ticket seller. The freight storage room off to the right was added later in the 1920's, and connects to the station via a door cut into the wall. Two sliding doors allow for cargo to be loaded onto the platform side, or out the street side for loading onto a truck. (This freight room also conveniently features a ramp for wheelchair-bound passengers to ascend into the building.) Here is the modular side of things: One left and one right platform, the station proper, the control room and it's roof are all connected by either pins or a very few studs. As usual, comments questions, and complaints are always welcome! EDITED 2/20/17: Updated the screenshots into real-life pictures. EDITED 7/24/18: Updated the model's real-world pictures and associated text. -
Mount Clutchmore small town railroad depot (modular 10259 MOD)
Murdoch17 posted a topic in LEGO Train Tech
I really liked the Winter Village train station when it came out, but it it is so small, with no back wall / roof. I tried for many months and multiple design changes to get it to work, and then I recently stripped away most of the basic framework underneath to give it a cleaner foundation. This last attempt finally gave me the needed inspiration for the model as shown below. This is the result, with the LDD file available here at Bricksafe. I added a freight office, a bathroom (the toilet design was stolen from the Modular Pet Shop set but the sink is my idea) and a "stone" fireplace. Their is a loading dock for the freight section, and two detachable platforms for added track-side length. Most of the rear wall opens up 90 degrees to allow access to the inside, and the roof comes off for viewing the passenger section. The tower should have three of this clock print, while the reddish brown 1 x 4 tile on the rooftop-sign should have this "Mount Clutchmore" print. The rear features a small truck loading platform with sliding door for the freight depot, plus the fireplace. (By the way: the window closest to the staircase is the ticket seller's window.) Here you can see all the many details of this model, including the removable roof, left and right sections of platform, swing open wall and the station itself. This new station might be built at some point in the future to replace my other rural station, of which about 60% of the older one's parts will be use to built this newer model. Fun Fact: This is my first building designed for my own personal LEGO town to include a bathroom! As usual, comments, questions, suggestions and complaints are always welcome! -
I was inspired by a failed Ideas project railroad round house and shed from this builder to make this Wild West armstrong turn table in LDD. I'm thinking of doing this model instead of the the two track shed, as it is a bit smaller than the twice-as-tall shed. As this a mechanical table powered by brute force and not steam, electric, or pneumatic means, the table has four angled "iron" bars for mini-figures to grip to pretend-turn the table manually. (This type of table is called an armstrong turn table.) The two sets of tiles on the middle of the table should have this GREAT and this WEST prints from the Toy Story 3 line. NOTE: The flex tracks are supposed to be taken apart into two halves for them to fit on the table ends. You should only need one flex track instead of two as shown, as one whole equals two half units. The 3 and 1/2 track long table has eight tracks radiating outwards on it, with the possibility of more or less tracks if needed being an option in the future. If this was built in real life, the four main locomotives will enter on the bottom-most track and proceed to be rotated to the correct stub-end track for storage. However, the BTTF Time Train cannot fit on the rotating table, (it's just a bit too long) so it will sit on the straight-through track and just run across the table to get off at the other side. (All the items but the blue steam engine and table itself have been bought and built in real life.) As usual, comments, questions, suggestions, and complaints are always welcome!
-
Wild Western "wooden" railroad steam locomotive storage shed (two tracks)
Murdoch17 posted a topic in LEGO Train Tech
This railway shed was inspired by Shaun Baseby (or @lightningtiger here on Eurobricks) and his smaller farm shed from 2014. He designed the basic Technic frame on this shed, and I ran with it to create this wooden western-style steam locomotive shed. This shed is 4 1/4 tracks long with a total of 68 studs from back wall to entrance to the building, along with a 10 stud wide entrance for stream locomotives. The shed features a cow skull on the front above the entrance, just to give it that wild west flair. The rear wall of the shed. The roof of the shed is not removable, but it can fold open a bit on clips. With this view you can see how the Technic frame supports the roof. Here is the scene with the three steam locos stationed at the Fort Legoredo area depot The shed will normally hold my 4-6-0 and 4-4-0 steam locomotives, with the smaller 4-2-4 sitting on a third track outside the shed as shown. That's the BTTF time train on the fourth track, in the way back. Comments, Suggestions and Complaints are always welcome! -
From 1919 to 1962, the Chicago, Milwaukee, St. Paul and Pacific Railroad (known as the Milwaukee Road) had these five General Electric-made behemoths pulling trains under the wires from Chicago to Seattle. They were called the Bipolar's for each of the locomotive's 12 motors had only two field poles, mounted directly to the locomotive frame beside the axle. The motor armature was mounted directly on the axle, providing an entirely gear-less design. These locos were so powerful they could out-pull modern steam locos, and what used to take two steamers took just one bipolar. However, after a disastrous 1953 rebuilding by the railroad's company shops (who had no clue how to work on a electric loco) the engines were prone to failures and even fire. And so, in 1962, four of them were scrapped with the lone survivor, numbered E-2, towed to the Museum of Transportation in St. Louis Missouri, where it has sat silent even since, as seen above. The slightly stylized LEGO version of the locomotive was inspired by a 1999 version of the Bipolar electric locomotive built by user legosteveb and by a digital-only design by @Sunder. With this updated, more curvy model, the classic orange and red scheme was impossible, and so as the yellow and red of the previous model type. Thus I was forced to invert the red and yellow to the fictional scheme seen. (The black number boards in front and rear should say "E2" in printed 1 x 1 tiles.0 The loco frame is split in three sections as per the original engine. The front and rear section can pivot slightly to make the engine go around curves. Since the last uploading of this model, the wheels have been re-arranged into two groups of seven (they are joined near the end of the frame, with the exact middle section floating freely between the two ends) and the body of the engine has been extended for a total magnet-to-magnet length of 70 studs. The model should perform well on R40 curves / switches, as this picture attests to it's flexibility.... though until it's built in real life, it will remain untested. The newer model is only 1 plate higher than the previous version, with the same length and width. As you can see, it's my longest single locomotive yet designed with 14 axles total. (I'm not 100% sure my articulation attempts in all the boogies and the frame were enough to work on standard LEGO track, but I guess I'll just have to see when it's built in real bricks latter this year!) The passenger train, and the rear car in particular, were inspired by the Milwaukee Road's Olympian Hiawatha service from Tacoma, Washington to with the rearmost car being a Beaver Tail observation car, which were out of service by 1961. (you can read more about these odd-looking cars here on this Wikipedia page.) Actually, I'm not sure the Beaver-tails were ever used all the way to the West Coast on the Olympian, but since it's LEGO, who really cares! That's all I have done for now, and as usual, questions, complaints, comments and suggestions are always welcome! (real life pictures coming to this topic as soon as possible, but the LDD file for the whole train is available here at Bricksafe)
-
Western-style wooden / iron truss bridge (nine tracks long- double tracked railroad trestle)
Murdoch17 posted a topic in LEGO Train Tech
One of the major problems of using my Eads bridge at shows is it's only one track wide.... so, I devised a western double-track wooden and iron structure using instructions from an old instruction I found on my hard-drive. (Originally from a defunct website / magazine called Railbricks and in a more modern concrete-looking format). This double structure is about 300 less parts than my single track Eads bridge and sits at the same height / length, so it can fit in the same spot. There are no bricks above track level at the beginning of the bridge so it works with even 10 wide trains or curves / switches immediately off the bridge! (This is unlike the Eads bridge, which cannot have turns right after it.) This trestle has about a track and a half of space between bridge end and truss section for an engine to straighten out on. The 10-wide BTTF time train fits easily though the bridge with room to spare! (time train not included in LDD file!) The new trestle is the same height and length as the Eads bridge, but with double the width for 300 less parts. The Eads bridge is also modular in construction, while the new one is not. (Eads bridge not included in LDD file!) LDD file for the wooden bridge (NO time train or Eads bridge in file!) is available at Brick-safe. Comments, Questions and complaints are always welcome! -
This bridge design was originally downloaded by me (I don't remember the name of the original designer who created the bridge) from the LEGO Factory / Design By ME page in 2010-ish and was never built in real life due to questions about it's strength. I came across it again while looking at my MOCpage account's older files and made it into the version seen above using newer parts and a longer frame. A big thank you to Wes Turngate over on Flickr for helping get the angle right to put the bridge supports in place. The LDD file is slightly different than the pictures as it is 2/3 of a brick taller to add in the proper parts to make it work. The bridge fits any of my trains, and should fit all official LEGO trains except for double stack containers such as sets 10219 (Maersk Train) and 10170 (TTX Intermodal Double-Stack Car). Side view of the bridge. The old design is on the left, new is on the right. (NOTE: The new bridge is in the LDD file, but the old one is NOT!) Here is the ldd file for the newer bridge: bridge link As usual, comment, questions and complaints are always welcome!
-
7997 - inspired railroad station - expanded and improved
Murdoch17 posted a topic in LEGO Train Tech
I built this station with set the 2007 CITY set 7997 in mind. I got the original set in 2007, along with a double rail crossover for my Birthday that year. I wanted to make it a full building but didn't have the parts. By 2008, I had discovered Bricklink, but the station was in pieces by then and was not re-created until early 2012. The station was a stock set, while I searched for ideas. Eventually, I came across a build by a fellow Eurobricks user named Lazarus that incorporated a modular basis, a full building (street & track-sides) & a appealing design. I saved a picture of it and made my own design based on his. I included really neat features, (such as the arched lattice windows made with a fence) but I went too far and made it impossible to transport to train shows and LUG meetings. The platforms were very flimsy om the XL baseplates, and during the move to my families current house, it shattered into small chunks. So, I went back to the drawing board, scrapping everything but the building itself. Here is the end result, which is strangely near where I started with set 7997. It has one platform, plentiful outside seating on the platform, and is red instead of yellow. There are many changes from the set, (no stairs on the platform, for example.) but the heart and soul of that 2007 set is still there. The row of studs on both track and street sides should say the station name in printed 1 x 1 tiles. This sign currently says "IRONWOOD", as that's the name of my city layout. The model is now 8 studs deeper, allowing for more room for my hands when being worked on. Here we can see the street side of the station with it's new wheelchair access ramp. Here we can see the interior of the station, with blue ticket machines, seating, and snack bar on the first floor. The train tracking / switching controls are located on the second floor along with the employees - only coffee machine with paper cups.. This printed part here provides the computer display screen. Here you can see the modular breakdown of the model, which includes the following: -Station building (lower floor) -Station roof and Tower control room (upper floor) -Tower roof -left platform section -right platform section The LDD file is here, in case anyone wants to built their own version. (I will be building this version soon, most likely before Christmas.) Comments, Questions & Complaints welcome! -
Hi guys, I hope you won't mind a Technic guy playing with Trains a little. I have created something very ugly, but at the same time quite playable: More info & pics: http://sariel.pl/2017/04/railroad-crane/
-
This mod is provided with opening (and locking!) doors, removable roof for the Captain / crew, and space for the number of the ship featured on the doors' exposed studs. (Unfortunately the printed tiles required are not available in LDD) I also added some height to the walls to keep the imaginary water (as the boat does NOT really float) out. ,and I extended the bridge's length by about double it's original amount of studs to make it a little less cramped. This ferry allows for three and 1/2 space of track, which isn't much, but is more than my original inspiration for this MOD, set 343 from 1968's blue track 4.5v era. Also, it uses up two of the annoying flex tracks! The doors open and shut, and with the included Technic pins (hidden in the pictures) allows for it to stay shut. The roof of the cabin comes off, allowing for access to the inside of the bridge. The loco seen is NOT included in the LDD file, but is merely to show off the 3 1/2 tracks worth of space for the placement of rail cars / engines. The LDD file is available here, if you want it. As usual, comments, questions, and complaints are always welcome!
-
Originally built by my father in 2004-ish, this building is one of my dad's biggest creations. I modified it and brought it up to my specifications... okay, I whinged it from looking at the model about two years ago. I took some liberties, (and made some mistakes) with the original model. For example: the first version had a smaller smokestack, (diameter wise) and a different Railroad loading dock. I also changed the roof to be removable to allow access to the inside. The factory was originally built in sand red, not regular red. Since this color is extremely expensive and hard to find, I used regular red with modern white window frames plus light blue glass. This end of the factory has a ladder to the top of the smokestack. Inside view with the removable roof taken off. I never finished this part (neither did my Dad), and probably never will. As to what it is supposed to produce... that's up to your imagination. The boxcars were inspired by this red 2014 design by Flickr user lets_play_lego. The doors open about four studs to let freight (or hobos) inside. The grille parts on the sides of the car are supposed to be ladders to access the roof walkway. The freight cars are already built in real life, but the factory is too expensive to build right now by me... maybe someday! The LDD file for both factory and boxcars is available here. Comments, Questions and Complaints are always welcome!