Search the Community
Showing results for tags 'Train'.
Found 774 results
-
Hi, I am currently working on a 4-4-2 steam engine and need some help. The base looks like this: I know that I can fit a 88002 PF Motor here, but the engine would run muuch too fast and wouldn't have much hauling power, so I wondered what I would have to do to get it to the same speed as the other PF trains, if possible. Is there a possibility, and how would I have to do that???
-
My first piece of track. Here my first piece of embeded straight track project, it's printing!!!! :D Printed!!!
-
Eightball Why have one vehicle when you can have eight? The Eightball is a specially designed vehicle perfect for long-haul trucking, ocean voyages, mountain travel, construction, urban transportation, and space travel. Stats: Length: 108 studs Width (widest points): 78 studs Weight: 9.8 lbs. Build time: 2.5 months Pieces: ~4000 High resolution and additional pictures on flickr. Come see it in person at Brickfête this year.
-
Here is a preview of my MOC for Brickworld 2013, the Villa Park Metra Station. Villa Park is a small suburb outside of Chicago, Illinois and Metra is the commuter rail. Comments, questions and critiques are always welcome. Reference pictures of the real building More pictures can be found here:
-
Hey! Do you have a favorite TV show, series and/or documentary program about trains? I've started to get interested in trains again after a long hiatus and am not so familiar with what's been put out recently. Personally, I've always enjoyed Michael Palin's travel documentaries such as; 'Around the World in Eighty Days' and 'Pole to Pole', although they're not strictly about trains. He's also done a show in the 'Great Railway Journeys' series from the BBC, hasn't he? There are a couple of railway-related series that I have been watching lately: > 'Rail Away' - the English version is a documentary series of twenty-five programs in which they go to a different European country each show. > 'Extreme Trains' - an American show of eight episodes with a different focus each time, i.e.; freight train, steam train, etc. Kid-related shows are, of course, Thomas and the 'Choo Choo Bob Show'. There's also a show called 'Chuffington' or something like that, isn't there? What have I missed? Thanks, Joe
-
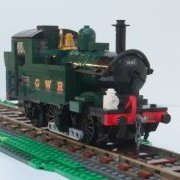
Hi all, First train MOC since I got back in to LEGO about 1.5 years ago. Finally got the space to do a permanent layout in the basement. Just need to set up some tables or make a workstation. Here it is! I redid the cow catcher at the last second. I changed it from 6 wide to 8. Much better this way. Allowed me to curve it more gracefully. Not happy with the headlight. I couldn't decide how to make it better though. It needs to be bigger. I didn't know I had so many 1x2 light grey grills.... I'm thinking the cover over the rear door needs to be raised a little to bring it closer to the roof. The windows took some SNOT work to get right. They're a little high on the chassis, but changing them would require tearing apart the whole thing. This engine is like... enormous compared the rest of my layout and trains. It completely dwarfs everything. If you open the door in the back, there's a little 9v battery box that powers.... An M-PF motor that turns all 4 cooling fans! All they need are some decals. That's all. Rolls around turns pretty nicely. It's a bit heavy though.
-
I've built a huge Lego train layout which is fully automated by microcontrollers, Arduino. The passenger trains 7740 and 7745 ride around and after a while they stop at the station. The freight trains 7755 and 7760 intersect with the track of the 7745. A section of the track of the freight trains can be powered down: if the 7745 passes the intersection, the 7755 and the 7760 will stop. The trains use PWM signals to start and stop. For starting is actually needed: otherwise the locomotive will disconnect from the wagons and drive away by itself. Video: I've built it in my living room so unfortunately I have to tear it down again :(
-
hi all Im' posting here as i'm now creating a lil story for my steampunk train you can see it here : http://www.eurobrick...showtopic=82776 so let's go this story takes place in the early 20th century, at the beginning of the industrial era. Steam trains are crossing country for several years now, but they are slow. And here come our guy, georges "steam-man" steamerton. He is in the steam things since his childhood, and is now a true steam creator. To meet some other inventors, he uses trains as his steam super car can't travel long enough. He always thought about some super train, traveling fast enough to crossing the country in only a few hours. But the biggest problem was that the wheels scratching on the rails were slowing the train, the loss of power and speed was really high. So this thought: "hey why not trying something else, like if the train was not using rails anymore for traction but only as a guide. As he was an inventor, he had already tried some magnetic field production, but only for fun. Now it was time to create a BIG one. So he worked, worked and worked again, and finally came up with one of the biggest and powerfull magnet ever seen. so he buyed an old warehouse, restored it and began to work. unfortunatly while working he lost a hand, quickly replaced by this awaiting to have enough money for something better so it's all for now, our guy is actually destructing the right part of his warehouse to build a rail way, because now he got his magnet, he needs a train coach to test it :D Thx for watching, see ya folks !
-
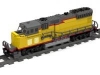
[ full gallery] Here's my take on the classic SW1200 yard switcher, this time in NP colors. I chose my subject from the MTM collection for several reasons, (1) my son is fond of this specific locomotive in part because it is featured in several episodes of the Choo Choo Bob Show (if you've got railfans under the age of 8 in the US I highly recommend this show), (2) I am fond of this specific locomotive because I spent way too many hours running it and maintaining it as a volunteer 20 yrs ago. On a side note, I know of at least one earlier build of the same subject by the folks at GMLTC. I built this locomotive as a gift for my son. He like's his 7939 set but although he is barely in the recommended age range he much prefers his dad's trains. So I wanted to build a very realistic train for his birthday. Since he is still young, it had to be kid tough, which meant one or two compromises, the biggest one being the cab. I managed to get a lot of great details in the cab, I am particularly fond of the back, getting the windows pretty close to correct. Shortly before building this I was commenting to a friend about the reintroduction of 1x1 trans clear bricks and how you could almost always substitute the much cheaper 1x2 bricks... oops... I needed four 1x1's for this and the photos predate my acquiring them. I also like the fact that I was able to work in the all weather cab windows. The thing I don't like about the cab is its length. It is 4 long and I would much prefer to have done it in 5 long, but all of the designs I came up with would have been a lot weaker. As it is, the 4 long cab is the weakest point on the locomotive (plenty strong for AFOL use, but you can't stand on it), I've had to rebuild it a few times ("now remember, the most important thing is that if it breaks, you collect all of the pieces"). To keep the structure tough, I used a lego train base. I also wanted to keep some flavor of classic trains, so I used the train railing on the ends. My son likes to push his trains around, so no motors on the stock build, but I made the trucks the same size as a motor so one can quickly swap in a 9v motor when desired, e.g., The hood is 5 wide, mostly snot. I am particularly fond of the stacks, I think I got the look pretty good (as original, not with the spark arresters that were subsequently added to the MTM unit). I borrowed the hood doors from my GP20 The taper at the cab was inspired by Jeramy's BN kit (the production of this kit reportedly consumed all of the available 2x2x3 double convex slopes in black at the time, though now they are becoming more common). With instructions now available for free here. At the time of the build I contemplated building a second one for myself, but I did not want to take away from the magic of my son's locomotive. In spite of some of the compromises, there are a lot of features on this build that are among my most advanced. I really wanted to give it to him and have him build the set, but in the end (sadly) I built it and presented him with the completed model (in a few more years I can give him the bricks and instructions, just not yet, this build took me a few hours to assemble). Some point in the future I will likely revisit this prototype to incorporate a few changes- 5 long cab, slightly longer frame, replace the train baseplate with regular plates, and motorized from the start. [full gallery]
-
Hi all As i don't have enough money to build all i want, i keep building on LDD to spend some time, i've worked on it 3 days This will be my first minifig scaled creation, a full steampunkn train My first part is the travelers coach, it fits 16 seated minifigs, and some more standing up It has a lot of machinery on the sides and the roof, some steam tankers for the brakes, and the wheels/rails are hidden under by the side machinery, as i wanted it to be "floating" it is composed by 2175 parts, so it's quite a big build, but i like challenges ;) roof is openables to place minifigs inside, and the side doors are openable too Here are the pics, thx for watching ! comments are welcomed ! i'll update the post with the rest of the train when they'll be done !
-
This train is a replica of the commuter train from Lisbon actually walk everyday them :) has two floors, two 9V motors, about 1 meter and 60 centimeters it took me about a year to build almost 4000 pieces these photos has no stickers yet, but I think its enough to compare to the original Hope you like it i know it should be 7wide, but i dont have enough bircks to do that modification for now :)
-
I have submitted a new project to LEGO Cuusoo, an inductive charging system for Power Functions trains etc... The idea is that the train would stop over an inductive pad, similar to the ones available for phones etc... but tailored to fit between the rails. It could be placed out of sight in the through-sidings of a fiddle yard so that one train would run while the others charged up. I would like this to become a single LEGO piece similar in size to an IR Receiver i.e. 4x4 with a flying lead. The same coil device would be used under the track and on the train. This is the simplest possible form and probably the cheapest too. I would equip all the sidings in a fiddle yard with coils (perhaps 10 on my layout) and each train (maybe 16), so 26 coils in all. I hope each one would not cost any more than an IR Receiver. It would also have application for Technic and Mindstorms, so making the same piece work in all markets makes it most viable. Please follow the link, support, leave comments and spread the word! Thanks, Mark
-
"The Twins" Now finished and will be on running display at the Bucks Railway Centre show 25-27th this month. Managed to get 3 working front LED lights on 10000. Both have 9v motors in...again a bit of "smoke an mirrors" with them as they have a dummy 3rd rim above the track. The pics dont really show it but I managed to get hold of some metalic brushed aluminium vinyl for the numbers and lettering, which looks very nice IRL and true to proto. 3mm tube is LEGO metalic silver, again the pics dont show it well. I've also tried to include the subtle differences between the engines ;) These are the first 7 wide full size diesels I have done (they were sort of a test to see if I can re-visit the class 37 and 40) and also now the longest at 2 or 4 studs (cant remember) longer than the Pullman DMU units. Link to Flickr set:
-
Hi, How can I have a train that makes no sound when running over the rails or whatever it runs on (could have small tries and run in a groove made from plates/bricks. I also don't want any noise from the motor inside of it and I need it ti run as fast as possible, it will just go past a window every few seconds so I can either put it in reverse or loop it back to the same piece of track (which will mean having an oval track shape. I don't think the window and wall will deaden the sound too much, maybe I should just have it attached to string that is winded into a large drum that is hidden somewhere far away? I'm not sure what the 'good' ideas would be
-
Attention all Brickworld train enthusiasts... We are pleased to have a Train Technology presentation at Brickworld Chicago on Friday, June 14. Name: "Building Techniques: Train Technology: Realistic Ballasting, Switching and Operation" Presenters: Steve Jackson, Cale Leiphart, Nate Brille Description: The PennLug team will present advanced techniques for Ballasting track, Remote Power Functions decoupling in a locomotive, NXT trolley control, and Prototypical Yard layout and operation. Samples of ballasted track and working locomotives will be available for viewing. Please join us in Chicago if you are coming !
-
I've been looking at the 10170 TTX intermodal cars for some time, and I really like them, except the container size. When I went looking around, I found the following topic, which was a good start for me: http://www.eurobricks.com/forum/index.php?showtopic=71804&hl=10170 I however thought the design was a bit too long, to wide and too high. I ended up with only copying the elements of the 10170, got rid of the 7939 container car elements, and this is the result: It can take a double stack of containers, and with the increase of the bridge of the 7937 by one brick, it can pass underneath it.
-
Here is my own design for a baggage car to add to my emerald night train. Feedback is always welcome. Sorry for the fuzzy first couple pics.
-
KIDZ CAR'S AND TRAIN'S EXHIBITION My name is Richard Banks and i am organising the very first model car and train exhibition aimed exclusively at children in the Hampshire area. The event will be designed to allow children to watch, interact and play (that's up to you!) with train tracks and car tracks and help raise money for a local charity (this year will be Little Sunbeams Preschool) I am sending this email to clubs, associations, toy shops, hobbyists and enthusiasts throughout Hampshire and beyond to garner interest and exhibitors for the car and train exhibition. I believe that this type of event which mixes scalextrix, model trains, plarail, brio, r/c cars, lego trains (and more obscure ones!) is a first for Hampshire and is a real chance for all clubs and associations to promote themselves, their services and products while creating an engaging and fun environment for children of all ages to play in. We are expecting 100-150 visitors on the day, all of whom will have the chance to visit your exhibition! The exhibition will be held in the Lockswood centre, Locks heath, Fareham on the 28th September between the hours of 10am and 5pm and there is NO charge for exhibitors. If you are interested, want to know more or are able to help spread the word to other exhibitors (or anything else!) i would like to hear from you. Please be assured that whatever you can exhibit at the event will be welcome and any fears that allay from the play aspect of this event are entirely at your discretion!
-
Hello, i'm new to Eurobricks and would like to introduce me and my "table town". My name is Ralf and i am an AFoL from Germany. My favourite Themes are (Classic-)Town (mostly 80ies and 90ies style) and Castle. My AFoLness lasts for 20 years now and for that anniversary i reconstructed/rearranged my town, called Lindburg. I use the 9V-system for my trains and MR for trams. The town has been apart for 7 years now and it was time to ... A lot wip there, but enough words: The oldest part of town, Sheeperstien (Shepard's Stone), mostly Tudor, partly due to a renewal, some houses done: the namegiving castle Burg Lindberg: the newer quarter Norderbruch, mostly from the 60ies: an 9V-adapted 7740 in action: a 6399 Airport shuttle tram crawling through a factory: the firestation (wip): view from the river: a last snapshot: more here on BS http://www.brickshel...ry.cgi?f=526695 Greets, Ralf
-
-
Just wanted to share my MOC Train station. As always it seems to be a never ending work in progress but here are some pics of what I've done so far :-) http://www.flickr.com/photos/edsmith0075/sets/72157632609123761
-
This is more of a wish list topic, but please, oh please why can't we get more train track varieties ? I'm new to the train Lego them and thus only using PF tracks, but I really wish you could get more functional type tracks, (affordable) crossover, t-junctions, ramps, x-junctions, and + junctions (like 12volt) .. .. Do you think Lego will release more variety ? Re-release crossover tracks ? And why not ? anybody have any insights into the limited range of tracks ? is it just cost of production ?
-
I am having issues with my Emerald Night derailling as it goes through switches. This issue may have come up a long time ago and there are just too many topics to try and look back that far. Can anyone give me a solution/cure to my problem?
-
[ full gallery] I have finally had a chance to photograph my semaphores. First off the signal bridge is modified version of a design I first saw by Jeramy Spurgeon. I have since seen this idea duplicated on several other layouts, but so far all of the examples I have seen have inactive signals. Sure, I had working LED signals, but then a few years back I started thinking about semaphores. There is just something nice about the changing position. So soon enough, I combined my semaphore idea with the signal bridge design. The MOC is tucked away in a dark corner of my layout and my camera batteries were dying, so I couldn't get any good video, but I was able to piece together this animated gif to give you an idea of how they look when operating. The mechanicals are fairly simple, a PF m-motor with a rubber band for a clutch. The one non-obvious feature is the two 1x1 plates just below the red and white semaphore arm. These are twisted ever so slightly to provide stopping points, the plate in back for the white and the plate in front for the red. I use an RCX to run the whole signal tower with a simple "break beam" train detector consisting of a PF LED pair in the middle shining on two light sensors, one for each track. I used a technic half pin to keep the emitted light beam tightly focused and a 1x1 plate sized hole in front of the sensor to keep as much ambient light out as possible. Because the whole setup is in a dark corner, the light for the sensor looks a lot brighter in the photos than it would normally look, e.g., I had the semaphores at one show and some of my club members were puzzling over how it sensed the trains. Given normal light levels it was a lot harder to see the light used for the sensor. The RCX is tucked away in a snug shed along the tracks, with cables coming out for the sensors, light, and motors. The program isn't complicated, but it does have a few clever tricks worked in, e.g., at startup it samples the background light level and stores that for a reference (instead of using a hardcoded value). It then does a loop to check if beam a has broken (saving the result in a variable), then if beam b has broken (again saving the result), then checks to see if it needs to change the state of either semaphore (either due to a newly broken beam or timing out since the last detection). Then loops back. Since most of the action is confined to the conditional statements, the program can complete the loop quickly and sample both tracks with a fairly frequency. I should also mention that I do not actually cut power to the track, so these are just for show. It should be fairly simple to modify this set up to control a single block on one track. [ full gallery]
-
Lego 79111 Constitution Train Chase The largest of the new Lone Ranger licensed series, this train comes complete with track and a bunch of figures. You'll have to wait till the end to see the figs though. I haven't seen the movie (it's not out yet!) and honestly am not that familiar with the Lone Ranger, so I'm reviewing this primarily as a train set that happens to be tied to a movie, not as a licensed set that happens to be a train. Name: Constitution Train Chase Set Number: 79111 Pieces: 699 Price: $99 Minifigs: 7 Theme: Lone Ranger Year of Release: 2013 Links: Bricklink Peeron Brickset The Box The Box front shows what I assume to be the Lone Ranger theme, with a bright yellow band across the top for high visibility on the store shelves. The train is shown on track with the usual liberties in how things are happening - for example, the horse cannot stand in that pose without falling over. They had to stick the water tower in the back so it didn't obscure the train, which is a bummer since it's a cooler accessory than the exploding rocks. The Figs At the bottom of the front there's a lineup of the figures included, with their names so you know who's who. Lego was really trying to save space to give the train as much room as possible on the front though, so they cut the legs off all the figs! The 1:1 On top of the box, they used the same figure lineup (but with legs this time!) as the 1:1 size indicator. That's sorta surprising to me, since most buyers would know what size a minifig is, but it's hard to judge the size of the train from the photo. Something like the wheels from the locomotive would be a better scale I'd think. The Back On the back of the box we have the usual second photo of the whole set, plus insets of all the play features. You can see that the water tower falls over, the gun spins, the tender has a hiding place, etc. The Contents Inside the box you get: bundles of track, 6 numbered bags, one un-numbered bag, a tiny sticker sheet, and two manuals. Sorry, no cardboard for the manuals so things are a bit curled. The Stickers The small sticker sheet isn't too bad, considering the size of the set. There's a couple stickers for the locomotive and one "scratched panel" that'll go on the jail car. The Manuals Two books - the first builds the locomotive and tender, the second builds the other two cars and the accessories. All the instructions are clear and simple to follow, as long as you actually pay attention to the part box to make sure you do everything you're supposed to on each step. The Wheels The locomotive gets 6 large wheels. They're the same as the Emerald Night (and the Toy Story train). They're packed as two bags, each with two flanged drivers and one blind. Good to see these available again! (well, I guess they are in the Monster Fighter Ghost Train, but who bought that?) The Special Parts There's some nice pieces here. I'm not 100% sure on the colors, but I think the silver bars and rocks are "metallic silver" in Bricklink naming. That's definitely a new color on the ingots, and the silver rocks haven't been seen in years (assuming they are metallic silver). The printed tiles (you get an extra of the stopwatch) are nice and useful, though a real slingshot would be cooler! And the guns... this is a new mold from the old revolver. It's nicer, more detailed, and you get it in both light and dark pearl grey in this set! 3 light and 2 dark, to be precise. The crate is not a new mold, but it is a new color. I think it's medium dark flesh, but I could be wrong. Building the Locomotive, 1 The locomotive starts with a nice sturdy frame. That's good to see, since the Toy Story train was so wobbly. Building the Locomotive, 2 Pretty obvious where this is going... but also obvious that there's not going to be an easy way to motorize it. Building the Locomotive, 3 Details are starting to appear. It also surprises me every time how many colors Lego sneaks into things where they won't be seen. This set included a number of the dark orange 2x2 round plates, and none are visible in the end. Did they have extra dark orange ABS left over or something? Building the Locomotive, 4 More stacking. And some SNOT starting to show... Building the Locomotive, 5 The first stickers go on 2x4 tiles to indicate the RR. I like the detailing in the rods on the sides too - a black wand, a black lightsaber handle, a cone, and another wand. Simple but nice detailing. Building the Locomotive, 6 Finally, the wheels. Sadly, there's no driving rods in the set to make it look more realistic, but it'd be easy enough to add. And I'm not OCD, so my wheels aren't all lined up like in Lego's photos :) Building the Locomotive, 7 The front bogey is nicely designed. And you can't have a western train without a cowcatcher! Building the Locomotive, 8 The base of the locomotive is done. Since the center driving wheels are flangeless and there's nice articulation between the front and main parts, it'll work just fine on Lego track. Building the Locomotive, 9 Now the cab is taking shape and we're finally getting some color! Sorry, no glass in those windows. Have to add that yourself if you want it. Building the Locomotive, 10 The green slopes here are the same as used in the Emerald Night, but without the gold stripes. There's a bunch of snot brackets used to give the boiler its shape. Building the Locomotive, 11 Here's how the front of the loco comes together. There's an extension with snot brackets that lengthens the boiler, and a tile on the top of the bogey so it can slide. Once the rest of the green slopes are added it'll be plenty strong. Building the Locomotive, 12 Nearly finished. The dark green looks great and I like the black stripes in it. Building the Locomotive, 13 The bell and light are both nicely built. The pearl gold clip and fez make for a great small bell to fit the scale of the train. Building the Locomotive, 14 Complete. The hat on the front gives some nice details there, and the overall train is just nicely made. I'm not 100% in love with the smokestack design, but it's ok. The Tender, 1 The tender is pretty simple, but it looks good. The trapdoor is a quick way to get some basic play features for the kids, and some round black plates on top help the appearance. The Tender, 2 And it's done. (actually, it's not. there's a shovel that goes on the front and some wands that go in the back clips that I forgot to put on before the photo - but basically, it's done) The Gun Car, 1 Here's the base - a nice way to get snot right away. And the second car will use the same base, so pay attention :) The Gun Car, 2 I really like the touch of red here. Otherwise, it'd be pretty dull. The Gun Car, 3 Some storage bins are added, as well as the base of the gun. The Gun Car, 4 There is a pretty simple mechanism coming to make the gun spin. First, a crank is built (that tan crankshaft part is pretty rare in this color) with a gear and a towball as a handle. The Gun Car, 5 The gun car is done. You can see the gear mechanism here. The binoculars and barrel make a pretty decent-looking gatling gun. The black pins mean it has enough friction to stay at whatever angle you put it. Likewise, the click turntable underneath means you can position the gun and have it stay. The Jail Car, 1 The base is the same, but the top changes from the gun car. Bunches of 2- and 4-long log bricks combine with some 1x1 cylinders to make most of the walls. The Jail Car, 2 The sides are now done and sliding doors are added on both sides. There's also a nice jail door dividing the car in half. The Jail Car, 3 Nearly done. The Technic beam in the rear pivots to knock out the end wall (not in place yet). I love the simple little lamps at each end of the car though. A great little detail touch. The Jail Car, 4 The end wall. The sticker side goes inwards to form the jail cell in the car. The outside has some dynamite attached - combined with the lever sticking out of the roof at you have the nearly-mandatory-for-Lego-sets knock-out wall. The Train Is Done The full train. It's a nice length for pushing around by hand, although it definitely helps to have it on the track since the front bogey on the logo flops around if you don't. It's sorta goofy - I mean, how many trains have massive gun cars like this? - but it's a great toy. And if you mod the cars into something nicer, it makes a great old steam train. I just think it's fantastic! The jail car would be simple - take out the lever and bar windows, fill in those gaps, and it's a great little boxcar. Take the gun off, and you have a nice little flatbed car. The Water Tower, 1 Time to finish the scene. First comes a water tower. The base has a lever and some of the new 1x2 plate with pinholes, and they're all nicely reinforced with the tan curved bricks. The Water Tower, 2 Almost done. There are a few trans-blue parts inside the tank to be the water, and the whole thing is ready to topple. The Water Tower, 3 And it's done. The dynamite (with a little help from the red lever on the other leg) is ready to crash the water tower across the train tracks! I found in my play that usually the whole tank pops off, but it doesn't come open and spill the 4 trans-blue parts out. That's fine as far as I'm concerned - they'd be a pain to pick up if they flew out. But really Lego, just 4 little 1x1 round bricks to fill the tank with? And I assume that this water tower is for the townsfolk, not for filling the train as it comes through, since the spout is away from the tracks if you have it ready to fall and block them. Makes you wonder though why they'd build a tower so close to the rails... The Exploding Rock, 1 No build photos needed here. It's simple but blows up pretty good. The Exploding Rock, 2 It's a nice play feature except for one thing. You have to hold the front of the rock down when you press the lever or the whole thing flips up. The tan base needs to extend out a little on the lever side for stability! On the other hand, the pair of grey slopes sticking out on the front make great spots to hold it down with a finger or two. The Figs Finally, what you've all been waiting for. Here's the 7 figures. The Lone Ranger gets a pair of guns, but Butch only gets one. And poor Latham - he can hardly stand up with that rifle in hand! Seriously though, these figs are just fantastic. I'm not familiar with who they all are, but who cares? They're just great old-time characters! Four very different hats, wide variety of torso prints, great faces. The Backs All the figs have back printing as well. The Alternate Faces With the hair off, you can see the alternate faces that some have. FYI, Tonto's hair is rubbery, but the rest are hard plastic. Tonto's hair also has a small hole on top for the bird to attach to. The Horse Even I know you can't have the Lone Ranger without Silver. This horse is like the new ones in LotR with moveable rear legs, but it's the first time for that version in white. And yes, the standard brick and plate are included if you want to remove the saddle. The Comparison, 1 Here's the Constitution next to the Emerald Night. You wouldn't expect them to be on the same scale since EN was the same price but without track, such awesome figures (though it does have 3 basic figs), or a Disney license. I have to say, I'm impressed with how well the Con stands up to the bigger brother. I wouldn't think twice about running them on the same layout, especially if you added some driving rods to the wheels. The Comparison, 2 From the front you can see how much larger the EN is in pretty much every way. The boiler is MUCH bigger, but again, I'm impressed that the Constitution doesn't look bad in comparison! The Comparison, 3 For a perhaps more fair comparison, here's the locomotive from the Toy Story train (7957). Granted, the TS train is supposed to look like a toy, but I just was never really impressed by it. It always seemed flimsy to me, and it was annoying to push around by hand since both sets of wheels are articulated on that locomotive. The set didn't include track, so most had to play on the floor with it. The Con is much more sturdy and looks FAR better. The extra $20 in retail price is well worth it, especially since you get more figs AND a loop of track. The Conclusion Wow. I LOVE this set. I'm not really a western guy and don't know the Lone Ranger, but I think Lego hit a solid home run on this set. I think it's a far cooler train than any of the recent sets. Obviously apples to oranges since there hasn't been a steam train since the EN, but still... the one drawback as a train is that there's no simple motorization option. You could put a train motor under the tender, but it'd take modification of the floor to work, and there's not room for a battery box in the tender. A better option might be to make a larger boxcar and use that for power, since you could put the motor underneath and the battery and IR receiver inside. For the kids, it's a great train with lots of play possibility, sturdy enough to play with, and it comes with track to play on. The Ratings Value: 10/10 - Considering the EN was $100 when it was out, and other train sets are more (but also include power functions), this is a solid value. You get 7 great figs, a horse, some scenery, and a great train with track. Design: 10/10 - It still looks good even standing next to the Emerald Night. Enough said. Minifigs: 10/10 - These 7 figs (and the horse if you want to count him) are all great. Not a dud in the group, and a wide variety too. Playability: 9.5/10 - I only took off anything because if I was a kid I'd want it motorized and have a remote. That would have kicked the price way up though, so I totally understand Lego doing it this way. Parts: 9/10 - Train parts, nice dark green curves, a simple but sweet water tower. My only complaint would be a lack of much color, but it's not supposed to be a brightly colored Toy Story train. Overall: 10/10 - A Great Set.