Search the Community
Showing results for tags 'BuWizz'.
Found 175 results
-

[MOC] X-MARXX 8rc, 8 buggy motor and 4 BuWizz rc car
Marxpek posted a topic in LEGO Technic, Mindstorms, Model Team and Scale Modeling
Hello all here is my latest build, inspired by the Traxxas X-MAXX 8s remote controlled car. The idea was to build a car as "compact" as possible while using 8 buggy motors, 2 for each wheel to give it decent power, as you might notice the buggy motors are at a 90 degree angle from each other, this is to prevent them sticking out the front and back, the chassis needed tall shock towers anyway so it was a nice fit. The front suspension and steering is built fairly sturdy, however crashing with this power, you can brace all you like, it is just going to break as you can see in the video.. The newer type cv-joints are used at the motor end, but since i did not want to use the new hub with its reduction, i used the "old" cv joints with the hubs, and yes, it does "eat" the joints and/or the hubs when something is not sitting correctly. the front has a dampener, a large thin pneumatic actuator, normally hidden by a panel, it is shared with both sides and does.. very little.. but is was fun to integrate. The front springs are from the 8420 motorcycle, adjustable in stiffness, but less stiff them most people imagine them to be, these just seems to fit the build, sadly i didn't have more yellow ones for the rear. The steering uses 2 servos, not only to give it more torque for steering, but also to help reduce the slack from the gear rack to the 12z gear, The two 12z gears on the rack are both offset by 1 tooth, but against each other, the long axle going to the servo's are under a bit of stress but nothing serious, it really helps reducing the slack on the steering. To further prevent slack from the hubs they are steered with the front links and stabilized the rear links, the next picture shows the 2 gears on the same rack (car is upside down), you can also see the imprint of a 5L axle from the bumper on the 5x7 frame after a crash.. The rear suspension has the same drive setup, but since it is more fixed and less likely to get damaged in a crash, it never destroyed any joints or hubs, here i also integrated dampener in the form of small pneumatic actuator on each side, which again.. do very little.. but was fun to integrate, it also has a torsion bar going from one axle to the other to prevent body roll, let's just say it was fun to integrate :) The grey springs are the exact same as the yellow ones, but these come off the Lego 8369 rc "dirt crusher" set, i happened to have these 4 spring, considered to get 2 more yellow ones, then i saw the price.. and went with mismatched colors.. so please forgive me i cheaped out... The body started out as a crawler body, and got heavily modified, extended in every way, added 4 seats for Technic figures and a new color scheme, It is fully detachable with 5 pins. The front and rear lights are in the chassis but they line up perfectly with the translucent bricks on the body, making it easy to get to the buwizz for charging or turning them on. The video and pictures have some inconsistencies in them, i know.. but i have had 3 horrible crashes, that required rebuilds plus some roadside repairs here and there, some i forgot to give the proper fix later on.. shooting the video took me a bit longer because of the same reason, i need to practice my driving skill... or not go to a skatepark when it is wet... or just not build in overkill mode... Thanks for reading! if you have questions or comments, feel free to ask of course! Marx. -

1:1 Scale BuWizz powered Motorized Go-kart
Zerobricks posted a topic in LEGO Technic, Mindstorms, Model Team and Scale Modeling
The go-kart is one my most ambitious projects. To build it, it took over 7000 Lego pieces, 32 L motors, 8 BuWizz bricks, one BuWizz app update and hundreds of man-hours. The final build, can easily drive a 60+kg person with the top speed of 4km/h. The story of the go-kart starts right after finishing the video shoot of pulling the train card with the heavy transporter. The heavy transporter showed me that Lego pieces have the needed strength to carry and transport the weight of a person, albeit in that case quite slowly. So I got an idea to create a carrier which would use a higher amount of motors than the heavy transporter and have a higher speed. Unlike the 24 small wheels the transporter used, the new model would only use 4 wheels based on the Technic Gear rack 11 x 11 Curved. Work first began on the wheels. They had to be capable of carrying a total weight of around 60 kilograms. When dealing with such heavy weights and forces, the only way to succeed is to distribute the load over a high amount of bricks. In this case the wheels were designed with multiple parallel rings, each carrying part of the weight: The rings would be stacked onto each other to form the finished wheel: Each wheel is powered by a total of 8 L motors through a gearbox. The original idea was to gear the 8 L motors up 3x times using a combination of 24 and 8 tooth gears. But after testing the wheels I soon realized that we will need a lower gear ratio, so a combination of 20 and 12 tooth gears was used to gear up the motors by a factor of 1,67. The resulting gearing gave each wheel a top speed of around 4 km/h The wheels were further optimized during testing to use clutch 20 tooth gears as the main weight-bearing wheels instead of the original 12 tooth gears. This change helped the wheels to spin more even and it allowed the load-carrying axle to be stationary, reducing wear and tear. Since each wheel used a total of 8 L motors, a total of two BuWizz bricks were needed to power each wheel. With the wheels finished, it was time to build the frame of the go-kart. The frame is based on two main pieces, a 1x15 Technic beam and 7x5 Technic frame. The 7x5 frames are crucial to the rigidity of the frame, while the beams connect them all together. Of course there were also thousands of pins used to attach everything together. With the help of Lego Digital Designer I created the first sketch of the go-kart's frame: With the virtual model created, I now had an estimate of the needed parts. With that information, I started looking for the cheapest deals on Bricklink, updating the digital model was I got along. Red beams turned out to be the cheapest solution, and we ended up ordering around 850 of them. Total number of parts ended up at around 7000-8000 with over half of them being pins. Once the ordered parts were received, it was time to build the massive model, which took several days: During the assembly process, the frame and model have been further improved and reinforced in order to carry my own weight without excessive bending. The wheel rims were covered with adhesive window rubber insulation to add grip: The rear axle was flipped 90 degrees in order to increase its rigidity and the whole kart was split into several modules for easy assembly and maintenance. In fact the whole cart can be taken apart to a couple of modules and assembled in less than 10 minutes. A couple of custom stickers and the Go-Cart was finished: With all the mechanical problems solved, it was time to turn attention to the control of the model. Since each wheel uses a total of 2 BuWizz bricks, the whole model used a total of 8 BuWizz bricks. This resulted in a problem with control, since Android based phones can connect to a maximum of 7 Bluetooth devices at once. We decided to try to use an Apple based device to see if we can connect to 8 BuWizz bricks at once. There were no issues, so a simple Iphone 5 was chosen for main controller. The phone was integrated into the steering wheel: The control device also had to compensate for the difference of motor speeds when taking a corner. Due to the load on the wheels, a simple sharp turn could cause them to fail if we would not slow the inner wheels down when turning. We needed a way for the BuWizz app to know that the wheels are being turned. This is where I came up with the idea to use the phone's own internal accelometer to detect the steering position. Since the phone turns along with the steering wheel, it always knows in which position of the steering wheel. We asked our app developer to add a simple gyroscopic command to the app, which we then used as an input for our tracked steer mixer. I experimented with different mixer steering ratios and in the end settling with the factor 0,1. The finished model was also duplicated in LDD, where the final piece count is around 7500 bricks: Now that our go-cart was fully functional, it was time to head outside to give it a final test run in the real world and the record the following video: Few weeks later the Go-kart was also driven by kids on the Brick Planet exhibition: All the long hours designing in LDD, building, rebuilding, fixing, optimizing, the blood, sweat and tears, they were all worth it when you see how happy kids are driving the Go-kart! -

buwizz and camera
MichaelWareman posted a topic in LEGO Technic, Mindstorms, Model Team and Scale Modeling
Hello: Has anyone had any success connecting a camera to the buwizz app to live stream the model's action? If so, what camera model are you using? Mike, -

Considering the BuWizz 2.0/PF Set, Any Thoughts?
StudWorks posted a topic in LEGO Technic, Mindstorms, Model Team and Scale Modeling
I have only been building my creations with EV3 but for a long time now I thought about getting a BuWizz. It's a good price right now. I'm really interested in how amazing this product is and I would be excited to make the transition to PF/BuWizz powered cars, so I have to get a servo motor and a few L motors to go with it. What is your opinion on buying a BuWizz 2.0? What PF parts should I buy to go with it to make car MOCs? Thank you for your feedback. -
For an exhibition I made a small Corvette-scaled car with an RC motor powering rear wheels. Powered by Buwizz, that model turned to be totally uncontrollable, with epic amount of oversteer at low speed and underster at high speed. So I got an idea. Why not make a 4x4 version of a miniature car? My worries were that the added complexity needed to power the front wheels will increase the complexity, weight and reduce the performance... But I decided to give it a shot anyway. The first version used a chain drive to front the front wheels from the rear axle, but that was soon scrapped due to the poor strength of the chain. So after replacing the chain drive with an axial driveline, I came up with this little, yet powerful model. The front wheels are an older 49,6 x 28VR type which use softer rubber than the rear ones. This way the car tends to oversteer less: In the rear DUAL 49,5 X 20 are used to give it as much traction area as possible: The bodywork can easily be removed to expose a torque-tube sytled chassis and a simple interrior: A servo motor steers the front wheels via a rack. Maximum steering angle is around 22,5 degrees: 3x11 panels are used as the main chassis, giving the model very high rigidity, while keeping the weight low: According to LDD the model is made of less than 400 bricks, less than to the upcoming 42109: The front wheels are powered directly by the rear axle via 20:12----12:20 gear sequence. There are no differentials, since the model reaches high enough speeds for wheels to understeer and slip in the corners anyway. Technical specs: Length: 25 cm Width: 14 cm Height: 10 cm Weight: 575 g Theoretical top speed: ~18 km/h Even with 4x4 drive, the racer still powerslides all 4 wheels even in just the normal mode, as you can see in the quick and drity slo-mo gif I made: I was pleasantly suprised by the amount of control you get with the added FWD. No longer am I at the mercy of the rear wheels to stop the car from crashing into a wall. Accelreation is of course much better, making this one of the fastest accelerating models I made. Oversteer has been reduced, but there is still plenty of power left to powerslide the model with all 4 wheels spinning. Stay tuned for a proper video showing off the performance soon.
-
 Now for something completely different: A Spyder from the future - the Turbo Racer's AMC Ultra - and its opponent - the Police Interceptor MM Falcon PS (both based on @rm8's chassis for his AWD prototype) Now you can play Outrun - but for real! UPDATE: This series of RC cars will get updated in the future with new additions. UPDATE2: It was time for a logo and here it is (might be subject to change)
 -
[MOD] Lifted and motorized 42110 Land Rover Defender
Zerobricks posted a topic in LEGO Technic, Mindstorms, Model Team and Scale Modeling
Here is my take on the motorization of the 42110. Basically the whole model was lifted to accomodate the bigger wheel, motors and BuWizzes. Model is powered by a total of 8 motors, 4L motors for RWD, 2L motors for FWD, one servo and one M motor. Total gear ratio is 1:3. It uses custom portal hubs in the front which have a pivot even closer than normal ones thanks to the new rims. Rear uses normal hubs and wheels, since they are sturdier. Axles use the original suspension's upper arms as mounting points along with a pair of 9L links for each axle. The original gearbox is connected to the rear drive, so it works normally. Steering is also connected to the original links, so steerign wheel and HOG also turn when steering Winch is motorized using an M motor. Video coming soon. -
[MOC] RC Ripsaw EV1, 8 buggy motors and 4 BuWizz
Marxpek posted a topic in LEGO Technic, Mindstorms, Model Team and Scale Modeling
This is my attempt at building a proper and most importantly; fun to drive ripsaw with somewhat realistic performance. The 8 buggy motors and 4 BuWizz seem to do the trick.. I tried to replicate as much as i could from the original design, obviously the drive-train works differently; the real EV1 has 1 motor with a clutch system in the rear differential to power the tracks from the rear alone, which i did try to replicate by adding the fake V8 and rear diff, which does function, but i disconnect it most of the time while drive outside because it has a habit of getting jammed by leaves, rocks and twigs, the gears used to connect to the fake V8 are all exposed. Here the sprockets are powered in the front and rear and each is connected directly to the slower output of 2 buggy motors, giving this thing crazy speed and torque. The suspension is set up like the real EV1 and works fine, but does require a track tension system, the real thing has a suspended front sprocket to keep tension on the tracks, in this case it would mean loosely suspended buggy motors, an idea i did not like and did not try, yet. I am using a simple lever, spring and wheels to keep tension on the track but it works fine and looks ok. For the body i tried to capture the look and feel of the real thing, using as little as possible panels and using beams for the boxy look with just the exposed framework seemed the right thing to do, i am sure it is filled with illegal connections, i go by the rule: "if it fits without force, it fits". The body is surprisingly solid, it can be lifted from several positions and it can take some abuse from driving, and abused it, i have.. The are 2 seat for Technic figures and the electrical wiring functions nicely as a seat-belt for them. I have added 2 sets of LED's on the top bar, i do not think the real EV1 had that, but it seemed the most "natural" position to me and it works nicely since they are aimed down a bit. And here you can see it in action! please leave a like if you can and help out my tiny channel: I hope you like it! -
This is an expansion, upgrade and update of the Tiger 4 x 4 x 4 The idea was to improve certain aspects of the 4x4 version: 1. The bewel gears were the weak part of the driveline, so the 6x6 uses additional 12:20 gearing after bewel gears, increasing available torque by 67% 2. Adding a second rear axle additonally helps to spread the load while climbing, increasing available overall torque by another 50%, allowing for a total of 2,5x more torque than 4x4. 3. Using defender wheels, and self-built hubs the pivot point is now a stud closer to the steering wheel and steering angle is increased from 18 to 25-30 degrees, removing the need for rear steering. 4. Center section was widened by 2 studs, allowing both gearboxes to be placed in parallel and the steering servo motor low in the center. Total gear reduction has been increased to 1:5 in high gear and 1:15 in low gear. Gear switching mechanism is now faster and more reliable. 5. Suspension is now pendular with a shock absorber in front and tandem axles with shock absorbes in the back. This allows the suspension to smoothly adjust to the terrain at slow speeds without wasting energy compressing the shock absorbers. At high speeds the shock aborbers smooth out the ride. In the picture below you can see the blue 1x7 beams which swing and allow the front suspension to act like pendular: 6. The model now has working fake engine(s) and steering wheel.I'm thinking of adding a hook arm with a winch in the back, so I can use this model to pull others out during trial truck races 7. Number of motors have been reduced by removing rear wheel steering and having one motor for the gearbox, allowing to add aditional functions as before mentioned hook arm. So...that's all about it for now, I'm only missing defender wheels to finish this monster. Yes it's going to be heavier and slower, but I expect it to be even more capable and reliable.
-
[Finished] Fox 8x8 V2
Zerobricks posted a topic in LEGO Technic, Mindstorms, Model Team and Scale Modeling
I think it's time to update and rebuild the legend.. Differences between the old and the new model: Because the model will be powered by 3x BuWizz instead of 4 AA battery boxes, it will be at least a kilogam lighter. Independent suspension will be changed to a live axle suspended pendular type. This will allow for much more movement when going offroad and more even weight distribution on the axles. Gear ratio will be changed from 1:3 to 1:1,677 due to the increased power of the motors, decreased weight and improved suspension - making the model 80% faster. NO MORE U JOINTS. Since no U joint, or CV can withstand the torque of an XL motor powered by BuWizz, the motors are now directly mounted on the hubs and steer with the wheels. Because there are no U joints the axle can be narrower by 4 studs, but I had to sacrifice a stud of ground clearance comapared to the old one. Servo steering - steering is now updated with 2 servo motors, each in their own axle. Front-most axle's steering angle is 25 degrees. Rear axles no longer need steering due to... Differential steering - since all motors can be individually controlled, the BuWizz's app allows for automatic correction of motor speeds when steering. This means the model can steer even tighter by reducing the speed of the inner motors when steering. Improved wheel mounting points using parts 24122 - the torque is now sent directly to the inside of the wheels without having to use 24 tooth gears and pins. I ordered the missing components and will send photos of the build as it progresses. For the bodywork I am thinking about a red cabine, but not sure which style - high and flat, or low which stick out in front further. Additional functions will be a winch in the front and possibly a crane arm in the back - I will decide on that after I see how it performs. -
Hi! Today I'd like to show very small MOC. This funny model has two motors, two wheels and one BuWizz :) Because of rotating center it's not easy to control it, but it is very funny. Instructions: https://rebrickable.com/mocs/MOC-28945/desert752/tumbler/#comments Thanks for watching!
-

[MOC] RC Police Motorcycle (futuristic)
syclone posted a topic in LEGO Technic, Mindstorms, Model Team and Scale Modeling
Good Day. Got inspired to build this after an in-game motorcycle from Honkai impact 3rd Original idea was to use 2x XL motors, but it was boring af. Next obvious step were buggy motors - allowing an approximate speed of 10km/h. It could probably pick up a higher speed with BuWizz 2.0's Ludicrous mode, but fast mode of BW v1.0 is enough to topple the bike over when taking high-speed turns. Unfortunately it does require "training wheels" to ride straight, as it would lean on one side without those after taking a curve without those. The bike does feature rear axle suspension, and small wheels have shocks as well. "01" stickers reused from MPATEV, "police" from 42047. Design-wise it belong to the same "universe" as my spaceship and racers - an Axos Police bike used to patrol within city high-speed tunnels and surface operations. Video&photos, C&C very welcome and appreciated))) Cya later! -

[MOC] KrAZ-255 (free building instructions added)
keymaker posted a topic in LEGO Technic, Mindstorms, Model Team and Scale Modeling
Hi, I would like to present you my last creation - ukrainian truck KrAZ-255. I was inspired by the model which is available in PC game: Spintires. The truck is built in scale 1:23. I tried to implement some key features of real truck, like suspension, drive train, details like engine and easy aplicable additions, which are present in the game. Enjoy :) Some details: - weight: 995g - dimensions LxWxH: 49x15x18 studs (without mirrors and additions) - live axle suspension - separate drive shaft for each axle - 6x6 drive, no diffs (L motor) - steering (M motor) - front and rear lights - working fake V8 engine - openable hood and doors - additions! Video: Instructions: https://rebrickable.com/mocs/MOC-55793/keymaker/kraz-255/#details There are some additions too! All of them are easy to connect or disconnect to swap to another. The first is simple crate: The second addition is prepared to wood transportation: The last one is the most advanced one - the crane. It is also partially remotely controlled. Functions: - rising/lowering two sections of the arm - crane rotation - gripper rotation - gripper closing/opening - extendable and lockable outriggers - openable maintenance section More photos: https://bricksafe.com/pages/keymaker/4.-kraz-255 I hope you like it :) -
[MOC] Bugeye RC racer
syclone posted a topic in LEGO Technic, Mindstorms, Model Team and Scale Modeling
Good Day. Continuing my futuristic series of racers (Ximos , Xonox & Azimus) is this one - popularly called "Bugeye" in Xalax races - Scarab in 1:10 scale Features: BuWizz v1 2x Buggy motors RWD independent suspension m-motor with return to center working steering wheel detailed 1:10 openable canopy light up power core and "dashboard" Overall this was just a filler build with very basic chassis that served as a test platform - bucket seat with actual driver, front suspension with only one shock (part #48912), independent suspension built around buggy motors. This was as well an excuse to use some "new" Bionicle parts on a build and SILVEEEEEEEEEEEEER!!!!!! In the end it turned out OK, but steering was somewhat weak leading to a crash into my pet roomba effectively destroying the car (driver was okay so crash safety test passed?). Incomplete LDD file (the chassis and seat is there, only missing bodywork, power core and steering wheel/dash assembly. download Bonus: Crashed car and fuming driver. Cya later! -
[TC16] Hex rover
Zerobricks posted a topic in LEGO Technic, Mindstorms, Model Team and Scale Modeling
For Mission to Mars I decidd to build more of a classical machine - a six wheeled rover. I was heavily inspired by the upcoming Mars 2020 mission (https://en.wikipedia.org/wiki/Mars_2020) and wanted to integrate a drone inside the model. First thing to build were the foldable Rocker-bogie suspension arms, which is unfolded with pneumatics Each bogie featurs a steerable front wheel which is steered using a worm gear mated to a small turntable. Drive power is carried through the turntable to the front wheel. The rear wheels are on their own bogie and are driven by a combiantion of Cv and universal joints: A longitudinal differntial is used on each drivetrain which allows for the speed differences between front and rear wheels when steering. Differential is especially required when steering at 90 degree steering angle, since the rear wheels do not turn at all. A driven differential is used to level the both sides of the suspension arms: Differential allows for the movement of suspension and keeps the body leveled. A single M motor is used to adjust the leveling angle via a worm gear. Suspension in action: In order to unfold the rover, a pneumatic compressor was installed near the front of the body: The same compressor also powers 4 small pneumatic cylinders which open up the tops sides of the rover: A large actuator lifts the base of the 3D camera (placeholder for Wi-Fi camera) on the top and reveals the propeller "drone" inside the rover: Since most rovers include some kind of an arm to dig and check samples, I decided to equip mine with claws. They are able to pick up and lift with the use of a single M motor: And finally the rover can launch the propeller drone using an RC motor powered by BuWizz: Here is the final wrap up of the features and characterisics: 38 x 25 x 15 cm when folded 41 x 25 x 57 cm when unfolded Weighs 1800 grams Powered by 5M, 2L and one RC motor Controlled by 2 BuWizzes Independent all wheel drive with longitudinal differentials Rocker-bogie suspension Pneumatic unfolding Raisable 3D camera arm - placeholder for a WiFi camera Leveling mechanism Drone launcher Working claws Unlimited steering angle And a quick video of the rover in action: -
[MOC] RC Small Red Roadster
syclone posted a topic in LEGO Technic, Mindstorms, Model Team and Scale Modeling
Welp, back onto 1/15 scale Made this little thingy in about 12 hours after Madoca's small supercar popped up in my YT recommended. BRICKSHELF (whenever uploaded) As with my Mini Nitro Menace, this year's Corvette wheelbase was taken as a base - should be compatible with the transporter truck - and so the build began. Of course, drive&steering has been done a million times already so this needed a cherry on top - the roof was what I was looking for. Making a chassis was dead easy with the slim wheels and by motorising each rear wheel independently, the need for a differential was eliminated. Thanks to the placement of the BuWizz in between the rear wheels, steering and roof motors could now populate the central tunnel and be hidden under the black 3x11 curved panels giving the interior a "cleaner" look. Now, bodywork ain't my strongest point, but I wanted it to be ferrari RED. This meant working with a very small inventory (for me) most of which you can see on the car Of course ricer butterfly doors were made to make it look cooler than it is. Have a nice weekend, Cya) -
I have done this MOC more than a year ago, but as for the Ford Mustang Hoonicorn, I can't make the video until the bug of the BuWizz (with the Fast and Ludicrous modes) is corrected. So I show you the pictures of the MOC for the moment. ^^ I have started to build this creation when I have received 2 RC motors. The purpose was to see what I could make using 2 RC motors and a BuWizz. So this thing is an airplane... until the bug stops the BuWizz. With the 2 RC motors connected to big wheels by the high output, this is very fast. How I had the idea to make this model? I wanted to make a cartoon / videogame style MOC, so I chose the most famous vehicle of Mario Kart videogame. The 2 RC motors are at the rear, the BuWizz is between them. At the front, there is the servomotor which activates the steering with an Ackermann effect, and there is a return to the steering wheel. The body work is easily detacheable. You have just to remove some pins, or simply to detach the blocs from the chassis. Video coming in a moment I think...
-
Hello all! I recently bought myself a BuWizz 2.0 and I've been experimenting with transmission designs using the new Chiron shifting bits and gears. I'm trying to figure out how to control a servo with the BuWizz unit in such a way that it only has full left, centered, and full right as options for a 3 speed transmission. The closest thing I can find is the light buttons in the control setup, but they only allow for center and full lock in one direction. Has anyone figured out a good way to control a servo like this or found a clean way around it? Thanks!
-
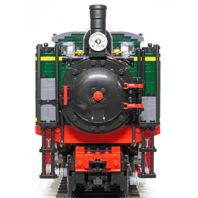
MOC: 1/22.5 scale Kitson-Meyer - Ferrocarril de Taltal. UPDATE: Now with video!
Sven J posted a topic in LEGO Train Tech
Dear trainheads, Finally, my new locomotive is ready! This time, I chose a prototype from quite a distant edge of the world - an articulated narrow-gauge (1067 mm) 0-6-6-0T "Kitson-Meyer" engine belonging to the Chilean "Ferrocarril de Taltal" (FCT; written as "Ferro Carril Taltal“ on locomotive number plates), or "Taltal Railway". Ten of these locomotives were delivered to the FCT by Kitson & Co. (Leeds, UK) between 1904 and 1907, and further eight engines later acquired second-hand. Over the years, several modifications were carried out: For example, all engines were converted to burn oil soon. Water and fuel capacity of some locomotives (including No. 50, the prototype for my model) were increased by adding welded enlargements on top of the side and rear tanks. "The Railway Magazine" gives a short description of the FCT (Vol. 90. No. 551, May-June, 1944, pp.158—159): More detailed information can be found in the books "The Taltal Railway" and "Kitson Meyer Articulated Locomotives", both by Donald Binns, which were my two principal sources. In general, very few technical information about the FCT locomotives can be traced. Despite searching for months, I wasn't able to find a detailed drawing. So I had to largely rely on taking measures from photos and on one single, distorted sketch on a data sheet describing the near-identical engines from the "Ferrocarril Tocopilla al Toco" - see below. (While there are numerous photos of the sole surviving FCT Kitson-Meyer, no. 59, nearly all of them were taken during the engine's last years in service, when it was already in a very poor state of maintenance, or since it has been on display as a monument. Because of that, it's difficult to conclude how it looked in better days. Nevertheless, I hope - and believe - that the model's overall impression comes close enough to the real locomotive's appearance.) The model is held in accurate 1/22.5 scale. It consists of quite exactly 3,000 parts and weighs in at 2.4 kg. The engine is powered by two L-motors (one mounted vertically in each bogie); each motor has its own BuWizz as a power supply and R/C unit (technically, one BuWizz would suffice, but this configuration allows for longer running times). The wheels come from BBB and the lighting equipment was purchased from Brickstuff, as usual, while the rods are 3D-printed parts of my own design. Enough said – enjoy the photos! Data sheet for the similar engines (though with different brake equipment and cab) of the "Ferrocarril Tocopilla al Toco": Detailed cab... ... and also smokebox interior, showing the exhaust nozzle, the base of the chimney and the boiler tubes: The cab roof is detachable. The ventilation flap really opens, you can see the lever for the steam whistle through the hole: The top of the Belpaire firebox is also detachable, giving access to the charging sockets and the power buttons: The lower part of the cab ladder is attached to the bogie and turns with it. Note also the chain which prevents the bogie from jackknifing in case of a derailment. Advanced lighting functions, controlled via two BuWizz channels: Before starting their daily trip into the Andes, engineer and fireman still have enough time to pose for a photo with their trusty old lady... ... while one of the brakemen uses the unexpected spare time in a different way. Well, but not for long. Soon "El Jefe" arrives in his flashy Chevrolet and critically watches his employees' activities... A few shots from the building phase, showing further details. First, the bogies with the motors. You can see the leaf springs underneath, as well as the brakes and (as on the real thing) only one single sanding pipe in front of the first wheel: The firebox once again: The main frame. The ashpan contains two weight bricks, which help to keep the centre of gravity low and thus to prevent the model from tipping over. And a view of the complete technical layout with batteries and motors. The multi-coloured bricks underneath are just the building stand. Full-resolution images can be found in my Bricksafe folder. At the moment, it’s too hot in my attic for filming, and I’ll go on holiday next week; but when I’m back, of course I'll shoot a video of the locomotive and its train, so stay tuned! Last but not least, I'd like to give my heartfelt thanks to all those AFOLs who attended the development of this model with their feedback and encouragement; and especially (though we've never met in person) to my dear "pen-friend" Sergio Monai @monai, whose multilingualism and commitment were an invaluable help during the research phase. Comments and criticism are of course most welcome! Thanks for stopping by! Best regards, Sven Edit: Video now available here! -
[MOC] RC Audi S3 Quattro with BuWizz
T Lego posted a topic in LEGO Technic, Mindstorms, Model Team and Scale Modeling
After a long and difficult builing proces, the project is finally done. The project started in early may, when I created a WIP topic here on EB. In the end, I set the bar a little bit too high as I was not able to get all the desired features inside. Audi S3 quattro Specs: - Dimensions: 44x19x14 studs (L x W x H) - Weight: 1300g - Estimated part count: 1800 parts - 4 PF motors Features: - Opnable doors and bonnet - Ajustable seats (2x HOGs) - All wheel/quattro drive with three differentials (2x PF L motors) - Steering (PF Servo Motor) - 4 Speed sequential gearbox (PF servo motor) - BuWizz 2.0 Power - Complete detailed interior with no mechanics/electrics visible I tried to use as many panels as possible which is IMO essential to get the best looking bodywork. This model consists of 45 technic panels. The stepper mechanism (located underneath the roofspoiler) used for the gear shifting is increadibly simple and works very well. The chassis is very stiff. the car can easily be lifted from the roof without damaging anything. To open the bonnet, you need to tilt and pull it at the same time. The LBG pin/axle connector slides trough the 5L axle with stop when you pull the bonnet. This system was necessary, beceause othewise the bonnet would have interference with the dashboard. Like in most of my other builds, I pay a lot of attention to the interior. I never want mechanisms visible or motors inside. You will find many details in the interior, like a handbrake, steering wheel, gear lever and door handles. When you pull the red part in the center up, the buwizz turns on/off. Too bad that the center dail which is placed upside down though. The seats can be ajsuted forwards and backwards by rotating the tan 20th gear. It is a very simple setup consting of a few gears, a worm screw and a 1x7 technic gearrack on which the seats are mounted. The building proces may be very interesting to read (if you have not seen it yet). Many interisting ideas and suggestions were posted that are not shown in this model. For instance, it should originally feature (air)suspension, but due to the airleaks and absence of differentials, it couldn't take corners propelry enough. Thanks to everyone who helped me with this build! You can check it out here: I wanted to make a video of it today, but my buwizz onstantly cut off power so give me a few more days... I won't make instructions, beceause I am busy working on intructions of another model which I will show this year as well. I hope you like it. Comments, feedback and constructive critisism are as always highly appreciated! -
[MOC] Mini RC Nitro Menace (8649)
syclone posted a topic in LEGO Technic, Mindstorms, Model Team and Scale Modeling
Having finally set free the buggy motors from TC16, it was time for something speedy again. Having seen the new 2019 transporter, that scale got me again, so making a car "compatible" with that set was very interesting. And having 8649 box on display made it clear which one I wanted 2 make. After a day of non-stop building this abomination somewhat resembling the original was born: The build was based off this year's Corvette wheelbase - 20x15 studs. 8649 has oversized wheels, giving it a cartoony apperance, but that wouldn't work for this one as space in the rear was required for a double buggy motor setup. Low profile tires in combination with old rims were a perfect tuner combo and gave resemblance to the 68.8 six spoke wheels. This also allowed to place the rear wheels much closer to the buggy motors using a non-standard 36z - 16z gears combo (1:2.25) with half-stud on-axis offset [see picture below] powered through the slower, outermost motor output to an approximate 2000rpm to the rear wheels. This gear combination resulted quite reliable when braced properly and withstanded all crashes, slides and racing that was thrown at it. In contrast, the front axle is a real mess. Having to place the m-motor right after the BuWizz made it really weak, and the flex axles make it hinge forwards. It does stay in place though due to all the bracing, so good enough? Also low-pros are amazing for drifting, which makes this vehicle very enjoyable to play with . Bodywork-wise it is NOT a "modern beauty" but carries the approximate lines of the original model. All the interior details are present - double NOS bottles in the rear, Red bucket seats and a tuner steering wheel (RHD version for some JDM powah ). Supercharger was a no for me - it looked terrible on the original. Big a$$ exhausts were kept to annoy the neighbours In the end it is not fully compatible as it probably wouldn't be able to drive up the ramps, but does drive cool. Welp, here's the video and LDD file https://rebrickable.com/mocs/MOC-26855/syclone/mini-rc-nitro-menace-8649/ Best Regards, Dan. Cya later!!! -
Tiger 4 x 4 x 4
Zerobricks posted a topic in LEGO Technic, Mindstorms, Model Team and Scale Modeling
After completion and playing with the Leopard for a few months, I noticed the model had a few shortcomings which I wanted to eliminate with this version. These include: Suspension oscilations at high torque High center of gravity Instability on rough terrain at high speeds Most of these issues were due to the usage of the torque tube suspension which is simply too heavy and unresponsive at high speeds. What I needed was to replace the live axle suspension with independent suspension while keeping the articulation needed for offroading. Here's what I came up with: Let's break down the suspension to it's basic components to better understand how it works: Colored green are the main shock absorbers. These caryy most of the wight and provide a high suspension travel Colored orange are the gearbox transfer arms which fix each perpendicular gearbox firmly to the suspension, thereby reducing friction and fixing the U joints to keep them from popping out. Colored black are the side beams which help guide the transfer arms and hold the suspension together Colored in red and gray are the two independent drivelines powering the wheels. Finally in transparent, the suspension arms are made as long as possible for maximum suspension travel. I built the first version with this setup, but soon discovred a flaw. The torque from the drivelines would push the suspension arms down, causing the suspension to stop responding (indicated with red and grey arrows in photo above). In order to solve this problem I added the suspension bridge above, colored in pruple. The suspension bridge performs the following functions: Compensation of the driveline torque Supports 20% of the model's weight Improves articulation when going over rough terrain With the suspension solved, I turned my attention to the chassis. I wanted a model with high torque and high speed. To achieve that I installed a two speed gearbox for each independent driveline powered by a total of 4 RC motors: Finally a very sturdy chassis based on frames was built to support the model. Each axle was given it's own independent steering with servo motor and each driveline has an M motor for switching gears. This redundacy means that even if half of the model breaks down, it can still drive back home. Next step was building the model in real life. Thanks to ForwART's custom stickers the exterrior really came to life: The doors can be opened, revelaing two seats and the steering wheel: Each wheel has over 6 cm of wheel travel, allowing the Tiger extreme articulation rivaling live axle setups: And let's not forget the most important photo of them all: Finally, since there is only so much I can tell in words, enjoy the video experience: As usual the LDD file of the model is available by clicking the photo or link below: https://www.bricksafe.com/files/Zblj/tiger-4x4x4/Tiger 4x4x4.lxf To summarize, compared to the previous Leopard, the Tiger has the following improvements: Improved stability due to the independent suspension and low chassis Higher top speed due to the gearboxes Eliminated suspension oscilation Improved performance at high speed thanks to lighter and more responsive independent suspension Improved maneuverability thanks to all wheel steering Sadly there are also a few drawbacks which I plan to fix in the future version: When pushing the model hard in Ludicrous mode and in low gear the 12 tooth bewel gears can get damaged and need to be replaced Low steering angle (18 degrees) Because only one servo motor is used per axle, steering is more prone to be bumped out of center. -
[WIP] Audi S3 quattro 1:12 RC - finished
T Lego posted a topic in LEGO Technic, Mindstorms, Model Team and Scale Modeling
Yes, yes yes... I am going to build another Audi After a very good result of my previous Audi, I thought with those design parameters I can't make a better car. Therefore I wanted to do something different, yet similar. I am going to scale up (slightly), and add a bunch of new features. I also realised that performance of the result won't be comparable to the previous one. The main reason for that is, that I am not going to use buggy motors. I recieved many questions like: "can I build it without expensive buggy motors?'' . I will be using these wheels: https://www.bricklink.com/v2/catalog/catalogitem.page?P=41896c04#T=S&O={"iconly":0}. I want the car to be 19 studs wide and have a wheel base of around 25 studs. The design parameters are: All wheel drive (quattro) with a central differential and without diffs on the axles. Front and rear independent suspenion. 50-50% (or close) weight distribution Servo steering (perhabs with steering wheel) Driving using two L motors 4 speed sequentail gearbox (servo operated) A good looking bodywork that reflects modern Audi's A good looking interior without any electronics/mechanisms visible Funcionality does not compromise for aesthetics (previous version is a great example) BuWizz power I allready have made some progress on the front axle. This is the result of many hours of puzzeling. It meets the requirements mentioned above. The buwizz is located behind the front axle and underneath the future dashboard. Axle for driving runs underneath the buwizz. I used these parts for the steering rack. It is connected to an eight tooth gear. On the same axles sits a 16 tooth gear which connects with the 20 thooth gear connected to the servo. The turning radius is great. I used these parts to stabilize the CV joints The next step will be to design the gearbox and rear axle. They will be integrated to save space. Comments, questions and feedback are highly appreciated! -
BuWizz Picnic & off road competitons 11-13 May
Zerobricks posted a topic in LEGO Technic, Mindstorms, Model Team and Scale Modeling
BuWizz Picnic and Competitions Free accommodation, food, drinks and animation. FUN, FUN & FUN BuWizz Team is happy to invite you all to our annual Picnic and Competition in a beautiful Lake Bled, Slovenia. The event is for all AFOLs and BuWizz fans that would like to meet up with the BuWizz team and big BuWizz international community. This year we will offer free accommodation to all contestant and BuWizz affiliates. There are 20 beds in the Villa. Extra beds can be arranged upon request in surrounding apartments and hotels. Food, drinks, and animations are FREE. Good company and FUN is guaranteed. Come to our event and have FUN with other AFOL’s. Free accommodation The Millhouse guesthouse offers 20+ beds in beautiful refurbished millhouse. It is in the most beautiful place on the planet. Bled is voted the most beautiful place in Europe and the World by Tripadvisor. Slovenia is the 2nd best country to visit in the world by Tripadvisor. It offers so much in a small space. In one our you can be skiing and an hour later swimming on a beautiful coast. BuWizz LEGO Truck Trial 11-13.05.2019 Truck trial in nature with 2 events: Truck trial Tracked vehicles Rally racers No limits competition Sumo (battle bot competition) Free food and drinks - Picnic in nature Food, drinks and crystal clear lake to cool down. Everything for a perfect day with friends and AFOLs. Animation and games We will organize some animation and games for you: archery, blowgun, Survival in nature crash course, and outside games for all (volleyball, swimming…) Please book ASAP as the number of places is limited. Believe us – it is worth it. It’s going to be awesome. For more info, rules and to book, please check the following link: https://buwizz.com/buwizz-picnic-and-competition-2019/ -
.thumb.jpg.be7f3ef7c74531e8a3ac98ae1e300e94.jpg)
[MOC] [WIP] Crawler crane in 1:20 scale
Bogdan Valceanu posted a topic in LEGO Technic, Mindstorms, Model Team and Scale Modeling
Hi guys, I’ve been following the forum for some years not, but I’ve been mostly a “lurker in the dark”. But, after 2.5 years designing and building when I had some spare time, I can finally share my 1:20 crawler crane MOC with you. For now it has somewhere around 40.000-60.000 parts (don’t know exactly how many). I’ve tried to build it as close as possible to a real crane in terms of assembly and functionality, with the usual constrains that you have with building out of Lego at this size and scale. As a disclaimer (and as a direct apology to Lego purists), the slewing bearing is not lego, but a cross roller bearing. The drive of the bearing is Lego, using the ¼ gear racks from the 42055 BWE. Took me about 6 monts to find a bearing that fits in size with the internal gearing of the gear racks, so that the driving axles still fit trough. Also, if you look really close, there were some occasions where I got out the Dremel for some adjusting (mainly panels), as I didn’t want to sacrifice strength, or design. Again, sorry to the purists. The crane is powere by 4 BuWizz, one in each central counterweight (between the crawlers), and one in each superstructure counterweights. I love the fact that you can still operate the BuWizz while it’s charging, so I have a power bank battery next to each BuWizz. Like this you get hours and hours of play time even with a large heavy model like this. The drive is as follows: - Each crawler is powered by 4 PF XL Motors (and one BuWizz per crawler) geared down 240:1. The motors don’t drive the ends of the crawler, but 8 sets of 2 gears underneath each of the crawler chassis. Due to weight reasons I used metal axles from Eezo’s Brick Machine Shop from the US. -Slewing is done again by 4 PF XL Motors which sit in the base of the superstructure. - Each winch is driven by a PF L motor. They were powered by 2 PF L motors, but because the winches are worm-driven I had some issues with them not running synchronous and overloading the motors. The winches can be individually taken out from the superstructure for maintenance and use 1mm wax rope. Structurally the main building technique for the crawlers, undercarriage and superstructure is an array of 5x7 technic frames. I’ll come back on another post with some pics of the various building techniques and technical details. Maybe I’ll also do a more detailed video on this sometime soon. The crane is not finished yet. I still need to build the superlift tray and telescope, which will be EV3 controlled so that it self-adjusts, and sadly I need to rebuild all the boom. Until a main boom length of 4.5m everything is ok, but with more than that it starts to bend too much. In the video below I’ve build 4m of boom, because it was pretty windy when we shot the video. The goal would be 7m someday. I want to keep the boom in the main boom+short fixed jib configuration. A luffing jib would be easier to lift (most large Lego cranes that I saw are built in a luffing jib configurations), but as I work in wind turbine assembly, I want to build the boom configuration that we use mostly. Here some pictures from the assembled crane: https://www.flickr.com/photos/164584645@N03/ And here a video about the crane (without wanting to advertise for the channel) As mentioned before, I’ll follow-up with some more pics from the building phase and building techniques. I hope you guys like the crane.