Search the Community
Showing results for tags 'Train'.
Found 774 results
-
Another one fictional loco. Retrofuturistic locomotive by Sunder_59, on Flickr
-
This is the "historic version" of my previous moc:
-
I went to look at the selection of Lego trains recently, and I noticed the heavy haul train is a similar remake to the cargo train, and I noticed the passenger train appears to be a remake of the 2007 one. What is going on?
-
I just need some tips to build a steam loco. what parts would look good? also, would a single axle front truck, unflanged driver unflanged driver flanged driver unflanged driver config work?
-
Hi, i was looking for the set in the lego online shop in Italy but it can't be found. Is it being retired?
-
This tube stock model is based on the 1996 stock that currently runs on the Jubilee and Northern lines. My goal was to keep them 6- wide, and worked to fit the proportions that came from that. As a result, the model uses small tram wheels, which introduces an obvious problem if i wish to motorize it. If anyone has any suggestions on how to do so i'm happy to hear them! The model roof isn't high enough to fit minifigures inside unfortunately, but removing their legs and clipping them to the inside can produce a nice effect. I'll possibly post some more photos in the near future, as well as a showcase video on my youtube channel.
-

Brickworld Chicago 2017 50th Anniversary Train Layout Collaborative
BMW posted a topic in LEGO Train Tech
In a previous thread, I proposed a collaborative Nostalgia Train Layout for this Summer's Brickworld Chicago: http://www.eurobricks.com/forum/index.php?/forums/topic/146028-brickworld-2017-train-collaborative/ This is a new thread is to determine participation so this is your chance to sign up :-) We hope that this collaboration will attract many participants by recreating the nostalgic look and feel of the older train layouts featured in Lego catalogs and the train idea book. Unfortunately Brickworld won't permit us enough floorspace to do the large "L E G O" layout I first proposed. Therefor we are moving forward with the alternative shown here: a moderately sized "50" nostalgia layout to celebrate 50 Years of Lego Trains! Here is a description: - The overall size is 16'x13' - Only official Lego sets will be featured: track, trains, stations and other sets. We have limited space so priority will be given to train specific sets first, then to general town sets as needed. Upgrades and part substitutions are fine as long as the trains still look original (for example replacing 12v traction tires, re-gearing an Emerald Night, etc). - This is a floor layout. The green and tan areas are created with colored roll paper taped to the floor. Tracks will be laid down over the colored paper. - Scenery will consist of loose trees, vehicles and figures placed on the paper between the sets (just like in the catalog pictures :-) Open areas will remain so people can step around for access. - Security will be addressed by having special stanchions up all show days (not just the weekend public days). These stanchions will feature a additional lower horizontal pipe to prevent young ones from entering the layout area. There should be about 30" between the stanchions and the outermost tracks. - Once we know what everyone is bringing, we will develop an operating schedule with hours when who's trains will run. The signup sheet is here: https://docs.google.com/spreadsheets/d/1TWLe2n5GGTr_nSR4KT4gXIht13L1dktrYV25H3z30pU/edit?usp=sharing Please list what you can bring and then Please signup by May 15. -
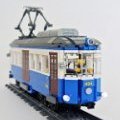
This was an experiment of automation of a tramway line with an old LEGO RCX brick: All sensors and cables are 100% LEGO. There are 8 light sensor, 4 (two couples, one couple for station and one for switch zone) on input 1 and 4 on input 2. 3 output, output A (station 1 - switch), output B (station 2 - switch) and output C (switch zone). Everything is handled by NQC program
-
Hello Guys! I am trying to find grease in America that would be safe to use on Lego 12v motors (from the 80s) without paying horrendous prices. I am wondering if anyone has found suitable grease in the U.S. I have had a few people tell e about ROCO 10905 but that would be $20 to have it shipped over here from Europe. Thanks -RailCo
-
Hi I present you my latest solution for opening train doors The mechanism is operated by a gear and the current setup is suited for 8 wide trains. However, this can be applied to 7 wide too and im working on a solution to place the operating gear on top.
-
IF THIS IS THE WRONG THEME PLS MOVE IT TO TOWN Hello AFOLs! I´m new to Lego Trains... I mean, i already had a few Train sets (7898,10194,7897) but I never built Train Moc´s or challenging Layouts. But i think this would be a cool Hobby. So i´ll build my own Layout, some Trains and a City. To build: 2 Trains with a few wagons. I thought about a cargotrain (like minecars) and a passengertransport. Buildings: Mine, Tenements, Rail Station and maybe some other Things if I get some more Ideas Layout: Actually i dont have a layout yet. But a idea. I have 68 of those: 37 of those: 1 of this: and 6 of those: I will Need some help at my layout. I dont have that much space but i would like to make a long track. I saw some Layouts, which had 2 Levels. I want do it aswell but which slope may it have? Thanks for Reading!
-
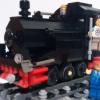
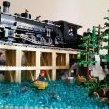
"The Crash at Crater Canyon (part 1)" is a thrilling two-part episode of the 1950s / 60s TV series Woody's Roundup. In this episode, Jessie the yodeling cow-girl is knocked out by Prospector Stinky Pete, as she had discovered Pete's plans for Sheriff Woody and the town he protects via the mine tunnels under the town filled with dynamite and nitroglycerin, set to blow up high noon the next day to destroy the town in a giant sinkhole. Jessie is then placed unconscious on a steam loco which is uncoupled from it's train and sent hurtling uncontrollably through the wilderness to Crater Canyon, where it will meet the Cannonball passenger train on the bridge. (Thus destroying the only fast way to town and keeping Jessie out of the way for the town to explode with Woody saving Jessie and not in town to stop Pete's plan.) Naturally, Woody rides out on his horse (Bullseye) to save Jessie,who has at this point woken up and discovered the throttle lever missing and steam loco's brakes disconnected. This episode ends with this scene above: Jessie reaching for Bullseye and Woody while both trains are barreling towards each other and certain destruction, while the timer on the clock in town square ticks ever closer to noon. What happens in the next episode will never be known, as the show was pulled from the airways as the film office where the future episodes and unfinished scripts were kept burned to the ground, destroying all the un-aired episodes. It is assumed, though, that Woody rescues Jessie, stops the town from exploding, and jails Pete all before the credits roll. The real scene takes place on my Eads bridge with engines 2 and 3, plus the passenger train for the latter loco. The yellow steamer is not even finished: the side not shown is missing one wheel and moving piston and was carefully staged to hide this fact! The story behind the picture is 100% fake, as the Woody's Roundup only exists in Disney / Pixar "Toy Story" films. (specifically the second one) I tried using every to make the story sound believable for that era of TV it was set in, such at the middle 1950's to early 60s when Howdy Doody and Westerns in general were very popular. What do you guys think?
-
Howdy! This is an update of a post I made earlier this year of a Durango & Silverton K-36 narrow gauge locomotive. I recently decided to submit this MOC to the Lego Ideas website as an effort to get Lego to produce more quality train sets. I shared my project with the good people at the Durango & Silverton Narrow Gauge Railroad, and I have been blessed to receive their full support and endorsement of my efforts. I consider the D&SNGR to be the finest railroad experience in the country, if not the world. If you haven't had the good fortune to ride with them, do yourself a favor and make plans to go as soon as possible. You will not be disappointed. Check out their Facebook page for information about the railroad and a look at their endorsement of this MOC. https://www.facebook.com/DSNGRR/ If you are passionate about Lego trains, as I am, please visit the Lego Ideas website and show your support for this MOC. Help me convince Lego to make this dream a reality and immortalize the great D&SNGR with the world's greatest toy! https://ideas.lego.com/projects/161449 Back to the MOC. Let's start with the engine. I am not a fan of Lego Digital Designer, so all of my MOCs are built through a trial and error evolutionary process. This is the first picture I stopped to take of the locomotive. By this point, I had nailed down the frame, wheels, and the driving mechanism. I opted for including all the power functions elements in the locomotive rather than the tender. Working on hiding the power functions. Taking shape Experimenting with the stack and the headlight. Finalizing front end. On to the cab. Getting close. Power functions access from the top. The motor makes a nice firebox. A glimpse of how the wheels are powered. Done! Now for a look at the evolution of the passenger car. Finally settling on the SNOT technique for duplicating the look of wood panels and windows with depth. Placing a horizontal stripe in the middle of vertically striped plates was a fun challenge. I eventually found a way to suspend the upper non window portions from the ceiling. I really enjoyed building this car. All done! I didn't really take any pictures of the caboose process. I essentially used the same techniques from the passenger car. The inside is pretty ugly though, as I only had so many pieces available in this color of red. Now for a few shots of the train all together! How about a little scenery? From the good folks at the Durango and Silverton Narrow Gauge Railroad! I took the train to Brickfair in Birmingham, Alabama, and it won staff favorite! Kids loved the bear in the cave. Brickfair is a blast. I highly recommend it to anyone interested in Lego or anyone with kids.
-
I finally took the plunge and bought my first PF train set. And I'm not ashamed to say I'm now addicted to making train things in LDD and Stud.io. Here's my first completed train car. A passenger car to match the colors of the Cargo Train set engine. As always (well most of the time), the build guide is available at charlesp.org
-
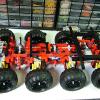
I just unboxed by first SBrick this weekend and this note provides a review of my experience thus far. First let me start with the background. I was fascinated by the development and release of the SBrick last year. It looked REALLY great, but I thought to myself, "while I'd love bluetooth controller, it looks great, but I don't think I could justify $60+ to replace IR if I only need one output." Of course there are a lot of people on this forum building their own homebrew bluetooth receivers, while they look incredible, these self-build receivers are way beyond the reach of my time resources right now. Yet, from long before the SBrick came out, I have been struggling with power issues in my two long passenger trains. The first train is my Superliner train with 7x 52 stud long cars, a dummy F40 and a powered F40 with a pair of PF train motors. The second train is my North Cost Limited with 8x 42 stud long cars, and an A-B-A set of locomotives (one powered with 2 PF train motors, the other two dummies). Examples of both trains taking standard lego curves can be found in this thread about a now aborted project to build wide radius curves. I made a 90° R88 right before ME announced their Kickstarter (man, that would have saved me a lot of time if I had known it was coming, but I'm still a happy man for the ME curves). Both trains predate the ME curves and I now have R88 and R105 curves (which both trains love and can take at full speed), both my permanent layout and my club's layout are both 9v, so I also want to be able to operate with the legacy R44 curves. I have had no power problems with the IR receiver powering a pair of XL motors and pulling VERY HEAVY trains (50+ cars in some cases), however, the combination of the train motors and these too heavy passenger trains taking multiple curves is just too much for the IR receiver. The original IR receiver can handle one 90° R44 curve without complaints for either train. Sometimes my club layout is large enough that I can use the full consist, but other times I have to set cars out if the straightaways are not long enough. As soon as the train is long enough to be in two curves the drag overpowers the IR receiver and it trips out for a few seconds... only to come back abruptly at full power and pull the magnets apart (in spite of the additional rare earth magnets). [Of course at this point in the review it is premature of me to say that it was the IR receiver that was tripping out, it could have also been the battery or the motors... but based on what I've found with the SBrick, it was the IR receiver. Anyways, back to the original timeline...] So for an upcoming show one of the other club members was talking about bringing 8 pf trains and letting the kids run them with IR controls. That is way cool and I think will be a huge hit with the crowd and the venue... but not so good for my running pf myself. For this show I don't want to do 9v (we are doing this one "just trains" and it will be our first show "on the floor"). So what's a man to do? Then I got to wondering about alternatives for IR in general, and higher power in particular. That was when I discovered that the SBrick can deliver up to 3A while the standard IR provides about 1A and I think the v2 provides up to 1.5A. I needed no further convincing and got one to give a try. I unboxed it two days ago. The first think that is clear, you need an account on the sbrick servers to configure your receiver. The SBrick folks have videos on line showing how to configure the software, but you first have to sign up for an account. This part was one of the things I did not like. Rather than simply offering a receiver, they are offering a social networking site that you have to pass through before you can get to your receiver. Not a huge deal, I just found the social networking a minor annoyance. It only took 5 min to turn off 20+ "share this" options, an equal number of "notify me when" options, and switch my profile to private. I'm sure many will find it a nice bonus, but for me I don't plan on spending much time on the SBrick site. I just want a plain vanilla train controller. This point could also be an issue in 5-10 years if they stop supporting the SBrick, but if it works it is worth the small risk for me. Once you have your account and the SBrick app you can go to the profile market... but none of the controls looked like the met my needs and what little documentation there was did not clarify things for me. So sooner than I had expected, I was off to design my own graphical user interface (GUI) on the Beta version of the designer site. First drawback is that it appears the site only works with Chrome or Safari browsers (not a problem if you already use one of those, but another minor nuisance if you don't... and here too, once I get my GUI working, I don't plan to spend much time on this site either). I was not able to find much documentation on the GUI design, so here's what I discovered: (1) I think you need an "exit" button to quit your control, at least the default GUI has one, it is a special object class and since it seems like a generally desirable feature I did not feel like exploring whether you can do away with it. (2) As I recall, there were three other types of objects- a 2D slider control, a 3D joystick control, and a push-botton. (3) While it was not apparent to this newbe, you do not define which specific output each control is set to (the SBrick has 4 outputs). Instead, you come up with a name for the particular output. I wound up using a single 2D slider and named it "throttle". (4) There are a lot of control settings you specify (or accept the defaults): min power, max power, default start position and power, "snap back to default start position when control released (like the non-train PF controller)" or "hold the last setting when released (like the PF train controller)". It takes some trial and error to get all of these settings to your liking. Each time you want to make a change you need to tweak the GUI layout in your browser, then download them to your device, then tweak the settings on your phone/tablet (more on that in a moment). It is nice that you can scale and position the various control elements where you like on the GUI layout. I think you can include multiple SBricks in the layout too, so a single controller could easily have room for 4+ trains on a tablet and 2+ on a phone. (5) It looks like the GUI is infinitely customizable, they offer 6-12 options for button styles, slider styles, background styles, etc. or you can upload your own artwork. (6) Unfortunately it looks like each GUI design is aspect ratio dependent, presumably to preserve custom artwork. So the GUI I designed for my phone was not available on my tablet and I had to redo it for the tablet at its aspect ratio. Here too, not a big deal given the simplicity of my controller. It's a bit like programming your microwave for the first time. It would be nice if they also had a "universal layout" option that could be used on many different platforms, by shrinking it to the most constrained dimension... maybe in the future. In the mean time, it would have been REALLY nice if they had an option to copy an existing GUI so that you could adjust it (if that option is there I couldn't find it). None of this is a deal breaker for me, just be prepared for a small learning curve as you get up to speed with their system. It took me an hour or two to get to a point that I was satisfied with. With your GUI designed or redesigned in your browser, you then go to an option on the SBrick app to go to the profile market to download a profile. Once downloaded the profiles are stored locally, so you could design a single throttle control in the GUI and then in the SBrick app make variants for several different locomotives, each with their own SBrick. Or as noted above, you probably could also make a single controller that controls multiple SBricks. One minor annoyance to me was that every time you went to the profile market it first insisted on loading all of the standard GUI options (none that I wanted) before it allowed you to get to your own GUI designs. Once the profile you want has been downloaded to your device, you then go to "my creations" to actually associate a GUI with an SBrick. I think you have to have the given SBrick(s) on initially so that your device can sync with the SBrick. Then you go to the configure page for the creation and this is where you tell it to associate the "throttle" in the GUI design controls with one or more specific output(s). I decided to use the Superliners as my test case since this train has more drag (heavier and longer cars). Since I have two motors I decided to put each on a different output from the SBrick. They were previously on a single output from the IR receiver. Not sure if this makes a difference on the SBrick, but it was easy enough to set the throttle to control two or more outputs. There are also virtual pole reverser switches similar to the little switch on the IR controller. Then you are ready to run your model... well... as they recommend, try it first to make sure you have the pole reversers set to the direction that you want. In my initial design I wanted a "kill switch" like the IR train controller in addition to the throttle. I could not see a way to associate two control elements to a single SBrick output, so away went the kill switch. Usually hitting the exit button will kill all motors, but not always (here too, more on emergency stop in a moment). I started with letting the throttle range from full reverse to full forward, but I found that getting it to stop at no power was very difficult. There was no "snapping" to zero. Since the Superliner and North Cost Limited are effectively one way trains, I made a second controller that is limited between zero and full power (no reverse beyond "hand of god"). So I can easily flick it to zero without worry. There might be away to fix this, but I haven't found it yet (remember, I'm a newbe at the SBrick). So I first had the model running with all of the PF innards exposed and it ran great. No problems pulling the entire train through two 90° curves and a small S-jog all at once. It ran for at least an hour with now power drops. So that's how I knew it was the IR receiver that was limiting me before, the IR receiver would not survive when the train was in the two 90° curves (R44). So at this point I stuffed all the PF wires inside the model and put the roof back on. Of course now it started misbehaving. !@#$% did I drain my battery so quickly with the heavy load? The IR would run for a few hours. Nope, that wasn't it. After some trouble shooting I realized that I had inadvertently knocked one of the connectors off when reinstalling the unit after testing. So only one motor was getting powered. As a result, the locomotive would stall once the train was in two curves. Apparenlt without intending to do so I discovered that the SBrick has a much nicer overload response than the IR receiver. The train sat there and the engine did not jet off at full speed, it did not move at all until I rezeroed the controller. In fact the single powered motor was strong enough to pull the train in a single curve with wheels spinning while pushing against the dead motor. Once fixed, I didn't even have problems starting in the most twisted part of my layout. That was when I decided to see how far I could push it. At the moment I have two single crossovers in my layout (I've been playing with the PF trains). So the train effectively went across two switches, through a 90° curve, then through two more switches back to the original track. It was as the locomotive was returning to the main track when it overpowered the rare earth magnets. So more than enough pull and something else failed before the SBrick was pushed to its limits. Now here's where I learned another important feature of the SBrick. Once I set the train running, I could go to blank screen on my device and the train would still run. Nice, you don't have to run down the batteries on your device to keep the trains running. My trains are in the basement and I went to get something upstairs. At one point in this trip there were two concrete walls between me and the train. When I returned the train was stopped. Did that stinking battery finally run out? Nope, it started right back up when I hit the SBrick controller. Okay, what happens when I turn off bluetooth on my device? Train stops. Cool. Lose contact with the controller and the SBrick stops. Turn bluetooth back on and the SBrick responds immediately to the next command. So there is a potential emergency stop if the exit button does not do it for you. So needless to say, I will be buying a second SBrick here in the near future for the North Coast Limited (hum... maybe I can build some of those other cars that I was forced to leave out for the IR receiver). For now I'm going to stop at two SBricks. It is nice to be able to completely hide the receiver, but probably not worth the extra $45 for me given the number of PF trains that I have. The extra power, however, is definitely worth it if you need it.
-
Stations and depot (inspired by real ones of my city) for my tramway line:
-
Hello ! Some words about me: my main Lego theme is technic, but I like trains and city also. I decided to make some train releated MOC under the aegis of Spark Industries. There are many plans, but one came true, and another one is almost finished. So I'd like to show the products (and plans) in this topic. The goal: Build not too complex (meaning: not display only), fresh and recognizable MOCs with good functionality for the existing Lego train world. Please comment, advice... (I'm from Hungary, sorry for my bad English)
-
Our first three types of custom train tracks are ready and available in our Bricklink store. The goal is to make an extended track system for LEGO trains so you have a much higher flexibility in building your layout; just like we did for the monorail. Let us know if there are any other types of track you would like to have... FYI: the tracks are printed with a custom developed Dark Blush Gray abs filament so that our tracks match the color of the LEGO RC tracks: the cross track below is 3D printed, the straight track below is a genuine LEGO track.
-

Bricks Britannia at the Kent and East Sussex Railway - April 2017
ahardy posted a topic in LEGO Events and User Groups
The Kent & East Sussex steam railway is pleased to announce its first LEGO® show. This exhibition of stunning models, created solely from LEGO® bricks, charts the history of Britain from the Neolithic Stonehenge through to the supersonic age of Concorde. Featuring over 30 models created by Bright Bricks (as featured in Channel 4’s Inside Lego at Christmas) and using hundreds of thousands of LEGO bricks, Bricks Britannia opens on April 1st at Tenterden Town Station. The centrepiece of this amazing exhibition is an eight metre long model of Flying Scotsman, the world’s most famous steam locomotive, and three Pullman carriages! There's also an opportunity to join our workshops where both young, and young at heart, can build their very own LEGO steam locomotive and Pullman carriage. These are exclusive to the K&ESR and available at the special price of just £10 when booking online. This exhibition is FREE to K&ESR ticket holders - SELECT YOUR DATE TO BOOK ONLINE BELOW & SAVE 10%! www.kesr.org.uk/bricks -
Behold, my first large scale locomotive MOC, the EMD SD70ACe. The engine is 7 wide, and runs 48 studs in length from coupler magnet to coupler magnet. Everything is brick built, not a single sticker to be found on it. Motive power is provided from two PF Medium motors each driving an A1A wheel set. A PF receiver sits where the dynamic braking grid would be, and the battery box is accessed through the hole between the air horns. I know the locomotive number belongs to a GP-38, but it worked in the size. Given the motor locations, there wasn't any room to build the internals for the cab. And now, a shot of the internals. You can see the two PF Medium motors rather easily in here, along with the battery box and PF receiver. Given the generous length of the locomotive, I plan to upgrade it to two L motors next time I hit the LEGO store in Koln. It hauls a lot of wagons, but lacks speed. If the motor upgrade doesn't speed it up, at least I'll be able to haul a lot more. I'd like to thank everybody that's posted their MOCs up here. I've cribbed a few ideas from stuff to improve the looks.
-
Inspired by TAF and Vivalto Italian regional trains, I built a double-decker, 8-wide train. Click pics to zoom. Some statistics for the 1+4+1 configuration: ~3000 bricks, 226 studs lenght, 140 passenger seats. PF motors, large PF battery packs, lights. Total weight: 3.84 kg including 6+6 AA batteries. Mandatory video:
-
Hi Guys, I got a bit carried away with my latest lighting setup and thought I would share my progress. I started off just wanting front and rear white/red lights but... well video's speak louder than words.. I have an ESP8266 onboard programmed with the Arduino IDE. The motor is controlled with a RC brushed motor ESC and the LED's (6 in total) are all programmable so they only need 1 output pin for all 6. It is communicating by MQTT and at the moment I am using Home Assistant just as a test controller but the plan is to use it with 4DBrix's nControl software as the features become available. A benefit of using Home Assistant lets me control it from my phone or PC. It will work across the web as well but I don't really have the need to control my trains from outside the house. Not yet anyway... I'll get some video's about the build up when I can Mike
-
Hello all, I have a quick question about the BBB medium wheels. I noticed many people have made MOCs with them and have been able to make the non-flanged wheel and the flanged wheels (i.e. an 0-6-0) be right next to each other. I am not sure how people did this because my non flanged wheel is the same depth as the flanged wheels. Also, I was wondering how people put traction tires on these wheels. Thanks! -RailCo
-
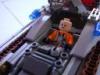
Now this is going to be a bit of a funky post I think. To be honest only 15% of the content is Lego (and none of it are my own MOCs either!) but I feel the subject is far more befitting of the Train Tech forum than the Community forum, because in particular today I got to go inside the real life Maersk locomotive. Seeing how 10129 is one of the most beloved Lego sets of all time among train fans; getting to go inside the real thing is a special treat. To be technical,the engine I went into today Dynarail 644 is not the same locomotive type which set 10129 is based on, 644 having received its Maersk paint on the ATSF, and the Lego set being based on a Norfolk Southern SD40 unit. However, if you happen to be one of like the five lucky individuals with a stockpile of Maersk blue Lego bricks who is considering adding an additional Maersk locomotive to your Lego collection, 644 is a great prototype that is visually distinct from the original Maerks unit (its wide body would make Power Functions easy in even a six wide build). Also it is a bit of fantasy fulfillment, being able to climb into the cab of a Maersk unit like the minifigures on our Lego train sets get to do everyday. Also as part of the train show today I did get to stop by the ULUG group. As mentioned before, I am not a member of the ULUG as of now; but I like to see their displays. In particular, a large portion of today's display was significantly different from the last ULUG display I saw a few months back, so I gotta give them credit for constantly being able to mix things up with their work! My pictures in the ULUG display came out blurry, so I didn't take a lot of them, but I hope you guys will enjoy what you are able to see. Forgive the blurry photo quality. The ULUG train display as always was a hit with kids and families. Here we can see the Disney Castle set surrounded by a lot of the smaller Disney Princess sets, situated next to a classic space monorail display. Another blurry picture of the ULUG set up (I never have had good luck taking photos inside an event such as this.) The layout's railyards are in the distance, with a display of mosaics, Star Wars, Technic, and other stuff in the foreground. The ULUG had a good location, between the Sherman Hill HO Layout display and the Rio Grande Modeling and Historic Society display. Honestly due to the traffic flow in the event, the Lego layout was the first layout I saw during the trip. Now for the 644 the Maersk unit. This was one of several Maersk units which worked different US railroads, and the only one I know that is in preservation. The unit's owner, Chris Fussell is planning on restoring it to its original Amtrak paint; but for now it wears the Maersk heritage proudly. Unit owner Chris Fussell in his appropriate "Maersk Blue" shirt opening up the engine for us. Unlike the Norfolk Southern unit set 10129 is based on, 644 worked for the ATSF (Santa Fe) railroad. Hence why the paint patterns evoke the Warbonnet scheme used on the Superchief. This is what it looks like from the cab of a Maersk painted unit. If you have been wondering what your minifigures could see out of your 10129 set, it probably looks similar to this. The cab of the real thing is far more roomier though, with three seats, and standing room for six or so people. Chris in discussion about his Maersk unit and its sister Daylight unit coupled behind it. Eventually the two units will return to their proper Amtrak paint; but for now they still wear their more ostentatious colors. If I had more time and money I would love to MOC up these two units in Lego. YouTuber and fellow Blogger "SconeEmpire" taking in the view from the engineer's seat of the Maersk unit. I hope you enjoyed my little Maersk locomotive interlude. I had so much fun with 644 today, I am really tempted to start seeing if I can capture the unit in an LDD MOC sometime (who knows, if I start that maybe this will become a work in progress thread someday? ) Although seriously, if any of you guys want to beat me to the punch in bringing in some more Maersk power into Lego, I'd be happy to see it! Until next time.
-

A Pair of Wide-Vision Burlington Northern Cabooses - 6 Wide MOC
Freezingvettes99 posted a topic in LEGO Train Tech
I wanted to share a couple of my Burlington Northern Wide-Vision Cabooses with everyone. I built them a while back and really like how they turned out. I believe I was able to capture the prototypical look fairly well, it took me several attempts to get the height and length just right before I was happy with the result. I went with the later version of the BN Cascade Green caboose with the windows welded over for simplicity purposes and the BN Freedom caboose was that way so I didn't have to decide on that. Feedback always welcomed. Untitled by freezingvettes99, on Flickr Untitled by freezingvettes99, on Flickr 2017-02-16_09-42-37 by freezingvettes99, on Flickr 2017-02-16_09-42-18 by freezingvettes99, on Flickr