Search the Community
Showing results for tags 'SBrick'.
Found 171 results
-
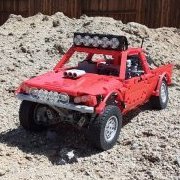
How about that little cross between mud and go on the rocks? Crawler 4x4 always ready for it! Still would! Its wheels are shod with tires RC Rock Crusher X/T 1.9, coupled with portal axles and two motors running by SBrick and LiPo battery box - we have an off-roader with excellent maneuverability, suspension geometry and a low center of gravity due to the unsprung axles. Crawler 4x4 built under the rules of the forthcoming Off-road trial competition in Moscow, at the same time. I tried to build the chassis in such a way as to achieve maximum throughput and maximum flexibility - namely, so this chassis can set the wheels of virtually any size from 62 to 108 mm. The body of the model removable. This allows the chassis to this every body, even though the truck, even an SUV. Get more photos on my blog of flickr
-
REVIEW SBRICK PLUSINTRODUCTION It feels like yesterday, but it's already over two years ago that Vengit introduced us to the SBrick! The SBrick is a versatile LEGO compatible component, used to control your PF elements via a smart phone or tablet. The Kickstarter project reached its goal and SBrick was born. Two years later a new family member is introduced, the SBrick Plus. Sounds like an SBrick with additional functionality. Well, let me tell you a secret...it is! The form factor of the SBrick Plus has remained the same. So have the four connectors. The SBrick Plus is fully compatible with the SBrick. The difference between the regular SBrick and the SBrick Plus is that the Plus version is able to communicate with the two available WeDo 1.0 sensors: Motion sensor Tilt sensor The following descriptions have been copied from LEGO Engineering.MOTION SENSOR The motion sensor (part 9583) can detect objects very roughly up to 15 cm away, depending on the shape of the object and other properties (reflection, colour, etc.). It is sometimes called a distance sensor. Very technical details: The motion sensor is an active IR (infrared) sensor. One of the visible parts emits a light while the other is the detector. The LED light is pulsed at 7 kHz. You might be able to see (and show) the flashing light using a camera phone. The sensor can work with 5 to 9 volts, with the WeDo set at 5 volts. TILT SENSOR The tilt sensor (part 9584) detects changes in position. It can detect six different positions: tilt this way, tilt that way, tilt up, tilt down, no tilt and any tilt. On occasion, the vibration of the motor will interfere with the accuracy of the tilt sensor. The fix for this is to design a construction in which the motor vibrations are isolated from the sensor. In this topic I will demonstrate several aspects of the SBrick Plus, starting with the WeDo 1.0 motion sensor. This review will be expanded with more information and videos later.TEST MODEL To test the SBrick I have made MOD of two copies of the 42035 - Mining Truck. The only extra parts I used are some PF elements: 1x PF Servo Motor 1x PF L Motor 1x PF Battery Box 1x PF LEDs 1x PF Extension Cord In the rear of the vehicle I have mounted the PF Battery Box. The SBrick Plus is tucked away in the middle of the vehicle.MOTION SENSOR For my first video, the Motion Sensor is attached to the roof of the model. For this video I have connected the SBrick Plus to an HTC running Android. In the introduction you can see the SBrick Plus test screen. Here you can connect to the SBrick Plus and test the ports. I have attached the Motion Sensor to Port A. The distance measured by the sensor as I move my hand closer is displayed next to the port. I have also attached a set of PF LEDs, which can be tested by sliding the Port B slider. In the profile designer I have created a sequence which will blink the LEDs a couple of times. Creating sequences is something you can do with the regular SBrick as well. So, we have blinking LEDs and we have a motion sensor. Now what?! Well, we need to create a circuit to let the sensor values determine the action. As you can see in the video there are different Logical options to make a circuit. For this demonstration I will use the "On change" option. When my hand is close to the object, the circuit triggers the sequence called "Flashing Lights". Let's take a look at the final result. As you can see the Flashing Light sequence is nicely started when my hand is close to the sensor. The WeDo sensors aren't very accurate, but they are accurate enough to detect an object in front of the sensor, which results in lots of possibilities. CONCLUSION I needed some time to get used to creating circuits and sequences, but when you have done this once or twice, it's really easy to accomplish. The profile editor truly is a work of art. I love the fact that you can modify the graphical elements of all controls, resulting in a personalized smart remote. Do you need to get an SBrick Plus instead of a regular SBrick?! That obviously depends on your need to use WeDo sensors. When you are creating demonstration models, the SBrick Plus adds a lot of value. When you like to manually control your model, the regular SBrick might suffice. Is your regular SBrick depricated now? No, it definitely isn't. SBrick can be mixed with SBrick Plus in the same profile, so there's alway use for your current SBrick. Controlling your model with a regular SBrick, while the SBrick Plus listens to the sensors and acts accordingly. That's a win-win situation. All things considered I really like the SBrick Plus, so I definitely recommend getting one, or two. I will add more information to this topic in a later stadium. More information about this project and the possibility to back it can be found on the Kickstarter page of SBrick Plus. SBRICK PLUS TESTED BY PAUL Here is another video made by Paul "Crowkillers" Boratko.
-
Controlling models with Sbrick
technic_addict posted a topic in LEGO Technic, Mindstorms, Model Team and Scale Modeling
I bought some Sbricks and connected them to an IOS phone using a slider profile for steering and acceleration and found it very difficult to drive. I had concerns this would be an issue but had hoped it would be ok. Does it take a lot of practise? I am driving a small quick go-kart vehicle. Any recommendations? -
[MOC] Mini Trophy Truck
offroadcreations posted a topic in LEGO Technic, Mindstorms, Model Team and Scale Modeling
Hello all, While I was waiting for my BL order for my TC10 entry, I worked on a small trophy truck. It has indepentent rear trailing arms, drive from 2 L motors, steering from a Servo motor, power from a 9 volt battery through a Minizip cable, and an Sbrick. It isn't complete yet. Some pictures: Thanks for reading! -

[MOC] RC Off-roader With SBrick
KevinMoo posted a topic in LEGO Technic, Mindstorms, Model Team and Scale Modeling
Like I said in my last topic, I’m a big fan of Japanese cars. Today I’m bringing you a new MOC based on a popular off-roader. Inspiration & Goals This MOC was inspired by the Toyota Land Cruiser Prado series. I didn’t want to make an exact copy of the original car, but focused on the chassis and drivetrain. Also it should have a full-length body with five openable doors. Specs / Features / Functions Dimensions: 420mm(L) x 210mm(W) x 190mm(H) Weight: 2.1Kg Parts count: 2700 pcs Propulsion: PF XL motor x 2 2-speed gearbox Working steering wheel / headlights / taillights Rear alxe: live axle with diff lock Front axle has independent suspensions with positive caster angle. More Details Compromises & Inperfections 1. The model has about 2700 parts. Given the functions that I achieved, that’s a huge number. I was expecting it to be around 2000. 2. It is WIDE. Even with those beveled window frames it looks wide. (It is wide. The body covers the whole tyres from top view) 3. Gear ratios are 5:1 at 1st gear and 5:3 at 2nd gear(differentials not included). Safety fuse kicks in quite often when steering at full speed on 2nd gear(As shown at the end of the video). I have to use 9V AA battery pack instead of Li-Po and stick to 1st gear most of the time. 4. A real Land Cruiser Prado has central differential & central diff lock. They were on my prototype. Rear diff lock and central diff lock work simultaneously. But they are quite unreliable. 12-teeth half bevel gears inside the central diff got damaged after only a very short period of test drive. I have no choice but to remove them from the drivetrain. A short video showing the prototype: Anyway, I’m basically satisfied with the overall performance and looking. Building instructions will be ready in a while. Hope you enjoy! -

Hardbody Stance Pickup
filsawgood posted a topic in LEGO Technic, Mindstorms, Model Team and Scale Modeling
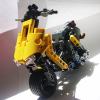
Hi guys! Today I finished another lowwww project along with Drift Van and Subaru Forester. Now it's Slammed JDM pickup. At this time, I was inspired to build a pickup Nissan Datsun (Nissan Hardbody) mid-90's in D21 body The model is based on rear-wheel drive chassis with independent suspension front and rear axle. Buggy motor is responsible for the nimble movements of pickup space, and servo motor helps to dodge all of a sudden in the way of obstacles. Controlled all so beloved by me, SBrick, and electrician feeds LiPo pack. With the receiver from LEGO model is unlikely to make friends, because he would kill her at first dumb on turn - very high speed, but not so on the reliability front end :) The design of the rear suspension allows the use of one buggy motor and a pair of L-Motors, which are also good model piles, given that the pickup weight is 750 grams. More photos you can find on my blog and my flickr -
[MOC] Churchill Bridge Layer
Tommy Styrvoky posted a topic in LEGO Technic, Mindstorms, Model Team and Scale Modeling
Lego Churchill bridge layer by Tommy Styrvoky, on Flickr The Churchill AVLB (armored vehicle-launched bridge) has been one of my projects that I have wanted to see operational in Lego form. It is a rather unusual vehicle, as it's task is simple, no bridge, no problem, it brings a mobile bridge to where bombed out bridges are. There are many different bridge layers built in lego, though most rely on having power being routed to the bridge to unfold it. I wanted to replicate the original mechanics of the real vehicle because the vehicle utilizes a single large hydraulic cylinder to move the bridge into position. This cylinder is retracted for one full stroke to transfer the bridge, from the vehicle to at 90°, and then locks a lower carriage, and the cylinder extends for a full stroke. This mechanism is rather simple, but with the Lego system, this was a difficult challenge to solve. Lego's current array of pneumatics and linear actuators are too small and weak for this task, as I attempted to build this vehicle two years ago, but abandoned it, because two linear actuators weren't powerful enough to lift it. A custom brick-built linear actuator was utilized with a rack and pinion, powered by a L motor with a 1:24 reduction. This provided sufficient power to lift the ≈1kg bridge, though because of the length of the arm, the mechanism has to lift ≈9 kg. This required a robust design for the actuator, and it had to be rigidly connected to the hull. I am very pleased with the results of this model, and it performs great, and looks much better than my old Churchill VII. This is because I changed the spacing between the road wheels to 2.5 studs, instead of 3.This was the biggest issue with my old Churchill, I wanted to build another churchill, but build a different variant. I originally wanted to build a AVRE (armored vehicle royal engineers) with the spigot mortar, and small box girder bridge, thought that variant was too similar to the Churchill VII. I had thoughts of building the model at the same scale as Sariel's Churchill, as it would be a fun, compact build that could use linear actuators for the hydraulics. Though a larger scale version would be more of a challenge, and be more impressive, as the model can lift a 73 stud long bridge. This vehicle is based off of the hull of the Churchill IV, it has some minor external differences, the most noticeable is the crew hatches on the sponsons are square. One of the minor issues is that the tank is unable to cross the bridge, but that isn't a flaw with my model, it's just a lack of traction in Lego's tracks, maybe the rubber pads from the nexo nights would work, though It's inaccurate for most vehicles, as few vehicles had rubber tracks at the time, and it makes the tracks too bulky/expensive. This model may be my last model in light blueish gray, as I recently aquired a large purchase of DBG parts from Bricklink for future models, also this model used almost all of my light bluish gray tiles and 1x plates, for the bridge and sponson details. The old abandoned version from 2014 Lego Churchill Bridgelayer 1/15 (RC) by Tommy Styrvoky, on Flickr Lego Churchill Bridgelayer 1/15 (RC) by Tommy Styrvoky, on Flickr lego churchill Bridgelayer 1/15 (RC) by Tommy Styrvoky, on Flickr Lego Churchill bridge layer by Tommy Styrvoky, on Flickr Lego Churchill bridge layer by Tommy Styrvoky, on Flickr Lego Churchill bridge layer by Tommy Styrvoky, on Flickr Lego Churchill bridge layer by Tommy Styrvoky, on Flickr Lego Churchill bridge layer by Tommy Styrvoky, on Flickr Lego Churchill bridge layer by Tommy Styrvoky, on Flickr Lego Churchill bridge layer by Tommy Styrvoky, on Flickr Lego Churchill bridge layer by Tommy Styrvoky, on Flickr Lego Churchill bridge layer by Tommy Styrvoky, on Flickr Yes the bridge is strong enough to hold a variety of Allied armor. Lego Churchill bridge layer by Tommy Styrvoky, on Flickr My next MOC to present, though college has arrived, and I have a lot of editing to do for that model. I have to figure out how to get unofficial ldraw parts into my parts library, as I want to do some renders of the internals, and make instructions... it's packed inside with stuff. -
[MOC] LEGO Technic Wall-e
falconluan posted a topic in LEGO Technic, Mindstorms, Model Team and Scale Modeling
Hello, all, I'd like to present you my third MOC: A lego technic Wall.E This MOC was motivated by Lego ideas wall e 21303. Since there is hardly any room left for motorized aside from the 2 tracks, I decided to make a motorized technic version from stretch. The goal is to make a motorized version as small as possible while packing enough motorized functions. The end result is a little bigger than the ideas one. It uses 7 motors and 2 Sbricks in total. The Sbricks can be substituted by 4 IR receivers of course. Though some parts at the back of the model need to be removed for the additional receivers. The motorized functions are: 2xL motors for propulsion (one for each track) 1xL motor for head rotation 1xL motor for head pitch 1xM motor for body lifting 2xM motor for the arms 1xAAA battery box It has some manual functions too: Like the ideas one, both arms can be moved back and forward. Since its arms are based on the large LA, they can extend and retract. It has three fingers on each hand. Its cargo door can be opened by hand, however, the cargo space are taken by the battery. Photo instructions and RB link is here: http://rebrickable.c...o-technic-walle Video: (please let me know if you can not watch the video) Now, photo time! I was trying to make it stand-able, but the result is not very good. The body can only be lifted by 4 units or so. The difference is showed below: Here is it comparing with 21303: Some details: The cargo bay is a little crowded... The motors used to control its head movement are part of its head structure. By doing this, 3 M motors, the battery box, the body lift mechanism and 2 Sbricks can fits in its body. The underside is very simple: More photos can be found at: http://bricksafe.com...lconluan/walle/ Hope you like it. Thanks for watching. -
Hey there guys! I finally got myself an S-brick, i wanted to test it out so i built this go-kart. Functions: - 2 gears gearbox - auto clutch - braking system - differential The vehicle turned out to be pretty fast and with a great handling, unfortunately i need to wait some better weather to shoot a video of it and a bigger place as well. Like in a real kart there's no reverse gear so i'll probably need something like a parking lot to test it out. The gearbox is working great with the buttons of the S-brick operating the M motor I hope you'll like it!
-

[MOC] Avtoros Shaman 8x8
Madoca 1977 posted a topic in LEGO Technic, Mindstorms, Model Team and Scale Modeling
Hello everyone! Since TLG released 76023, I had been waiting for affordable Technic set which includes so-called Tumbler Tires. So I jumped at 42050 Drag Racer. I also bought some extra tires separately, then revived old project which had failed three years ago. Avtoros Shaman 8x8 Building instructions: Rebrickable Weight: 2550g - 4x L motor for 8 wheel drive - 2x Servo motor for 8 wheel steering - M motor for switching steering mode (AWS and crab) - M motor for winch - 3x LED for front and rear lights - 2x SBrick powered by 2x 8878 rechargeable battery box - Independent suspension for all wheels - Working steering wheel - Openable hood, doors and roof hatch Back in 2013 As you may know, real Shaman is which can go through almost any kind of terrain. It has three steering modes and can scale 45-degree incline. On top of that it is amphibious. Seeing pictures and videos, I instantly fell in love with it.When I started the project, I was too ambitious to realize all features above. Sadly I could not build even steering mechanism while keeping all wheel drive and independent suspension. So I changed the project to building another 8x8 vehicle. It ended up as my Tatra 813 Trial Truck, but that is another story. Focus on characteristic features Two months ago, I suddenly came up with an idea that enables both normal AWS and crab steering. In the case of four-wheeler, you can do it by switching rotation of second Servo motor for rear axle. But in eight-wheeler like Shaman, you should change turning radius of second and third axle. In normal mode, the steering angle of inner two axles is smaller than outer axles. But in crab mode, all axles should be steered at the same angle. This is the basis of steering idea. I used the way of fixing/moving pivot of steering linkage. A: There are two 7L steering racks connected to 7L beams. Front rack is connected in the middle of beam, rear is one stud backwards. Both ends of beams are connected to steering arms of each axle. B: In normal mode, rear rack is fixed by 12T bevel gear. So the fixed pivot of 7L beam is its 5th pin hole. Which makes front end of beam moves twice as rear end does. That means the steering angle of 1st axle is twice as 2nd axle. C: In switching crab mode, 12T bevel gear moves one stud forward and fix front rack. Fixed pivot is 4th pin hole of beam. Which makes both ends of beams move equally. That means the steering angle of 1st axle is the same as 2nd axle. And there is one more twist. D: I put main steering rack (moved by pinion gear) on one stud forward of 7L beam's front-end (which means 9L beam’s front-end). Seeing from the pivot point, this rack is connected to farther than the point of front steering arms connected. So front steering arms always move slightly shorter than main rack does. When Servo fully turns 90 degrees, pinion gear moves the rack in one stud sideways. Steering arms move less than one stud. This was necessary for keeping CV joint (connected to steering hub) rotate smoothly even when fully steered. Challenge and compromise First of all, this MOC is NOT amphibious. It is too heavy to float. And because of driving motors of low position, chassis is not waterproof at all. So it is not recommended driving it through even shallow water pool. My aim was to achieve decent crawling capability. But I had to lower the bar because there was no room left for portal/planetary hub reduction. Without them, heavy load from 81mm tires directly goes to 12T half bevel gears. First attempt was using two XL motors geared 25:9. I put each motor for left/right side of axle. The result was unsatisfied. Even when climbing over small obstacles, bevel gears often slipped and got damaged. So I replaced them with four L motors geared 3:1. Each one drives a pair of half axles. Thanks to their good speed and smaller torque, new drivetrain proved to be more reliable. Although bevel gears were still slipping a bit, I accepted overall performance. The picture above shows two L motors for driving right side of axles. The power functions switch for changing rotation of rear Servo motor is synchronized with moving steering pivot mechanism. In crab mode, rear 4 wheels steer opposite the same direction as front wheels. As always I used few of non-Technic parts. Big roof tile was used for saving weight, curve slope parts were better choice for filling the gap. LBG axles sticking out the roof are visible indicator for steering mode. They are mechanically connected to switching mechanism. In the video you can see how they work. Instructions available at Rebrickable. Building it in red is possible by using red parts instead of white. I hope you will enjoy building! -

[WIP] 42043S (RC Arocs 3245 with SBrick)
Sphexish posted a topic in LEGO Technic, Mindstorms, Model Team and Scale Modeling
Greetings! After coming out of my Dark Ages and tackling both the excellent Ultimate 8043 & 42009 (see below) designed by Jurgen Krooshoop, I was hungry for another Lego Technic challenge. But I felt rather lost at this point: without a large collection of loose Technic pieces at my beck and call, motorized MOCs which weren't heavily based on existing Lego sets would require some hefty Bricklink investments from my part. Fortunately, a fifteen-percent-off-everything anniversary sale at a local toy store with an expansive Lego section made the choice for my next project a lot simpler: they had the 42043 Arocs set that had already been calling out to my wallet since way back in oh-fifteen. They also had a certain little gizmo called an SBrick in stock, which I had heard quite a few things about. My previous builds had involved standard PF receivers and remotes, so it seemed like an interesting new challenge to incorporate this new-fangled blue-toothed thing-a-ma-jig into my already-slightly-more-challenging attempt at "RC-afying" the Mercedes. I'm already a little way into the project, but I've already made a few false starts and moronic missteps, so I figured it might be educational for others to document my frantic flailing about experiences, so that they might avoid my (myriad) mistakes. The first thing I did, of course, was to order the necessary PF components: a Servo Motor, an L-Motor, an 20cm extension cable, and a couple of PF lights. In hindsight, this already turned out to be my first mistake: I hadn't done my research properly and hadn't realized that the SBrick requires an extension cable to be hooked up to a battery box. This meant I was probably going to be one cable short, since I didn't think the cable for the L-motor used for drive would reach. While I waited for these crucial parts to be delivered, I began preliminary work on the Arocs proper. After completing most of bags 1 to 3, I had three loosely connected main sections of the truck - the cabin housing the 6-cilinder engine and the L-motor that came with the set, the gearbox with the outriggers, and the rear section with the dumping bed and the differentials. In my mind, I could already see a problem arising: there was a drivetrain going from the rear wheels all the way to the engine in the front of the truck, which would obviously make the pistons move as you move the truck along. I already guessed I would be severing this connection by remove the driveshaft with the CV joint and attaching an L-motor in the center somewhere. Which would render the engine, the drivetrain, etc. utterly useless. This was not acceptable - not in the last place because my kids had unanimously decided that seeing the pistons in my 42009 mobile crane move was officially The Coolest Thing Ever™. So I fiddled about a bit before connection these three main sections, and eventually came up with this: Might be a bit hard to see, but... Basically, I placed an additional small gear directly in-between the L-motor and the gearbox, which allows it to power the axles and gears connected to the piston engine when in use. So, it wouldn't be connected to the drive anymore, but at least there could be some motorized eye-candy when one swung back the cabin and fired up the main engine. It wasn't long before my motors and such arrived, so the first I tried to accomplish was to connect the L-motor for the drive somewhere. One nifty solution I'd found involved replacing the engine in the front and using the long drive-train to power the rear wheels -- a technique I thoroughly rejected for several reasons: It seemed inefficient, and COOLEST. THING. EVER. So I figured I'd just bolt the bloody thing directly to the rear diff, as I'd also seen in this fascinating and classically scored tutorial vid by RC-master PPUNG daddy: It didn't sit right with me to just attach the motor with two pins like that though, so I have attempted to support it a little bit better without messing up the way the rear suspension works too much. Right now, it looks something like this: Not exactly perfect, but it seems to work well enough, even when I give the suspension a bit of a work-out. Next came the steering. My first attempt was based on this extremely helpful Youtube video by yu shine: Basically, this involved just connecting the Servo directly to the standard HOG steering mechanism for the Arocs, just below the two orange lights-slash-knobs at the top which you're supposed to turn. It seemed the most simple and elegant and -- being but a simple soul -- this naturally appealed to me greatly. It also didn't require the purchase of any additional parts, and left the mechanically unique way the steering on the Arocs model works intact. At this point I was able to put together a sort of prototype for the RC driving, by dangling the SBrick from the battery box and just hooking everything up in a makeshift manner. After installing the app, setting up the official 42043S profile, and playing around with my handiwork for a bit, I discovered the following issues: The L-motor was supplying quite a bit of power, making the truck actually pretty hard to control. Of course, there was a lot of weight left to be added at this point, so I was willing to reserve judgement for the time being, but given that my kids no doubt want to play around with this thing as well it'd be nice if I could prevent them from semi-accidentally ramming a massive Lego vehicle into, well, practically everything. Not sure how I could address though, other than from the software side. Placing the Servo motor where it was, behind the battery box, didn't actually fit all that well. The battery box itself actually pushed up against the servo when inserted, bending it back by at least a stud, which also frustrated my attempts to secure it in place a bit further. The steering was a bit... inadequate. The problems regarding the steering I recalled Sariel already mentioning in were only exacerbated here. It felt imprecise and rather unresponsive, and it didn't help that there was quite a bit of play in the wheels even with the Servo hooked up, meaning they weren't necessarily centered even when it was. So in the end, I stripped the away the steering mechanism and the wheels up front until I was left with this: After that, I decided to pony up and order the parts which -- after careful visual inspection of PPung's tutorial -- I figured I'd still need to mount the servo at the bottom, between the two sets of front wheels. So, mostly a set of gear racks and gears, in addition to some beams and various connectors used for bracing. This also gave me the chance to simultaneously order an extra extension cable from the same supplier, since it was pretty clear I was going to be needing it if I wanted to have any hope of hooking up the drive motor to the SBrick up front. And now, we wait... Although, to pass the time, I busied myself with rebuilding the back of the cabin, which I had previously taken apart to place the servo motor. I didn't need all the gears used for the steering mechanism, of course, and I figured I'd be better off trying to mount the SBrick in this space instead. For the moment, I came up with the following: I did notice the two black Technic pins still sticking out back there, and peeking ahead in the manual revealed that these will be used to help brace the pneumatic crane, once the time comes to attach that beast. As far as I can tell, that should still be possible even with the SBrick where it is, but no doubt I'll have screwed up somehow. We'll find out in the next update, hopefully! (Assuming, quite optimistically, that there is actual interest in such a thing. ) -
[MOC] M18 Hellcat Tank Destroyer
Tommy Styrvoky posted a topic in LEGO Technic, Mindstorms, Model Team and Scale Modeling
Lego M18 Hellcat Tank Destroyer (Sbrick by Tommy Styrvoky, on Flickr With all of the posts about the new Porsche set, this vehicle would be considered the Porsche or supercar of tanks (it's a tank destroyer), this vehicle was the fastest armored vehicle used by the Allies in WWII. It can travel at 55 mph (88 kph)... now that's not some lightweight sports car that packs a 1000 hp engine, this is a 19.5 ton AFV with a 9 cylinder 400 hp radial aircraft engine... and a high velocity 76mm gun. This impressive weapon allowed the Allies to combat the larger and later war German vehicles such as the Tiger II and Panther. It was known to be the most effective Allied tank destroyer fielded, with higher kill to loss ratios than other Allied tank destroyers. With my model I attempted to copy the drive train and focus on the aesthetics of the vehicle. The most challenging parts of the model would be the upper glacis (topmost armored plate in the front of the vehicle), as where this part met with the "cheeks" above the sponsons. I think a brick solution would have worked here, but I lacked the pieces to build it and all of the available parts wouldn't have been steep enough to work. The open topped turret was also a challenge, as everyone who builds with lego will know round shapes aren't easy. I decided to omit some features on the turret, as they didn't look correct and they effected the smoothness of the turret. The open top allowed me to use an interesting compact turret traverse/gun elevation unit that is rather compact and functions decently (I would like to add more reduction to the traversing gears). This was difficult to mount into the hull, as it is already packed with full-length torsion bars, the torsion bars are 10 studs long, this allows them to be softer for the light model. Overall I am pleased with the amount of SNOT work on the hull and turret. I think I replicated the model to the best of my abilities, though I wish more detail could have been added to the turret, as the massive breech guard limited the gun elevation, and took up lots of space. I also compared the model to the blueprints, and it seems to be mostly faithful to the real counterpart. The most impressive part about this model is the size, I was able to put most of the functions of some of my larger tanks into a footprint smaller than a 32x16 baseplate. I wish Lego made parts for radial engines, as it is very difficult to build a functioning one at such a small scale, as I wished I could have included that in the model too, The only case where I was able to mount one was in my M6 heavy tank. Another interesting engine that would be very difficult to replicate is the Chrysler multi-bank, a 30 cylinder engine mounted in later versions of the Sherman. I would like to sometime replicate that and put it in a M4A3E8 "Fury" tank. I had a lot of fun with the editing, my new photography backdrop makes it easy to clean up photos, just by adjusting the RAW exposure, you can get a pure white. It also rained today, so no outdoors footage, but I had some fun with photographing the model in puddles, as there are interesting reflections. Lego M18 Hellcat Tank Destroyer (Sbrick by Tommy Styrvoky, on Flickr Lego M18 Hellcat Tank Destroyer (Sbrick by Tommy Styrvoky, on Flickr Lego M18 Hellcat Tank Destroyer (Sbrick by Tommy Styrvoky, on Flickr Lego M18 Hellcat Tank Destroyer (Sbrick by Tommy Styrvoky, on Flickr Lego M18 Hellcat Tank Destroyer (Sbrick by Tommy Styrvoky, on Flickr Lego M18 Hellcat Tank Destroyer (Sbrick by Tommy Styrvoky, on Flickr A comparison with blueprints, there are some minor perspective differences, but it is relatively close for Lego. Lego M18 Hellcat Tank Destroyer (Sbrick by Tommy Styrvoky, on Flickr Lego M18 Hellcat Tank Destroyer (Sbrick by Tommy Styrvoky, on Flickr an underside shot... not too much here to see, but you can see how the swing arms alternate between half-stud offset, and full stud offset, this allows for a 5.5 stud space between road wheels. Also note how the left side torsion bar is leading in front of the right side. Lego M18 Hellcat Tank Destroyer (Sbrick by Tommy Styrvoky, on Flickr A couple renders of the traverse/elevation mechanism, instructions for that will be comming soon. Lego M18 Hellcat turret traverse/gun elevation mechanism. by Tommy Styrvoky, on Flickr Lego M18 Hellcat turret traverse/gun elevation mechanism. by Tommy Styrvoky, on Flickr Lego M18 Hellcat Tank Destroyer (Sbrick by Tommy Styrvoky, on Flickr The unit markings for the Hellcat are from "Black cat" both of my cats were wandering around when I was filming. Lego M18 Hellcat Tank Destroyer (Sbrick by Tommy Styrvoky, on Flickr IMG_1591 by Tommy Styrvoky, on Flickr Turret details IMG_1597 by Tommy Styrvoky, on Flickr IMG_1601 by Tommy Styrvoky, on Flickr IMG_1602 by Tommy Styrvoky, on Flickr Suspension Lego M18 Hellcat suspension by Tommy Styrvoky, on Flickr -
[MOC] M8 Greyhound 6x6 Armored Car
Tommy Styrvoky posted a topic in LEGO Technic, Mindstorms, Model Team and Scale Modeling
Lego M8 Greyhound 6x6 Armored car (SBrick) by Tommy Styrvoky, on Flickr This model was a rather interesting challenge to build, as the independent suspension took up a majority of the internal space. It features all-wheel drive with differentials, traversing turret, and gun elevation. mounting the m motors for the turret was the most challenging part of this build, as they are placed in-between the first and second axle. This is also my first model to use an Sbrick to control it. Lego M8 Greyhound 6x6 Armored car (SBrick) by Tommy Styrvoky, on Flickr Lego M8 Greyhound 6x6 Armored car (SBrick) by Tommy Styrvoky, on Flickr Lego M8 Greyhound 6x6 Armored car (SBrick) by Tommy Styrvoky, on Flickr Lego M8 Greyhound 6x6 Armored car (SBrick) by Tommy Styrvoky, on Flickr Lego M8 Greyhound 6x6 Armored car (SBrick) by Tommy Styrvoky, on Flickr Lego M8 Greyhound 6x6 Armored car (SBrick) by Tommy Styrvoky, on Flickr Lego M8 Greyhound 6x6 Armored car (SBrick) by Tommy Styrvoky, on Flickr Lego M8 Greyhound 6x6 Armored car (SBrick) by Tommy Styrvoky, on Flickr -
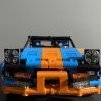
[MOC] Mazda Race Car with SBrick
KevinMoo posted a topic in LEGO Technic, Mindstorms, Model Team and Scale Modeling
EDIT: Building Instructions Available: HERE ________ I’m a big fan of Japanese cars, mostly because of its reliability. In the city I live in, there is a car factory which manufactures some models of Toyota and Mazda cars for the Chinese market. Among them is the Mazda 6 Atenza, the latest model of Mazda 6 series. (via Internet) I like this car a lot. A family sedan beautifully shaped like a supercar. Also you can choose hatchback or wagon configuration, but you don’t see a two-door race car model in this series. So I decided to build one out of LEGO. After a long winter, now I present you my latest MOC: A Mazda Race Car with SBrick. This project started with this iconic front grille. I don’t have a concept of the overall scale for this MOC, everything was decided by the scale of the grille. Ironically, I didn’t realize part 32192 in LBG is rare until the prototype is finished in LDD, and I don’t have a single one of it. Finally got my hands on it after quite a long time. Let’s have a look at a video first. (4K @ 30 FPS, watching in full screen is recommended) Weight: 1130g Dimensions: 350mm (L) x 160mm (W) x 127mm (H) Parts count: 1390 pcs Working headlights / taillights Servo motor cable has to go between the two seats due to length concerns, otherwise I can put more details in that area. A tiny fake engine for a tiny space. I must say I’m not a big fan of soft axles and I don’t use them too much. But they look great when used to shape wheel arches. The car is heavy towards the back, so rear suspension looks kind of weird. It gets the job done, though. Drivetrain is quite simple. Also you could find some inspirations from Madoca’s Supercar and Corvette. :thumbup: More photos: Building instructions is on the way. It will be available very soon. SBrick can be easily replaced by PF IR receiver. Enjoy and stay tuned! -
[TIP] using RC motors with Sbrick
JJ2 posted a topic in LEGO Technic, Mindstorms, Model Team and Scale Modeling
Hello, I have discovered that when using Sbrick you can bridge ports and have double amperage and double power cutoff. I think this might be useful for MOC's but please give me your opinion. IMG_0385 by JJ2Sam, on Flickr The black 9v wire represents where the RC motor will connect. Thanks -
[MOD] FJ40 Crawler with SBrick
Madoca 1977 posted a topic in LEGO Technic, Mindstorms, Model Team and Scale Modeling
Hello everyone! This time I built a modification of rm8's Toyota Land Cruiser FJ40. FJ40 Crawler Weight: 1145g Propulsion: XL motor for 4 wheel drive Steering: Servo motor 2 speed gearbox: M motor Winch: M motor Headlights: PF light Powered by: SBrick and 8878 rechargeable battery box This is my third SBrick model. One SBrick and a rechargeable battery box fit well in the rear space. Unfortunately tumbler tires from 42050 cannot use for front axle. They touch the connectors when steered. So I used normal balloon tires. One XL motor has enough power to climb the slope of over 35 degrees even in high gear (4.2:1). It can climb much steeper slope in low gear (12.6:1) but less-grippy balloon tires would start slipping. You can see that situation in the second half of the video. Building process was not straightforward. First, I decided to adopt bigger wheels, working headlights, motorized two speed gearbox and winch. Also I was planning to keep the whole original bodywork as possible. Like rm8’s chassis, it has front and rear live axles with 3 links. In offroad driving, 81.6mm wheels require gear reduction after differentials. My first attempt was using central torque vectoring diff and rear portal axle like my Off Road Pickup. Front axle was not changed. Although it kept the same wheelbase as original, this version was failed. Every time I started driving, 20t bevel gear and diff disengaged. Second plan was using front and rear portal axle. I tried to make the wheelbase as short as possible. It became five studs longer than the original. So I needed slightly longer body. Building whole chassis was the most difficult. The problem was how to minimize the mechanism of motorized gearbox. I used new driving ring and red clutch gears. I felt that they were stronger elements than old version and they could handle more torque. Although 2 speed gearbox was simple, I had to hide the whole mechanism under the seats. I eventually squeezed a mini linear actuator into the left of gearbox. Changing gears is not fast, but it's easy to adjust lever in neutral position in case of using winch. The winch mechanism is the same as the original. It is powerful enough to help climbing steep hills. I have to say that rm8 had achieved perfect weight distribution. I recognized it when I was attempting to build various versions of chassis which had different motor locations. So in my final version, all PF elements are in nearly the same position as original. The bodywork needed some minor changes due to the new chassis and my parts assortment. In original “face”, it was impossible to put LEDs into behind the headlights and shine trans-clear parts. Moreover, Round tile 2x2 trans-clear seems not to be the official parts. My alternative was built out of available parts. I know the original looks far better and hard to change. But it was worth for me to find another solution. Original FJ40 is modular building. It has various options like doors, roof and snorkel. Since my MOD became bigger and heavier, I didn't add the roof. (Still, four soft shock absorbers are slightly compressed when it stands stationary.) Instead, I built detachable doors in two versions. Building instructions: http://rebrickable.com/mocs/Madoca1977/fj40-crawler I hope you like it! -
Lego Technic Suzuki Jimny Trial & Trophy customs
filsawgood posted a topic in LEGO Technic, Mindstorms, Model Team and Scale Modeling
Hello! Today I am pleased to present to the general public of the two brothers - Lego Technic Suzuki Jimny Trial Custom and Lego Technic Suzuki Jimny Trophy Custom. They are united, above all, not just a long name, but also a common chassis, all-wheel drive and compact size. I was inspired to build a Suzuki Jimny sample 2001-2010 years. They are often prepared to take part in various off-road competitions, and that I thought - why not? And that's what came out of it. Enjoy ;) Models are made in the off-road style, and have all its attributes - extra lights, safety railings, stingers high clearance More photos and building instructions you can find on my lego technic blog here -
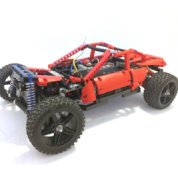
[MOD] Formula Off-Roader 42037 RC with SBrick
RabbiT_CZ posted a topic in LEGO Technic, Mindstorms, Model Team and Scale Modeling
Hi all, Recently I wanted to try to modify the 42037 Formula Off-Roader with the SBrick remote control and Power Functions. It is done with two L-motors for rear-wheel drive and the servo for steering. It is little bit larger modification but the shape is still close to original. Only the back of the buggy is bigger to accommodate the large battery box. It is capable of riding in a short grass and even climbing to a moderate hill. The final gear ratio is 1:2.334 but can be easily changed for higher speed on a smooth surface. If you are interested, here is the LDraw file: 42037_-_formula_off_roader_sbrick.mpd (original by Philo). PS: On the photo are different front springs as the front is very light and I wanted softer suspension. -
SBricks & Trains - Second test runs with Stadler FLIRTs
Ashi Valkoinen posted a topic in LEGO Train Tech
Previous tests with description of how SBrick should be mounter in trains and how it can be used from smart devices, please refer to this thread: http://www.eurobrick...howtopic=115885 After equipping my red Stadler FLIRT EMU (415-001) with SBrick and testing it on different events I decided to put the SmartBrick inside my blue (415-061) Stadler FLIRT EMU as well. The two 9V train motors had been removed and two PF train motors (each attached previously to a 9V one) remained in the trains. The basic idea from switching from 9V to SBrick was that the two Stadler FLIRT units with 8 train motors together needed a really high current to move, and after several tries with paralell speed regulators and more power supplies connected to 9V loops it became obvious for me that making 7 kg of trains consisting of two invidual EMUs run is not sustainable on longer time period, and I can't expect other LUG members to supply me with all those extra cables and custom 230V AC->10V DC adapters under their part of layouts. Other issue was that voltage in 9V tracks depended how far the 9V train motor from power supply was, so synchronising the speed of my two FLIRTs seemed impossible. The two PF-train motors driven from SBricks can deal with the 3.5 kg weight of each FLIRT train, however they really slowed down on sharp turns and points. Each train can run around 3 hours with 6 pieces of 2100 mAh VARTA AA rechargeable batteries. For synchronised run I needed to design a new SBrick profile on designer.sbrick.com, where a slider drived both trains' SBricks' driving output (actually output "D" in my MOCs). After setting up the right polarity (done in profile settings, the two EMUs started into opposite direction for first try) they started to run, the magnet couplers hold them together and there were no problems on straight track segments. Problems started to appear in curves, the rear train, running still on straights was faster than the first one slowed down in curves, so it simply pushed the first one through the coupling causing derailment of the last bogie of the first train. Unfortunately it seems that two PF train motors are not enough to keep up the speed in curves, however with careful driving and slowing down in time the derailment can be avoided. Also rechargeable batteries should be approx in the same condition, a train with fresh or stronger batteries will be faster, however they have approx. the same weight and number of train motors. These derailments and problems (I almost couldn't run coupled FLIRTS on points, the first train leaving the point become faster and decoupled from the rear one) are caused by the not satisfying number of train motors and maybe failures of my train couplings, I'm working on them by now :) , equipping FLIRTs with a third PF-train motor for less slow-downs and a stronger, technic-parts containing coupling system (but still keeping magnets for easy to play experience) Also I need to put EMUs front/tail lights for ends "A" and "B" to different outputs - I can't reach the small polarity reversal bricks to turn off lights between units (see Fig.1. for details). Fortunately SBrick has four outputs - now two for front/tail lights, one for driving and one for indoor lights are being used. Fig.1. Polarity reversal brick to turn off front/tail lights manually on my EMU when the end is connected to other EMU. Not very playable when the train is in the middle of they layout. And let see how the application worked for me. I used a HTC One M8 mobile with the latest application and latest firmwares on my SBricks. Problem 1.: You are not allowed since version 1.6 for Anroid to attach an SBrick port to more sliders or buttons. Therefore when I start to operate Stadler FLIRTS simultanously, I have to first exit from the profile wich allowed to run them separetely (with two driving sliders) then load a profile with one slider for synchron run. It's such a pity that only one slider or button can handle a function. Problem 2.: derived from problem one, application crashed when I tried to reconnect to the two SBricks with a new profile. I don't really now how informatics and programming works, but crashes happened only on the first day of exhibition (7th of April), for the remaining three days they magically disappeared. Problem 3.: Connection lost. It happened quite often, at least three-four times in 10 minutes time gap. When running two trains synchronised and the first stops due to disconnect,well, derailments and broken couplers were the results. Also while App tries to reconnect, the profile screen gets darkened (see Fig.2.) and while it is darkened, you can't handle your outputs - even while the other, connected train is running. The only way to stop if reconnect not happening in short period of time is to exit from the profile. I couldn't figure out the cause of these disconnects, they appeared both while trains were running together, trains were running separately or one or two of them were just staying somewhere with turned on lights only. Fig.2.: One Sbrick disconnected, but other working - and if set to run, still running. Photo is just illustration, taken of different phone and with second SBrick in my Bombardier Talent EMU previously. A short video of the FLIRTs running together with SBrick: Conclusions: Pros +Playability for first - I liked to have my trains run together, controlling both of them with the same slider, then decouple them and let them run on their own way. +Four outputs on one SBrick - I need them more then ever. Increases level of playability. +SBricks can be hidden - no visual contact needed and high range of control - a very needed advantage for bigger layouts. +Not SBricks's Pro, but my FLIRTs now can run on non-9V track as well, ME-models R102s really tempting for smoother run, while I spared 4 of 9V train motors for other MOCs. Cons: -Once it was available to drive an output from different buttons and sliders, it is needed when you need your train solo and synchron run as well. (Or a non-train application - turn sign of car can be driven separately, but when signing warn or get stucked you need to blink them synchronised.) -Still too many disconnect problems, when two SBricks connected to a profile, can't stop non-disconnecting one. (I know, disconnects vary with different type of phones and phone operation systems and it should be hard to write the code which works fine on every device.) -Slider's 80% still not moving a train - not only my heavy ones but any train driven with SBricks. Voltage output function for trains applications should be changed. Please note, this review was focused on the coupled run and my needs, previous review focused more on how to use SBricks. I hope you find useful informations here when you plan to run your locos, motor units together to pull a heavy freight train or carry more passangers in your LEGO-City! My experiences also had been sent to SBrick developer team. -

Ultra Small Forklift - Muravi
mahjqa posted a topic in LEGO Technic, Mindstorms, Model Team and Scale Modeling
So I prefer to build small. I managed to miniaturize all the functionality of a standard forklift (driving, lifting, tilting) into a chassis only 11 studs wide. One of the advantages this offered me (among better strength, speed and maneuverability) is that I was able to build an entire warehouse to muck about in. This wasn't always the plan. I thought I'd just build two or three containers to show off its functionality, and that would be it. Then, the Android Sbrick app crashed and burned (or at least, it did on my phone) and it took two months for them to update the thing into relative functionality again. So I had plenty of time to build some scenery. For the enthusiasts; I've uploaded a LXF file to Vayamenda.com so you can tinker with it. (By the way, if you're a person who has built a forklift, could you link me to a picture of your forklift in this view? https://www.flickr.com/photos/28134808@N02/26063611241/ I'm very curious to see how it's scaled relative to other people's MOCs.) -
[WIP] M8 Greyhound 6x6 Armored car (RC)
Tommy Styrvoky posted a topic in LEGO Technic, Mindstorms, Model Team and Scale Modeling
I have always wanted to build a 8x8 or 6x6, I recently acquired 10 62.4x20 tires, so now I can get to building a multi-axle vehicle. I also purchased a Sbrick, this will allow me to control my models at a greater distance outside. So I wanted my first model with a Sbrick to be special. The M8 Greyhound is a light armored car, that is mainly for scouting roles and mounts a 37 mm gun for supporting fire. When designing the drivetrain, I wanted a functional suspension system, and differentials. I attempted to replicate the real setup with staggered differentials, but this failed as there wasn't enough space, so I was forced to use a similar axle setup of the Arocs, as this is rather compact, but because of the height of lego springs, this made it very difficult to mound more than one L motor. I initially wanted this to be powered by two L motors, with a 1:1 ratio between the driveshaft and the differentials. Because of the height of the suspension, the roof of the engine deck will be very close to the top of where the shock absorbers are mounted. This has created a very interesting challenge, The low profile of the vehicle severely limits the area where I can mount power function elements. My progress over my short easter break is shown in the images below, I won't be able to continue progress on this model until the end of April, as that is when college is finished. Real vehicle Lego M8 Greyhound 6x6 Armored car WIP (RC) by Tommy Styrvoky, on Flickr Lego M8 Greyhound 6x6 Armored car WIP (RC) by Tommy Styrvoky, on Flickr Lego M8 Greyhound 6x6 Armored car WIP (RC) by Tommy Styrvoky, on Flickr Lego M8 Greyhound 6x6 Armored car WIP (RC) by Tommy Styrvoky, on Flickr Lego M8 Greyhound 6x6 Armored car WIP (RC) by Tommy Styrvoky, on Flickr Lego M8 Greyhound 6x6 Armored car WIP (RC) by Tommy Styrvoky, on Flickr Lego M8 Greyhound 6x6 Armored car WIP (RC) by Tommy Styrvoky, on Flickr -

[WIP] Grave Digger
AxeSlash posted a topic in LEGO Technic, Mindstorms, Model Team and Scale Modeling
I've been lurking here for a while but have never been satisfied with any of my MOCs enough to post them here. The nearest I came was an MLRS that worked well but looked rubbish :P Anyway, I'm in the process of designing a Grave Digger monster truck replica (approx 1:15 ish scale). Features: - 4 wheel drive - 4 wheel steering - Steering modes: 2-wheel, 4-wheel, crab - 4-link, very long travel suspension - Suspension travel is also to scale. Almost. - All motors contained in the chassis (no servo-on-axle affairs) - SBrick control - Tyres from a Tamiya Lunchbox I'm designing this in Sketchup and rendering with the Twilight Render (free) plugin. Note that I've drawn all the pieces myself, and they're all drawn to have a low polygon count so that my machine doesn't croak to a halt. Some of the pieces aren't very accurate atm (e.g. the XL motors). So far, I think I've got the chassis designed: And here's a couple of closeups: Issues I can foresee so far: - Friction from so many knob wheels - Bump steer (but I don't want to sacrifice suspension travel by putting the servo on the axle) - Not sure whether having the steering upside down like that will have any negative effects. - Not sure if I can get all of the parts in green that I want Can anyone see any other potential issues with this design (before I start putting in BL orders)? Thanks -
Black Rat Rod with custom battery
JJ2 posted a topic in LEGO Technic, Mindstorms, Model Team and Scale Modeling
Hello, I have been building with Lego technic and power functions for about 2 years now and like many others have discovered that the 7.2v of 6 rechargeable batteries is sometimes not enough for some creations. One day I found a old TYCO RC for free, looked at the battery and saw,"9.6v" I thought "SCORE!" and started making a adapter for it. I made this "Rat Rod" to test out how the extra 2.4v effected fast models. So enough talking here are the pics IMG_6020 by JJ2Sam, on Flickr IMG_6021 by JJ2Sam, on Flickr It uses: . Servo for steering. . 2 L-motors geared 3:1 for drive. . and obviously 1 custom battery "Box" The car was literately built around the Sbrick and has almost no open space in the chassis and it is very rigid for how small it is. The steering is regular rack and pinion and the L-motors were coupled together because there was sadly no room for a differential. I have not measured the top speed but I think it is around 6-10mph on a full charge. When I built the bodywork I tried to make it look tough and powerful almost like an armored bank vehicle. The battery almost took up all the space on the top so I had no room even to make a rough interior. I am not at all happy about the hood because of the steep angle and gaps but this was built just to test out the battery not to win a beauty award IMG_6024 by JJ2Sam, on Flickr Almost forgot the most important picture. Here's the video All pictures and more are on my Flickr account LINK Thank you for reading -
[MOC] ICARUS Supercar
Madoca 1977 posted a topic in LEGO Technic, Mindstorms, Model Team and Scale Modeling
Hello everyone! This is my latest creation. ICARUS Supercar Introduction The name comes from a man who desired to fly higher using his technology. Many times I have tried to realize the speed what supercar MOC should perform. I needed “wing” called buggy motor, but all I had is a bunch of PF motors. So I connected motors together using “wax” called SBrick. Like Icarus of Greek myth, higher speed and torque may be lethal for the model itself... The result is here in the video! Weight: 1760g Propulsion: 4x PF L motor for rear wheel drive Steering: PF Servo motor Front and rear lights: 2x PF light Powered by: 2x SBrick and 2x 8878 rechargeable battery box Features: independent suspension for all wheels working steering wheel manually adjustable rear spoiler opening doors, hood, engine cover, glove box Drivetrain You may think it is not fast enough, but for me it was a relatively success. Surprisingly, gears and CV joints have never damaged or popped out even at the time of maximum acceleration. Although I had designed its drivetrain carefully, I was not sure if small bevel gears in differential withstand the load. Two 20T bevel gears of each side divide the load from differential equally. In this setting differential doesn't move back and forth easily. That means differential and 20T bevel gears hardly ever disengage. So they keep rotating smoothly even under high load. In this MOC there are three L motors (and two SBricks, two battery boxes, bunch of wiring) on the supposed location of V8 engine. So if someone build manual version with gearbox, there would be enough room for it. Body design As expected, building 1:10 scale supercar was very hard. Especially the body work. I've built one three years ago, but it was primitive MOC in every way. New MOC is heavily inspired by modern McLaren supercars. I tried to build their curved shapes using rather technic panels than flex axles. Front and rear light section happened to become different from the original mainly because of the positon of LED. Though finished model is not a copy of P1, I am happy with the result of realizing proper mid-engine proportion. Building instructions: http://rebrickable.c...icarus-supercar I hope you like it! -

Hello! I am new. (And I need some help, please!)
sir_launcelot posted a topic in Hello! My name is...
How to Motorize the Mars Rover I am looking for some suggestions. My daughter is building the Mars Rover set (go here for the details: http://www.eurobricks.com/forum/index.php?showtopic=98222) for a presentation at school and I told her I would help make it operate by remote control with one of the power function kits. Problem is that it is a lot more complex than I thought. (I have no experience at the expert level building. (No building the rover is not part of the project, she is doing it as an additional part of her presentation on Rovers). I think I can maybe get it moving with a remote, receiver and simple motor attached to one wheel, but I do not have any idea how to do the steering and don’t know how to move any of the other functions (camera, antenna, robotic arm). see So, to steer, I use a servo? How do I operate the other things, more servos? And to move things slowly, do I need complex gearing? (I was looking at the SBrick which might work. I saw a few designed steering racks and chassis on Ebay, some simple, some pretty complex. Would I be better off buying another set that has a chassis and steering and drive designed to work with motors and then build it and adapt the Rover to it? Any suggestions to help me figure out what I need to do and what to buy to easily make this work would be much appreciated. Thanks!