Search the Community
Showing results for tags 'Instructions'.
Found 253 results
-

75187 BB-8 UCS full RC mod with free instructions
Sariel posted a topic in LEGO Technic, Mindstorms, Model Team and Scale Modeling
I'm not 100% sure if this belongs here, seeing as it's a Technic mod of a Star Wars set, but let the moderators decide. So, I want to share with you complete and free instructions for modding the UCS BB-8 set to be fully RC. And by fully RC I mean: it can drive, steer, it has rotating side panels (so it appears to be rolling when viewed from side) and retains the wobbly head. Ths instructions are available at http://sariel.pl/downloads/ and while they're completely free, you may want to consider a small donation if you feel it is earned at https://www.paypal.me/sarielpl Here's the video followed by a link to photos and description: More: http://sariel.pl/2017/12/75187-bb-8-ucs-rc-mod/ -
Hi guys! Until I receive the missing pieces for my TIE Interceptor and my TAS Batmobile... (Follow me on Instagram, Flick or Facebook ;) ), I quickly made a try for the Peugeot Spinner from Blade Runner 2049 (French power! ;) ) with pieces I have in my room. I tried to be closed to the minifig's scale. It's not very nice... I prefer my other MOCs I find better than this... I like the inside and the rear of the vehicle but not the rest... The small drone! And a full inside ! If you want to build it I made a fast tutorial! Maybe too fast... Send me an e-mail if you have problem for the building process! (The stickers come from the First order snow speeder and the Rogue One AT-ST but I'm not sure) Link for the parts list on Rebrickable : https://rebrickable.com/mocs/MOC-1090... Let me know what do you think about this MOC? :) If you have build my MOCs, could you send me a picture? I will be very happy to see if my work is around the world! :D Keep on building in a free world! You can see my other topics : TIE Fighter (SW Rebels Design) : https://www.eurobricks.com/forum/index.php?/forums/topic/155546-moc-tie-fighter-starwars-rebels-design/&tab=comments#comment-2873629 ITT : [MOC] ITT (Imperial Troop Transport) from SW Rebels TIE Advanced Prototype : [MOC] TIE Advanced Prototype (aka Inquisitor's TIE) from SW Rebels A-Wing (McQuarrie / SW Rebels Design) : [MOC] A-Wing (McQuarrie / SW Rebels Design) Batman's Batmech : [MOC] Batman's Batmech Speeder Bike 614-AVA : [MOC] Speeder bike 614-AvA
-

Can someone give me a link of a site where I can get these instructions for free
tiesvandenberg posted a topic in Hello! My name is...
Hi this is my first forum so I don’t really know how to make one but can someone give me a link where I can get the instructions for free?? -
Hello! I am happy to announce that my first book is now available! It's a LEGO book ... it's a LEGO train book! The book is in German and the title "LEGO Eisenbahn – Konzepte und Techniken für realistische Modelle" means "LEGO® trains – concepts and techniques for realistic models". I've received my first printed copy last week and it seems that the book is in stock at amazon.de and other online shops. The printed version has 294 pages, kindle and ebook versions are also available. Amazon.com also lists the kindle version and the paperback seems to be available from amazon marketplace shops. I've roughly translated the Table of contents, you can find it here: http://www.holgermat...o-eisenbahn.php And I just not did work on the book but also build a couple of trains which are featured in my book. The German Regional-Express was anounce here early this year: http://www.eurobrick...opic=119238&hl= As counterpart for such a modern train a more complex steam engine was needed. I've choosen the BR 10 once again. My first version from the year 2000 was missing moving pistons and rods. This is what my 2016 version of this great German steam engine looks like: Larger image over at flickr: https://www.flickr.c...157668271658135 On nearly 100 pages in the book you'll find various building instructions for various train MOCs. Due to page limitations some instructions could not be included in the book. But I am happy to offer PDF downloads of instructions for my new BR 10 and my little BR 80 on my website. Just check out the train section at: http://www.holgermat...s/en/trains.php 1000grüße HoMa
-
So, I've been looking for Custom Lego instructions lately, and I've come to the disturbing realization that there are almost no instructions for custom pirate ships. I'm looking because I want to learn some new techniques, and maybe even bricklink a model. Which leads me to my two problems. First, there's like no colonial era/pirate ship instructions on the web. Second, the ones I found didn't have parts lists. I don't mind buying instructions, but I won't if they aren't willing to tell me what I need to build them. I mean, lego is expensive, and I want to know how much I would have to spend to actually build the model. Can anyone help?
-
Can someone give me the instructions for this build
tiesvandenberg posted a topic in General LEGO Discussion
link removed <===== can someone give me these instructions for free please you would make me very happy -

Project Machina Teneb (MT-D9) *Now With FREE Instructions!*
Leonardo da Bricki posted a topic in LEGO Sci-Fi
A need arose in the army of the Galenis Confederation. A war machine like none seen before, a machine that could attack swiftly, engage multiple enemies, and survive unscathed. It needed to be extensively armored, yet fast. And above all else, it had to strike fear into any who opposed it. From the twisted minds of the scientists in Tech Lab 2C came Project Machina Teneb. A hulking beast of metal, the MT-D9 was two/thirds the size of its cousin, the Sprite HK-P4. However, it packed almost four times the firepower, and was over twice as intelligent. MT-D9 Leak More will come soon... This is just a sneak peek. Instructions are now available on BrickSafe!!! -
When the Late World Order collapsed in August of 2079, from the ashes of Europe rose the Galenis Confederation, a group of nations bent on control over the remains of the world. Machines were their enforcers, and there was no taking prisoners. The main weapon in their arsenal was the Sprite-class Hunter/Killer (Patrol) drone. Sprite HK-P7 Almost 14 meters tall, this machine has Level 4 AI, meaning it is autonomous, but not free-thinking, and it is tied to a central command system. It is armed with a Martek Industries cannon, capable of firing at a rate of 800 rounds per minute. A Luminaire Tech spotlight augments it's suite of visual detection systems, which include radar, lidar, infrared and ultraviolet. Contained in the body is a Martek Industries Viper Launcher. It has a magazine of 16 rounds of HERP (High Explosive Rocket Pod) missiles. Each missile bursts open to release 7 individual rockets in a dispersed pattern. The Sprite uses several gyroscopes to maintain balance, and it is capable of running at speeds of nearly 50 miles per hour. I have this model built for about two years now... It has been standing on my self, and since I got a new shelf, I had to move it. And I decided it needed some upgrades... I tweaked the head just a bit, and overhauled the feet and lower legs, which were orginnally too bulky for the spindly model. And I will let the photos take the place of words, because I have been rambling on, and no one likes that... This is the view of the oppressed: Sprite HK-P7 Side profile of the Sprite: HK-P7 Profile A view of the cannon. I am quite happy with the design, it works well and is easily side-mounted. In the future, I might try it with the 4L bars instead... Sprite HK-P7 The secret missile launcher: Fire 1! Front view of the entire machine. It is 15 inches tall. Sprite HK-P7 by Will Mood, on Flickr Comments and critiques are welcome. This was my first attempt at building a mech, so tell me how badly I screwed up. I will have another one to show tomorrow as well. Instructions can now be found on BrickSafe. - Leonardo da Bricki
-

[HELP] What should I include when selling instructions?
MovieMocs posted a topic in General LEGO Discussion
Hello, I am going to start selling some instructions for my best mocs and I was wondering what should I include in the folder I sell someone. I'm thinking; PDF of instructions a "readme" file telling the user anything they have to know the LDD file Pictues of completed set bricklink parts list (Don't know how to do that yet) Does that seem alright? Is there anything obvious I'm missing? This is my first time selling instructions. Thanks, MovieMocs -
This Custom Lego moc is a super detailed model, and will go awesome with your display. Buy instructions here: http://www.ebay.ca/itm/-/222605677891? Smaug is one of my favourite lotr (Lord of the Rings) characters. Check out the parts list here: https://rebrickable.com/mocs/MOC-9179/LotrNerd/smaug-statue/#buy_parts Your purchase will include: 2 PDF's, the Dragon and the Stand The Lego Digital Designer files for both kits which can be imported into your Bricklink wanted list The part lists Tons of great renderings. You can find a awesome parts list for this MOC at this link, go to "Buy Parts" at the bottom of the post [MOC-9179 Smaug Statue] on Rebrickable. This is a super cheap price for a moc this size and to this level of detail. Anyone in the world can buy a no shipping cost! If you have any questions or concerns don't hesitate to ask. The instructions are super easy to follow. Once you purchase the instructions I will share/email you the files via Google Drive. There are no shipping costs. I hope you enjoy my moc and instructions.
-
Finished Monster Truck MOC! *Free Instructions Now Available!*
Leonardo da Bricki posted a topic in LEGO Technic, Mindstorms, Model Team and Scale Modeling
Today I present to you my latest build: a motorized monster truck, still unfinished. Now Finished! Background: It was started last weekend after reading Sariel's book, "Incredible Lego Technic," which featured Crowkiller's monster truck MOC. I looked it up on his website where he had a photo of the chassis and the words "This model could easily be modified to be motorized and driven..." Now you all know what happens next... The Original: Crowkiller's excellent model is a manual 4x4x4 monster truck, with 5 link live axle suspension with diffs, a central differential, all-wheel HoG steering, a fake V8 connected to the drivetrain, and a detachable, and therefore, interchangeable, body. The Motorized Truck: The chassis length was increased by two studs in order to accommodate the two L-motors used for driving. The suspension geometry remains the same, though I will probably have to use the hard shocks... A Servo motor was added to control steering, as well as a standard AA battery box and a V2 receiver. I wanted to keep the central differential, but it would have required the body to be too wide. I also tried to incorporate the V8 engine, but the Servo motor and the steering shaft restrict the placement of gears to connect the fake V8 currently. What Is Planned: 1. A body (or two, or three, or four). 2. Reinforcement of the steering. At the moment, if I crash into anything at speed, (which happens frequently ) the front portion of the axle will bend to the side where the impact occurred. Which is not good. 3. Changing to the hard shocks, as the additional weight is already causing the suspension to depress most of the way... What Is Finished: See below what has been done. Also, LDD file instructions are available here. Photos: Wip MT side Wip MT front Wip MT under The Model Is Now Finished! Free Instructions Are Now Available! Click Here! More photos and information is on Page 2! Monster Truck Thanks for looking, feel free to give your honest opinion (anything from "I love it!" to "Why the &%#@ are you copying other people's work?!" is acceptable ) and any advice you want to. - Leonardo da Bricki -

I Made a Replica of Marshall Banana's 7500pc Lego Millennium Falcon (Instructions!)
Brick Customs posted a topic in LEGO Star Wars
Last year I stumbled across Marshall Banana's massive, and exquisitely detailed Millennium Falcon MOC. I was quite impressed by the model as it makes Lego's official UCS appear quite pitiful in comparison. I had always felt Lego's UCS was a bit blocky looking (even for Lego) to begin with. After discovering Marshall Banana's custom, my first thought was "I'm going to build this one day." I tossed it into my browser's bookmark folder and didn't think about it for another four months or so. It was then that I decided to open a new project in LDCad and "just mess around with it." A couple of months and 200 hours later, I had a complete digital model. 60 hours after that, I had a complete real model. Finally another 70 hours and I had a complete instruction manual. Youtube | Ultimate Lego Millennium Falcon | Timelaps Build My model, while a very near twin of Marshall Banana's masterpiece, also boasts a number of upgrades and improvements throughout. I did succumb to using some "cheater" moves to avoid some techniques I didn't like. Most notably, I didn't like the technique used for the rear engines that involved bending stacked 1x2 plates. It put way too much tension on the bricks that would inevitably lead to cracking. My solution was to use 1/8 brass hobby rod as a 3mm rigid hose alternative and arrange the greeble and engine details into clip-on sections. This lead to another fix for the upper and lower edges of the engines. MB seemed to achieve a slight angle by attaching the pieces unevenly on the studs (assuming I interpreted correctly from the pictures). I really didn't like this, so I added another 1/8 rod at the correct height to allow the pieces to clip in and rest at the correct angle. I've made numerous other modifications including a number of shape adjustments to the shell plates to allow them to fit more evenly. View full Flickr album here. -
Hello AFOLs, I have been working on a project recently that will commence in an instruction manual for all cars and figures included in Lego Racers, the PC game. I have just finished up the manual section for circuits 1 & 5 and am willing to share that with the community. The complete manual will require a small fee to obtain once it is done ($5-$10), but I am willing to share the first part of it with everyone. I am going to work on getting a bricklink list together for these individual circuits, and will share that when it is done. Link for manual: https://1drv.ms/b/s!Ar57uhfvA0rTin-SwY17MLgMHeAI -Christian
-
Despicable Me is about to be released here in Spain. You can download the instructions to build a standard minion form: http://www.bricksonthefloor.com Here you have my version of a minion dressed as an inmate.
-
While most instructions for LEGO sets are pretty good, especially these days, there have been some not so great instructions throughout the years. So, what are the worst instructions that you have encountered for a LEGO set? The strange thing about this is that there are several ways in which instructions can be bad. I’ll try to avoid problems that are caused as side-effects of being scans, although those can too have problems like colour distortion, graininess or splitting pictures up into two. Some plans can be a bit annoying because the do too much in a single step, so you might overlook things being added, or have a cut-out for building some specific section, but then also add other pieces outside of that cut-out which you might overlook (6286 Skull’s Eye Schooner). Admittedly too little happening in each step can also be slightly annoying, as it can be trying for your patience. One problem that a lot of people have complained about is when the colours are unclear. The most common problem is telling black and dark grey apart. This especially was a problem in the early- to mid-2000’s where plans got a more CGI looking. One set I remember having this problem is 7103 Jedi Duel. In general the art in various problems can have some odd quirks. The aforementioned CGI plans, seen in themes like Star Wars and Island Xtreme Stunts, were pretty ugly in general. Earlier Pirates sets had an odd quirk in that the tricorn hat often looked much larger in the plans than it actually was on the figure. But on the actual bad end of the scale we have other problems. When parts and plans don’t match it’s a problem. I have seen plans with colouring errors in them such as some early City sets having the wrong colour of hands (7236 Police Car) or 2009 Pirates sets having the wrong colour of arms (6239 cannon Battle). We also had sets with actual errata sheets (7019 Viking Fortress against the Fafnir Dragon). These kinds of errors sure are confusing. There are also the occasional mismatches of pictures within the plans themselves like the box photo having things like plants in different places that the instructions show them (6266 Cannon Cove) or even outright colour errors in the box photo (6296 Shipwreck Island). There are also the occasional art screw ups. It sure felt like the instructions for 6390 Main Street has more studs in the drawings than the actual base plates have. There can also be errors where things changes places. Then there are plans that are just outright terrible. Technic plans from the 70’s have a lot of problems for me. They don’t always show very well what you are supposed to do. And at times it’s like you have to take a few pieces off to actually do what they want you to do. It can even be a bit hard to make out what pieces is actually being used.
-
Dear All, it has been a very long time since my last “productive” post on EB – I have been lurking ever since from time to time - but no contributions from my side. It is time to share some of the stuff that has slowly accumulated over the recent years. These are some locomotive and rolling stock ideas/MODs/MOCs. Below is a short summary of what and why; the instructions were meant to go on the RailBricks repository but that seems to be no longer an option. Instead, I am using my cloud space at work; a click on the link below the images should get you to a corresponding folder with the MLCad/LDraw file(s) and the LPub instruction PDF(s). Note that there are 300DPI as well as low-res versions of the PDF files; the latter are much more bandwidth friendly. Also note that there may be numerous errors/faults – I am using these files as references and aid for my rather limited building capabilities. Generally, I am building in a rather weird way, I guess. Most of the parts I am using, particularly for rolling stock, are spare parts from LEGO sets I got as present or simply purchased for other parts. Rarely the sets I am buying survive as a whole. It may also be an excuse to regularly visit the local TrU or LEGO stores nearby … for some reason it is still very exciting to me to browse through their shelves – that is also the reason for not ordering sets or parts online that often. There are exceptions of course. BrickLink is more of a last (and beautiful) resort. I have simply more fun figuring out ways of using individual pieces that initially appeared to be useless even for a longer time. Also, I hardly use scaled schematics for building – it is just my personal look and feel that should be “right”. So all my models may well appear as inaccurate or unrealistic in some way or the other – but they are just that: LEGO MOCs and MODs … and I am sure, that many building ideas have already been shown – either here on EB, in the various BrickShelf galleries, or somewhere else. I have not checked thoroughly though – just let me know and I’ll add the references. There are currently no photographs of the real trains. I am planning on taking these along with some impressions of my expanded “home office layout” – hopefully sooner than in a couple of years from now. This a rather long post, I am sorry. But I simply did not want to open several threads on rather minor things. Locomotives/Trains 1) GP38 “BNSF” (#10133) MOD LDraw file(s) and PDF instruction(s) I personally believe that the BNSF GP38 is one of the most inspiring train models TLC ever made. It appears as if many builders have modded, extended, and (re)designed their models based – at least partly – on the layout of this engine. I have also merged some of the beautiful design elements from the SD40-2 “Maersk” train (set #10219; these are the cab lights, front section, truck elements with new discrete brick/plate pilot design) along with a new frame comprised of discrete plates, re-bricked the fuel tanks, and added front PF lights. The concept of powering the locomotive is either pure “9V” or “PF”. A PF version requires a controller of some sort; either custom approaches (e.g., Arduino) or plain vanilla PF controllers/batteries located in separate cars etc. When running on its own with onboard battery and controller, the color scheme suffers severely on the 4-wide body section of the locomotive, which could be covered by custom stickers of course. The modified SD40-2 “Maersk” train introduced further below may also serve for “controlling” purpose. On my layout an SD40-2/GP38 pair is hauling rather heavy loads: The SD40-2 as PF controller with onboard battery and two motors and the GP38 with just one additional motor hooked up to the SD40-2. The V2 version of the PF receiver is handling 3 motors rather flawlessly when fed with the rechargeable LEGO LiPo battery. The required building steps are included in the SD40-2 instruction section, see below. 2) SD40-2 “Maersk” (#10219) MOD LDraw file(s) and PDF instruction(s) The major SD40-2 changes are the discrete plate frame (this way it became possible to add the neat white stripes the original locomotive features), changes to the trucks (they are one stud shorter and have a discrete brick/plate pilot), changes to the main body behind the cab, which is now only 4 studs wide, and to the fuel tanks. The engine is PF controlled, runs on the LEGO LiPo rechargeable battery, which is in turn charged through power-pickup from the 9V rails using a modified 9V train motor, cf. this EuroBricks topic, PF V2 receiver, and second PF train motor, along with PF head lights. The additional second PF receiver output wired to the rear section may be optionally used to operate a third motor; the GP38 shown above is an example. The color scheme of the 4 studs wide section behind the cab is suffering from the dark/light grey sections of the PF elements; however, I pretty much like the “used look” that results from that though. I never really like the original LEGO design of the body, where the receiver etc. is covered by large plates – to me, it appeared simply too wide for an overall 6 studs wide model. Note: There is an additional PDF which shows the required modifications to pair the SD40-2 with the GP38 shown above 3) Cargo Train (#4512) MOD 1 (engine), 2 (battery car), 3 (box car), 4 (box car type2), whole set LDraw file(s) and PDF instruction(s) The “major” changes to this very classic 9V train are the addition of a PF “battery car” in the same color scheme of the original locomotive and box car, and some undercarriage changes to the latter. There is also a second version of the box car. I really do like the old-dark grey/green color scheme of this train. Fortunately, my father has given me his Sopwith Camel (set #3451) as “brick supply”; this way also the second box car version became reality in the grey/green color scheme. The front section of the locomotive is raised by one plate and the front handrail changed. 4) High Speed Passenger Train (#7897) MOD 1 (engine), 2 (coach A), 3 (coach B), whole set LDraw file(s) and PDF instruction(s) Ages ago the “real,-“ department store close by not necessarily well known for their LEGO set inventory had the RC high speed “ICE” like train set on sale … I got two for very little money. Well, the one-piece front cab of this train (part #55768) has been discussed “controversially” – carefully phrased – but nevertheless, as far as I am concerned, with some modding a more or less decent passenger train resulted from merging the two sets. Everything has become a little “longer”, particularly the coaches. Also, the coaches have discrete plate frames and their trucks are rather heavily modified – based on the design of James Mathis’ Santa Fe cars (sets #10022/#10025). The four additional white 6x8x4 cylinders with flattened upper half (part #45411) required for a train consisting of two engines and three coaches came from two City tank truck sets (set #60016) – I could not get hold of the white cylinders with flattened lower half (part #45410) so the third car has a modified lower section. [Note: Unfortunately the “RC train base” (part #55455c01) is not available as official LDraw part – and I guess it never will be. I simply assembled that part from bricks and plates for the instruction and treated it as part in LPub … no idea how to do it differently. Also the “ugly” front nose is not even an unofficial LDraw part, I found the LDraw.dat file at digital-bricks. Rolling Stock 1) 4 Axle Tank Car MOC LDraw file and PDF instruction The tank design is close to that of the #10016 tank car set; there are some additions to the top section. The frame is made rather conveniently mainly from Technic pieces. 2) 2 Axle Tank Car MOC LDraw file and PDF instruction This is a plain vanilla 2-axle tank car – I guess there were many similar designs posted in this forum. 3) TankTainer Car MOC LDraw file and PDF instruction This one is a result purchasing the #3368 Space Center set – I was looking for the #64448 support/fence part (or whatever it is called) in red for a bridge structure – and these were left overs – as were the (sloped) tank half shells … looks a little weird but this way the car is more or less 6 wide and the tanktainer is easily removable. The frame is again mostly comprised of Technic pieces 4) Flatbed Car MOC LDraw file and PDF instruction The flatbed car is entirely made-up … it started with the four #91176 support parts from the 2011 Red Cargo Train #3677 set – did not know what to do with them … the cargo is – hmmm – cylinders? Had too many of the round 2x2 bricks and round bright green 1x1 plates … 5) Spine Car (with girders) MOC LDraw file and PDF instruction I guess the 5 “Toy Story 3” sets I purchased one after another for €20 each at TrU. No idea why that was, they had them for more than a year somewhat hidden in the “bulk-brick” section and each time I was there I could not resist … lots of bley plates for another bridge and for a rather big train station … but also tons of the 2x2x10 girders … 6) Gondola Car MOC LDraw file and PDF instruction As already mentioned, for the high speed passenger car MOD shown above I needed extra white 6x8x4 cylinders. At that time, the original ICE-type high speed train set was gone for long; the City tank truck set #60016 featured two of these cylinders each though; white with flattened upper half and green with flattened lower half. The white ones were perfect for the passenger cars, the greens were “left overs”. Which brought me to the gondola car – again entirely made up and again with a Technic element frame. 7) Tipper Car MOC LDraw file and PDF instruction This car is the result of eight yellow tipper end sloped pieces (part #3436) from the #4565 Freight & Crane Railway set (which was my first train set after my Dark Ages). For long, I did not know what to do with those. Then I saw tipper cars on BrickShelf, looked them up on the internet and this is the result. I guess they are rather “European” if not “German” … small and compact. The yellow color is not appropriate at all, but that’s how it is. This is it for the moment. Thanks for reading! Regards, Thorsten
-

Lego Titanic MOC - Can't create instructions
Mirco Hussmann posted a topic in Digital LEGO: Tools, Techniques, and Projects
Hello everyone, while I was reading in this forum for a pretty long while now, I now signed in to ask for your help. I recently designed a Lego Titanic in a pretty large scale (it is about 2.50 metres long), so loading and everything else in LDD takes a long while of course. But no matter how long i wait, I can't seem to make my computer spit out the instructions, although I think it's not that bad of a machine (i5 4690k @ 4Ghz, 8 Gigs of RAM). Could anyone give me tips what the reason could be? I also thought about splitting it in parts, but as it is that large that you can barely move big areas of it without the software freezing, I disapproved of that idea. Sadly I don't know how to upload the .lxf here because it is too big (230KB). Thanks in advance, Mirco -

Lego Volvo Af25 suspension 42030 crawler (plus instructions)
The Vooduist posted a topic in LEGO Technic, Mindstorms, Model Team and Scale Modeling
Wished I posted this sooner......... When I was originally had the model normal it couldn't go over an half inch actual brick tile :(. Due to that I spent a long time modifying it to barely go through grass about as tall as the pretend sticker grill. This thing can go over an emaxx tire with its 2 not one xl motors and it had an l motor for steering (only do if your not using 3rd party tires) if using 3rd party tire use an xl motor for steering (I only had 2). I'm now building a a25E tanker to spray weed killer for me so I don't need to sweat to death. Since its super easy to detach the bed I could be able to switch the tanker and soon changed bed be swappable maybe? Picture from very first successful time. Version 1.0 instructions: http://bricksafe.com/pages/Voodu/42030-dump-truck-super-mod-instructions Video as just a quick demo of some average grass: This is what I'm building while doing Ingmar Spijkhoven 6x6 truck and stay tuned! -
I finally took the plunge and bought my first PF train set. And I'm not ashamed to say I'm now addicted to making train things in LDD and Stud.io. Here's my first completed train car. A passenger car to match the colors of the Cargo Train set engine. As always (well most of the time), the build guide is available at charlesp.org
-

[Feedback requested] [Instructions] [MoC] "International" Gondola
jtlan posted a topic in LEGO Train Tech
Those of you with good memories may remember this gondola: It first appeared in the thread for @Commander Wolf's T18, and has since appeared in various videos of our locomotives. The gondola is a relatively straightforward design, being a modernized version of the body from 4543 Railroad Tractor Flatbed mated to trucks from the My Own Train series of cars (10013, 10015, 10016, 10017). Besides being pleasantly "official" in style, the design is fairly international; we liked it because it looked decent when paired with locomotives from various parts of the world. I've gone ahead and made instructions for this model: You can get them in PDF form below: International Gondola (PDF) In exchange, would you mind giving me some feedback on the instructions themselves? For example, are they easy to follow? What don't you like about them? etc. Enjoy! P.S. If you prefer images to a pdf, there is a Brickshelf gallery here (pending moderation). -

[MOC] 42060 C-Model: Tow Truck WITH INSTRUCTIONS
BrickbyBrickTechnic posted a topic in LEGO Technic, Mindstorms, Model Team and Scale Modeling
This was really hard. The pieces were quite hard t use, just like the a-model functions ;) But I spent $40 on this set, so I thought I would do something with it. Video at the bottom also contains Instructions. Thanks BrickbyBrick ;) -

Cool things to build from sets you didn't necessarily want to buy as a whole
BubbaFit45531 posted a topic in General LEGO Discussion
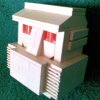
Searching for instructions for nice MOCs was mostly fruitless, so I turned my attention to official Lego instructions from sets that had something cool in it. 75000 has instructions for a relatively simple droideka, but I don't have all the necessary parts yet. 76051 had Ant-Man as jumbo Giant-Man. Still need to order a few more special parts like the face and hands and connectors. 30611 is the buildable R2-D2, again with special parts. -
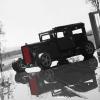
(Moc Instructions) 1971 Ford Falcon XY GTHO
Doc_Brown posted a topic in LEGO Technic, Mindstorms, Model Team and Scale Modeling
Hi Guys, been a while! Just thought I would drop a quick line letting anyone know that instructions are available for my GTHO, only 4.5 years after I first started building! hahaha. I have received a lot of enquirers about the instructions and its those people that keep me at it, through to completion. Please check out Rebrickable. :) Now I can finally start on something new! YAY ;P -
I'am looking for an instruction creator that works good with LDD. I'am trying it with blueprint, works great with LDD but big moc's are hard to manage. LIC is ok but leaves out parts, not very compatible with LDD. That's the same with Lpub and not very user friendly. Any ideas? Regards RobenAnne Ps my website www.ramt-brick-design.com My website
-

[MOC] Building McQuarrie's A-wing with Ahsoka and Chopper
DarthTwoShedsJackson posted a topic in LEGO Star Wars
Taking a few critical looks at my original A-wing MOC, I decided that a few important improvements were in order to get the shapes and proportions right. So I spent a few hours during the past few weeks to revisit the built, and a lot has changed - quite a lot, especially with the internal frame and the way this model is built. The changes were neccessary to accomodate the more correct outer shape, and to retain the sturdiness of the original MOC. Now Ahsoka's ride was finally finished, and after a few intelligence missions into imperial territory and a daring escape, Ahsoka asked Chopper to check her A-wing for imperial transmitters in an abandoned facility from the Clone Wars before returning to Phoenix Squadron. "What have you done, Chopper?! When I told you to take this thing apart to check for transmitters, I meant it figuratively, not literally!" "Badoop, ba ba. Arrrrrh!" "Ach, okay. Now let's check these sub-assemblies, and then help me put this thing back together, understood?" "Woop, woop!" If anyone would like to create an lxf-file - be my guest! Enjoy and have fun!


.thumb.JPG.3c74c0d405dc1afb04b2fa216ebc79e6.JPG)