Search the Community
Showing results for tags '9v'.
Found 135 results
-

MOC - Lego 114 reloaded - a little story in idea book style :)
Paperinik77pk posted a topic in LEGO Train Tech
Just for laughs!!! The train has wrong colors and during the photo shooting I mounted the roof in wrong position...but it was a simple and fun experiment after all. BTW...I'm still pushing the hand railcar!!! Bye! Davide -
Hello fellow train heads, Today I have for your viewing pleasure a 9V system that's been adapted for Lego narrow gauge (4 stud wide) track: NG: 9V shunter (3) by Nick Jackson, on Flickr Here's the engine up close: NG: 9V shunter (1) by Nick Jackson, on Flickr And the underside: NG: 9V shunter (2) by Nick Jackson, on Flickr Now here's a video of it in operation: NG: 9V shunter (vid 1) by Nick Jackson, on Flickr It's pretty finicky in operation at the moment, so I'm looking for your input on ways that I can improve this system! The two main areas that need help are 1) the engine's traction and 2) the electrical pickups. Thanks in advance for your help! ~Nick J~
-
Hello everyone! What kind of ideas pop into your head when you hear of a "cmf 8x8 vignette contest"? Mind you, I eventually thought of Micromotor, 9V, Fiber Optics and a matching figure capable of delivering the goods (hint: it did). Here's what came out of that idea... Just a dance club, folks! Nothing to see here, carry on... It is fairly tall for a vig, but it certainly works give the space restrictions. The dim lights were a pain to film in my setting, although I tried my best. The show must go on, no excuses allowed! And no regrets for that matter. Welcome the Catwoman from the Batman Movie franchise! Double the fun!! Some technical shots. The old 9V system is invaluable for how smoothly it integrates into Lego System. Fitting the fiber optics element into 8x8 was one hell of a task. At times I felt like a car thief on a job... The floor, oh, the floor! Don't even ask. Some bits and pieces. The pole absolutely had to be chrome - a choice afterwards regretted... I dare you to find a sound, functional and purist solution of proper length if you don't believe me. A rubber wheel was the only option of attaching the piece as far as my knowledge of pieces goes. ...And the heat goes on... Now that's a club I wouldn't at all mind visiting... Hope you had a great time here, be sure to visit soon! And something tells me you might just do that... Thanks for your attention! Let me know if you had as much fun as I did! x)
-
Hey guys, Recently bought a large lot of vintage 9V train sets and parts. The 9V AC/DC wall plugs are the 230V European version. Anyone have any recommendations on replacements for 110V US? Was looking at these ones on Amazon: https://www.amazon.com/Planet-Waves-9V-Power-Adapter/dp/B00191WVF6/ref=redir_mobile_desktop?_encoding=UTF8&dpID=41UoeHnCcDL&dpPl=1&keywords=9v power supply&pi=AC_SX236_SY340_QL65&qid=1518564574&ref=plSrch&ref_=mp_s_a_1_3&sr=8-3 but not quite sure on the plug type... Thanks, Jeffinslaw
-
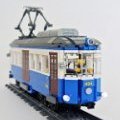
Hi all, this time I'd like to show you something that is a bit different. It is more a study, or an experiment than a real model. It's is a very small narrow gauge locomotive, inspired by an hand-made creation of Mr. Akio Inoue (who is a famous live steam builder in Japan). The locomotive is depicted on Mr. Mori Iroshi site, which is of great inspiration to me. There's also a Youtube channel (simply search AKUBI LR on Google, you''l find it immediately). Let's say it is a mix between a DEKI-3 and a Rhatische-Bahn GE 2/2 162. Once it was yellow, now it has RhB colors. It's a bit "Japanese" since it has a super-deformed body, it is more tall than long. "Power" (HA HA HA ) is coming from a 9v micromotor mounted upside-down, and there's a working headlight. It needs a battery car to work. I use it on black narrow-gauge Lego curved track, but I recently discovered that LEMAX track has the same gauge and offers straight tracks (no switches, sorry ). It is sloooooooooooooooooooow! I hope you like this little,nerdish thing! It's name is PKZIP (like the file compression archiver for DOS PCs of the past)
-

Retro Review: Old school Lego Set Speed Builds
travisridenour posted a topic in Brick Flicks & Comics
Hey guys new to the forum but not to lego. Just started a new Youtube channel where Im speed building all the old sets i got when i was a kid. They range from about 1990-2009. Im just getting going on the channel so the list of sets will build as I go. I have roughly 2-250 sets so if you're a fan of older sets check it out. Thanks Travis -

What trains could be rereleased if Lego goes the Legends route?
Doom2099 posted a topic in LEGO Train Tech
I am so excited with Lego's news about their reselling the Taj Mahal, because there's always the possibility that this is just the start of something big, and we could be getting an affordable chance to buy classic sets that we missed out on, or don't want to pay the current online prices. I remember with the arrival of the internet how cool it was to go to places like Lugnet, and then to Ebay, and being shocked at how much trains had gone up in price, even just from 1980 to 2000. Then after everyone complained online about how they missed out on the Metroliner, it suddenly reappeared like a legendary phoenix. With the Club Car in tow! At the time, it made perfect sense bringing back the first 9v train while 9v was still going strong. 10 years seems to be the magic number for rereleases with Lego, as seen with the Legends line, and now Taj Mahal. So I was wondering, what if any trains do you think Lego could/should rerelease? Could they take old 12v and 9v sets and swap in Power Functions? What about the Train Shed, or Santa Fe Super Chief? Emerald Night? Are there any regular retail trains sold after 9v that people are clamoring for a return of, as we saw with the Metroliner almost 20 years ago? Is a train related rerelease even feasible with Lego today? I would love to hear what others think is possible / desired. Personally I wish I could buy more Santa Fe cars for regular retail price! -
Hi, I've been away for a while, and without writing a huge story about it, I'm wondering what the status of third party 9v track and accessories is. I was a backer for ME Models metal track - I was also one of the people who expanded their order back in the summer of 2016, and received my full shipment last January. I take it they are having a lot of problems now, and a lot of people did not receive their product. That's really unfortunate... we need some successful players in this market, even if it means higher prices to cover costs. I was recently able to finally set up the track for my annual Christmas train set up - the only time I get to keep out a functioning train layout. The ME track was... interesting. Coming from all LEGO, I will say the conductivity seemed flawless compared to years past, where I always seemed to have bad track along the way somewhere that made the train slow, even after cleaning. I was very impressed with it. That said, the larger radius curved seemed to suffer from not being perfect arcs when put together. Putting the track together - and keeping it together while trying to connect other track, was also fairly frustrating - and I ended up just not using the end plastic pieces that join sections together, and instead just let the traditional rail joiners hold them together. But I checked ME recently, and as we all know there is no more track available. I was so optimistic at the time if the campaign - even answering surveys of what I would like to see next (like new motors). So I searched here.... bricktracks seemed like it would have been worth a shot, but the campaign failed, probably because it was competing with the ME campaign, but I don't know. Still, bricktracks seems like a functioning business - but I only see plastic in the store. So is there any news that I'm missing? I really don't want to just give it up - I really dislike battery operated for a number of reasons.
-
It's 7 weeks till Christmas week from now and you know what that means? Tis Christmas Train season coming up quickly! Some of you may remember me setting up a little train layout in my office last year. All colleagues loved it very much and so this year me and some colleagues are expanding the office train for this year! Compared to last year the new office train will be about 60% more track, 70% more cars and can carry more than 50% more "real cargo" than last years train! This year's office train will feature the following: - T-Shaped 9V layout with 3 stations (calling at 3 different desks, so everyone in this particular office has access to the train) - 4 Track wide cargo cerminal and card - 20m of track length in total - 16 cars in total - Original Santa Fe Super Chief Engine upgraded with the original light brick - Candy wagon for storing and transporting real eatable candy - Band wagon for transporting a bluetooth speaker and stage for the BrickBand - PF shunting engine for the Power Functions yard - A small handcar (this is an inside joke with colleagues) - Winter Holiday Train which I built yesterday I'm super excited - construction will begin this week. We'll see how far we can build it during lunch breaks. Pictures will follow shortly after! But to get me started, I have a couple of questions: How does one operate a 9V layout with two transformers? Do they plug in parallel (i.e. exactly the same way on both transformers)? What power settings do I use when running a train with two 9V motors (power setting the same on both transformers)? Do I have to unplug one of them if I run a smaller train with only one 9V motor, or do I just not bring up power on one of them? Thanks in advance for answering my questions! Here's the planned layout for this year's office train:
-

Strange Motor Noise?
BrickWild posted a topic in LEGO Technic, Mindstorms, Model Team and Scale Modeling
Hi there, I've noticed whilst testing 'Electric Technic Motor 9V Geared 480rpm' (47154) http://peeron.com/inv/parts/47154, it was making a strange buzzing noise whilst going both clockwise and anti-clockwise. Could this mean one or more of the internal gears are failing? Thankfully, there are four thin screws on the bottom which allow the motor to be taken apart. Are replacement gears obtainable? If not, then I have to have them either 3D Printed or cast in a silicone mold. Thanks. -
[VIDEO] Trenbrick 2017 RENFE R104 Circuit + Narrow Gauge
mtrkustoms posted a topic in LEGO Train Tech
Hi to all, Here is a short video of the last event I participate with All spanish replicas of Renfe from Aitoruco and myself. 2 diferent loops with r104 custom curves (printed by blastem), 20Bps cable bridge (Designed by Sheppo), R104 trains (designed by Aitoruco and MTRkustoms) and also working narrow gauge (by MTRkustoms) Enjoy it -
Addendum to “Electrify your train switches” Dear all, much has been said and shown about ways to electrify LEGO 9V/PF train switches. Along with the EB electrify your train switches thread and some other posts on EB and elsewhere there hardly is anything interesting to add. But then … as said before, I am just wrapping up more than a decade of years of fun with my train layout. My switch electrification approach is far less driven by achieving “to scale modeling” or “most elegant solutions”, it is governed by “using as many diverse LEGO motors as possible” on a more or less standardized and simple drive base design “using as little parts as possible”. I simply like to make efficient use of the stuff in my LEGO boxes – since there are about 30 switch points on my layout. There are a couple of my personal design lines: Since some areas of the layout are rather “dense”, the footprint of the drive mechanism should be as small as possible A clearance that is a little greater as compared to the original configuration with the manual switch stand installed. The reason is that some of my rolling stock MODs/MOCs have a fairly large “overhang” in curves and thus need some additional clearance when passing switch points The switch drive should not fall apart even after prolonged operation as almost half of my tracks are hidden behind bookshelves and other furniture. No modification of the switch – this means that the force required to throw the switch is often considerable. The rendering below shows one very simple base design for my switch drives. It consists of a couple of Technic as well as plain bricks and plates. The rendering is already 5 years old – time is flying. This particular drive mechanism has one serious disadvantage: Operated with the full torque of the PF motors (e.g. with the PF bang-bang remote #8885) it falls apart after five or so cycles. This issue is rather easily overcome, when the torque of the driving motor is adjusted via power control and pulse timing using a programmable brick as for example an RCX or Scout. It took me ages to figure out how to accomplish that: Adjust the length (e.g. 0.3 s) and the power (on LEGO’s 0 – 7 range) for the motor “on” state. This LDraw file contains all the above varieties; the individual sub models combine to any of the drives shown. (Note that you may need to install the unofficial LDraw library as of 2016 to correctly load the files). Alternatively, paying more careful attention to the original EB switch point electrification thread entry (https://www.eurobricks.com/forum/index.php?/forums/topic/44821-electify-your-train-switches/&page=3) would have told me that Jonathan uses his NXT to do exactly that – and for long! The switch is thrown by a lever, which fits into the space between the two mounts for the manual switch stand. By small variations of the actual gear configuration, almost all typical LEGO motors can be attached. The geared varieties [e.g., PF M motor (#8883), Technic mini motor (#71427, #43362), Technic motor geared (#47154), or even the Mindstorms MicroScout PBrick (#32344] are driving the lever with none or low additional gearing ratios; the ungeared Technic motor (#2838) requires higher gear ratios to work properly. The advantage of this drive design is the footprint (as measured on the floor, not height!), which is 3(x6) studs for clearance and 5(x6) studs for the base = 8(x6) studs. The picture below shows two MicroScouts on the bridge operating the two switch points on the right. There are light fibers plugged into the MicroScout’s light sensors; these do transmit the VLL code generated by a Scout PBrick (not visible) to control them. MicroScouts operating as “intelligent motors” for switch drives are fun. The “forward/reverse” “switch” is somewhat unique: When the MicroScout is put into “P” mode it pays careful attention to its built-in light sensor. In this mode, the MicroScout understands some VLL (LEGO’s Visible Light Link protocol) commands such as “motor on forward” etc. In other words you can operate the switch using optical signals from a VLL source. The rendering below shows a Scout controller operating 4 MicroScout switch drives. This version of a switch drive has the smallest depth I could come up with to securely operate unmodified switch points: I used that one on my layout here: Here is the link to the LDraw file. In the mean time I have slightly modified the “RailBricks #9 challenge” drive (a number of ingenious train experts have contributed to this one – see the "Challenge reveal" article by Benn Coifman in RailBricks #12, page 37) and reduced the size to 5-wide at the base. This drive never falls apart, regardless how much torque is exerted on the driving axle. The design is simply amazing! I have retrofitted almost all of my switch points with this version. When a MicroScout is operating the drive, it should be oriented such that you can easily get access to the buttons (on/off, select, run). There are several drive versions to attach the MicroScout in such way that is does not interfere with the required clearance on the point and good access to the buttons. Here are some real world examples: This folder contains all LDraw files Best regards, Thorsten
-
Hi all, I recently picked up an old bundle of 9v stuff and I'm a bit stuck with son power issues and hope someone can help. I'm a 12v guy so I'm a bit lost! ?. The transformer seems to work. I can't get any power to the track. If I connect a cable from the transformer to the motor directly it works fine (or seems to anyway). When I connect the track connector cable to the track it just won't work. I've tried cleaning the track etc. Also, if I leave the normal 9v cable connected to the motor and then place it on the track with the track connector attached it cuts the power to the motor. Does that make sense to anyone? Haha. Hope someone can help as I'm baffled. Cheers!
-
I can't seem to find anything about this elsewhere, so I'm going to ask here directly. Are there any disadvantage of using the older, 9v battery pack (4760c01) that took one 9v cell to run power functions receivers and motors instead of the current, 6x AAA battery pack (87513)? I know it will require a converter cable, but from my view it looks as though a 9v battery pack would be better as it is smaller (in height) and available in more colours than just DBG, so easier to hide in 4-wide MOCs and such. Will this have lower power or current output to the motors, or discharge faster? Is it suitable for use in train MOCs, considering mine won't need to run very far or for very long? I was intending on using it with a rechargeable 9v cell or two, how often would I need to swap one out and recharge it? I'm trying to decide whether or not buying one, and a converter cable, is a good idea. (Or I could try bashing together a PF cable and 9v battery clip perhaps, like this.) Thanks in advance for any help!
-
[MOC][RC] motor-selector with additional gearbox/output-selector
TechnicSummse posted a topic in LEGO Technic, Mindstorms, Model Team and Scale Modeling
Since i cant testdrive my newest speedracer because of the rainy weather, i decided to clean up my "in progress moc corner" and found this: A as small as possible electric doubleswitch, wich you can use, to control 2 different motors with the same RC output. You can simply select wich one you wanna use. At the same time you can use it to control a gearbox, or output-selector, as you can see in the video. The idea to invent this, was, to realise as much functions as possible in a rc-model, with a limited amount of receivers (in my case just 1 RC-unit). You can use the auxilary output of the RC-unit to control the micromotor, and thus switch between 2 different functions ( for example drive and a pneumatic compressor). The output-selector can be used, to switch for example a servormotors output between steering and pneumatic-switch. "Why so complicated, you could just use the auxilary output for the compressor" -> well... you could do that and beeing limited to the auxilary current limits (~500mA). Also you wont have the gearbox/output-selector then ;) While using this, you can power your compressor (or what ever you want) with the "unlimited" power of the RC-units buggy-motor-output. AND fine-controll it with the 3-step forward, 3-step-reverse-control. It is also possible to control this with the RC-units steering output instead of the micromotor... like that you still have the auxillary-output free for use. How it works: The trick here, is to angle the 2 switches axles by 60 degres (45 would be perfect, but this is ok ;)). But you need to try the right 60 degres angle... only 1 position works, otherwhise you will have 1 motor switched on in one position, and 2 motors beeing on in the other position. The gearbox/ output-selector in the video can be simplified a lot, this is just to show, how it could work. I am pretty sure, there are some more things you could do with it... also with regular power functions ;) -

[Train Layout] The WindMill Lego Train Layout Project (WMLTL)
LegoLow posted a topic in LEGO Train Tech
Hello everyone, for those who do not know me, I'm a big fan of trains and especially Lego Train. I finally have a space to create a Layout finally worthy of the name. My approach comes a little more of the model in the sense that I like to see a train pass over another, to automate the network, make realistic through light signals, station stops, etc. ... I started this project in February 2016 in my basement where I made by myself, furniture and shelf for storing SET Lego but also to design the layout. I was already well advanced when an incident occurred: the flooding of the basement end in May 2016 .... Then in August, the discovery of a leak in the water supply of the house forced me to completely dismantle this first try of a Layout to access the water inlet pipe ..... I come back now in force therefore with a first experience, many tests on the possibility for our pretty trains to climb slopes (straight or curved) to optimize the best of my available space and create a nice layout ! ;-) Due to financial limits, this layout will be not made with 100% of Lego, I will use wood and homemade stickers, custom electronic to make it. Here are the first shots (or I should say the nth plan because with Bluebrick, we never stop to change those plans) to my future Layout (so different from the first that I had designed and unfinished) WMLTL - v5 - Level 0 by LegoLow, sur Flickr Corresponds to trainyard + walkway + a brief passage of the 12V track WMLTL - v5 - Level 1 by LegoLow, sur Flickr Ground level with his future main station WMLTL - v5 - Level 2 by LegoLow, sur Flickr First level of the "mountain" : secondary station and then, possibility to climb in the mountain or to go back to the main level WMLTL - v5 - Level 3 by LegoLow, sur Flickr WMLTL - v5 - Level 4 by LegoLow, sur Flickr WMLTL - v5 - Level 5 by LegoLow, sur Flickr Top of the mountain.... Finally a view (done quickly, I will improving later), global superimposed, giving the idea of what will be hidden, visible .... WMLTL Project - v5 by LegoLow, sur Flickr Following probably next week with the start of the implementation of Level 0. It's a big challenge for me because this project is made of mixing differents things : LEGO, electronics, electricity problematics, Priority management on a network, etc.... Hope you will find that interesting to ! -

Programing 9V Elector Motors with EV3-G
Jarema posted a topic in Digital LEGO: Tools, Techniques, and Projects
What block and programing I must use, to properly handle management of 5119-1 9V Micromotor, and others ?!! -
This was an experiment of automation of a tramway line with an old LEGO RCX brick: All sensors and cables are 100% LEGO. There are 8 light sensor, 4 (two couples, one couple for station and one for switch zone) on input 1 and 4 on input 2. 3 output, output A (station 1 - switch), output B (station 2 - switch) and output C (switch zone). Everything is handled by NQC program
-
'ME-Models' markets metal tracks that substitute Lego's official 9-volt track, and 4D-Brix reproduces 9-volt monorail substitute parts (including track, motors, plus battery packs) as well, so why has nobody stepped up to the plate and tried to recreate/mass produce motorized 9-volt train bogies/trucks (serial number 590/70358)? A mint one currently goes for as much as 70 USD and used ones go for almost 40 USD, which is ridiculous since that's enough money to buy me food for a week.
-
Greetings all. Recently, I have decided to make the painful decision of selling my 9V collection. It hurts a bit to sell all these wonderful things, but for the last year they haven't done much except sit in a drawer. They deserve better than that. Listing: Basically, what I did was took the lowest BrickLink price for any given article and cut a bit more off. I'm not interested in making a massive profit off of these. I'll settle for an even 3,400.00 EUR, shipping costs on me. Trains would be shipped worldwide via FedEx, UPS, DHL, or any courier of your choice available in Poland or the UK (pickup also available in these two countries). Not everything on the pictures is listed, but everything in the picture (LEGO-wise) is included. Additionally, as I'm cleaning the room in which the LEGO are in (it's quite a big room, about 45-50 square meters, and it's filled with stuff so it won't take a short while), I'm more than willing to send free-of-charge anything else I can find from my collection (I'm pretty sure there were about 5 9V motors lying around somewhere). I am also including a folder with this collection. The folder contains instruction booklets in EXCELLENT condition for most of the models. All the instruction booklets for the Santa Fe sets are in there in mint condition, as well as the certificate of authenticity for the limited edition (please note that the other one is not limited edition). The folder also contains all the spare parts from the Santa Fe car sets, so conversions are possible. Feel free to email message me about any inquiries regarding this collection. If you want I can put it up for a private auction on eBay (I'd rather avoid doing so because of the fees). *Note - the Metroliner is counted as 2 sets, but one is incomplete. As you can see from the picture, what I have is the Metroliner and 2 additional cars. The cars came from 2 incomplete Metroliner sets (one contained the engine and the car, the other contained an incomplete engine and the car, only the incomplete engine survived and is seen on the picture). I've basically listed the Metroliner and 2 incomplete sets as 2 complete sets (2 engines, 3 cars). *Note - one of the cargo train locomotives is a custom. I ordered it by accident from BrickLink (didn't read the description). It's a bit shorter than the original, and it doesn't have the undercarriage mechanics, although this is easy to add. It still comes with a working 9V motor.
-
Hey guys! As some of you know, I recently got back to Lego trains after 15 years of neglect. A close friend of mine thought it was a good idea to document my progress, thoughts and plans on a personal blog, so others would be able to one day build their own big layouts and see what I struggled with and how they can do it better. I'd like you guys to check it out and use this forum to comment on my posts and maybe give me suggestions (I love ideas) on things you would want to hear about or see of. This blog is entirely dedicated to my Lego trains project. So far there are 4 blog entries (The latest one is being uploaded right this moment). If you wish to comment on something, let me know which post you're referring to, so I know what the topic is. http://wafa-sadri.de/pages/blog.html Thanks for checking it out! //Edit: By the way, I try to post once a week, every Monday.
-
Hey guys, I've recently been trying hard to come up with a useful layout to use both my old 9V trains and my PF trains on the same layout. I just can't come up with anything that works and is interesting. Most of the time I end up with one loop and a dozen sidings and that would only allow me to run one train at once which is a bit boring. I have a decent amount of track (150+ pieces), both 9V and PF, but I just can't figure out something that I like. Here are a couple examples of some layouts I came up with: I don't really like either of them too much but I can't come up with anything better than these two. I'd like to know how you designed your layouts and how you go about designing new ones. I'd like to utilize as much of the track I have as possible. I've already looked at dozens of pictures online but most layouts are either too big or not interesting enough. Looking forward to seeing yours :)
-
Does anyone know where to find broken 9V train motors? I searched bricklink and ebay but i didn't find anything. I want to make it in to a custom PF power pickup.
-

[MOC] Canadian National X-10-a with Power Functions and 9v
Commander Wolf posted a topic in LEGO Train Tech
Well, it's been more than a year since I started work on my last locomotive MOC, the China Railways QJ. Having built most of the practical engines (not too big for R40 curves) that I was visually interested in, I had to wait a bit before my interest was piqued again on the locomotive front. My inspiration came from running the QJ at most BayLUG meetings for the past year and change. The QJ isn't necessarily unreliable or difficult to set up, but it's still not very convenient: the model isn't that easy to move around or manipulate due to the size, the tender, and the number of fragile bits. The lengthy drivetrain with its fair amount of friction and torque also prevents the engine from generating smooth low-end torque. Finally, BayLUG still runs 9v at most of our shows, and the QJ can't easily be converted to run on 9v. So this is really my second locomotive to be born of functional requirements (the first was my U30B): 1. It should be easy to transport [from here to there] and move around [a layout] 2. It should be designed with robustness as a key feature 3. It should be easily convertible between PF and 9v operation 3b. The PF components should be easily removable (also helps with charging) 3a. It should run smoothly when pushed [by a 9v power car] Requirements 1 and 3 really insist that this engine be a large tank engine: for 1 I don't need to deal with a tender when transporting or moving and for 3 it needs to be big enough to fit all of the PF stuff. It actually took me quite a bit of time to zero in on the X-10-a as large tank engines are apparently pretty rare in the US and North America: it seems that even most of our branch line and shunting steam engines were tendered. But eventually I found a drawing and the work began! What I learned from the QJ is that if the weight of the loco is properly distributed, one powered (and tyred) axle is good enough to generate usable torque. From this notion I designed the chassis to have exactly that one powered axle, which I could easily remove to remove tyres and gearing for 9v operation. For the same reason, the driven axle isn't cranked either; in the QJ I would have had to remove all of the cranks and all of the wheels to access the tyres or gears. The lack of cranks on the driven axle also lets me keep the chassis articulated, which should help minimize rolling resistance for 9v operation (say compared to a 6-coupled flange-blind-flange configuration for the drivers). The drive rods are made using the half-pin in rod-track technique, and there's a bit of a hack: the connecting rods have to go around a corner due to the articulation, so the travel is longer than the usual three studs, and the connecting rods are both loosely pinned down and made of flex. As far as I can tell this arrangement doesn't add significant friction, probably because the corner is very small. The engine is designed to be powered with two M-motors, but I'm using the E-motor right now for the novelty. Unfortunately it wasn't quite possible to get as much weight as I would have liked over the driven axle: the battery box must go behind the boiler due to its height, and that really limits weight distribution options. The loose 9v motor in the front is simulating the weight of a second M-motor, and it helps bring the net weight over the driven axle to maybe 60 percent? Here you can also see how all the bits come out of the engine: almost all of the top surfaces are detachable. Whether this is convenient enough to fulfill requirement 3 remains to be seen. Construction of the body is actually very similar to that of the QJ: structural integrity is mainly provided by studs-out beams and everything else is studs up. Stickers are created at 300DPI and printed on 3M 3200-L mailing label material. This is a small detail, but it is actually one of my favorite parts, inspired by and stolen from 60052: And finally a video showing the locomotive running. The first 70 seconds is PF running and the last 20 seconds is 9v running. For PF running I'm using the AAA battery box with AAA Eneloops and the aforementioned E-motor. The E-motor is actually pretty neat: it has a wider dynamic range than the other PF motors and it is quite quiet as well. Sadly it is a little bit underpowered as well; I'm geared down 3:5 and you can still see it struggle a little in the corners during the PF segment. The 9v segment is a bit hazy, but we ran out of sunlight because DST. The engine is actually smoother than I would have guessed in the unpowered configuration: you can see how it basically doesn't lose *any* speed in the turns, and the regulator is only turned up to notch 3. Alright, I think that's all the commentary I have on this. There is as usual a full gallery if it ever gets moderated. There's a bunch of build and reference pics there that I didn't show. EDIT: Instructions for this model are now for sale on Rebrickable: https://rebrickable.com/mocs/MOC-61355/NonsenseWars/148-canadian-national-x-10-a-powered-up -
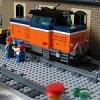
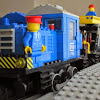
This is a typical small 2axle industrial locomotive which can (could ) be seen shunting waggons in bigger industrial areas in Sweden. It's 7wide, 18studs long and has a 9v train motor.


.thumb.jpg.19742e89790e473128572b8d3969c36d.jpg)