

LegoLow
-
Content Count
15 -
Joined
-
Last visited
About LegoLow

- Birthday 02/14/1979
Recent Profile Visitors
921 profile views


-

[Train Layout] The WindMill Lego Train Layout Project (WMLTL)
LegoLow replied to LegoLow's topic in LEGO Train Tech
Thanks ! Yes @Vliebricker, there will be both : a circuit of 12V that will cross the major 9V circuit..... I hope without crashes !!! -
That's true that some models are resized to fit particular printer. I saw that with My Robox, printing in ABS, I have to adjust sometimes the model (especially sometimes due to the retraction of ABS). Personally, I have remade my own models : I use as a template file a LmCAD file that I export to STL via LDView (and then, repare through an online 3D repair service). That's true that I don't know yet the durability of such track in time....
-
[Train Layout] The WindMill Lego Train Layout Project (WMLTL)
LegoLow replied to LegoLow's topic in LEGO Train Tech
Hi @Vliebricker ! Thanks ! ;-) I hope that my trains will be able to tow a number of carriages into the moutains !! Otherwise I must give up my project ! Or at least 1 or 2 of my 25 9V trains ! I planned (but not tested yet) : 4 double wagons (light weight)(or 8 little light weight wagons) per 9V engine. For more wagons, I planned to use 2 engines per train (especially for exemple for my metroliner that have 4 (very very high weight) club car)...... and otherwise, do an intelligent combination of light weighted wagons and high weight wagons per trains..... For the 12V, I planned only 4 wagons max per engine...... I planned about 16-18 cm between levels; with an incline of 4° (so about 20-24 tracks to climb 16-18 cm)... I've tried before with a few (light weight) wagons and it works well ! It's works too with my 7740 (climbing 15,5 cm on a 18 straight track slope). The hard thing is the "arrival" to the top of the slope : the engine can derail if the end of slope is not smooth enough ..... To reduce risk (only for 9V), I have 3D printed special tracks : a begin slope track and an end slope track. I will test it soon to see if that's enough smoothing enough at arrival to the upper level..... -
[Train Layout] The WindMill Lego Train Layout Project (WMLTL)
LegoLow replied to LegoLow's topic in LEGO Train Tech
Hello everyone ! Here is small news because it seems like this project does not advance ! But YES ! Electronic Side Detectors I refined my IR detectors and found a good compromise for detection. Moreover, with the use of an analog multiplexer / demultiplexer (the HC4067, to make simple it is a "power strip"), I will be able to connect as many sensors as I want ! I tested the detection by a reed switch : by raising the reed switch by 1 to 2 plates with respect to the cross beams of the track, detection of the head magnet ( And tail) works !!!! I must test if it detects the magnets binding the wagons ... Train Track Switches Automatisation For the control of the switches, I found my servo! A beautiful TowerPro MG92B with metal pinion that has enough force to actuate the switch itself without making any alterations on the "friction" contained in it ... Here is the "alpha" mounting open and closed : I received my bricklink order for bricks and plates in dark bluish gray in order to make the beta ... I tested a PCA9685 card (yet another power strip, but more powerful (16-Channel 12-bit PWM / Servo Driver - I2C interface)) which allows to control 16 servo using only a few outputs of the Arduino. In addition, they can be cascaded; This is good because I have about 25 switches to drive ... and it works! Power supply Side Power supplies of the block sections : I am therefore always on my L298N. I will test the use of the card with PCA9685 in order to just multiply the control of the "signal" regulating the "power" of the L298N. I've decided to begin with a standard power supply (like for portable PC) that delivers 9V with 5 amps. I have received but not yet tested Servo Power Supplies + IR Led + other electronics composant : 5V. I found also a standard power supply that delivers 5V with 10 amps. For the 12V trains, I will do the same with a power supply that delivers 12V with 8 or 10 amps. Lights and signals I don't know yet if I do "basic" 3 lights signals or more complicated like the french signalisation.... like that : Accessories/pieces side Santa Claus offers to me a 3D printer last christmas.... so I print things that I cannot create with Lego... such as : I print my 9V power connectors (need at least 58x2, 30 minutes per piece) I must print also some straight track (half straight, quarter straight) and some curves track for the signals, I do not know yet if I stay on that: (By adding of course a white trace making the outline of the signal (paint or sticky sheet) (The foot is not the definitive, I'm just talking about the design of the "box" lights) I have modified the layout in last months, I expect to stabilize it again a bit before posting the images on FlickR. I stay on 6 levels : 3 mains with 2 have a big station (one with the 4554 station and an extended 4 docks of 7937 / the other with the 7824 and an extended of 2 docks of 7937). The 3 others levels are the "walk" in the mountain. 11 block sections on the 12V (for 4/5 trains) and 58 block sections on the 9V (for 25/30 trains). So I'm advancing on this titanic project and hope soon to return to you with other news! -
I would like to thank you very much Richfilth for all your jobs on arduino for Lego trains : you made me discover the arduino and the power of that card for such wonderfuls projects ! And the potential of conceiving incredibles things ! I just have a question : you say, you use as much LN298 to control several trains..... but in my comprehension, you control power delivered to rails sections to "simulate" the fact that you control several trains, is that ? So, in this case, we join the world of model railways by creating block sections of rails in the layout to get control over several trains and with this method, we avoid power problem that we can have sometimes when we put multiple 9V motors on a circuit.
-
[Train Layout] The WindMill Lego Train Layout Project (WMLTL)
LegoLow replied to LegoLow's topic in LEGO Train Tech
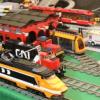
Thanks kieran and capparezza ! I planned to build a yellow hopper and a green crocodile too ;) Yes, for the first time of my life, plenty of space for a big true layout ! This week I set up electronics composants and I think next week I will advance more in setup the rails ! (Maybe doing MoC on RC switch then convert them to 9V with copper tape). -
[Train Layout] The WindMill Lego Train Layout Project (WMLTL)
LegoLow replied to LegoLow's topic in LEGO Train Tech
Small pictures of the soft advance... First, I did not know what to use for coating: Model mats, true flocking because 100% Lego, a surface like that to cover, here is expensive ! So I opted for the concrete effect wallpaper ;) Covering wood with wallpaper to simulate ballast by LegoLow, sur Flickr[/img] First rails.... First rails on place... by LegoLow, sur Flickr And first test of the presence detector in "condition" almost real ... Testing IR detector in condition by LegoLow, sur Flickr Still I must gauge the strength for the detector and find the best values for good detection .... Following soon ;) -
[Train Layout] The WindMill Lego Train Layout Project (WMLTL)
LegoLow replied to LegoLow's topic in LEGO Train Tech
Thank you "LEGO Train 12 Volts" ! and thank you kieran ! I need luck that's sure; and time, method due to the multiple problematics : electronic, programming, electricity management, layout construction... -
[Train Layout] The WindMill Lego Train Layout Project (WMLTL)
LegoLow replied to LegoLow's topic in LEGO Train Tech
Thanks Capparezza and tmctiger ! I will watch if track will not be to narrow in the implementation ! I think the wider is ok but the longer (I think about trains with huge "nose" like 7897) is to checked.... thanks ! ;) -
[Train Layout] The WindMill Lego Train Layout Project (WMLTL)
LegoLow posted a topic in LEGO Train Tech
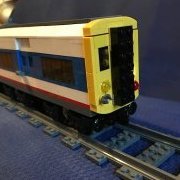
Hello everyone, for those who do not know me, I'm a big fan of trains and especially Lego Train. I finally have a space to create a Layout finally worthy of the name. My approach comes a little more of the model in the sense that I like to see a train pass over another, to automate the network, make realistic through light signals, station stops, etc. ... I started this project in February 2016 in my basement where I made by myself, furniture and shelf for storing SET Lego but also to design the layout. I was already well advanced when an incident occurred: the flooding of the basement end in May 2016 .... Then in August, the discovery of a leak in the water supply of the house forced me to completely dismantle this first try of a Layout to access the water inlet pipe ..... I come back now in force therefore with a first experience, many tests on the possibility for our pretty trains to climb slopes (straight or curved) to optimize the best of my available space and create a nice layout ! ;-) Due to financial limits, this layout will be not made with 100% of Lego, I will use wood and homemade stickers, custom electronic to make it. Here are the first shots (or I should say the nth plan because with Bluebrick, we never stop to change those plans) to my future Layout (so different from the first that I had designed and unfinished) WMLTL - v5 - Level 0 by LegoLow, sur Flickr Corresponds to trainyard + walkway + a brief passage of the 12V track WMLTL - v5 - Level 1 by LegoLow, sur Flickr Ground level with his future main station WMLTL - v5 - Level 2 by LegoLow, sur Flickr First level of the "mountain" : secondary station and then, possibility to climb in the mountain or to go back to the main level WMLTL - v5 - Level 3 by LegoLow, sur Flickr WMLTL - v5 - Level 4 by LegoLow, sur Flickr WMLTL - v5 - Level 5 by LegoLow, sur Flickr Top of the mountain.... Finally a view (done quickly, I will improving later), global superimposed, giving the idea of what will be hidden, visible .... WMLTL Project - v5 by LegoLow, sur Flickr Following probably next week with the start of the implementation of Level 0. It's a big challenge for me because this project is made of mixing differents things : LEGO, electronics, electricity problematics, Priority management on a network, etc.... Hope you will find that interesting to ! -
Thanks BrickJagger !
-
Thank you dr_spock ! The flooding problem was resolved by repairing the evacuation of rainwater and by repairing the leak in the water supply to the house. Last evening, due to a strong thunderstorm with hail, flooding comes back in the basement but not in the room of the Train Layout, flood risk is limited now and I'm ready to beginning my big dreamed project !
-
Thank you so much Capparezza !
-
Hello Robert8 ! Thanks for your welcome and thanks for my collection I calculate that I need 254 straight Rails to expose it.... I never did it ! But soon, with my layout project, I think it will be possible ! Yes, I see it : the SET 10254 ! It's a beautiful SET that I think I will buy in some month !
-
I finally decided to subscribe to EuroBricks ! I'm from France, I'm a fan of the little brick since young and especially LEGO Trains ! First through the SET that my parents gave my young, and with my own (not having an unlimited budget unfortunately ), I advance as I can, every month, every quarter or every year in my collection and my MoC project. I had my periods of collections, my periods stop and come back in strength since I have enough space to create my first true LEGO train layout !!! I would talk in another topic on this project which is important to me since it is expected to run 25 trains that I have in parallel (some will remain in trainyard) : make cohabit a 12V circuit with more than one 9V circuit automate more as I can with Arduino Add lights, traffic lighs Automated switches, secure crossings Add also to grow 6 levels of train, thereby to create a moutain terrain (L0: trainyard | L1: Main Station | L2: secondary station / mountain top | L3 / L4 / L5: Mountain path) MoC rails (conversion rails for RC and 12V to 9V, referrals modifications) Here is a link to my YouTube channel following this extraordinary adventure: https://www.youtube.com/channel/UC2w5b6j0MyfxNHv0XCy_sbw Here is an overview of my trains collection (not complete) An overview of my LEGO train collection by LegoLow, sur Flickr And here's a diagram of the space (royal) that I have for my project (which has already experienced a failure due to flooding problems) WMLTL - Layout Dimension (version 2) by LegoLow, sur Flickr Thank you for your welcome and wish you a good day!