Search the Community
Showing results for tags 'Ucs'.
Found 181 results
-
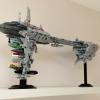
Well, hello there! There’s a story behind every Lego build so, please indulge me, and let me tell you ours…. It’s a beautiful seriously wet night here in Australia where I find myself gazing riveted to my computer, with Studio 2.0 open, marvelling at the final depiction of what represents a year’s work between an odd coalition of adult Lego lads. Hovering virtually on the screen in all its three-dimensional splendour is the cumulation of our little brains trust, our version of Henrik Anderson’s 75355 Ultimate Collector’s Series X-Wing Starfighter. Somewhere in Sweden though is the real thing. Our prototype. It sits solidly & gracefully in a professional photographer’s home reportedly receiving the lens love it deserves from his deft touch and eye. More importantly, he’s our team’s test builder, coder and (for all intents and purposes) Lego ‘Sugar Daddy’. I say this with both the full respect and appreciation as a man who barely had to fund this project even a few cents or break any Lego lift arm pieces along the way. For that we can thank this professional photographer. A determined dreamer who both initiated and pushed this venture forward with a maximum amount of swear words in toe and a minimum amount of doubt in hand! And, he’s probably had to fork out enough cash to almost build three different variants of UCS X-Wings along the way! Thanks ‘rde’ you’re a champ! But wait! There’s also a chap quietly celebrating somewhere in Greece. He’s just finished an instruction manual for our build in addition to overseeing the first print run of its sticker sheet. Now, when I say ‘quietly celebrating’ I mean instead rather ‘loudly’ with that measured quality you can sense in someone that betrays the fact that they tend to generally know what they’re doing, why they’re doing it and just how to get it done at the same time. This speaks volumes! He also flies helicopters for a living so you’d hope he’d have all those qualities in abundance otherwise your life insurance premiums would be through the roof! He’s also ‘The Fixer’ and goes by the handle ‘rilted’. That trickster that finds a solution just when all seems so dark, and your floor is dangerously strewn everywhere with a minefield of Lego pieces that obstructs your path to the bathroom you now so urgently need to use. He’ll find you a safe way there and faster than your bladder can say “Too late!” And then there’s old Aussie me, ‘Aeroeza’. The VFX guy with a penchant for accuracy and tendency to see the tree for the wood and sometimes the wood for a forest full of hungry arborists looking for lunch. I’ll make a meal out of anything ILM jerry-rigged in 1976 and try to build the equivalent in polygons and Lego form however structurally unsound and physically unsafe. That’s a great place to start when you know your ‘back ups’ can both build and fix it no matter the price and broken piece count. Together we formed an international brood of Lego devotees nominally referred to as ‘Gentlemen of the Brick’ a.k.a. GotB. A name mostly chosen because ‘League of Gentlemen’ was already gratefully taken, and ‘League of Extraordinary Gentlemen’, although a good graphic novel is still mostly remembered as just a bad film. Introductions aside, behold our first project! GotB’s UCS X-Wing Starfighter! 75335 Original vs 75355MOD-GotB (excl. minifigs): 1949pcs vs. 2699 pcs 1.80kgs vs. 2.0 kgs 563x443x118mm vs 576x495x112mm (without stand) Well, that’s only a photo of the previous old prototype. The one that worked really well and then we made better…. Turns out ‘rde’ is also a busy responsible dad (not just the ‘sugar’ type) so I can only assume photos of said final prototype promised in my preamble above have been slightly delayed... So instead have a sexy render of the final model! We’ll update with new shots soon…. Is it a MOD or MOC? Hard to say but we think it deserves centre place on your coffee table! Certainly, its external appearance owes much to Henrik Anderson’s original but that was always the point! We didn’t want to reinvent the wheel so much as make it spin faster, have juicer suspension, and enough tyre tread for urban assault expeditions. At the same time though, we wanted our X-Wing to look at home sitting alongside its UCS cousins while honoring the original set and Lego artist that inspired it in the first place. Admittedly there were a few concerns for 75355 out there amongst Adult Fans of Lego that also inspired and galvanized us into getting this project off the ground. Chiefly amongst those was the set being a little too flimsy and somewhat fragile. There were also those who felt its accuracy lacking or even unsettling in critical ways. The nose cone was clearly very stubby for a vehicle inspired by a 70’s dragster car and the front section’s side profile was rendered a bit clumsily using stepped plates that were in dire need of streamlining. The engine intake cowlings also appeared either too big or too small depending on whether you thought the wings were long enough or just too short. The same could be said about the R2’s minifigure scale. And the general greebling, when compared to many other recent UCS models, was also often deemed more ‘creative’ in execution rather than intentionally ‘accurate’. In truth we think Henrik got so much right and with a ton of tricks and wizardry on display for us to enjoy along the way. Where 2012’s 10240 UCS Red Five X-Wing Starfighter had seemed focused on improving choices made for 2000’s 7191 UCS X-Wing Fighter, 75355 proved a radical departure altogether in techniques and design sophistication. It bristles with effective ideas made real for a commercial product and clearly pushed ‘The Bricks’ boundaries further than had been commercially possible before. We really do like it! But it did depart from 10240 in one critical way… The S-Foil. 75355 has a rather snappy, dramatic action when deploying the wings. This is a novel approach and fun alternative to the slow thumbscrew-like turning mechanism the older UCS versions promoted. However, this S-Foil system is perhaps a bit too clever as the action comes at the cost of a more stable platform 10240 generated with its lift arm design. We felt our version needed to restore this lost stability. Which leads me to highlight the heart of our build under all those external similarities. This is a feature very different in approach to the official set but harkens back to the solutions of old. An S-Foil system whose conceptual genesis lies in the form of a MOC designed by an American named…. well for the sake of privacy let’s stick to his Reddit username of Hypodorious. This nifty little 40-tooth gear and worm screw mechanism promised to address some of the concerns regarding 75355 out there. We managed to make it a little more compact, move past its chain link driven mechanism and install cogs for the use of a dependable rear ‘thumbscrew’ to deploy the wings. The result proved a robust and reliable one that was still able to split open to a screen accurate 36-degrees or close without leaving a gap. This proved only the beginning of our journey though… We were also able to expand the internal space found in the engine bays, enough to accommodate two 31mm technic wheels. These directly link the lift arms of the S-Foil through a variety of pins and axels to the technic bricks and plates of the wings, simultaneously providing both stability and a degree of accurate detailing to an area of the build that the official UCS X-Wing’s have consistently overlooked. The wings themselves can droop ever so slightly toward their tip but this is not noticeable when they are in ‘attack position’. When deployed the S-Foil appears a pretty gravity defying construction that closely matches the external appearance of the hero model X-Wing Fighters from Star Wars Episode IV: A New Hope. Our wings have been lengthened by three studs to better match the source material as too the rear of the fuselage by one stud. The lasers have also been corrected. Schematics from the book ‘Star Wars: Rebel Starfighters: Owner’s Manuel Workshop’ were referenced to get these dimensions as close as Lego bricks could get us. It turns out that the width of the engine intakes Henrik designed are perfect when compared to these schematics but, his wings being a bit undersized, confused these proportions. Our new wings resolve this characteristic. Another area we wanted to nail down was the forward section of the model. Getting the front fuselage’s top and side panels to be smooth, angled and gap free has been successfully implemented by several MODs out there and ours is no exception! But it was the front nose cone that really needed to be right. The solution we found took many iterations and additional research to refine but we believe it to be a nose cone worthy of any true 70’s dragster! What’s also worth noting is that the width of our nose is nigh on perfect if the forward fuselage is scaled up by a factor of two. Everything lines up beautifully given the size of the canopy. We had a lot of fun with the rear fuselage’s top panel. The vertically oriented technic 6 x 8 technic bricks with open centre, that provides a framework for our S-Foil system, allowed too for a degree of height differential when mounting the details of the top fuselage panel, making for some subtle ‘greebling’ accuracy to play out. The rear fuselage side panels have also been completely redesigned and are pretty robust. The back panel has similarities to 75355 and the ‘thumbscrew’ integrates nicely here, passing for greebling that is also found on the screen model, just like 7191 and 10240 does. Which brings us to the cockpit. We’ve done our best to scale its details correctly and to utilize every millimetre of space. Control surfaces were incorporated into the side panels of the cockpit and unsightly gaps found in the forward avionics area closed. We even designed additional stickers for placement on these consoles that wonderfully match the style of the official UCS set’s decals. The rear avionics of the cockpit also went through many iterations. In the end it was decided to incorporate a couple of play features at the expanse of a little accuracy. The targeting computer has been kept and can swivel, retract, and angle into a stored position while allowing the canopy to still close. Now, with that all said, here’s how to get your hands on our free instructions… https://jedi.ck.page/products/75355-mod-x-wing-starfighter-building-instructions Links to the Parts list and custom stickers will be sent together with the instructions. May all our UCS X-Wing dreams come true! Cheers all, Aeroeza, rde and rilted – GotB May 4th 2024 P.S. More images to follow & Happy May Fourth!!
-
Finally, an official addition to your Collection is here! After years of requests and tweaks to the model, Cavegod's Sandcrawler is officially ready to be released to the public! The MOC itself contains 12,110 parts, and its manual is 645 pages long. The MOC is built to minifigure scale, and does a job in capturing the sheer size of the vehicle in a way that no Lego set ever has (Or likely will) ever done. Lots of interest has been generated for this MOC, and Cavegod and I are really glad to make its release to the community! Looking forward to seeing all of the improved collections and Tatooine MOCs. If you would like to build this MOC, we are happy to share it with you in exchange for $60. Included is the pdf instruction manual, an xml part list, LDD files, and any help you need throughout the process of making the MOC. For more information please PM me or contact me at chrdvorak@hotmail.com A rebrickable page with a parts list is available here: https://rebrickable.com/mocs/MOC-13289/cjd_223/cavegod-ucs-sandcrawler Here are some pictures of the MOC and of the pdf manual:
-
As beautiful as it is, not everyone has either the funds nor the display space for the UCS Star Destroyer. To that end, I offer a highly detailed yet modestly sized alternative that is a modification of an existing set, 75055. This is a model of Vader's Imperial-I class Star Destroyer Devastator as seen in Rogue One and A New Hope, but can also be reconfigured using easily swapable modular parts into an Imperial-II class Star Destroyer as seen in The Empire Strikes Back and Return of the Jedi. The original set has had the internal playset removed, a complete ventral hull added with main hangar, detailed engines, and two new command towers. The model has been slightly enlarged to 1/2700 scale and is 23.5" long. The command tower, main batteries, and dorsal axial cannons are modular to convert between versions. The Mk I also has removable waist mounted quad cannons and engine thrust vanes. Completing the model is a display stand and a microscale Tantive IV Corellian Corvette, that while slightly overscale still fits perfectly in the main hangar and can be attached there. I used photos of the original Devastator filming model from A New Hope and the larger Avenger filming model from The Empire Strikes Back as reference. More pics available at https://www.flickr.com/photos/rx79gez8gundam/. Star Destroyer - 75055 Mod by Justin Davies, on Flickr Star Destroyer - 75055 Mod by Justin Davies, on Flickr Star Destroyer - 75055 Mod by Justin Davies, on Flickr Star Destroyer - 75055 Mod by Justin Davies, on Flickr Star Destroyer - 75055 Mod by Justin Davies, on Flickr Star Destroyer - 75055 Mod by Justin Davies, on Flickr Star Destroyer - 75055 Mod by Justin Davies, on Flickr LEGO Star Destroyer - 75055 Mod by Justin Davies, on Flickr
-
This MOD upgrades your 75331 Razor Crest as below: - add a toilet next to the sleeping room - removable front landing gear - retractable rear landing gears (they're strong as the original) - add a display stand (229 parts) - tidy up the front panel - add more details to the laser cannons - entirely flip the boarding ramps - enlarge the rear entrance so that blurrg can walk through it - fill gaps and holes around the body and engines 419 extra parts are needed. Instruction is available at https://rebrickable.com/mocs/MOC-131686/ Enjoy and have fun!
-
Here it is finally... Dimensions: 65 x 137 x 46 studs 52 x 110 x 37 cm 20.5 x 43.2 x 14.6 inches Pieces: 11103 Weight: 7.75 kg (273.5 oz) Vigilance - Venator-class Star Destroyer by Martin Latta, on Flickr Vigilance - Venator-class Star Destroyer by Martin Latta, on Flickr Vigilance - Venator-class Star Destroyer by Martin Latta, on Flickr Vigilance - Venator-class Star Destroyer by Martin Latta, on Flickr ------------------------------------------------------------------------------------------- Original post: Hello, I'd like to present here my current project - Venator in UCS scale. I set few requirements: - as faithful to the original model as possible - completely SNOT/studless - interior (all 4 hangars) - use only active and relatively accessible Lego parts - easy to transport in separated modules - the same size like my previous Venator
-
I've been working on some modifications to the 2023 UCS X-Wing in Studio. My main aims were to increase the slope angle of the top surface of the nose and to build a stand to display the X-Wing on landing gear, I also swapped the nose tip parts for light blueish grey and got rid of those horrible white flippers on the laser tips. The landing gear feet and doors are built into a a thin flat base which the X-Wing rests on top of, aligned by the rear gear and supported by a column of bricks that poke up into the ship's display stand hole. The X-Wing set doesn't need to be modified to sit on the stand so hopefully it'll be useful to anyone like me who wants to display the under a coffee table. It can also be moved, the UCS plaque positioned on either side (or not at all) and the X-Wing can be lifted away very easily. Free instructions are on Rebrickable I also built a detailed little R2 to display with the X-Wing. Like many others I wanted to reuse the old 30611 polybag head part behind the X-Wing's cockpit, it's slightly too big to be the right scale but personally I prefer it to the too-small minifigure. Big thanks to Jan Woźnica, who goes by john_carter and is the behind the Tale of The Space Age Lego Ideas set, he kindly let me alter and use his very clever R2-D2 design. He brilliantly positioned 1x1 Round Plate with Bar pieces at 45 degrees between two 4x4 Round Plates, taking advantage in the gaps between studs and anti-stud notches underneath round plates, allowing an open stud piece to securely connect to the end bar poking out of the 4x4 circle. You can find his excellent original here and I created a seperate set of instructions for R2 (also on the X-Wing mod Rebrickable page). I'm really pleased with how the mods turned out, it's great (for my marriage) to be able to display such a big set under a coffee table rather than taking up huge amount of space with the s-foils opened. I really like seeing the ship with the wings closed with the added bonus of the weight of the top pair making them appear fully close. I hope the stand proves useful to some of you, thanks for looking!
-

[FINISHED][2.2 meters long] Venator class star destroyer "ATELLES"
Kommander posted a topic in LEGO Star Wars
+++ UPDATE 27/December/2016 +++ Happy holidays eurobricks! I have some new pictures of my Venator. You can check out my flickr for more pictures. I will upload more as soon as possible. First post also edited. greetings Kommander +++ UPDATE 3/December/2016 +++ Long time no see eurobricks! Today my Venator enters the sky above the ship yards of Rothana Heavy Engineering. As the project manager I proudly present you the capital ship “ATELLES”- a Venator class star destroyer. Back in 2005 when I saw the Star Wars Epi. 3 starting sequence in the theaters – I was like “I really have to build one of these giants!” Then a few years later and already earning my own money I started the wip. The plan was building a venator bigger than the Lego ISD (10030). While processing the project there were 2 points of massive improvements. Each time I change the size and the new version was bigger than the old one. The building time on the last version of the Venator I´m showing you in this thread was only about 2 years. Now be at university the time has come to finish this ship. Over the whole 7 years I ordered about 100 times at Bricklink.com. Additional to these orders I used a lot of my own bricks in storage. I don’t know how many bricks I used for the Venator. It have to be something above 45000 pieces with a weight of 65 kg. The construction of the inner structure and the frame is basically like the #10030 IDS. A structure made out of technic bricks carrying the whole ship. This technique is easy to scaling up to big dimensions. The Venator´s of Erik Varsegi and Iomedes were always leaders in supersized star destroyers and a good orientation for my project. At one point my Venator should be one of those as well and I destroyed the old version and made a bigger one. This Venator how hitting the length of 220 cm x 117 cm x 68 cm. A bit smaller than the others. However, the thing was building this ship as accurate as possible. Some details of the origin Venator from the Movie has been changed or replaced with own ideas like the frame structure at the surface. The overall impression has to match and looks smooth. For those they want to know about construction details here we go. In the middle of the ship is a massive string - the ship´s “backbone”. Different sections like the hangar or the thrusters are connected with it. The inner structure mostly consists of technic bricks, pins and plates. Simultaneously I build the “wing”-plating because the wedge-plates with their angles restrict the shape of it. And as you know the plating is a bit bigger so it can overlap the frame. The thickness of the plating is 5 layers of plates. One slope underneath and above the string create the first important angle. Each one has left and right technic bricks as well. On those the wings can be attached. Unfortunately I secured the underneath-plating with some wires because the weight was too much and I couldn´t find any alternative to fix this problem. It is the only thing that isn’t Lego. Glue also never touched this project. In every thruster is also a solid string with technic bricks. Rings consists of 8 hinge-elements are the basement for the use of round bricks for the shape. A unique technique which also looks pretty nice. To counteract a misalignment of the long thrusters I decided to install them with an increasing angle upwards. And as expected it works pretty well. The command tower as well as other sections can be detached easy. Reason behind this is of course for the transport. Next step is to exhibit this giant on events in Germany. Maybe I manage to change and improve some things unstill the first event. Finally the last step is selling this thing dissembled in components or complete as Moc. More pictures: https://www.flickr.com/photos/39520243@N03/albums/72157620671087561 - Kommander +++ Original Post +++ Hello Eurobricks, my name is Philipp and i`m a member of www.imperiumdersteine.de (IdS) and of course german :) Today i`m here introducing my work in progress UCS Venator. Some of you maybe discovered my litte turrents on flickr in various groups. At the beginning of the building progress in year 2008 i started with a size around 150 cm in lenght, but by passing the years i scale up the size to the Venator im showing you now. This ship hitting a lenght of 220 cm and has a width of 120 cm. Dimensions like Erik Varszegi`s Venator. Maybe a litte bit smaller. Btw. here you can see a picture of my first Venatorbuild. Looks kinda cute, isn`t it? Most things are finished...thrusters, guns, superstructure. I really can see the finish line. But this update/post is only for an overview. That means unfortunately no closeup pictures. The next and last milestone is the underside armor. In the meantime i`m going to fill the gaps and there`re still bricks that need to be changed. Before i forget; this is my flickr account: https://www.flickr.c...s/39520243@N03/ and here the original thread on IdS: http://www.imperiumd...estroyer/page-4 - Kommander -
Ten years after building a first version of an UCS-like Tantive IV, inspired by official sets 10019 and 10198, I have decided that it was about time to provide some lifting to my MOC. Believe me, coming back to an old MOC is a challenge. Over 10 years, many new parts have been released, many new build techniques were introduced and if means what can be seen as a simple re-lifting may become a total rebuild. Anyway, without additional blabla, here is the result: Tantive IV - 2023 Edition by Veynom, on Flickr And you may compare it with my previous edition from 2013: CR90 Corvette Tantive IV by Veynom, on Flickr Just as the previous version, it can be opened to reveal a detailed interior: Tantive IV - 2023 Edition by Veynom, on Flickr Instead of letting you spot the 7 differences (and there are more than 7), I will review the main changes brought to the model. The first one is about the color scheme. The old dark gray and red have been replaced by DBG and dark red everywhere. The model is also globally whiter than the 2013 version. The second global change is a massive move from studfull to almost studless, only keeping studs were it could provide greebling advantageously. And now, let's start to zoom on some sections, starting with the rear engine section. Tantive IV - 2023 Edition by Veynom, on Flickr It is 6-stud wider than the original, with extra space added between each engine pod in order to add some extra details. Just making it wider implied a full rebuild from scratch. Many, many details were added everywhere to closely match the original model. The engines are a bit longer and the exhaust part was revisited to provide a nicer visual effect. Just detailling the exhausts added more than 400 extra parts to te model. Tantive IV - 2023 Edition by Veynom, on Flickr With the radar section, I made structural strengthening, extra details on the lateral pods with smoother ending, detailed inside, brick-build white wings, and a brick-build radar. Tantive IV - 2023 Edition by Veynom, on Flickr The roof section was also rebuild from scratch. Details were added to all panels for visual improvement and also to ensure minimal holes between angled panels. Then we have the head... Tantive IV - 2023 Edition by Veynom, on Flickr I cut the head just after the central section and rebuilt it completely. As the original shape is somewhere halfway between a hammerhead and a double truncated cone, just reproducing it is already a challenge. If you further want it hollow in order to add a detailed cockpit then it becomes a very interesting challenge. The solution I used is maybe not the most esteatic one when looking at it closely but it does the job when moving a bit away from the ship and it allows to put 4 sitting minifigs and some walking ones in the central corridor. Tantive IV - 2023 Edition by Veynom, on Flickr It was really not easy to capture the curves, the outside details and still proposing an easy way to open it. Yet, the result is quite strong with enough details inside. Tantive IV - 2023 Edition by Veynom, on Flickr And there is a corridor allowing us to guess about some well know scenery from ANH. Tantive IV - 2023 Edition by Veynom, on Flickr And now the main room. Tantive IV - 2023 Edition by Veynom, on Flickr With Darth Vader, always elevating people around him with his typical sense of Imperial justice. Tantive IV - 2023 Edition by Veynom, on Flickr My lateral pods are still present, each with a small vignette inside and more details or better smoothing. Tantive IV - 2023 Edition by Veynom, on Flickr Tantive IV - 2023 Edition by Veynom, on Flickr A few more pictures from the build: Tantive IV uplifting WIP by Veynom, on Flickr Tantive IV uplifting WIP by Veynom, on Flickr TantiveIV uplifting WIP by Veynom, on Flickr A friend of mine told me the radar metabrick was not up to the level of the MOC. So I built a new one ... the result if indeed much more appealing and aligned with the original model. TantiveIV uplifting final WIP by Veynom, on Flickr A color swap which truely improve the visual impact: replacing the LBG engines (wheels) by dark pearl gray ones. Tantive IV uplifting Engine colors by Veynom, on Flickr Now, there is still a major disadvantage to this re-lifting. The beast weights now 25% more than before, increasing from 4.4 to 5.5 kg. Heavy MOC, I tell you. The length remained identically (that was a surprise to me). I've no clue if I will change it again in 10 years, maybe it will switch to a blue color-scheme...
-

[MOC] Kage Goomba's TIE Defender (TIE/d) - Ready for QA/Testers (fully built in real life)
Kage Goomba posted a topic in LEGO Star Wars
NOTE: I changed things on my Webserver so images may be broken - if anyone wants to see things let me know and ill dig them up - these forum boards are not entirely friendly on edits. - Sorry! (Pictures are still there - just have to go the the trouble of fixing them.) - And it appears these stupid boards won't render the images upfront - but they load when you click - sigh. UPDATE - The Hinge fixes worked - its stable as it can get - enough that you'd be at the level of the UCS Star Destroyer or X-Wing or any other model in terms of how much a model can take before it starts having issues. Currently working on redoing instructions to get it up to current design specs. PIcs below are still accurate - only the hinges are twice the strength and the stand does a better job keeping it stable. Instructions are updated up to the stand - got an another 200 pages to blitz through before I can post the current iteration. Should be done tomorrow. Future plans are improvement on the panel wings to not looks so fragile - cockpit strengthening. Going to need help with Q/A on instructions and anyone whose released a design - PM me and give me some pointers - total newb here - want to do it right. Reminder - not charging for instructions - these will be free. I will however accept donations (to put towards Otana - the "other" monster project) Would really like to see someone build this thing to really get a sense of cost/design. Also just might send this up to Lego Group. Any comments about that? Much thanks. PS: Bug thanks to the Technic gents who helped me puzzle out a stronger hinge design - which turned out to be a "Well duh" problem and not a disaster. ==== UPDATE 2: Instructions/Parts List are done. https://www.kagegoomba.com/lego_moc.php (2 Files - 54-55MB - 1 PDF/1 CSV) *Again - please respect the work done here - don't go running off with it/etc - for everyone to enjoy* I'll be looking into making the manual look pretty with a cover/end cover/credits/graphics. Decal has been created for this design - https://www.ultimatecollectorstickers.co.uk/product-page/lego-star-wars-ucs-moc-sticker-for-tie-defender-by-kage-goomba TIE Pilot not included in design - just a random thing I snagged for display purposes. ---- <TIE Pilot isn't included in the design - thought it would be cute> As I said before - still updating instructions and parts list. So stay tuned. UPDATE: I Added LED's - still need to clean it up but here it be. https://www.kagegoomba.com/lego/tie_defender/TIE_Defender_prototype_led.mp4 ============== This is my second MOC (albeit first one to be "finished" to the point of building) There's history behind this design that ill save for later - I'll just focus on the meat and potatoes. Here's the pictures from Stud.io - ill look into a rendering version in a while. Cleaned up the Cockpit <-> Main Core area - not sure if that area is stable but it certainly looks good (Stability in the little bits that decorate it) And the Stand itself 3421 Parts as of this posting (With stand) 20” x 19” x 19” (51cm x 47cm x 46cm) (Think - Between an A-Wing/TIE Fighter UCS in size terms - also not including stand so it may be a pinch taller/longer) This MIGHT support mini figurine in the pilot's seat. Bit of Lore (My Take on it) The TIE/d or "Defender" was Grand Admiral Thrawns answer to the X-Wing Space Superiority Fighters. Essentially the first of its kind to be Mass Produced with not only Shields - but a Hypderdrive with exception of modded TIE/i (Interceptors) and Darth's TIE Advanced (bit of a debate?) Point is - this was designed out the gate to be more inline if not exceed the trouble that X-Wings bring with them - and the ability to not require a Mothership to "Get around" thanks to the Hyperdrive. It also sports additional weaponry. Packing the lasers and ordinance that is typical of a TIE Interceptors (4 Laser Cannons - dual launchers) - this also has 2 ion cannons to make it a formidable ship (taking a page from the Y-Wings/B-Wings). - Also sporting a Tractor Beam to make it easier for its quarry to be killed. Carries more ordinance as well. Bit of a debate on speed but its essentially an Imperial X-Wing with bigger fangs. Bottom line - this TIE would have been the nail in the alliances coffin if it had been taken seriously as it could fill a Bomber role that the Y-Wings did - Tarkin however would block this project citing its too expensive and prefer to keep to his doctrine of throw many cheap TIE's at them and not bother cleaning up the mess. We all know how that turned out. Thrawn would have cleaned house if he had the backing of the Empire - but alas - he was essentially ignored and the TIE/d was only on field in limited numbers - and still feared overall. Again - just my take on it - I'm a big fan. (For some reason they say it has "Chin cannons" - it doesn't - don't care what they say - don't give a damn - I reference the TIE Fighter Game and similar games :P) That said - in my honest opinion - this was the King of TIE's - the Apex predator of the Empire for Space Superiority. Vader even grinned behind his mask when he got to fly one - a rare moment indeed (Thrawns books as source) But alas - too little too late - and the rest is history - for now? (We shall see) FAQ: This is a UCS Scale like model - not a play thing - not very tolerant with tampering. Yes there will be a Stand - and you can purchase a decal for it - ill dig up a link when I get there. Cost? - Instructions will be made available for free when they get done. This thing set me back about 2K USD (maybe less now that it's refined? Not sure - happy to take estimates for anyone brave enough to build this beast) - I'll accept donations to put towards my Otana project - but I don't intend on making profit off this for the main reason as to how this project came to be. It did take 1000 hours plus to build this thing out - and it will take a lot of effort to build instructions for it. Build - there's half a dozen "super rare" (not ultra?) parts Id estimate that may cause some trouble - namely the Cockpit hatch up top and the Window - then you have some decorated tiles inside for looks - and maybe some other parts. I'll audit to remove these variables as much as possible. Majority of the bricks are Black and Grey with some slight alterations. Feel free to substitute where you like if you see fit to do so. Stud.IO file will be made available on request when I get around to releasing this thing propper - so just ping me if you want a copy. This will also produce a parts list as well. Will it work? I'm 80-90% Confident it will. Doesn't this look like _____ model? - Yes - it does - the Mocopolis model is no longer available because that design was fraudulent - a total rip off. I actually bought instructions and this became a 3-4 month long nightmare. I suspect that designer will not be allowed to come back let alone claim credit for an "impossible" build. Hence why I'm releasing for free. More details below. Bottom line - this model WILL work - and is legitimately possible to build....I hope. (Going to find out for sure!) I intend to build this in real life very soon - need to these parts off my desk so I can move on to other projects lol - so I'll be sure to take pictures during construction or rather "reconstruction" - keep reading for answers to THAT question. As I said - I'm confident it will work this round. Update: Updated the Cannons - so now they don't freely spin looking awkward//broken/odd. Shrunk the length by an inch or so - more parts - but better looking. PS: This forums engine has very retarded caching - the images have been updated but it won't load the images - if you load the images in a new tab/window you'll see the updated pics. MVP's - Special Thanks to @Monkeyulize for helping to redesign the core body/pylons/TIE Panel main struts from ground up - creator of the gorgeous TIE Phantom -> Big thanks to "Darth Soban" - a Homeworld MOC'er enthusiast whose been giving encouragement and check-summing me the entire time. @ForgedInLego for helping me solve the Cockpit "sagging" problem or at least giving me the best shot. And lastly @Kdapt-Preacher for majority of my sanity checks and feedback overall since the beginning. Who has a fantastic collection of minatures -> This community is just full of genius that allowed the best chance for this "Salvage" project to come to fruition. Now as to the background as to why this is a thing - ill just tag this as spoilers - happy reading if you wish. Things left to do: 1: Rebuild Core body/Pylons 2: Rebuild Cockpit / Reinforce Cockpit sagging 3: Rebuild Tail Section 4: Rebuild Stand to accommodate new body and polish remaining areas. 5: Parts Audit/Colorization (ties into 4) (In Progress) 6: Test Build/Construct in Real Life (In Progress - Bricks ordered) 7: Did it work? Is it stable? Corrections? 8: Release final version of 2.0 Model and publish (In Progress) 9: Instructions (1.0 Version done) - Need to go back through and fix and adjust/polish! 10: 3.0 Version? - TIE Panels need rebuild due to ugliness - Feedback from other MOC'ers Big thanks to everyone who helped out! Here's hoping it will work this time!\ PS: This began as a "rant rave for bad moc'ers taking money into fixing this thing and making it work - so bear it all with a grain of salt. ==== Real life build progress: Day 2 Progress Looking great - and its holding structurely quite nicely - very rigid. May have to make some changes to the dressing that covers the spine - its too think with the current build so I removed some plates to make it nice - that and it wasn't fitting so nicely. Or I may keep it as is. There's some opprotunities to change some parts to make things better/easier however - and I've made those notes in the manual error list. The next step is the make it or break it point! Next is the cradle/stand being modded for the body - and the outer panels. Found a oops in assembly process and may need a change in parts for the "caps" (center hubs) on the panels - but not enough to cause concern for now. Off to sleep - here's hoping next post I make in terms of updates is good news that the new TIE Defender is legit (albeit not quite perfect) is build-able. ==== Reported "oopses" on the instructions: Fixed - its live Ready - needs to be "compiled in" Manual Corrections: (In progress) -
Nebulon-B Medical Frigate by Dranac feat. Onecase (photo by Onecase) Hello every one. A few years ago, I revealed my UCS Nebulon-B frigate. It is now time to update this post, with new photos... new version and new instructions. It is now the the sixth version (v6) and I think it will be the very last. Because, Onecase (one of the best star wars mocer), added some welcome details, I decided to add some of these improvements to my Nebulon-B (with his kind authorization), I also rebuilt some parts of the frigate, for better resistance, optimization and better rendering. Because I'm not a very good photographer, I asked him if I could add to my photos some of his. He accepted and I thank him. I also decided to fully remake the instructions (PDF). It is a very nice and clear version, accessible to everyone. The instructions + part list are still on sale. Here is the part list (Red and lime colors can be replaced by anyelse) This new version is made of 4585 parts (the v5 was made of 4200 pieces), but keep the same proportions : 85 cm long This moc is still as strong as before (you can move it with one hand without any risk), as stable as before and still 100 % modular (you can disassemble it easily to show it in any convention ! ^_^) Enjoy ! Nebulon-B Medical Frigate by Dranac feat. Onecase (photo by Onecase) Nebulon-B Medical Frigate by Dranac feat. Onecase (photo by Onecase)
-
Hello everyone! After receiving so many enquiries seeking instructions for my Zeta-class cargo shuttle, I am pleased to announce the release of a professional 768 page instruction manual for purchase. The final piece count is 4418, just surpassing 75159 Death Star. The completed model measures 70 x 56 x 38cm (wings upright). I have put together a package that includes the 768 page pdf instruction manual, parts list and LDD file. All of it is available for 25 British pounds (£25). If you would like to purchase the plans, please either PM me or contact me at renegadelight@googlemail.com. I will have a public parts list uploaded to rebrickable very soon (for simplicity, red coloured pieces can be anything you like, they are not visible from the exterior). I’m sure everyone appreciates the long hours that went into designing both the physical model and step-by-step build. I had a lot of fun putting this one together and hope others will too! The Rebrickable parts list is now live here. Here is the original thread from February 2017 and the Flickr album. I have revised the attachment between the wings and main body, but not been brave enough to motorise it - I'll leave that to someone else to try! Below are a few excerpts from the manual: Please feel free to use this thread to discuss anything about the model design, building steps, part substitutions, etc.
-
Here is my "UCS" rendition of the Harrower-Class Dreadnought from the Old-Republic game. The final model contains 6408 bricks and measures: 95cm x 68cm x 30cm. 1311 Page HD Professional instruction booklet available for £20 by emailing me: eclayforth@outlook.com The WIP thread can be found here: Inspiration for the top and bottom superstructures was taken from SwanDutchman's model: https://www.flickr.com/people/swandutchman/
-

[MOC WIP] UCS? - The Punishing One / JumpMaster 5000
PixelProtectors posted a topic in LEGO Star Wars
Hello everyone! I come to you today with something I've been working on for about 2-3 months now. What started out as an effort to make a really nice mid-sized ship turned into quite a challenge haha. My son has really been into bounty hunters lately and I decided to pick a ship. Originally it was going to be Bossk's Hound's Tooth because I have a TON of brown bricks. But I instead decided on Dengar's ship, the Punishing One for some reason. Don't remember why. Anyways... After reviewing a lot of Google images and blueprints of this ship, I wondered if I could attempt something a little bigger. And this thing is definitely going to be big. Considering how large the ship is in the Star Wars universe. I'm not sure if this would qualify as a "UCS" ship... I am certainly no master builder. The biggest concern here is making sure everything connects together (preferably using Technic techniques) so fit the wings on to the main part of the ship and making sure the cockpit works too. All with removable panels for the roof, possibly in sections. Let me know what you think or what suggestions you have. I'm having the most difficulty with the curved cone shape of the nose of the cockpit. I'm not entirely sure how to pull this off so it's not so wobbly? Thanks so much! Sorry for so many images! :P Oh also - someone else started a thread here about building this ship in 2018, and I didn't realize until much later that our layouts are very similar and we must have been going off of the same blueprints. @Tracytron54321 BELOW: This is everything I have currently completed. In the back you can see the front gun cannons I made. BELOW: A front shot of the cockpit BELOW: The cockpit with Dengar, and the doors currently closed. They do slide open... BELOW: Same image, but the doors have been opened on a track inside the wall. BELOW: An above look at the layout of the ship's main area. BELOW: Dengar's "common area" room with workbench. My son added the helmet. He thought it looked cool :P BELOW: Opposite the image above, this is the seating area in Dengar's "common area" room. BELOW: Bathroom area partitioned off with a cape, between Dengar's quarters and the cockpit. BELOW: Bathroom area displaying a tiny area with a toilet. Hard to see but there's a little sink to the right. BELOW: Dengar's personal quarters. Not much here. BELOW: Dengar's personal quarters, door does swing open and shut. BELOW: It's hard to showcase Dengar's quarters, but there is a bed, a panel on the wall, and a small table. BELOW: A look at the common area room, coming into the cargo area. BELOW: Going back into the cargo area now. Seeing some panels and the loading dock built into the floor. BELOW: A hidden panel on the floor to stow away hidden goods. My own addition. BELOW: A look at the loading dock and cargo area. Created a panel with gear to grab as he exits the ship. BELOW: A look at the opposite side of the cargo area, and Dengar's speeder and R5 unit. BELOW: A look at the engine room I'm still working on. Made the floor grates so you could see pipes through them. BELOW: A top down look at the pipes through the grates. Need to add engines and walls, etc. -
.thumb.JPG.3c74c0d405dc1afb04b2fa216ebc79e6.JPG)
[Instructions] Mortesv's CR-90 Corvette - Blockade Runner (Tantive IV)
Cjd223 posted a topic in LEGO Star Wars
Finally, an official addition to your Rebel Fleet is here! After over a year of tweaks and specifics, mortesv's CR-90 Corvette is officially ready to be released to the public! The MOC itself contains 2,808 parts, and its manual is 133 pages long. The MOC is built to the same scale as the Nebulon-B, making a perfect addition to a rebel fleet. Lots of interest has been generated for this MOC, and mortesv and I are really glad to make its release to the community! Looking forward to seeing all of the improved fleets as well as those that will begin with this ship. If you would like to build this MOC, we are happy to share it with you in exchange for $30. Included is the pdf instruction manual, an xml part list, LDD files, and any help you need throughout the process of making the MOC. For more information please PM me or contact me at chrdvorak@hotmail.com A rebrickable page will be available soon, but for now the xml part list will be included Here are some pictures of the MOC and of the pdf manual: https://www.eurobricks.com/forum/index.php?/forums/topic/139982-moc-ucs-cr-90-corellian-corvette-–-blockade-runner-tantive-iv/ -
Hey everybody, I'm new to the community but I've been MOC designing for sometime now and I have finished my massive project. I've been working on it for just under two years, The ISD II The Eviscerator. It sits on a single removable stand measuring at 148 studs long with 19,225 pieces. I really wanted to capture that "It doesn't look like Lego" feel and try to give it a studio model vibe. One of my goals for this build was to have only one stand that the model sits on securely. This was an incredible challenge due to the size and weight of the model. In fact, it's what took the most time to develop through out the build. Overall, I'm satisfied with how the model turned out. This is more accurately representing an ISD II Destroyer. I tried to pay attention to every detail I could, based on a couple of star destroyer sources. It's a very modular build making it easier to assemble and disassemble. There is no interior in this model. Just pure structural integrity throughout the entire inside. Just the frame and stand are 6,000+ pieces, but this was my goal. Create as accurate of model as I could, displayed on one removable stand, and not having to limit detail because of weight and size. Anyways, enough rambling: You can view the rest of the photos here: Flickr Album Now here is some great news. If you want to build one yourself, you can! I have made instructions for this build that are available at https://www.brickvault.toys/products/imperial-star-destroyer
-
In 2012 LEGO released 10225, the UCS R2-D2. It remains one of my favorite sets of all time, but I've always felt like something was missing... and now with a new BB-8 model coming (that appears to be in the same scale as R2-D2), it's obvious that C-3PO needs to be done next. So I set out to build one myself... and so far I've succeeded... kind of. Legs by Brikkyy13 ., on Flickr back by Brikkyy13 ., on Flickr Sections by Brikkyy13 ., on Flickr With R2-D2 by Brikkyy13 ., on Flickr Currently we're looking at 1295 pieces, and it can only get bigger. The original plan was to have it in scale with the R2-D2 set, but since I'm a bit lazy instead of doing measurements I just eyeballed it, using the size of his feet to judge how big everything should be. So the feet ended up being in scale with R2, and everything else accidentally turned out bigger. I didn't actually realize this until I took the screenshots, and I was too proud of my work to go back and change it. The next step is to make C-3PO's feet bigger to be in scale with the rest of his legs, and to continue working upwards from there. I intend on bricklinking all the parts and building this bad boy for my collection once it's finished. I will eventually post the lxf and/or instructions too. I'll update this post as I update the model. Any and all feedback is appreciated. Thanks for checking it out!
-
[MOC] - WIP - Kage Goomba's YT-2000 "Otana" - UCS - Ready for Evaluation
Kage Goomba posted a topic in LEGO Star Wars
UPDATE: I've changed some things on my webserver - so some pics will be broken - they are still there - just hiding - happy to fix the links if requested - but these forum boards are horrid at editing links so ill just keep it to the highlights for now. Some of you may have saw my "YT Corellian Transport Thread" - This is what I've been working on. (Those who know - please don't share my pics - as I'm keeping things simple for now) Tonight I've hit roughly the 45-49% Mark in terms of proof of concept design wise. So now I feel like revealing the work to get some community feedback/encouragement. To date - no ones ever done one - there's been some miniatures - some rather "smallish" models - but nothing like UCS scale. EDIT: Seems I wasn't the first. Per @Geihlen who found this -> Vieral's Otana - 2012 - 10 years back - not bad - certainly didn't have the luxery of parts we have today. Google didn't see this either - not in any MOC DB's - I did in fact reach out to him as a result. I've been wanting to do this since I first saw this ship. Little background first: https://starwars.fandom.com/wiki/Star_Wars:_X-Wing_Alliance Back in 1999 this game showed up - I grabbed a copy - and saw this Falcon like ship for the first time and fell head over heels in love with it. To be honest - I never liked the falcon that much - yes its the fastest hunk of junk in the galaxy - but as Leia said when she first saw it - its ugly (inferred or otherwise) - The Otana however was glorious in shape and design. As a lego maniac I wanted to build one. Fast forward to today - I now understand why no one's really done one yet - or at least tried and nearly went bald/insane. The ship unlike the YT-2400 and the 1300 is very different in that the cockpit is down the center-line - and it has a larger "saucer/dome" section in the main hull of the ship. Add to that - 1990's computer graphics doesn't help much in rendering. Little to no "hard facts" on this ship which makes it a bit of a challenge to interpret the design. Funny enough - everyone thought I was building the YT-2400 - which is well known as the Outrider which is funny because its already been done - quite nicely I might add (as did copy off the engine array design of one hehe) Some Info on the Otana (keep in mind - open to interpretation) - https://starwars.fandom.com/wiki/Otana Ive decided to go with this rather nice layout design - with some room to stretch/squeeze as needed. I've put a lot of thought into this project over the years - thankfully I didn't attempt this until now. As one of my new community friends @Kdapt-Preacher pointed out - there are very nice pieces recently released that make these challenges "possible". Thankfully the biggest blessing as this is a symmetrical ship that allows for clone/copy once I get one side done. Hence my unveiling. I've also seen as I researched prior to Thanksgiving - that people have been literally screaming for this MOC - so I'm excited to be in the running for the likely first second? one done of this type or scale - certainly what I call "UCS". So I'm hoping this will get the fans to come out of the woodwork. After many months of work - its ready for poking and prodding before finishing touches. Some questions I'm expecting that ill try to answer: 1: How big are we talking? - Roughly the size of the UCS Falcon - measures at (currently) 32"x24"x11" at 7.5k-7.6k pieces. 2: Are you going to build this? YES - of course I am - but it will take time to budget and gather parts - right now I need to make sure this thing is ready to be built - still need finishing touches. 3: What kind of model aside from UCS? Playable? Insides? - Not a "play model" - there will be a cockpit that ill try to have something to show for it insides wise but this isn't going to be that kind of design - maybe in the future - but not for this "iteration". It will likely require a stand or a cradle as there are weight concerns/structure wise. 4: Are you going to post instructions if so how much? Yes at some point - but I'm undecided on whether i charge or not. Its taking 10's if not 100's of hours to get here - So I may have to consult with other designers and ask for suggestions advice. 5: This (insert this bit here) looks wrong. - Yep there's many bits that look wrong - feel free to point out and suggest. Right now the following areas are "no touchy" - Dome Suacer sections (There will be 4 - 2 on each side) - that thing has stolen days from me in redesign. I may end up having to redo it - however its looking very good. The rest vary depending on the critiquing. My to-do list will be posted so you can check that if your curious. 6:Scaling is off - yep it likely is - it was VERY bad early on as some of my new friends pointed out. Again - check to-do list before pointing something out. 7: Otana has dual gun turrets! - Don't Care :P I'm going Quad Guns - I however would like to figure out where to stick a/the Ion Cannon(s) at (Suggestions are welcome!) (In truth this is not really a big deal but Its just my little "dispute" from the game) - Yes I totally ripped the Falcon's turret off and "smashed" it to fit. I'm open to redesigning this. Yep ok you win - its not the Otana if its not to spec. 8: You going to make changes after release? - I'm going to avoid doing this for obvious reasons - so I'll try not to "rock the boat" with perfectionist syndrome. 9: Bonus Feature - Gun Turrets that drop from hidden hatches (Ion Cannon/Laser Cannon) with sliding hatches. Todo list: 1: Get some volunteers who are willing to help me evaluate this carefully and MAYBE do some test builds to make sure this will hold up. 2: Design a Cradle/Stand/Plaque 3: Surface "Candy"/Greebles/etc. 4: Cockpit needs some refinement (inside) 5: Part Audit (make sure I'm using readily available parts and nothing stupid insane aside from obvious (3 parts estimated at this point) 6: Instructions (cringe) Major Phases: Phase 1: Proof of Concept - done - ready for evaluation. Phase 2: Detail it out Phase 3: Audit to make sure the bloody thing won't fall apart and can be built out (will be looking for volunteers to test/poke) - with colors. Consider bricks and price. Phase 4: Instruction Manual (I'm not looking forward to this) Phase 5: Build it! And pray it works. Phase 6: Release! (1.0) And that's that.....hope you guys are excited as much as I am. Biggest thanks and shout outs to @Kdapt-Preacher with his tolerance of my ranting/screaming/spamming of my progress and "Darth Soban" who gave me inspiration for the dome sections. Those who are interested in helping me out - PM me and we can discuss - I strongly advise you get Discord because these boards are not suited to up to minute detailed chats. The goal is to make sure those who decide to shell out money for this - won't regret the investment (like me for instance). I will charge for instructions yes - but that's yet to be determined. -
Hello everyone, finally after almost 10 months I can present my new MOC. This time I decided to make a risky choice and wanted to recreate a "mighty and bad" vehicle that when I saw Episode IX immediately reminded me of a snowmobile. I spent a lot of time designing the two troopers. I wanted to recreate the right anatomy and I wanted to capture the right details. Little is seen in the film but this too is a medium that deserved a UCS version. To give you an idea, the "Driver Trooper" helmet is made up of 137 bricks and the "Jet Trooper" helmet is made up of 141 bricks. Here are some info on the MOC: - 5956 bricks and 2 minifigs - lenght 80,0 cm - width 25,2 cm - height 35,2 cm Here is a small presentation teaser I really hope you like it!
-
Hi everyone - for those who already have or plan to buy and build the UCS Luke Skywalker's Landspeeder (set #75341), I've created an 'Enhanced Edition' of the model that you may be interested in! Fixes and enhancements are: - Reduced the length (by 2 studs) of the overly long nose of the standard model to give it a more accurate & balance look. - Added forward and rear removeable panels to show new internal details including power plant and anti-grav units in the rear; and fuel tank, sub-frame, piping and cabling details at the front. (I used the X-34 Landspeeder diagram from the Star Wars Complete Vehicles 'amazing cross sections' book as my reference when designing the internal details.) - Fixed the left hand side & top wobbly engines issue. Modification instructions are on Rebrickable here: https://rebrickable.com/mocs/MOC-126009/Simon Lenz/ucs-landspeeder-enhanced-edition/#details Video mod explanation & walkthrough can be found here: https://youtu.be/MYEt0IpRcI8 Full photo gallery here: https://bricksafe.com/pages/SimonLenz/ucs-luke-skywalkers-landspeeder---enhanced-edition
-
Hello! -The professional booklet is a HD PDF file with 298 Pages and includes the parts list for Bricklink. -The model is composed of 2849 pieces and measures 80cm x 41cm x 23cm. -The price of the instruction is: 17.50 GBP/20 EUR/25 DOLLARS, to purchase them, please email me: brickforcetoys@gmail.com
-
Hi everyone! I haven't been here for a long time ... Over 4 months ago I started building a new MOC The idea came up a long time ago, but each time I started a different project. In October 2021 I ordered the 75288 set and I knew it was high time for my AT-AT :) AT-AT Dimensions: 4882 parts (list of parts here: https://drive.google.com/file/d/1crWVI4Cygw0i5zEefJh7ClROWkN2_iGy/view?usp=sharing) 46,1 cm height, 52,1 cm lenght, 18,4 width. It is much larger than the playset 75288 but smaller than the UCS 75313. I think that for many of us this size is the perfect solution. Personally, I don't have a place for UCS at home, it's too big for me. In addition, he did not make such an impression on me live - he has too many studs :) It is possible that my design is similar in size to Raskolnikov, that is, such PlusSize. The project has a huge number of functions, I will mention some of them: - movable feet and legs - rubber bands under the feet, improve stability, - bottom with details, the possibility of attaching a rope from Luke Skywalker, - a lot of tiles on the side panels, - all side panels open to get inside, - a speeder bike stand mounted on the back, - fuel tank, - black interior trim, - a lot of control panels inside, - 2 racks for weapons, - special seats for Snowtroopers, - 2 lightbricks and a switch on the roof - movable neck - moving head - the head can be detached very easily - head interior for 3 minifigures - 20+ minifigures can be given in the entire vehicle PDF Instructions Contains 3 files, 2 are ready now - if you are intrested ask me on kozlowski.michal86@gmail.com Project will be available on Rebrickable soon! Today will be movie on my youtube where you will see all the details
-
Hello, my new MOC is ARC-170 starfighter from Episode III. It's my favorite ship and like Venator it's one of my "dream MOCs". Dimensions: 95 x 60 x 30 cm flickr Brickshelf BUILDING INSTRUCTIONS !!!!! >>> see this post <<< I hope you like it !
-

Final: [MOC-BW2001] UCS Resistance Troop Transport (RTT-Initiative)
coreyschaaf posted a topic in LEGO Star Wars
MOC-BW2001 RTT-Initiative (UCS Resistance Troop Transport) Instructions are currently being printed in incredibly limited quantities. Please contact support@brickwars.net and you will be notified the moment instructions are available. Each instruction manual Includes part list, a unique 1 x 6 tile and UCS sticker. Build Details * Total Parts: 4496 Total Lots: 415 28.2" / 71.5CM Wide 16.1" / 40.8CM / Length 6.8" / 17.3cm Height Weight: 155.33 ounces. (9.7Lbs) Instruction Progress: 100% completed -
After many months of hard work here finally my last MOC has finished. MOC name: TS-PROJECT - SB00201 TIE-Silencer - Personal ship of Kylo Ren - Number of pieces: 3176 - Minifigures: 2 - Length: 74 cm - Width: 35 cm - Height: 17 cm Main features: - solid and separable structure for transport - hatch opening (90 °) - fully accessible cockpit with 90 ° screen opening - side panels that can be opened with access to the engines - preparation for lighting system (engines and interior) I attach a flickr link because I can not upload photos here... and I do not know why! :-(
-
Hello, after several months of building, demolishing and rebuilding, I just finished my Lego Star Wars UCS MTT MOC. I picked the MTT as a set to build a UCS style MOC for several reasons: Till today there is no Lego UCS version of the MTT. The existing Lego sets (7662 and 75058) are play sets and therefore not that accurate to the 'real' Trade Federation Multi Troop Transport. It's a challenging build, the MTT has great curves, the thing is all sloped and rounded, so a lot of trial and error fun. I like to build to minifig scale and the MTT is just 'small' enough to do this. To realise a set in minifig scale is almost impossible for the Lego company (UCS Falcon as the exemption to the rule) When I started the build I also did not see any lego MTT MOC's on the internet in minifig scale, so I wanted to fill the gap. When build to minifig scale the build is at a sweet spot in terms of size and weight. It's quite a large build, so you can work full on detail, but you can still pick it up easily and it still fits on a small table or deep bookshelf. It comes in brown , so something different than the usual Star Wars grey shades. After seeing the incredible UCS Sandcrawler of Cavegod and Marshal Banana a couple of years ago, it's clear that shades of brown can be quite interesting for a lego Star Wars build. The build is a compromise between SW universe vehicle accuracy, integrated technical functions and playability. The MTT's main function is to transport and deploy battle droids. Therefore the whole build is centered around the battle droid rack. The droid rack is deployed by a technic scissor lift that is propelled by 2 lineair actuators powered by a PF XL motor. It can also be operated manually trough the top wheel on the backside of the MTT. I wanted a droid rack with four vertical rows of droids like in the real SW universe. It can carry 48 droids (2 rows wide, 4 rows high, 6 droids in a row), so the front had to be wide enough to allow the droid rack to pass, but still small enough to take the inwards curved sides at the vehicle's narrowest point. Because of the height, there was also not a lot of room to make the bottom in the front sturdy enough. Bodywork: Different shades of brown combined with dark blue grey. I tried to go for a weathered look, as in an MTT that has seen some battles. Because of a lack of greebling opportunities I made some blastholes in the sides to go with the weathered look . Specs: Lenght: 90 studs, 70 cm/27 inches height: 35 studs, 34 cm/13 inches weight: almost 8 kg/17lbs Structure/firmness: The inside is all technic bricks and liftarms. You can easily lift the set up on the 2 sides, flex is ok. It rolls on 6 wheels, so kids can move it to play with Work in progress: trial and error to get it moving again on 2 or more lego XL motors or skip the motorized propulsion overall. When I finished building the technic frame, it could be driven by 1 PF XL motor and steered by 1 medium motor. Now with the exterior finished the 8 kg is definitly too much for one XL motor. If anyone has some experience building heavy moving lego or technic vehicles, I'm open to tips Question to the community: would adding one extra XL motor be enough to propel 8 kg? I believe the Sandcrawler MOC is double this weight and it runs (more like crawls) on 4 XL motors? making building instructions: I'm doing this in bricklink studio. I'm making progress, but It will still take a couple of months to finish them. As for a total number of pieces used, I can't say right now, I'll be able to add the number when the instructions are finished. https://www.flickr.com/photos/191523974@N02/albums/72157717588828336 I've posted some pics on my flickr account:


.thumb.jpg.25baa490c88582e649b56b854a721261.jpg)