Search the Community
Showing results for tags 'gauge'.
Found 8 results
-
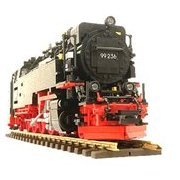
[MOC]: Brockenlok 99 236 (Harzbulle) of the Harzer Schmalspurbahnen (HSB) in scale 1:22,5 (gauge IIm)
Spur II aus Klemmbaust posted a topic in LEGO Train Tech
Hello everyone, after a long time without a new locomotive, I would like to introduce you to my newest MOC: 99 236 of the Harz narrow-gauge railways (HSB). The model is my most complex one until now (11 months of construction time, over 5,000 bricks). About the original: The 99 236 (formerly 99 7236-5) has been my absolute favorite locomotive for as long as I can remember. Therefore, it was clear that when the time came and after I had some experience with building MOCs (99 1782-4, Mallet 11sm) I had to build this machine out of Lego. About the model: The locomotive is completely to scale and is powered by two L-motors on one axle. I'm a little proud of the slanted driver's cab windows, the slanted tender and the snow clearers, which cost me a lot of work. The MOC can run on standard garden railway tracks of gauge IIm (gauge 45mm). As always, I have put together a short video with detailed shots, driving videos and, as a bonus, a ride with the great role model from Wernigerode to Drei Annen Hohne. I hope you enjoy watching it. Best regards, Niklas -

[MOC] 1:22,5 Scale - G Gauge (45mm) - Toy Locomotive (Mark II) and new LGB-based "gondola" wagons
Paperinik77pk posted a topic in LEGO Train Tech
Hi all! Here we go again with big Lego trains running on 45mm G Gauge track! Some of you may remember the yellow Toy Train locomotive I prepared back in 2019 -it was one of my first experiments with G-Gauge trains. This little locomotive was based on a small Powered-Up battery box and a Medium motor. Here it is during a night run on the new 45mm copper track with wooden sleepers I restored to be used on my small garden railway. Here's a detail of the old chassis with the original 1,667:1 gear ratio. This solution proved to work fine on a flat track at home, but was completely useless on the garden line, which can be easily considered a "mountain railway". A 3:1 gear ratio worked better, but gears were too stressed and speed was ridicolous. Plus, with some wagons, the motor always needed to work at full speed. Therefore, back to the lab, I completely revisited the heart of the locomotive, and updating some details on the exterior. Here it is, the Mark II (TADAAAAAAA) !!! And...what's new??? Actually, at body level, it did not change so much from the older one . Handle bars, and headlights have been modified and a new exhaust scoop has been added over the hood (there's no more a red On/Off button). The real new part is under the bodywork: A completely new chassis has been introduced, and now features a new 4-ports PuP Hub and a more efficient Large Motor. Gear ratio is now 2.779:1. It is very strong and smooth - the big battery/bluetooth hub helps traction (which can be increased with the use of rubber bands around the wheels), and the L-Motor is a great improvement over the M-Motor. I've prepared some workflows on the PuP application to work at 25/50/75/100% of the power. The chassis can be detached from the body with four "fast unlock" pins, so changing the batteries is now an easy task. Then, with a locomotive now up to the task of garden railroading, I needed some rolling stock. I've some LGB wagon bases with studs on top (item number 94063) which are the perfect chassis for some wagons I've designed in Stud.io. Both axles are steering, to help the wagon working on tighter curves. So here it is the small gondola , in a bright blue color: And the tan/beige gondola with taller sides: The LGB chassis runs smoothly and really helps the whole train to roll better. Sometimes these things are available (used or new) with an acceptable price, so I get them. A final photo of the consist (fat least for the moment)! Next to come, a passenger and a closed freight wagon with sliding doors (let's see who comes first). I'll try it on the garden railway soon and give some feedbacks (for now only some pretty satisfactory tests were conducted on homemade ramps) I hope you like it!!! Ciao! Davide -
Hi all, after a quite long absence from the forum, I'd lilke to show you this small MOC I just prepared. It should have been a model for the Octrainber, but since I've no time to prepare the whole diorama, I'll show you only the little railcar. The Egger-Bahn is a model line created in the 60s, based mainly on fictional freelance rolling stock (even if some models were inspired by real prototypes). These models were in 1:87 scale, running on H0e track - therefore simulating a narrow gauge system. One of the main models was the articulated steam railcar you can see in this picture taken from internet. The lillte railcar is articulated and composed by a steam motor and an half-passenger wagon. It is a very nice model and I've always liked it! Since I'm working a lot on big scales, I wanted to do something different, so I got back to 6-wide on 4-wide track: It's super-deformed as my other small locomotives I made , and it's based on the 9V red MicroMotor. It can run on black Lego narrow-gauge track and on LEMAX Christmas Train track - which is perfect for small Lego models (and features straights and larger curves). Here below you can see the different components, like the MicroMotor, the rear bogie, and body parts (motor and trailer). And here's a detail of the motor and passenger trailer. As you can see, the 9v MicroMotor is mounted upside-down, and moves the rear wheels of the steam motor. The power comes from a 9v battery box, but I succeded to run the Micromotor on small 12v batteries. Some home made electronics may save space! The batteries should be placed near the trailer link, therefore their weight - insisting on the only driven axle - can improve traction. I hope you like it! Ciao! Davide
-
Hi all, after a very long time, dedicated to my retrocomputing hobby, I finally got back to Lego trains . What made me come back to drawing and studying was a very cheap copy of G-Gauge LGB trains, made in China by a company called Newquida. These trains also offer a specific track, only proposed in Radius 1 (600mm), all made by brown plastic. So I gave this track a try (for 25 Euros I got a full circle, two points and an half circle). Apart the 45mm gauge, the track is all in all very similar to Lego standard geometry. Currently my two prototypes are not G-gauge perfect, they simply are 12v Lego trains with their size multiplied by 2. They are a 7810 and a 7720 on steroids, basically. After getting the track, I widened the bogies of my Lego prototypes of "big" Lego trains from L-gauge to G-gauge and I made a test run...the result is...I'll never go back to L-gauge (only for for trains which are so big and heavy ). This track is cheap and quite solid. More than enough for the moment! So, having the opportunity to properly test my locomotives, I bought three LGB cars (the ones used on standard sets) at quite a bargain price. Immediately, I understood that some ideas I got from photos, catalogues , Eurobricks members ( @Tenderlok ) were correct, others were quite right at a first sight, but totally wrong. First thing to think about: dimensions - The scale 1:22,5 is the one commonly used by LGB for Narrow gauge trains running on 45mm tracks. It means that real trains running on tracks around metric gauge (950mm/1000mm/1067mm, but also smaller ones) are quite standardized to this scale. Standard gauge real trains are quite commonly scaled to 1:32. My Double-L trains are something between these two standards. They are taller and narrower than LGB cars. They are close, and this was quite a satisfaction for a newbie like me. So let's make a bit of reverse engineering. I got some data of real trains (for example BerninaBahn Abe 4/4 30 - 1000mm , JNR KIHA 31 railcar - 1067mm and Genova-Casella locomotives 950mm adapted to 1000mm), and I calculated the measures in studs. We're always around 13/14 studs for width, lenght may vary but buffers are quite often near 3 studs, height can slightly vary but roofs at 15,16 bricks from ground. What I would like is to have some basic reference measures to standardize a bit some parts of my future design. So i dismantled one of the LGB cars and started to take some measurements in order to see if my calculated dimensions were correct. Well,let's say three studs for a single buffer. So lenght of the body could be approximately calculated as: overall lenght over buffers translated in scale and then divided by 0,8cm, subtracted by 6 studs. It's not a general rule, but it works to at least have an idea. I went back on fixed buffer solution instead of pivoting one - it works perfectly. My train base chassis is 12 studs wide - LGB one is 11. but LGB undercarriage parts are thinner than Lego, so I will have to rework all the details (leaf springs, bogies and so on) to be a bit more narrow. Axle steering at least is correct and works fine - it should be limited a bit - LGB axles steer but not so much (I'm no more using Lego tracks for these trains so I can limit the steering a bit). The wagon's body is 14 studs (sounds nice). All doors and windows are smaller than I thought on these wagons. Second thing to think about: weight So, I always tought my locomotives were too heavy. Not at all, LGB wagons are heavy too, so a bit of weight in the locomotive is welcome to improve traction. One thing for sure: the XL motor works fine and smoothly , but bigger batteries are needed (the small battery box is not enough). So, this is what I learned from my errors and ideas so far . First trial in designing something more serious I would like to share with you my first design of a locomotive in real G-Scale, not based on double-sized Lego sets. It's the Electric locomotive number 29 (red) and 28 (blue) of the Genova-Casella railway, one of the survived narrow gauge railways in Italy. Locomotive number 28 was scrapped and parts were used to keep the 29 alive. This design still keeps the possibilty of changing from L-gauge track to 45mm track, but I am redesigning the whole thing. I do not know the real width of the locomotive and I do not have blueprints...so I used a lot of photos. Currently it is 14 wide (16 with ladders), but I'm going to make it narrower by one stud (the real locomotive is thin and tall), in order to give a more faithful look. It will loose the double gauge feature, but I think it deserves a less square design. I'm planning to use two XL motors and a standard PF battery box, but I could also think of a 7,2v high capacity (4000Mah) RC car battery. They are simple as usual, the only snot-designed part are in the front of the locomotive. I hope you like them, and I'd really like to understand if what I experienced could be correct or useful Ciao to all! Davide
-
Hi all, some days ago I was watching some videos of LGB G-Gauge trains running in the garden. They're big and very well done...and really out of budget for me. So I wondered if I could replicate such a big locomotive using Lego. And trying to be cheap!!! A big train like that needs: an XXL PF Motor; a simple PF battery box; a PF receiver; a PF remote control. All in all we're at about 50 Euros from Lego Shop. 4 large flanged wheels from Lego or BBB (3 Euros each - 12 Euros) - our total increases to, let's say, 65 euros. Then, it's time to think about a body - it must be as simple as possible, sturdy, and without too many special parts. Since I was not particularly inspired (in these days I'm playing a lot with the new Lego Boost set) , I used a well known Lego model. Yes, it is what is seems - a 7720 multiplied by 2 - 32 studs long, 12 studs wide. Even the Voltage is doubled . This was painted blue, otherwise the two red "lights" would disappear. Since track is now quite small - I chose to draw only one central buffer, suggesting this is a narrow gauge model. As you can see it is simple as it can be. I think I can try to stay below the 100 euros limit. Then, this weekend I began to prepare the mock-up to test how heavy it could be, if everything fits inside and so on. Here below you can see the yet unfinished 7720 on steroids . In this photo I used a 45mm track from G-gauge - it is actually a part of LGB track. This big girl will be able to travel on both tracks. Reasoning in studs, the L-gauge puts 4 studs between the wheels, while the G-gauge requires exactly 5 studs. Since wheels will be mounted internally respect to the fake suspensions, both gauges can be achieved by adding or removing two half Technic bushes between the wheels (one per side, so 4 studs + 0.5 stud + 0.5 stud =5 studs). But we want to be cheap - and LGB track are not - so we'll keep the standard Lego track. You cannot see it from the photos, but the black part is all made by 3x2 and 4x2 parts - too small - but I had only those around. Inter-axle is 15 studs - BBB wheels can handle the R40 radius, but this is an heavy locomotive, so I think I'll shorten the inter-axle to 13 studs. Now I'm studying how to transmit power to the wheels - I was tempted to use a chain-driven system based on lego 3711 parts, but it costs a lot and I'm not sure how much weight and torque it can handle. I'll end using the Lego 32702 gears - they seem right and are cheap enough. Let's see how this develops!!! I personally am very curious to see it in action! Ciao! Davide
-
Hi! As you can see on the two pictures above and in this short , this MOC is a copy of a real thing.We haven’t got a Grand Canyon, or an Eiffel in Hungary, but it’s still possible to find nice places here. For example Szilvásvárad (a little village) is one of the most best places of the country. There is a small valley here, which was made by the Szalajka creek. And at the and of it there is this beautiful waterfall. There are a lot of other sights, too, for example the ancient men’s cave, the lookout tower, etc. It’s possible to reach the end of the valley on foot, by bicycle, and by the narrow gauge railway. It has a 4 km long trank in the forest, near the creek. It was a forestry railway in the past, and now it’s the only narrow gauge railway in Hungary, which can maintain itself. It has more, than 200 000 passengers a year. The railway usually uses two engines. One of them was modernized a few years ago, it is the one on the main photo. My Lego version contains this engine, a passenger coach and the snack bar wagon. The snack bar wagon is almost always near the waterfall, sometimes the engine takes it back to the village to refill it. The amount of tourists is increasing, I guess it was the reason of some developments there. Due to them, the valley contains to much buildings and asphalt, but it’s still nice. Don’t forget to visit it, if you are in Hungary! You can find more pictures about the Lego model, and the real train on Mocpages! Thanks for watching!
-
Hi guys, I want to have a tachometer to test my MOCs RPM and I am considering four options: Building it with LEGO (I have seen videos of LEGO tachometers (Nico71 is a great example) and they worked quite well but centrifugal tachometers are big and not really accurate, because you have to calibrate it yourself). Buying some sort of RC tachometer (I can't find any at a good price that could be attached to my MOCs. Buying the LEGO speed computer. Use gear ratio calculators and not buy or build anything (I will need to switch on the computer each time I want to know something, because I don't think there is any mobile app for Android to calculate LEGO gear ratios or at least I couldn't find it). What should I do? Any advice of which one to buy if you choose second option? Thank you in advance and sorry for my poor English, I hope you can understand it. EDIT: 5th option: Making it using Arduino but I think it's quite difficult/expensive to make it work as accurate as a "real" tachometer.
-
This little engine was inspired by the little shunting engine from LEGO's own City set, 4204 'The Mine' which it is pictured with below. This little engine is just 5 studs wide, and can run on rails at just 4-studs wide. The LEGO historians amongst you may recognise the character on which it's name is based. The engine is based on the iconic miniature engine 'Talyllyn', from the Talyllyn Railway, the worlds first preserved railway in Wales, United Kingdom. The aim was to not to create an exact replica of the engine, but rather it was a self discipline exercise to produce a set that would fit in nicely along side the rest of the LEGO City range. As well as to represent a steam engine at this small scale. Heres an image of it next the magnificent Emerald Night to appreciate the scale of the model. The entire 3-piece train is a tad longer than just the Emerald Night's Engine section! Had all the pieces been available in their respective colours I would have made a physical version of the model, but alas they don't, so instead this model was created using Bricksmith and rendered in POV-Ray (Thanks to C3POwen's awesome tutorial). I've decided to upload it to LEGO Cuusoo, so if you like please SUPPORT it there. It would be great to have an actual LEGO Train set that was more affordable to those with a smaller pocket, as the smaller sets in the Trains range always seem to be random rolling stock, railway furniture (lights, station accessories, etc) or track packs, not much with the 'swoosh/chuff' factor. There are more pictures as well as a second engine and some other rolling stock in the works which I'll post up here, and in its Flickr Album when they arrive..