Search the Community
Showing results for tags 'moc'.
Found 5698 results
-
My final entry into the SW Community build for Revenge of the Sith on Eurobricks. This has to be my favorite scene from RotS so I though it made sense for my to build it. And yes, that is pretty close to the actual measurements of the hill. It was quite fun to build, I really enjoy building smaller MOCs. Flickr Set Built October 2012
-
I can't say I really know what else to call it. The build was quite fun though. It was really nice to be able to have all of the parts I wanted on hand to build with. A snow scene just seemed fitting, I can't really say why. Be sure to check out the Flickr set! Built October 2012.
-
I built this Lord of the Rings MOC last week and brought it to an event with Swebrick, the Swedish LUG, this weekend. First I had planned to do a build with all of the fellowship, but I didn't come up with anything good at the moment so I settled for this idea. I think it is a really iconic scene for the first movie. Sorry for the non-clean background. The trees got a bit demolished in the transport home and I'm not sure if I'm going to rebuild them so I took the photos from the event. Hope you like it!
-
This is an Abandoned Mansion I made for Halloween which I have posted on Cuusoo as a Modular design. http://lego.cuusoo.c...deas/view/29482
-
B-OV-39B Welcome to the newest IKEA store! IKEA for Lego-fans, to be precise. Our largest family project yet. 3 months in the making. Experience the wonder of the Swedish furniture discount store: You walk in to buy a desk lamp... and you walk out with more flatpacks than your car can transport! If you would like to see more pictures of our creation go to http://www.mocpages.com/moc.php/339462. Cheers Ecki & family
-

1950's Rust-eze modular factory with boxcars and semi-truck - real life MOC's
Murdoch17 posted a topic in LEGO Train Tech
Introducing the Rust-eze factory, which is where they make the rust remover / chrome restorer product Inspired by / not quite the same as the one seen in the CARS & PLANES shared universe from Disney / Pixar . I have set this building in my transition-era layout, which means the 40's through the mid-1980's, as the steam / diesel mix era continued longer on my alt-timeline. Their is a small 0-6-0ST switcher that services the factory as seen above and here in it's own topic. The factory without the train in front. The rear of the factory, with the ladder to the top of the chimney flue. The detachable roof can be removed, however I never really finished the inside part, and probably never will as I haven't a clue what to put in there machinery-wise. The loading doors do open, and were modified from the original arched doors as they couldn't fit a forklift... then again, these doors might not either! I was inspired by this photo by JB Lego to build these boxcars as seen here. They are made to haul pallets of cargo, specifically Rust-eze chrome restorer in 55-gallon drum containers for commercial packaging at another facility into smaller containers. This model was heavily inspired by set 8486, (Mack's Team Truck) from 2011. I changed the model to seat one mini figure at the wheel, added new headlights and license plate plus revised the fenders and enlarged the cab. The rear of the semi features a opening door and fold-down trailer stand, while the cab has two moving driver's doors. The trailer no longer has opening sides, but it does have two opening rear doors and folding stand for when the cab pulls away. Speaking of the cab, the roof of the driver's compartment comes off and both doors open. I hoped this factory would be of some use for some people, as the original always has been gathering dust in the basement since it was built, as seen below: This is the original factory that was by my Dad around the years 2000 - 2004. it was built with parts from several Sand Red supplemental packs available at that time. It does not feature any interior, nor does it have a removable roof. But this thing is built STRONG: you have to really put your weight on it to press the roof together. Here is the rear of his model. Comments, questions, suggestions, and complaints are always welcome! EDIT 4/9/19: added real life photos of the factory. -
A small MOC showing a family playing Pong in the 70s. I got the inspiration to build it from an old Nintendo advertisment.
-
[pid][/pid] 142A This is my first Moc post on Eurobricks, but it is certainly not my first Moc . This is my newest ship. I built it after watching POTC At World's End, having been inspired by the Junk in the movie. I also wanted to have a try at custom hulls, something I have not tried before. They didn't come out too bad, did they? I'm sorry for the bad quality, this was taken on an IPod. Here is the full ship, with crew on it. Without Crew Gundeck/Midsection Stern area/poop deck Instead of using a steering Wheel, like most ships, I thought a tiller would add more of an Asian and exotic feel, so here is my tiller. It doesn't actually move the rudder, though Bow/Front Area Head on shot. Anchor. Its not the best designed, and probably not very realistic . I could probably make it better, but I like how it comes over the front. Stern shot and Rudder. Here is a little bit of how I did the hulls. Not really sure how much you can get out of it, though . Front small sail. Back Large Sail. Finally, The Crew. Captain First Mate Pirate Pirate Pirate Pirate Pirate and Ship's Monkey And, that's it! I hope you liked it. Any and all Comments and criticism are very welcome
-
In my ongoing Heroica RPG Quest, The Light That Reveals Everything, the heroes have made it to a convent with a large sanctuary. It's dedicated to the god of Light and Justice, Ennoc, protector of the Paladin Order. From the beginning I was just planning to make a small set piece but well... it turned out a bit bigger With the heroes. Stained glass window technique is of course inspired by eilonwy77, the Queen of cheese slopes. Thanks for watching!
-
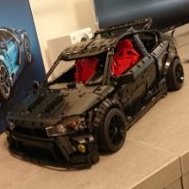
So, I made a Batmobile but it was a little too big, so I gave it a go. What do you think?
-
Hi, I'd like to introduce to you my first ever modular MOC. I'm fairly new to Lego so my collection is small. Therefore I think it's only appropriate that my first modular MOC is in the mini modular scale. Please note the studs on the roof (rear view) represent a rooftop garden. I'd appreciate any feedback as I plan to add new creations to my 10230 set over time. Additional photos can be seen on my flickr account http://www.flickr.co.../in/photostream
-
Hello I,am Georg from Germany I've decided, to post a description and building phases of my Big Scale Lamborghini Countach Lego Project. Modell: LP500S Why this car? I Love it, i have also a big Countach Collection of Modellcars The Idea was, i need a bigger Modell from the Countach, with Lego? Why not 1:18 Kyosho Modelcar served as a template. Plans on LDD start in 2007 - 2010 3 Jears Plan time on LDD, early was the LDD so slow Loading this Model abaout 1hour Time To Generate the Building Plan, the PC was over a Day on LOAD Next i buy many many many New Parts from Pick A Brick Store - I would need new Parts for this MOC Start: with Headlights open So i need 2 weeks Building Time... Then was Ready with this Moc, its my biggest one I know many Pics, I hope you like it
-
Pandora Panda got a brand new Roadster for her birthday! Here she is cruising along, ... ... showing off the dark red leather interior and folding roof, ... ... opening doors and uhm... steering wheel, ... ... shiny front, ... ... and (headache-inducing) sloping rear and spare tire. Of course Pandora Panda had to really test the performance of her new Roadster, so she challenged Ricky Raccoon to a race through the streets and forests of Fabuland in his fast Hot Rod. All the Fabulanders came to watch the race and... see Pandora Panda win. Let's see if you can spot the obligatory Fabuland frog.
-

ASK HERE MOC-stuck? Ask for general building advice here!
mrklaw posted a topic in General LEGO Discussion
I'm trying to make a slightly larger model of the Big Ben architecture set, to allow me to not have the clock face sticking out. But I've run into trouble with the roof. Seems that Lego don't make any 75 degree corner pieces. This seems odd, as they have a 75 degree slope, and a roof 'cap' but no corners. So any suggestions how to work around this? I was thinking to use the smallest wedge pieces, but I'm having trouble figuring out how to hinge them at an angle to form a roof. I've tried the standard 45 degree slopes and they just look wrong. I need the roof to be four studs wide at the bottom, two studs wide at the top and about a brick high, maybe 4 studs. Plus I need to be able to build on top of it, so I need to be able to get something through from underneath - even if it's just a pole -

Datsville community LDraw project
Dilvish posted a topic in Digital LEGO: Tools, Techniques, and Projects
Some of you might be aware of Datsville, a ~20 year old community project aimed at creating a multi-user town in LDraw. There's a historical page dedicated to it at LUGNET, and a GitHub project with recent activity. There are also a Facebook page and a Flickr photo stream. Some recent discussion has appeared on the LDraw.org forums and LUGNET. What we need, however, is more submissions! If you'd like to create and submit a new model please drop us a line. Note that all submissions need to be licensed under a Creative Commons BY-SA license or public domain. There are high resolution 8192x4096px versions of the above images on Flickr if you click on the download link and select "Original Version". -
Firstly I have done a search on building techniques and although I found lots of helpful information I couldn’t find what I was looking for. After years of wanting to make my own Hoth base I have finally taken the plunge and bought a load of loose bricks. I have built lots of sets over the last three years, from various themes (40+ at least) I am yet to make my own creation though. I am going to purchase a 7666 Hoth base to give me the foundations, the plan is to modify it and, in the future, add the Echo base control room. My question isn’t straight forward- I really don’t know where to start on the build, I have bought several lots of bricks: 2X http://www.ebay.co.u...984.m1439.l2649 http://www.ebay.co.u...984.m1439.l2649 http://www.ebay.co.u...984.m1439.l2649 Also found some ice pieces (and a load of trans light blue 1x1 tiles) in this lot: http://www.ebay.co.u...984.m1439.l2649 My quandary is, do I build the base to a set size of base plate or build it to the vehicles I want to place inside? I was thinking about going 48 x 20 outside. I am hoping this will give enough room to place the blast doors and end wall on and for some trenches and gun turrets etc. I haven’t given the inside much though as of yet, probably to include an x wing and two snowspeeders. My idea to make is different to any others I have seen it to put mezzanine floor at the rear of the set. I am hoping this will give the dio a bit more texture and not be quite so linear. Made up of these: http://www.bricklink...86&itemID=64904 To summarise, I would love to hear some advice on the planning stage- I don’t want to spend a fortune on buying base boards (aren’t they expensive?!) and find they aren’t the right size for my build. Maybe sketching out my idea is the way forward? Thanks in advance, Edbrick
-
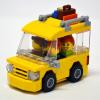
After more than 30 years of loyal service, Billy Goat finally decided to replace his old tow truck. Look what the cat goat dragged in.
-
Fabuland's Ricky Raccoon has a new ride. He has replaced his scooter with a fast new hot rod. Bigger versions of these pictures on flickr.
-
V-LF-15B Updated May 31, 2012! Jump to the latest version! Support on Cuusoo LEGO Ideas! Original post below: Yes, it's another ambulance to add to the numerous ambulance MOCs on this forum. I chose to do this because ambulances are one of those vehicles that every city ought to have, but the official Lego versions don't look like the typical American ambulance. I've also seen some great ambulance MOCs here, but they weren't quite what I had in mind in terms of scale and proportions so hopefully mine will bring something new to the table. The first thing I started on was the 6-wide cab. I specifically wanted to be able to fit 2 minifigs in there. That wasn't too hard, but I did have to remove the seats in order for the roof of the cab to fit properly, otherwise I would have had to raise the roof by one plate in height. At first I used a 6x5x1 wall panel as the back of the cab to allow space for the seat backs. Once the seats were gone, I decided to use regular bricks. This allowed there to be an opening to the patient section in the back like on a real ambulance. The outside of a real ambulance has a lot of storage areas that can open up. For my model, I decided to focus more on the inside detail, which meant that outside storage had to be sacrificed since there isn't enough space. I do have a container on the driver side, but that's it. I added some 1x1 light bley tiles to simulate the door handles of some of the storage compartments. The roofs of the cab and patient section can be removed for easy access. This picture also shows the brick-built doors in their open position. This was the first time building my own brick-built doors and quickly found that simply using hinges wouldn't work due to the thickness of the bricks. At one point, I experimented with a snot door that had cheese wedges on the side to allow it to open and close. It didn't look good, so I scrapped the use of hinged plates/bricks altogether. A shot of part of the interior. There is a seat for an EMT to help with the patient and lots of storage for medical supplies. The other side (not shown) has an area where another minifig can sit, though the stretcher would get in the way of the fig's feet. There's also an oxygen tank and fire extinguisher that you can't see in this photo. The ice skater has had a bad fall! Her fans are quite worried. Here you see a bit of how the doors are made. There is a bar on the door attached to two robot arms. The other end of the arms are attached to a bar on the interior of the patient section. This allows the brick-built doors to be pulled straight out and then swiveled to the side. It's hard to see, but I also used 1x1 corner panels to allow a bit more clearance for the robot arms. I feel like I've seen this door technique before, but I'm not sure where I've seen it. The side door opens just like the rear doors. I'll probably use a similar design if I decide to make a bus. Comparison with official Lego vehicles. The bus from City Corner is looking a bit small now. Well, I guess that's it for this MOC! Thanks for looking! My next MOC might be an 8-wide bus, or maybe a regular car of some sort. This MOC can also be viewed at: Flickr MOC Pages LDD file: Spacysmoke's American Ambulance (ver.B)
-
Let me introduce myself and tell you something about this new topic. Some of you may know me in connection with modification of alternative model from set 8052. I modified it into truck with work platform last summer and provided you building instruction via brickshelf. It is not my only creation so I decided to share my other creations with you too. One more note before introducing my models – I am focused on building models from one set so they could be named as “unofficial alternative models”. It’s enough about me and let’s look at what I have for you now! This is truck with work platform I spoke about above. My latest creation is “telehandler” also from set 8052. Honestly it doesn’t have telescopic boom but at least it looks like it has... :) It features following functions: lifting boom via linear actuator and medium motor with gear ratio 1:3 (it is as slow as lifting container in main model) rear axle steering with eccentric control via beacon on roof of cabin – this was little puzzle because lack of bevel gears front stabilizers which are able to lift front wheels little bit above land adjustable rear mirror (I like especially that one on side of battery box)
-
*UPDATED May 21, 2014! Click HERE to jump to the post and see the updated version! Support this project on Lego Ideas: https://ideas.lego.com/projects/937 ---------------------------------------------------------------------------------------- The post about the 2nd Revision can be found HERE. ---------------------------------------------------------------------------------------- Original version below: This is my first MOC as an AFOL. While waiting in line at one of my favorite food trucks here in Los Angeles, it dawned on me that the food truck would be the perfect choice for my first MOC. As I stared at the food truck in front of me, I started imagining how the details of the truck could be translated into Lego. For the past 3 weeks, I've been working on this vehicle, solving problems, adding details, and making the build as efficient as possible. My goal was to make it in the style of official sets while adding as much detail as I could. Hence, it is 6-wide and uses the wheels and mudguards seen on most official sets. I was very tempted to go 8-wide since that would have made things a lot easier, but I like a challenge. Above is the food-serving side of the truck. It has a large panel that can swing upwards to reveal a counter and a serving window. The silver 1x1 round plate is a handle so the door can be lifted easily (without it, it is really difficult to open since the panel is flush with the wall). The 2x4 light bley tile is for the menu. This is what I call "the boring side" of the truck. It's not really boring, but it is a bit plain. I tried to add as much detail as I could. There's a fuel tank panel and some vents. I also added that ridge, though I wish I could continue it down the entire length of the truck. The door is one of the things that bugs me the most. Unfortunately Lego doesn't make a door in quite the style seen on these trucks. I was debating whether to have a door at all. The back of the truck is one of the first things I worked on. Those vents are one of the most distinctive things about a food truck, so I knew that if I couldn't get that to look right, I might as well not do it. Here's the serving side with the panel open. The display area was inspired by a similar display in the Winter Village Bakery set. There's also hot water and coffee dispensers on the right. Oh, and say "hi" to the chef! The skylights are another detail that help make a food truck a food truck. This build was inspired by the roof door of the Fire Brigade modular building. Now if only Lego made those glass pieces in trans blue, it'd be perfect! C'mon Lego, make me happy! You can take off the skylights to access the cooking area of the truck. I tried to make it as easy as possible to remove, but it can be a little difficult. Here's the best shot I could get of the cooking area. I had to remove a bit of the walls to get a clear shot, but you can see that this truck is equipped with a stove, oven, grill, sink, cabinet, shelf, and a place to hang a frying pan. "I'll take one brickwurst, please." "That'll be one hundred bucks." The counter is a little high, but I think it still works. Here's a quick height comparison to the bus from the City Public Transport Station set. I think the truck fits in rather well. That's it! Hope you enjoyed it as much as I enjoyed my first MOC! Now to think about what I'll do next! Also at MOC Pages!
-

[KEY TOPIC] Eurobricks MOC LXF Index
XimenaPaulina posted a topic in Digital LEGO: Tools, Techniques, and Projects
In the past couple of years, Eurobricks has been witness to the rising popularity of LDD use among members as evidenced by the significant influx of LDD MOCs throughout the site. This Index was created to provide a convenient means to search and browse all the LDD MOCs that were posted here in the forums. The LDD MOCs shall be indexed according to theme, and members could add their own or other member’s LDD creations in this Index by following the general guidelines below. General Guidelines: Only LDD MOCs with LXF files that were posted here in Eurobricks (in the appropriate subforum) are eligible to be indexed. Posting your own LDD MOC: If you have done an LDD MOC that you have posted before on the appropriate forum which you’d like to be part of this Index, post the topic link and the LXF file in this topic using the following format: LDD MOC Name by LDD Builder - LXF (insert topic link in the ‘LDD MOC Name’ and the LXF file link to ‘LXF’) If you have a new LDD MOC that you haven’t posted yet, post it first in the appropriate forum, then provide the required topic link and the LXF following the format above. [*]Posting other member’s LDD MOC: If you found an LDD MOC of another member on a certain subforum which you think needs to be added on this Index, post the topic link and the LXF file. Important Reminders: When posting your LDD MOCs in the appropriate subforum, pls. observe the image size limit of 800x600 pixels max. If you made an LDD version of someone else’s MOC and would like it to be indexed here, make sure you give credit to the original source or better if you ask permission from them. If you used an LDD MOC from this Index to make your own brick-built version and you post photos of that MOC, it is a must and proper courtesy to acknowledge the source of the design. The LDD Staff and Indexer reserve the right to refuse MOCs which do not follow the rules and are not up to EB standards. Since we are just staring this Index, feel free to comment, ask questions, and add your suggestions. Index Statistics: (to be updated) -
I was asked in another thread about my photography setup, so I thought I'd start a new topic and share my techniques and give others an opportunity to comment and share theirs. Admins and Mods, if I've strayed into the wrong forum with this please move it to the correct one with my most sincere apologies. Anyway, here is what my setup looks like. I use a technique called three point lighting which you can read more about here. I've numbered where I placed my lights and where I place three more when I use my softeners in red or blue... My red and blue bulbs. Looks like there's been another walrus whacking in hinckleytown... I set up the shadowbox itself with three sheets of foamcore. I took a regular cardboard box that LEGO was shipped to me in and cut off two of the sides. Then I taped the back of the foam core inside what was left of the box and glued it down with some wood glue: So, that's it. I sharpen all my photos in Photoshop and switch the sharpen mode to screen to brighten them up and do basic color correction with the color balance tool (Ctrl + B for PC, Apple + B for MAC). Foamcore and cliplights are relatively inexpensive. I probably got my whole setup for about $30. The camera was through the roof and so is the Adobe Photoshop software...but the shadow box and light setup are easier to obtain than you think. I'm no photography expert so feel free to tell me where I may be going wrong if you know and impart more knowledge upon me and the rest of us!!! X-D better LEGO pics on! UPDATE 09.18.2007-Just wanted to update this thread with some more tips and tricks: 1. I've noticed a lot of people post pictures at 300 dpi or higher. This uses a lot of memory and bandwidth. To post a picture online, it only needs to be 72 dpi. You can't tell the difference on screen between a picture at 72 dpi and a picture at 5,000,000 dpi, trust me. If you have photo-editing software you should be able to change the dpi. Your camera settings should allow you to take pics at 72 dpi, although you want to keep your camera at 300 dpi if you like to print your pictures...Reducing the dpi will reduce the file size by a great amount! 2. When foucsing your three point lighting, focusing should be done one light at a time. So when you are focusing one lamp, make sure the others are off and that the light you are focusing is either spotlighting or filling the area you need it to... 3. If you don't have the lights or the rig to use this setup (mine is clipped on to the plumbing and gasline in my basement) you can reflect natural light from two points using posterboard or reflect light from lamps using posterboard. White poster board reflecting light from one lamp or window can be just as effective as using mutliple lamps. 4. Color correction-if you don't have photo-editing software and you need to color correct your photos, say they are coming out too yellow, you can use poster board for this as well. Using blue posterboard to reflect light into your shadowbox can reduce yellow, red balances cyan (lighter blues), and magenta balances greens...If you have access to gels which you may find in a theater or photography studio or the theater or photography dept at your school. You can balance color in your shadowbox with colored gels that cover the lights.