Search the Community
Showing results for tags 'WIP'.
Found 313 results
-
I am taking on my largest MOC yet, a fully (minifig) sized multi-troop transport. I will be updating this thread with picturs as I go along. It will feature a two floor droid deployment rack, rear space for destroyers, and even a retrofitted Super battle droid rack. It will, however, NOT be in accurate colors due to my lack of suffecent brown or separatist blue. Any suggestions would be appreciated. :)
-

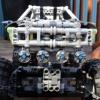
[WIP] Rock Crawler
Technic156 posted a topic in LEGO Technic, Mindstorms, Model Team and Scale Modeling
Hey Guys, So I decided to go back to one of my first MOCs and wanted to rebuild the whole thing. Going with live axles, XL motor mounted directly to it, then geared down to 1:3 and have the knob gears to finally deliver the power to the wheels. I will probably do the front end tomorrow. So what do you guys think? Too overkill? :P And this is V1 -
Hello all, I have been thinking about making this a while back, but didn't have any WIP builds. The idea is a general WIP topic for posting WIP shots of unfinished creations. If you post something here please include (if posssible): - A picture (or more) - Links to prototypes and/or creations you base you creation on - Any other information other user should know when they help you I will start: I am currently working on an American diesel engine like this one but in 7 studs wide and a fictional colour scheme. American Diesel Engine WIP 1 by UrbanErwin(EPJL), on Flickr American Diesel Engine WIP 1 by UrbanErwin(EPJL), on Flickr legoman666's version is also a big inspiration source. As I don't have seen one of these in real life I have no idea if the scales are off, or that they are right. Things I still want to add: - A big ventilator thing on the back (how do you call those?) - Plows and couplers on the trucks - A better fuel tank I hope I have provided enough information. Erwin
-

[WIP] 6x6 Offroad Truck
VKTechnic posted a topic in LEGO Technic, Mindstorms, Model Team and Scale Modeling
Newest update: Completion! See the completed model here! I've had a 3rd pair of Axial Ripsaw 1.9 tires lying around for quite some time, and I figured it's about time to use them. I'll be building a 6x6 truck based on this: So far, I have the axles done: Thoughts? -

[WIP] Chassis Project
Phoxtane posted a topic in LEGO Technic, Mindstorms, Model Team and Scale Modeling
I've started on a chassis that will eventually be used to build a supercar with, as per the unofficial Technic rite-of-passage: Notable features include a floating differential setup that's borrowed from Thirdwigg's 8081 RT MOC (found here: http://thirdwigg.com/2014/01/12/8081-rt/) The always necessary underside shot: The right and left sides, respectively: The back end: And a shot from the top: A lot of this is placeholder; the entire front steered suspension setup is also borrowed from Thirdwigg's MOC and as such is held on with the power of Grayskull wishful thinking. In addition, the chassis is about as short as it will get due to the fact that the drivetrain is artificially long to avoid issues with the half-width offset generated by the floating differential, and the servo motor is set directly end-to-end with the L-motor. Finally, I think the chassis overall is a little too tall for a supercar, and I would like to lower that somewhat. Basically, I'm looking for what I can improve to make this a bit more compact (and yet still have room for a battery, something essential I forgot to put into this) and what I can do to make it stronger. This project is derived from the thread I made recently about developing a compact suspension (http://www.eurobricks.com/forum/index.php?showtopic=97809) - as you can see, I ended up using Thirdwigg's solution as it was going to be much better than anything I could come up with in a reasonable amount of time. Let's finish off this post with some nice pictures of the rear drivetrain, with and without the various supporting elements! -
This page will contain all next projects wip about pacific rim, including kaiju and jaegers, at the same (or realy close) scale than My Gipsy (linked #http://www.eurobricks.com/forum/index.php?showtopic=97069) and for the now this is one image of the current project, sugestions, critiques and ideas are all welcome, thanks for attention
-

[WIP] RC Chassis V6
z3_2drive posted a topic in LEGO Technic, Mindstorms, Model Team and Scale Modeling
Hello! I haven't received my last bulk order from Canada so I'll go ahead and start the WIP topic as the model stands now. I have finished the rear axle and won't make any changes until I see fit. The difference between this version compared to the previous 5 is that I want to attempt more complex suspension systems while still retaining enough strength for the speeds seen with my V5. The drivetrain is different in order to accommodate the rear suspension. 4 Buggy motors driving a 40 tooth gear from the slower output, which drives a modified 4L differential that I've had for a while-it can handle more torque. Photos: It can be locked but I used the driving ring as more of a spacer. I used pneumatic cylinders with Lego springs inside similar to nicjasno's large scale builds. It might be too stiff but we shall see. This version has the sturdiest construction with no chassis flex, and I'll try to keep it that way with a mostly studded frame. I limited the travel so it won't scrape too easily, and the unequal length arms allow for gradual negative camber. If you haven't noticed, the rear is an even stud length rather than the odd length I usually work with, so I had to use some odd pieces to get the desired features. Like I said in another topic, I made sure the rear suspension used nicjasno's custom hubs, and this is the simplest and strongest idea I came up with. Very unusual building techniques were used, but I'm very satisfied with the result. I might have to reinforce some elements later on. Everything is snug, with no room to spare. Hope you all like it so far, the next update should be when the frame starts to take shape. Another note: only a few pieces were modified, which upsets the ancient purist inside me, but I promise I will avoid mangling parts as much as I can -
Hello My friends! i start a new project... actully i'm not a huge fan of Power Rangers Series, but i see just because of Zords, andwhat is the most powerfull zord? the green ranger Dragonzord! http://news.tokunati...ragonzord-2.jpg so, i will post some steps pf this project, in the first fase on LDD. Chest and head (and little Green Ranger) a lot of snot, and try to make
-

[MINI][WIP] 6 wheeler
CNT2 posted a topic in LEGO Technic, Mindstorms, Model Team and Scale Modeling
OK !! I'm starting this wip thread for my mini contest entry my entry will be some kind of 6 wheeler car or truck. functionality is still undecided, I need to work on the body either a flat bed truck with something on the back or maybe a touring car with steering, plus it rolls well so far I've got a reasonable chassis with about 50pcs minus the 2 middle support bumps but the body needs some improvement (heh) and some pics... -
Hello everyone, This topic will be about designing and hopefully the build of the Smit Zwarte Zee. The Zwarte Zee was launched in 1963 and was the most powerfull ocean tug from Smit internationale sleepdiensten for a short while. It was wrecked in 1984 after several attempts to sell it, (to be converted into a yacht) did not succeed. For a lot of Dutch people this is one of the most beautiful tugs ever build. As a 14 year old I had build the wooden model of Billing Boats and turned it into a RC version. It was far from perfect but I was very happy with. I don't know what happened with rhe ship but I don;t own it anymore. Somewhere in march 2012 I started with the wheelhouse. The reason for that is that I had not build a ship that was longer than 1 meter at that time. Besides that I did not had any idea how to build a smooth hull of 2 meters long and about 32 cm wide. In April 2012 I had this: Bridge of the Smit Zwarte Zee by Konajra, on Flickr A good start. At the end of april 2012 I had the wheelhouse finished. Zwarte Zee WIP (3) by Konajra, on Flickr But then I still had no idea how to start with the hull. Other projects came around and I put the Zwarte Zee at hold. But after building my larger ships, the Fairplay and the Grampian Don. I had discovered new techniques how build a smooth looking hull. But stil I wasn't looking forward to desinging the hull. So I started to build the wheelhouse in bricks after I had broken down the Calypso. That ship has been displayed across europe and it was time to take her apart. WIP Zwarte Zee by Konajra, on Flickr WIP Zwarte Zee by Konajra, on Flickr This is the situation at the moment. Some other things came by and I haven't come any further yet. Until the beginning of januari this year when I finally started with designing the hull in MLcad. First attempt failed badly zwarte zee by Konajra, on Flickr zwarte zee Ldraw WIP by Konajra, on Flickr Normal slopes and curved slopes did not work here as good as they did on my Fiona coaster. After four restarts I have yet a great looking hull: Zwarte Zee Ldraw Wip version 4.0 by Konajra, on Flickr zwarte zee WIP by Konajra, on Flickr
-
[WIP] Mustang Rebuild
VKTechnic posted a topic in LEGO Technic, Mindstorms, Model Team and Scale Modeling
This past Saturday, I rebuild my abandoned Mustang chassis (and made some improvements) . Here's what I got done: Features are all the same so far: - Front independent suspension with Anti-dive geometry, caster angle, kingpin inclination, and Ackerman geometry - Rear leaf spring suspension - Return-to-center R/C steering - Remote control drive The main improvement with this chassis so far is a slightly more compact gear system for the steering, which allowed me to move the drive motor up (and add a second drive motor). Here's the old chassis for comparison: This Saturday, at 12:00 PM Pacific Time, I'll be hosting another build livestream. There, I'll be building the cabin and dashboard, possibly more. Here's the link. In the meantime, what do you guys think of the rebuild so far? -
Hi all, after a bit of a road trip I had a pretty good idea on how to construct the trucks that are commonly seen driving between cities in Australia. I decided to go with a general long nose truck with a sleeper cab and not a specific make or model to allow a bit of freedom with the design, but with minor bodywork or accessory changes it could be changed. I based the dimensions on the 3221 LEGO truck set from 2010. As it stands now, the truck is 6 wide (with nothing but the side mirrors and wheels protruding out past the fenders), 22 studs long and just over 10 bricks high. The entire truck is built on a 2x16 plate for a sturdy chassis with a fair bit of weight down low for stability. I borrowed most of the rear axle and tail light area from 3221 for commonality between the two but will be tweaking it as it is pretty boring back there right now. The sleeper cab can accommodate a minifig on the bed but it is a bit of a tight squeeze and I haven't built in any luxuries back there yet. Up in the cabin the driver is a bit confined too and I still have to get a steering wheel in there somehow. Moving forward to the bonnet and a couple of the parts are still floating, I'll fix this up when I figure out how to build a hinged bonnet and add an engine to the mostly empty space in there. I left the two studs on the nose to use as an attachment point for a bull bar when I can think up a beefy enough design and the jumper plate below represents the hitch where multiple trucks connect up. For access to the cabin, both doors are hinged but the side mirrors limit how far they swing out. The roof is made of two sections with the front consisting of the windshield and cabin roof floating but secured in place by several key points. The rear section is the sleeper cab roof which rest on the cabin roof and the back wall of the sleeper cab. Two studs secure this in pace but should allow for easy removal. I'll keep fine tuning this for a little bit longer, it only took a couple of hours to knock this first version out so it shouldn't take too much longer to get it finished. In the mean time let me know what you think. Update: I ended up tweaking the bonnet so now it's attached by a 1x2 plate with stick to 2 1x1 plates with upright holders on the frame. There's also a simple engine block underneath but it's main purpose is to hold the air filters and doors in place as they are still floating. A steering wheel wedges the air filters and door assembly in place nicely and I think the nose is done now. I still have to do a bull bar but for now I'm trying to build this with what I have on hand.
-

[MINI] Mini (8052) Containertruct
Mark275 posted a topic in LEGO Technic, Mindstorms, Model Team and Scale Modeling
Hi everyone! This is my first time entering in a Eurobricks contest so i'm really excited . I decided to make a containertruck (like 8052 (the old one)). I started building very optimistic , 200 parts max would be easily possible i thought. When i finished my model, it counted around 250 parts, so I had to remove some parts. This was unfortunately at the expense of the beautiful and firmness. It now counts exactly 200 parts. However, I'm not totally happy with the result, and I hoped that some of you would have some tips how to improve my model . Have a nice day, Mark See the lxf file here: MINI Mini (8052) Containertruck.lxf (sorry for my bad English) -

[MINI][WIP] My entry: Front Loader
msx80 posted a topic in LEGO Technic, Mindstorms, Model Team and Scale Modeling
Hello, this is my first competition here on Eurobricks and first technic one! My entry is a front loader. Ok, not very original, but.. :) I tryed to make it as compact as possible. The hard part is done: the steering and loading mechanisms work and are very solid and compact. The driving cabin will come next. Feature: - Working steering - Working front loader Any feedback is welcome :) -
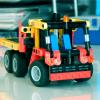
[MINI] [WIP] Wheeled Excavator
VKTechnic posted a topic in LEGO Technic, Mindstorms, Model Team and Scale Modeling
Last night I started work on my second MINI Challenge model...a wheeled excavator. Here's the chassis design, only 55 parts and it has 4 wheel steering. Now to work on the hardest part: a good-looking digging arm. -
Well, I need to post more of my moc so I think this topic is a good idea. Lets start whit my current WIp. I played a lot of SpinTires recently and I felt in love with the Ural 4320 equiped with a logging crane. (WIP) Ural 4320 logging truck par Ti_Max, sur Flickr Here is the bare chassis with all axle suspension, permanent rear wheel drive with a select-able front axle drive, a v8 and the 4 rubber part to maintain the cab. (WIP) Ural 4320 logging truck par Ti_Max, sur Flickr Speaking of the cab, here it is whit the open-able hood and doors,the spare wheel and the offset hog. (WIP) Ural 4320 logging truck par Ti_Max, sur Flickr
-
It's been a while since I last posted here. Recently I wondered what to build on the edge of a curved road. The space there is quite limited, so it is rather hard to construct an appealing building. I had a thought about a bavarian beer garden, but finally ended up with an alsatian wine inn. (Click on each thumbnail for a larger image.) The outer walls of the two-storeyed stone building are covered with vine tendrils. The outdoor range is separated from the street by an ironwork lattice covered with climbing plants. The kitchen is equipped with a wood-fired oven on the very right: Several spices dangle down from the top, and you can see a tarte flambée sizzling. The window allows the staff to serve cars directly. Left of it are some vessels with dips and sauces, such as mustard or mayonnaise, hanging from a pole. In front of it is a counter, containg a fridge with cold beverages. Left of it you may notice a fire extinguisher. And even more left you see the screen from the checkout. Upstairs is a double room with a fireplace and two bedside cabinets, each with a lamp. In front of a large flat TV is a cosy purple sofa. Both the pub room inside as well as the outdoor range invite you to enjoy a splendid wine and an opulent meal before relaxing upstairs. The last picture shows the pub room in detail with its heavy wooden seating on the left and some wine casks on the right. I have not thoroughly checked if all the parts used exist as real bricks in the respective colours, but apart from the copper ones most of them should at least exist in similar colours. If you want to examine this building in detail, you may download the LXF file here. But please be aware that I do consider this set as WIP, so maybe I'll change some details in the future and update that file without further notice.
-
Land Cruiser 80 Crawler (WIP)
VKTechnic posted a topic in LEGO Technic, Mindstorms, Model Team and Scale Modeling
I saw this photo on an R/C forum post...and now I'm hooked on crawlers: I've set about building my own crawler based on the above picture, and I'll post WIP photos here. Your feedback is greatly appreciated. To start the WIP photos, here's the chassis as of today: -
Hi Everyone! This thread will contain all my WIP with regular updates, and finished projects will have their own thread, with high quality pics, videos and maybe files. I will be using this to document everything I do with Lego Technic! Gone a bit mad To start with, here is my current problem!!!! My Patria 8x8 AMV ....broke I was just testing on level ground, then a small object and crack! :cry_sad: I will just swap them over from left to right, but still very puzzling after not even going off-road! Is this a known flaw? Anyone else experienced simpler breakage? My other current project is a 32 Ford Hot Rod. Here is a quick video of performance. It features live axles front and rear and chassis modeled of the real thing. 2XL motors power and 1 servo for steering. More pics are coming soon, so stay tuned! Thanks for looking!
-
Recently I've been working on modding a 7166-1 Imperial shuttle, and I decided that I should make a new cockpit. The current one is a little unfaithful, so I took a crack at it. The cockpit should be quite small and thin, which I tried to encompass in my new cockpit. Any suggestions and comments are welcome. If anyone wants, here is the current LFX file:Imperial shuttle mods 2.lxf One problem is there will probably not be room for any figs, but it would look better. The underside. Still no floor.
-
[MINI] WIP Mini 8109
captainmib posted a topic in LEGO Technic, Mindstorms, Model Team and Scale Modeling
My participation in this great [MINI] contest, i'm building a mini 8109. [updated] It has the following functions: - Steering (hog) - Sliding trailer-bed - Lifting both rear axles to ease the loading of vehicles - winch on the trailer-bed. - adjustable seats Part-count: - 195 I'm happy with the result. There is still time left for adjustments, but I'm pleased with the overall result. More pictures: Here is an early LDD model. I started this after i made some ideas with real lego's to see if the partcount is anywhere near 200 parts. So far the score is 174 bricks. -

[MINI] [WIP] Robinson R22
EvilEnderman posted a topic in LEGO Technic, Mindstorms, Model Team and Scale Modeling
'Ello, been a while since I've posted here A good way to break this absence with my WIP Robinson R22. I've always loved that heli, and this contest has given me the boost to attempt to make it. It features a fake engine, connected to the rotors. The front bodywork is pretty much done, but I fear I've already exceeded the parts limit :p https://imgur.com/1w8uDE9 Bottom section - nothing special here. Haven't finished that second 'thingymabob' yet. https://imgur.com/TFiLotx Front view. Something about the front section doesn't look right to me - Don't know what it is - Perhaps it's how wide it is. https://imgur.com/zHPvMqE Rear view. I really like this, the engine is showing, like the real thing, and, the rotor turning hand knob is put onto the engine fan thingy :p Used those system curved bits to get the shape just right https://imgur.com/fG0GJ5a Side profile Picture resizing may not work, but I'm praying for the best. EDIT Nope, i'll use these imgur links 'till i get the opportunity to resize properly. Apologies for the hassle it causes. More pics to come, - or, even stripped down model if I exceed the limit :p Gonna have a good ol' count. Depending on the result of this, decides if I'm gonna strip down, or add the rear section :p -Enderman -
hey everyone, after seeing sebeus's new wip frigate, i got inspired to build the redcoat counterpart of it. i wanted to use sebeus's tumblehome technique, but i soon found that it ended up with a rather flat side. so i paired it up with kurigan's idea to flex the broadside, and started building! However i got stuck on making the stern. I wondered if i could get some advice, for i am rather blank for ideas at the moment. Thank you! pics: image by captaingoldenhook, on Flickr image by captaingoldenhook, on Flickr image by captaingoldenhook, on Flickr you can see what the stern looks like now: image by captaingoldenhook, on Flickr
-
Hey guys, I just got around to starting my new project, a small waterline style sloop. I have alot of black parts so that is what the base color will be. Here is my progress so far. I am open to suggestions, especially on the bow. image by captaingoldenhook, on Flickr And here is a close up of the bow so far: image by captaingoldenhook, on Flickr Thank you for your time :D Note to skimmers! please go through the comments at the bottom to see where I posted my progress! I won't post it in the main topic ;P
-
-