Search the Community
Showing results for tags 'Robot'.
Found 315 results
-
Here is my entry for the mini competition. It's a 4 axis manipulator arm. Videos: Final assembly and operation: https://www.youtube.com/watch?v=H6N-x8fn5VU Remote control with backpack: Promotional image: Entry Name: 5200X - Robot Arm Parts Count: 200 Functions: Shoulder Yaw Shoulder Elevation Elbow Elevations Gripper Power Functions Ready. Remote control backpack set sold separately. Promotional Image (front and back of box): Parts Image: LDD: Download: http://s000.tinyuplo...884804100941772 LDD for the backpack: http://s000.tinyuplo...987728314159761 Building videos: From the parts in the parts image to the model used in the promo image. Building part 1: Building part 2: Building part 3: *Sorry for the poor lighting. I will shoot some new ones soon. I recommend watching these in fast forward.
-
[MOC] MEGA Arm !
TechnicHead41 posted a topic in LEGO Technic, Mindstorms, Model Team and Scale Modeling
Hello ! About time for me to present a new moc again, This time it's a robotic arm that is controlled by and old rcx brick via remote control. Sorry about the missing pictures but it is to dark now me to take any one. But i promise you as soon as i can get some god shoots i will post them here and on mocpages. All i can tell about it, that its yellow and very BIG. And finally i also have some other moc's that i will upload very soon. So keep your fingers crossed. ;) See ya ! Edit: Now for some pictures.. Hope you like the pictures, see the rest of them her: http://www.mocpages.com/moc.php/421726 -
Agent Orange by Toto Hermanto, on Flickr
-
MegaSphere - Atai by Artemiy Karpinskiy, on Flickr Atai is a spec ops trooper/android/whatever from upcoming randomly generated pixel-graphics platformer MegaSphere (http://store.steampowered.com/app/386340/).
-
Sup guys! It's been a while since I've posted anything, so I decided to fix that. Today I am going to treat you with what I believe to be the revamps to all small-to-middle M:Tron sets. Let's start with a droid I made as an addition to my series of Space-thematic robot helpers. M-Tron Service Bot by Artemiy Karpinskiy, on Flickr The service drones of M:Tron are created to serve on the huge space ships, and therefore their chassis are made to roll on the relatively flat surfaces of various cargo holds and hallways. Have no special tools, only their hands to assist them. Next on the list is revamp of #1478 Mobile Satellite Uplink. M-Tron Mobile Satellite Uplink by Artemiy Karpinskiy, on Flickr As you can see, I have continued the idea of roller-ball chassis, and it was not long before I decided to make it the theme of all M-Tron vehicles. I know that in real life the friction won't allow those balls to actually roll, but one can dream, right? =) The main features of the set are traditional steering through joint in the middle, plus deployable satellite dish with two antennae, and tiltable chassis for better mobility. Second in the line is 6833 Beacon Tracer. M-Tron Beacon Tracer by Artemiy Karpinskiy, on Flickr Nothing special on this one, except for making it some sort of "dune buggy" thing. Next we have 6811 Pulsar Charger, first of the flying vehicles of the M:Tron. M:Tron Pulsar Charger by Artemiy Karpinskiy, on Flickr As I decided that roller-balls would be the main feature of small M-Tron land vehicles, I decided that propelling rings would be the theme for their flyers. Other than than, really nothing special about this set. As usual, I decided to keep as much trans-green bits, as possible. And since we've started with the flyers, why not show the 6877 Vector Detector M-Tron Vector Detector by Artemiy Karpinskiy, on Flickr I guess this one can count as the least look-alike since I took liberty of adding four propelling rings, and overall shape of the hull is different. The MOC still has a container box attached on the bottom. And last, but not least, we have the second biggest vehicle in all the line, 6896 Celestial Forager! M-Tron Celestial Forager by Artemiy Karpinskiy, on Flickr As you can see, the original functions are saved, sans the magnets. Okay, that's about it! Please, leave your feedback, I would gladly appreciate it!
-
This is my attempt on Mech machine inspired by all the game and sci-fi action movies. It is the assasin walker - TT-1. Piloted by no other than the famous Boba Fett Prototype. The challege of this mech is to make the foundation strong enough to support the heavy, rotatable torso. The armors can be adjusted for firing enemies from all directions. When it is in its turbo mode, the back panel plates flip up for better resistance. Hope you will like it. Please follow my flickr account : Ivan Bricklim for more MOC. Thanx! https://www.flickr.c.../119955216@N06/ http://i1377.photobucket.com/albums/ah70/Ivan_BrickLim/front%20profile_edited_zpsu09nemlr.jpg http://i1377.photobucket.com/albums/ah70/Ivan_BrickLim/angle1_edited_zpsxaic14u1.jpg http://i1377.photobucket.com/albums/ah70/Ivan_BrickLim/angle4_edited_zpsqy1i6fr2.jpg http://i1377.photobucket.com/albums/ah70/Ivan_BrickLim/legs_edited_zps9inutckr.jpg http://i1377.photobucket.com/albums/ah70/Ivan_BrickLim/side_edited_zpsaeflglol.jpg http://i1377.photobucket.com/albums/ah70/Ivan_BrickLim/angle2%20edited_zpsssjm3myx.jpg http://i1377.photobucket.com/albums/ah70/Ivan_BrickLim/charge_edited_zpsi4lryqql.jpg
-
Hello Gents and Ladies! Here is your chance to buy my collection of one of Lego's classic Space themes from 1994: Spyrius. All these sets are in great condition. No fading, as they have been kept in the closet all these years. All instruction manuals are included. This lot includes: #6835 Saucer Scout. Complete with instructions. #6889 Recon Robot (x2). Both complete with instructions. #6939 Saucer Centurion. Complete with instructions. #6949 Robo-Guardian. Missing one 2x2 brick to attach wheel (see picture below). Otherwise complete. Instructions included. I am asking $100 for everything. Feel free to make me a reasonable offer though! As for trades, I'm interested only in Pirates....classic or new (just no POTC). Ships are a big plus. Also....if there is interest, I have the complete Ice Planet 2002 series I may be willing to sell/trade for Pirates sets. Free shipping to US addresses. For international shipping, please PM me, and we can work out a price. All sets will be disassembled and bagged individually for shipping. Please message if you have any questions. Thank you. Now to the pictures.....
-
Here we have a Bakers Dozen Of Battles Bots all of which are my own design, let me know which one of them is your favorite.
-
Hi All, last time I created SD RX77-2 (see http://www.eurobrick...opic=112496&hl=), this time I create SD GUNDAM RX78-2 with similar scale. Hope you all like my creation.
-
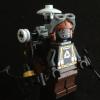
The Shadow Builder Fluff: Unknown to President Business a Super-Secret Project (Project NSOT) successfully created a Robotic Master Builder. The prototype escaped and began building his own stud-less army of drones. The Shadow builder now vies to control the city eliminating stickers and studded creations everywhere. Known Armaments: - Finger Blasters - Eye Seeker Missiles - Atomic Flux Over Load cannons (Hidden Inside Head) The Shadow Builder is inspired by Movie Micro Managers I intended it look like the same technology, but refined with articulate hands, mostly symmetrical details, and nimble legs. He is a perfectionist, so his creations are studless and almost the same (he's a good builder but not too imaginative) He has a second pair hands for battling the resisitance. Okay so the first spread is everything I built regarding The Shadow Builder: Hidden Cannons Rear and a better look at the NSOT here: Eye Missiles firing simulated by transparent pieces: Hands changed out and finger stud launchers firing simulated: LDD Back LDD Cross-section so you can have a look inside: Originally he wasn't going to have arms, but after I created the arms, I knew he had to have legs... and then the tennis shoes came out of nowhere :) Thanks for having a look... I'm kind of a lurker. The LDD file: http://www.brickshel...dow_builder.lxf (IDK if it pulls up until the gallery is public. There is a neat surprise on it though)
-
I think I should have updated my earlier topic but I am still waiting for head suggestions, meanwhile this guys turned out quite well with the new head, custom colors and guns, I hope you like them and would be more than happy to see some of this guys popping around in someone else's MOC's. "The Sentinel combat drone has been developed by The Targus Engineering Enterprise under the request of the Terran government to fill a wide variety of roles; it has been designed to be large enough to carry thick armor plating and highly efficient power cells while still being smaller than regular combat drones or mech suits so it doesn't become an easy target for heavy turrets or artillery, it's also equipped with boosters for fast deployment on space or ship combat/defence and can be equipped with multiple other weapons and gear for more specific roles, its size makes it very agile and fast in comparison to other similar hardware and is considerably accessible. Without a doubt this will be the next step in mechanized warfare against alien invaders or rebellious colonies in outer space..." P1010017 by Nom Carver, en Flickr P1010021 by Nom Carver, en Flickr P1010036 by Nom Carver, en Flickr P1010033 by Nom Carver, en Flickr P1010057 by Nom Carver, en Flickr I hope you liked it even if you dont comment (it seems to be a fairly quiet subforum).
-
Hi guys, Salut tout le monde, I'de like to share here some links to The NXT Step blog where is presented the ROBOT REMIX #1 challenge, where the MINDSTORMS team challenged some of the MCP (MINDSTORMS Community Partners) to come up with creative ways to remix a given Technic set and the Home edition of the EV3 set. for ROBOT REMIX #1 the Technic set is the brand new Sea Plane, a great Technic set that happens to be in the same color scheme ;) In this first post, is explained in a bit more details what is ROBOT REMIX http://www.thenxtstep.com/2015/08/robot-remix-1.html Then this week was presented the first of 4 remix, this one from master Isogawa http://www.thenxtstep.com/2015/08/robot-remix-1-exhibit-helicopt3r.html Stay tune for the presentation of the other 3 remix in the coming weeks. : . . baz
-

[MOC] "Sentinel Omega" - Help for designing of the head of a m
Nom Carver posted a topic in LEGO Sci-Fi
I am asking for your help to design a smallish head for this little mech, it turned out pretty well but I am not satisfied with the head, I need it to be around 2x2x2 studs and 1.5 or so, a minifig head gear hat or helmet fits just fine for the scale but it doesn't fit with the stile I am looking for, I would like it to be either a single "eye" or something that resembles the face of the classical optimus prime, any ideas? P1010022 by Nom Carver, en Flickr P1010036 by Nom Carver, en Flickr P1010043 by Nom Carver, en Flickr P1010061 by Nom Carver, en Flickr P1010065 by Nom Carver, en Flickr The body is very posable and mixing some interesting colors will make it look great, I think that those new smallish ball joint bricks would make marvels for it alongside some clip hinges, meanwhile this is just the prototype, I hope you like it and would use some advice regarding to the head, so please comment. -
This is my first time to create the themes of Gundam by using Lego Bricks. I am not the fan of Gundam. I created it this time because this is my first model which I bought first time when I was child. Hope you all like it.
-
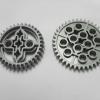
Hi, Here is my latest project that i have been working on the past 2 months. It's only function is to keep on rotating a platform or sphere. So it doesn't really have any purpose besides looking kinda cool. It can be used as a MOC display stand, but it has it's weight limit. I tried to have Gyroboy(from Ev3 education set) balancing on the platform but it was to heavy and it didn't really like the unstable platform. So it ended up with a borring box on top instaid. Lego Axis by Andreas Håkansson, on Flickr The build was inspired by a robot/machine i saw on the new season of battlebots. It's the one holding the trophy. After some research i found out that it was created by Mark Setrakian. I also found a video of his machine. (see below) You might notice that his moves alot more smoother. And that i stole the name becouse i couldn't come up with something myself. So this project was kinda software heavy compared to my other mocs so i figured i might aswell share i little about what makes it tick. For those that don't care how it works or just hate math should probably skip the rest. First off, what is the problem? The problem is to get the arm to follow i curved line at a specific height in space so that the 5 arms together makes a circular motion. What I need for this is a way to convert X,Y,Z coordinates into angles for the diffrent joint in the arm and then a way to plot a curved path in the X,Y,Z coordinate system. Converting X,Y,Z coordinates into angles (for 3 joints) The way i did this was to create two 2-dimensional views of the arm, X-Y and Z-Ys (not same as Y). YX by Andreas Håkansson, on Flickr So first of i calculate the value of Ys. This is done with the X Y positions that would be part of our desired position. Ys = sqrt(X^2 + Y^2) Now it is possible to get the angle between Ys and X. Angle Radians_YsX = arccos(X/Ys) (arccos = inverted cos = cos-1) Some calculators/softwares (EV3 original software) would directly give you the value in degrees. In labview you get the value in radians instaid of degrees so you have to convert it into degrees youself. The diffrence between radians and degrees is basically that for degrees 360 = full circle and for radians 6,28(Pi x 2) = full circle. I used labview so i had to add this. Degrees_YsX = Radians_YsX x 180 / Pi Now i have the calculated angle for the first joint. YsZ by Andreas Håkansson, on Flickr B and C is fixed distances in the mechanical design so they will be constants in this case. Ys i got from the calculations above and Z is part of our desired position so i know that value aswell. To get the angle for bc (third joint) i first need to know the lenght of V. V = sqrt(Z^2 + Ys^2) To get the angle for bc. Radians_bc = arccos((B^2 + C^2 - V^2) / (2 x B x C)) Degrees_bc = Radians_bc x 180 / Pi Now i just need the angle between B and Z (bz) for the second joint. First i calculate the angle between B and V (bv) Radians_bv = arccos((B^2 + C^2 - V^2) / (2 x B x C)) Degrees_bv = Radians_bc x 180 / Pi Then i calculate the angle between V and Z (vz) Radians_vz = arccos(Z/V) Degrees_vz = Radians_vz x 180 / Pi Add them together Degrees_bz = Degrees_bv + Degrees_vz Now i am able to generate the degree values for the 3 joint in the arm based on the XYZ coordinates. However the degree values of the joint is not the same as the degree value for the motors so i will have to account for that with some gear ratio calculations. (I have a feeling most people here in the technic forum knows the basics of gear ratio so i'll skip explaining that.) In the calibration sequence of the machine i then match the starting position for the motors with the appropriate degree value. Creating a curved path. The curved path is based of a circle that has it center in the middel of the machine. Each arm will move along 64 degrees of the circle. I used 64 degree instaid of 72 (1/5 of 360 degree) to avoid collisions of the arms when they do the transition. I had to use a separate coordinate system for the path based of the center of the machine, in the new coordinate system i use Xc and Yc. Path by Andreas Håkansson, on Flickr As you can see in the image above the path starts at 328 degree and moves to 392 degree. I keep going above 359 (instaid of starting over at 0) to avoid having make special code that would have to hadle the jump as it moves along the path. To get Xc and Yc coordinates for the path (based of th center of the machine). Yc = cos(v) x r (v = angle, r = radius) Xc = sin(v) x r Ex: 1/ (Yc) 127,2mm = cos(328) x 150mm (Xc) -79,5mm = sin(328) x 150mm 2/ (Yc) 150mm = cos(360) x 150mm (Xc) 0mm = sin(360) x 150mm 3/ (Yc) 127,2mm = cos(392) x 150mm (Xc) 79,5mm = sin(392) x 150mm Now i just need to get the path based in the center coordinate system to the coordinate system for the arm. The distance between the two coordninate systems is know (just measure). To get the Z and X positions. Z = P - Yc (P = distance between the two coordinate systems) X = 0 - Xc Ex: (Z) 122,8mm = 250mm - 127,2mm (Yc) (X) 79,5mm = 0 - -79,5mm (Xc) The Y value for the arm does not need to be calculated, it can be what ever i set it at as long as the arms can reach it. So that is basically the math for the machine. I use the same calucaltions for all 5 arms. To get it to move in the path i start at 328 degree and then every 100ms i add 1 degree until i get to 392. Then i lower the Y value to lower the arm and then start to subtract 4 degree every 100ms until it reach 328 again. Then change back the Y value to make to arm go up again then it kinda repeats that. Each arm starts at 5 diffrents points in this cycle so that when the first arm starts moving forward the last arm will start moving revers. This way there will always be 4 arms holding the plate. There is probably more efficent ways to solve this, but this is what i could come up with. :) Most of the equations could be used for a walking robot as long as its only has 3 joints / leg if you want all legs to pull in the same directions. But i have a feeling there might be some weight issue. Hopefully the explinations was understandable and not too boring. :) /Hknssn
-
Hey guys, so it turns out I'm not dead. To prove my worthiness of staying I'm sharing with you my newest thing that I've made: Underbite the Robotroll. Reddit - 4Chan - Flickr - Imgur
-
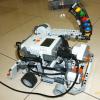
Hi there, I'm new, and this is my first robot on this forum! So today, I'll be showing you the EV3 Camera Bot! This robot is controlled by remote, and it can move by wheels, and even press the trigger by remote! It IS actually a pretty practical robot, as it can get into places where humans can't squeeze in, such as under a bed. Anyway, just check out the video below!
-
Hey all - I just posted my Voltron on Lego Ideas - https://ideas.lego.com/projects/107044 It fully separates into 5 Lion mechas and joins back into Voltron - the sword clips into the red lion's hand/mouth. Check it out on flickr or Ideas and give me some love if you like it....and share my post :) Thanks Chris Voltron: Defender of the Universe by Chris Wight, on Flickr Voltron: Defender of the Universe by Chris Wight, on Flickr
-
This is one of my favourite 80's Japanese classic animation. It is combined from 4 war machines. They are eagle, lion, leopard and elephant. The lion, leopard and elephant can be transformed into tank, animal and robot status repectively. The eagle can also be transformed into robot. When they are combined into Dancouga, the eagle is the head. The elephant becomes the main body. The lion and leopard are the right and left foot respectively. If you haven't ever watched it before, here is the link! I am working on the weapons for it right now. Hope you all like my creation! https://www.youtube....-SwWY5E&index=1
-
After buying one of those new Airjitzu-Flyers (LEGO Ninjago) I was wondering how to repurpose that new "dome" - Then I had an Idea...
-
This is my first time to build a mini-scale robot. It's Voltron. Hope you all like If you don't know what it is, please click
-
Lego robot wars: recyclopse
PKW posted a topic in LEGO Technic, Mindstorms, Model Team and Scale Modeling
As promised (I know I'm a bit late ) my new project! Recyclopse from robot wars it was a big roundish bot with an exendible tongue that has a flipper hided into it, Made with recyled materials: recycl-opse As usual i start building from the aesthetics, because i have few pieces to make that green shield, this is the shield with the tongue and a try to put electronics inside I used dark green bricks (the only i have) that has the same color of the real one but the result is a piramidal shape, fit everything in will be an hard challenge I thought about three options: -one RC motor (pump+valve) for the flipper, L/M motor for tongue extension -one M motor for the flipper; one L motor for tongue extension -one XL motor for tongue extension, at the end of the travel two strings linked to the chassis will act the flipper (M motors are for the wheels, trough chains) hope I can make sole tries asap, last hope is to make a 2 section angulation for the shield (=more space) but this means gray shield or maybe with mixed pieces... receivers will replace that green transparent brick -
This is TRANSFORMER GRIMLOCK G1 version however, it cannot transform into robot form. Still, hope you guys like this dinobot!
-
Hi All, this is my new creation CHIMA-BUSTER. I take use the parts from 2 boxes of CHIMA WOLF LEGEND BEAST 70127 only. I hope that you like my creation.
-

[EV3] Super Stadium Truck – Motorized Short Course Vehicle
DamonMM2000 posted a topic in LEGO Technic, Mindstorms, Model Team and Scale Modeling
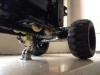
This is a large short-course style stadium truck built with Lego Mindstorms Ev3. It features independent rear suspension and a front live axle with steering. One Medium Motor controls the steering, and one Large Motor drives the rear wheels. It also uses the InfraRed Sensor for Remote Control. The reasons I used only one motor in this model are: 1. I was attempting to reduce weight, 2. The chassis of the truck is even studs wide, not odd; not allowing a very easy placement of two motors, 3. This vehicle was built as a test vehicle for the new 4-stud wide differential I got a while back but never used until now. The drawbacks of this truck are: 1. One motor does not exert nearly enough power, 2. The old-type differential makes it impossible to not use more gears in order to transfer the power, 3. All the gears used decreases efficiency massively, 4. The rear independent suspension worsens performance, 5. A 3:5 gear ratio was used (a 1:3 would have been better), 6. The truck is very large, bulky, and heavier than most other robots that I have built. I extremely apologize for the audio/video sync issues, I have no idea why the video turned out that way. Music: http://www.bensound.com [] Extra pictures coming soon! []