Search the Community
Showing results for tags 'ucs'.
Found 180 results
-
2016 has been a very successful year for LEGO Star Wars. There so far have been 37 Star Wars sets released (including the 9 sets to be released September 30th). They also made a new LEGO Star Wars TV show, The Freemaker Adventures which just aired its final episode. But 2016's UCS sets have sparked loads and loads of controversy, when the images and details of 75098 UCS Assault on Hoth it sparked outrage as many people though it costed way too much, didn't deserve the UCS title, and was a lazy attempt with so much incompleteness, and other complaints. The other UCS set is the 75159 UCS Death Star, it also has been criticized as a lazy attempt and a cash grab by LEGO. ^ 75098 UCS Assault on Hoth ^ 75159 UCS Death Star Set Reactions: Now I totally see everyone's point on 75098 and I think it was a very poor effort by TLG, but I differ from the majority on my opinion of 75159. I believe that 75159 is great, I have heard how upset people were when 10188 was discontinued, but it was very old and needed an update. Then when we got the update everyone is so outraged and upset with TLG for not changing it much. I see that people wanted something new, but 10188 was selling well for the 7.5 years it was being produced so why change it, everyone loved the set. Now I also see why people are upset about the price hike, but two factors called for it, first is that inflation sucks and accounts for roughly $50 of the increase, and second back in 2008 there was only LucasFilm with the rights to Star Wars, but now LEGO needs both Disney and LucasFilm licencing which isn't cheap, so it sucks but we know that this had to be done to continue to make profit. Also this might be slightly biased because I got to the LEGO and Star Wars buffet late and by the time I bought my first Star Wars set in late 2015 I was not yet big enough a fan to consider buying 10188, so I want 75159 badly an that is also my final reason for why there was nothing wrong with what TLG did with 75159, because there were so many more who wanted and couldn't get the original and we now have a second chance to get it. So leave your reactions to these two sets in the comments and May the Bricks be With You, Always.
-
I posted about this earlier in the year, but I've now finally got around to finishing it (although I still need to add footplates, but that's a relatively small job). The Dark Orange colour-scheme was quite a challenge, due to the limited range of pieces available in that colour, but I'm very happy with how it turned out. A link to my Flickr album is here, which contains a lot of WIP photos, together with descriptions.
-
First off THIS IS NOT AN *OFFICIAL* VOTING FORUM but anywho out of these 3 things what would you like next years Lego UCS model to be? 1: a motorised minifig scale MTT with a bay for a or multiple staps like the 2014 version and also space for some droideka's plus a super battle droid rack that you can swap out for the regular one plus a cockpit that can fit 2 pilot battle droids and with fully ball jointed guns at the front plus of course being on transparent wheels which are also motorised along side the actual droid rack and being released both in its trade federation colours and it's separatist colours (this is what I'd like) 2: a motorised minifig scale AT-AT with space for troops inside the main body, an actual tunnel in the neck back to the central body, and a folding down ladder and opening door on the side for minifigs to go down 3: a venator class republic cruiser with a small amount of space inside the bridge(s) for minifigs, folding down landing gear (yeah I know it'd be hard but I'm sure it's possible) and of course fully articulated turrets (including the 2 on the sides just in front of the middle of the ship)
-
Hello to everyone. This is my first post in eurobricks, and I want to share the modification of the UCS 10175 Vader`s tie advanced. I have been collecting the and bricklinking UCS sets in the last three years, but this set was really disapointing for me. When I assembled the sandcrawler I was amazed by the planning and analysis of the model. However on the Vader`s tie advanced there were some details that were not taken care of. For example: 1. The cockpit is a huge problem. First of all the Light Bluish Gray Dish 6 x 6 Inverted (Radar) with SW TIE Advanced Hatch Pattern is a unique part that makes it very expensive. On set 75082 there is a similar 6 x 6 one an looks really great. tie front by pablo gutierrez 2. Trans-Clear Windscreen 10 x 10 x 4 Canopy Octagonal with TIE Advanced Pattern is the same as set 75082 and ithe octogonal cockpit has nothing to do with the circular pattern of the cockpit like set 8017 3. On the back you just see a plain gray pattern with no details. Some light bluish gray and dark bluish gray parts to simulate a flat surface. The TIE Advanced x1 featured a Sienar Fleet Systems I-s3a solar ionization reactor and paired P-s5.6 twin ion engines like the original TIE Fighter and is supposed to have extra power. So I expected more details on the engine and there are details on the sides where should exist a space next to the wings and another one smaller in the back (look at the model). tie back by pablo gutierrez model tie advanced by pablo gutierrez 4. The back of the ship is another example of lack of details. There are just two Light Bluish Gray Flag 2 x 2 Square pieces. 5. The seat of the cockpit looses when you put the ship on the pedestal. COCKPIT by pablo gutierrez Here are some modifications of the set. 1. Modified it form the similar 6 x 6 one of set 75082 that looks really great for me. Is an inexpensive solution, keeping the tie pattern and also allows to see inside the cockpit. TIE ADVANCED MOC ENGINE DETAIL by pablo gutierrez, en Flickr 2. I replaced the U$160 octogonal cockpit by adapting the 75082 frontal part of the ship. It looks similar to the original model and respects the tie fighter aesthetic. TIE ADVANCED MOC FRONT by pablo gutierrez 3. I created a thicker back. I used Light Bluish Gray Brick, Round Corner 10 x 10 with Slope 33 Edge, Axle Hole, Facet Cutout of set 8017 fitting perfectly on the sides. TIE ADVANCED MOC BACK by pablo gutierrez 4. I created the spaces on the side with access to the lateral part of the engine. 5. In the middle part of the engine I included more details on hoses and some color to the set, it`s too gray. TIE ADVANCED MOC ENGINE DETAIL by pablo gutierrez 6. The back of the ship was modified with a pattern similar to the model and with a pattern that represent the exhaust of the engine of a interstellar spaceship. TIE ADVANCED MOC BACK by pablo gutierrez TIE ADVANCED MOC BACK by pablo gutierrez 7: Included the patterns included in set 8017 on the motor and wings TIE ADVANCED MOC PATTERNS by pablo gutierrez Hope you like it! Pablo
-
Greetings to all, Finally, after the course of almost 3 months of designing in LDD, I have finished my original creation of the beloved T-47 Airspeeder—but what we all know and commonly refer to as Snowspeeder, from the epic battle of Hoth featured in "Empire Strikes Back." Prior to building this airspeeder, I loved The Empire and everything concerning it, yet I despised the Rebels and everything about them. Well recently before the snowspeeder, I have been building a minifigure-scale AT-AT walker and numerous things related drew on me—especially the snowspeeder. I began to find the snowspeeder quite fascinating, and the idea to have one accompany my walker. Now the rest was made history in the course of about 3 months. Proceeding to photos Upon the level of detail, yet on a small scale, one would consider this a scaled down version of the 10129 UCS Snowspeeder model for minifigures. Like so it would be appropriate to design a display stand, for a "in flight" position. The bottom is nothing less of a swooshy-esque Now proceeding to various details of the ship: Here is the inside of the cockpit Unlike others, I decided to forgo a detailed interior. My priorities were to design the body with structural integrity, and readily accessibility for placing and displacing minifigures—even to having them sit on tiles instead of plates, because we all know how frustrating it is to pull minifigures off of studs by their headgear. Besides the smooth uniform slope of the repulsor units or either the laser housing, one of the most unique details are the grille detail on the repulsor units. Prior to designing, I have not seen this detail properly represented, but with exception to Lego's UCS Snowspeeder. I am appreciative I was able to achieve this because they look absolutely attractive. As well of something that is other times overlooked is the barrel diameter for the lasers. I believe any were to make their original T-47, the barrel diameter for the lasers should be according to. There is simply nothing else better than the use of technic pins for this aspect of the aircraft. As you have notice, besides the new Speed Champions windscreen, I have implemented Larry Lars' nose design into my work. I originally used the decorated wedge brick used on Lego's former Snowspeeder products, but later on in the design it work as desired. But what I always find remarkable about the plated nose is how readily easy it was to implement without sacrificing any details on the wings. Also I used Lars' most recent heat sink design, yet I made changes to it for implementation into my snowspeeder. Not only that, I as well replace that hinge plate he used for the plug detail on his with a modified tile with clip—for added accuracy of detail. Thrusters. What I believe is also critical to be represented, is the smooth, uniform, transition from the end of the wings to the boarder of the canopy. Simply the way this aspect must be, but mission accomplish here. Onwards to the structure of the build: The minifigures Luke & Dak True, Luke & Dak did not operate a snowspeeder with orange markings, but who ever cared about this with the original snowspeeder back in 1999 and its reboot in 2003? Unique 20 facts about this: I have fidelity for details and for them to be accurately represented as possible in my models Yes, I am perhaps a model maker, yet I aim to utilize Lego in unprecedented ways to incarnate the quintessence of that which I am modeling after I have only implement Lars' design for the nose and heat sink the rest of this model genuinely original The model is quite modular—can be separated in three pieces: body and wings The body is structurally sound—comprised of mostly plates which are overly interlocked to each other It would take such a crash to obliterate the body This model consist of 486 Lego elements The dimensions of the model from the wides and longest points (excluding the laser tips) are 20 x 23 studs Only three parts are unproperly connected according to Lego's system There is no black elements featured in the model (excluding the display stand) The heat sink and the grille pattern of the repulsor units are featured in old dark grey—a stylistic preference to highlight these aspects of the model in a respect to have being weathered down by heat The thrusters uses a dark grey antenna—a rare color unreleased before The harpoon gun was redesigned 7 times before settling on the current version (which makes 8) Despite some elements in older colors, the oldest part is the sunroof set for the canopy The display stand consist of 30 Lego elements While displayed, the snowspeeder is locked fixed onto the stand by the four fingers clutching the rib-esque section underneath While attached the snowspeeder will not wobble and could even be handled upside down (though that is not recommended) Placed on horizontal surfaces, the display would not topple unless intended force is applied There is 176 white elements, 151 light blueish gray elements, and 136 dark blueish gray elements A LDD file is available and is free as for now *FILES REMOVED*
-
I’ve been working on updating the 10019 Rebel Blockade Runner, which so far has gone quite smoothly apart from the engine block on the back - I could really use some ideas for part substitutions. The original model has many rare parts on each engine: 33211 spoked wheel (long out of production), 2515 Wheel in Light gray (can be recoloured to pearl dark grey), 2903 wheel in dark red (unique), 3961 8x8 dish in light bluish gray (never made), 3934/3933 Wing 4x8 in white (hard to get in bulk). There were also stickers across multiple pieces to provide some additional detailing on the cylinder shells. I’m struggling with rebuilding this, and my attempts so far are shown below: Firstly, replacing the dark red wheel is a nightmare because of the limited number of parts available in that colour. I tried using 1x3 curved slopes (left) to build a circle, but the circle works out at something like 8.2 studs and you can’t sit the engine cylinders next to each other. I also experimented with a pentagon/circle technique I found online (middle) which kind of works but it’s awkward to mount on the cylinder, and I’m not sure how strongly I can attach the 2515 large wheel that forms the engine nozzle. My current preference (right) is for 4x4 round corner plates to build up the red stripe, but I don’t see how to mount the large wheel securely - any ideas? I’d also like to avoid the stickers on multiple pieces, by rotating the 8x8 cylinder 45 degrees - that way, the sticker should fit on just one shell. Problem is, all the turntables seem to spin freely - is there any compact way to lock lego bricks at a 45 degree angle?
-
Continuing with my project to update and refresh all of the UCS sets to use modern and readily available parts, I’ve adopted a more systematic approach and am now working through the sets in order of release. The first UCS sets were of course the 7181 Tie Interceptor and 7191 X-Wing, but the Tie Interceptor requires so many changes that it would essentially become a MOC and the X-Wing was already updated as 10240 Red Five. I’ve therefore skipped these sets, and moved on to the oldest UCS set included on the UCS 10th Anniversary Poster: 10018 Darth Maul. (Rendered with Blender via Mecabricks) Released in 2001 as a retail exclusive, the model has an interesting build though the two-tone colour scheme gets a little dull and repetitive. The instruction manual was rather unusual, using a top-down view throughout and having the model built up one layer at a time. (Rendered with Blender via Mecabricks) Being a brick-built sculpture, pretty much every part is still in production and I didn’t have to do too much work here. The most visible change is in the cylindrical block that supports the whole model, which I recoloured from black to dark bluish grey - the main component is 30562 Cylinder Quarter 4x4x6, which only appeared in black in one other set. Some of the other parts used in the original model took me by surprise, as I’ve only rarely encountered 4x6 and 4x10 bricks and I never knew 4x18 bricks even existed. These bricks have all had to be replaced with smaller bricks or combinations of other plates. One lovely touch on the original was a chrome silver antenna to represent Darth Maul’s small silver earring. Since Lego don’t do chromed parts any more, I’ve sadly had to replace it with a 4L bar in light bluish grey - though I’d advise anyone actually building this model to get a custom chrome-plated part so that the detail could be done properly. Summary of all changes to the set: You can view the model on mecabricks, and download the LDD file here. I’ve not prepared an LDraw file, because so little has changed with this refresh that the instruction manual for the original can still be used. Please note that I’ve not built this model in real bricks yet, and probably never will. Darth Maul is just a little bit too creepy for my tastes…
-
Ok so im in the process of bricklinking the 10030 Star Destroyer but wanted to show the mods im planning on doing. As awesome as the original is i was always a bit disappointed in some of the details and greebling, anyway, enough talking and on to the pics. Hopefully the touch ups are noticeable but not enough to be in your face, all the greebling was redone, front of bridge reshaped, entire engine area redone and a few things changed and added. **LDD file in post #20**
-
Hey guys. My UCS B-Wing is starting to bend under it's own weight :( The main area is where the cockpit attaches to the main body that houses the engines. Anyone else got this too? Is there any know solutions to sort out the problem? Thx
-
Five years ago when the Super Star Destroyer 10221 came out, I couldn't dream of buying it. In Canada, with taxes and possibly shipping combined you were looking at around $600.00 for it - which I'd already dropped on the Death Star playset and that was, I felt, the maximum I would ever spend on Lego. I simply decided that the SSD wasn't happening in this lifetime and that was that. But after MOCing the rest of the major OT locatons/ships, five years later this one slot remained empty into an otherwise comprehensive collection. I had to have that Executor, I thought. Checked out some listings on eBay, Kijiji and of course Bricklink. The markup would have made me spit coffee at my screen - if I drank coffee. The prices were lowest at $1400.00 CDN. There was one complete and assembled going for $1100. Unreal - but understandable. It's a limited edition high demand item. A compromise was made and I started to Bricklink Pellaeon's brilliantly designed Midi Scale Super Star Destroyer found here. It would cost me about $70 to get the parts I needed for it on Bricklink. It is a beauty of a design and TLG would be smart to adopt this kind of scale for such a distinguished and iconic OT Star Wars ship. But it nagged at me - in the back of my head - if I did build this, would I be satisfied with the scale? Despite already ordering parts for the midi scale, I started to sink deep into the abyss of Bricklink and multiple blogs, posts and threads on the subject of Bricklinking large sets. I was hooked on the idea of this huge set I couldn't afford. But I also discovered some very important information - the UCS Super Star Destroyer contains no super special, highly priced parts that only appear in that set, 10221. Encouraged by this, I found a great price on replacement stickers and that was that - I was invested and there was no turning back. The goal was to get this half price. If I got the price down to $300.00 ($200-250 USD?) I could do it. It wouldn't break the bank so to speak and the full size SSD could be realised. It would just take several long nights alone working out which pieces to buy, who from, and what sets I had that I could cannibalize for parts... ...especially wedges. There are over 100 wedges of the 3x12 type in this model. It ended up being mostly a scramble to see if I could get the right number of the right color and how cheap. Here's where it got weird: the light grey wedge pieces are very common in both Star Wars and non Star Wars kits. They are, for that reason, highly in demand because people want them to build all manner of MOCs. This was reflective in the prices. So what I ended up doing was only using those more valued light grey wedges for the top and the absolute bottom layer of the base. The rest of the build I would use dark grey 3x12 wedges, of which they were much more available and cheap. So if you are willing to cut costs down with a bit of color changes, I'm sure the choice saved me close to $100.00. The build of this thing was very exciting. There are 4 main stages, the base, the spine, the "cityscape" on top (with the bridge) and the perimeter neckline that gives the SSD its distinctive shape. Building these stages, I was serious about getting the base and spine as accurately built as possible, lending some flexibility to the top bits which are arguably more cosmetic. Lots of rainbow colors came out to help put the base together. Sadly this resulted in a lot more work near the end, as I had to rip apart the whole thing to replace some of the rainbow bits that were visible from the lateral strips that hug the sides of this giant beast. Most of the rainbow bits were contained but I was surprised how deep into the ship you can see once you've got a lot of light coming in to the display. The spine was tricky - I had used a bunch of smaller beams in my haste and once the Bricklink shipment with all the long technic beams came, I was compelled to replace some but not all of them. The stability was and still is decent. I'm proud to say that it ended up being rather swooshable (with a firm grip of course!) Once I got to the cityscape part of it, I started taking a few minor liberties. There were a couple of areas where I got lost, in particular with the intricacies around the recessed bridge scene. In the end, I took a leap of faith based on assembly videos and was invaluable. Even though it didn't show every step (the instructions were good for that) it was super helpful to see everything in real three dimensions. I spent a lot of time reviewing and pausing Brickbuilder's helpful video to check the build. I'm sure it wasn't made to assist in a build but it certainly did.One area that I went completely "off book" was the triangle-shaped bit that brings together the front taper of the ship with the back end - I hadn't ordered enough 4x4 wedge plates and I was getting impatient. I just rammed together some bits to make it work and so far it seems perfectly sturdy and I have no plans to revisit it. The discrepancy might stick out to owners of the official kit, but no worries for me. Finally I had one last Bricklink package arrive with dozens more 2x12 plates and 2x4 plates to help fit together the two large strips that make up the outer edges of the top. Since I'm still not 100% finished with it (it's done but I plan to work more on it when time allows) so for that reason I haven't anchored down the two strips using those 12 door hinge plates on the undersides. So those parts are a little loose - with too much shake the end plug can pop out and send the two strips flying off. So I reinforced them a bit more to survive ejecting to the floor. That's why there are a few extra wedges attached to the underside of these strips. It may look a little wonky but the reinforcement it provides is well worth it. As for the figures, Bossk is a major holdout. I will buy him eventually. For now, I'm satisfied with the stand-in involving the Chima croc head. It's certainly worth mentioning that I didn't bother with the stands (or the plaque) but I plan to build them someday. My shelf actually allows it to be displayed without the stands. The only issue is it cannot be displayed flat on a table - it needs to dangle off part of the table to avoid ramming the engines into it and have an engine array collapsing on the floor in a million pieces. That only happened once, so far. There are a few bits on the underside that use the wrong dark grey. Those will be swapped out eventually. I'm surprised there wasn't more. We've got some stand-ins for 4-Lom and Zuckuss, too! Thanks for reading this. I am super thrilled with it. It was a satisfying build that I managed to pull off within budget and about three months of spare time. What a satisfying and mighty sight. Although I regret not getting it an retail, having one slightly imperfect at half price is a great thing. Questions, comments, etc welcome. Oh yes, of course, the obligatory "no disintegrations" scene!! "You are free to use any methods necessary, but I want them alive..."
-
Hello, my question is about the height/high of the set 10019 UCS Blockblade Runner (Tantive IV). I don't have this Set, for that is my question. In centimeters, and including the bases (or supports). Thanks for your help. LEGO 10019 High v2 by Kuek Cuac de Koki, en Flickr
-
[MOC] UCS Medical Frigate - Further Improvements and INSTRUCTIONS
mortesv posted a topic in LEGO Star Wars
This thread is about the ongoing tweaks to the Nebulon B I posted a few weeks back – and, more importantly, the instructions how to build it yourself! Here is the original post: http://www.eurobrick...pic=129607&st=0 Before we delve into the improvements there is a message from the instructions master himself: “To everyone who is interested in this absolutely gorgeous model, I am sure that you have heard the rumors of a professional grade instruction manual, and in the words of Han Solo, "It's true, all of it". It is indeed true that a manual will release, and I am currently working on it as I type! Along with the manual will be some awesome content, but we will save that surprise for later. Obviously the biggest thing in your mind is "When will it be done?" To answer that question, I am pushing myself to get this done 100% ready for release on June 1. What is keeping me from making the release date sooner is the fact that there is one tricky thing for me to do in terms of reverse engineering this model, but once that part is done, it will be very easy to finish the manual up. It is very possible that I can get the manual done before then, but let's keep it as June 1 for now in order to avoid pushing the date back at all.” I can’t wait for these instructions and will probably have to build it again :) Now to the tweaking After making the original post I looked at the pictures and I though that the model looked pretty good. However a few areas still stood out to me. In some places I simply discovered a better brick to convey something and in other places I found a bit more detail to put in. For example, I have changed a few bricks and added a few details to the top pod. The “gold bar” brick in lbg has come in quite handy. The overall detailing on the green pod is also better, but I am still considering a few bricks changes for some of the finer details. There are several tweaks like these, but there was one place in particular that still bugged me - the long subdivided pod near the bottom of the stalactite. Even when designing the first iteration of the ship I wasn’t completed satisfied with it. Back then it had been a little too small and I wanted more detail on it. During the rebuilding process I had gotten used to – even though now it was clearly too small and compared to the rest of the ship it lacked detail. Besides the size discrepancy, the pod on the film model consists of 82 narrow sections from one end to the other. My original version consists of 27, not so narrow sections, and that kept being an eyesore to me. So as an experiment I did this: Just by changing the small slopes with grilles I got the look of the sectioned pod. The way the old pod is built meant that the spacing between each of the grille bricks matches the width of each individual grille-legs. Thus each leg of each grille looks like a separate subsection. By tilting the core of the original pod the shape of the pod began to emerge. Now I just had to mirror this and put the detailing back on. Now the pod consists of 27 x 3 = 81 sections, just one from the studio model, and lives much better up to the detailing of the rest of the ship. In the picture above you can also see that the section below the long pod had been updated and made wider. This is the sections that among other things uses a racecar on the studio model :) I have also added more detail more piping and detailing elsewhere – and removed a bunch of studs. The backside has also gotten an overhaul especially the back of the fin, but I forgot to take the picture of the back before the model was put back on display. The antenna placement was also tweaked :) I hope you like the changes. They will make it in to the instructions as well. Any further changes will be updated in this thread. Next up: putting in lights ;) Lastly, I have gotten a few question about the stand. It is pretty stable also compared to some of the standard UCS stands. It just takes a little help from a friend to set it up. You hold the model while your friend places the legs - 20 seconds and you are set :) Watch this space for updates on the INSTRUCTIONS! Now with X-wings: More changes: -
.thumb.JPG.3c74c0d405dc1afb04b2fa216ebc79e6.JPG)
Mortesv's UCS Nebulon-B Medical Frigate INSTRUCTIONS AVAILABLE
Cjd223 posted a topic in LEGO Star Wars
Hello all Eurobrickers! Today is a great day for the community as a MOC is making its long awaited release to the public! That's right, Mortesv's UCS-Scale Nebulon-B Medical Frigate now has plans ready for purchase The purchase of these plans includes a professional grade manual totaling at 1,493 pages, the LDD files used to create the manual, an excel spreadsheet covering the 531 unique parts lot and their quantity, and a bonus LDD file that contains to scale models of fighter ships to put next to Nebulon when it is on display! So to recap, a purchase of these plans includes the original LDD files, a 1,493 page instruction manual, an excel spreadsheet parts list, and a bonus LDD file with to-scale fighters. The final price for this awesome bundle is 50 U.S Dollars ($50). If you are interested in purchasing a copy, please PM me or send an email to chrdvorak@hotmail.com The final MOC contains 5,728 pieces, which would make it the largest Lego Star Wars set if it were released on shelves. The ship measures about 4 feet long when completed! A lot of hard work went into this project on both the designing end and the manual end, and Mortesv and I are very excited to give everyone the chance to build this awesome MOC! Here are some images from the manual: May the force be with you and happy building!!! -
I am not the first to have built BB-8 out of Lego or at a UCS scale, but I couldn't resist building my own version after having a surplus of white plates left over from my other project. Hope you like BB-8 joining the droid family. The Red astromech droid is R5-D4 from ANH. Awesome Foursome by Miro Dudas, on Flickr cheers Miro
-
Hello everyone=D I m fresh afol. I want to share with you my creation. I m interesting about a feedback. This is my first MOC after DA. I ve build it around a half year. Ok less talking. Pictures: You can find this MOC on lego ideas. Support very welcome Here is my flickr acount with better resolution photos
-
Hi, So, obviously it is not too late to start collecting Lego. I'm over 40 now, but am picking up set after set or so it seems. I am, however, not new to Lego. Being born in the mid-seventies I got my first sets about -76 or -77. I remember, for instance, 928-1, which I owned among many other sets. From those years and on to about mid or late eighties I had a steadily growing collection of Lego. Mostly space and techic. Then other things got more interesting and to my horrror my parents gave away all lego later on, without even asking. I have still not forgiven them for that ;) Fast forward to 2000. I freezed in front of the quite new UCS X-wing 7191 when getting Christmas presents for my GF's daughter. Ended up getting the set in christmas present myself. Best Christmas ever, since childhood! I promptly bought the UCS TIE Interceptor and they've been on display at home or at work ever since! Then, last fall, something happened and I started to actually buy sets. Sets I have looked at but always thought 'Hey, I'm grown up now, the moment has passed' or 'I do have my two UCS, that should do it'. It started innocently with a small set and over a year I have increased my collection to about 30+ sets. I am no rich and am in no rush. I just realize that it's never too late to get those sets that I wanted secretly. My issue is that I have no space for my sets and really, I need to consider price too having kids of my own now and everything that comes with that. But every now and then I can spend a few on a set. Do I build MOC's? Sometimes, I add a pic of something I did some year ago just for the fun of it. A small tribute to the Youtuber AgentJayZ that works with jet engines. Not as much as an act of a fan, I sorted some of the Lego I managed to salvage from my childhood and started to build randomly. :) My interest in Lego seems to be focused on Classic Star Wars, UCS and the more advanced vehicles like the VW Camper, Mini etc. I like vehicles, in short. Real and fiction. I've added my current collection to brick brickset (http://brickset.com/sets/ownedby-jemakrol) and rebrickable (http://rebrickable.com/profile/jemakrol - not public yet though) and now I ended up here as a result of searching for info about the new 10252 Beetle. Thanks for the attention, and happy building / collecting folks!
-
Hello Eurobrickers! I've started a MOC of the 11th and 12th Doctor's Tardis. Please enjoy. Day 1: (sorry for the poor quality pictures and messy table, this will be fixed soon.) C&C much appreciated.
-
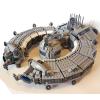
75098 Assault on Hoth™ Ages 12+. 2,144 pieces. US $249.99 - CA $299.99 - DE 249.99€ - UK £219.99 - DK 2199.00 DKK *Euro pricing varies by country. Please visit shop.LEGO.com for regional pricing. Play out action-packed Hoth battles like never before! This fantastic LEGO® recreation of the Rebel force’s Echo Base from Star Wars: Episode V The Empire Strikes Back has all the details you need to create your own epic ice-planet battles. Set out on scouting missions with the Snowspeeder armed with twin spring-loaded shooters, and when you spot the enemy speeder bike, get back to base and help Luke, Han and the other Rebel heroes lock down the blast doors, ready the laser cannons, man the gun turrets with dual spring-loaded shooters and power up the devastating ion cannon, also with 2 spring-loaded shooters! This amazing model has so many more features, including a service area with crane, control room area, power generator with explode function, rotating communication dish, scout post with dual stud shooters and a Tauntaun with its own stable. There’s even a Wampa cave (with Wampa) for Luke to escape from! This amazingly detailed set’s modular design also means that you can create your very own Rebel base configuration. Prepare for ultimate LEGO Star Wars action! • Includes 14 minifigures with assorted weapons: Luke Skywalker, Han Solo, Toryn Farr, Rebel Officer, Wes Janson, Wedge Antilles, K-3PO, 5 Rebel troopers and 2 Snowtroopers, plus an R3-A2, Tauntaun and a Wampa. • Features Rebel base with modular wall and trench sections, a Snowspeeder and a speeder bike. • Wall section features slidable blast doors, service area with crane, control room area, power generator with explode function, ion cannon with dual spring-loaded shooters, laser turret with spring-loaded shooters and space for a minifigure, scout post with dual stud shooters and space for a minifigure, Tauntaun stable and a Wampa cave. • Trench section features heavy blasters, laser turret with double spring-loaded shooters and space for a minifigure, and a laser cannon with rapid stud shooter. • Snowspeeder features an opening cockpit, extending speed flaps and 2 spring-loaded shooters. • Weapons include Luke’s Lightsaber, 7 blaster pistols, 2 blaster rifles and 2 blasters. • Accessories include 7 Hoth Rebel helmets, 2 Snowtrooper helmets, and Wes and Wedge’s flight helmets. • Man the weapons and prepare to fire! • Jump in the Snowspeeder and track the enemy. • Keep a lookout for Imperial forces from the scout post. • Close the blast doors and prepare for battle! • Tend to the Tauntaun. • Hoist up the Snowspeeder ready for servicing. • Bring down orbiting starships with the devastating ion cannon! • Can Luke escape the ferocious Wampa? • Snowspeeder measures over 1” (5cm) high, 7” (18cm) long and 6” (17cm) wide. • Speeder bike measures over 1” (3cm) high, 5” (13cm) long and 1” (4cm) wide. • Power generator measures over 3” (8cm) high, 6” (16cm) wide and 5” (13cm) deep. • Wall section including ion cannon measures over 5” (15cm) high, 20” (51cm) wide and 11” (30cm) deep. • Trench section measures over 3” (10cm) high, 13” (35cm) wide and 4” (11cm) deep. Available for sale directly through LEGO® beginning April 30, 2016 via shop.LEGO.com, LEGO® Stores or via phone: 8]US Contact Center 1-800-453-4652 8]CA (English) Contact Center 1-800-453-4652 8]CA (French) Contact Center 1-877-518-5346 8]European Contact Center 00-800-5346-1111 LEGO, the LEGO logo and the Minifigure are trademarks of the LEGO Group. ©2016 The LEGO Group. All rights reserved. Star Wars and all characters, names and related indicia are © & ™ Lucasfilm Ltd.
-
IMHO, the Imperial Shuttle is one of the best spaceships in the OT (what makes it one of the best of SW in general), and UCS is its ULTIMATE recreation of it. I start with this stash (bricklinked before for MOCs): 5x White Slope 55 6 x 1 x 5 6x White Slope 75 2 x 1 x 3 And I have ordered 1141 pieces, for 85€ (shipping included). My main objetive is to get the ship under 0,10c/p. I'm open (and really really needy ) to advices.
-
I seem to be among the first to review the new addition to the UCS line. Long story short: it's not a terrible set, but I have completely no idea why LEGO thinks it belongs with Ultimate Collector's Series. This is everything I DON'T expect to see in a $250 UCS set: old, recycled, cheap and full of cut corners. To be honest, I find it the UCS badge on this set completely unwarranted, and the price only adds to the insult. This thing has 150 pieces more than the 75060 UCS Slave I set, but somehow it's 25% more expensive. And to make things worse, they were both designed by the same man. I mean, someone decided that the next task for the creator of exquisite 75060 should be "sell these same 4 old sets again".
-
Second set for separation =) Like, comment, subscribe if You enjoyed this video.
-
Hi there! I faced the problem of lack of storage space for assembled sets and decided to separate them, and then sort the items by color and put in boxes. But I had an idea - why not to take a video of this process. So I want to present You a kind of "review". If in all reviews You saw how to build the set, here You will see the opposite process :) If you liked, subscribe and thumbs up. Critique is also welcome!
-
Hello all! I have been recently thinking about Bricklinking some of the rarer/more expensive UCS sets but before I take the plunge I am looking for some advice. Looking at Lobot's 10179 MF and 10143 DSII have been helpful but I am circling back to the idea of other sets. Here's the list of them: 10175 Tie Advanced 10143 Death Star 10212 Imperial Shuttle 10179 Millenium Falcon 10221 Super Star Destroyer I am looking for some advice on which one to build/best to buy. I do know I can buy a SSD but £350 is A LOT and am looking to save on money. I also know that parts on the MF are getting rarer especially those grey boat rigging so now might be a better time to buy before the prices are crazy! Any advice, pros, cons? Thanks, -824
-
When I am taking a break I sometimes mod my models. This little post is what happened the last time I needed to take a break. I was building my latest moc and was about halfway done. In the morning had gotten a big shipment of the dgb plates I needed to move on and I was content with the progress I had made that day. The sun was shining and birds were singing. Well, it was early March and there were very few birds to be found anywhere - but I imagine I could hear them sing. Suddenly the imaginary birds went silent. Something on the model was not lining up as expected. I took a second look. Nope. It was not correct. I had messed up. Badly. I knew what I had to do. I needed to take most of the model apart and a long with it the last couple of days of work. I felt the frustration surging through my veins (if this story ever turns into a movie, I would like to be played the Rock. I imagine he has the acting skills to play a frustrated Lego builder). I stood up (a bit too fast so I got dizzy and had to sit down again). I was sitting down. Pondering. I really did not feel for taking the model apart. If only there were something I could do to help me push off the inevitable – just for a bit. I stood up (this time slowly). I looked around my Lego filled room. The models were getting dusty. I took my brush and went to work, cleaning the models. The radar dish on the falcon always falls off when dusting, but not today. Maybe it was a sign? I continued. I knocked over the Y-wing. It had not been a sign… Then I got to the Star Destroyer. The command tower had a thick layer of dust. I took the model down so I could give it a good cleaning. I got to the back. Saw the engines covered in cobwebs (well not cobwebs exactly, but it sounds more dramatic than ‘more dust’, so bear with me). I glanced at my old engine mod. Hmm, it could be better. I had had fun making it, but I hadn’t been concerned with the finer details. Well, now I had the time… The mod was pretty straightforward. It is just about putting bricks on top of bricks. Nothing was taken a part - that would diminish the purpose of relaxing :) I wanted to get the sloping engine housings as correct as possible along with all the piping. The remnants of the old mod can be seen behind the engines. How the detailing exactly look back there I am not 100% certain, but this gives a nice affect of depth. Yes, I have used a lot of lbg levers. I was lucky I had a small stash because they are pricey! This time the tables have turned! With the assitance of an Escort Frigate, the Corellian Corvette is hunting down the behemoth Imperial Star Destroyer – yes they are all both exactly to scale :) ISD 1600m. Frigate 300m. Corvette 150m. The Corvette is a modified version of the mini model Lego released a few years ago. The Frigate is what happened when I accidentally shot my Nebulon B with a shrink ray! After this, I could go back and take my moc apart.
-
Hello star wars lego people. Proxy here, first post. I've been collecting the star wars sets for a couple years now. I have a bad habit of buy two of each set to see if I can combine them into an improved version of the set. My latest run was at the Mos Eisely Cantina. Using two Cantina sets, along with some left over parts from my advanced Jabba's Palace, I made the follow improvements. I'm not 100% complete and satisfied with it yet, but its a good start. I wanted to keep the same feel as the original set, and not build something insanely accurate to the movies. I feel this still holds onto the heart of a lego set. Exterior Front entrance with Stormtrooper patrol 20140823_153120 by artisanproxy, on Flickr Stormtrooper patrol 20140823_153135 by artisanproxy, on Flickr Front view of the Cantina's side 20140823_153323 by artisanproxy, on Flickr Rear view of the Cantina's Side 20140823_153306 by artisanproxy, on Flickr Rear entrance 20140823_153254 by artisanproxy, on Flickr Interior Set still folds open as originally designed 20140823_153426 by artisanproxy, on Flickr Improved bar 20140823_153646 by artisanproxy, on Flickr I used the face from the Rancor handler for the bartender 20140823_153623 by artisanproxy, on Flickr Background characters on new wall (Bossk is totally getting a lap dance) 20140823_153557 by artisanproxy, on Flickr The band has been filled out to 20140823_153542 by artisanproxy, on Flickr Wall Tops Removed The side wall ceilings are removable for playability 20140823_153755 by artisanproxy, on Flickr Side view with ceilings removed 20140823_153811 by artisanproxy, on Flickr Top down view 20140823_153747 by artisanproxy, on Flickr I have advanced versions of some other sets I can post as well.