Search the Community
Showing results for tags 'tie interceptor'.
Found 17 results
-
Hello. I made a post a while ago where I showcased quite a few changes I made to the Brickvault Tie Fighter model. Now I'm back to showcase the same thing with additional Tie Fighter variants from their store, alongside a few I made using other models as a base. I'm not talking about one or two, I'm talking about 24 distinct models. Some ships are heavily altered, while others are unchanged minus one or two tweaks. On top of that, I've probed the depths of Canon and Legends lore for additional color schemes I could apply to some of the models. I've amassed enough pictures to drown a forum post in, so I'm going to do just that. *Because I went into much more detail in my previous topic, I won't talk much about the parts of ships that share the basic Tie Fighter's cockpit or wing designs. I recommend you check it out before continuing, but you don't have to. Tie Interceptor This ship was the obvious first choice for improvement following the Tie Fighter due to the two models sharing the same design for the central pod and wing pylons. As for improvements unique to the Interceptor, I slightly modified the wingtip cannons and added their power conduits using hose pieces. I changed the construction of the wide armor detailing where the wing pylon meets the wing hub for better screen accuracy. I also moved the ribbed detailing where the power conduits meet the wing hubs and rebuilt the sensors between the two wings for the same reason. Finally, I got rid of the grilled bricks on the rear solar panels and made the backside of the wing completely flat. This design also has the most additional color variants with the first being a version belonging to Inferno Squadron. The construction is taken from the Inferno Squadron Tie Fighter I modified in my first post. While not shown in-lore, its existence can be inferred; why would one of the best group of Tie aces still be flying regular Ties in a time when the Interceptor exists? While this isn't a color variant, it's minor enough to be counted alongside them. It's a version using the 6x6 Tie hatch piece that Lego used before downscaling to the newer 4x4. Even though it is less accurate, I prefer to keep the smaller piece because it's much more available and affordable. This is a version belonging to the 181st Fighter Wing, adorned with a brick-built red stripe on each wing. Some of the support for the stripes bleeds through to the other side of the wing, but I tried to keep it unobtrusive. This is a version modeled after Vult Skerris's ship from Star Wars: Rebels, with its sparse red highlights and hemispherical gray cockpit stripe. This is a primarily red version based off the Emperor's Guard paint job from Star Wars: Squadrons. Its construction is nearly identical to the base model, illustrating just how much difference some color blocking can make. Royal Guard Tie Interceptor Despite being listed as a unique model on Brickvault's website, the Royal Guard Interceptor is the same as the regular Tie Interceptor save for the four extra winglets. The biggest change I made is the addition of the mounting brackets for said winglets, something present in the ship's original appearance. Tie Bomber The main feature I wanted to change with this model is the construction of the missile-hole on the front of the ordinance pod. The original is sort of a vaguely defined square and is too large, mostly because of the unique construction of the face. I was able to modify the design to make a 2x2 hexagonal hole using slopes, but I had to use clear tiles to support the shutter arms. Other things I've modified for increased accuracy include remaking the front detailing between the pods, shrinking the thrusters, filling a gap in the bracers that run the length of the pods, and making the front and back of the wings one continuous surface. Here is another variant inspired by the Emperor's Guard paint job. Tie Advanced Another model that's mostly unchanged is the Tie Advanced. I adapted this design to utilize the newer 4x4 hatch piece for consistency with the rest of Brickvault's Tie lineup. I think it does the job well enough, but I don't think it could be any better without completely changing how the central pod is built. I also gave this Tie the updated “bowtie” details on the central pod and the blasters from the regular Tie Fighter. Finally, I beefed up the rear wing pylon construction and flipped the brackets covering some gaps on the rear of the ship to hide their studs. Tie Brute This is the first design I tweaked not made by @Jerac. Despite having its own style of wing construction, I replaced them with my modified version from the regular Tie Fighter because I think they look more accurate. I recessed the wing pylon details by one plate on the front and back of the model and created a gentler armor slope from the central pod using jumper plates and ingots for better screen accuracy. Next, I rounded out the central pod by making the top and bottom out of 6x6 hinged dome pieces. This means I got rid of the newer Tie hatch and replaced it with the old. The ratio of the larger hatch to the central pod is about the same as the smaller hatch to the normal Tie Fighter. I also gave the central pod upscaled “bowtie” detailing and remade the engines for screen accuracy. There's also the variant that uses 4x4 quarter dome pieces for the central pod. Tie Defender The Tie Defender's central pod now has the same updated features as the Tie Advanced. Additionally, the rest of the pod is rounder and free of inaccurate surface greebling. The triangular armor on the wing pylons is more substantial and the rest of the armor has been slimmed down. The biggest changes are the wings. The original ones are based off of older appearances, where the wings are smaller and shorter compared to the pod. I wanted to modify the ones that came with the model, but they're constrained by their use of ball joints for support. I didn't know how to make new ones until I saw a post by @Sylyphics showcasing his own Tie Defender MOC. I bought the instructions and started tweaking those wings too. The new wings have been majorly reworked for added length and build simplicity, while the wing hubs are unchanged. The result is more of an experiment representing my ideal Tie Defender model, uniting components from two great designs. This variant is based off the Elite Tie Defender from Rebels. It adds 6 missiles in between the wings and uses brackets that conceal highlight connections to get the little areas of color at the rear of the wings. This is based off Vult Skerris' personal Tie Defender Elite, basically the same as the above variant, but in yellow. This is another variant based off the Emperor's Guard paint job. Since the wing pylon rings run through the wedge plate detailing, I replicated the latter using jumper plates. Tie Striker This model also received the standard central pod enhancements, though the rear details required some interesting connections to get everything to line up correctly. The wings now come to more of a point and the laser cannons have their long, long power conduits running all the way to the cockpit. The biggest changes are to the top hatches; the 6x6 dome pieces have been replaced with an ovular, brick-built roof piece. It is removable for access to the interior, held in by a few studs while resting on smooth tiles. While not explicitly shown, this Emperor's Guard inspired variant follows the same design rules as the other ships with this coloration. First Order Tie Fighter Thanks to the Tie Series' inherent design similarities, improvements made to one model can be applied to many others. Case in point, the First Order's Tie fleet. This model is envisioned as a “V2” update to the First Order Tie Fighter, similar to the one its Imperial counterpart received. The new model is mostly built off of my tweaked Tie Fighter, but there are a few unique details that make it more a simple color swap; firstly, there are holes near the wing pylon armor, as there are on all First Order Ties. The thruster orientation rotated 90 degrees and there is an antenna on the right side of the central pod. The “headlight” details near the cannons are depicted with small segments of hose. The printed hatch piece has been replaced with a regular 4x4 dish for consistency with the other models. Finally, the interior wing hubs and bracing struts have their bulkier, armored appearance from the movies. This is a custom color variant that can be applied to all First Order Ties. Based on the appearance of the Final Order fleet's livery (and initially an excuse to see new Ties in the classic color scheme), this color scheme asks “What if all the forces of the galaxy-conquering First Order Navy didn't stop existing as soon as Kylo Ren found some shiny, new toys?”. First Order Special Forces Tie Fighter Despite its unique construction, the Special Forces Tie still benefits from some of the standard Tie upgrades, such as rounder pylons, more accurate pylon armor, updated wings, and a more circular central pod. The larger cannons are made using slightly altered construction from the regular Tie. The thrusters are now their correct size and shape, at least as close as it can be for the latter. Finally, the power cell banks on the wing pylons are fuller, more circular, and feature all of the segments in-line with each other This is as variant of the design that replaces the printed 6x6 dish on the rear of the central pod with a brick-built assembly. While it costs 2 dollars in comparison to the dish's 1 and eschews the detail of the printed element, it features a correctly colored rear window and can be built in whatever color pattern the design requires. Here is the requisite Final Order color variant of the Tie/sf. Thanks to the color change, it now features the 4x4 printed Tie hatch for added detail. This variant can only use the brick built rear windshield due to the new coloration. Tie Baron The changes here are mostly minor tweaks made to bring this model in line with the other edited Ties. The central pod received the standard Tie upgrades, including chin cannons, “bowtie” detailing, thicker pod dimensions, and an interior matching the standard First Order Tie Fighter. The wingtip cannons have been remade to fit their correct size and the power conduits have been simplified. The missile launchers have been edited so that the ordinance inside is visible. The wings are free of inaccurate detailing, the front wing pylon armor has been slightly modified, and the internal support “spine” behind the central pod has been made more sturdy. The Standard Tie Baron created by the designer features all the same improvements, but in black. The Special Forces variant now has the turret, chin cannons, and antennae of the Special Forces Tie Fighter. The Final Order variant swaps the gray and black from the Standard version. Modified Tie Whisper The central pod has been replaced with one based off the pod from the Special Forces Tie Fighter in order to correctly depict the two-seater cockpit. It uses some a unique connection to the handlebar element to both represent the red windshield ring and to support the windshield “spikes”. The red protrusions on the central pod have been rebuilt to be 1 stud wide and feature custom vent detailing stickers that can be applied for a more accurate look. The rear solar panels are made using a specific type of wedge plate because it is the exact shape they're supposed to be, though this leaves them covered in studs. The wingtip cannons have been redesigned and the indentations along the rearmost part of the wings has been made smaller. Here is the Final Order version. Those are all the official models I've modified, but I've also used those models as a base to create designs for ships that don't have as high-quality representation as Lego MOCs. Tie Experimental M1 “Bizarro” The first of the new models, and the first of the unmanned Tie Experimental series, is the Tie Bizarro. It was designed as an inverse to the standard Tie Fighter, with 2 pods straddling a single, central wing. Just as the model makers rearranged and recombined parts from a standard Tie to create this design, I've done the same with the Lego model of the Tie Fighter. The pods had to be modified to create a smooth outer curve thanks to their new positioning showcasing what once flowed into a wing pylon. The wing pylon itself is now a singular construction that runs from pod to pod. It's made using the longest 2-wide plates Lego produces for stability's sake. The pylon armor had to be modified as well to fit on the pylon, though this just means it is a plate thicker on each side compared to the standard Tie. The internal of the pod housing the turbolaser has been completely stripped and replaced with a scaffold to support the dish piece that replaces the windshield. This is a variant that more closely follows the “rules” of Tie design, with the vertical pylon armor next to the pods and the horizontal armor by the wing. It maintains the slimmer pylon armor of the Tie Fighter due to its unaltered construction. Tie Experimental M2 “Big Gun” This is a standard Tie Fighter with two large cannons attached to its outer wing hubs. I made the cannons 7x7 studs to depict their relative size to the central pod, but this led to some issues with how to mount them to the wings. I had to redesign the outer wing hubs with jumper plates to connect to the holes on the underside of the plates supporting the cannons. This accounted for the half stud offset required to center the cannons on the hub. Tie Experimental M3 “Warhead” This is a Tie Interceptor with missile pods mounted on the outside of its wings, so I took the modified Tie Interceptor model and did just that. The launch tube detailing on the front of the pods is too fine to be represented using Lego bricks, so I created custom stickers that could be applied over a flat, circular 4x4 area. Tie Experimental M4 “Bomb” This is a ship designed to act as a large missile. Fittingly, it is based off a Tie Bomber with a single pod and is fitted with a massive booster engine. The modification to the base Tie Bomber model was easy enough to make, as I just mirrored the construction already present for one side of the ship. The engine proved more challenging, thanks to its length. I made the smaller shaft out of cylinder pieces, while the larger part is a novel assembly made to display curved slopes on all 4 sides and to recess the exhaust. I've reinforced the engine and its connection to the main ship using Technic axles, but as I've only made a digital model, I can't tell if this engineering would be enough to support the engine in real life. Thusly, I created a stand to act as support for the engine. Tie Experimental M5 “Booster” This is a standard Tie Fighter with an engine based off the Tie Bomb's added to it. However, the Tie Booster's engine is even longer and larger than the one on the Tie Bomb, and is supported by a much smaller central pod. The construction of the engine is similar to the Tie Bomb, but magnified where necessary. The bracers running from the wings to the engine are attached to the rear solar panel strut by a clip-and-bar connection to achieve the correct angle. I also created a stand to support the engine regardless of the design strength, because it would definitely throw the model off balance in real life. Tie Droid This model is based off the droid-controlled fighters that were produced in swarms by the factories of the World Devastators. I based the model off the ship's appearance in the first Rogue Squadron game, because details like the wing size, wing detailing, and windshield color vary wildly across its initial appearance in comics and later illustrations. The central pod and wing pylons are almost entirely unchanged from the base Tie Fighter, save for the two protrusions a the top and bottom of the windshield. The opaque windshield is supposed to feature a horizontal line bisecting it, which would be represented with a thin, rectangular sticker, but the Stud.IO part designer program doesn't apply textures to domed surfaces too well. The standout feature of this design is the blocky wings. They're attached to the wing pylons by two clip-and-bar connections each, which should be enough to support the weight of the wings. The wings themselves are built around an oddly designed core, which supports the tiles of the large, smooth wing hubs. The solar panel detailing and outer edge leave the core mostly untouched, only connecting together in a few places for structural support. The outer edges themselves have been designed in a way to keep the two-plate thick sizing consistent across all sides of the wing. Tie/rc This obscure Tie variant was never given an actual name beyond its factory designation (the obvious Tie Reconnaissance Fighter referring to another ship entirely). It's little more than a standard Tie Fighter with a single cannon and some sensor greebling on the front of the ship, some of which is represented through custom stickers. I made it because it was an easy modification to do, though presumably somebody would be interested in displaying it. Tie Ground Targeting This unique model of Tie was designed to serve as he Empire's initial bomber for planetary bombardment. Given its in-universe existence before the dedicated Tie Bomber, it's built from a modified Tie Fighter frame. However, like a mullet, the front of the central pod is the same as a regular Tie (one cannon non-withstanding), but the rear is cylindrical like that of the Tie Bomber. This proved challenging to make because of its odd-numbered sizing, which needed to be mounted on, and centered to, an evenly-sized studded surface. The rear of the pod is made using a similar construction to the engines of the Tie Bomb and Tie Booster, and has a set of thrusters similar to that of the Tie Bomber. The top and bottom of the pod feature plates that are integrated with the top and bottom cockpit hatches, similarly to the design for my tweaked Tie Striker. The gaps from the regular Tie pod to the cylindrical back half are filled as best as possible, and are mostly hidden by the wings and hatch assemblies. Finally the triangular wing strut armor coming from the central pod has been redesigned to match the ship's reinforced appearance, complete with holes where they should be. Tie Fire Control This is the Tie/gt's other half, and another relatively easy build. This model of Tie was designed to house the sensors required for precise ground targeting, which was then relayed to the Tie/gt fighters it flew alongside. This ship shares its sticker detailing and single cannon with the Tie/rc. Its unique features are the chin mounted sensor arrays flanking the laser cannon. These boxy protuberances are meshed to the central pod as well as can be achieved without sacrificing the quarter dome pieces for something custom built to house the sensors. The sensors even extend into the area reserved for the bottom 4x4 dish, so a brick-built lookalike stands in for it. Tie Heavy Bomber This is a ship based on the Tie Bomber, but with two ordinance pods. I was inspired to recreate this design after I saw a Flickr post by Gingko19 Biloba showing a similar model. Unfortunately, he didn't alter the sides of the pods, which meant they clipped into the model in a manner impossible to build in reality. He told me he used a tile with a stud attached to a tile with a hole in the middle (a stud reversal method) to connect the pods to the central pylon. A plate ran from the core of one pod to the other for structural stability, covered by increasing the depth of the pylon by one plate. With that info, I set out to refine his model into something physically possible. The ordinance pods have been slightly altered in order to evenly meet up with the pylon. Additionally, I increased the height of the wings to extend past the bomb chute, a feature that is actually accurate to their portrayal. Emperor's Guard variant. Tie Interdictor / Punisher The next logical model to make after the Heavy Bomber. This ship basically mirrors the double-pod side for 4 ordinance pods. Emperor's Guard variant. First Order Tie Brute Seen exclusively in an immersive shooting gallery ride at Disney World, this Tie is largely the same as the Imperial Tie Brute. The First Order version has small, red headlights on its pylon armor, the requisite antenna array, and unique thrusters resembling those of the Millennium Falcon. I created the thrusters using custom stickers, including some applied to 1x2 grated slopes, meaning someone building this in real life would have to gently press the stickers on. Also available with small corners. And in the colors of the Final Order. First Order Tie Whisper To end this list of ships, we have the regular Tie Whisper. They are seen during the Lightspeed Skipping chase in TROS and have the wings of the standard First Order Tie Fighter. I reused the central pod and pylons from the Modified Tie Whisper and the wings from the Tie/fo. One detail unique to this ship is the curved, almost dented appearance of the wing hub's armor plating where it meets the wing pylon bracer. This altered construction means this ship can utilize the same wedge plate bracer design as most other Ties despite the extra plate's worth of armor usually blocking it. Final Order Version. Let me know what you think!
-
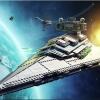
It's been a while since I did my Minifig Scale TIE Fighter MOC and I always planned to quickly do the Interceptor as well...but life got in the way and things got delayed. But now I've finally completed the prototype. Pictures below.
-
I saw a couple of promotional builds and gave them a try and realized how good they looked, so I gave it a try with two other iconic vehicles and got this as a result, I hope you like them. 1 by Nom Carver, en Flickr 2 by Nom Carver, en Flickr 5 by Nom Carver, en Flickr 6 by Nom Carver, en Flickr 7 by Nom Carver, en Flickr And some extra pics with the promo inspired builds. 8 by Nom Carver, en Flickr 9 by Nom Carver, en Flickr
-
Hello, I'm trying to build a TIE/wi Whisper for Rebrickable but I can't quite figure out the brick stacking method. Can someone please help me? Thanks!
-
A long, long time ago I started working on a micro scale Millennium Falcon. To begin with all I wanted to do was add detail to the Microfighter but I kept tinkering and before I knew it I had a growing collection of micro Star Wars freighters and fighters, and here they are! Instructions for all these little builds are on my Rebrickable page. Since this all started with that Falcon Microfighter the cockpit piece (a light blueish-grey 2x2 truncated cone) became my yardstick for scale. Luckily trans-black 1x1 slope pieces work as fighter cockpits at the same scale so all the ships are, and will continue to be, as close to scale with each other as I can manage, at least based on these pieces and whatever reference images I can gather from Google. My Blockade Runner (April 2021) is the last ship on my micro Star Wars to-do list, although it’s hardly micro! The size and weight were a new challenge for me, I’ve never had to worry about a moc falling apart under its own weight before, but I enjoyed the challenge and managed to make it pretty easy to pick strong. I’ve put together instructions for the Tantive IV as well as the Liberator from Star Wars Rebels, which I couldn’t resist building for myself. Rather than doing new posts for each new ship I’ll edit the very long post below. All the instructions are on my Rebrickable page and there are photos and Studio renders some photos of the ships in this post, plus a few more on Flickr and Instagram. Thanks for looking!
-
I experimented with Lego pieces introduced with the 2018 and 2019 sets. I hope you like these spacecraft models. I find the TIE cockpit a challenge to model in Lego. It is shaped like an ice-cream scooper with two handles. If done properly, the result should look spherical and be strong enough to “fly” with TIE Interceptor wings (pictured above) or the heavier TIE Fighter wings (pictured below.) TIE Fighter wings are heavier than TIE Interceptor wings. My previous attempt at connecting my MOC to the 9492 TIE Fighter wings didn’t work. I over-applied technic pins for too many of the connections, so wings were wobbly when shaken. This time I extend the plates all the way from the center to the wings. Having 2 studs of overlap between plates ensures minimal bending. I saw two 35299 pieces used in Yoda’s Hut set. Luckily, with Defense of Crait, this piece now comes in Light Bluish Gray. I put two of them behind a 6 x 6 Dish Inverted with SW 8 Spokes Radial Cockpit Pattern. Result: a spherical shape although elongated width-wise. The chin-mounted muzzles are a pair of 35480. The cockpit ball is 9 studs in diameter. There is enough room to fit a 4-stud diameter dish but not a 6-stud one. I originally intended to build a 5-stud wide canopy, but there is not enough space. (update 2019-11-20) Some of you asked: "Where's the Twin Ion Engine?" Well here it is -- the obligatory hexagonal cavity! This is supposedly a window or an ion discharge port. The doughnut-shaped plate on my MOC obscures the hexagon from the camera. I need to find a way to move or lengthen the cavity a tad towards the rear of the spaceship.
-
2021 remake! Initially it started as a minor update to fix few issues, most notably weak guns/windshield attachment, but over time scope of the changes grew and grew and grew. Changes: - Cockpit now can has space for the pilot in any type of the helmet, including the grossly oversized one; - Cockpit interior now features new controls layout and few more details; the "bowtie" detail taken almost 1:1 from 20feet's variant, with a slight modificiation to make it match the intended "flow' of the cockpit a bit more to my liking. Big thanks here! - gun and windscreen attachment is redone to be much more solid; though this particular change was already implemented in First Order TIEs; - top dish was replaced to use 4x4 one. This is a bit controversional, but bricklink prices for the 6x6 one are extreme, because they appeared on only one set some time ago. 4x4 is much more popular and so this is a better option for a model which is supposed to be built by other people too. - side struts were redone to resemble original ones a bit more. I had great help here from 20feet who helped me to go through few ideas and find one which is a nice compromise between screen accuracy and fitting rest of the ship's styling. Thanks again! - side struts were made longer, as I made a slight scaling mistake in the original TF. - wing/panels are basically an entirely new build. The shape, which has proven to be a little bit controversional due to being much more rectangular, is more similar to what movie and Rogue Squadrons game TIEs are using. I know it is not 100% perfect and a bit too rectangular, but this particular layout enabled me to use most of 1x2 grille bricks, aside from the slopes. I believe it is a good trade-off and the angle is definitely closer to the original, even if wrong in the other direction now. - I also tried 20feet's vertical stacked bricks idea and it looks great - on black background. It is included in the instructions pack, and is probably the best choice for people who will display the ship against black background. Otherwise, gaps between bricks are quite noticeable. Still - a super interesting idea and one which got implemented! - New wing cores: Hexagonal, finally! Again thanks for 20feet's insistence on making them better! I thought my original idea was good enough but it was worth pushing a bit more! - New color variant! This was Charlie's idea (one of Brickvault leads) and I was skeptical even after building it. Thankfully, he insisted and so, over time, this variant grew on me to the point that I now believe it is the best looking one. It is a bit assymetrical but overall a compromise worth doing! - New universal stand debiuts here, and I intend to use it - in various similar versions - for all future ships in this size. So, yeah. Quite a remake. I apologize for delaying it this much, especially after repeatedly telling people the update is "soon". Sorry. This is the first time since 2019 where I finally was able to get everything right. Since T/F shares almost entire core with the T/I, I redid it too: Interceptor shares most of the changes with the Fighter. Initially I did not want to redo the panels - I thought they were perfect, but, well, yeah. They were not. Having Rogue Squadrons 3d models as the sources enabled me to get proper dimensions finally. Ultimately, the panels simply required lenghtening the back part and making those weird offset guns at the tips. I still believe it is an odd choice, but nonetheless, I tried to replicate it. The red one is a Royal Guard TIE Interceptor and aside from the obvious new racey paint scheme, it also features smaller additions to the wings. I tried to keep the angles same as on the main panels, which was quite a challenge, but eventually it ended up being perfectly possible. At this rate, 3.0 is scheduled for release around 2024. Let's place bets on what will change, and please tell me what's the weakest part of those designs, so I can focus on them in the future! I want to ditch 3x3 dome pieces as they clog up the interior, and this probably will be the focus of 3.0 - if I get some good ideas to try. And who knows, maybe I'll be able to make a perfect T/F wing panel this time? --------------------- Yet another LEGO TIE Fighter. How far can this classic design be pushed? How many ways are there to build an eye sandwitched by hexagonal solar panels? Is there a perfect design already? This is where beauty of LEGO as form of modelling strikes with full power, as answers to these questions are: Very far, infinite ways, and no, there is no perfect design available and never will be. In 2014 I have built this: It worked, and I think for 2014 and what was available back then, it was pretty good. It had obvious flaw though: no space for a minifigure, and it was also a little too small in scale. I was limited mostly by the fact there were no proper cockpit pieces, and my attempt with literally the only other one was... not spectacular, not to mention it needed painting with A LOT patience required. The new model takes advantage of this cockpit piece, which allowed me to push that original 2014 design further. I know, I am late to the party, years - literally - behind other designers of great TIE models, like Bricks Feeder or Rebel Builder, yet I hope I can bring something new into the T/F building scene. Originally I thought I would just stretch the build here and there but no, heheh, no way. Literally the only unchanged parts are the eight quarter (or one-eighter?) dome pieces, which are to me still the only way to have smooth and roughly spherical design without holes all around. Unfortunately when we look at a closeup of a real movie-filming model of the T/F we see how far are we from true modelling but I say we're collectively inching towards it pretty nicely. I have said this plenty of times but original designers of TIE Fighters really did all they could to make them unbuildable properly, naturally unknowingly - who would think adult guys 30 years in the future would try to recreate the design using perhaps the weirdest medium available?. The T/F is just a sphere, two struts and two flat hexes. Except: 6-diameter central cokcpit piece would require a 9-diameter ball, minifig-scaled TIE would require an 8-diameter ball and don't even get me started on sources for TIEs dimensions. If you think that Illustrated Guide To Star Wars vehicles is helpful, well, not much. I dare to say this book did awfully lot of harm to LEGO Star Wars MOCing scene. So is my TIE perfect? No, not yet. I promise though, I did all I could to make it as good as possible, with no compromises made. And this time it houses a minifig! The design is super sturdy to my standards, nicely swooshable - for a reason, but I will get to that later. Naturally having a T/F built opens a way towards the Interceptor, which for me is among the best looking spaceship designs in any sci-fi. While the core design is similar, the ball has some differences, mostly to accomodate longer struts. This is because LEGO curiously didn't develop 2x9 plates and for once I was in a situation where I can't really replace 2x9 plate with anything without compromising structural integrity. Having that solved I went onto the wing design and OH GOD INTERNET WHAT HAVE YOU DONE. If anyone knows angle on the panels and can prove it, gets a free beer. With shipping. Because the wings are angled in all dimensions, good luck guessing proper values from photos. Because of the IGTSWV book, half of the models (and I don't even mean LEGO models) existing are wrong. And then because of SW animated series, the other half of the models are also wrong... ...so my source of reference was this: Then after having all that done, I experienced another unexpected problem: The ship is top-heavy and won't stand straight. I added tiny legs on the bottom edges of wings which help a bit, and because the design is quite sturdy, the T/I requires no stand. There you have it. Yet another T/F and T/I. I hope you like the designs and I hope I managed to introduce something new to the very competitive scene. Enjoy! ...but wait, there is more! I would not build these models if not a commission request from BrickVault: https://www.youtube.com/channel/UCrhb3SP2lZBgguLHIWWuHOQ Originally it was meant to be just a few TIE models based on the 2014 design I had, just LDD files, but over time we developed a much more interesting designs and... instructions for each of them! The instructions are paid and please understand, it took weeks to develop them, error-proof, make the experience enjoyable and builds sturdy enough to be handled easily. Normally I do not make instructions, as I prefer to build with real bricks than to do electronic designs. The instructions are designed to have dozens of simple to follow steps with just few pieces per step, have submodels where needed, parts list for each step and a total bill of parts at the beginning. Additionally, in few places, there are notes to watch out for some particular details. I can fully understand now what LEGO designers go through and I can imagine amount of effort required for making instructions for larger and more complicated designs. I am pretty sure it took more time to design instructions for the recent UCS Millennium Falcon than to design the model itself. Thanks for watching and Happy New Year!
-
This is my version of the iconic TIE Interceptor from Star Wars: Return of the Jedi. I'm amazed that LEGO hasn't decided to update this creation themselves since 2006 with their release of 6206, especially after releasing 9492 (TIE Fighter) in 2012 which showcased almost movie accurate solar collectors and then the development of new elements for the windshield and cockpit hatch from 75150 Darth Vader's TIE Advanced vs. A-Wing Starfigther from 2016. I first need to give a shout out to the initial influence of Rebel Builder's TIE Interceptor MOC for the solar panel collectors and then too Kevin Yoo for his cockpit ball design. My biggest grudge with the TIE Interceptor MOCs was the connection point between the pylons and solar panel collectors. They always appeared to big, bulky, and cumbersome for a fighter that is suppose to be sleek and fast. My solution was to do some "unofficial" LEGO connectiions to keep the attachment points sleek and narrow. I'm still not 100% happy with my MOC, the pylons need to be thinner and I need to solidify the attachment point for the forward windshield (it's not the strongest connection). Any and all comments are appreciated. Follow the link to my Flickr page to see more of the design process. TIE Interceptor by gcanik, on Flickr Flickr Album view: https://flic.kr/s/aHskTH9hFx
-
This is my version of the iconic TIE Interceptor from Star Wars: Return of the Jedi. I'm amazed that LEGO hasn't decided to update this creation themselves since 2006 with their release of 6206, especially after releasing 9492 (TIE Fighter) in 2012 which showcased almost movie accurate solar collectors and then the development of new elements for the windshield and cockpit hatch from 75150 Darth Vader's TIE Advanced vs. A-Wing Starfigther from 2016. I first need to give a shout out to the initial influence of Rebel Builder's TIE Interceptor MOC for the solar panel collectors and then too Kevin Yoo for his cockpit ball design. My biggest grudge with the TIE Interceptor MOCs was the connection point between the pylons and solar panel collectors. They always appeared to big, bulky, and cumbersome for a fighter that is suppose to be sleek and fast. My solution was to do some "unofficial" LEGO connectiions to keep the attachment points sleek and narrow. I'm still not 100% happy with my MOC, the pylons need to be thinner and I need to solidify the attachment point for the forward windshield (it's not the strongest connection). Any and all comments are appreciated. Follow the link to my Flickr page to see more of the design process. TIE Interceptor by gcanik, on Flickr
-
About a year and a half ago I posted my initial TIE Interceptor model and I pointed out a few areas that I didn't like, notably the wing pylons. I went through two more changes, each being stronger than the last but that wasn't all I was unhappy with. I ended up building a second version, totally from scratch, using Belkor's wing pylon design. New cockpit interior (hell, entirely new cockpit), new thinner wings - only two plates thick. But my absolute favourite part of my second, improved version is a functional rear viewport. Unfortunately, I am currently lacking the money to buy extra pieces for v2 so only renders for now. There are still a number of things I would like to change. I'm pretty happy with the wings, although if I find a way to keep the edge panels closed that would be great. Ramses' TIE fighters have better wing pylons where it connects, so I want to modify mine to be more similar. Cehnot made an excellent cockpit interior, so I plan on changing mine to use that. However I'm very happy with the thinner wings and functional rear cockpit. It took quite a bit of time fiddling around with plates to have a design that was strong enough throughout with the wings. Hopefully, v3 should be in full brick form.
-

[MOC] TIE Interceptor proportions study... 11 months later
dream-in-bricks posted a topic in LEGO Star Wars
Earlier this year y'all gave some good feedback on my TIE interceptor MOC I finally gotten around to addressing the pylon and wing stability issues. And thanks to your feedback below I painted the windscreen piece to blend into the cockpit. TIE interceptor windscreen and port side https://www.flickr.com/photos/108145384@N05/30733259382/in/album-72157675914045466/ https://www.flickr.com/photos/108145384@N05/30813172646/in/album-72157675914045466/ More photos on Flickr (including earlier posts) https://www.flickr.com/photos/108145384@N05/albums/72157675914045466/ -
Hi Eurobricks My first MOC here ever, and its this weird TIE cockpit I've had lying around for months, with boring TIE Interceptor wings glued on it. The idea of a TIE cockpit like this (6x6 dishes on either side, with the 1x4 bowed bricks in between) was originally by Yub Nub, although the means of accomplishing it is my own. TIE fighters have had such a range of sizes over the years that I'm sure this is minifig scale relative to one of them... Ultimately I can't say I'm too happy with it, its not very strong, and while it can (barely) fit a pilot, it can only fit the old style, and they sit too high. What I am happy with, is that I managed to get the window in the back (or according to the guy drawing the Darth Vader comics its a thruster) to actually be a window, and that I found a way to get the canons on the cockpit (in a perfect world, there'd be a short length of red flex tube in there, rather than the green stud. But I dont have any, and this thing isn't worth a bricklink order). It took an entirely new piece coming into existence to figure that one out. I also threw together a regular TIE Fighter with the same concept, although its an older design, before I figured out the front canons. It does demonstrate how it looks in light grey though.
-
The TIE Interceptor. One of my favorite TIE Fighter variants. It was fast. It was sleek. It was deadly. And, from what I've seen, is the A-Wings rival. Anyway, here is a picture. http://www.repubrick...interceptor.png And an LDD file. http://www.repubrick.com/index.php?option=com_virtuemart&view=productdetails&virtuemart_product_id=4171&virtuemart_category_id=180&Itemid=144〈=en
-
I think this may be my first real post in this forum, so hello everyone, I'm Brian, aka Bootz. I've recently started seriously collecting SW sets again after a long while of favoring my modular buildings and City sets for my town layout. Last week I purchased the 75082 TIE Advanced prototype with the intention of turning it into an Interceptor (plus I wanted the figs). Since I was snowed in last night, I took it as an opportunity to build the Interceptor I've always wanted but TLG hasn't made in forever. The cockpit is essentially unchanged from the official set, of course I deleted the "Advanced" body to strip it down to just an eyeball, but otherwise I left the design as is. The wings make use of several FO TIE and T-70 polybags that now I don't feel so stupid for buying so many of. The overall shape is as close to the real thing as I wanted to get. They're a tad too long towards the rear but I feel that they look right. The hinges are the same as the Advanced prototype, so there's no chance of them supporting the weight of the model without collapsing, hence the makeshift stand. They do however "click" into place when extended like you see here, and they stay in position while swooshing. With all my builds I aim to retain swooshability and this model is exceptional in that regard. I also kept the missile launchers of the official set with the rotating back of the cockpit as the firing mechanism. It doesn't look great from behind but it's fun to shoot things and the mechanism is very slick to use. My A-wing started as mostly a recolor of the green RZ-1 from the Mon Calamari Cruiser set, but by the time I was done I realize it looked more like the Ralph McQuarrie inspired A-wings seen in Rebels. I'm very pleased with the overall shape, I wanted to capture the rounded hull as best I could while sticking close to the official models and average building techniques. The engines aren't quite accurate, but I instantly loved the way those round pieces looked there.
-
Using the ever-versatile 75082 set, which I believe is the first Interceptor on this site to do so (I've lurked). Previous MOCs I've seen using this set were for a TIE Fighter or Vader's Advanced TIE. UPDATE! VERSION 2 I've made major changes to the wings of this MOC to be better proportioned, detailed, and more accurate. The wing mid-sections are now 6 studs wide, while the wings themselves have been lengthened by one stud each, and pushed back. You can see the original version here:
-
Hi, I am new to this forum - joined today. I'd like to introduce myself with MOC - TIE Avenger. This model is comparable in size to 8017 LEGO Darth Vader TIE Advanced Set, but has slightly longer wings. Dimensions: Height: 11 cm Length: 21 cm Width: 17 cm I have added my project on https://ideas.lego.com/projects/68294. If you like it, please support it. View from an angle: Front: Side: Rear: Top: Hope you like my version of TIE Avenger. Cheers, Kariusz
-
The TIE Interceptor has always been my favorite ship in the SW universe. One of the fastest fighters of it's time, it's deadliness went hand in hand with it's beautiful, menacing design, intended to provide the pilot with increased visibility and decrease overall targeting area for enemy fighters. Lacking heavier armor, the TIE INT pilots had to rely on speed and maneuverability to outgun the rebels praised X-wings Over the course of LEGO SW history, there have been two attempts two capture the iconic TIE Interceptor, both falling short. The 2000 UCS version failed on wing design, both with dimension, proportions and silly part usage (grid panels??) The 2006 midi size version was part the worst LEGO TIE lineup ever, with unexplainable blue color scheme and blocky, uninspired design. I believe we will get a revamped version of the Interceptor soon, probably in line with the latest TIE FIghter, but until then, here is my version in minifig size: I am not 100% satisfied with the cockpit design, and will probably be making some alterations to it in the future. Of course, all suggestions and comments on improving the design are welcome :) Cheers!