Search the Community
Showing results for tags 'Mindstorms'.
Found 225 results
-
 Hi all, A while ago I purchased the EV3Lights Led Controller by Mindsensors. The contoller is powered by a 12V adapter and it plugs into one of the sensor ports of the Mindstorms EV3 brick. To control the strip you need to download an EV3 Block and you are good to go. They even have sample program, which worked instantly! Christmas will never be the same!
 -
LEGO Mindstorms Official Models
Jim posted a topic in LEGO Technic, Mindstorms, Model Team and Scale Modeling
Needs an update! MINDSTORMS EV3 RETAIL SET STARTER MODELS These robots can be built with the Mindstorms EV3 Retail Set(31313) TRACK3R TRACK3R R3PTAR R3PTAR SPIK3R SPIK3R EV3RSTORM EV3RSTORM GRIPP3R GRIPP3R MINDSTORMS EV3 RETAIL SET FAN MADE BONUS MODELS These robots can be built with the Mindstorms EV3 Retail Set (31313) BANNER PRINT3R – created by Ralph Hempel BOBB3E – created by Kenneth Ravnshøj Madsen DINOR3X – created by Lasse Stenbæk Lauesen EL3CTRIC GUITAR – created by Daniele Benedettelli EV3D4 – created by Vassilis Chryssanthakopoulos EV3GAME – created by Ricardo Oliveira EV3MEG – created by Martyn Boogaarts KRAZ3 – created by Marc André Bazergui MR-B3AM – created by Kenneth Ravnshøj Madsen RAC3TRUCK – created by Laurens Valk ROBODOZ3R – created by Mark Crosbie WACK3M – created by Martyn Boogaarts MINDSTORMS EV3 EDUCATION KIT STARTER MODELS These robots can be built with the Mindstorms EV3 Education Core Set (45544) Building Instructions & Program Description - Education EV3 Starter Gyro Boy Sorter Puppy Robot Arm MINDSTORMS EV3 EDUCATION KIT EXPANSION MODELS These robots can be built with the Mindstorms EV3 Education Core Set (45544) and the Mindstorms EV3 Education Expansion Set (45560)*. See briefings for more information. * Spinner Factory needs 2 EV3 Intelligent Bricks, 2 Color Sensors, 2 Touch Sensors, and ALL six motors. SPINNER FACTORY Project Description (PDF) REMOTE Project Description (PDF) ELEPHANT Project Description (PDF) TANK BOT Project Description (PDF) STAIR CLIMBER Project Description (PDF) ZNAP Project Description (PDF) -

[WIP] 42029 R/C Custom Pickup Truck MINDSTORMS EV3
DamonMM2000 posted a topic in LEGO Technic, Mindstorms, Model Team and Scale Modeling
Well I'm finally back! The footage in this video is at least 1-2 years old, and I've been working on this project for even longer. I'm slowly working on completing this build, but I need your input and suggestions! My work-in-progress Lego Technic Customized Pickup Truck 42029 is being motorized with Mindstorms Ev3. So far, I have much of the chassis built. Two Ev3 Large Motors are used for the drivetrain and one Ev3 Medium Motor for the steering. I also have it set up so that a Lego piston engine can run while the vehicle is driven. -
I built a fish that can be remote controlled. It can also swim standalone with an ultrasonic sensor. There's also a Youtube Video of the fish swimming. What do you think?
-
Hello everybody! I've managed to find in Russia used EV3 for about $100. Upon receiving I'll have 15 minutes to test it and decide whether I want to buy it. My question is how can I effectively test electronic parts without a computer?
-
.thumb.gif.ad7c8d88b264ee812194946c07404504.gif)
[TC14] The Zapper - FINISHED! - More information added!
mocbuild101 posted a topic in LEGO Technic, Mindstorms, Model Team and Scale Modeling
After 2 months of work, I can finally present to you, The Zapper! This MOC was quite a challenge to build, not only because it's the biggest thing I've ever built, but because of the numerous design changes that I made while I was building it (most of which you can see in my posts below). I'm just glad I managed to finish it before the deadline, otherwise who knows how many more design changes I would have made... Video: Quick stats: Height (to top of support structure): 30 studs (24cm / 9.45") Width: 32 studs (25.6cm / 10") Depth: 34.5 studs (27.6cm / 10.86") Weight (with batteries and passengers): 1968g Now, you may look at those numbers and think that they're just measurements, but while that is true, there's also quite an amazing coincidence among them... You see, as I was typing it out, I realized that written as grams, the weight was a year - not just any year, but the EXACT year that the original Zipper (which is what The Zapper is based on) was first invented! Unbelievable, I know, but I can assure you that is the exact weight. Links: More about The Zipper: https://en.wikipedia.org/wiki/Zipper_(ride) Bricksafe page: https://bricksafe.com/pages/mocbuild101/tc14---the-zapper YouTube page: https://www.youtube.com/watch?v=kxbVNoT2SOc More photos: All versions (from prototype to final entry): Original post: -
[TC14] Gyroscope
The_Icestorm posted a topic in LEGO Technic, Mindstorms, Model Team and Scale Modeling
I thought I might try to replicate this ride design for this contest. The ride consists of 3 spinning 'rings' with the riders attached to the innermost ring, and the ride rotates them around 3 axes. Some functions I want to include in the ride: Independent motorised control of each spinning ring. All motors external to ride, using a Mindstorms EV3 controlled system. Whole ride raises and lowers to allow riders to get on and off (like in the video) As I want all the motors to be external to the ride (having motors attached to the rings will cause wire entanglement issues) I have to somehow transfer power through the rings to spin the inner ones. Here's a diagram showing how the power will be transferred to spin up the inner rings. Red line is power transmission. Some pictures of the middle (green) ring and a basic mounting frame (not final). Black axle is input and tan axle is output. -

Daft Lego Punk (Technic Music Video)
Saberwing40k posted a topic in LEGO Technic, Mindstorms, Model Team and Scale Modeling
A music video for Daft Punk's Harder Better Faster Stronger, with Technic letters, filmed using a GoPro on a custom Mindstorms controlled rig. Made by this guy:https://www.youtube.com/user/fastythefastcat -
Please check these link: https://www.epo.org/learning-events/european-inventor/finalists/2018/munch.html And watch the video. "LEGO programmable robots" (basicaly Mindstorms ) and their "ufficial "inventors (i.e. those named on the patents) are candidate to the European Invento Award in the category of "industry". However there is also a "popular prize" that can be obtained with on-line vote. Check here: https://popular-prize.epo.org/i/i/gaute-munch-erik-hansen-dk-and-team/#inventor-gaute-munch-erik-hansen-dk-and-team It would be nice to inform as much AFOL as possible to support LEGO Mindstorms and its inventors. So please, let's support LEGO Mindstorms together P. S. I work at the European Patent Office. If you need more information, you can always contact me
-
 The Delivery Station unloads the train, separates the candies from the containers and delivers the candies to the visitors. The 2017 consisted of four parts: Push mechanism: pushes the containers-with-candies from the train Roller mechanism: rolles the containers-with-candies to the lifts Lift mechanism: lifts the containers to separate the candies from the containers Locker mechanism: candies are stored in lockers, to be opened with the ticket reader The order of the candies needed to be kept, so every visitor received the candy in the color he requested. You can watch the 2017 here (starts at timestamp 2m39s): For 2018, we keep the Push mechanism and the lockers. The part that will take care of separating the candies from the containers, is completely redesigned. The push mechanism however, was rather slow and - as you can see in the video - it needed quite some space due to the slider. So, that needed a redesign as well. You can see the new version here (click on the photo to go to our Flickr page): And of course a video: Enjoy, Hans
 -

[WIP] Lexus LC500
StudRobotics posted a topic in LEGO Technic, Mindstorms, Model Team and Scale Modeling
Here is a quick summary of a previous post. Right now I'm planning on a new project and I could use some help. It's a 1:8 scale model of Lexus' LC coupe powered by Lego Mindstorms EV3. Currently, I have the rear axle built off the instructions from the Porsche 911 GT3 RS set. I also made the engine for the LC500 on Lego Digital Designer and I am wondering if it is good enough to buy the pieces for it on BrickLink. I also want to add the following features: Four or six-speed paddle-shift transmission Retractable spoiler Detailed interior Fake V8 engine (but I would like to achieve moving pistons) Full independent suspension I would welcome some helpful comments about the V8 engine, axles, and the gearbox I planned to use before I order pieces on BL. Thank you. -

Mindstorms EV3 questions
david4662 posted a topic in LEGO Technic, Mindstorms, Model Team and Scale Modeling
Hello, I have a couple of questions regarding Lego Mindstorms EV3 1) Is it possible to program the EV3 brick using C++? Is it a viable option when programming? 2) Is there some software that could help me programme an EV3 robot with NXT sensors? I have not been able to find this option in Labview so far? Can you recommend me an alternative? I’ll be highly grateful for any answers. -

Lego GBC Three Forks Module
sawyer klegr posted a topic in LEGO Technic, Mindstorms, Model Team and Scale Modeling
This lego great ball contraption module uses a three sided wheel with "forks" to lift the marbles to the next module. The module is surprisingly reliable but it can take some time to get it running well. The stepper used to load the main mechanism works fairly well but it could still use some work, as you can see at 0:50 in the video it does not always work perfectly. The instructions, LDD file and part list are here. I used 1x3 technic half beams instead of the correct 1x5 ones in the instructions becuase LDD does not have them. The differential gear is not essential, it is only to make it easier to set the timming of the loading mechanism. -
Lego GBC Tipping Ramp Miniloop
sawyer klegr posted a topic in LEGO Technic, Mindstorms, Model Team and Scale Modeling
This lego GBC miniloop uses three technic lift arms to push the marbles up a ramp, then they fall onto another ramp. When a second marble falls onto that ramp it tips them down another set of ramps and back down to the start again. It is quite reliable if you place all the 1x1 "cheese" slopes straight but it can get stuck if they are not straight. (using 2x2 cheese slopes would fix this problem but I did not have enough in dark grey) The instructions are here. I also have a LDD file for it but I can not find any place to upload the file as it is not a standard file type, any suggestions? -
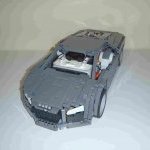
[WIP] Lexus LC500 EV3 1:8
StudRobotics posted a topic in LEGO Technic, Mindstorms, Model Team and Scale Modeling
This is my first WIP post on EuroBricks where I will show my progress on my newest build, an EV3-powered 1:8 replica of Lexus' newest flagship coupe, the LC500. The car will most likely be a combination of both the standard and the V6 hybrid LC, but it will have a V8. The body will also be orange. Here's a photo I found of an LC that looks a lot like the one I am shooting for. Features I'm planning to add: Four or six-speed paddle-shift transmission Retractable spoiler Detailed interior Fake V8 engine (but I would like to achieve moving pistons) Full independent suspension All I built so far was the rear axle for the LC. It's exactly like the one in the Porsche 911 GT3 RS set but more reinforced. I also made the V8 engine using Lego Digital Designer. I plan to build the paddle-shifting mechanism used in Didumos' Ultimately Playable Porsche 911 GT3 RS (the one with the tilted wheel) and pair it up with a gearbox. I currently am having trouble whether to motorize his gearbox with the EV3 motors or to pick a different one with less gears and friction. I also am having a little bit of trouble finding the right front axle, though I like the one that Didumos put his Porsche because of the fact that is has two shocks for each wheel. However, I find it very difficult to fit the V8 engine in the middle since the axle is made for a rear-engine car. Here's a poorly drawn render I made of what I'm trying to achieve with the front axle. And here's the chassis in the real LC and the measurements for the LC Lego model. Overall, I'm excited about the build. I would welcome some helpful comments about the V8 engine, axles, and the gearbox I planned to use before I order pieces on BL. Once I start working on the body and aesthetics, I would appreciate some input with that as well. I can also give you the download for the .lxf file of the engine if you'd like to check it out. I look forward to replying to your comments and sharing my progress. Thank you. -
I'm Yves from Montreal city, Quebec province in Canada. While I don't consider myself a true AFOL as I don't build big mocs, I still love legos and I love to find out the unlimited creative talent of others. I'm not into castle, themes etc. I'm more into buildings, vehicles, technics (I have many technic sets... not the recent ones). I've been working in the industrial Automation fields (PLC = Programmable Logic Controller) for 30 years and I also own few mindstorms sets :) But I did not really "played" much with them yet. I've been off of the scene for about 10 years but recently, I stumbled on my old Lego Interface B (9751 - 70909) and had an Idea. 10 years ago or so, I did some VB.Net project to control this old baby. Was OK, certainly better than nothing but still lacking of some friendly programming language like we have in Automation. Then I had an idea to revive the Interface B. I'm going to share in the proper section if I can find it :) Here's my old brickshelf gallery: http://www.brickshelf.com/cgi-bin/gallery.cgi?m=YvesLev
-
Beginner Car Chassis - Lego Mindstorms EV3
StudRobotics posted a topic in LEGO Technic, Mindstorms, Model Team and Scale Modeling
This is my simple Lego car chassis for Mindstorms and Technic beginners. Features Rack-and-pinion steering Full independent suspension 1:3 gear ratio driven to rear differential I built this chassis as both an experimental project but also an educational one to not just me but people starting to make their own cars with Mindstorms and Technic. If you're looking for a chassis design that may work for the build you're creating (a sports car, sedan, or small truck) then I hope this helps you and I would look forward to seeing the finished result. -
ASSAULT3R: An EV3 Assault Vehicle
StudRobotics posted a topic in LEGO Technic, Mindstorms, Model Team and Scale Modeling
This is ASSAULT3R, a Lego Mindstorms EV3 Assault Vehicle. After getting a second Lego EV3 set, I knew that I had to build something awesome. Features RWD and Steering Ultrasonic Sensor Infrared Sensor Two Color Sensors Dual Ball Shooters Gullwing Doors Detailed Interior and Exterior The ASSAULT3R's front sports red lights that will strike fear in enemies and their machines. Its dual ball shooters will shoot a total of six Lego balls, three for each side, high or low. That's twice the weaponry used by EV3RSTORM. The gullwing doors allow easy access for operators and it makes the ASSAULT3R look futuristic yet sinister. I had a lot of fun building this, and I'm very happy with the result. And of course, here are some photos as always. -

Looking for instructions. Master Grabber Arm from Lego website.
Juxtapoisson posted a topic in LEGO Technic, Mindstorms, Model Team and Scale Modeling
I recently pulled out LEGO Robotics Invention System Set 9719 from the basement. I believe this is the first mindstorms set. It has a robot claw arm pictured on the box. https://img.brickowl.com/files/image_cache/larger/lego-robotics-invention-system-set-9719-packaging-25.jpg I believe it is like this: http://www.mastincrosbie.com/mark/lego/images/grabberarm1.jpg I received the set used from a friend when it was only a few years old, and haven't really touched it. The instructions are complete, but the instructions for the robot claw arm pictured were never part of the set. As far as I can tell it was an optional DL from the lego website. As this was about 20 years ago, you can guess that those instructions are no longer on the website. In fact, I have only roughly pieced together conclusion that they were ever on the website, I may well be wrong. I know this doesn't compare to modern Mindstorm options. But I really have my heart set on building this claw arm. Does anyone have any leads on where these directions might be available? It's old enough that it is not in the usual places that I know of that record instructions or alt. builds. Please and Thankyou. Else, I am sorry, I am not strictly certain this belongs in this forum (maybe in the "looking for" forum), but I thought the mindstorm nature of this search might put it here instead of general lego places. -

[WIP] B4TTL3ST0RM - A Two-Player Battle Game!
M1dn1ghtN1nj4 posted a topic in LEGO Technic, Mindstorms, Model Team and Scale Modeling
This is my first fighting game for the EV3. Going to completely remake the one I started a couple years ago. New programming, movements, sounds, build, etc. I will update this thread as often as I can, although subscribing to my new YouTube channel would be much easier. :D Support me on Patreon! https://www.patreon.com/M1dn1ghtN1nj4 New channel, LegoRoboGo: https://www.youtube.com/channel/UCfj_fY7gc3rqKueez_H76vQ New videos will be posted above the old ones, so you don't have to scroll down for ages looking for the most recent video. Version 1 Final: Update 2. Making progress Starting out: Original version, which has since been recreated in the videos above: -
Hey everybody, I'm Noah. I've been a Lego builder pretty much my whole life, up until a couple years ago, when unfortunately, due to a financial crisis, I was forced to sell a lot of my stuff, including my EV3 Home kit. I just purchased a new kit, and it will be arriving next week. I wanted to get a new YouTube channel going, where I could build to my hearts content, and share my projects with everybody. That channel is called RoboGo. I have quite a few projects already lined up, and partially build in LDD, I just need the physical kit to make it a reality. You can find that new channel at the link below: https://www.youtube.com/channel/UCfj_fY7gc3rqKueez_H76vQ I also have another, slightly unrelated YouTube channel, where I have been growing my subscriber count pretty quickly. Not directly Lego related, but still worth a look if you're curious what my previous work has been about. Link below: https://www.youtube.com/m1dn1ghtn1nj4 Hope to see you guys around. I'm pretty good at replying to as many messages as I can, so if you have any questions or comments, hit me up!
-

Which suspension type should I use ?
Storext posted a topic in LEGO Technic, Mindstorms, Model Team and Scale Modeling
(sorry for my bad english) I'm thinking which suspension type should I use for my race car. I'm doing it outta LEGO Mindstorms (NXT/EV3). It's suposed to be RWD (with differencial) car for racing on flat surface. But on the the track the is one jump - it has 15 cm (or 5.9 inch). And I need suspension that is going to be light, kinda robust (it has to survive fall from 15 cm (5.9 inch) and also simple. I was using multilink suspension in the back and something like McPherson in the front, but it didn't worked as i wanted. So I'm thinking about using still multilink in the back, but double wishbone suspension in the front. (I'm using soft springs because car weights 850 g (or 1.87 lbs)). What do you thing is it allright or should I change it, or are there some bad sites of this two types of suspension ? -
 Dear All, LEGO lasts forever – assuming “forever” is exceeding 6 decades – which surely will happen (or has happened already?). I still have bricks from 1965 (my first LEGO set was #323 – a push along steam train running on rubber tires …) – that still have very good clutch, colors only very little faded – and seamlessly fit into 2017 sets. Almost as long as I live, LEGO has been part of my life. True, there were dark ages from the late 1970’s to 1996 – but then it instantly came back – everything: The excitement about a new model, just another LEGO box, new bricks, colors … and it never disappeared since then, in contrast. 1998 was the ultimate rush back into the LEGO world: The Mindstorms RIS system – the RCX (at that time without the “1.0” extension) – it blew my mind. And since then a somewhat larger collection of all themes has assembled over the past 20 years. Building over multiple themes is my brick-philosophy. During my dark ages computer technology became my favorite hobby. The “IBM PC” was lightyears out of reach but other miracle machines came up: The C64, the Sinclair ZX81 – and that one was within reach of my limited budget! 1 kByte of memory and a 16 kByte dynamic RAM extension I built myself. “Tri state TTL bidirectional bus drivers”, the 74LS243 – and no internet, that remained to be invented. And it went on – the ZX Spectrum with 16 kByte of on-board memory got a 64 kByte memory “upgrade” – switchable in two banks. It was fun. Today, TTL chips are fading out and 64 kByte would result in the worst digital “photo” ever … I am not whining – so many wonderful new things have emerged! What really shocked me though was when TLG did not even think about making a 64 bit driver for the “perfect” Mindstorms USB IR/VLL tower. That beautiful communication hub for all RCX1.0, 1.5, 2.0, Scout, Spybotics, MicroScout, CodePilot bricks one is truly dead since 64 bit operating systems have taken over. At least this is what I have learned from the internet after years of searching. The next shock came around 2002, when .NET came up and Microsoft said “no more VB6 development at all”. VB.NET was so different from what I knew. In the following years I stuck to VB6 … my fault, sure. But I am moving slowly as time for LEGO is rather limited. XP vanished, 32 bit OS came out of fashion – and all that cool stuff – the Mindstorms software, the NXT software, NQC for RCX, RobotC for RCX … and all my VB6 programs – almost “gone”. Well, I kept of course my Dell Latitude E6500 laptop running WinXP SP3 with all that stuff installed and I still have it! Carefully backed-up everything and there it is, slowly aging. I hardly like to play with that thing – I don’t want that it gives up, which will eventually happen of course. Yes I know: “Install XP within a virtual machine” – but that did not work to the extent I would like to use a “LEGO programming and playing workspace”. The one thing that changed everything were internet rumors about the old Mindstorms RS232 tower working well with NQC/BricxCC on a 64 bit Win7 machine. So for the past couple of days between Christmas and New Year’s I was browsing the net, installing this and that, copying stuff from my old XP machine … and: BINGO. It all works! Everything works on my rather new DELL Precision 7510 with Win10 Professional as OS. All the old-back-from-the-late-1990’s stuff! OK, I know, not everybody will be as excited as I am. But I believe LEGO lasts forever – and now all the software I love so much, as well as all my old-fashioned programmable bricks (there are currently 9 RCX1.0, 6 Scouts, 10 MicroScouts, and 1 NXT PBricks doing work on my train layout) are directly accessible from this laptop, and they are programmed/operated using NQC/BricxCC, NXC, NXT-G, RobotC, the Mindstorms SDK 2.5, and most importantly VB6 SP6 programs – all natively running on a Win10 64 bit platform. A dream came true. And for all old or old-fashioned Mindstorms PBrick heads, for all who never managed to get their head around .NET stuff, for all who still believe that RCX’ and Scouts are miracle thing: Here is how I got it to work: Assemble some software from the internet: BricxCC (free, latest version from 2011) The Mindstorms Software Developers Kit (SDK) 2.5 (free on Philo’s homepage) RobotC for RCX 2.03 (which is free as well). Don’t download the 32 bit tower driver. It won’t work. The NXT 64 bit driver from TLG VB6 SP6 from Microsoft VB6 cumulative update for SP6 from Microsoft Get out the original CDs for: VB6 (SP5 or higher) The NXT-G 2.0 software suite – if that is not at hand, TLG’s Mindstorms website has it Assemble some required hardware The Mindstorms RS232 tower. They came in 1998 with the original RIS system – and they are widely available at BrickLink for about $5. Don’t forget to put a fresh 9V battery into the battery compartment on the back. Slide the range knob on the front to the left (short range). An USB2RS232 converter – I tried a (randomly picked) LogiLink converter, which works just fine. A PBrick of type RCX, RCX1.5, RCX2.0, Scout, or Spybotics. The next steps are for proper tower access: Plugin the USB2RS232 converter into the computer and let it find and install the driver (either shipped with the converter or on the internet). Open device manager (Windows key + X, select “Device Manager”), expand the “Ports (COM and LPT)” section, find the “USB Serial Port (COM X)” entry, double click it, choose “Port settings” then “Advanced” and make sure the COM port for this device is in the range between 1 and 8. Otherwise BricxCC and other old programs will not find the USB/RS232 converter = IR tower! It cost me some time to figure that out. When all COM ports in this range are taken by other devices, move one of them to the next free COM port far up and then manually (modern hard/software has no issue using COM ports in the range exceeding COM 8!) assign the converter to the now free COM port in the 1 – 8 range. Plugin the IR tower cable into the USB2RS232 converter. Next is getting access to RCX, RCX2, Scout, and Spybotics PBricks via BricxCC – this will also let you download the latest RCX firmware is case it is “gone”: Install BricxCC (full install) – this comes with NQC and many more things, e.g., the RCX firmware downloader. Put a PBrick from the list above into the IR tower range, a couple of inches away. Start-up BricxCC – it will try to connect to an RCX PBrick and most probably fail (“Cannot find brick. Switch it on or move it closer and press OK”). Press “Cancel”. Select “Tools” in the menu, go to “Find brick” and in the window that opens, select the correct COM port manually. Also select the correct PBrick. An RCX, RCX1.5, or RCX2 without firmware will correctly reply to the “RCX-type” in this window. The LED in the tower should come on and the program should connect to the PBrick, which is shown by many of the menu icons now being enabled. Download firmware to the PBrick (RCX, RCX1.5, RCX2) and that is done. Next is RobotC – this very straight forward: Install the software and run it. Select menu entry “Robot” and then “Platform type”. This should be “LEGO Mindstorms RCX”. Select menu entry “View”, then “Preferences”, then “RCX communications port” and select the COM port you have the USB to serial converter on. Download the required RobotC RCX firmware – and done. Next ist NXT-G – again very straight forward: Install the NXT-G software. Install the 64 bit NXT driver – done. Finally VB 6 – this is a little more elaborate: Install the Mindstorms SDK 2.5 – this will register one essential DLL correctly (vpbcom.dll). I don’t know how many times I tried that manually – I am too old I guess. Don’t install any USB tower software – it won’t work. You can test a PBrick connection using the “ScriptEd” program – upon starting it, the IR Tower LED should come on. This program also lets you download firmware or monitor the IR tower. Very handy for checking things. Install VB 6 from the CD. Now the trick here is that a full default install won’t work. Follow the instructions of this youtube video. There are many others, but this worked for me. I did the install directly from the “VB6 Professional CD” I still had (the video assumes you have an enterprise version but that makes no difference). The single most important point is to uncheck either the entire “Data Access” check box during the preparation steps for the installation or select “Data Access”, click “Change Options” and uncheck the “ADO, RDS, OLE DB Data providers” entry. The let the install program do what it has to do and be patient at the end, when it attempts to register all sorts of things. That may take several minutes, at least on my machine. I had a cup of coffee, did some other things and when I came back, it successfully finished the install. Install VB6 SP6 in case it is not already on the CD. Install the cumulative patch for VB6 SP6 in case it is not already on the CD. Right click on the new VB6 icon in the start menu, go to “Properties” and select “Run in XP SP3 compatibility mode”. Run VB6. Open or start a new project, then select “Project”, “References” and then tick the “LEGO VPBrick 2.1 Type Library” – and access to the above PBricks is established! The Mindstorms SDK has a PDF explaining the calls to the routines you need for that (e.g. ”FindPort” or “OpenPort”. This is it. At least on my computer. There may some other things to do on other machines, but it really appears to be doable. Just in case you want to program with VB6 “forever” or more importantly run all of TLG’s miracle PBricks from the latest Microsoft OS … as I do. And Yes I know, neither Microsoft nor any decent programmer will endorse this, in contrast. But then: It wasn’t my fault that TLG never published a 64bit driver for the Mindstorms USB tower. Nor did Microsoft ask me whether or not it would be OK to abandon VB6. All the best Thorsten
 -
For those who have not following my topics, a small introduction about Sioux.NET on Track, a large full automated Lego candy factory, trains, lots of Mindstorms EV3 and all controlled by a Microsoft C# application. Every year, we show our layout at Lego World in Utrecht, the Netherlands. You can watch videos on our Youtube channel (www.youtube.com/user/siouxnetontrack) with the progress of all the updates and changes we make and you can also watch a video of the layout at Lego World. The video from 2017 and 2016: We always have an interface to the visitor, the so called 'PUI' which is an abbreviation for Physical User Interface. The visitor can choose the color of the candy (s)he wants to be delivered. The colors red, green, blue and yellow can be chosen. Okay, okay, its is more purple than blue. But in our layout, that is the blue candy ;-) Through the years, we have had several types of PUI's: In 2016 and 2017 we used a so called Wheel of Fortune as the color selector: The visitor had to pull the lever, making the wheel rotate. For an adult, this works fine. But lots of our visitors are little children, who have never seen a wheel of fortune. So some children pushed the lever, some pulled it but now hard enough and some children thought they had to pull the lever and push it down until it would touch the floor. Sometimes, I really thought the Lego would crack but fortunately it survived the hundreds of enthousiastic kids. For Lego World 2018, we've made an update of the Wheel of Fortune. Instead of a lever, we decided to use a motor for the rotation. But I found out that this was easier said than done. The main problem is the weight of the wheel, it needs quite some torque to start rotating. Plus I needed a free-wheel mechanism: when the motor turns, the wheel should turn. But when the motor stops, the wheel should keep rotating until it is stopped by the pointer. I first used the free-wheel mechanism from the lever: However, he torque was too much for this free-wheel mechanism. So, I started looking on the internet for a more powerful version. On the Youtube page of William Sargeant, I found a version that looked more firm. I made two of these and in combination with two EV3 L motors it is powerful enough to spin the wheel. Apart from that, I mixed the colors in the wheel. The result: And of course a video: I need to design two buttons that will be controlled by the visitor. A green button to start rotating the wheel and a red button that stops the wheel. I'll keep you posted. Thanks for reading and watching. Enjoy, Hans
-
Remix: Saphiro the Blue Dragon
Antonvh posted a topic in LEGO Technic, Mindstorms, Model Team and Scale Modeling
Hi All, Here's a dragon MOC I made a few months ago. You can build it with 42066 (Race Jet) and 31313 (Mindstorms). It can walk forward, backwards and make turns. To my best knowledge, not many LEGO quadrupeds have this range of movement. Enjoy! I also did a making-of video. You might be interested in all my bloopers: I didn't make building instructions, but there's an LXF file here. I'm not a really good builder - I'm more of a programmer - so I would be interested in your suggestions and improvements: https://drive.google.com/open?id=0B3p... Programming the dragon is not really easy, because you need to sync and resync the legs. Here's program file to get you started: https://drive.google.com/file/d/0B3phDY_OwOU9VEdMLUQzNUFBLW8/view


