Search the Community
Showing results for tags 'Lego Technic'.
Found 178 results
-
[INSTRUCTIONS] Lincolns and Mencks and Buggys, oh my.
Doc_Brown posted a topic in LEGO Technic, Mindstorms, Model Team and Scale Modeling
Sorry, couldn't resist with that title!!! :laugh: Just a quick note to let you guys know that I have a lot of instructions coming your way, some paid and some free! As promised, the Menck Cable Bucket Excavator is now available to build. And I'm really excited to see if you guys like it, and also some smart people to improve the controls/relationship between the lower and upper arm. Any questions please ask here, as I don't check rebrickable comments that much. Cheers. Yet to be complete is the Rocket buggy, and the GTHO. Both of which it is pretty much publication to do. Menck Instructions C Model, Hybrid Rocket Off-Road buggy Instructions Lincoln Instructions Rebrickable GTHO Instructions (Instructions In progress) -
Hello Everyone! Been a while since I posted a 'complete' MOC (Tries to keep a straight face) I present to you McLeach's Truck! This has been a long time in the making and a very very frustrating build. Originally this was going to be my entry into the TC6, but just ran out of time due to too many problems. This truck is from the movie The Rescuers DownUnder, A great movie if you haven't seen it. The first movie to feature cutting edge 3d animation of the time and still looks not too bad today. The movie bombed at the box office due to being released along side Home Alone.... This MOC features drive using 2x L Motors, and steering using a servo. The crane with in the movie fires net rockets and can be used to lift stuff with a hook, is powered by 2 M Motors. As I said this was a terrible build and tho looks good, doesn't function too well. Copying the movie truck its clear the animators didn't really concentrate of actual mechanics. haha. The truck in the movie gives new definition to the term "floating axle" Never the less I did my best to copy it. More pics here. https://flic.kr/s/aHskbQkgQh
-

Sheepo's Mustang Fast Version
nerdsforprez posted a topic in LEGO Technic, Mindstorms, Model Team and Scale Modeling
Okay... perhaps not as fast as I wanted it to be ...... but quite a bit faster than the original. Here is Sheepo's Mustang with actual RC racing parts. Traxxas Titan motor to be exact. I had to create a new bracket, drive train, etc. to accommodate for the new rpms, power, etc. To be honest, the drivetrain could have actually used more power, it is the heavy back end that limits performance on this model. I will not post all the details here... that is too exhaustive. But I had done so elsewhere. http://mocpages.com/moc.php/412797 Check it out it you can.... hopefully it is an interesting read. I love feedback, especially constructive feedback, but if you have something scathing I totally don't mind, but please read the whole post on my mocpages before posting something too critical. I love it when people post stuff but haven't read or seen all the videos.... sometimes your question/concern/opinion will be addressed if you read/watch all that has been posted. Also, the post has some things that I think may be of interest to the Technic community... such as how to address the problem of short supply for red flex cables..... and perhaps some additional information as to why Sheepo is now building 1/10 scale instead of 1/8 scale. Dang.... I can't get the videos to post. It is so hit and miss with these things. I use the exact same procedure everytime.....Is there anything I am doing wrong? Grrr.... I guess that is a different post. If someone knows.... please feel free to fix the issue. -
Mobile Geological Research Laboratory "Terrascout" is a mobile complex for cross-country eight-wheel all-wheel drive chassis to perform the tasks of geological exploration in remote places. The crew - 4 people - a driver, a senior geologist, drilling rig operator, technician-geologist. Video: Specifications: 2 large battery box 1 small battery box 2 Infrared receiver 2 Infrared receiver V2 4 L motors to the drive wheels 1 Servo motor on the steering 1 M motor to the drive motor winch 1 M motor to the drive lifting / lowering the boom 1 M motor to the drive outriggers 1 M motor to the drive borax 1 M motor to the drive mechanism for lifting / lowering of the drill
-
Hi, I posted this creation on the technic forum, but I suppose it might interest people on this forum as well. Here is the original topic in the technic forum And here is a picture of the MOC I'm talking about: @Moderators: I'm not sure whether or not I'm allowed to crosspost (couldn't find it in the guidelines), but feel free to close this topic if crossposting is not allowed
-

Two tractors with PF ...
super-jaschka posted a topic in LEGO Technic, Mindstorms, Model Team and Scale Modeling
Hi guys! I present to you two of my tractor. Wheel tractor ... It has long been lying in LDD, decided to collect. One problem at the start stands on its hind legs ... Technical data: -1 XL to the drive -1 M on the steering Weight model without a trailer - 470 grams. Gross weight with trailer 720. 560 parts with a trailer, without a trailer 502!? Crawler Tractor ... Was a version with "subtractor", 1 XL for movement and 1 M on the steering. Of course it was more convenient to manage, but always jumped gear. Had to put a second M, XL cast on trash... Well, the big plus without "subtractor" place for battery box. Technical data: 2 x M. Little BB under the hood. Weight with BB - 635 grams. 639 parts!? A few more photos of "brothers" ... My assistant... Tired to plow, go make a video ... -

[WIP] Lego Technic House moving truck and trailer
Kiwi_Builder posted a topic in LEGO Technic, Mindstorms, Model Team and Scale Modeling
I am currently most of the way through my latest project to build a large Technic house moving truck and trailer. I had also been wanting to build a Scania T143m, I have never actually seen one in real life but their 'lack of curves' without better terms has always attracted me to them. I have currently got the truck built with the trailer a few hours' work away. The truck is RC with 3 functions; XL motor for drive, servo motor for steering and 2 L motors for a sliding turntable. There is also a flashing light mechanism that automatically turns on when the battery box is started. The XL motor is geared down to increase torque and decrease speed, so far the only main problem I have encountered is the drivetrains gearing is prone to slipping from the resistance put up when pulling the trailer. I have braced the gearing from the top, bottom and one side, so if anyone could give me help on how to stop that happening would be much appreciated. The truck is 50cm X 18.5cm, has 58 light pieces and weighs 2 kilograms. While I have been MOCing for many years now this is my first post on EB. I have put some photos up on Bricksafe: http://bricksafe.com/pages/Kiwi_Builder/Technic/house%20moving%20truck I will hopefully have a video up in the next few days. All feedback is appreciated, Adam (Kiwi_Builder). -
Hello, I'm looking for a good Lego tailgate for a truck I designed. Does someone have a good idea?
-
[WIP] 2016 Ford GT
Doc_Brown posted a topic in LEGO Technic, Mindstorms, Model Team and Scale Modeling
Finally I get some time to build! WOOT! Well I've been wondering what to make for my next project, as I really wanted to make a modern curvy supercar for once! And just when I was about to give up look what pops up! What can I say? I love the looks, and I wasn't really a fan of the old and really old GT, but this one I like! I'm also looking forward to building in a new style for me consisting of Black and Blue rigid and pneumatic hoses. The idea is for it to be ultra light and cheap to build using 8070 rims and tires and possible those nice Ferrari rims. I'm not sold on the back of the car tho, kinda looks like a skull with firey eyes! LOL Looks nice in silver! http://www.motorauth...icago-auto-show Here is my WIP The bodywork will be completely pneumatic hose, and I'm aiming for under 1kg final weight. The hose on the Left is 3rd party, slightly more stiff and off blue tho. I must express my disapointment that my previous thread was locked after only 4 days with no WIP, but anyway we shall move on. And no discussing what makes a supercar or not! Make another thread please. -
[HELP] Compact Subtractor
Doc_Brown posted a topic in LEGO Technic, Mindstorms, Model Team and Scale Modeling
Hey everyone. I built a compact subtractor as I thought I would give it a go. Unfortunately I doesn't work very well, doing 1-3 turns before the current protection kicks in and stops. Any ideas why? Is it cos I used the L motor and not another XL? I wanted it to turn on the spot so I thought a faster motor would work, and it does, it just cuts out. This is taken with the BB and IR not in place. Cheers. -
[TC6] Fire truck
super-jaschka posted a topic in LEGO Technic, Mindstorms, Model Team and Scale Modeling
Hi guys! I came back, thank you all for your support. Probably helped fists from the Russian Far East. And so. I watched a bit of the models that were submitted for the contest (TC 6). A lot of good work, but I have not met one fire truck. And it was my choice fell on this model. -1 L for driving and outriggers (manual switching function) -1 S for steering -1 M for turntable -1 M for boom lift -1 PF lights -2 IR receivers Look what I got ... Finally a short video ... -
Mobile crane in retro style
super-jaschka posted a topic in LEGO Technic, Mindstorms, Model Team and Scale Modeling
Hi, guys! This is Alex - Yakov's son. My father was unwell a little. The heart infarction was alarmed at work, as a result. He asked me to lay out this model. I will tell in confidence, this crane very much is pleasant to me. Well, here you look... -Motor. 4-cylinder, in-line, mounted longitudinally. Due to the complex design of the windscreen and bonnet of rise small, it was decided to make transparent cylinders. Now when the vehicle can observe the work of the engine. - Steering. - Rear axle with differential. Torque is transmitted to the motor through a complex system of gears, due to the fact that the axis of the differential gear and the rack are aligned. -Side Support connected in pairs on each side and down-climb worm mechanism is used to drive the "curve starter." - Differential switch. It is possible to scroll the motor with the help "a curve starter". - The opening doors. - Lifting mechanism of an arrow. A little noisy mechanism, but it allows to fix an arrow in any situation. - The cargo winch is supplied with the same mechanism. - Maximum height. -I forgot to tell. The father with this model won first place at competition "LEGO Technic Russia". Competition was organized and carried out by Egor (rm8). yours sincerely, Alex. -
Well guys, I've been lurking here for a few months and finally decided to join the party. After being inspired by many creations here and elsewhere, I decided to attempt to recreate one of my favorite vehicles from the Mass Effect video game series, the M35 Mako. I've spent about two months building and refining this based on the part inventory I currently have. It has been quite a joy driving around for several weeks over the holidays. Alas, in order to build new things I must decontruct this. My best option was to attempt to learn LDD and "save" the model for next time. This was my first time using the program and mostly it worked out, with only a few alignment issues. I am including an LDD file for now. Please let me know what you think. I hope to do more builds in the future and share them now that I know how :) M35 Mako - Lxf file Here are a few specs: Rear wheels driven by 4 M motors Front wheels driven by 1 L motor Steering via Servo Motor Manually operated turret with full 360 rotation and vertical lift via LA 2 Battery packs + 2 IR receivers fully independent suspension including dual shock system in front A few notes on LDD file: Battery packs and IRs will sit lower in physical model Steering linkage should be raised by 2 studs to fit perfectly (LDD would not allow me to place correctly) Small hard yellow shocks should be fitted between the two black pins on the front suspension, location is just between the two pairs of 5L half width beams. Tilted bottom front panels should connect to pins just above. Front studded beams can be moved one stud closer to body (replace 3L connection with 2L supplied below) LDD would not permit the proper parts Inner arm of each large shock should be connected to the axle located one beam higher than represented. (should be obvious) Please leave feedback! Enjoy!
-
Lego Technic Shock Absorber Spring Rate Guide
Doc_Brown posted a topic in LEGO Technic, Mindstorms, Model Team and Scale Modeling
Hey Everyone! I had an idea to create a guide showing various shock absorbers being decompressed to help anyone trying to guess what springs to use on their Mocs if they know roughly what weight it will be. I tired to press down on each spring at around 90% without bottoming out, to give an idea of the maximum weight each one can take. All springs used are in very good condition, with the exception of the Pneumatic one which grinned a bit, but being almost 20 years old we'll let it off! Anyways I hope this is useful, let me know if you have any suggestions or can give info on the last spring which I don't have. Cheers. -
[MOC] Deadly Nightshade Video + Instructions
Doc_Brown posted a topic in LEGO Technic, Mindstorms, Model Team and Scale Modeling
Hey Everyone! I thought I would make a new thread as I'm very excited to offer instructions at MOCplans very very soon! Also after a month of trying due to bad weather and stuff, finally have finished the video. Extremely happy with how it turned out, so without any further delay I present the Deadly Nightshade Off-Road Buggy! Extra pics here https://www.flickr.c...57647263278138/ Instructions here http://mocplans.com/designer/deadly-nightshade.html Thanks for watching! -

Aircraft Nose Landing Gear-new design
Andy G posted a topic in LEGO Technic, Mindstorms, Model Team and Scale Modeling
Hi folks, Here are a few videos showing a new nose gear design for a four engine lego technic aircraft I'm working on. -
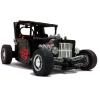
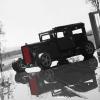
[MOC] Volksrod - Red Baron
sm 01 posted a topic in LEGO Technic, Mindstorms, Model Team and Scale Modeling
Hello everyone, This is another creation that I made before joining Eurobricks, which I'd really like to share with you: Plan was to make relatively simple, light and fast car (it was before I bought RC motor). It is 37 studs long, 19 studs wide and 12 studs high and weighs 589 g. Two L motors are coupled and geared 5:1. Power is transmitted, without differential (my attempt to increase drifting capabilities) to the rear wheels only. Servo motor is for steering and everything is powerd by 8878 battery (easy accessible for charging). Working 4 cylinder boxer engine and serpentine belt part which drives fake fan. Doors can be opened. It also has: - working steering wheel (directly connected to second output of servo motor). - functional glove box and some other details in the interior. - fake fuel tank at the front, with filler cap that can be opened. - custom stickers, chromed details and a smile on the face of the person who drives it More photos can be found at: MOCpages - http://www.mocpages.com/moc.php/384440 Flickr - https://www.flickr.c...57642862140243/ I hope you'll like it… -
Hello everyone, I finished this 8070 modification two months ago (before I joined Eurobricks) and I would really like to hear your thoughts about it. It has adjustable air suspension and motorized/remotely controlled driving and steering... You may have already seen it in a drag race video with my hot rod Lucky 13. Original 6.5 L hard springs have been changed with 6.5 L soft spring + small pneumatic cylinder, for all wheels. It has large pneumatic pump at the back and pneumatic switch at the cabin for controlling the riding height. It also has working steering wheel and remotely controlled original functions (doors, rear spoiler and hood - choice of a function is done manually with gearbox lever, like in the original). It has additional two L motors for driving and M motor for steering, two IR receivers (one of them V2). Original battery box has been replaced with smaller 8878 - hidden behind panels at the rear for more realistic appearance. More photos can be found at: MOCpages - http://www.mocpages.com/moc.php/391089 Flickr - https://www.flickr.c...57645381445513/ I know that 8070 is an old set and that there are mixed feelings about it but I hope you will like this version...
-
Hello all! I want to present my MOC - remote controlled (RC) Grader. Total construction time – about 4 months. Total length without rigs – about 80 cm. Weight – 5 kg. Total parts quantity – 5200. There are 12 independent RC functions: five mechanical: - All-Wheel Drive (3 x XL); - Two-stage steering (1 x L – forward wheels steering, 2 x M – articulated chassis); - Forward wheels tilt (1 x M); - Mouldboard rotation (1 x L); and seven pneumatic (5 x M – I used scheme with dependent and independent valves, as illustrated on picture below, so I exclude two additional motors): - Forward and rear PPTOs; - Mouldboard attack angle; - Horizontal mouldboard shift; - Diagonal mouldboard shift; - Left and right main mouldboard cylinders. The two-pump compressor is auxiliary function and it has independent RC too (1 x M). All of these functions are provided by 17 Power Function motors connected to seven IR Receivers and two AA-Battery Boxes (electric scheme of the model you can see on the picture below). Model composition: Total pneumatic hoses length – 14.8 m. Scheme of pneumatic connections: The model has opening doors with locking, realistic mirrors and lights, some versions of rigs – forward (additional blade with pneumatic control or additional weight for mouldboard pressure increasing) and rear (pneumatic controlled ripper). Opening bonnet makes possible a visual control of pneumatic valves working. Paralleling of the Power Function channels is realized by covering/uncovering some IR Receivers by using independent RC channel (mode switch). The mode switch consist of three M-motors, one of them is used for dependent pneumatic valves management. The model is very big, so I create special platform for its transportation. And a small video demonstration: Thank you for your attention!
-
Hi, today I want to present you a new MOC from me :
-

Rail Road Excavator Atlas
Tji-chan posted a topic in LEGO Technic, Mindstorms, Model Team and Scale Modeling
Hoi hoi Here the photo's of the Atlas rail-road excavator for narrow track rail. The model is based on the Atlas 220 WWR "Sterke Hufter" (Strong **hole) Normely it's working under the rail catenary and have no problem to lift 10 ton whit the boom completly set out to the frond. I don't now or there realy exists a narrow track model but this model is made for Lego rails. One thing that is not correct on the model is the pneumatic cilinders, The real model have underlying cylinders, On my model the are situated on top of the boom. All the boom functions are pneumatic, The rail wheels can go up and douwn by small air cylinders. It roles and turn manual, Made als some equipment for it like a rail stabilizer, weed control unit, a hook , excavator bugget small and midium, and a jip.. Hope you like it. ps hope my post is easier to read if not pleace say so ! Part 2 Loading a truck whit air The weed control unit in action The rail stabilizer in action More photo's you can find here. http://www.mijnalbum.nl/Album=IVIEUYC4 Muddy -
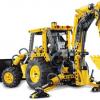
[REVIEW] 8862 - Backhoe Grader
ABslego posted a topic in LEGO Technic, Mindstorms, Model Team and Scale Modeling
Recently I had the opportunity to buy this nice oldie. It is the 1989 Technic flagship set, 25 years old, but still in great condition Many Technic fans will still remember this set from their childhood. I've never had it, it was too expensive :) So for me it's the first time building it. The box front and rear: Compared with the currently used boxes for the big sets, this is rather a small box. Despite it's age, it is still in very good state. The parts: This set comes with a total of 671 parts. Not a huge amount of pieces, but it does have a good variety. A lot of beams, plates, gears, axles and of course pneumatics. Also some special parts: I've never seen that big black brick before. It's really heavy and is used as a counterweight in front of this machine. Another not so common part is the threaded shaft. Builing: What immediately stands out is that instructions are more difficult than today. A lot more pieces are added in each single step. Building is going really fast forward, and it's much easier to forget something. You'll see in the pics below, how fast it goes. I have to say, I like that! The sets of these days I often find too easy. After 4 steps: Step 5: At step 10: Step 13: Step 15: Step 18: Step 20: a lot of pneumatic hoses Step 22: Step 24: Step 26: finished the back boom. Step 27: this is already the last step. The complete front bucket is build in this last step :) Finished: First let's compared it to it's newer brother, the Technic set 8455. As you can see the 8862 is a bit larger. Also the difference between studded and non-studded is clearly visible here, but both has it's charms. Also their functioning varies quite a bit. The newer 8455 is completely pneumatic, while the 8862 has only a pneumatic back bucket. The turning of the back bucket, the complete front bucket system and the outriggers are all operated mechanical. Some parts in this old set have already an improved version. For example the bevel gears. The old ones (left) just are not as good as the new ones are (right). Sometimes they just pop off the shaft, and they do not run as smoothly as the new version does. Conclusion Personally, I like the 8455 a little bit more, but this set is also highly recommended! Pros Lots of functions (8 in total) Great playability High nostalgia factor Big model Scale and looks are good Interesting B model Cons Front scope is a bit weak The bevel gears Which set you love the most? -
[WIP] White Motorized Excavator
fresko posted a topic in LEGO Technic, Mindstorms, Model Team and Scale Modeling
Hi all! I'll sumbit my alternate 42004 excavator soon as possible, once I got some time. It are busy days, and making the instructions is more difficult then I tought. Anyway, here is a WIP where that I have been developed for a long time, after my Red Mini excavator. I tought it could be motorized better, or rather remote controlled better at that scale. And we all know: Remote control at small scale = (m)LA instead of pneumatics. Building in 3 or 4 motorized valves isn't feasible in a 12 studs wide space. In the first place I just wanted to do some small changes to my Red Mini Excavator, and 'converse' it into a full motorized version. It turns out quickly the 'superstructure' of that excavator wasn't a good base. It has the same functions as the ultimate 8043, or as many other motorized excavators. -Driving (2 M-motors) -Boom raising and lowering (1 M-motor, 2 mLA) -2nd Section of the boom (1 M-motor, 1 mLA) -3th Section of the boom (1 M-motor, 1 mLA) -Turning (1 M-motor, with worm, gear ratio 1/46,6) As battery box I first tought about the rechargeable Battery Box, but it turned out it was to big. Instead of that one, I used the smaller 9V Battery Box (with the aluminium foil trick for powering the receivers). I hope it will last a little while and it won't run out fast. History: The first thing I did, from the 'conversion' of the prevoious excavator was changing the pneumatic cylinders to mLA's. In the first case I used a single mLA for the raising and lowering of the boom. Later I replaced it with 2 mLA's for a more realistic look. To motorize those functions I had to chose between M-motors or Mini motors . I was in doubt because I tought M-motors are a bit long (6 studs), while Mini motors are only 4 studs long. On the other hand Mini motors are 4 studs wide, while the M-motors are only 3 studs wide. I was afraid the excavator would be too long, because the behind the motors would I need to place the battery box and receivers, which toke about 8-9 studs. I made the decision to use M-motors, to simplyfy the design of the side bodywork. Because I had to place 3 receivers, 1 battery box and 3 motors in the superstructure, the most logical choise was to place the turning motor in the undercarriage. It seems the receivers and their cables sometimes block the turntable, which has 'dramatic consequenses': the undercarriage is pulled apart, trought the worm screw. What I still need to do: -The boom (color, firmness, 3th section) -The weight distribution of the superstructure (so it doesn't 'hang over') -A cabine (at the right scale - any suggestions?) -The turning system (especially the wormscrew) -Give the backside of the excavator a more realistic look (eventually with lights) And to end... http://www.youtube.com/watch?v=tsyRDvk1JaA If you have any suggestions, questions or comments, don't hesitate to say! Fresko (more images in my Brickshelf folder, when made public) -
The Reaper 4x4 (Outdoor test)
Doc_Brown posted a topic in LEGO Technic, Mindstorms, Model Team and Scale Modeling
Hi Everyone! Here's the outdoor test I "finally" recorded today after a long wait. Very happy with the results, performance was amazing especially on slippery rocks at 6.30am! Enjoy the action! ( Kookaburra sings during one run, and I pause for it, if you have never heard one before listen out for it) :D Based on Tim Cameron's Showtime -

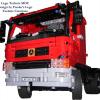
Lego Technic Mobile Crane II
legosamigos posted a topic in LEGO Technic, Mindstorms, Model Team and Scale Modeling
Hello Eurobricks members! Today I would like to show you my mobile crane II with a tower from 42009 set. My mobile crane is full remoted control. Specifications of mobile crane: Length: 63 cm Width:18 cm Height: 29 cm / after lifting boom 60 cm / after extension boom 81 cm Length of boom: 43 cm / after extension 67 cm Weight: 3,5 kg Power Functions: 5 x PF M motor 1 x PF XL motor 2 x PF L motor 4 x PF IR receiver 3 x PF IR remote control 2 x PF battery box Functions: Drive for 4 wheels – XL motor 2 front steering axles – M motor Outriggers – M motor Driver`s cab – M motor Rotation 360 degrees – M motor Lifting boom – L motor Extension boom – L motor Winch – M motor BS gallery Lego website [media] [/media]