Search the Community
Showing results for tags 'Gearbox'.
Found 167 results
-
Lego Technic RC 3 Speed Manual Gearbox
TechnicBrickPower posted a topic in LEGO Technic, Mindstorms, Model Team and Scale Modeling
Here I've created my first attempt at a RC 3 speed gearbox allows you to change gears up and down using a power functions remote control. The gear changing mechanism is implemented using two parallel axles each with gears arranged in such a way that shifting one of the axles to one of three possible positions meshes the gears with 3 different gearing ratios. The gearing ratios implemented are 3:5, 1:1 and 5:3. The gear shifting axle is controlled by a lever mechanism driven by the 4 state stepper from the bugatti chiron set. This mechanism in turn is driven by a medium power functions motor activated by the remote control. Hope you like it. -

[MOC] Rolls Royce Phantom (2018)
Appie posted a topic in LEGO Technic, Mindstorms, Model Team and Scale Modeling
I am still looking to tweak a few spots (the panel at the rear window is included in this), but mostly it is finished: 20190827_134133 by Appie NL, on Flickr 20190827_134604 by Appie NL, on Flickr 20190827_135244 by Appie NL, on Flickr 20190827_134945 by Appie NL, on Flickr I don't think I mentioned this before, but the "gas" and "break" pedal function as the forward/neutral/reverse for the gearbox. If I did the math right, then the reverse gear ratio is slightly above the ratio of the 2nd, perhaps not very realistic since afaik they are usually around the ratio of the 1st, I couldn't figure out a better ratio in the space I had left for this. 20190827_134741 by Appie NL, on Flickr 20190827_135042 by Appie NL, on Flickr The white levers with silver knobs control the windows and the black one on the dash controls the airconditioning. The lever below the steering wheel is for the lights. My aim was to have the positions for these controls as close to what they would be in a real car. Despite the roof being open, the front window levers are a little hard to reach for my big hands (especially with my left as you will see in the video below). 20190827_153707 by Appie NL, on Flickr 20190827_135520 by Appie NL, on Flickr My attempt to recreate the "star filled heaven" roof lining of the real Phantom. These are "glitter bricks". They only come in weird colours like dark pink until a set of Harry Potter brought these light blues. I considered adding PF lights to this for extra effect, but it didn't have the desired result in terms of lightning and I didn't want to use 3rd party stuff on this build. 20190827_134306 by Appie NL, on Flickr 20190827_134407 by Appie NL, on Flickr 20190827_135313 by Appie NL, on Flickr Behind the back of the trunk is the gearshifter from Attika and some wires. 20190827_140703 by Appie NL, on Flickr Perhaps looks a little bright in this picture, but there's only 2 PF leds per headlight on these. 20190827_140547 by Appie NL, on Flickr And the taillights, 1 PF led each. 20190827_140944 by Appie NL, on Flickr @Attika Here's your desired belly shot I don't have the new wire holders yet from Control+ sets and not sure of these can even hold 2-3 wires in 1, so I made something myself to hold/tunnel/guide the wires. At first I wanted to completely cover up the floor and "hide" the Technic like I mostly did on the rest of the car, but decided to keep it open. And some might notice that I updated the front suspension. When I nearly finished the build it needed an upgrade to 3 hard springs, same number as the rear, since the front suspension was pretty much dead in the old configuration. And a little video to showcase the windows and airconditioning Original opening post below this point: With all the great sportcars on this forum, I felt I had to try a different approach to the "1:8 Lego supercar". Choosing this car also gave me a good excuse to add different kind of functions usually not in these kind of cars. First of all I want to say thanks to a few people on this forum for information, techniques or mechanisms they provided: @Didumos69 and @jb70 for their work on the Chiron gearbox. This model uses their efficiently build Chiron gearbox, I only tweaked it slightly further to make it shorter. Also thanks Didumos and @Erik Leppen for their information on suspension, made it easier to look for how to fix stuff. @Attika for his compact servo based gearbox stepper which I used in this model. @Jeroen Ottens for all sorts of neat techniques and tricks in his DB11. The front mounting of the suspension is very similar to his to get the engine very low like in his DB11. I am sure I forgot a few people, my apologies. So here's the current progress: WIP3Frontside by Appie NL, on Flickr WIP3RearSide by Appie NL, on Flickr WIP3Side by Appie NL, on Flickr The current features are: - 8 speed gearbox - V12 fake engine - Suspension - Electric windows - "Airco" - Lights I think, despite the outer shell being about 70% system bricks and 30% technic, the base of the car is all Technic and that it should belong in this forum and not the scale forum. This is how the car looked in the early stages: WIPRollsPhantomFront2 by Appie NL, on Flickr But if Jim or Milan thinks it should still be in the other forum, I am sure he will move it. The reason for the mostly system outer shell is because I had a hard time making all the little curves with Technic (panels) and I felt those little curves made the difference to try and capture this car. Especially at the front, after that I tried to minimize Technic panel use because it would be a breach of style at that point. Overall I am happy how it turned out so far, some parts I don't like. The windscreen being the biggest offender with how square and flat it looks, but the A-pillars being part of the structural integrity of the model made it hard to come up with something else. Stuff left to do: - Dashboard and midconsole - Front seats - Roof - Mirrors - The bottom 2 studs of the model (under the doors, bottom of front grill and the second layer of the floor to hide wires and provide more rigidity to the model) -

[MOC] 90 degree stepper for servo motor
Leo12 posted a topic in LEGO Technic, Mindstorms, Model Team and Scale Modeling
This is a new stepper designed for use with the power functions servo motor. The output will spin 90 degrees every time the servo fully turns to the right or left and returns to center. The basic concept is that when the servo leaves it’s center position one of the ratchets on the differential housing disengages. As it continues to rotate the other ratchet stops the housing from moving, rotating the output. When it returns to center the engaged ratchet allows the housing to slip, so the output remains stationary. If you plan on building this yourself and it is not turning reliably check that the ratchets can rotate easily and the rubber band has enough tension. -

Tiger 4 x 4 x 4
Zerobricks posted a topic in LEGO Technic, Mindstorms, Model Team and Scale Modeling
After completion and playing with the Leopard for a few months, I noticed the model had a few shortcomings which I wanted to eliminate with this version. These include: Suspension oscilations at high torque High center of gravity Instability on rough terrain at high speeds Most of these issues were due to the usage of the torque tube suspension which is simply too heavy and unresponsive at high speeds. What I needed was to replace the live axle suspension with independent suspension while keeping the articulation needed for offroading. Here's what I came up with: Let's break down the suspension to it's basic components to better understand how it works: Colored green are the main shock absorbers. These caryy most of the wight and provide a high suspension travel Colored orange are the gearbox transfer arms which fix each perpendicular gearbox firmly to the suspension, thereby reducing friction and fixing the U joints to keep them from popping out. Colored black are the side beams which help guide the transfer arms and hold the suspension together Colored in red and gray are the two independent drivelines powering the wheels. Finally in transparent, the suspension arms are made as long as possible for maximum suspension travel. I built the first version with this setup, but soon discovred a flaw. The torque from the drivelines would push the suspension arms down, causing the suspension to stop responding (indicated with red and grey arrows in photo above). In order to solve this problem I added the suspension bridge above, colored in pruple. The suspension bridge performs the following functions: Compensation of the driveline torque Supports 20% of the model's weight Improves articulation when going over rough terrain With the suspension solved, I turned my attention to the chassis. I wanted a model with high torque and high speed. To achieve that I installed a two speed gearbox for each independent driveline powered by a total of 4 RC motors: Finally a very sturdy chassis based on frames was built to support the model. Each axle was given it's own independent steering with servo motor and each driveline has an M motor for switching gears. This redundacy means that even if half of the model breaks down, it can still drive back home. Next step was building the model in real life. Thanks to ForwART's custom stickers the exterrior really came to life: The doors can be opened, revelaing two seats and the steering wheel: Each wheel has over 6 cm of wheel travel, allowing the Tiger extreme articulation rivaling live axle setups: And let's not forget the most important photo of them all: Finally, since there is only so much I can tell in words, enjoy the video experience: As usual the LDD file of the model is available by clicking the photo or link below: https://www.bricksafe.com/files/Zblj/tiger-4x4x4/Tiger 4x4x4.lxf To summarize, compared to the previous Leopard, the Tiger has the following improvements: Improved stability due to the independent suspension and low chassis Higher top speed due to the gearboxes Eliminated suspension oscilation Improved performance at high speed thanks to lighter and more responsive independent suspension Improved maneuverability thanks to all wheel steering Sadly there are also a few drawbacks which I plan to fix in the future version: When pushing the model hard in Ludicrous mode and in low gear the 12 tooth bewel gears can get damaged and need to be replaced Low steering angle (18 degrees) Because only one servo motor is used per axle, steering is more prone to be bumped out of center. -
Improved theory automatic gearbox
TechnicBrickPower posted a topic in LEGO Technic, Mindstorms, Model Team and Scale Modeling
Hi All, This video demonstrates an improved design of a 2 speed automatic gearbox based on a theoretical approach. Typically a Lego automatic gearbox consists of two stages namely a gear selector and a torque detector. In this video, both of these components are improved upon. The gear selector gear count has been reduced from 13 gears down to just 9 gears and a torque improvement of 40% is demonstrated via pulling on rubber bands and measuring the force using luggage scales. The torque detector is analyzed mathematically and the equations determining it's gear ratio behaviour are presented. Finally the overall improved automatic gearbox is tested and demonstrated to have a powerful second gear. -
Gearbox theory application - my attempts towards building an automatic gearbox for a car
TechnicBrickPower posted a topic in LEGO Technic, Mindstorms, Model Team and Scale Modeling
This video applies gearbox, torque, and gearing ratio theory to design a prototype 2 speed automatic gearbox. First I describe the main components of an automatic gearbox, namely a gearing ratio selector and a torque detector. The ideal gear switch over torque point is described in terms of the PF motor torque and speed operating point, as well as the ideal gear switching ratio for the 2nd gear of the automatic gearbox. A technique for creating the 2nd gear is described by either adding to a differential by engaging a gear, or by subtracting by disengaging the gear. Issues around torque friction making it difficult to disengage a gear are mitigated by speeding up the gear switching axle to reduce torque. A torque detection method is shown using a differential for torque detection and driving a rotary catch back to the gear selector to change gears. A strategy is shown to reduce the torque and power loss due to the torque detector by placing it on a secondary path from the main power path. Finally an actual implementation of a 2 speed automatic gearbox is demonstrated and tested using a configurable torque generation mechanism using a series of clutch gears. -

Gears-efficient gearbox
technicmath posted a topic in LEGO Technic, Mindstorms, Model Team and Scale Modeling
The idea of @nicjasno in for a gearbox can be improved as follows. There is no need for a 24 or 28 gear with clutch: the setup can be built as (two axles) 28-24-(20 with clutch)-clutch-(16 with clutch) (16 with clutch)-clutch-(20 with clutch)-24-28. For these gear combinations, a distance of 44/16=2.75 studs is desired. By using the above configuration, there is a distance of sqrt(2^2+2^2) or approximately 2.828 studs. This can be improved by xx -> 1 x 2 technic brick with 2 holes with axle at the left xxxx -> 1 x 4 technic brick with axle at the right. Then the distance is sqrt((3*2/5)^2+2.5^2) or approximately 2.773 studs, which is much closer to the desired 2.75 studs and then the gears run much smoother. -
Torque in Practice
TechnicBrickPower posted a topic in LEGO Technic, Mindstorms, Model Team and Scale Modeling
Hi all, here's a video I did where I use a 10 level torque gadget I created to run some torque experiments to help improve my automatic gearbox designs. Hope you find it interesting. -
8 Speed Gearbox using just two levers/selectors - for @SNIPE
TechnicBrickPower posted a topic in LEGO Technic, Mindstorms, Model Team and Scale Modeling
Here I present an 8 speed gearbox that does the seemingly impossible - creating eight speeds using just two levers/selectors. Normally two selectors are used to create a 4 speed gearbox - however this design allows for 1 of 8 different speeds to be selected - thanks for the idea @SNIPE -
2 Speed Automatic Gearbox using a worm gear for torque detection (prototype)
TechnicBrickPower posted a topic in LEGO Technic, Mindstorms, Model Team and Scale Modeling
This video present a 2 speed automatic gearbox based on using a worm gear for torque detection. The 2 speed gearbox works by using the linear counter-action force on the worm gear to connect a gear to create a second speed. This 2nd speed is added to the main drive path using a differential after being passed through a worm gear to prevent back rotation when the gear is disconnected. -
3 speed automatic gearbox fail. Do you have a solution?
TechnicBrickPower posted a topic in LEGO Technic, Mindstorms, Model Team and Scale Modeling
This video presents a 3 speed automatic gearbox design that failed to work as expected. This design is based on an earlier design of a 2 speed smoothly switching automatic gearbox that worked very well. That gearbox was extended by adding another speed to the rotary catch selector however something happened I didn't expect. -
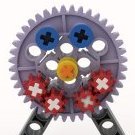
Efficient 4-speed gearbox
lmdesigner42 posted a topic in LEGO Technic, Mindstorms, Model Team and Scale Modeling
Hi everyone. This is an efficient 4-speed gearbox design I came up with a while ago using the wave selector and new(ish) 20-tooth clutch gears. It is efficient since only 8 gears and 3 rotating shafts are required, which is near the minimum possible. The shafts in the image are as follows: Yellow - output Red - input Orange - shifter Black - extra, free-spinning All of the shafts go straight through the gearbox. The compact design is possible by meshing 16-tooth and 20-tooth clutch gears, which gives different ratios at each of the 4 clutch points. Unfortunately, the two shafts with driving rings need to be connected by another gear mesh (in this case 12:24) which results in out of order shifting with the wave selector. Gear 1 (1st) – 12:16 + 12:24 = 8/3 = 2.67:1 Gear 2 (3rd) – 12:20 = 5/3 = 1.67:1 Gear 3 (2nd) – 16:20 + 12:24 = 5/2 = 2.5:1 Gear 4 (4th) – 16:16 = 1:1 The shifting order issue could be corrected by using a mechanism shifting one driving ring back and forth and then the other, but that would take more space than the wave selector. The offset of one driving ring by one stud is handled by a sliding 16-tooth gear linking the lower driving ring with another 3 studs higher, putting it in the proper position to mesh with the wave selector. The extra free spinning shaft (black) is used to hold the third driving ring. The transmission fits into a small 9x7x6 box (not including the stepper) which can be easily connected to a chassis represented by the 5x7 frames. The below picture shows how small the core part of the gearbox is. In conclusion, the advantages of this gearbox include small size, few moving parts, and different ratios, while out-of-order shifting is a disadvantage. Comments and questions are welcome -
NEW 2 Speed Automatic gearbox - Smooth and Compact - has this been done before?
TechnicBrickPower posted a topic in LEGO Technic, Mindstorms, Model Team and Scale Modeling
Hi All, I have created a new design for a 2 speed automatic gearbox that is both smoothly switching and compact. The best of both worlds. I don't know if my new (for me) technique has been used before so welcome your feedback. -
[MOC] Build Instructions for smoothly switching 2 speed automatic gearbox
TechnicBrickPower posted a topic in LEGO Technic, Mindstorms, Model Team and Scale Modeling
Hi for those interested I have put the build instructions for my "smoothly switching automatic 2 speed gearbox" on rebrickable: https://rebrickable.com/mocs/MOC-51030/TechnicBrickPower/smoothly-switching-2-speed-automatic-geabrbox/ Here's the video about it: -
[MOC] Smooth transmission 2 speed automatic gearbox
TechnicBrickPower posted a topic in LEGO Technic, Mindstorms, Model Team and Scale Modeling
Here I present a smoothly switching 2 speed automatic gearbox. The gearbox uses the "differential jam" phenomena to prevent reverse torque transmission during the gear switch over point, when the driving gearing can be momentarily disengaged. The gearbox automatically switches down by a ratio of 2/3 when the load on the output is sufficiently high by using a differential to detect the loading and to drive an orange rotary catch. This is a smooth transition due to the reverse path being only one directional. https://youtu.be/h7j50GRm6Vc -

[MOC] Tatra T813 KOLOS by MajklSpajkl
MajklSpajkl posted a topic in LEGO Technic, Mindstorms, Model Team and Scale Modeling
Dear friends! Finally, I started to clean out my MOC closet, which has been gradually filling up the last two years and somehow, I couldn't get myself to empty it. The first of more-to-come skeletons to fall out of it is this TATRA T813 KOLOS in truck trial version, that I have built almost a year ago for our LUG’s annual 14th truck trial race “KockeTerenci”. I got inspired by this little canary on steroids: This is my biggest truck so far, that is actually capable of tackling some terrain. The dimensions are as follows: l / w / h = 65 cm / 19 cm / 25 cm or 81 / 24 / 31 studs. It is a bit to narrow for my liking, but one of our TT race rules states, that gates on track are 30 studs wide, so I went for a fitter width. Truck weighs slim 3,3 kg with 2 AAA battery boxes, with Buwizz a little less. It is a bit front heavy as the cabin weighs more than 0,35 kg+ the steering mechanism protrudes a bit into the cabin. Some photos of exterior before further babbling… I tried both PF and Buwizz for power, which one did better is obvious… I hereby thank @imurvai for BrickController application – it was a pure joy using it. Truck features 8x8 drive with typical TATRA suspension and single drive shaft where left and right half axles are misaligned for half a stud, similar as IRL. Fatso is driven by two PF XL motors that are hard-coupled on a two-speed gearbox, which is a modification Sariel’s linear heavy-duty transmission and is placed between the 2nd and 3rd axle. It is remotely controlled with a small linear actuator driven by a PF M motor between 3rd and 4th axle. Total gearing in 1st gear is 23.2:1 and in 2nd gear 8.3:1. 1st gear is pretty sluggish but does the job well and the 2nd gear is good only for rather flat terrain with minor bumps. Unfortunately, I ran out of place for hiding the motors inside the chassis so not to good looking from above but the body covers them well from the side. I had to rebuilt and modify the gearbox a couple of times, bracing each pair of gears as close to them as possible. Previous versions of gearbox resulted in some ABS abuse as you can see on photos below . Front two axles are steered by an L motor which also turns the steering wheel in the cabin. Steering mechanism is a modified 2 axle steering system from Madoca’s Tatra T813 which is some studs wider than my version. Below the cabin there is a working mini fake V12 engine with fan (original design by @jorgeopesi). The cabin has two seats, some gauges around the steering wheel, and fake shift stick. As you can see, I had to make front axle suspension pretty stiff due to heavy front of the truck. There are three pairs of hard spring shock absorbers on 1st axle, two on 2nd and 4th axle, and one pair on 3rd. When there were only two pairs of shocks on front axle, the truck was sagging pretty bad. And now (IMO the highlight of this MOC) to stickers. The truck is full of them, as is the real truck. I searched the web for some that I found cool and funny. Stickers were printed on plain white sticker sheet and some on a transparent sticker sheet for laser printers. The latter took some colours very well and some not – especially red colour pealed off rather quick, which made the rad claw marks look old and worn out which turned out even better. I find it quite hard to tear it apart as I am very pleased with how it turned out. In addition, teardown is being postponed continuously because the transparent sticker sheet leaves some glue spots on bricks and I haven’t found the right mood to clean them. I hope you don't mind, if I point them out... A funny thing with those septic tank cleaners - on Facebook,a guy from Republic South Africa comes out and says he sees trucks of this company all the time as they have HQ in town next to him - small world isn't it? I hope they don't mind some extra commercial . To end, here are some more photos from the beast’s natural habitat and a video of course. In order for you not to fall asleep, I sped up some of the footage. I also apologise for some part of the video being a bit on the lower side of quality - it comes so that my cellphone is practically all my shooting gear. Thank you for your time reading this and I hope you like it. I am looking forward to your thoughts and comments. Fire away. Higher resolution photos can be found in my BrickSafe folder. Best regards, Miha P.S.: In case someone wonders, how I did on the race – see photo of competition below. Mine is that small yellow fella in the middle. As you can imagine, I was no match for those small and fast woodpeckers FREE BUILDING INSTRUCTIONS AVAILABLE! -
Hello everybody! This is the first MOC I present on Eurobricks. My most popular MOC yet is the 3 speed auto gearbox (https://rebrickable.com/mocs/MOC-33711/lbrix/3-speed-auto-gearbox-overworked-version/?inventory=1#comments). But now to this gearbox: At first ask yourself this question: Which sense has a normal D-N-R gearbox in a manual technic car? It has no sense. It makes no difference if you are in the forward gear or in te reserve. But with this D-N-R gearbox it makes a difference, because if you are in the forward gear, you can not push the car backward and if you switch in the reserve gear, you can not push the car forward. If you want to build this gearbox into a technic car, you have to connect the grey connectors to the wheels and one of the black ones to the fake engine. For more information check out this MOC on rebrickable (maybe it is not approved yet): https://rebrickable.com/mocs/MOC-47985/lbrix/alternative-d-n-r-gearbox/?inventory=1#comments No I wanted to ask you, what you think about this D-N-R gearbox? Here is an video of my gearbox:
-
[MOC] Compact 2 Speed Automatic Gearbox
TechnicBrickPower posted a topic in LEGO Technic, Mindstorms, Model Team and Scale Modeling
This is a compact 2 speed automatic gearbox design. Instead of using a differential to react to torque on the output it uses the force on the gear teeth to push a liftarm to automatically change the gearing ratio to the 2nd speed once the torque threshold has been exceeded. The automatic gearbox will switch back down to the first speed once the torque on the output is reduced by using two rubber bands to pull back the liftarm. The first speed is simply a 1 to one ratio and the second speed is a 0.6 ratio. The design can be easily modified to change the the second gear speed to other ratios such as 0.36 or 0.2. -
[MOC] Build Instructions for automatically reversing gearbox
TechnicBrickPower posted a topic in LEGO Technic, Mindstorms, Model Team and Scale Modeling
Hi All, Have just published the build instructions for my recent automatically reversing gearbox on rebrickable: https://rebrickable.com/mocs/MOC-49276/TechnicBrickPower/auto-reversing-gearbox Here's the video about it: -
Hi all, Here is my next project. First i would like to say that this is shot as a really early design stage. This is the first rush on that project. I do command from TLG the new orange selector for gearboxes. I do not received them actually. My first impression when seeing them for first time was that they were designed and intended to fit into a bike gearbox. That it was their reason of existing. And, as you always have better following your very first inspiration I do began the work on this project. Pictures! First, the main frame. As it do exist multiple sorts of frame I choose one who is the less conventional in a sense for a Lego model: This frame offer many advantages on a scale model, the main one is to free a maximum of space for the mechanics. Other view: The challenges are quiet hard on this project. As for many small MOCs the smaller they are, the most compact mechanics has to be and hardest is the designer's job. I am not a designer and even not engineer so i'll try do do my best to reach my goals with the best result I can. Here are my (hopefully) goals: - Superbike inspired - 4 speeds gearbox, with, if possible but I do not figure out on how, a neutral point correctly positioned between first and second speed. - Shifter commands like the real machines ... On design point of view, those bike are often fully careened . I do not think this will be the best choice for a technic model, as it would be great to have a full look at mecha inside. Here are the very first rushes on design: As you can see on the pictures below, there are still so much work to do.... For those who follow my workflow, you will understand my working method. I will now rebuild a second model independently of this one. I think I must begin by the engine part included gearbox setting and stepper commands. If you have any opinion idea or experience on this subject, feel free to post your stuffs and inspiration. Good sunny day all !
-
Automatically Reversing Gearbox
TechnicBrickPower posted a topic in LEGO Technic, Mindstorms, Model Team and Scale Modeling
Hi Everyone, This gearbox has been designed to automatically reverse if there is a high load on the output. The gearbox works by using a differential to react to the torque on the output and it drives a two state switch to select the reverse or forward direction in the gearbox. -

Ultra Compact 8 Speed Sequential Gearbox
Anto posted a topic in LEGO Technic, Mindstorms, Model Team and Scale Modeling
I made it almost a year ago, but I didn't have the time to make its presentation. It's a gearbox I made at the release of the rotary changeover catches. My purpose was to make a gearbox as compact as possible. So I decided to couple a 2 speed gearbox to a 4 speed gearbox. There are 2 advantages: firstly the gearing is more compact, and then the shift system is also pretty compact. When the changeover catch of the 4 speed gearbox makes one turn, it activates the one of the 2 speed gearbox. So to change the speeds from the lowest ratio to the highest, the 4 speed gearbox does 1; 2; 3; 4 while the 2 speed gearbox is in first gear; then the 4 speed gearbox activates the second speed of the 2 speed gearbox, and it does 1; 2; 3; 4 again. Little trick: when you make a double gearbox like this, it's important to be sure that the gears are in the right order. This means the 6th gear (2-2) must not to be lower than the 4th gear -1-4) or you cannot control the gearbox properly. So in Excel, I recreated the structure of the gearbox using cases in the calculations (for example F3*G3/F4*G4). Then I put the number of teeth of the gears I may use in the cases, and I got the final ratios of the gearbox. After some tries, I got a good result, and a perfectly controllable gearbox. To control this gearbox, I used the stepper of the Bugatti Chiron that I compacted a little bit (the piece in red). To finish, a modelization of the mechanic to have a clearer view of the gears: Finally, this is an extremly compact gearbox, easily controllable. -
1023 Speed Car MOC. A 1023 speed gearbox has been built into a remote controlled car chassis.
TechnicBrickPower posted a topic in LEGO Technic, Mindstorms, Model Team and Scale Modeling
A 1023 speed gearbox has been built into a large remote controlled car chassis. The car can be steered and driven via remote control using two channels. The gears can be manually changed using ten selectors that drive ten differentials. This allows for one of 1023 different speeds to be selected to set the car's forward and reverse speeds. The car drives well on carpet as well as a smooth surface. It uses 4 large 10cm diameter wheels and a medium sized motor for the steering mechanism. The main drive is from a large power functions motor. The gearbox functions are explained in detail. -
.thumb.jpeg.019d538e6955d37410627e0d5e3cb08d.jpeg)
[MOC] Airboat with a 2-speed transmission
Parazels posted a topic in LEGO Technic, Mindstorms, Model Team and Scale Modeling
Hello everyone! This is my new moc! The airboat is at rest, when the propeller is rotating at low frequency, and begins moving, once the propeller has worked faster. 1 L-motor 2 M-motors Watch the video! https://youtu.be/Tiue-ojVghQ https://youtu.be/pOQoqyriUZY https://www.instagram.com/p/CIavqCVpOoy/?igshid=1lkuooe8kmue6 https://www.instagram.com/p/CIaublcJVqf/?igshid=1clc6dkfsshwd -
[MOC] 12 Speed Rotary Gearbox
TechnicBrickPower posted a topic in LEGO Technic, Mindstorms, Model Team and Scale Modeling
Here I present my 12 speed gearbox design. The gearbox implements 3 reverse speeds, a stop gear (zero speed), and 8 forward speeds. The forward speeds range from 0.307 to 1.2 and reverse from -0.067 to -0.36. The gearbox has a single gear lever to drive two rotary selectors to select the gears. Let me know if you like it, have any comments or questions.