Search the Community
Showing results for tags 'LXF'.
Found 40 results
-
[MOC] [LXF] Minifig-scale Phantom from Star Wars Rebels
ScottishDave posted a topic in LEGO Star Wars
This is a minifig-scale model of "The Phantom", the shuttle from the TV series "Star Wars Rebels". It's about a foot long and has a full interior, with working hatches at the rear and on the underside. I re-used the cockpit and nose from goatman461's excellent design, along with elements of the sides, roof and underside hatch: and I'm grateful for his kind permission to post this model. As usual, I've documented the build as an LXF file for my own reference, and I am linking the LXF file here in case anyone else feels like building this model. The LXF is nearly-but-not-quite correct. I can't place the roof (the angled pillars at the back prevent it from attaching) and the tyre with tread at the front of the engine should be an old smooth tyre (part no. 132) - something which does not appear to exist in LDD. Update: Many, many thanks to @monkypaws for making the instrctions available for free on rebrickable - link here. This page contains both a step-by-step set of instructions and a parts list. The details section contains a list of rare parts to check before attempting a build. Before someone asks: yes, I am pondering building the Ghost in scale with this shuttle. I estimate it would be quite large - 138 studs long, 1.1 metres, or the length of a stay in a local psychiatric hospital. Here are a couple of pictures. More can be found on the flickr album: Here are some photos of the Interior. First a shot from the front of the cockpit, showing Hera and Kanan, with the rest of the crew in the background (minus Chopper, who is in his droid socket on top of the ship). The belly hatch works, i.e. it opens and closes: There are eight seats in the back (realistically, seating for six, given the width of Lego figures): Once again, more photos can be found on the flickr album There is always room for improvement: If you have any suggestions, comments or criticisms, please feel free to leave them below. Edited 16th May: added interior photos. -

Understanding LDD's LXFML Schema
Gnac posted a topic in Digital LEGO: Tools, Techniques, and Projects
For a while now, I have been itching to know just how LXFML files work. Although there is official documentation to explain the purpose of the <nodes>, information which details the attributes of these nodes is scarce. The most useful thing to understand would be the "transformation" attribute of the <Bone> nodes, which appears to contain data about the position and orientation of each <brick>. However, before we can even begin to try to understand the comma-seperated values here, we need to understand the LDD grid, how the application displays it to you, the user, and how it relates to the 3D Cartesian Co-ordinate System. Take a look at this image here! This is what I have learned about the LDD grid from doing a series of tests on an instance of part 3039, placed in the very centre of the LDD grid. I planned 32 test cases which resulted in all the basic positions for a brick that I could think of, and made a PHP script to read the LXFs, extract their values, and display them in a comparison table. The X, Y and Z movement values are pretty obvious, but the rotation values less so. 10 tests are pending (because I think I really should have made sense of these values by now), and I see no sense in doing them until I have an "epiphany". Seriously, Just LOOK at the changed values (in red) on that table. Could there be some sort of bitwise combinations going on with fields 1-9? My brain is getting smashed in by plastic rocks here. -
Inspired by some of the other excellent threads on this forum, I decided to have a go at lengthening my First Order Transporter: I've added an extra 16 studs, twelve of them in the troop compartment: it can now take a total of twenty stormtroopers. I have rebuilt a lot of the details: I have also shortened the cockpit and moved it back. It is accurate in profile and still fits a minifig. Finally, I've lengthened the engines and added some greeblies to the space between them. Sourcing another 16 stormies was fun but expensive: Battle of Takodana + 2 batle packs + 2 Bricklink orders. Special thanks to our very own Lobot for his rapid and friendly Bricklink service. Many thanks also to Vodnik, deskp, Veynom & Solscud007 for their inspiration. If anyone wants to build this mod, I've created a Lego Digital Designer file: (LXF) This file is slightly different to my "real bricks" version, due to Lego Digital Designer being a crotchety old block. Bonus fun - Spot the differences! To build the version in the LXF, you will need a 75103 First Order Transporter and about 470 extra parts: (XLS). Having an extra 75103 on hand (£40 on ebay with no minifigs) cuts that down to 300 parts: (XLS).
-
Hello AFOL's, i want to show you my new Moc of the Pelta-Class Frigate from Star Wars Rebels. It has Parts: 5722 Lenght: 122cm Width: 86cm Height: 27cm Building Time: 2 Days I would be happy for feedback.
-
My first Lego locomotive MOC. Modeled after a BNSF ES44AC locomotive. 6 studs wide, 50 studs long and powered by two Lego Power Functions train motors. The three axle bogies have enough articulation to negotiate the standard Legos curves. It's made up of about 1200 bricks, took about 50 hours to design in Lego Digital Designer, 8 hours to assemble and cost a little over $200 to build, complete with electronics, from parts purchased off Bricklink. I've included the .lxf file below and welcome anyone to build, copy, modify or just examine my building techniques. I took great care to create many different groups to make the digital version easy to disassemble an examine. I've also included a link to a YouTube video of it running. It negotiates the standard Lego curves with no problems. I hope you like! Here's the .lxf file... https://bricksafe.com/pages/sed6/bnsf-es44ac-locomotive Thanks for looking!
-
Good day! Sometimes I make MOCs that don't deserve a topic, or simply have WIP concepts that I don't publish . This will serve as a place where I post my WIP creations that may end being a MOC , and small sized MOCs which are too simple to post a video or create a topic.
-

MPD file to LXF conversion
Hoth Rebel posted a topic in Digital LEGO: Tools, Techniques, and Projects
Hello, I've been searching for a while now, but can't find anything that really helps me out. I would like to convert a Multi Part Document (MPD) file to Lego Digital Designer (LDD/LXF). I've imported the MPD file into LDCad (from what I read online this is the way to do it), but when I save (as) it's still a MPD file. Can someone tell me how to convert the file so that I can open it in LDD? Thank you in advance. Ps. I've searched this forum for answers, but couldn't find any. If there are than excuse me for making this topic. -
Hello AFOL's, today, i want to show you my new awsome Moc of the Imperial Light Cruiser from Star Wars Rebels. It has Parts: 2908 Lenght: 92,8cm Width: 38,4cm Height: 12,8cm Building Time: 2 Days I would be happy for feedback.
-
Hi everybody, I am desperately trying to find a LDD file for the 3677 cargo train engine, and the link on this forum is broken. Can anybody help me out? Thanks flyboy4183
-
I downloaded LDD just 48 hours ago and got right to work on designing a hopper car. Well eight hoppers to be exact. I know they just look like simple color changes but the first one took me the better part of eight hours. Then I spent many more hours getting familiar with groups and templates. Simultaneously I hand keyed them into Bricklink and spent many more hours getting them from about $90 per car to the to $40-$50 range with careful parts and color editing. So now I have a choice to make, I'm going to order parts for three cars and want your input. Which colors combinations do you like the best and why? Most favorite and least favorite? I also welcome any opinions, or suggestions. They are 24 studs long and I won't be making any changes to their length. Thanks in advance, hope you like! -Scott Link to .lxf file. https://drive.google.com/file/d/1e9qqypkfY-aygmPB61na6wNFS1eNDONc/view?usp=drivesdk Link to a high quality pic. https://photos.app.goo.gl/MgeiD3S4d71siK5c2
-

Kev's Decorated Pieces.
Kevin Flemming posted a topic in Digital LEGO: Tools, Techniques, and Projects
I've gone through and added every standard decoration currently available in LDD to separate torsos and heads, in order of how they are in the decoration menu. The best way I've found to use these, is to grab which ones you want, separate them from the rest, select them all and Ctrl-C to copy. While LDD is open, it will remember what you have copied into the clipboard. Open your current project and Ctrl-V to paste in your desired pieces. Or you can simply press Ctrl-I (that's "i") and import the decorations files as a whole. This import method might cause some lag or crashing on weaker systems though, as you will be pasting over 300 pieces into your current project. If you are copying an existing official LEGO set, then it's better to look at the instructions, and use the former method to grab what you need beforehand. Just personal experience from using LDD for years. Torsos: Link to shared file: http://www.mediafire.com/file/d9c95cbs3uyj5x6/Kev%27s_Decorated_Torsos.lxf Some of the backs have been done, but not all. To be honest, I'm burnt-out after doing 340 of the buggers lol. Not all colour schemes are 100% correct, as most are from memory, and I'm not going to look through over 300 torsos to find the right colours. But fear not, friends. Ones that don't have the correct colours have been painted logically (dark decal has a lighter torso, and vice versa) to make them relatively-easy to find. Heads - Updated (22/06/18): Link to shared file: http://www.mediafire.com/file/8e8u88mc1h1618y/Kev's+Decorated+Heads+-+Updated.lxf Update: I've now sorted the heads into a couple of categories. From top to bottom of screenshot: Back of head decals, Female decals, Male decals, and Monster type decals. Hope you find these useful. Anything beats the awful menu that has a mind of it's own, right? -
My first house [MOC] - if anyone wants the LXF link, they'll have to show me how to post it.
-
I needed a couple of additional middle passenger cars to complete the look of my 60051. Instead of paying $40-50 each plus shipping on eBay (or even BL) I decided to just make my own. I copied the instructions and have faithfully recreated the middle passenger car. I've attached a link to my Bricksafe account where you can download the LXF for yourself. I built two for about $35 each, including a complete sticker set for each. https://bricksafe.com/pages/sed6
-
Update - she's built and pics added! These 4-4-0's were so popular in the US from the mid-1800's to the mid-1900's that they are referred to as a 4-4-0 American. They were a mainline work horse until the early 1900's when larger engines replaced them but they continued service on shortlines and spurs until the 1950's. My particular engine was inspired by #185 of the St.Louis-San Francisco Railway, nicknamed Frisco. It has 1050 bricks between the engine and tender and took me over 50 hours to make in LDD. It's 8 bricks wide and I tried hard to capture many of the important details without making it too super detailed. I focused mainly on scale and proportions. I did add good detail to the boiler in the cab and gave the tender good detail behind the cab to include the coal shoot and working coal doors. It's powered by a PF train motor under the engine with the battery and receiver housed in the tender. The very top of the coal heap serves as the button for the battery and you can look straight down and see the battery light glowing green. The cable for the motor runs under the floor of the engine and tender, but just above the coupler, keeping it out of sight. The .lxf file is quite detailed with over a dozen different groups making it easy to take the engine and tender apart allowing you to make modifications, change colors or just to examine my building technique. I have not run it through Bricklink yet, so there could be some parts in certain colors that are not available, like all the metallic gold in the cab for example. Here's a link to more history about the Frisco Railway... https://www.american-rails.com/the-frisco.html Here's a link to the .lxf file... https://bricksafe.com/pages/sed6/4-4-0-american-locomotive And here's some pics (click on each for bigger)...Hope you like!
-
How I can create video building instructions, shown above, without capture screen in real-time ?
-
ABOUT : I'm gladly to introduce tools, that can help maintenance with collection of LEGO Digital Designer models in real-time. This tool do not harm you file and do not write | modify anything inside your models. Every content /image, text, statistic, etc./ you can see... come from model file directly on indirectly. DOWNLOAD: LDD Explorer /Windows Desktop version/ THIRD-PARTY SOFTWARE REQUIRED: LEGO Digital Designer 4.3 LDD Parts List 2.1 INSTALLATION PROCESS: Download and install LEGO Digital Designer 4.3 for Windows PC Download and unpack LDD Parts List 2.1 Download and unpack LDD Explorer Put xml2explorer.xsl from step 3 into root directory chosen in step 2 HOW TO USE IT : On first run, click the label to set the path. When LDD Explorer is on the run. It is possible to minimize him to the system tray, and restore by double click. You will be informed when you create new or delete existed. Latest modified file is always on top on list.
-
Hello AFOL's, today, i want to show you my new awsome Moc of the Imperial Interdictor Cruiser from Star Wars Rebels. It has Parts: 5163 Lenght: 99,8cm Width: 51,4cm Height: 25,5cm Building Time: 4 Days I would be happy for feedback.
-

Lego Ninjago Movie 70629 Piranha Chase Concept LXF
DanielWeissberg posted a topic in LEGO Action and Adventure Themes
Download Concept LXF File: https://drive.google.com/open?id=0BwRZCfASKSKYOTQ1QlItRDNnUWM -
Hi All Long time reader, but first time topic starter :-) Thank you for a great forum. I need some help getting started - I love to build, but lack talent in designing the models. How did you begin when you first started building your own models using LDD? I have decided to create a double sized Lego Yoda using LDD. My initial plan was to hire someone on this forum to help me, but I understand this is not allowed :-) I want Yoda to be roughly 130cm from head to toe. He has to be able to stand on his own unassisted Has to be in one of the poses linked below: Do you guys have any ideas? Cheers
-

Lxf to ldr - Chain is not converting
atanas1223 posted a topic in Digital LEGO: Tools, Techniques, and Projects
I am converting a lego model to an .ldr file. However, the chain link models are not converted/present in the export! Is there a way to export the chain models too? Otherwise how can I get their models into my .ldr file? I've created an animation here: -

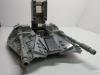
Belly Tank Speeder "No.6" - 42059 C-Model
Immo posted a topic in LEGO Technic, Mindstorms, Model Team and Scale Modeling
42059 alternative model. Uses all parts from the set (exl. spares). No functions whatsoever except for inherited pull-back motor and quite pleasing looks. It showcases the "40 years" part nicely. It's a rear-engined landspeed hot rod, inspired mostly by "belly tanks". Looks better with lower profile front tires borrowed from 42046 Getaway Racer (last pic). Bonus: can be used with minifigs! LXF FILE - I might have missed something. The model SHOULD USE ALL PARTS from the by the A-model. If there are any leftovers, please inform me. The pink parts obviously represent the pull-back motor. The bit that sticks out in the front should of course be rotated as in the pictures - LDD won't allow you to do so. With better tire setup: -

[MOC] ProLaps Golf Caddy (GTA)
syclone posted a topic in LEGO Technic, Mindstorms, Model Team and Scale Modeling
Good day! Today I present you my newest MOC - ProLaps Golf Caddy (Cart) from GTA V . I wanted to build this vehicle since May of this year when I first seen it in a video, but newer got into starting it. I used reference pictures from GTA wiki . Not 100% accurate, but I tried my best on it. Propelled by 1x m-motor without diff and 1:166 gear ratio ; steered by another m-motor with working steering wheel. Powered by a large BB and cotrolled by a V1 receiver. Video coming soon . Scroll down for video Bricksafe gallery My LDD is glitching a lot , so I don't know if the digital model will ever be finished. Thanks for reading, I hope to hear your opinion on it -
Hi! This is an old MOC of mine - strictly speaking a MOD of Larry Lars' excellent snowspeeder model, which I urge you all to take a look at. He has provided instructions, and they are a masterclass in advanced SNOT techniques. I put the LXF file on Brickshelf in July. I notice that someone else on this forum has picked up on it: so rather than clutter up another topic, I thought this might be a good time to take some photos and do a full post. As I said: most of this is lifted straight from Larry Lars' design. However, I was never completely satisfied with the accuracy of Larry's MOC. The changes I made were: The sides slope all the way up to the canopy: The heatsink/grille at the back is angled slightly: The engines exhausts are positioned closer to the centre-line of the ship: The underside is as accurate as I could make it. One of these days I might SNOT it, but for now: The LXF is very similar to the physical model, but four pieces at the back would not attach, no matter what I did: To aid anyone who wants to build this model, here is a photo of one of the missing parts in place, with the top of the housing removed so you can see how it fits: More photos are available in my flickr set. EDIT: Brickshelf keeps on disappearing, so I've put the files in my dropbox folder: White: LXF XML Grey: LXF XML Thanks for looking!
-
Hi! I'm not a coder but I'm very familiar with the Unreal Engine 4's visual scripting system which I used to create a tool that will help you to convert Rebrickable part lists to LDD user palettes, This is how it looks right now: Features: One-click converting of Rebrickable CSV files to LDD user palettes Features coming soon: Converting decorations (prints) correctly Converting rarely used colors correctly to colors available in LDD Merging mold variations to bricks available in LDD Support for old colors Limitations/Disadvantages: Since it's running on a video game engine, it's quite heavy in terms of file size (102 MB) and requires a modern PC All bricks are placed at 0 0 0 so if you try to open the palette file, LDD will remove all but one brick. Every part of a multi-part brick like power function components will have everything colored in the main color. DOWNLOAD Decide yourself if the relatively large file size is worth the time you may save in comparison to LDD manager's palette process (which is still a great tool!). Right now it only uses Rebrickable IDs for the LDD IDs but that is going to change when I get through each file and check it for mold variations and decorations. The colors IDs have been translated manually which is why I need feedback regarding the colors. Sometimes It wasn't easy to decide which color in LDD is which color on Rebrickable. Is it worth continuing? Let me know what you think!
-
Okay, so I'm freaking out a little bit about this problem. I went to open up an lxf. file in LDD, one that I had been working on for a loooooong time; my T-70 X-Wing MOC. But when I went to open it, nothing showed up. No grid, no model; when I try to generate instructions for it it just churns, the screeenshot mode (whatever it's called) is just a blank screen. Do any of you know what this problem is, or how I could fix it? Any help is greatly appreciated! Thanks. EDIT: Never mind, everyone! For some reason, the typical right-click to drag the view around moved the model and grid in the frame.