Search the Community
Showing results for tags 'pneumatic'.
Found 155 results
-
My idea for this contest is a pneumatic carousel. I never work with pneumatic before and I was not sure if it would even work. After going though so many prototype I finally have something to post. Here is my progress so far. Pneumatic is a lot more challenging than I thought.
-

[TC10] Pneumatic Scissor Lift Cart
lindr6 posted a topic in LEGO Technic, Mindstorms, Model Team and Scale Modeling
Introduction: For this contest, I wanted to model a piece of hydraulic equipment that uses a manual pumping action to manipulate the hydraulics. This would give the Technic model a natural look and feel when using the manual hand pump to activate the pneumatic cylinder(s). After much thought and searching, I landed on a hydraulic scissor lift cart. This piece of equipment will require the three main components of the Technic pneumatics system, should be compact requiring interesting mechanisms utilizing the pneumatics, and has a added bonus of being something that is rarely modeled (are there any others?) hopefully making this contest entry slightly unique! Here are some pictures I will use for my inspiration: Plan: I plan to break this model into four distinct builds: General Frame, including caster wheels and handle bar for pushing cart. Scissor lift mechanism to raise and lower the cart table using a pneumatic cylinder. Foot pump mechanism that uses the manual pneumatic hand pump to cause the pneumatic cylinder to extract. Hand brake lever mechanism that moves the pneumatic switch to cause the pneumatic cylinder to retract (based on gravity, not air pressure). Anticipated Challenges: Keeping the mechanics of all the pneumatics into a low profile so that the cart table is a low as possible when all the way down. The sliding mechanism of the scissor lift. I am not sure how to best model this and keep everything stable and strong. Translating the vertical foot pump action to a horizontal stroke that is strong and long enough to depress the pneumatic hand pump while keeping it low profile. Operating the pneumatic switch located in the cart base via a lever on the handle bar. I am currently thinking that this might be good use of the flex system! Issue here will be having enough travel to successfully move the switch far enough. Also need the mechanism to include a spring to return the lever back to initial position. Build: Part 1: General Frame Here is my initial prototype to set a standard for size and to use as a base for the different mechanisms. Part 2: Scissor Mechanism Part 3: Foot Pump Mechanism Part 3: Hand Lever Mechanism Final Model: Video: -

[TC10] Scraper Caterpillar
juGSI16V posted a topic in LEGO Technic, Mindstorms, Model Team and Scale Modeling
Hello everyone, For the new contest on Eurobrick, i built a scraper like this one: Functions All functions are pneumatic: - Steering by 2 pneumatic cylinder V1 2x7 - Ascent and descent of the bucket by 2 pneumatic cylinder V1 2x7 - Ejector are actionned by 2 pneumatic cylinder V2 2x11 Compressed air are produced by a pneumatic pomp small V2 and a L motor. In front, there is an 6L fake engine pulled by front wheels. Pictures Here is the first picture: Now I have to build the front of the vehicle. The rest of review later -
[TC10] Pneumatic Press
roppie11 posted a topic in LEGO Technic, Mindstorms, Model Team and Scale Modeling
Introduction Hello, I present to you, my new, first fully-finished MOC and entry to TC10: The 'pneumatic press'! About I wanted to participate in the contest, and it should not be a problem for me since i have 42043 with all it's pneumatics. I didn't want however to create another vehicle. I really like the Hydraulic press channel so i decided to make a hydraulic press, well a pneumatic press to be precise. So here it is. I am creating the discussion topic after the build but that is perfectly fine because i have progress pictures which i will show you. If you have suggestions for mods etc. you are free to suggest. There are for sure a few flaws which can be made better. so it has a few functions - You can move the platform to position your part (2 yellow knob gears). You can move it for-/backwards and sideways. - The yellow blast shield can be opened with a small pneumatic cilinder. - There is a big cilinder for pressing. All controls can be found at the front. For safety there is a blast shield, just like in real presses. Building progress I realised that i had to make progress pictures when i was here: I had then made the positioning and i added a pneumatic pump. I made the platform such that it can handle a lot of weight, well it remains ABS plastic but i made sure to build it such that it doesnt fall apart when there's weight on the platform. As said, you can move the white platform sideways and for/backwards. This is done with gear racks. one knob gear is moving with the platform (in one direction). I can make something so that it doesnt move but that would make my MOC even uglier and i don't think it is a real problem. My plan was first to put the pump in the top, so that the tubes dont have to go up the pump. Later, i realised that you need a control panel and that the switches have to be at the bottom. So i added the pneumatic pump at the bottom. I didn't like an exposed pump so i used a beam and a lever mechanism which you will see in a video further down, OR in the final entry video. My first function is the blast shield. It works pretty nice and the blast shield doesnt look that bad. What i don't like is that the supports stick out. The blast shield cant clap up 90 degrees, but i don't think that is needed and it would make it a lot more complicated. then i built the cilinder for pressing. It only has one attachment point so i had to make a frame such that it can't swing. the 4l axles, next to the pins, will later be replaced with 7l axles but you will see later on. This will be attached to the frame This cilinder also has to be connected to the switches and when all the tubing is done, the underside looks like this you can actually see that i had too little space for all the tubes so i gave him 4 feet (the LBG rims). then i need to do panels to work it off. You can see that i used some frames and beams to make the top part stiffer. between the black panels, come the grey panels which can fold out On top of that goes a cover which wont be attached with pins. This is so you can easliy see through and repair/change something. Now it is done, finished. here is one more picture The way the black panels are attached is really ugly. Then i built in in LDD, this way i can see exactly how it is made and where it is the weakest. file can be found at the bottom. While building i changed the model a bit. I replaced 2l pins with 3l pins. Red pins with axle connectors for regular pins, and added extra pins for more firmness. i also changed the way the black pannels are attached and i added a some beams. On the cover i added 2 red 5l beams so you can pick it up more easily. the final version is the one, made in LDD. Of course there are no pneumatics but it is pretty clear where they have to come. It is very good visible on the pictures. I couldnt find a few parts in LDD so i used something else. Updates/Changes Let me know what you think. What are good and what are bad things about it. Feel free to suggest changes because a MOC is never perfect. I haven't done measurements like part count weight, volume etc. but if you want to i can do that. does anybody know when i can enter my moc in the entry topic? Upgrade 1: post #13 I am not gonne upgrade the lxf file, maybe later. Here is the lxf file: pneumapress.lxf -

[TC10] Small and Robust Compressor
9v system posted a topic in LEGO Technic, Mindstorms, Model Team and Scale Modeling
hi all I am trying to design a small robust compressor and came up with a design that works well and uses hardly any parts pictures video -
[TC10] Pneumatic Walker
trekman posted a topic in LEGO Technic, Mindstorms, Model Team and Scale Modeling
I present to you my effort in this competition. This will be a pneumatic walker, powered by a separate compressor. There will be a supply going to the pneumatic valves. These will create a sequence of eight movements at four cylinders, which should be enough to lift the legs and tilt the lower body. This is very much at development stage and will be added to until the deadline. I have a nice selection of pneumatics, which makes this contest quite appealing. -
[TC10] Forklift
Epic Technic posted a topic in LEGO Technic, Mindstorms, Model Team and Scale Modeling
This is my entry for the long waited pneumatics contest. A forklift, that uses an i2 LPE with a pneumatic drive/reverse gearbox, pneumatic steering, fork lift with tilting and probably some other functions. The whole contraption will be powered from a buggy motor pump. and controlled through a tethered (with the tubes) remote. The forklift part The forks. The powerhouse, aka the LPE which to my knowledge the the most compact i2 with large cylinders. Now the Drive/Reverse gearbox. And it paired with the LPE Now the steering. And the whole chassis And finally the pump And now the controller; I have only completed one joystick (this one is the for steering and drive) More progress will follow in the next week. To view all the picture in their full resolution follow the link:http://bricksafe.com/pages/Epic_Technic/tc10 -
[TC10] Pneumatic lift [GBC] module
Captainowie posted a topic in LEGO Technic, Mindstorms, Model Team and Scale Modeling
Hi. With the quality of entries I've seen so far, I don't like my chances of winning, but it would be nice to get a badge! I'm going to use this contest as an excuse to redo a previous model of mine - a GBC module powered by pneumatics. This is what the old version looked like: I have used it in a previous display, but it has numerous shortcomings as a GBC module. The output is not in line with the input, violating the spec. It was what I needed at the time, but it's not suitable for general use. The output is impolitely high. Again, it was what I needed at the time, but I couldn't put this into a normal circuit. It would frequently jam. It spilled lots of balls. I will be using the same sequencing (basically the simplest alternating sequence possible). I had toyed with the idea of something more complicated, but 1) I couldn't get my head around how to make the sequence I wanted, and 2) it would have been too slow anyway. I probably won't make a compressor for this one, leaving it hand-operated. The idea being that in a display it can be somewhat interactive - the audience gets to power the Contraption (or at least some portion of it). Best of luck to all entrants! Owen. -

[TC10] Caterpillar M315D
KUPOV1 posted a topic in LEGO Technic, Mindstorms, Model Team and Scale Modeling
Hello everybody, I want to share my new project. I am going to build Caterpillar wheel excavator. Featuring: -4x4 drive -one axle steering -air tank (if it'll be necesarry) -12 pneumatic pistons -7 pneumatic switches -2 small pneumatic pumps -HoG steering Rotating of main boom will be controlled manually. In main boom I will place battery box as counterweight, motor with pumps and fake engine. Trought the main technic turnable actually goes steering (black wheel), gearbox elements will be used for driving fake motor and one pneumatic hose to bottom switches. After three days of work I have got almost completed bottom of excavator and front blade. -
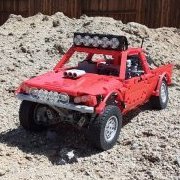
[TC10] Car Transporter
offroadcreations posted a topic in LEGO Technic, Mindstorms, Model Team and Scale Modeling
Hello All, Today I am presenting my WIP Pneumatic Car Transporter. I hope to build a truck like this one: I hope to include: HOG steering a working V6 engine opening doors many pneumatically raised and lowered (platforms?) Here is what I have in LDD so far, and IRL the body is almost complete. Please tell me what you think of it so far. Thank you! -

[HELP] Buying Third Party Parts Discussion Topic
Saberwing40k posted a topic in LEGO Technic, Mindstorms, Model Team and Scale Modeling
Well, my Bricklink and Google-fu has failed me, so I'm wondering if anyone else has found any educational sites/webshops that sell Lego pneumatic cylinders for lower than Bricklink/Brickowl, and Ebay. If you have any ideas, that would be much appreciated. Sadly, I can't seem to order any parts individually directly from Lego, so that's why I ask. Also, I did some searching, and i have found a place that is not an Ebay store, where you can get some Lego compatible pneumatic tubing. Philo actually discovered this stuff. Versilic Tubing. It's available on Amazon, under science, and lab supplies, and there are many lengths available. What you are after is the tubing that is 1/8 inch(4mm) Outside diameter, and 1/16 inch(2mm) Inside diameter. You can get 50 feet for only $30 US, which is a pretty spiffy deal. This is particularly relevant now, because we are having a pneumatic contest running now, so some people might need it. Also, I'm kind of wondering if we could maybe add a section under the index for alternative stores to Bricklink, and places to procure stuff like third party string, and pneumatic tubing, and stuff like SBrick, LifeLites, etc. -

Restoring Old Pneumatic Cylinders
Klirre posted a topic in LEGO Technic, Mindstorms, Model Team and Scale Modeling
So... I took a good look on my old pneumatic cylinders from the late 90's. They are in dire need of some lubrication, I will buy some silicone oil next time I'm in a hardware store. The biggest issue is that they're only single-acting nowadays, i.e. they extend but refuse to retract no matter how much I pump up the pressure tank. I suppose the top seal between the housing and piston is leaking pretty badly. Is there any way of fixing this? I tried opening one of them but I'm afraid of breaking them. Do i have to take them apart in order to lubricate them? Otherwise I'll try with silicone oil first and see if it helps at all. Is there any point in polishing the pistons with steel wool or does it only make things worse? Let's assume the worst, if they're shot and there's no way or fixing them, How hard is it to get hold on good large v1 cylinders? I'd prefer the old square bottom ones to match the ones I've already got. I'm thankful for all types of input, I hope there's some pneumatic guru out there who knows how to save my cylinders. -
[TC10] Metsjö Pneumatic High-Tip Trailer
Klirre posted a topic in LEGO Technic, Mindstorms, Model Team and Scale Modeling
Hi! This is my first topic on the forum, I would probably not have posted at all if it weren't for the pneumatic contest. A combination of me seeing the 42053 EW160 and finding my old lego technic from late 90's and early 00's led me to this forum filled with nice people playing with arguably the most versatile toy ever. I'm a trained mechanical engineer, though not practicing my trade yet, and looking back I believe Lego Technic was one of the big inspirations that made me choose that career path. Back in the day I had (and still have) a 8459 pneumatic wheel loader, and now I was leaning towards buying the 42053 EW160. But why not test my skills (and luck?) by making a nice little MOC for the contest. Enough drivel about the good old days, over to what I've come up with so far. Please bear with me, I am aware that you guys are way better at this, have more parts at home etc. The point of this project was to make something that I actually wanted for my already existing sets without costing a fortune for me to buy and build. It's a trailer suitable for both the 8459 and 42053, inspired by the Swedish-made trailers from Metsjö. I wanted it to be more than just a regular trailer with tipping function, so I'm aiming for a two-step high tip function which raises the rear of the bed before tipping it. The tailgate is automatically opening and closing with the tipping, thanks to a lever on each side which are connected to the frame. The final "function", so far, is a parking support in the front. This is what I've come up with so far, I must say that LDD is really bad when you want to try the functionality of your model. I still haven't figured out how to make the pneumatic circuit work as intended. The goal is to put the main switch on the Digger/Loader/Tractor pulling the trailer, leaving the two-step function automated and built into the trailer. So when you pull the lever to tip your load, it first lifts the rear, then tips. I'm hoping that my old friends, the laws of physics, will solve this for me without the need of two extra switches on board to route the air, but I suspect that Murphy's law will decide my fate in the end. So what do you guys think? Too simple and easy? Too predictable? Put on a LA and paint it gray and you'll end up with half an Arocs? Awesome? Improvements? Other ideas? If the feedback is good enough I'll just have to convince my bank account that I need to make an "investment" or two on bricklink to build it IRL. There's still a lot of things that needs testing which is not possible in LDD, so I'm a bit scared that I will have bought a bunch of bricks that won't work... metsjo-trailer.lxf -

[TC10] Classic Locomotive
Samer posted a topic in LEGO Technic, Mindstorms, Model Team and Scale Modeling
Eurobricks TC10 Classic Locomotive Updates: click here for latest update on 23-Sep Objectives Model a Classic Steam locomotive that runs using LEGO pneumatic system. The Plan (best hopes) Match an elegant locomotive as much as possible Smooth run at decent speed The Initial design The idea is to create a pneumatic engine directly driving the locomotive's wheels. The engine receives power from a pneumatic compressor and can be supported by a fly wheel function to support smoother run. Other functions such as opening doors can also be implemented. Progress My target is to first accomplish the main function, getting the locomotive to run. when it starts moving I then have to try to make the run smoother. Finally, if time allows and if my parts are enough, I may try to add some extra functions. For now I built an initial structure and started the struggle to have the engine move when pumped. -
[TC10] Volvo EW180E
Technivor posted a topic in LEGO Technic, Mindstorms, Model Team and Scale Modeling
Hi guys! Herre is my entry for the pneumatic contest. It's a volvo wheeled excavator. I was not really happy witthe new volvo excavator o I have decided to make my own Fonctions are: (Frame) HOG at the rear of the chassis; Rear stabilizers; Front blade (Turret) PF pneumatic pump operated by m motor First boom section (large pneumatic cylinder) Second boom section (large pneumatic cylinder) Bucket (Medium pneumatic cylinder) Here are the pictures: I hope you like this if you have any questions don't hesitate to post! Have a good day! -

[TC10] Unimog U 400
syclone posted a topic in LEGO Technic, Mindstorms, Model Team and Scale Modeling
Good day! Just instantly got the idea of making a unimog with pneumatic attachments. Functions that will be included: -4x4 -Fake engine with moving pistons -Pneumatic ports on front and rear -Mechanical outputs on front and rear -Attachments using these outputs -Tiltable cabin -The PTO's can be engaged to the drive -Tiltable bed -HOG For now the front axle, has steering and drive. Probably will have a pendular suspension on front. I made some more progress, in an hour the images will be, right now can't upload them. LDD file shows the actual progress. I also made a folder on Bricksafe Also I used Sariel's scale tool to get exact dimensions of the model based on the wheels -
 TECHNIC PNEUMATIC CONTEST By popular demand the next Eurobricks Technic Contest is all about Pneumatics. The new Volvo EW160E has been released recently, so it seems like a logical moment to focus on Pneumatics. In the past we've had several great Pneumatic models and recently we kind of lacked a nice manually operated model. TLG stepped up and released the Volvo. They even created a new hand pump for this model. So Pneumatics V2 is very much alive! DESCRIPTION Design a pneumatic model operated by one or more hand pumps and/or one or more (PF) motors powering one or more pneumatic pumps. So you can use motors as long as they are used to drive a pneumatic pump. They can't be used for other functions (not even to operate a pneumatic switch). There's no limit on the number of hand or motorized pumps and you can use. Third party hosing, strings and rubber bands are allowed. No other 3rd party parts. LEDs (and other LEGO lights) are permitted when you are using one or more motorized pumps. Since this contest is all about Technic and Pneumatic, Model Team entries are NOT allowed. A studded model is okay (like the excavator in the picture) but don't turn it into a Model Team entry. DEADLINE Deadline date is Monday 31st of October, 2016. Contest will be closed on Tuesday 1st of November, OR LATER. Disclaimer: I will close the contest when I see fit and when I have the time to process the results. This can be later than the deadline date. Please don't complain about this not being fair and all. RULES AND REGULATIONS The following section describes the contest specific and general rules and regulations. But before that, please take notice of a simple motto regarding the Eurobricks Contests: CONTESTS ARE FOR FUN! Of course there's competition, but at the end of the day, LEGO is just a hobby and the main goal for each of us is to have fun! CONTEST SPECIFIC RULES AND REGULATIONS Model Team entries are NOT permitted. Studded is okay, but no model team. One or more PF motors ARE permitted as long as they operate pneumatic pump(s). You CAN combine hand pumps and motorized pumps. Umbilical cords for hand pumps, switches or other operations ARE permitted. You can use ANY type of motor, as long as it's operating a pump. PF or other motorization is NOT permitted for non pump functions (not even operating a pneumatic switch). LEDs (and other LEGO lights) ARE permitted ONLY in combination with a motorized pump. There is NO limit on the number of pumps or pneumatic cylinders. 3rd party strings, hoses and rubber bands ARE permitted. Other 3rd party parts are NOT permitted. Linear actuators are NOT permitted. Electronics (PF elements used for non pump functions, SBricks and Mindstorms) are NOT permitted. Pullback motors are NOT permitted. There is NO size limit. GENERAL RULES AND REGULATIONS The contest is open to all EB members (also new members). Members who joined EB after the start of the contest can be banned from voting (when vote rigging is suspected). Voting rules will be explained later in the voting topic. One entry per member. Entries need to be new (never posted anywhere previously or shown at an event/LUG meeting). Only physical builds, so no LDD or other virtual entry. If you have any doubts about the suitability of your entry contact me, or Milan. All entries are to include only real LEGO. No clone brands, 3rd party parts, or digital entries allowed. Custom stickers are allowed. No cutting, sculpting or modifying parts. Entries are to be placed in the entry topic in this forum. Entries not in the entry topic are not eligible for voting. The entry post may be edited at any time up to the end of the contest, so feel free to make improvements if you wish. The contest might be closed later than the deadline. Don't complain about this not being fair. You have enough time to build. Don't ask for more time. We reserve the right to disqualify any entry that does not follow these rules. These rules can be changed whenever we see fit to ensure that people follow the intent of the contest. Staff members are Jim is not eligible for winning prizes. WHAT DO I NEED TO ENTER? All participant need to create a discussion topic and create a post in the entry topic. DISCUSSION TOPIC A discussion topic starting with [TC10]. A discussion topic needs to show some actual progress (i.e. pictures of the build in progress) and should NOT be used to "reserve an idea". ENTRY POST The entry post in the entry topic should contain: Entry name Short summary of the functions. One or more pictures Embedded video (mandatory) Link to the discussion topic PRIZES Prizes will be sponsored by the guys from Vengit (SBrick), for which I am of course very thankful. Keep up the good work guys. WINNERS The Top-3 contestants will receive a copy of the new Volvo EW160E! And of course they will be rewarded with a medal tag. CONTESTANTS Each contestant will be rewarded a pneumatic tag as well.
 -
TECHNIC PNEUMATIC CONTEST CONTEST INFORMATION More information about the contest can be found in the general discussion topic. WHAT DO I NEED TO ENTER? Please take a careful look at the rules before posting in this topic. Each participant is obliged to create a post in this entry topic. Posts need to follow the rules stated below. Posts not following the rules will be disqualified so please read them carefully. ENTRY POST The entry post in this topic needs to contain: Entry name Short summary of the functions. One or more images (max 10) Video (mandatory) Link to the discussion topic IMPORTANT This topic should be used for entries only, so commenting is prohibited. Please use the general discussion topic for comments on the entries.
-

[MOC] Full RC Compact Excavator
Anto posted a topic in LEGO Technic, Mindstorms, Model Team and Scale Modeling
This MOC was built after 2 other attempts, 2 years ago and these didn't work. (I can explain a little the reasons if someone is interested) The design was difficult to do because of the round shapes. But I think the result is so good. You tell me ! The functions are : Left track Right track Blade Rotation of the turret 1st section of the arm 2nd section of the arm Moving the bucket Rotation of the arm (right/left) Opening/closing the clamp (pneumatic) All the functions are powered by M motors, except the rotation of the turret. But there are 9 functions, and it is possible to control just 8 functions with the IR system. How it's possible ? It's quite simple ! A gearbox allows to choose between "rotation of the arm" or "opening/closing the clamp". The chassis is very compact. It has 4 motors and 1 IR ! The mechanism of the rotation of the turret is not visible (the turret is too compact ! ^^) The rotation is quite fast (not too slow). Here you can see the motor actioning the 1st section of the arm. The motors of the 2nd section of the arm and the bucket are placed inside the arm. The last motor is placed in the middle of the chassis. It actuates the gearbox and you can choose the function to activate. With the clamp, there are a bucket and forks. -

Liebherr R974 Pneumatic Excavator
Sariel posted a topic in LEGO Technic, Mindstorms, Model Team and Scale Modeling
Here's my model of a classic Liebherr exavator. I'm not overly happy with it, but my primary goal - full remote control of all pneumatics with a high degree of accuracy - was achieved. Oh, and that custom LED beacon is available here: http://bit.ly/buybeacon Photos & reading: http://sariel.pl/201...atic-excavator/ -

[MOC] Pneumatic Grader
paave posted a topic in LEGO Technic, Mindstorms, Model Team and Scale Modeling
This is my first pneumatic MOC, and with no PF. It is based on GS-18.05 grader. I tried experimental placing of the cylinders to keep its look realistic. Features & Functions: Turnable control (moving down/up/left/right/incline) Blade control (moving aside/down/up/turning around) Dozer blade lifting/lowering Ripper lifting/lowering Frame turning Front wheels turning Front wheels incline Video: Some more pictures: Building Instruction: -

[MOC][WIP] DuraStar Tow Truck
Thirdwigg posted a topic in LEGO Technic, Mindstorms, Model Team and Scale Modeling
I am in a little bit of a creative lull right now, so I decided I needed to make something small and quick. I very much enjoyed doing the quick build of the 911 I did earlier this year. There was something enjoyable about posting nightly, and watching how something comes together in the course of a week or two. Plus the feedback was enjoyable and contributed to a better MOC. So I decided to do a small tow truck: an International DuraStar. Since I have spent so much money on many pneumatic parts, but find myself decidedly in the Linear Actuator camp, I figured a MOC with pneumatics would be a good challenge. The MOC will feature: Steering Drive Fake motor Winch Crane Crane extension Car lift Final colors will be yellow with blue highlights. Here is the first WIP picture, and more will be posted nightly (roughly). Here we go! -
[MOC] Dump Truck 8x8
Lucio Switch posted a topic in LEGO Technic, Mindstorms, Model Team and Scale Modeling
Hi to everybody! It's been a while from my last MOC...a year and 1 day to be precise ..well, how some of you already knew, the last year I bought and refurbished a home and that involved much of my free time. Now that the home is almost finished (I doubt that it ever will), a baby is coming ...that's mean that I'm planning to do instructions, but I don't know when. Now, that's my new MOC. It's a Dump truck 8x8. The scale is about 1:11. It was inspired by the Iveco Trakker (more than anything else to derive the dimensions), but the front grid ended to be more a beheaded batman logo. It's 8 wheels drive, moved by 4XL Motors connected to the wheels via a driveline, it has a differential per axle. 2 XL Motors drive the 1st and the 2nd axle and the other 2 drive the 3rd and 4th axles. This allow to have a virtual central diff and stress a bit less the drivetrain since the torque is splitted. A fake 6-inline engine is connected to the driveline of the 1st and 2nd axles. The 1st and the 2nd are steering axles via 2 PF Servo motors (one for each axle), with different turning radius and working steering wheel. The suspensions system consists in 4 live axles. Shock absorbers for the 1st and 2nd axles, with an anti-roll bar for the 1st axle, leaf springs for the 3rd and 4th. The Pneumatic system consists in 2 small pump driven by an L motor, that provide compressed air for tilting the cab, elevate the bed and to an hypothetical trailer. The lightening system consist in 4 PF Led, 2 in the front and 2 in the back for the headlights (and 2 extension wires). In the back there is a connector where is possible to connect lights of a trailer. There is even a winch in the front moved by an L Motor. It uses 2 SBrick that control everything, with the exeption of tilting the cab and providing compressed air to the trailer, that are actuated manually. It has openable doors (manually) that allow access to detailed interiors of the cab and it has a trailer coupling. The truck itself is built to be a base for several future MOC/MOD. In fact, tipping bed system a part, everything is contained in the chassis or in the side tanks. Weight and dimensions: Length: 93 studs (74.4 cm) Width: 29 studs (23.2 cm) (without mirrors) Height: 42 studs (33.6 cm) (without antennas) Weight: 6 Kg PF elements: 4 XL Motors for drive. 3 Servo Motors, 2 for steering and 1 for the tipping bed pneumatic valve. 2 L Motors, 1 for the pneumatic pump and 1 for the winch. 4 Led, 2 in the front and 2 in the back. 2 Li-Po battery. 2 SBrick. 4 20cm extension cables. 1 50cm extension cables. Pneumatic elements: 3 new long pneumatic cylinders 2 new small pneumatic pumps 3 pneumatic valves 2 M pneumatic cylinders A video is coming soon For more pics see: https://www.flickr.c...157667401525315 I hope you like it! -

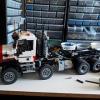
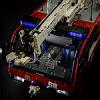
[WIP] MAN TGS 44.480 8X8
TheItalianBrick posted a topic in LEGO Technic, Mindstorms, Model Team and Scale Modeling
Hello, this is a WIP of my latest moc: a MAN TGS 8X8 leafspring suspended fully RC with autovalve compressor pump! Plus many other features and functions. It also features many attachments, like a Fassi F1950 XP crane fully RC using new pneumatic V2 system! It also has a dumping load bed, a front snow plow (this will be shown later on when completed! The idea is to use the cabin and chassis as a starting base to develop more mocs like the XXL version of the same truck, 3 axle, 4 axle, 5 axle. Functions: - 8X8 driver train driven by 1 L motor - Realistic steering system with levers (plus different angles between 1 and 2 axle) steered by an M motor - Pneumatic compressor with autovalve powered by an L motor - 2 IR receivers that controls the drive, steer, 1 pneumatic switches (in this case used for tipping the bed) and 1 more motor for extra function (in this case used to rotate the crane) More pics here: http://bricksafe.com/pages/TheItalianBrick/fassi-f1950-xp http://bricksafe.com/pages/TheItalianBrick/man-tgs-44.480-8x8 I'll progress I'll take more and better pics. Enjoy what I have so far! And this is the crane, it's also a WIP but so far I'm happy with the result! -

[MOC] Mining Dumper
jorgeopesi posted a topic in LEGO Technic, Mindstorms, Model Team and Scale Modeling
I can finally disassemble this , my first "complex" MOC with instructions. At first I thought to do a specific dumper, a white liebherr, but at the end I did a generic truck because I didn´t want uncommon pieces and I wanted to use less room as I can. Everything is in the vid, is a simple MOC, very tight but simple I think. You can see the construction post here - http://www.eurobricks.com/forum/index.php?showtopic=112319&st=0 . I hope you like it. http://www.youtube.com/watch?v=e3BMUcXSgqU&feature=youtu.be '>http://http://www.youtube.com/watch?v=otIHXDS_dS0&feature=youtu.be
