Search the Community
Showing results for tags '9v'.
Found 135 results
-
Dear Lego Fans, While at work, my colleges and I were talking about how awesome it would be to connect our work desks with a cargo train to haul post-it notes, candy and office utilities around our office. I offered to bring my old Lego train set and we set it up during our lunch break. It has really relighted my love for Lego trains! I got my first Lego set around 1999/2000 with the blue and white Lego Railway Express (Set 4561). Being a kid at that time, I could not afford much Lego. I got a few track-packs and switches and intersections. I also bought a Santa Fe engine and one of the cars with it. I've stopped playing with lego all together roundabout 2006/2007 when the first RC train sets were released and 9V systems were retired. It's been 10 years since I last got my train set out and now being an adult with money on my hands, I really feel like getting back into the Lego trains that I so dearly loved as a child. I'm now faced with a few problems since the 9V system is no longer available. For one I know very little to nothing about the new train sets. I'm wondering wether it's worth buying a new train set or not, which train set to get, or just lurk around eBay to see if someone might want to sell their old 9V system. I'm thinking of building a new, larger layout in my basement once I bring home my train set from the office. As far as I know, all the rolling stock will work fine on the new rails and the new trains run fine on the 9V track. so to conclude, here's a list of questions I have: - Are there any train sets out right now that I should get? - Are there any train sets coming out in the near future that are worth waiting for? - Should I not care about the new train systems at all and check eBay frequently for old 9V sets? If anyone is interested, I will post some pictures of our little office-cargo-train thank you in advance!
-
Hello all, in the last month I was working on three articles written in Hungarian language to use it as a standard for our train fan community. Last week I decided to translate it to English as well, and here it is for all those who needs advice on simply layouts, ideas for train station geometries and possible usages of Holger Matthes' long radius curves built from straight tracks. The three main sections of article (from original Hungarian articles) are the following: 1. Basic geometry rules and simple tricks - mostly based on Bill Ward's article on Brickpile, but including some own ideas 2. Station geometries - ideas for small, simple stations, station with through lines, building connections between parallel lines, using flextrack in 9V-setting, widening distance between tracks for platforms 3. Long radius curves built from straight tracks: ideas to use these not only in full loops, but at station geometries as well. Article contains URL to .bbm file as well to download it (made in BlueBrick version 1.8.1.). Article is at my Google Drive, since Brickshelf didn't allow me to upload in .pdf format: https://drive.google.com/file/d/0B2pGVpZyXf5hU3NYRWNuRkVCbHM/view?usp=sharing&resourcekey=0-HwAH24JRnsFAFtsowbF3cw
-
Hi all MOCers, I finished this MOC of Budapest tramway approx a year ago but I never had time to take some photos and show it to the community. So, here it is. The original tram was manufactured by CKD in Czechoslovakia for Budapest Transport company. A total of 322 cars were delivered between 1979 and 1984 (and all of them still running). In the first times they were used to go single (they have driver's cab only on one end so they needed loops on end stations), then with the growth of the number of passangers they started to operate them coupling two or three cars together. Now these trams run in line 1 and 14 with three cars and line 12,17,28,37,41,56,56A,59,59B,61 with two cars. The LEGO-tram runs using its 2 9V train motors, each car has one motor. Other bogie is dummy, however it uses train wheels, because the standard wheel holder part is simply two high for this application. I'm proud on the pantograph design, but I know, some of the purist won't like the cut and curved 3 mm diameter hose. Unfortunately the clip with bar holder doesn't exist in red colour - a red pantograph could be autenthic, however due to weathering and coal-dust from upper part they are only red a couple of days after painting, then they become black. Hope, you like it. Please leave your comments and critics here. :)
-
hi everyone in this topic I'll show my collection of trains to start, a moc I made using pieces I had laying around
-
Hello there! Recently I have taken my time to wash and sort my old inventory of Lego pieces. Parts from way back in the 70s (which were donated to me when I was about 5), parts and complete sets from my childhood (including the wonderful Set 740) up to my last Lego Technic Set (8868). After that last technic set, my Dark Age set in and lasted until 2016, nearly 23 years... and I just came out of my Dark Ages because of my little son, as I am preparing to get a hold of the old sets (hopefully complete) to give them to him as presents over the next years. Well, it didn't take long to completely draw me into the fascination of building with Lego again. When I gathered the pieces to put together my Metro Liner (4558) and, after a sleepless night, I had my Railroad Crossing (4539) complete as well, I suddenly ended up buying some extra tracks, points and even a crossing. Some of that extra track came with two very, very incomplete sets: No 1, the Load and Haul Railroad (4563) and No 2. Freight and Crane Railway (4565). Basically, there is no single engine or rolling stock anywhere near complete. 20% of the pieces are existant at best. At the moment I am trying to restore those as possible with my limited inventory. So, that's how I ended up here, searching for clever tips and tricks to somehow finish those two sets with my limited amount of bricks and trying to get some insight to what is new on the topic of Lego trains. And maybe build some MOCs too, while I'm at it Thanks for reading and have a good time building, Capparezza
-
Hi, I have probably a 20-25 year old motor that only on the straights jitters/loses connections and looks to be slightly bouncing. The track is clean because other motors work flawlessly on it. I am wondering if I need to take it apart or if something could be warped. I'd rather not have to buy another $50-$80 motor for my metroliner if I don't have to. Thanks -RailCo
-
I have some difficulties in placing this topic in correct section. Should it be Trains? On the other hand it is supposed to work in a modular town, that's why I put it in Town. This is my biggest creation so far. Actually those are two modulars designed to be placed together on a display. The depth is 48 studs instead of regular 32 because of tracks and platform. I decided it was unrealistic to stick to 32 and still have decent building. Anyway, on with presentation :) What I hope is apparent from the picture above is that I incorporated some lights into these structures. The old 9V battery box is in the warehouse and gives power to all six pairs of lights (2x 9V in warehouse and 4x PF in station). There is also old style 9V switch that controls turning lights on and off without the need to reach for the battery box (black switch on the side of the warehouse). Before I show you the warehouse let's have a look at the platform: The warehouse: This is how the electric parts are distributed in the warehouse. You can also see the inside with some pallets and a cupboard for employees. Now, let's have a look at the station building: First - the roof. This is where I put all the lights that go with the station. This is how it looks like from the underside: That's 4 pairs of PF lights, one PF extension cable and one 9V cable to provide easy to disconnect outlet. The station itself has some nice flowers on the front, benches for passengers, some roof over the platform and a phone booth. That's what you could already see from the outside. So let's have a look inside :) There is a bit o a stir at the moment because of some careless passenger. Don't worry - this is being cleaned as we speak :) Looking from the front of the station you have confectionery that sells ice cream too and on the right your typical railway station fast food stand (with microwave in case your yesterday pizza is cold! :D) Looking from the platform side on the left there are some tables belonging to the restaurant, ticket booth and some waiting area. On the right there is an obligatory public toilet :), two gaming machines and luggage deposit lockers. If you wonder how it looks in town - its natural environment - here are just a couple of pictures: Full gallery is available as always on my Bricksafe: http://bricksafe.com...-with-warehouse
-
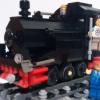
Dear All, From the MTRkustoms train Factory i have the pleasure to announce my latest MOC, After some Spanish Train MOCs I wanted to make a Steam Locomotive, and I Started with the biggest and more powerful Spanish Steam, the “Santa Fe” 151 (French/Spanish) 2-10-2 (Whyte) This locomotive was able to pull a 450 tons train at 30km/h and a slope of 20mils The most difficult challenge was create a MOC that can run in R104 Blastemtrack, and R40 curves. To get the power I use a 9v dummy motor to pick up energy and 2 L PF Motors inside the boiler attached to the 9v pickup, is not a fast MOC, but is a very powerful Locomotive DIMENSIONS Locomotive length: 45 studs Tender length: 25 studs Total length: 70 studs Height: 9 bricks 7 wide Details To be a complete MOC I made some type of cars, 1 Closed boxcar, 5 open coal cars, and one caboose car. Details These 2 axle wagons have a flex hose coupling to be connected and allow Little turn of the axles. Also the coal wagons have an aperture system for the next project. All the pictures in Flickr Album And a little Video: Enjoy it
-
The idea for this work has come from the LDD model posted by the member Mudoch17 here: http://www.eurobrick...howtopic=119791 The main rail car is built on a 9v motor using a 4,5v loco base and the wagon is built on a regular 16x6 plate. So, event they look similar, they were built in different ways. More pictures could be seen here: https://www.flickr.c...157667833314506 LEGO Tram 05 by Severus A, on Flickr LEGO Tram 04 by Severus A, on Flickr LEGO tram 03 by Severus A, on Flickr
-

Getting started with monorail (how bad an idea is this) . . . .
Breakdown posted a topic in LEGO Train Tech
I'm not sure whether to consider myself lucky or unlucky since I have an addictive personality. I know the basics. The three sets 6990, 6991 & 6399 and some of the aspects that make all of them unique. I also know that Mono means one and rail means . . . . (wait for it) . . . . . rail. I managed to land a second-offer for $75 on a really mixed bag on e-bay. All of the baseplates for airport 6392, instructions for 6395, 577 and a whole bunch of other stuff. 4 long monorail turns, 9 long straights, and one extremely short straight, and a bunch of stands for the monorail. I also got at least one (I think two) of the baseplate bogie things to build the monorail on the 6990 instructions, random pieces from the set, & the 9V battery box. There's a couple of things that I'm obviously missing off the hop. The first is the motor (currently bidding on one on E-bay) - wish me luck! My winnings are currently at my US warehouse so I cannot really view them (might have to wait till mid-May) I obviously want a couple of those pieces to stop or reserve the train in the interim and then afterwards some incline tracks and switches (all of which will be expensive). Is there anything that I need to know right away?? Other than the fact that I might want some old-school light grey 1 X 4 plates stat??? Kind of patiently waiting to see what I do have in this oddity lot, there's a chassis from model team, another from Technic, the car carrier and the supports for the raceway 6395. Windup motor, pull-back motor, weird plane wheels, a police boat?? By far this is the single most screwed up lot of lego that I've ever purchased. I've put the link below if you want to check it out (guy who won had zero feedback and didn't pay, hence the price discrepancy, I should mention that the pics of the guy's socks haven't led me to fall in love with him. http://www.ebay.com/itm/Vintage-lego-set-pieces-monorail-boat-power-station-futuron-books-accesories-/221737792641 -
I have almost completely migrated to PF powered models, but still build som "old" 9Volt powered models. When building small shunter yard locomotives, it certainly helps to only have a 9V motor, and to be able to focus on detailing more than hiding bulky PF components. My design is partly based on E69:s built by PolLUG and LatLUG. Base is 7wide with 6wide hoods and 6 2/3 studs cabin, and overall length just 16studs (buffers not counted). With extensive use of SNOT and various offsets, I think the look is quite prototypical. Feel free to comment. (if I manage to upload photos.....)
-
A little history: I was about to pull the trigger on the altBricks track. I literally had the content uploaded to Kick Starter but needed to tie up some loose ends before posting and then, BAM, the ME KS project was public. But alas still no metal track... I considered releasing the altBricks version at the same time but worried that the ME KS project already tapped the funds of the LEGO train enthusiasts. I figured out a way to make metal and plastic track relatively simple in one mold for all 4 curves (or 3 curves and 1 straight). It's a one piece track sections (like LEGO track) that is 100% connector compatible to LEGO track. The beauty of the altBricks system is that one simple machining process on industry standard HO nickle silver rail satisfies any radius curve or straight length. I made prototypes, a half dozen of these straight tracks and a 1/4 circle R88 (I think 8 segments) using ME rails and they all work fantastically. I would continue to do this for my whole home layout but its a big pain in the butt to retro-fit plastic rails and you tend to mess up 1 out of 6 times destroying the plastic track. The question now is do I make this process public domain? If so, I hope that if someone runs with the idea they pay me 3 full circles of each radius and some straights as royalty :-) Or should I do a Kick Starter project and have altBricks do this? A better idea is if the ME guys would agree to talk with me, they are the most logical company to do this and this solution can work in their system too. And my royalty seems pretty reasonable. :-) Your thoughts? Thanks, SteveB altBricks
-
Hey Guys hope you are all having a wonderful 2016! I have another shunter built today (If you haven't noticed I have build a couple, they're just a fun way to pack things into one small package). The Idea came to me recently one night that I liked the 7760 but will never be able to afford it while I also enjoyed the red/white color scheme of the 4563 Load N' Haul engine. So I thought to combine the two and make it look more modern but still have that classic style we all love. Here it is Enjoy! MOC: The Combo Shunter (Mix of 4563 and 7760 plus a modern twist) by Rail Co, on Flickr Love the classic train drivers, he doesn't seem very smart for hanging all the way outside the door... MOC: The Combo Shunter (Mix of 4563 and 7760 plus a modern twist) by Rail Co, on Flickr A side view here you can see the under carriage detail but for a more "bright" but iffy quality picture you can check my flickr. MOC: The Combo Shunter (Mix of 4563 and 7760 plus a modern twist) by Rail Co, on Flickr The front view shows the front grill along with something I haven't personally put a model yes which is a SNOT window design which is built sideways. MOC: The Combo Shunter (Mix of 4563 and 7760 plus a modern twist) by Rail Co, on Flickr Back view nothing to exciting to show here. MOC: The Combo Shunter (Mix of 4563 and 7760 plus a modern twist) by Rail Co, on Flickr Some of the cab detail. Sorry for my camera doesn't do close-ups well at all. MOC: The Combo Shunter (Mix of 4563 and 7760 plus a modern twist) by Rail Co, on Flickr Thank you all very much for looking. A with all my MOCS constructive criticism s always welcome along with compliments alike. Keep on Chuggin -RailCo
-
Hello guys I am starting to get into 9v now and I have 5 motors. They all run at different speeds and some are slower when they first start but get faster when they have been running for a minute or two. I am wondering if anyone has tips and tricks to fix/tune up or clean the motors so that they all run at the same speed. They all run fine it's just some run slower. Thanks -RailCo
-
The story behind Born in the late 70s, I grew up in the 80s. My favourite themes were town (I received nearly all town sets from that era), and technic. Moreover, I'd always like to have one of those beautiful 4,5/12V train sets, like 7735 or 7745. But my parents told me that I could either get technic stuff set or train sets, but not both themes together. So, it always ended up with increasing my technic collection... In 1991, I saw a new chance. A new system, a new era. 4563 was the set to go. But again, my parents refused, arguing that I would be too old for Lego in general. They were right, I went on to buy my first computer (which is another story) and bought my last Lego sets in 1992. The dark ages started. But they were not 100% dark, as I never missed to grab the new catalog each year, what helped to keep me on track. Some years ago, the dark ages were gone and I went into PF trains. Simply because they were available easily, they were affordable and they were close to 80s looks and standards. In contrast to the city theme, where cars and everything else seems to be extremely blown up, compared to 80s 4wide standards. The story today I never planned to get into 9V trains. TLG has dropped the 9V system quite some years ago, even the support has ended. Sets and parts are highly sought after, and therefore rather expensive, even if they are in used condition. But some days ago, it happened: I managed to get an unbuilt 4558 Metroliner at a reasonable price. I just couldn't resist. Seals are loose due to age, but the parts are still in their trans-clear bags. Opening the set The top of the box looks rather worn: Parts in sorting tray and polybags: Sorting tray, foil is still sticking firmy: Compared to today's sets, the amount of parts looks somewhat small: Instructions in perfect condition, stickers look also very good: What's next? I don't know. Keep the set unbuilt? Build it? Try to get a box which is in better condition? Try to swap it against an unbuilt 4563 set?
-
Hello everyone. I'm new here and I have a question regarding the possible voltage for 9V Lego train motors. First of all, I'm from germany and 34 years old. I've played and build with Lego since I was 4. I loved the 12V trains back in the 80's and their advantages over newer systems. But the 12V system had a big disadvantage: the middle power tracks. I absolutely hated them because of the looks and that they bend up often so the trains got stuck. I love the 9V tracks and currently I run every train on 9V and use my 12V transformator for trainstation and town lights and for remote the railroad crossing. So I use 2 transformators, one 9V and one 12V. It would be nice to use only one of them. And that would be the 12V because the 9V is not strong enough to power the lights and has no seperate connection that is always at full power. So remote the railroad crossing is impossible too. But it would be possible for me to connect the 12V transformator to the 9V tracks. Now my question: Would a 9V train motor run at 12V? Or will it get too hot or even burn? I hope someone here can answer my question or has any other ideas. Thanx^^
-

9V motor issues - replace or convert to Power Functions?
Tannerman posted a topic in LEGO Train Tech
Long time reader, first time poster. So back in 2002 I picked up 4535 LEGO Express Deluxe to run around our Christmas tree. It features a 10205 My Own Train engine and tender with 9V motor and light package. I typically only run it around the holidays (after cleaning all the track, etc), but over the past few years I've been having issues with the motor. This year I'm noticing that it just runs for awhile... and then stops, almost as if its overheating or something. If I wait a while (5-10 minutes), the motor seems to work once again. My gut is that the motor is giving out on me finally, but wanted to confirm with those in the know. That said, if my 9V motor is failing, I'm looking at affordable next steps -- and also trying to keep a 4-year-old boy pretty happy. Do I suck up secondary market prices and buy another 9V motor or do I make the jump to Power Functions? If the latter, then I don't know really where to start regarding what I'd need to purchase from BrickLink, etc. Any help or advice would be appreciated (Also, if anyone has successfully converted this engine/tender combo to PF, I'm all ears). Thanks in advance! - Steve -
I've recently picked up the 12v controller and a signal set, and intend to pick up some lamps too. I really like both the look and the way they are controlled. I also love the way it's all controlled from one central control unit. So here's my question: Has anybody either modified the innards of the 12v controller to drive 9v or modified 12v motors and controller to rail wires to run without the central rails? I'm keeping my mind pretty open at the moment, just looking for ideas that (with the minimum of modifying aging mechanisms) that would allow me to use any part of the 12v system on a more modernly powered layout. Worst case scenario, I'll just use the controller as a signalbox and nothing more, it's still pretty cool. :)
-
Dear all Train Tech guys, Thanks to the kindness of SBrick team I got two SBrick units for some testing - one of them was built into my LEGO MÁV Stadler FLIRT electric motor unit, another one into my LEGO MÁV Siemens Taurus electric locomotive. We tried as well to install SBrick between 9V Train Speed regulator and a loop of 9V track, where usual 9V-based trams were running. Fig.1. TFOL driving SBrick-controlled Stadler FLIRT on our layout. 1. SBrick installation For first, a quick overview for those, who don’t know, how SBrick works. If you are familiar with the smart brick, you surely can skip this chapter. To imagine SBrick it is the easiest to think about a normal LEGO Power Functions IR Receiver with four outputs, more channels and without the restriction of the infrared technology - with other words your smartphone or device doesn’t need “visual” contact to the receiver unit, thanks to the bluetooth connection. Also it works surely fine within the range of 50 metres, but by good circumstances it works from 100 metres as well. Other great advantage, that SBrick’s current limitation is 3 Ampers per output, while PF IR receiver has 800 mA - better choice if you want to run something heavier then avarage 6W trains. Fig.2. The SmartBrick unit. (Photo taken from sbrick.com.) SBrick could be powered with normal LEGO battery boxes or LiPo rechargeable battery with a Power Function extension cable. It is also possible to power SBrick from old 9V battery boxes or even a 9V Train Speed Regulator, using the 9V/PF end of the extension cable. In this case you should check, if the little green light on SBrick is on - depending on polarity the SBrick is enpowered, or nothing happens. You can plug on your train motors, lights, other PF motors on the SBrick’s four outputs. Next step is to design your remote control interface for your device. To do this, you need to be registered on social.sbrick.com, then go to designer.sbrick.com to create your profiles. The profile designer works in most of the web browsers properly, you can add sliders, joysticks and buttons to it. It is really advised to fill the “name” field in setting - later you need to know, which slider do what when configuring SBrick. Sliders work like old RC Train Remote control, joystick is an advanced slider, buttons works like turn on and off. For all controllers you can configure maximum output - if you want to limit your train’s maximum speed, quite easy to do, setting a value lower then 1 to maximum output. Also you can set up, if the controller will reset to zero or not, when you stop touching the screen of your device. You can set background for your controller, you can change the design of the sliders, joysticks and buttons - we have dozen of previously created ones, but you can use also own-designed images as well. Fig.3. My profiles designed for event TEMOFESZT 2015. Upper one manages three SBricks at the same time, a tram line with a slider, the ferris-wheel with a button (0.3 maximum output) and two other sliders my FLIRT train. Theoretically, if your screen is big enough, you can manage 16 SBricks and 64 funtions at the same time from the same device - perfect tool to operate a whole layout. After the profile is done, you should connect your MOC to your device. To do this, you need the SBrick application (or for quick play SBrick Tester application). Create a new Creation in SBrick application, turn on SBrick in your MOC, add SBrick to your creation and download your profile to your device. Then click connected SBrick (or SBricks) in your Creations menu, and pair sliders and buttons (if you named them before, it is easier :) ) to the outputs (A,B,C,D) of the SBrick in your MOC. After doing this, click the profile in the app you made for your MOC, and start playing :) 2. SBrick & Stadler FLIRT Surely most of you know this creation. It is my 8 stud wide electric motor unit, the original train manufactured by the swiss Stadler company. The LEGO train’s weight is around 3,5 kg-s, previously it was driven by two 9V train motors and two PF train motors, connected to 9V ones. The train also has front-tail lights (using modded PF leds, described in RailBricks #9) and interior lights - three functions to operate. Fig.4. Cables and cables - all of my train’s funtions connected to the SBrick unit. The bigger battery box (which never turns off) grants continiouos availability until the batteries die. As before, I sacrificed the toilette part of the interior to install electric parts - the big AA battery box powers the SBrick unit, and functions are mounted on the outputs. I had a small issue here with the design of the SBrick - if you plug more than one PF cables on the lower (C,D) outputs, it will be inpossible to plug any to A and B. So if you have to plug more than one on some output, you should put them on A and B, or if three output needs more than one plugs, you should insert an additional extension cable first to lower one C and D, and then plug your needed cable ends to the extension cable. In the train now boogie 2 and 4 are driven - 9V train motors are removed, and normal train wheels replaced them at boogie 1 and 5. The third (middle) boogie is unpowered as well. Operating the train is quite easy, if you learn, how to use your touchscreen properly. Since I have direction dependent front-tail lights, I named on my profile (refer to Fig.3) the two ends of my train “A” and “B”, just like the real thing. When starting, I always turn on lights for first, and later if I press the same direction of driving slider, the train will start into the direction of three white lights on it’s front. This could be especially important, when you have a layout where trains are running not only around on one loop, but they direction can be changed at wye-s, and you can’t exactly remember, which end is which on your fully symmetric train or loco. Fig.5. Wye-s designed by Bill Ward. Perfect way to get lost, where your train will depart when you touch the screen, or even turn the PF remote control around. Operation time was fine - the SBrick unit doesn’t take more power than the PF receiver unit, with the pack of AA rechargeable batteries I operated my train for a full day (exhibiton was opened between 10 am and 6 pm), the train was running for 2,5-3 hours before powered down, and it wasn’t turned off for all the day. Also I tested the train at home for continouos running - after 15-20 mins the PF-train motors got too hot and and train stopped, while SBricks temperature raised from 36-38 °C to 44-46 °C. (You can get voltage and temperature data using the SBrick tester application.) The SBrick unit works fine - I doubted it will manage my quite heavy train (compared to avarage trains built by AFOLs), but it served really good - the more problems I had with the software part. The SBrick application written for Android have several problems - not serious ones, but quite annoying. Connection problems Sometimes the application can’t reconnect to the SBrick. It happens when you exit from the driving screen from your smartphone or tablet (in this case the connection will be dropped automatically), and then you turn on again your controller - it starts to reconnect, then askes if SBrick is powered. This connection issue may happen if you connect your MOC from an another device while the first device is disconnected - until you are connected to the MOC with the second device, you can’t reconnect with the first one. The reconnection problem happened when the second device got disconnected as well. Also using the SBrick and SBrick tester applications from the same device can lead to this reconnection problem. Fortunately, all outputs of the SBrick are resetted to zero when you device loses connection with your train, so no accidents may happen. Fixing connection problems As I experienced, restarting SBrick application helps in most of the cases. If this doesn’t help, in your creation’s menu you should remove the SBrick, then add it again, reconfigure it, and it will work. Application crashes Smartbirck application crashed for dozen times during the three days - mostly when attempting to reconnect. Slider problem Basically I used “slider”-s to drive my trains. I don’t exactly know, how the software part of the sliders are written, but the first 80% of the length of the slider from zero (middle) point is quite useless in train operations. After reaching 80%, the train starts slowly moving, but it is really hard to set up the train speed properly on the remaining 20% length of the slider bar. As far as I know a totally new application for SBrick is under contruction, so the output function for the sliders and joysticks will be redesigned in the near future to avoid this problem, and hopefully previously mentioned connection problems and crashes will disappear as well. 3. SBrick & Siemens Taurus locomotive During the summer event of Kockajáték Club I installed one the SBricks to my Siemens Taurus locomotive. The loco works with two Power Function train motors, connected to the old RC train base - SBrick was placed on the output of the train base, so to turn it on for first I needed to give maximum power from the train base. Check this video of the locomotive pulling cars, and controlled from a distance. With this locomotive we made also some fun tests with the train guys hanging around - we put ten of our 8W, 58-64 stud long coaches on the locomotive to pull them. When the magnet coupling didn’t fail (with careful driving) the SBrick unit (and the two PF train motors) could pull all the cars, but the SmartBrick got really hot in less than 5 minutes - we reached the 90 °C temperature easily, and the SBrick got shut down by temperature protection. After couple of seconds it cooled down, and the smartphone reconnected to it. The whole weight of the pulled train was around 11 kilograms. 4. Controlling traditional 9V lines with SmartBrick Using an SBrick doesn’t mean you have to give up your 9V trains, tracks and motors. Get a 9V speed regulator, put SBrick on its output with a PF extension cable, and use the same cable to enpower the 9V loop, putting the dark bluish gray end on the Smartbrick and the light bluish gray end to the part you connect to the 9V tracks. Turn on speed regulator to maximum, put a 9V train on the loop - and now your 9V creation could be controlled from everywhere in a 50 metres radius circle, not just from the speed regulator. Putting more sliders connected to more loops will give you the oppourtunity to controll all your layout from the same place, while you don’t need tons of 9V extension cables to put every speed regulator at the same place. SBrick is even a powerful tool when you don’t have loops, just sections isolated from each other, like analogous model railway - every section could be controlled as described by loops. If you motorise switches with PF motors and connect them to SBrick, you can manage almost everything only using your touchscreen. 5. Conclusions SBrick is a powerful device to make your LEGO trains work with minor issues. The greatest advantage of SBrick that you need no vision to the receiver unit and you can controll your trains from a great distance - no more runaway trains thanks to the limitations of PF IR receiver. SBricks is also compatible with older 9V-based stuff - those who doesn’t want to switch to the newest LEGO train system can use it as well. The current limitation allows you to make really big and heavy trains to run - which is almost impossible when using original PF IR receiver. On the other hand - one SBrick unit is quite expensive, one brick costs £40 and taxes. However this price is not that high if you compare the possibilities to the possibilities what three PF IR receivers can give you for the same amount of money. Current SBrick application has minor issues as well, crashes and disconnects are quite annoying, and the application won’t work propely on all Android-based smart devices. For final words, I really advise to everyone who is into trains, especially at big shows to make a try with SmartBrick. Running only one train with your phone or controlling a whole layout with one screen - the decision is up to you. Video of the functions described above:
-
Hello everyone! It's me again and I'm coming with a new project :) Great Ball Contraption has been always fascinating to me. And few weeks ago I decided to start building my own layout. In this topic I will be showing you the progress on my GBC. Here is the first module - the elevator: Watch the video to see how it works: I'm now working on another module with NXT :)
-

[HELP] Fixing Micromotors
9v system posted a topic in LEGO Technic, Mindstorms, Model Team and Scale Modeling
hi all I have tried two time to get a dead micro motor back to life and so far I have been able to get them working but then I try do get rid of the magnetic powder and that kills the motor when I try to put power through it. has anyone been able to successfully get them working again without having to take them apart again? if so can you tell me how you did it? thanks 9v system -
This is a tutorial detailing how to modify a LEGO 9V train motor so that it may be powered independently of the track. This effort is part of a larger project inspired by Thorsten Benter’s article in Railbricks Issue 7 titled “PF and 9V Trains: The Best of Both Worlds”. Step 1) Open the 9V motor. This has been covered elsewhere, so it should suffice to say you carefully remove the 12 tabs holding the bottom cover on with an xacto blade or something similar. There is enough friction to hold the bottom cover in place later even without the tabs. Step 2) Remove all internal parts. Ignore the fact that I took this photo after completing step 3. Step 3) Use a rotary tool with a cutoff disk to bisect the metal strips in the top of the motor enclosure. These strips are exposed in the top studs, and we will later use them to pull power from the track and apply power to the motor. Very important: Be sure to apply NO PRESSURE when using the rotary tool. Instead, just lightly touch the spinning cutoff disk against the metal strip, and let the tool do the work. It will take some time, so be patient and careful. If you apply pressure, the metal strips will heat up and deform the plastic. If the plastic deforms, it will be impossible to interface with LEGO bricks and PCB adapters (like the one in the upper-right corner of the picture). Keep it light and easy. You will thank yourself later when you haven’t ruined your motor’s plastic housing. Step 4) Desolder the metal pieces from the electric motor. I don’t have a picture of this exact step because I used the electric motor from a Power Functions train motor. If replacing the 9V motor with a Power Functions motor, open up the PF train motor using a T6 bit, remove the electric motor, and desolder it from the wires. Step 5) Solder a short length of wire to each tab on the electric motor (do this outside the housing to avoid accidently melting it). I used 32 gauge DCC decoder wire, but you can use whatever you have that will fit inside the motor. Reassemble the motor with exception of the wheels and the bottom cover. Step 6) Attach the wires to the outermost halves of the metal strips; the innermost halves are connected to the wheels through the wipers. I used a silver epoxy for this. I chose silver epoxy for two reasons: 1) I didn’t want to risk melting the studs by soldering the wires to the metal strips, and 2) silver epoxy has a lower resistance than graphite epoxy. Step 7) Reinstall the wheels and make sure everything is running smoothly. This would also be a good time to lubricate the gears if you want to. Make sure you don’t get any lubricant on the electrical parts! Press the bottom cover onto what remains of the tabs, and you’re done! If you ever want to run the motor directly from track power, simply use a PCB adapter with a loopback connector or connect a LEGO wire (9V or light gray end of PF). This is what a PCB adapter looks like when installed on the motor. (I’ve updated the design since taking the previous photo.) And here is a connector leading up to the electronics (currently just a Power Functions battery box, soon to include a Bluetooth receiver) in my Horizon Express. The connector plugs into the PCB adapter. The PCB adapter is attached to the electrical studs on the motor. And the motor is pinned to the bottom plate of the locomotive. Now I can charge the battery in my train without taking it off the track, run it indefinitely on a mixed metal and plastic layout, and have non-line-of-sight control when I add the Bluetooth receiver. It really is the best of both worlds!
-
Hello everyone I think my layout is now at a stage that I can present it as a whole to the community. As you will see I have still some space to expand it and there are quite a few buildings that I wish to rebuild/redesign to make them better. My layout has a classic 80/90 inspiration and that's why most of the new sets I have are from the creator/expert line. here it is a video showing the whole layout with the trains and the new ferris wheel motorised: As you can notice from the video, since I love trains, a large parte of the table is covered by rails. There are three stations. 1) Legoland C.le (C.le stands for Centrale in italian, the main station) 2) another smaller station, located on the sea-side and near the vulcano called Lego Ville: and another station that serves the airport: The town centre of Legoland features a square with a Market, a Pizzeria, and a Carrousel, the ruins of ancient abbey, always crowded by visitors, the town-hall (the yellow-brown building) and - of course - a police station: There is a residential area, which is mostly restaurant and country-side with a small beach: The main Harbour of the town, with a bridge for the trains, and a restaurant in an ancient mill: Finally there is the city area, with two main tall buildings: well, there are more ideas to develop my city but I want to hear what do you think so far
-
Buying Vintage 12v and 9v Trains if people plan to sell
Rail Co posted a topic in Buy, Sell, Trade and Finds
Hey guys I plan on buying vintage 9v and 12v trains the only catch is that I am very picky on price, if you have a train you would like to sell please comment or pm me with a price and country along with shipping price to the U.S. Main Sets I am looking for include but are not limited to: 12v Sets: 7725 7730 7735 7745 9v Sets: 4559 4565 4551 4512 4511 I prefer to buy the 12v sets first and I only have limited budget so I will not be buying all of these! Thank you so much -RailCo -
Dear all EB users, From MTRkustoms Railworks we have the honor of presenting the RENFE 446 Cercanias Electric units, This train has an import significant for me as is the train where i pass a lot of time in my life in my daily travel to work. 446 series was a specially designed train to provide a proximity service in the early 80s and the previous series, the 440s were insufficient for the huge amount of passengers in the big cities of Spain. This units have 2400kW of power and a maximum speed of 100km/h. both side driving units and 3 pairs of doors in each car MODEL SPECS Lenght: 180 studs / 144cm Wide: 7 wide Height: 11 bricks (13 bricks with raised phantograph) Weight: 2200g Others: Turns in R40 but looks awful, much better in R104 or smooth curves. Comparison with real model More pictures Chassis and 9v-PF connection (this model have a 9v motor connected to a PF motor in order to take current from 9v rails and increase the power and traction with no more expensive 9v motors) This train in 90s was frequently vandalized, so this is my personal tribute with a full graffiti side More pics and full resolution pics in Flickr Album Enjoy it