Search the Community
Showing results for tags 'Review'.
Found 810 results
-
Lego 41062 Elsa's Sparkling Ice Castle Lego managed to get a Frozen licensed set in the new wave of Disney Princess sets. However, I'm VERY surprised by the size. It's a $40 set and comes in a small Friends-style box (roughly 12"x12" size) - I almost didn't see it on the shelf when I was looking for it because it's so small. I mean, I know it's only $40 but it's a friggin' CASTLE. And why did Lego only make this a smaller set? If they'd made a $200 Frozen castle they still would have sold every one they could produce. They made big Harry Potter Hogwarts sets and those sure sold. And have you SEEN the toys in the Frozen section of stores? HUGE playsets for Barbie-sized dolls. But I suppose I'm getting the cart before the horse here, reviewing before I've even opened the box. So..... Name: Elsa's Sparkling Ice Castle Set Number: 41062 Pieces: 292 Price: $39.99 Minifigs: 3 Theme: Disney Princess Year of Release: 2015 Links: Bricklink Peeron Brickset The Box The front of the box is standard Lego fare, other than the large Anna and Elsa in the bottom right corner. Oh, and surprisingly, nowhere on the box is the normal minifig lineup. The only way to know what characters are included is to look at the set pictures. The 1:1 This set uses one of the minidolls as the actual size sample. That's probably not a bad choice since the minidolls are not nearly as well known as a minifig. The Back On the back, the play features are shown in insets around a rear view of the castle. Like Friends sets, you also have an array of play accessories. The Seals Is this standard on 2015 sets or is this specific to this set? I've never seen 3 tape seals on a set. Even huge modulars or Technic sets only have 2, so 3 on a set this small seems excessive. Perhaps Lego expects people to try to steal the dolls? If so, why bother with extra tape? A tiny pocketknife makes quick work of the tape so the third strip doesn't even slow you down. The Contents In the box are 2 instruction booklets (bent), a white plate, a sticker sheet, and 3 numbered bags of parts. The Stickers These are very hard to photograph since they're shiny. I mean polished chrome shiny. Those dark lines across the corners are not really there, they're reflections of my ceiling. The Manual Backs The back of one booklet has a Friends "Win!" girl. The other has an ad for the Lego Disney Princess website. That site is SO girly there's even sparkles following your mouse cursor around. So I didn't stay too long or look too deeply. The Sample Page The interior pages of the manuals are on lavender backgrounds. It's standard Lego instructions with part callouts and insets when needed. The Build, 1 The first thing you build is Anna, but I'm not showing that yet. Then you build this little picnic scene. It's tiny but effective, and nice to have something not icy in the set since the movie has the "In Summer" song for Olaf. I'm curious what's in that sandwich though - green and pink? After the picnic is the Olaf build, but I'll save him for later too. The Build, 2 Next is this small sleigh. It has an amazing amount of style for something so small. The curved front and decorative whips on the back make it look sleigh-like instead of blocky. But come on, it already had pink accents, are the pink flowers really necessary? Technically, yes, so the whips can mount to them, but still, it's just over-girly for my taste. The Build, 3 The sleigh needs a ramp to help it rocket along (for a couple inches, at least). The ramp starts like this, with a hidden lime green jumper plate that gets a cookie on it. I couldn't remember anything in the movie like that, so I asked my wife and she couldn't either. A hidden cookie under a hill? The Build, 4 After putting the tilting 2x8 onto the base and adding decorations, this is the result. A lime green bucket holding a pair of ice skates, a flower (in the snow, really?), green and white round studs that I assume are supposed to be grass and snow? The Build, 5 The sleigh looks huge sitting on top of the tiny hill, but it actually works pretty well. Assuming you're on a smooth surface like a table, you can give the sleigh a little nudge and it'll shoot down the ramp and a few inches across the table. The unevenness of the slopes vs the blue tiles holds the sleigh in line well, and the bumps in the slopes don't seem to hamper anything. The Build, 6 Moving on to bag 2.... man that's a lot of colors in this base already. And I'm already starting to feel like there's trans-blue cheese thrown around randomly. The Build, 7 Continuing (and rotating), some steps and even more colors thrown in. Magenta? In Elsa's ice palace? I sure don't remember any of that... The Build, 8 Wait, seriously? An ice cream stand in the castle? That is what the magenta is for? I kinda actually like the looks of it, but it doesn't fit the set. The Build, 9 Spinning back around, now there's a light aqua spiral staircase added along with a roof. This is where I'm really starting to wonder about Lego's thinking. Those light aqua stairs, and the light aqua 1x4 tiles, are exclusive to this set (as far as I know... it's possible some other 2015 sets use them, but nothing in Bricklink yet). Seems expensive (to produce) to me, when there's no huge reason to need them. Another blue for the tiles would have been fine. And the spiral stairs? Really? Elsa's castle is KNOWN for staircases, but NOT spiral ones! There should be a huge straight ice stairway out front or sweeping curved stairs inside, but not a spiral. The Build, 10 And now we finish the tree. Again, why? Where is there a tree next to Elsa's castle? And so weird... with ice hanging from green branches that have both snow and flowers on them. Huh? Did Lego watch a different movie? The Trans-Light Blue Bits Before looking at the upper level, a brief pause to look at some other parts. Here's the 1x2x5 brick in trans-light blue and the 2x4x6 rock panel in glitter trans-light blue. Do those look like the same blue to you? And again, ANOTHER unique part for this set. Why do those rock panels need to be glitter, when Lego made the same panel in trans light blue in 2013 and 2014 for SuperHeroes, Friends, and Chima sets? Apparently Disney REALLY wanted glitter, because there are a bunch of trans-glitter parts in the new Princess sets. There's trans-neon green cones for Jasmine; Ariel, Jasmine, and Sleeping Beauty all get glitter trans purple cones. So there's a bunch of new glitter parts for 2015. The Build, 11 Back to building - time to add the upper level. We get a bedroom with a decent bed, although stickered. The Build, 12 The other side of the bedroom has some little accessories. Perfume and a crown I assume? The Build, 13 Time for walls and a roof. I like the small white macaroni bricks for a wall, but what's with the lavender fence piece in the center? I'll grant that it looks nice (a common white fence would have been a little boring), but it's ANOTHER unique piece to this set. The Build, 14 The very top of the castle is built separately. Not a whole lot to say here other than why is there a torch in an ICE CASTLE? The Finished Castle Once the roof is put on, the castle is done. And that big purple star on top says everything to me about the styling. It just doesn't look like modern Lego to me; it looks like this should be an old Belville fairy tale set from around 1999. If I saw a photo of just the castle with no figs (or picnic blanket), I'd assume that's what it was. The Oops, Not Actually Done Yet Accessories At the end, there's a few bits left to add. There are these dark purple skis (yup, another unique part) in the lower level. Let me tell you, they're a pain to get into that location, at least with my big man hands. More Accessories The top level gets a stickered book. The sticker has a nice castle image on it that is, while not quite exactly the castle from Disney World, VERY Disney-looking. I actually had to google and see if that's the castle they use in their logo. Nope, but it's the same style. The Leftovers There are a LOT of extra parts in this. That's almost 10% of the part count in the set right there! They are pretty useful overall though. It's great to have an extra "carrot" and brown "branch" for Olaf, since you know those will get lost as he's played with. The Figs Finally, the reason for the set. Let's face it, the castle set is just an excuse to make these figures. And they're GREAT. I mean just fantastic. The print on them is just such a good match to the real characters. Compare to the cartoon version from the front of the box. Elsa's hair is a little darker than the cartoon, but overall these are just dead on. If I had to pick out a flaw, it's the "spell" Elsa is holding. It's too bad she can only shoot it forward with her arm down like that. It'd be nice to have the end of the splash part bent 90 degrees so she can have her arm forward and the spell shooting forward too. Oh, one other thing. The minidoll heads don't press down tight to the body like minifig heads do. There's still exposed neck. It looks nice, but it means Elsa's cape can swing around. The Fig Backs Elsa's cape is glittery on the back and you can see the removable bow in her hair. The Full Set One final issue. When you put Anna on the sleigh, her cape doesn't have enough flexibility (since it's a wraparound kind) and so it folds out funny. That's why on the back of the box it shows her standing on the back of the sleigh with Elsa in the seat. Edit: How on earth did I forget to comment on those orange flowers to each side of the castle? I'm pretty sure Elsa did NOT have any flowers blooming outside her castle! The Conclusion Hm. I really wanted to like this set, but I just can't quite bring myself to. It feels like Lego pulled a random castle design from the files then redid it into white and trans blue to look icy and allow a Frozen tie in set. The figs are great, but the castle isn't. I guess the real castle in the movie would be a boring set and this one has play features, but it just is too different for my taste. The Ratings Value: 7/10 - $40 for less than 300 parts is high (especially when so many of the parts are tiny, but on the other hand there's a LOT of rock panels and 1x2x5 trans blue panels), but the figs help save it. Design: 4/10 - Not one of Lego's best. Not as bad as the lows in the 90s, but not a great set. Minifigs: 10/10 - Possibly even a 12/10. They ARE the reason to buy the set . Playability: 8/10 - There are a bunch of play features, but they actually detract from the design, so I had to knock off a couple points. Parts: 7/10 - A bunch of impractical unique parts (how often do you need dark purple skis or a lavender fence piece?) but also a bunch of nice parts if you wanted to make your own icy scene. Overall: 7/10 - A great bunch of figs, but I'd recommend not bothering with the manuals. Just use the parts to build your own castle that's better.
-
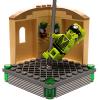
Hello Turtle fans! This is Oky coming at ya with a radical new review! But first let me give you a little introduction. Earlier this year, TLG released a line based on the new Nickelodeon hit series Teenage Mutant Ninja Turtles, which is the third cartoon series based on the comic books about the heroes in a half-shell. It is quite remarkable that the turtles have sustained their success since their creation in 1984. I have never been a big TMNT fan until now due to its rather odd concept (I mean who would have thought that something called Teenage Mutant Ninja Turtles would be such a huge hit? ) and because the '90's cartoon always seemed too cheesy for my taste (no pizza pun intended). However, the Lego sets and the new TV show have sparked my interest in this franchise, and now I can't get enough of the turtles! After watching the first few episodes, I just had to get all of the turtles and their iconic lair in the sewers. Does it do the ninja team justice? Is it worth getting, even if you're not a TMNT fan? Read on to find out! Set Number: 79103 Name: Turtle Lair Attack Theme: Teenage Mutant Ninja Turtles Year of Release: 2013 Pieces: 488 Minifigs: 5 Price: $49.99 USD S@H description: S@H Bricklink Brickset Brickshelf The Box The box is mostly purple with lime green contours, two colors which go great together in my opinion and fit the TMNT theme quite nicely. The art on the front shows something we have never really seen on a Lego box: a cutaway which shows part of a street that has a huge hole in it to reveal the Turtle Lair underneath. It's a clever way of integrating the above-street-level part of the set and makes for an interesting image. One thing I find odd is that in the picture, Raphael seems to be kicking the Foot soldier into the manhole that leads to their lair. Why in the world would he do that? Shouldn't he be trying to keep him out of their lair? Oh well, it still looks pretty cool, and I guess that's all that matters. Since this box is fairly large, there is enough room at the top to show all five minifigures at actual size. Looking at the back of the box, all I can think is: Holy shell there is a lot going on! Seriously, this must be the busiest back-of-the-box picture I have ever seen! And looking at how simple and boring most of the other Lego boxes currently are, especially the Super Heroes ones, this is actually quite refreshing to see. It showcases all the crazy colors and play features of the set which makes it look quite fun and interesting. At the bottom there is a comic strip that briefly tells the story of the set. The Dark Ninja and his minion break into the lair, but are quickly defeated by Master Splinter who seems to be using Spinjitzu. And if that wasn't odd enough, the two villains escape with the blueprints for the Shellraiser of all things. Was this their plan all along? Why would they possibly be interested in that? The Dark Ninja and his accomplice did follow the turtles into the sewer in the episode New Friend, Old Enemy, but they never entered the turtles' lair, and they were after the turtles, not the Shellraiser. Oh well, I'm sure this is not meant to be show-accurate, but merely present one possible scenario that can be played out with the set. Content Inside the box you will find four numbered bags, a sticker sheet, and surprisingly, one very small instruction booklet and one rather large one. The small booklet describes how to build all the small interior and extra bits while the large one covers the lair itself. Here's a random instructions page. The background is a solid bright green color, presumably representing ooze, and gives a nice contrast to the mostly gray builds. The part call-outs don't usually exceed three different types of pieces, so it's pretty easy to follow. There is a fair number of parts in rare colors in this set, including slopes and plates in olive green and dark orange, arches in dark gray and dark brown, round plates in purple, orange, and pearl gold, a trans-clear minifig head, a hook in dark red, and those spiral stairs pieces in dark tan. There's also one of the new lamp post pieces with only four grooves in black which only appears in one other set, Spider-Man's Daily Bugle Showdown, which ironically is also supposed to represent a street in New York City. There are other new/rare elements too, such as the 4x4 round plate with a hole, that ring with four clips that Venom has on his back, and the brick with a brick profile. There's also an impressive number of weapons in this set, especially if you count the spares. There are 8 katanas in total (5 pearl gray ones and 3 black ones), 3 sai, 2 shuriken, a bladed bo-staff, and a regular bo-staff. And while not technically a weapon, there is also a pack of dynamite which is just as deadly. That's 16 weapons! These ninjas mean business! There is a load of spare parts too. As you can see, one sai, one shuriken, and three of the katanas shown above are spares. The rest of the extra parts include the usual studs, tiles, cheese slopes, and Technic bits, along with two neon green antennas strands of ooze. Minifigs Most of the minifigs are exclusive to this set. Let's start with the good guys. This set includes what the show calls the "A-team", Leonardo (the leader in blue) and Raphael (who has got the most attitude on the team), along with their rat sensei, Master Splinter. Leo has a less angry looking face than in the other set he is in, the Shellraiser, although he still looks quite grumpy. Raphael on the other hand has an angry face, unlike in the other two sets he is included in, and considering his temper, it suits him quite well. They are both a regular shade of green and they both look great. I'd rather not talk about their rather female looking crotch areas though. Master Splinter is a pretty neat minifig too. The printing on his head is superb and I like the printing on his robes as well. Usually when TLG uses a slope as a dress for a minifig, it makes the minifig look too tall, but in this case it actually makes sense since Splinter is indeed a lot taller than the turtles in the show. Here are some reference images for comparison. Except maybe for their missing elbow pads, the minifigs couldn't have been more spot-on in my opinion! Looking at them from the side, you can see that the turtles' shells are attached to them like backpacks. Also, Splinter's profile looks especially good from this angle. All three of them have back printing. Leo's shell has two straps whereas Raph's only has one. Great dedication to accuracy here. Unfortunately Splinter doesn't have a rat tail, but I guess you can just imagine that it is hidden under his robe. And then we have the bad guys: A generic Foot soldier, the Dark Ninja, and short Shredder dummy. Okay, the last one is not really a bad guy. He isn't even listed as a minifig, but he's neat and has all the features of a minifig, so I'm counting it. The Foot soldier is the same as in the three smaller sets. Nothing special, but it's always good to add one more to your army. Also, the detailed foot print on his head is pretty cool (no pun intended). The Dark Ninja, however, is new and exclusive to this set. There is nothing extraordinary about him, though, except for his torso printing. For those who don't know, the Dark Ninja is Shredder's second in command in this show and, along with Xever, one of his top henchmen. The dummy is pretty cute and sports a dark brown version of Shredder's helmet. I don't remember the dummy in the show looking that much like Shredder, but I certainly welcome this color variation of that helmet. Its torso is a bit plain, though, and would have benefited from some printing, but oh well. Would have been nice to get Shredder's shoulder pads in brown too, but I'll take what I can get. Those of you who watch the show will know that (spoiler alert) the Dark Ninja is Chris Bradford the famous martial artist before he got mutated into Dogpound. He is a parody of both Chuck Norris and the real-life Chris Bradford. He only appeared in his full ninja gear in one episode and I don't think he was ever referred to as "the Dark Ninja", so I don't know where Lego got that name or why they chose to even include him in this set. I guess they just needed another named character they could throw in the set without having to make a new mold. I would have preferred Karai instead, but I digress. Looking at the reference image below, the ninja headwrap isn't very accurate for the minifig as it should be metal helmet, but I guess the shape is close enough. Also, the shoulder spikes probably should have been a new mold. The Foot Soldier on the other hand is spot-on. The evil ninjas have back-printing too, except for the dummy who, again, is very plain. In fact, he looks more like a pointy Ewok from the back. Under his mask, the Dark Ninja has Chris Bradford's face. It looks pretty good, but the hugh white pupils look odd. I know they were going for those glowing white Batman eyes that he has when he has the mask on, but they just don't work when you take the headgear off. He doesn't have an alternate face either, so you're stuck with this face for him. I think it would have been better if he had a double-sided head with one dark side with white eyes for when he is the Dark Ninja and one with a regular Chris Bradford face, or if he at least had an alternate expression. Also, here's a close-up of the dark brown Shredder helmet from the side. For comparison, here is what Chris Bradford looks like without his ninja disguise. The minifig version is mostly accurate, but sadly Lego failed to include his Chuck Norris mullet. We need a Lego mullet!! Now it's time for some ninja action! Here are all the minifigs with their respective weapons. Raph gets his sais and Leo his katanas of course, and Master Splinter gets a katana too. I wonder why they didn't include his jade staff which they could have easily represented with a trans-green lightsaber bar. The dummy gets a bo-staff, the Foot soldier a scythe and a shuriken, and the Dark Ninja two black katanas. Ready, set, fight! The Build The first bag contains all the parts to build all the small interior objects of the lair along with the Foot soldier, Dark Ninja, and the dummy. The entire first instructions booklet is dedicated to this part of the build. Here are all the pieces of furniture built: a TV corner, a training platform, a skate ramp, a crane, a workstation, a shelf with cans of spray paint and cans of ooze, a skateboard rack, and a catapult. They all look great on their own and already provide lots of playability (heck, this could have been a fine $15 set on its own), but we'll get into the play features later. Bag 2 contains the rest of the dojo and Master Splinter fittingly. Once built, this is how it looks. It has nice sewer look to it and features a weapons rack. There are enough clips to store Raph's sais, the dummy's staff, and Leo and Splinter's katanas, although I wish there were enough to store all of the four turtles' weapons. It also has ooze dripping down the walls and running on the floor, a technique which was already utilized in last year's Ninjago sets. It makes no sense why there would be ooze all over the dojo, but the green ooze is an iconic part of the TMNT franchise, so I guess it helps make this feel like a TMNT set. Then again, who else would have a dojo in the sewer? In case you're wondering, yes, the tree is actually accurate to the show since Splinter planted one in his dojo, although Lego's adaption seems like a very light version of the one from the show. The next bag contains the two turtles from this set and the parts to build the first floor of the main section of the lair. This part of the lair will become Donatello's workshop where he builds all the cool Turtle vehicles and gadgets, which makes it unfortunate that Donnie isn't included in the set. If you look closely at the blackboard in the back, you'll see that it features blueprints (or greenprints) of the Shellraiser, the T-Phone, and surprisingly the Turtle Blimp. So far there hasn't been a Turtle Blimp in the current show, so either this is just a neat little Easter egg for fans of the original cartoon or a hint at a future set. We'll have to wait and see. Also, there is more of that inexplicable ooze. The fourth bag contains the pieces for the second storey and the street level of the lair. Lots of browns and grays here. Here is the completed main section of the lair. The second and third stories are a lot more bare looking than the first. The second floor only has a few pipes serving as the walls and the street level only has part of a wall. There are also a fire hydrant and a lamp post to indicate that this is supposed to represent a street. It's very minimalistic, but you get the idea. Still, I wish they would have put more effort into making this look like an actual street scene. The "Mutants Rule" graffiti is a nice touch though. There is also a pizza oven on the second floor. I don't think the turtles have one in the current show, but I think they had one in the 90's cartoon, so perhaps this is another reference to that show. In the last step, you place all the small interior items from the first bag into the lair and combine the two sections by connecting the clips on the dojo to the little bars on the tower. This step is easy to do and also to undo if you wish. And yes, as you can see, it is possible to attach the ramp the top of the main section like on the box art, although it is not very stable as it is only attached by two studs. I wish they would have provided more space to attach it properly there, but oh well. The Complete Set Here is the finished lair, complete with minifigures, weapons, and all the extra objects. The clip hinges allow it to stand at a slight angle. Not sure what the purpose of this is, but it does make it look more interesting. One thing to note here is how high the steps of the stairs are. One step goes up to Spinter's hip! Oh well, they're ninjas, so they probably don't have any problem jumping up the stairs. The steps also tend to flail around a lot rather than stay in place whenever you touch them, so you have to be careful when playing with them. When compared to the Sewer Lair Playset from Playmates, it actually holds up pretty well since they both have strikingly similar designs and play features. In fact, I'd say that Lego's version is better as it is a lot better furnished (aside from the fact that it is Lego of course, which is always better). Although the street level is designed a lot better in the Playmates version, I give them that. Play Features Let's look at the play features of this playset. At the top of the main tower, there is a trap door underneath the manhole cover which can be flipped open by turning the large valve on the side. Not the most authentic way of creating an opening manhole cover, but it works quite well. The only nitpick I have here is that the ladder that is supposed to lead to the lair is off to the side. How are the turtles supposed to climb down there? Behind the wall with the graffiti there is a crank which allows you to make a minifigure swing on the pole on the other side. Underneath it there is a red peg which, when pushed, shoots the pizza out of the oven. The harder you hit it, the farther the pizza shoots. If you have read my other reviews, you will know that this is not the first set to feature a pizza shooter, and as strange as a pizza-shooting oven may seem, it actually makes a bit more sense than a pizza-shooting delivery truck. At the bottom of the tower, there is a crank which serves as a dynamite exploding feature. When you attach the dynamite to the wall and turn the crank clockwise, the middle part of the wall breaks open. If you turn it the other way or when the dynamite is not there, it wont work, as the green arrow indicates (Did we really need a sticker for that? ). This feature doesn't work great as the wall just plops open rather than being blasted open like from an explosion, but well enough. Although if the dynamite is attached to this side of the wall, shouldn't the wall fall towards the inside of the lair? Oh well, this is a world where some green ooze can turn turtles into human-sized crime fighters. Realism be damned! The training platform from the dojo section can easily be taken out for easier play. You can place the minifigs on one of the dark red studs and have them fight the dummy (or rather have the dummy fight them) by turning the gear at the front which spins the dummy around. This is a neat play feature, and I know I already made a comparison to Ninjago earlier, but I'm surprised that such a feature was never included in any of the sets from that theme, considering it is subtitled "Masters of Spinjitzu." I guess there was already too much spinning going on in that theme. Next, we have the TV corner. This is not as much a play feature as it is just an additional set piece, although the TV can be tilted back and forth and the antanna adjusted. There are seats for all four of the turtles to sit in front of it. What bugs me, though, is the TV screen. It shows a deserted alleyway with a manhole cover and some dumpsters. What is this? What are they watching? The set description states that it is a "video game station", but if that's the case, where is the game console and the controllers, or the game characters for that matter? It would have made a lot more sense if the TV was playing Leonardo's favorite show, Space Heroes, but maybe TLG was afraid to get sued by the owners of Star Trek (which Space Heroes is parodying). Or it could show an image of news reporter Carlos Chiang O'Brien Gambe, or of a Kraang, or anything other than an empty alley! Sorry, this just seems like a missed opportunity to me. I guess it's better than something completely non-TMNT related, like a tropical beach or something. We also get a catapult in this set for some ninja flipping action. Unfortunately it doesn't work too well, especially with some of the more top-heavy minifigs like the turtles. It just makes them jump up a bit and land on their face. This is actually my least favorite part of the set. It resembles nothing from the "real" turtle lair and seems like a useless addition. The skate ramp is a bit better. You can have the turtles roll down the ramp or make some cool poses on the bar at the top. The only problem is that they have trouble rolling up the ramp when it's not connected to a plate as it has a two-plate high step. Note that Raph and Leo's skateboards have different designs on them: Raph's has a torn look whereas Leo's has an apple on it for some reason. Ratings Design: 4/5 - This playset, like many Lego playsets, is an amalgam of scenes from the Turtles' lair rather than an accurate depiction of it. As such, it does a good job at conveying the look of the Turtle Lair in a limited amount of space. Also, this makes it appealing to TMNT fans of all ages as it doesn't represent any specific incarnation of the Turtle Lair. All the colors and details really make it feel like a TMNT set and are consistent with the rest of the sets. However, some parts of it look a bit bare and remind me of the old Harry Potter sets in that sense, so you can't help but feel like there is something missing. Especially the street level could have been fleshed out a lot more in my opinion. Build: 4/5 - The build is long and diverse enough to keep you satisfied. It starts small and simple with the little interior items and becomes progressively more complicated as it moves on to the tallest section of the lair making for an increasingly challenging build. However, there is no part in the build that is truly challenging for experienced builders. Minifigs: 4.5/5 - There are 5-6 minifigs in this set and most of them are exclusive. What more could you want? The turtles are great as usual, and while it would have been nice to get all four turtles in this set, I can understand why TLG didn't include them. Master Splinter is a very detailed and accurate fig and probably one of the main reasons to get this set. The Dark Ninja, while nice to have, is a bit disappointing though. Playability: 5/5 - This set is full of play features, making it a true play-set. Some work better than others, but either way, I'm sure this set will keep kids entertained for quite a while! Parts: 5/5 - There are lots of useful parts in this set, including many parts in rare colors and a plethora of accessories! Price: 5/5 - 488 pieces for $50 bucks is quite fair, especially considering it's a licensed set and includes several large pieces. Overall: 4.5/5 - This set is great for any TMNT fan, especially young ones! Even if you're not a fan of the turtles, it still has a lot of great parts and figs to offer at a fair price. Some aspects of it could have been executed better and the cobbled-together look will not appeal to everyone, but those are mostly just nitpicks as the set works the way it is. It has so many play features that it can compete with Turtle Lair playsets from other leading brands and that's what really matters in a playset. It also makes a nice center piece for your TMNT collection, so I can really recommend it. Well, that's all, dudes! I hope you enjoyed this 5th Anniversary review. If you want to learn how to make reviews like this, join us at the Eurobricks Reviewers Academy! Booyakasha! Oh, and remember what the set description said about "shredding the ramp"?
-
The Trevi Fountain is a wonderful piece of architecture in Rome. I looked it up when I learned I was getting the set, it's really a wonderful piece of sculpting. As an architecture set, there are no minifigures, which are a main draw for me, but as an engineer these sets look quite good. Thank you to LEGO and Bonaparte for letting me do this review! Set Information: Name: Trevi Fountain Set Number: 21020 Pieces: 731 Price: £49.00 Ages: 12+ Theme: Architecture Year of Release: 2014 Brickset Bricklink Flickr Set Box: The box is the typical set up for Architecture sets; black and minimalist. However, this is the European box so it doesn't have a part count on the front. On the back we have the usual information about the set and the real location. The sides of the box show some alternating images as well as the set name in some other languages. On the bottom of the box there is a huge block of warnings. The 1:1 image is of one of the 1x2 trans light blue tiles. I find the faded image of the set really intriguing. Contents: Inside the box there are six bags, the manual, and the survey sheet. None of these are new, just recolors, however, it's still nice to have them. I'm really excited to get some 1x1 trans clear tiles! Lots of extra 1x1 parts, including some tiles. Manual: The manual front has the same image of the front of the box and it also says what languages the manual has. On the first page this lovely print of the real structure greets you. The manual is laid out nicely I had no problems with colors. We also have some nice "fun-facts" on every few pages about the real structure. This was the only slightly confusing part. LEGO did a great job showing which parts were being put down, they outlined them in red so it's clear. Seems like someone always asks for this page, so here it is. It didn't want to cooperate for the picture though. Interestingly, there was this survey sheet also packed in the box. It's great to see LEGO looking for our feedback! The Build: The build progresses quickly enough. It was a bit slow putting down the water tiles. Adding the windows was rather time intensive, you had two separate x12 builds. This was a fun build. The rock work and the windows were quite fun to build. Finished Model: There is actually quite a bit of depth to this model. So many offsets to make the model. From the side you can see how far out the fountain pool goes out, as well as some of the very many cool offsets. This set is obviously not meant to be viewed from this angle. But this shows you the trans blue bricks that add some great depth to the windows. I'm not sure if I like the horses. The legs just seem to out of proportion. They do integrate well with the rocks. There are so many offsets here, I don't know where to begin. The four 1x1 cones are supposed to be statues. Here you can see the depth that the blue bricks behind the trans clear ones add. It really adds a great level of detail. The fountain starts up by the statue in the middle, then cascades down to the middle of the pool. LEGO did a great job giving it a fluid feel. I had a hard time finding a picture of what the LEGO set represents. This shot was the best one I found. But from it you can really tell how good a job LEGO did recreating this wonderful piece of Architecture at this small scale. One last shot with my sigfig to give you a sense of scale. Conclusion: I really do think this set is nice. For representing such a large structure, LEGO did a great job taking it and making it at this small scale. There are few discernible details at this size, but to make it as large and detailed as it would need to be, I'd see it at about the size of the latest Arkham Asylum set. The water and rock work is exceptional. Ratings: Design: 8/10 For the size it is, LEGO did a great job designing it. Price: 8/10 £50 is about $60, which seems reasonable for a 700 piece set. Parts: 9/10 There is a large selection of white parts, and those 1x1 trans clear tiles are just great to own! Total: 25/30 Like this review? Want to learn how to make good reviews? Then join the Reviewers Academy!
-
Launch Evac 1 Set #: 6614 Year Released: 1995 Piece Count: 119 Minifigs: 1 RRP: $9.25 Another throwback review as I continue to sort through my tubs of childhood LEGO. The space side of town in the 1990s was one of my favourite sub themes, though this is the only "Launch Command" set I owned. Interestingly whilst part of the "Launch Command" sub-theme the set include both the LC shuttle logo and the "V" logo from the earlier 6346 Shuttle set that was part of the "flight" sub-theme. So lets take a look at what the Launch Command fire department has to offer. The Box Unfortunately I no longer have the box for this set, so imagine the art from the front cover of the instructions with a thin blue border and a triangular "Launch Command" title and logo in the top right corner and you've pretty much got it! Instruction front cover: Being and early 90s set the box would also have had a few alternate builds on the back, one of which we see on this back of the instruction leaflet. Instruction back cover: The Instructions Well, I've already shown you the front and back, so what's inside? The pages feature a green, grey and blue background which seems to evoke a foreground of grass, background of hills then clear skies. Despite the many coloured background it does not interfere with the model, differentiation of parts and colours is good throughout. Being the 90s, they also happily throw on a good number of parts in most steps, though do provide call-outs when additions are hidden or easily missed: On this page you can see the biggest issue with 90s sets- the gauge sticker across multiple grey parts at the back of the engine. The Minifig We get a single minifig in a grey fire-fighter's uniform, which in contrast to the black town fire-fighter's uniform of the same era looks a lot more like actual crash kit worn by airfield fire-fighters. The torso print includes a contents gauge for his breathing gear which is a nice touch; no back printing of course. The fire helmet in black isn't as rare as I first though, having been the default for early 80s sets and used in 'specialist' fire sets (boats and airport) in the late 80s-early 90s. Our fig has also cultivated a very angular moustache. The Parts Here's the full set: Nothing that unique and all the patterns/details are stickered. This was my first encounter with the 1x4x4 doors though, and they do look pretty neat. The Build & Model It's the 90s, don't expect lots of SNOT or novel parts use. However there are some notable features; the wheel surrounds are all brick built (no mudguard parts) and the interior is somewhat asymmetric. The asymmetry is there to fit in the breathing apparatus behind the left hand door, the right side gets an axe and hammer. Note how the guage sticker at the back fits perfectly on the side of the 2x3 brick and thus can be saved when the model is later dismantled (thank you 11 year old me for realising this!). And finished: From this angle a good looking fire truck, though being only a 4-wide, it possibly looks a bit tall. Also notice there are no cab doors; a sign of things to come perhaps. The roof mounted monitor (water cannon) is a nice play feature, though there's not a lot of room in the chassis for a water tank to feed it- an issue I never even considered as a child. The utility lockers are also good play features: Oh No! I've lost my axe! Quick! Get the breathing gear on. Er...wait...I have to take my head off first? Finally, you get a rear mounted (string) hose for when you have to get up close and personal with the fire. Here saving 6673 Solo Trainer (http://www.eurobricks.com/forum/index.php?showtopic=94941) Having brought up 6673, I realise this is another set with naming issues "Launch Evac 1" It's not really an "evacuation" vehicle; perhaps "Launch Rescue 1" would have been better? And before the final verdict, a quick bonus shot of the alternate build from the back of the instructions: It's some kind of fire pick up truck? Whilst much less convincing as a useful fire-fighting appliance Its still good to see what can be accomplished with so few pieces. The Verdict Build & Model: 8 The end result is a nice little fire engine and getting there is not dull. Points are lost for the stickers across multiple parts, though as you saw this can be avoided. Fundamentally, it looks the part when sat next to similar era sets but would be dwarfed in today's 'city' scale. Parts: 7 A reasonable parts selection but nothing unique to this set. Figures: 8 For the era, this was a new and novel minifig, it still doesn't look terrible next to today's figs, aside from maybe the moustache! Playability: 9 As long as you have another set to go save from fire then plenty of playability here. The hoses, equipment lockers and monitor pack a lot into such a small set and it is fun just to vroom round the carpet. Value: 8 I certainly remember being happy spending my pocket money on this at the time! Overall: 8 A very good set in the context of the era. Good looks, plenty of play features, but urgh....stickers!
-

[REVIEW] 42008 - Service Truck
mostlytechnic posted a topic in LEGO Technic, Mindstorms, Model Team and Scale Modeling
Lego 42008 Service Truck Thanks to EuroBricks for making this review possible! As I looked at the recent Technic sets, this was one that I thought looked interesting, but not enough to buy. So when the opportunity to review it came up, I jumped! It's a European-style heavy tow truck with pneumatics and motors, so that's pretty cool. And it's GREEN. It's a surprisingly uncommon Technic color. There's the 2015 24 Hour Race Car, but other than that and some of the small sets, this is it. So there should be lots of new part availability and so forth for people to geek out over. Let's see how it looks.... Name: Service Truck Set Number: 42008 Pieces: 1276 Price: $129.99 Minifigs: n/a Theme: Technic Year of Release: 2013 Links: Bricklink Peeron Brickset The Box A normal Technic box. Except for the exciting info in the bottom corners indicating that this set has BOTH Power Functions and pneumatics. That's pretty rare but very cool. The Back of the Box A lot more detail back here - both the main and B models are shown with their functions and sizes highlighted in a multitude of languages. With all the details I'm surprised that the HOG steering isn't identified anywhere. The main model does show that there IS steering, and most Technic fans see the gear on the cab roof and immediately know what that means, but I was surprised it isn't called out anywhere. As for the B model, instructions are online only, not printed, but that's normal. It seems to have a lot of functionality for a B model but is very similar to many other Technic sets with a claw arm and trailer. The Contents There are a TON of bags in here. Small ones with small parts, big ones with big parts, some PF parts, and a bag full of pneumatic stuff (including precut hoses, unlike old pneumatic sets). Oh, and 3 manuals and a sticker sheet in a bag together. No cardboard, but the books are enough to be reasonable protection for the stickers. Seriously though, SO. MANY. BAGS. The REALLY? The reason for so many bags? Not just the 1200+ parts, but also bags like this. There are TWO identical bags like this. Why on earth weren't they combined? I just don't get it. I'm sure there's something in Lego's packaging and logistics to explain it, but I don't see it. The Manuals Three thin books. Not much to say, other than this is a 2013 set so one book has that Win kid on the back. Eek. The Sorting Instructions So Lego obviously thinks you should sort the parts. Makes sense, since there are no numbered bags or anything like that. Just 1200 and some parts to look through. Being Technic, it's easier, since there's tons of black pins and blue axle pins and so forth, but there's still a lot to look through. However, sorting it right either needs a bunch of dedicated space, or a bunch of containers. I had neither, so I did this: The Part Sorting, Sort Of That's most of the parts, in the box. I kept them sort of sorted by size. There are a few things I left out - the wheels, big panels, pneumatic and PF parts, etc, but that's 90+% of the parts right there. Not TOO bad, and as long as you're careful, you can move the box around when you need to clean up for the night. It does how how oversize the box is though! The Stickers A BUNCH of stickers for this set. And they're not terribly useful for anything else. They're very specific to the tow truck, and they're mostly cut for the Technic panel shapes so they'd be weird on anything else. They do add a LOT of detail and color to the finished set though, so for once I will actually use them! The First Step The first actual page of the manual. I'm used to manuals having a picture of what you're making at the front - makes sense when it's a City set with multiple vehicles. Here? I just found it hilarious to see the finished truck there at step 1. The manual is standard Technic though - plain blue background, part callouts, and lots of sub-assemblies. The Build, 1 After a few pages, we have this. Anyone used to modern Technic can figure it out pretty quickly. This is the steering for the two front axles. As usual, it's some great engineering. The green beams under the arms of the second axle make the distance from the pivot point to the gear rack different, giving different turning radii to the axles. It may not be exactly right due to the limits of Lego parts, but the concept is certainly there and the functionality of the set is better due to it. The Build, 2 More pages, more pieces added. Again, any experienced Technic builders can recognize what's happening here. A vertical axle for the HOG steering, some frame at the front for a cab to be built off of, and some beams out the back to start building the body of the truck. And of course, a bunch of random-seeming pins and parts that'll be used for connections later. The Build, 3 Now things start getting interesting. This is the main gearbox. There's two red driving rings with then the dark grey gears to transmit the power to the light grey gears below. I'd bet money that the axle between the driving rings will be powered and there's gears coming that'll drive both axles from that simultaneously. And as an important note - the axles below (with the light grey gears) are NOT connected all the way through. The gap in the beams below the red driving rings is a gap in the axle as well, so there's 4 totally separate outputs on this gearbox. The Build, 4 This is now rotated and flipped from the last pic of the gearbox (note the axle with the universal joint in each photo). But I was right - the tan gears let the center axle drive both of the side axles with the driving rings. A motor will get connected in there and then we have 4 outputs, 2 of which could run at the same time. There's the axle with the universal joint, the black axle above the three tan ones (parallel to the u-joint), the back left output which gets redirected and ends up going to the dark grey 8 tooth gear in the top middle, and then the back right output which is not currently visible. The yellow connector sticking off to the right is a control handle to shift between two outputs, and there's a matching one on the right. All in all, a LOT of complexity in a small space! The Build, 5 That universal joint gets connected to another in order to take an off-center drive axle and connect it to a centered linear actuator. It also of course allows the LA to pivot. The Build, 6 The pneumatics appear! This grey cylinder is a pump. Turning the tan axle will rotate the short blue liftarms and power the pump. I'm sure this will connect into the gearbox for power, but there's a ways to go before we get there. The Build, 7 Actually, nope, I was wrong. That frame with the pump mounts right into the gearbox and onto the chassis. I've also added the winch, so now 3 of the 4 outputs from the gearbox are in use (large LA, pump, and winch). You can't see it, but the motor is also installed under the gearbox to drive it. The Build, 8 The 4th output of the gearbox drives these mini linear actuators. The drive is coming in on the gear closest to the camera and then the other 2 gears transfer power up to the far LA in sync. The Build, 9 Here's what those mini-LAs drive. A pair of spade-type outriggers. Since this is a heavy-duty tow truck that'll often need to pull loads out of ditches and so forth, these can dig into the ground for a lot of holding force. The Build, 10 Time to set the chassis aside for a while and build this. It's interesting how differently they can use identical pneumatic cylinders. The one in the black section can only swing the lower piece through a 90 degree angle. The one on top, despite a 2 stud stroke, manages to move the 15L beams a massive 9 stud distance thanks to the clever lever design using the 3x5 L beam and 5L beam. The Build, 11 So much added, so fast. The arm from the previous step attaches to the large LA to form the main crane arm of the truck. The pneumatic tubes all come together to a pair of valves to control those functions. Mechanically, the truck's pretty much done and there's still a book and a half to go in the instructions. That's a lot of bodywork to be added! The Build, 12 The bodywork starts with the cab. The battery box sticks in the usual Technic truck location behind the cab. Thankfully, it gets a sticker with green and red arrows that will help with knowing direction for functions later. The seats are black and grey instead of the blue that they often are. This is also an unusual case of a bare connection that ends up in a finished model. See the pin sticking forward between the seats? It's one of these used to stabilize the vertical axle that will be the steering. Only the pin on one side is needed, but this piece () wasn't available yet. The Build, 13 And that takes care of the cab. A few stickers here, but there's lots left on the sheet. Susanne gets a nice license plate too. It almost actually feels bland though. Especially once the rest of the truck is done and stickered, it feels like there should be more detail on each side of the grill here. And the black tubes for the sides of the windshield are a cheat. They don't line up vertically - the bottom is a stud farther forward than the top, so it needs to be something angled. It makes sense, most windshields ARE angled, but where many Technic vehicles would use axles there, there's no easy way to modify the bottom to put a connector for an axle instead (the top could take an axle though). That's why it's tubes - they have enough flex to do it. As for functionality, the doors open. That's about it. There's enough going on in the back of the truck I can forgive it though. The Build, 14 Here is one of the side panels. The other side is just a mirror image. It's a nice decorative panel, but why didn't they put one more of the small triangular panels above the "service" to smooth out the slope some more? Anyway, once you put these two side panels on and add the wheels, it's all done. The Side Comparison The side panels REALLY add a lot to this design, so I wanted to show exactly how much "mess" they're hiding. All the mechanicals of the bare truck are so cluttered by necessity, where the panel just smooths everything out and makes it look less Lego. I like the finished look. And since each panel is held on by just 3 pins, they're easy to remove to get to the battery box or fiddle with the internals. The Good Here's everything in the "deployed" position. You'd never actually use them all at once, but here it is. The crane arm has a decent amount of height, considering it's usage on a tow truck, and the extension on it works well enough. It's also good that the main boom uses an LA rather then pneumatics so you have height control. Full up there would be WAY too high for the wheel lift! Now that we have tires on, check out the front steering. Nice engineering making the dual steered axles do different angles like that. It's not something we see on real trucks here in the USA since the dual-front axle design is not common, but it's nice to see implemented. The Bad There are several small things that annoy me (and those of you with OCD will feel the same I'm sure) so let me point a few out. Each side of the truck has a flip-up panel with one of the gear shift levers underneath. There's a sticker to indicate functions, but due to the design of the truck, the sticker isn't centered over the lever. What? Look at the hoses coming off the small pneumatic cylinder on the hoist. They get in the way of the wheel lift coming up all the way. I'm not sure why they didn't design it with those hoses coming off the other side of the cylinder - I might have to mod it and see if there's a reason I'm not seeing now. There also is no good place to put the hook. As I played around with the truck, it kept snagging on other parts as they moved. The outriggers only come just to the table surface. They don't extend far enough to actually dig into the ground if you had it on dirt. but that's probably ok. They're nice looking but a little flimsy, so if they extended further, since most kids will use this on a hard surface, they'd try to lift the back end of the truck and fail. Access to the battery box switch is fairly tight. It looks roomy enough, but as a 6'3" guy with man-hands, it's tight getting my fingers in there to control it. Too bad they didn't use the PF switch and put it somewhere more accessible. The Video Note when I show the pneumatics at the end, there's an issue with the pump. Since there's very little tubing and no air tank, it builds up to max pressure very quickly. That leads to a loud clicking sound when the pump is running, since it's being forced to compress with no room for the air to go, and then the pump slams back open as soon as the gear turns a bit further. It's loud and annoying. Once you start using the functions, it quiets down, but then gets loud again a few seconds later. The Conclusion So, what's my conclusion on this set? Pretty cool! This was one of a series of service trucks in a short span - 2012 had the Pick-Up Tow Truck, and 2011 had a Flatbed Tow Truck - but you have to go back to 2006's famous 8285 Tow Truck to get a more direct comparison. I've built the 8285 and it's an awesome truck, but different in many ways than this one. 8285 is much larger and has a bigger piece count, so everything is bigger. However, that leads to a lot of empty space in the truck. There's not many Technic vehicles made that have as much empty room in them as the 8285. Also, 8285 had no motor, so you had to pump the pneumatics by hand. This one is much nicer in that regard. Overall, I like it better. For a non-flagship set, this packs a TON of features. The Ratings Value: 10/10 - It's so close to the famous 10 cents a part mark, and there's so many useful parts. Lots of panels, PF, pneumatics, so it's solid. Design: 8/10 - As a whole, great, but there's a few details that could be improved. Minifigs: n/a - Playability: 9/10 - Lots of functions, and it's in a common Technic scale so I bet it would work well for towing other vehicles around. It'd be better for smaller fingers than mine though. Parts: 10/10 - It's got both pneumatics and PF, plus if you want green Technic, it's the only place to go. It's the only source of 1x7 beams, the best source for 1x9 and 1x13 beams, and the only current(ish) source for green panels. Overall: 9/10 - Very solid. -
The original sports car design come in the box is just not my cup of tea. So I try to make one that I would like with the same components in the box. What I have below is my original design which use Ferrari FF as a reference, is not actually looks like the ff, but, it still looks good and I am happy with it. Thanks for watching :-) Please watch review video here : If you would like to build this model, refer to build the instruction video below:
-
I recently decided to build a supercar of some sort, and after some input from Blakbird I decided to buy the famous 8448. This was my first “old” Technic set and while deciding to buy it, I found a surprising lack of reviews for it. The only comprehensive review I found was here on Eurobricks(which is here and is quite good) so I decided to do another review for it as this set definitely deserves more. In this review I’ll be reviewing the gull wing model.(I apologize for pic quality if I ever do another review they'll be much better I promise) Here’s the pile of parts at first glance. It’s pretty big coming in at about 1400 pieces, and was the biggest Technic set at that time (correct me if I’m wrong). It has a large number of 1x16 technic bricks and 7x3 liftarms. The set had a couple unique pieces being the wheels and the steering hubs. Here are the wheels compared to the common supercar tires made by Lego.They're quite large and IMO they seem to be the most realistic tires as they are thin and are able to make the most realistic steering designs (see here).They're shiny, but don't look that great in terms of design, so they aren't used much. The steering hubs are also quite interesting although they are not widely used except in Jorgeopesi’s Ferrari F40. Any way let’s go build this thing. The books are absolutley awesome and are divided between chassis and body(ies). They are both thick heavy books and the quality is great even 16 years later. The build is divided between the chassis and the body. The entire build maintains modularity which is interesting and adds a nice customization aspect. The chassis is divided into numerous modules and starts off with a frame. The frame is quite sturdy and has the beginnings of the drivetrain in it. Next up we have the suspension modules. The rear suspension is too stiff and the front suspension is too soft. I feel like this set could have really used the yellow hard springs as these are only the medium stiffness. After the suspension we have the gearbox. The 8448 probably has the best gearbox produced in a Lego Technic set. It has a total of 5 speeds and one reverse gear. It was reproduced in the 8466 Off Roader. The gearbox and engine are added, and at this point the car is fully functional. All of the gears can be selected and the engine moves nicely. I also like the effort put into the engine details, its not something you see in modern sets. The interesting thing about this car is that the engine can easily be placed in the back even when the model is fully built, but it makes the front look very sparse. Once the chassis is built you can continue onto the bodywork, but if you aren't a fan of the original design, you can always build one of the other 4 designs(hot rod, racecar, concept car, and buggy) The instructions used to be hard to find, but now they should be here. After this point the build loses a technical aspect and focuses more on aesthetics. The dashboard is added and the bodywork starts to take shape Eventually you reach this point where you make a choice whether to build the convertible version of the car or the gull wing version. I chose to build the latter. Some nice seats are added and the bodywork is finished up Anddd we're done. I gotta say even though this model is 16 years old, it still looks really good. The minimalist design with flex axles and panels with large holes leaves a bit to the imagination, but makes an awesome shape. There are a couple clever techniques to get these shapes. The functions all work well and the gullwing doors have an extremely smooth operation. One thing I don't like about this model is that it lacks Hand of God steering which makes it a bit more difficult to play with. I would go far enough to say that this car was the original "supercar". Although there were others before it, I feel like this is the first one in which looks seemed to be a priority. It also had realistic functions unlike the 8880(which is still an awesome car with its complexity) which had 4 wheel steering which isn't really seen on most cars. So how does this car compare to our modern supercars? I owned the 8070 for a while, but then parted it out to build the Vampire GT. Both the 8070 and 8448 have their strengths. The 8070 obviously has a more modern look due to the newer parts and it is much more filled it. It also has the function gear box which opens everything nicely; however, for me, the 8448's realistic gearbox is far more interesting. Something about the different speeds of the engine just interests me a lot. Also the 8448 has the modularity concept which makes everything much more interesting. Here's a final pic with Crowkillers's Vampire GT. The 2 cars almost look like father and son with their gullwing doors. Overall I got to say this is one of the best sets I've built. It has great looks combined with excellent functions such as the gearbox, modules, and gullwing doors. It only has a few flaws that detract from the main model, but they are barely noticeable.If you guys are still with me after this long review I'll give a rating now Building Experience-10/10 Building this model never gets boring. The modularity is nice and its always fun to see all the modules come together Design-9/10 The 8448 was a massive step forward in design compared to the blocky supercars of the past. It looks good, but has a bit too many holes in some places and the wheels don't look too good. Functionality-8/10 The gear box in this model is amazing and has to be Lego's best. Its gullwing doors open very smoothly. I can't attest to the other models, but I'm guessing their functionality is just as smooth. The only flaws I see here is the lack of HOG and the problems with the suspension. Value-10/10 In the States you can get this model for little over a 100 on Ebay while in Europe its probably a little cheaper. I payed a little more for my copy, but I don't regret it. The model is one of the best Technic models I've seen. Parts-10/10 This model is full of excellent parts. There are many normal Technic parts which are always good to have, and an abundance of bricks and studded parts which are good for Model Team/studded Technic. The set also has 10(!) of those rare #3 red connectors which sell for ridiculous prices on Bricklink. It also has many rare red soft axles and some interesting parts such as 12L axles in red. It also has the rare metallic wheels, dampers, and steering pieces. Overall-47/50 Highly Recommended. Go buy this model and you definitely won't regret it, and in the rare event that you don't like it feel free to send it to me Thanks for reading and feedback on the review is welcome
-
So I told myself when I bought 60036 last year that I wouldn't buy any more Arctic sets, and that I didn't need 60034 because I probably had all the parts anyhow. But then I went into Smyths, and they had a sale, and well....err... here is my review of 60034: Arctic Helicopter Set #: 60034 Year Released: 2014 Piece Count: 262 Minifigs: 2, plus 4 dogs RRP: $39.99, £24.99 I must admit the first time I saw images of 60034 I was quite excited; a lego helicopter not in police or fire colours. Not only that but clearly based on a real helicopter; the Sikorsky S-65 (CH-54) Skycrane, and almost in the livery of a real operator; Erickson Air-Crane. Also the huskies looked awesome! So did the set live up to expectations? The Box: A surprisingly compact square number: The front shows the helicrane doing what it does best, coming to pick up a crate under radio direction from the explorer on the ground. The husky team stand firm despite the rotor downwash and somehow avoid an unplanned swim. A nice touch is the pilot visible in the cockpit as this pose is not really possible in the actual model and he just disappears in the dark behind the trans-blue glass. Note the city skyline hiding just behind the mountains at the back. The back of the box is extremely busy as the left half is entirely taken up by the modular build and city online adverts leaving the right side to demonstrate the action/play features of the set: Take your husky team, detect the crystal block, call in the chopper, then race it home. The top edge is less action, more science with the team photographing and sampling the ice. A 1:1 pic of the helicopter pilot is shown for reference at 90° to the rest of the image as the box is barely a minifig tall. The Contents We get 3 bags, two booklets and a sticker sheet which between them pretty much fill the box (it barely rattles when you take it off the shelf): Sorry no printed parts in here! Here are the contents of Bag 1 which makes the crate, minifigs and dogsled: The ice block and crystal (in this colour) are unique to the theme, there are some 1x1x2s in light bley, we get a couple of ice picks and this is the first time I have seen the new style radio and metal detector pieces. Compare for example the new parts on the left with their classic equivalents on the right: I think the older radio looks much better, I'm also slightly disappointed by the loss of the stud on the detector as this reduces the MOCing potential of the part. Bag 2 & 3 give us too many parts to photo so here are my highlights: 3 2x2 round tiles with hole, 1x2x2 orange windows (though only 1 piece of glass), some orange Technic arm pieces and grey 1x2 plates with Technic axle holes. The Instructions The first booklet is about half the size of the second and covers the husky sled and crate build from bag 1. The cover shot is exactly the same as the box, but removes the helicopter and photoshops in the pilot: The second booklet cover also replicates the box art the same but photoshops out everything but the helicopter. The instructions are clear with good colour differentiation and a wavy pale blue background. My only possible gripe is that, as with 60036, the 'sticker' icon is missing from some steps so stickers magically appear on parts such as: The shot below shows the good colour differentiation between dark bley and black and light bley and white which is occasionally poor in other sets (including 60036). The instruction steps are all very clear and provide part callouts and plenty of pointers so your are unlikely to miss anything. The Minifigs Here we have our pilot with standard smug aviator sunglasses face and the Arctic pilot torso; I still love the leather jacket and parachute printing even if it is identical to that for the 60036 pilot. The explorer fig is the same female fig found in 60036 with the, in my opinion, unnecessary torso hourglass print; the details of the rest of the print are great though as noted in my 60036 review the goggle print limits use of the head to winter MOCs. A view from behind, I do very much love the Arctic logo: The Build and Model: Dog Sled and Crate The crate comes first and there is not much to it- plates over the base stack 2 bricks per support then add the roof, done: It does look quite effective, though lacks some realism in that the contents are not secured in any visible way. The sled is a very similar size to that of the one in 60036 though featuring some design differences. Oddly the sled features a much larger radar screen than the 30036 offering but no visible radar dish. Believe it of not this shot is the sled finished except for accessories and dogs: With everything on the sled looks quite good, and as ever the huskies are brilliant with each having a slightly different appearance due to the grey/white plastic mix: Although it looks good the sled has some drawbacks over that of 30036. Firstly there are no 2x2 round boat studs or similar on the underside to reduce friction so it tends to get caught in carpets. Secondly the camera attachment is rather flimsy and as the equipment in the crate is loose you tend to lose pieces if mushing too vigorously. Finally the crate attached direct to the large orange piece and so has a low of clutch power, so changing loads to the ice block (as shown in the instructions) requires quite a bit of effort and can lead to unplanned disassembly of other parts. 30036 got around this issue with jumper plates though that resulted in some loads being offset due to the different footprints of the 3x4 crate and 2x2 ice block (a problem this set does not have). Here is the sled carrying the ice block: The Build and Model: The Helicopter The helicopter starts with the spine, I was slightly confused at this point about the two 1x2 plate with hinge facing each other: It tuns out that these are a clever method of holding the engines (which I should note are the 2x2 stud versions not the older versions with the same shape but 1x2 pylon attachments): The spine grows very quick and suddenly you realise this model is going to be huge! Notice the winch, which passes through a gap in the spine: The cockpit is a separate build to begin with, and the reason for having 3 windows but only 1 glass element becomes clear: I assume this build method was chosen over using the equivalent 1x2x2 panels to reduce the overall number of unique parts required in orange. I suspect for this reason we also see 1x1 and 1x2 bricks used where we would normally see a 2x2 corner brick: You can also spot in this shot that I was mistaken, we do get 1 printed part after all, the instrument panel which is fairly common to city era aircraft. As with the 60036 helicopter the pilot gets a single control stick rather than the classic 90's two. The rather heavy build at the back of the cockpit gives the model some strength but unfortunately makes the rear window and spotlights feel a bit redundant as the pilot cant really get to them. The real skycrane had a rear facing operators station from which the winch operator could control the aircraft during winching operations. The snot plates of the cockpit are used to provide additional structural attachment to the spine via some 2x6 plates with a few bits of greebling: The landing gear is then built from a variety of Technic parts and some snazzy stickered wedge parts for decoration. The landing gear is probably the only fiddly bit where younger builders might need help (aside from sticker application of course) as parts have to be correctly aligned when inserting pins/axles: Finished, and my is it a big helicopter, although the crate just fits underneath. This is not helped by the fact the model actually sits a few degrees nose down as the nose gear is 2-3 plates higher than the main gear: As the winch is a single point attachment your loads will tend to swing around, though his can be temporarily fixed for the crate by attaching it to the plate at the bottom of the spine when winched fully in. And to justify having this set as well as 30036, well what happens if the mini helicopter from 30036 breaks down and needs rescuing: One last shot of the helicopter from the front: I think lego did a great job in capturing the feel of the skycrane in this model. It looks convincingly like a heavy workhorse and makes me think this model is what 60021 should have been (tilt-rotors don't make sense for logging operations). I must however, note two small deviations from the instructions I made in this build: 1 - I build the rotors with the opposite offset of the blades to produce an anticlockwise (Sikorsky type) rotor rather than the clockwise (Airbus type) the instructions showed. 2 - The rotor mast has an empty Technic pin hole behind the engines which I filled with a pin and 1x1 clear round tile from the spare bits in the set to simulate a gearbox oil sight glass. Finally a beauty shot of the whole set: Conclusion and Scores Parts: 7 - Good selection of bits but nothing unique except in terms of colour. The Figs: 8 - Very nice printing on both figs despite the unnecessary hourglass torso effect. If I hadn't already got the same figs from 60036 (admittedly different pilot face) I would be extremely happy so have rated accordingly. The dogs are simply great, very cute and the individuality of each due to the colour mix is a real bonus. Build & Model(s): 8 - The Dog-sled build disappoints slightly (until you get to adding the dogs) due to its simplicity. The helicopter has enough interesting techniques to please seasoned builder without being complicated; and when finished it just looks great! It would also be easy to use this helicopter in a city/forest scenario by simply swapping the skis for wheels. Playbility: 8 - Should be 10 but points lost due to the issues with changing loads on the dog sled and running it on carpet. A few extra parts could easily have solved these issues. The accessories (metal detector etc) allow for some play before the helicopter swoops in, but let's be honest, that's where the action is! The helicopter winch is easily controlled one handed whilst flying with the other and the model is very robust and swooshable. Value for Money: 8 - Though I think this score depend on whether you have any of the other Arctic sets as you could easily find yourself with many duplicate figs and vehicles fulfilling the same functions which will determine your view on the value of these element and also affect how long each particular set may be played with. Certainly for the sale price (£21) I was very happy, for RRP I would probably still be. Overall: 8 - Excellent helicopter, let down slightly by issues with the dog sled, but not enough to seriously affect the playability or enjoyment of the set. So what's your view?
-

VIDEO Review: LEGO House - exclusive Billund-Set (4000010)
Zusammengebaut posted a topic in Special LEGO Themes
Hello, in March, I have been to Billund and bought an exklusive Billund-Architecture-Set: The "LEGO House" (4000010). Beside the nice building, a fine booklet and a minifigure are included, as well. This is my video review - in German language. But if you have any questions, please feel free to ask me at any time. The "real" Lego House will open in about two years from now. Have you already seen this set or have you visited Billund in the past? Best wishes Andres -
Thank you to Eurobricks for allowing me to review this set, sorry about taking forever. When I first saw this set, I though it looked pretty decent, but didn't plan on getting it. I was curious to see if it would be strong enough to swoosh around. ZCeberus has written a wonderful comparison review here. Set Information: Name: Slave I Set Number: 75060 Pieces: 1996 Price: $199 Ages: 14+ Minifigures: 4 Theme: Star Wars Year of Release: 2015 Bricklink Brickset S@H My Flickr Set of the photos from this review. Box: Overall the box is very clean looking, the gold outlines fit very well. The background shows Bespin, which is the main setting for this set, as well as a flying shot. The back shows a landing shot as well as some nice shots of the functions. As the box is so large, there's a 1:1 image of all of the minifigures in the set. Continuing from the image of the minifigures is this shot of the set in a blueprint from; it shows the length, height, and width. This was on the side of the box, I love what LEGO did with this. It fades out from the set image to an almost schematic picture. Contents: I thought these two parts were interesting, they're new to me and I can see quite a few uses for them. There is a myriad of extra parts in this set. I was rather surprised to see so many, but with a set that has close to 20 different bags in it, it shouldn't be too surprising. There are 23 stickers in this set, but I think LEGO did a pretty good job of deciding what needed stickers. Manual: The front of the manual is virtually the same as the box, but it has some information about the manual languages on it. As this is a large UCS set, LEGO has done some research on the model used in the movie and spends several pages talking about the design and other things at the beginning of the manual. Seeing the animators from Ep. V, is pretty cool. I suspect this shot is some concept art from the designing of the ship. There are two pages that show what bags build what. The art and colors inside the manual are set out nicely, it's easy to see what parts go where, and I found no color issues. A whole page at the end of the manual is on a nice shot of the UCS Sandcrawler. Minifigures: While anyone buying this set is most likely not interested in the minifigures as much but I think LEGO did a great job providing a good selection of figures that fit well with the set. The Stormy and Han are the only ones not new in this set. This Boba is just such an upgrade from the 2012 one, with his arm printing. The Bespin Guard, while simple, is definitely one of the better figures in the set. LEGO did a great job keeping him simple while still capturing his look perfectly. I must say that I much prefer the print on the back of the Bespin Guard more than anyone else's. You can just see Han's alternate print sticking out from under his hair. Only Han has an alternate head print. Boba looks fairly close to the trooper. LEGO has once again brought back arm printing for Boba. I must say that it adds another high level of detail to him. Not much on his back, just a printing of a metal plate and a belt. There is SO much detail on his helmet, the paint is chipped in several places, and he's got some markings on his helmet. I know this piece has been out for several years now, but it's my first one. I must say that LEGO did a really good job translating it to a usable LEGO piece. And finally a quick comparison of the Boba from this set with the only other Boba Fett I have; White Boba. I must say that this helmet is much nicer than the old way. The Build: The first bag starts the construction of the main base of the ship. Bag two starts adding some shape. By the end of bag three, you've finished one sub-assembly. Bag four builds the front section of the Slave I. At the end of bag five, the base of the ship is completed. Bag six starts building up. Bag seven adds the side wings. At the end of bag eight, you've started on the cockpit. Bag nine adds one small sub-assembly. Nearly done! Finished! Finished Model: As usual with a UCS set, there's a 8-by-16 tile with some rather interesting facts on the Slave I. Two stickers in the cockpit, and there are spots in the cockpit for both of Boba's guns. Boba fits into the cockpit with his jet-pack on, I think they did a great job with the control area. This is the only sticker on the green curved slope, oddly enough. But I do think this area looks very much like the real ship. There are six stickers on this end, only two of them are rather small. But I do like what they add to the look of the set. The end is rather open, just a result of the angles. It's a bit bothersome, but you don't usually see this area. It has a great stand presence. It's most of the height of my Orthanc tower. (Makes Orthanc look kinda small too) Boba looks great in the cockpit, this is as far back as the chair rotates in the cockpit. Functions: The hatch on the left side. Opens to show some laser guns. However this side should be another missile launcher as opposed to guns. Then over on the right side. To show a missile launcher. Which is in the right spot. The main entrance to the ship opens. It can be a little hard to get your hand in there to open it. To reveal Carbonite Han. Finally the guns are adjustable, LEGO has it set on another gear so that it doesn't move unless you want it to. Conclusion: So I really do think this set is great; even with its few inaccuracies. LEGO did a great job capturing the overall shape of the ship, just a few of the functions don't agree with the actual ship. Oddly enough the ship is easily swooshed, but it can be rather interesting to get it on the stand; there's not really a good spot to hold it from. The minifigures are fantastic; Boba can't get any better. One thing I would have liked to have seen was the mines from Attack of the Clones; though I know they weren't in Ep. V. Ratings: Playability: 6/10 There aren't a whole lot of play features, but I don't really expect them for this set. Design: 10/10 LEGO has nailed the likeness of the ship at this scale. Price: 8/10 $200 is a fair price, and it has great shelf presence. Minifigures: 9/10 Boba is the best minifigure in this set. The Bespin guard is a bit plain for me. Parts: 10/10 I absolutely love all the selection of parts in dark red and dark green. Total: 43/50 Don't forget ZCeberus' comparison review here. Like this review? Want to learn how to make good reviews? Then join the Reviewers Academy!
-
"Why So Serious? This Baby Works Just Fine!” "Let's put a smile on that face!" - The Joker by Adeel Zubair, on Flickr First Impression 2014 was a very impressive year for LEGO fans; a huge number superb sets that were released including this impressive and outstanding recreation of the Tumbler from The Dark Knight Trilogy. It was first mentioned by Jason from The Brick Show on Youtube that we have a UCS Tumbler on the way. Since then many have speculated the set would be released because last year was the 75th anniversary of the Caped Crusader and we would see a Batman vehicle based off the classic Batman comics or movies such as Jerry Robinson’s, Batman 66’s, Batman Animated Series or even a redesign of the Batman & Robin Batmobile. In fact I would love for LEGO to release those but the popularity of The Dark Knight movie made this model happen. After many fans have trying to replicate this iconic vehicle and many LEGO Ideas submissions we have finally got a UCS Batman Tumbler from LEGO themselves! I was super pumped for this set: one hand it's a large scale car model (which I enjoy) and it's based on a very much loved film franchise and character that I and others enjoy; the price just put me off until now! Was it worth it though? Unique Parts Besides the obvious exclusive minifigure parts there are two exclusive pieces those being the Tyre Wide Ø81,6X44 (front wheels) and the Pearl Gold Wheel Bearing Back. Surprisingly the Batman head is exclusive. Minifigures This set includes Batman and the Joker minifigures, I guess they are only included to boost sales for rather large set; even though they are not in scale with the model as the box states. Those minifigures will drive collectors and people to purchase the set who are not even interested in the model (who wouldn't be?) which is pretty sad if you ask me. I got it purely for the model; the minifigures and stand are bonuses! They both can be displayed on a sleek and simple display stand with the information plaque in the centre which has many different stats and information about the vehicle. I like that The Dark Knight logo isn't placed at the top of the plaque, were it could have been cheesy. The plaque is instead titled 'Wayne Industries - Applied Science Division' which makes more sense as the Tumbler was known for all its cool facts and makes the model feel authentic. This is my first set with a display stand and plaque so I can say it took about 15-20 minutes to get the sticker right but it did catch some dust after multiple times so I have very few bumps on the stand but it's very minor. I like that it's not that sticky as other stickers which made it much easier to apply. The Christian Bale Batman is based on the Batman Begins suit since we have already got The Dark Knight Rises one in 2013. I'm really digging the level of details on the front and back of the torso; it's very movie accurate and doesn't look cartoony which 2013 one did. The most disappointing part about this minifigure is the lack of leg and arm printing, if this was based off a comic version of Batman it wouldn't be a problem but the fact it's not as detailed as the Marvel movie variants it's really disappointing for such a large set. Batman comes with a Batarang but it's the one that we have always had, I would have liked an exclusive Dark Knight Batarang instead. The main highlight for this set is the first ever Heath Ledger Joker who has been a fan requested minifigure for a very long time. He is pretty much perfect unlike Batman; he has a detailed torso and legs. I really like that just front of the head has white faded printing to give it the face paint effect, whereas normally he has a white head instead. His smirk is so sinister. I'm not sure if the Earth Blue hands are accurate. Like the Batman minifigure he also doesn't come with an exclusive accessory but at least Batman came with one but the Joker doesn't have anything; maybe an exclusive knife or Joker card would have been cool. I have put the pair of very precious minifigures free from dust so they are not on the display stand but it still does look good without them. Playability Besides rolling it backwards and forwards, several adjustable flaps, some movable interior details and the two sections of the removable roof it doesn't have anything else. It's hasn't got is primary features from the movie; those being an ejectable Bat-Pod, opening doors and steering. I understand and can see that the main goal was to get all those angles and shapes that we see on the actual Tumbler which the designer at LEGO has achieved. It's such a shame as it would have completed the model but I guess LEGO have given the fans an opportunity to modify the model and do it ourselves. I must say that getting its wheels to turn and motorize it must be really difficult. Not to mention ejecting a Bat-Pot from the model. Maybe there is a person out there who could figure it all out and make it work successfully and keep all the great angles and shapes Adam has put into the model. I had problems with adding the sub-assemblies during the end since they can be fragile which means it's not recommend for play. Build Experience This set contains 18 numbered bags (1-11.) This set contains five instruction booklets and two sticker sheets which come in a cardboard sleeve to keep them straight. To note, I got an extra sheet of the smaller stickers for some odd reason? Really, for a set this size they could have made it into a thick square bound book like they have done with a few sets already and included some facts about the movie vehicle and the LEGO design process. Boy was very challenging, I really enjoyed the build, it took me around 8 hours to build which was very surprising since most people took about 4-5 hours; it's very different to the models I normally build which are rather simple like the Modular Buildings. It takes a while to build the main frame of the model but after that it quickly comes together with many sub-assemblies. I understand that most of the time man made things are symmetrical so this had a mirrored build and it does get slightly repetitive but at least I didn't see more than 'x2' in the instructions. I had a hard time attaching the front wheel assembly that attaches to the Technic panel; it took some time to actually make it stay on since it's held on with many studs. I also found out that the design could have easily made that area stronger with a few of Connector Peg W. Knob; we get loads of extras of those so it's not really a problem. I also thought a few more of Slide Shoe Round 2X2 could have been used to make some of the assemblies much stronger like the chairs. The stickers where the only down side to the build which slightly stressed me out but I found out that sticking a corner of the sticker on the back of the actual sticker sheet makes it much easier and fingerprint proof. The main frame is very study when complete but like I said the sub-assemblies are the weak areas in terms of stability but I don't know how else it would have been possible. -What makes this model different from many other LEGO models is that you cannot easily tell how it's built; due to all the non-linear shapes and angles achieved throughout the model. I can say we do have two elements in the front wheels which are visible, that’s not intentionally part of the design but that fact that only the black is visible throughout the whole with a few hints of grey and gold details; normally we would have exposed blue or red LEGO Technic pins which normally takes away from most LEGO models but in this case it's only very minor which is great for a model at this scale. Value for Money This retails for £159.99 in the UK and contains 1869 pieces. The price shocked me; then I saw the designer video and was impressed with the size; now that I own it I can say it’s damn huge. It's beauty is the size and details; just speechless. The Dark Knight and Batman fans will really appreciate this model, it delivers a different and educational build experience, compared to your average set as it’s aimed towards adults and collectors. The other day I checked the price for the Tyre Wide Ø81,6X44 and I discovered that they are on the LEGO Bricks and Pieces feature and they go for about £8 each! Now I can understand why the set costs so much, the large tires must be very hard to make and manufacture so therefore the price reflects that. I added all the tires and rims and it came out close to £40. What this means is it would have cost £120 without the tires and rims. You have to understand that's the main reason why the set costs so much. Just like real cars. I plan to buy two more for a Bat-Pod MOC in scale with this Tumbler. Theme Popularity LEGO Batman sets always to well and this will make a great collector’s item. Exclusivity This set is available at LEGO Stores and Shop.LEGO.com and other selected retailers. Surprisingly it’s still listed 1 per customer online which means resellers will be upset and tells us that there is limited availability. Packaging I like the fact they changed the colour of the banner for this set and made is a mix of grey and black. The way they presented the model is just like it's jumped off the screen. On the back of the box we see a main image of the model in the basement, and just below it we have several technical views of the Tumbler. The back also gives us a good look at the interior which is pretty much impossible to see once built. Growth Potential This will do very well as an investment just because LEGO Batman has always done well in the secondary market plus the popularity of The Dark Knight will make it stand out. I can see its price tripled when it's discontinued since LEGO has limited one per customer on Shop.LEGO.com. Display Attributes Yes, this is a great collector’s item and display piece with minor flaws like: It's hasn't got is primary features from the movie; those being an ejectable Bat-Pod, opening doors and steering. I understand and can see that the main goal was to get all those angles and shapes that we see on the actual Tumbler which the designer at LEGO has achieved. The model looks how you would expect it to look, it’s definitely looks like a Tumbler and is instantly recognisable; it's not a very pretty model as it's a military tank therefore it's won't be target to some individuals who like models from LEGO Creator Expert but it's a great and cool vehicle and a great addition to any LEGO Batman collection. It would be a nightmare dusting this model as it has many different angles whilst using elements with visible studs. Whist having all those studs showing takes away from the Tumbler look and looks like random selections of elements put together; one way they should have avoid this if they tiled the entire model, but it would have greatly affected the RRP making it harder for us and costs to make new molds and colours would have been as issue for LEGO. So in a nutshell it had to be done like this. The back view is its most comfortable and standout area in the entire model. The tires are another standout in the set they are so sleek; I wouldn't want those catching any dust! I can see people modifying this in ‘5 - Brick Yellow’ and ‘138 - Sand Yellow’ for the Tumblers used in The Dark Knight Rises, it would take quite a bit of planning to accomplish. Final Analysis/ Conclusion Overall this set it is a must have set for every Batman or The Dark Knight fan. If you’re a LEGO collector of cars this will also be a unique model and it will stand out from other LEGO cars since it's probably one of the biggest car or vehicle of this scale. This set has two unique and exclusive minifigures so if you’re a Batman fan it’s defiantly worth. It also leaves you hanging to try and modify it because it wasn't realistic enough for the designers to get all its primary features into a model of this size but purely as a display pieces it defiantly triumphs as a model and stands out to the other exclusives that are currently available. This set is a best seller so get your hands on it while you can! Hopefully with the success of this set we get a UCS Batmobile from Batman V Superman: Dawn of Justice next year! Adeel
-
Set name: CHI Razar Set number: 70205 Pieces: 68 Price: $14.99 Release date: 2013 Packaging and Instructions Bag Front On the front of the bag, we see that Razar now uses his Chi to fight forest fires… Bag Back And on the back, Razar is staring of into the sunset as Gorzan sneaks up behind him. We also see a size comparison of his head, the combo model of Razar+Gorzan, and a comic of Razar using Chi to power up. Instructions Nothing special here. As usual, the same picture as on the front of the bag. Random Page No transparent Eris heads this time, just the standard light blue background. Advertisements Ooh, an ad for all the 2013 Chima ultrabuilds. After that, a display of some of the normal Chima sets. Then there’s an ad for Hero Factory sets. Parts Dumped Out The big parts in the big bag, small parts in the small bag, head in it’s own bag. I wonder why they leave the torso skeleton out of the bag. Interesting Parts First off, the black clawed foot, which I suppose isn’t that interesting, considering that it’s in 17 other sets. The new head mold, of course. A lovely “CHIed” up chest piece, which is printed. I would consider the 5M shell in silver fairly rare, appearing in 6 sets. The lovely 3M shell in a nice purple (medium lilac, according to Brickset), that only appears in this and the Constraction Joker set. That odd weapon piece is only in red in this set, and is in the CHI Eris set as well. And finally, the wing pieces from some of the Mixel and Chima sets, in both black and purple. Head The head is pretty cool, but I really think it would have looked better if there was dark red around the eyes. It has some rivets and cracks in it, which looks good. Building Action Frame Besides the wings, it’s pretty standard. They plug this piece into the back of the skeleton to attach the wings. Finished Build Front The black and purple color scheme here does look good. What would really make it look good would be if there were some dark red pieces in there. I actually like those spike pieces on Razar, they give him a nice look. They kind of remind me of talons. Profile I like how the head is slightly hunched over, contributing to his sly, sinister look. His wings don’t stick too far back. Back Wouldn’t it have been nice if they had included an extra shell back here? It looks sort of bare, but the wings do a decent job of bulking up the shoulders. Posing Like most CCBS sets, it has quite a few points of articulation. As one would expect, the wings can move around pretty well, just like extra limbs. Weapons I’m not really sure about those red pieces. On the Lego Shop description it says that they are supposed to be scythes. And those blue pins look pretty bad up close. I think it would look better if these were dark red though. Overall Razar looks pretty neat; He’s rocking a nice color scheme, and if they wanted him to look sinister, they succeeded. But reviewing him made me appreciate Bionicle 2015 so much more. This set is lacking the complexity and uniqueness of Bionicle, as well as the battle in a box idea (the Skull Spiders). Overall, it’s definitely not the best set Lego has ever made, but it is pretty good. I would suggest picking it up if you can.
-

Review LEGO Elves Azari's Magic Fire Polybag
brickpreviews posted a topic in LEGO Action and Adventure Themes
Hey all, this is a review of the upcoming LEGO Elves Azari's Magic Fire Polybag. This is a promotional polybag given to anyone to purchase the LEGO Elves set in March 2015 on Shop@ Home. I was able to find it in Toys R Us Canada oddly enough (not on shelves but the cashier had a cart with a bunch of them). It only has 27 pieces and the minifigure is slimmer than the regular minifigures but lacks mobility in the legs. Full Review: http://brickpreviews.com/lego-elves-30259-azaris-magic-fire-polybag-review/ Here are some pictures If you like the Elves theme you are in luck as I will be posting review of a bunch of the sets in the next few days! -
Review: 70162 - Ultra Agents Infearno Interception
Vorkosigan posted a topic in LEGO Action and Adventure Themes
Name: Infearno Interception Theme: LEGO Ultra Agents Year: 2014 Pieces: 313 Pieces Minifigs: 2 minifigures Price: USD $29.99 This set is nearing the end of its run on shelves as the new wave comes in, but still awaits a review. Personally its my first Ultra Agents set, I went for it because of the Blade Runner similarity. First, of course the box. The back, showing off all the action features and app tie in. The build is divided into two stages in numbered bags. The instructions has a very simple pale green background with grid pattern. Some parts that were interesting to me, I believe only the flame helmet piece is new. Nice to have the space armor in red. I don't buy Star Wars or much action themes so this is my first set with spring loaded missiles. This is the completed first stage of the build. Here you can see the ejection seat mechanism The figures, Agent Soloman Blaze and Infearno. The mech leg is a nice touch but while Soloman is a decent looking figure, Infearno is the clear standout. He really reminds me of a Mega Man villain. His armor, flame throwers and flame board are simple builds but come together very well. The printing on Infearno is very cool, its a shame the armor covers it up actually. But its great to have the printing available. The final build, look familiar? Getting even more Blade Runner-ish in this mode. All features open, the spring fire missiles work reasonably well and its nice they can be hidden. I feel like this should've been reverse printed or else the instructions should show it going on the inside. Lastly, here are the extras. Thanks for reading. Playability: 8/10 Nice articulation, typical flick fire missiles, ejection seat. Great swooshability for a small vehicle. Design: 9/10 The car design comes together very well. Unusual but functional front wheels. Doesn't feel fragile despite nice detailing. Price: 7/10 Average price per piece, I think this would be better at $25 despite quite a few trans pieces. Now is the time to get it on clearance. Minifigures: 8/10 Soloman is classy but not too exciting, Infearno is excellent. Parts: 7/10 Good amount of trans bricks, there are 1x2 trans light blue used that could have been simply dark bley. Total: 39/50 Solid build, good design, I'm tempted to pick up more Ultra Agents sets. -
Hey all, here is my review of the second tribe of the Series 4 Mixeles, the Infernites. While the colors on this look pretty cool and great for display, I still like the glowkies best as they seem to have more moving parts and the glow in the dark feature is awesome. Here is the review: http://brickpreviews...ernites-review/ Some pics
-
As requested by one of the mods here, here is my review of the McLaren P1 newly released on March 1 The Basics Release Date: March 1, 2015 Theme: Speed Champions Age: 7-14 Pieces: 168 MRSP: $14.99 USD, $19.99 CAD Box Dimensions: The Car McLaren P1 is a hybrid supercar designed by the British automaker McLaren Automotive. It is a limited edition car with only 375 units being produced for the price of 1.35 million USD per vehicle to start. It is capable of 217 MPH (350 KM/H) for max speed and can reach 0-60 MPH in 2.7 seconds. Here are some pictures of the real car from the McLaren website. The Box LEGO McLaren P1 comes in a small sized box with 4 unnumbered bags, 2 instruction manuals and a sticker page. I never understood why some speed champion sets have 2 instruction manuals while other sets have them merged into one. Minifigure This set comes with a standard driver minifigure with a silver helmet and painted jacket with McLaren logo in the front and back. Accessory Build The accessory build here is simply 3 traffic cones and a race curb. The traffic cones will definitely come in hand for any other LEGO City sets. McLaren P1 The average build time will be around 15-20 minutes. The instruction manual is pretty detailed so it is hard to make mistakes. There are lots of stickers to apply though and that can take some time to get them just right. We will start with the body using the typical black vehicle base common to many small vehicle builds. Next up is the hood/front bumper. Note the usage of yellow wheel covers (6103455) which are new parts. After the wheel covers we will build the rear bumper. The rear bumper utilize a black plate modified with racer car grille. Some stickers will be applied here to represent the rear lights. The doors here also utilize some stickers to convey the curved edges. The McLaren P1 features a rear spoiler, which uses a new part (6105957). The windshield is a painted piece that is also a completely new part (6107333) The wheels for the McLaren P1 are black (6104403) but it utilize the same tires as all the other speed champion cars. Two sets of interchangeable wheel trims are provided. Here is the final build. Final Thoughts Out of the 3 hybrid supercars I have reviewed so far (LaFerrari, Porsche 918, and McLaren P1), the McLaren P1 model is probably my favourite. The yellow/black theme is really nice to look at and the black wheels are pretty sexy. At around 9 cents per piece this set isn’t that expensive either. While the model is not comparable to the real car, I think it represented the overall shape fairly well. Here are some comparison images with the other Speed Champion cars I have reviewed. Alternative link for those prefer small images: http://brickpreviews...aren-p1-review/
-
Name: City 30313 Garbage Truck Theme: LEGO System / City Year: 2015 Pieces: 48 Minifigs: 1 minifigure Price: USD $3.49 I picked up this new polybag in the Easter section at Target. The parts. Front end could use a bit more detail, but a nice little utility vehicle vehicle. The extras, not much but the black arm is a nice piece. Playability: 7/10 For a $3.49 set its not bad with the trash and shovel and cans to put them in. Design: 8/10 Its a polybag, but the little mechanism for the cans is nice. Could use some sort of front fairing. In general this stood out to me more than some of the recent City polybags. Reminds me of a John Deere Gator type vehicle. Price: 7/10 Average price per piece, nice printing on minifig but nothing new. Minifigure: 6/10 Pretty typical blue collar worker type figure. Seems like a lot of these guys have facial hair in the LEGO world. Parts: 7/10 The trash cans are moderately valuable, the arms with hooks are always useful, and the oldschool car base is not found in too many sets these days. Total: 35/50 A pretty average set but would make a nice addition to a park scene. Will be watching to get a couple more cheap if they make it to 50% off the day after Easter.
-
Here is my review of the last tribe of the Mixels Series 4, the green/white space themed Orbitons tribe. http://brickpreviews.com/lego-mixels-series-4-orbitons-review/ Here are some images I took as well
-
Review LEGO Elves Farran and the Crystal Hollow
brickpreviews posted a topic in LEGO Action and Adventure Themes
Hey all, here is my review of the first box set of the Elves theme. This is a cheap set priced at $14.99 USD. It has only 1 minifigure (minidoll) and comes with a squirrel animal. There is a little catapult you can use to shoot acorns and a panel with a key you can pull out but otherwise doesn't have much playability. It does have a bunch of new parts and some bright colored pieces that were fairly rare before. Anyways here is the full review: http://brickpreviews.com/lego-elves-41076-farran-and-the-crystal-hollow-review/ Some pics -
Hey everyone, here is my review of the 75083 AT-DP. I like this walker for display as it is fairly tall and looks great, However has some issues such as being really flimsy and the spring loaded missile are horribly placed and misfire all the time. The new AT-DP minifigures are awesome though and the helmets goes for alot on bricklinks. http://brickpreviews...5083-dp-review/
-

REVIEW: 71008 LEGO Collectable Minifigures Series 13
WhiteFang posted a topic in Special LEGO Themes
Hello everyone, The earlier return of the successful original design of the LEGO Collectable Minifigures Series 12 is totally out of this world. With just two to three months after the launch of Series 12, The LEGO Group (TLG) has once again taken the world by storm with this brand new equally impressive line-up of 71008: LEGO Collectable Minifigures Series 13 which is very highly elusive. Before I begin this detailed pictorial review, I will like to give my very most sincere thank you and appreciation to TLG which consist of LEGO CEE and LEGO Collectable Minifigures Design Team for continuing to facilitate and providing me this very exclusive precious rare opportunity to gain access to this LEGO 2015 product which allow me to preview a 'very early' insight before many others could, in order for me to have adequate spare time to work, evaluate and review this absolute amazing newly minted LEGO Collectable Minifigures Series 13. As a Reviewer, this opportunity is a great honour and I am exceptionally thankful for everything that you guys have done. I cannot believe I have actually completed 15 exhaustive LEGO Pictorial reviews including this current review, solely for the coverage of the LEGO Collectable Minifigures Series / LEGO Minifigures Theme throughout the past four years plus. I will like to thank to Eurobricks Staff/LEGO Ambassador, CopMike and my entire fellow Eurobricks Staffers for being so helpful to this 'WhiteFang' traditional LEGO Collectable Minifigures (CMFs) reviewing endeavour. I am very glad that this ongoing reviewing project is still being continued after all these years. I must also thank my beloved wife, Kim/Belun for being there and supportive throughout this gruesome reviewing period! Seriously without the spouse support to give the blessings of doing a hobby like this that take away many weekends and sleepless nights, one must really thank and reward the wife for being so understanding and supportive. Otherwise, this review will never be make as a reality. It is important to have family and your loved ones to support the stuff that you have enjoyed doing and it also means include doing up LEGO pictorial reviews which is no easy feat. I am truly very pleased that I am able to able to continue to share this very special reviewing achievement with all of you. I hope I have not disappointed anyone in this review, if so, I will like to offer my humble apologies and I really hope I can continue to meet your expectations for this exclusive reviewing coverage. As the Eurobricks tradition depicts, let's do a formal re-cap for all of the past Eurobricks Collectable Minifigures polls once more. It started with a humble beginning of Series 1 followed by Series 2 in the year 2010 and it continue to spread like wildfire with another three strong waves of minifigures craze in the year 2011, putting Series 3, Series 4 and Series 5 in an excellent harvesting year. In the year 2012, we celebrated with Series 6, Series 7 and recent Series 8. With the beginning of the year 2013, we have the recent Series 9, Series 10 and Series 11. In 2014, we have seen the LEGO Movie Series, LEGO Minifigures – The LEGO Simpsons Series and Series 12. Now just before ushering in the year of 2015, I will like to invite the Eurobricks Community to cast their votes into this complete brand new LEGO Collectable Minifigures Series 13 poll statistics as well. Name: 71008 LEGO Collectable Minifigures Series 13 Theme: LEGO System / Collectable Minifigures / Series 13 Year: 2015 Minifigs: 16 unique minifigures Price for 1 box: USD N.A, GBP N.A, EURO N.A, SGD N.A Price for 1 packet: USD N.A, GBP N.A, EURO N.A, SGD N.A Resources: Brickset, BrickLink An image of an 71008 LEGO Collectable Minifigures Series 13 The LEGO Collectable Minifigures Series 13 main colour schema return in a close resemblance lime green colour or equivalent for this entire release. It is pretty similar and resemble to the third 8803 LEGO Collectable Minifigures Series 3 colour schema and a quite close relative of this colour group, which is the 71002 LEGO Collectable Minifigures Series 11. Please excuse me for the disappointment, that I will not be showing all of the previously released boxes of the LEGO Collectable Minifigures Series for comparison, similar to this image due to inaccessible reach of these boxes at this current moment. [Reference 1] [Reference 2] [Reference 3] [Reference 4] What could possibly contain within these mysterious sealed packets? The next highly anticipated of the incredible new LEGO Collectable Minifigures Series 13 The LEGO Collectable Minifigures Series 13 is slated for worldwide release on the 1st January 2015 or 1st February 2015. I do not have the official launch date with me, but I believed this is more or less to be considered an accurate range for this launch. This new Series 13 will just be an outstanding piece of decorated achievement for this very special LEGO Minifigures Theme. No doubt that it has now successfully clocked a total release of three series in the year of 2014 and this new Series 13 will be kicking off to a great start of year 2015 with an impressive line-up of originally designed minifigures which can be used together to integrate with the rest of your existing collection. Kudos to the LEGO CMFs Design Team for outdo themselves by amazed us with these 16 more new unique minifigures' designs. It is awesome to see such a traditional series and it is very encouraging to see it continued beyond Series 12. I am not very sure what holds in the future for this LEGO Minifigures Theme. One thing for sure, the LEGO CMFs Design Team will certainly continue to surprise us with great anticipation on our end. Please do note that the naming that I have use for this review are official TLG minifigures naming for the LEGO Collectable Minifigures Series 13. So, there is absolute no doubt or misinterpretation on the naming used. Front view comparison with Series 13 and together with all available LEGO Collectable Minifigures Series 1 to 12, LEGO Movie and Simpsons packets By placing all of these 15 different minifigures packets altogether excluding the LEGO Team GB packet. I did not include the LEGO Team GB packet as it is not considered as part of the mainstream and I am aware that they are others who hold a different opinion. For the purpose of this review, I have decided to opt out of it. From the above image, you will see an impressive transformation from LEGO CMFs Series 1 to the new LEGO Simpsons Series, and now to the current Series 13. Isn't it wonderful to be able to view them from a helicopter view. I will certainly think that this LEGO Minifigures Theme contain a very strong product range just by seeing all of the releases since 2010. Take a closer look at these following images. This is the front view of the LEGO Collectable Minifigures Series 13 packet, while this shows the back view of it. This is an image that shows the back view comparison for all of these packets. To the regular readers of my traditional LEGO CMFs review, you will probably notice that this paragraph is something which I have highlight again and again, because I personally felt that it is the most effective method to acquire the highly sought minifigures without taking any drastic measures. Therefore, I am going to highlight this 'same' golden rule, which has been mentioned in my previous reviews. If you are intending to narrow the precious and hard-to-find minifigures that you are bending to collect, please continue to hone the touch and feel method. It is a useful skill set to acquire and locate the minifigures that you want without wasting additional money to randomly acquire them especially when you are intending to buy large quantities. Your sole mission is to memorise and remember the minifigures assortments for each of the specialised designs. Isolate and identify the most unique accessory or accessories that appeared for the particular minifigure. From there, eliminate the torso, head and legs away and feel for other parts. The only disadvantage of this method is much idle time will be most likely wasted if the minifigures that you are seeking for does not exist in the box or ending up having sore numb thumbs after feeling. I personally felt that this approach is the most practical that works the best for me than any other uncommon approaches. Front view comparison between Series 1, 2, 3, 4, 5, 6, 7, 8, 9, 10, 11, 12 and 13 packets The LEGO CMFs Series is labelled and back to the traditional numbering. Do note that the numbered 13, is now placed at the bottom left corner of the packet, instead of the usual top right hand corner or the recent placement of Series 12 at bottom right corner. At the same time, you may also notice the removal of the '16 to collect' description from the packaging. I wondered what could that means. In time to come, we will soon see how this numbering will evolve as the years goes by. Meanwhile, here is the back view comparison of all the packets. I have also purposely distinguish the The LEGO Collectable Minifigures Series 3, 11 and 13 packets and put them together since these are in a pretty similar colour grouping. Placing Series 3 and Series 13 packets side by side This is the similar observation which I have noticed based on Series 1 and Series 10 packaging. There is a slight difference of the green colour shade. I just find it rather interesting to see how the past released colours grouping is now being re-hashed in recent series. It also make me wondered how does the colours of the packaging are being determined as well. Time will tell, and we will see what the future colours for the subsequent series are. Front view of the LEGO Collectable Minifigures Series 13 promotional poster Back view of the LEGO Collectable Minifigures Series 13 promotional poster As you flipped to the back of the LEGO Collectable Minifigures Series 13 promotional poster, you are able to view a string of random code printed at the back. This random code may require your LEGO ID account at the LEGO official website for login before you can input the random code in the LEGO.com/minifigures. As of now, this URL is invalid. I am sure the full promotional detail and the usage of this random code will be clearly explained. If you notice carefully at the top right hand corner of the promotional poster, you will be able to notice a number 16 which I strongly believed meant that the random code that I have received is catered for the new Series 13: Galaxy Trooper minifigure. Although the Galaxy Trooper numbered 16 has appeared in other packaging, the random code given is totally unique. Thus, I have a strong gut feeling that we are somehow require to collect all 16 different minifigures with their unique code being input into this site to unlock and complete for this promotion. For certain, this marketing promotion is definitely linked to this Collect and Win participation. I am sure we can win some decent and interesting prizes by TLG by collecting these codes and input into the website to attempt to redeem something. All the more reasons, to open up your mint packaging to reveal the promotion code since there is a chance to try your luck to win something greater. This is definitely the first of its kind TLG marketing promotion which is being introduced and for all you knows. It may even appear in some places before the celebration of Christmas. 1) The valorous Classic King The introduction of the very first Series 13 minifigure is none other than the valorous Classic King. No empire or state can survive long without a King leading and protecting the safety of his citizens. The line of kingship comes a very long way in the course of time. By doing a simple search, you will find a comprehensive listing of LEGO Kings minifigures in not so recent times. Please note that the listing which I provide is incomplete and I am very sure that there are other older generation of Kings that were not indicated there. All of these Kings have one thing in common. It is the usage of this chrome gold crown which can be easily identified of his kingship. I personally felt that this Classic King is a class of its own and unparalleled against those mainstream Kings which have been discussed above. This Classic King has an unique royal aura of his own that dignify his nobility through his attire. The overall colour schema of utilising red, blue and white represent and symbolises royalty. Furthermore, this design is very much suitable in the medieval age where you can easily use it to showcase him as an actual king in your playing scenario display. This is a close up view of the Classic King. Parts assortment The parts assortment for the Classic King is excellent. It comes with a good variety of accessories, which include the newly crafted design of this two tier cloth to form the royal cape of the Classic King through the combination of white and red. The white cloth also contains white printed spots which provide plentiful of nice detail from the back view and side view. It also comes with a new golden colour for the broadsword which will make a fine piece of medieval weapon. You can view the Classic King's true appearance without the beard on and a clearer look at his royal outfit. Next, you add the brown beard for the King to give a much stronger detail on his facial appearance, even though there are printed beard on his face. The best accessory in this minifigure design is the total revamp and complete new design of this new gold matt looking crown to represent the Classic King's kingship. You can see the obvious difference between the traditional gold crown and the new design. Personally, I felt it is about time that we have a new crown design instead of the usual run-of-the-mill design. It looks more real and nicer looking, that kind of stay true to those television dramas or movies. I really wonder if we will see this crown again in the future Kings of the LEGO Castle Theme. The Kings of the Medieval Age Introducing the new castle characters We are allies that would depend on one another You are not my match 2) The impartial Sheriff The impartial Sheriff has a reputation of not liked to be messed around with, especially to his Sheriff's badge which is a sign of disrespect. He is a dedicated law enforcer in the old Wild West Western Town to keep the outlaws at bay. He will stop at nothing to maintain law and order in the town and to protect the safety of others. As far as I can recall, I have only seen this classic LEGO Sheriff minifigure from 1996 to 2002. It is nice to finally see a brand new redesigned of the Sheriff. Of course, please do not forget the robotic Sheriff in the LEGO Movie 2014. This newly assigned Sheriff is an excellent integrative addition to the ongoing LEGO CMFs Wild West population. Parts assortment The parts assortment for the Sheriff is surprisingly good. It comes with some good accessories, which include the first of its kind of the minifigure brown colour in this re-hashed moustache that can be attached from the neck up and it can also be used for other minifigures as well. Do note that the brown moustache element can be a little loose and it can easily swing away from the face to the side of it. You are able to view more of the minifigure's details through the back view and side view which revealed a brilliant printed holster at the leg. The new 2x2 printed 'WANTED' tile is a nice touch and the person in the poster kind of reminds me of someone who you will see him soon. You can also view the Sheriff's young appearance without the moustache on and a closer look at his sheriff dark brown khaki outfit which is a great improvement from yesteryears. New LEGO Wild Wild West Series Anyone have seen this criminal? Both of us can assist you, Sheriff I am going to put you in the jail Robots versus Sheriff 3) The adorable Unicorn Girl When my wife and I first saw this Unicorn Girl minifigure design, we knew this is going to be a crazy hit for many AFOLs and children alike. Generally, the unicorn is a mythical fantasy creature which is incredibly hard to find in deep magical enchanted forests. In this setting, this lovely girl decided to don herself with the Unicorn Character costume and became a mascot with it. Seriously, this is just like a child's dream to be able to have a chance to grasp this adorable Unicorn Girl, that is somehow can be forcefully associated with My Little Pony on a limited comparing capacity. I got a very strong feeling that this design is going to be extremely popular, similar to the Series 12 Piggy Guy, which is very very challenging to find in local shops. I also can't help but to think that this Unicorn Girl is somehow closely related to the influence of the UniKitty since Matthew Ashton, Vice President of Design (TLG) is the key person behind the original creation of the UniKitty. I do know that he has some influence over the direction of the LEGO CMFs designs. In this case, I felt it could be a case that the Unicorn Girl might just be related to UniKitty, one way or another. This is my mere conjecture though. Parts assortment The parts assortment for the Unicorn Girl is pretty good. Even though there is no accessory for her to hold, the key focus is the outstanding design and starry bright colour detail at the front view. You are also able to view the adorable horse headpiece which does allow us to detach the horn away and transform it into her horse, even though there is a small visible hole. From her back view and side view, you can marvel at the fine purple tail and hair through this angle pose as well. The usage of the purple tail is commendable and I am glad to see this new component being used out of the LEGO Simpson which is by far seen with Scratchy. Common Colours Mascot Character Costumes Fairytale Characters 4) The mysterious Snake Charmer Who will ever expect to see an actual LEGO Snake Charmer minifigure? I am surprised and pleased with this design. Snake charming is an art of hypnotise a snake by playing an instrument called a pungi and has lasted for many centuries since the days of ancient Egypt. I will like to take this unique minifigure to be used in my LEGO collection by placing it in my Adventurers and Prince of Persia to let him carry out his snake charming trade in the bustling market street. Take another look in this close up view of the Snake Charmer. Parts assortment The parts assortment is good, and the main attraction of this minifigure is ought to be the new green cobra snake. This is an excellent opportunity to introduce the new snake element which is in the form of a cobra. It has nice prints which can be seen from the back view and side view which revealed the fine details of this snake. This new green cobra snake is a worthy addition as part of the ongoing nice LEGO CMFs animals. The remaining pieces are not too interesting, including the normal looking brown stick that meant to represent a flute or pungi. Well, at least I find the white turban is nice to have which show the wrapping lines from the back view. We will like a change of our pet snake Stay clear from us We are your Master 5) The nasty Goblin The nasty Goblin is one of the most exciting minifigures for castle fans like me, who has been yearning to see an original Goblin Soldier design. In this case, this is just a perfect outcome for a Goblin minifigure ransacking and looting from others. The only recent times that we had actual Goblin Soldiers, was from the Hobbits in 2012. There were other kinds of Goblins that were produced before, but none of which are made suitable for castle setting. However, we do get his other kind of counterparts such as the orcs and trolls. Either way, this Goblin is a perfect addition to the existing warring rivalry in the LEGO Castle Theme and this design is a great choice of a foot soldier. Perhaps, one day we may just see more of his kind in the future. Parts assortment The parts assortment is pretty good, especially of the inclusion of a typical scimitar design even though I did hope that they can include a new weapon design for the goblin other than recycling this design. The loot bag is the same design as previous bags, as seen in Series 8 - Santa, but coated with a darker brown colour. The Goblin has a nice new designed headpiece with pointed ears that is meant for Goblin. It is not the same as the Series 11 - Holiday Elf, for example. You can see the new headpiece design from the back view and side view, including skirt printing at the side. Castle Fantasy Characters Stop that Goblin from coming near to that cart New baddies in this realm Goblins and Orcs partnership 6) The meticulous Paleontolgist This is a surprising minifigure design and a very meaningful design to me as well. I am very glad to see this meticulous Paleontolgist being created in the form of minifigure. I would prefer it to have it as a male counterpart but I will definitely not mind having a female one instead. It is my childhood dream of wanting to be a Paleontolgist, but it is just not a viable profession in Singapore and it is not a job that is in demand in this part of the world. Well, Paleontology is a scientific study of life including the study of fossils to determine organisms' evolution and interactions with each other and their environments. Take a nice look in this close up view of the Paleontolgist in her working attire. For sure, I will tend to think this minifigure is much suitable for the very hard-to-find 21110 Research Institute set. Parts assortment The parts assortment for the Paleontolgist is not bad. She received a new safari hat design which can be seen clearly from her back view and side view. I am much fond of the fossil that she is holding onto. It appears to be some form of shell-liked creatures, while the other hand is just a simple white bone which may just perhaps belong to some prehistoric animals or dinosaurs. I did tell you that I am no expert in this, but thanks to our MCW Moderator, LuxorV who happened to know the origin of this fossil and it appears to be an ammonoidea. It is something which is very hard to comprehend unless you are studying or researching in this area. So, kudos to the designers for including something that is very realistic in nature instead of just doing a fictitious fossil. Adventurous Explorers Dangerous Recovery Expedition Ahhhh! This is not your fossil! Pleased to meet you, Jungle Boy 7) The fearless Alien Trooper Space fans that enjoy the Space Police 3 theme will look forward to get their hands on this fearless Alien Trooper. This Alien Trooper appears to resemble like an organic squid looking creature but in a striking lime green tone and creepy blue eyes. This seemed to be a new faction of Alien species which is classified under trooper or soldier equivalent. Not sure of his real affiliation though, but I tend to put this Alien Trooper under the evil side, battling against the Series 7 - Galaxy Patrol. This minifigure would either make or break. It means if there is a strong urge to army build this minifigure, it will also means this person is amassing a big fleet of Alien Troopers to rally, but past historical data has proven that similar alien related space minifigures can still easily be found in the wild. Parts assortment The parts assortment is quite alright and the main focus for this design is the newly crafted alien head where you see the outline clearly from the side view. There is also back printing as well. The remaining accessories are rather common and they did their best effort to recycle the Dino gun to represent a space blaster instead. Are you going to end up the same fate as I do? Evil Space Villains Non-Lethal Space Engagement 8) The loyal Egyptian Warrior Am I the only person who is excited? I bet I am not the only person to be screaming for this minifigure! The loyal Egyptian Warrior is one of the highly anticipated designs ever, especially with the earlier releases of the Series 2 - Pharaoh and the Series 5 - Pharaoh Queen. With this released of this minifigure, the LEGO universe can finally amass a full pledged living Ancient Egypt Empire. It will excite many of us out there, including historical fans and army builders. You can take a close up view of the Egyptian Warrior. Parts assortment The parts assortment for the Egyptian Warrior is impressive. The inclusion of the pearl gold khopesh weapon and the newly inverted triangle shield design, which portray the sun and the pyramid in nice pearl gold coating. It is also very rare to see shields being held in an inverted manner. You can take a moment to view the accessories in here and also upon holding the inverted shield. The full warrior attire is just plain amazing. You can see the back printing and marvel at the newly designed headpiece from the side view. Seeing this minifigure coming to reality is truly a dream come true for many. Ancient Egypt One of the greatest ancient empire ever My duty is to protect your tomb Rid of those foul evils The mightiest brave historical soldiers 9) The hardworking Carpenter City fans are in for a treat as this is the very first appearance of a hardworking Carpenter who is responsible for the wood works in LEGO Town. I am pretty pleased to see a new specialised occupation in the town where he is suitable to deploy in various parts of the town to carry out his forte. Armed with his bunch of tools at his waist, you can take a closer look of how ready our Carpenter is. Parts assortment The parts assortment for the Carpenter is above average. Note the fine details on his working attire and I am fond of the printed detail such as the chest hair near the shirt's collar. You can also notice his hard hat with hair fringes from the back view and the sleeve printing from his side view. The most impressive thing about the Carpenter is the given accessories. The saw is a complete new tool which contains two distinct colours to differentiate the handle and the saw blade. The new 1x4 printed wooden pattern tile is brilliant. It is a useful printed tile which can be used to crave and add detail at the house exterior. I am always fond of printed wooden tiles and this new piece will fit in nicely with the existing collection of printed wooden tiles. I have delivered your wood Time for a good drink after work We will like you to help with carpentry work 10) The treacherous Evil Wizard This is a very nice addition to LEGO Castle fans. Finally, we are going to get a brand new design of the treacherous Evil Wizard. Although there are many good and bad Wizards throughout LEGO minifigures universe, but there are not many evil Wizards around to terrorise the good guys. In this case, the Evil Wizard will be a fitting arch-enemy for the Series 12 - Wizard. Judging from the Evil Wizard's scorching red appearance, he seem to be a master of dark arts and fire magic, with perhaps specialisation in necromancy. Parts assortment The parts assortment is pretty good. The most amazing thing about this minifigure is the complete new design of the Evil Wizard's fiery black and red cape. It is made up of two piece of fabric to form the base of the upper cap collar. The construction of the weapon is rather common and nothing too fanciful, but lots of attention was focused onto the overall appeal of his evil wizardry attire, especially to the design of his cape. I am particularly fond of his evil red eyes and the choice of black beard which was also used in the Ninjago - Evil Wu minifigure. Good versus Evil Evil Wizards and Sorcerers We will abide your orders 11) The quick Fencer LEGO City has a new sports category in town and the citizens are talking about the art of fencing. So, people are wondering what is fencing all about. In a nutshell, as provided by the quick Fencer, it is a sport of fighting with swords, especially foils, épées, or sabres, according to a set of rules, in order to score points against an opponent. Well, that is what fencing is all about. This is also an Olympic Sports and has been there since the inaugural games in 1896. I got to admit that with the fencer donning on his protective white outfit, he is definitely ready to strike and score against his opponent. Parts assortment The parts assortment is not too bad. I will have to complement that the fencer's attire is very nicely done. I am particularly like the mask and the logo of the rapiers. Do note that the mask is not the same design like the kendo's helmet. The design also took fine consideration of covering the master hand with white glove. You can view the whole attire from his back view and side view. The rapier weapon was recycled from previous LEGO CMFs Series. Choose your favourite sports character Professional Fencers Make it count 12) The steadfast Samurai Although traditionally in feudal Japan, it is highly uncommon to see woman being a samurai warrior, but to protect the honour of the samurai family, they choose to bear arms and fight to protect the family's honour. Seeing this minifigure coming to reality deserved another celebration, for Ninja lovers and army builders. I did not expect to see a female Samurai in the LEGO CMFs, since the last recent one that we have saw, was Nya in her "Samurai X" outfit. It is a pleasant news to me, especially after the first appearance of the Series 3 - Samurai, we have not seen much of such relevant designs. I have always been an avid fan of LEGO Ninja theme and I have personally amassing my collection of Ninja and Samurai. Seeing this new released female Samurai, it is a great opportunity not to be missed. I am highly excited about this dual wielding Samurai and definitely be facing stiff competition from the public. Do take a closer look at the Samurai in action. Parts assortment The parts assortment is slightly above average. I am much interested to see what is beneath her samurai armour and thankfully, it is a printed torso with oriental flavour on it. It is much better than having a plain red torso which impedes the usage of interchangeability. So, I took the Series 3 - Samurai and refresh what is beneath his armour and showing a simple comparison between both. True enough, my hands went itchy and went around swapping the parts between both Samurai, which give a pretty positive results. I like the remaining accessories including the newly printed samurai armour, dual katanas and hairdo. With her full gear on, you can view the nice details from the back view and side view. We have another new Samurai The Feudal Japan Don't let them steal the chest away Samurai Masters 13) The energetic Disco Diva It is back to the retro and the energetic Disco Diva is in the house. Wow, her overall attire is just strikingly purple with the very nice done-up hairdo. She moves around in her white roller skates and sings her melody through the microphone. This is going to be a fun night with her crashing into the party. It is unexpected to see such a design and I will have to said that the printed details are just plain amazing. With her bling bling shade and shiny attire, you can just take a closer look at her smile and let her dance your night away with her singing. Parts assortment The parts assortment is quite average with the inclusion of a new printed microphone and white roller skates. However, the main highlight is definitely her retro purple attire. There are just so much detailed printing of bubbles or circles representation as can be seen from her back view and side view including her sleeves. Her overall design is pretty amazing indeed. Disco Fever and Dance your Night away These hairdos are awesome Retro Performance Roller Skate Girls 'LIVE' musical concert in City Square Central 14) The delicious Hot Dog Man Who is feeling hungry? Well, I can't help it but to feel my stomach growling after seeing this delicious Hot Dog, donned by this gentleman. This Hot Dog Man is certainly there to place as part of the marketing mix to promote the sales of hot dog. His suit is made up of a big sliced bun with a steamed hot dog and mustard applied onto it. This is just so amazing, and he is definitely smiling happily in his suit. I will think this is another popular minifigure among adults and children alike that could just entice many others to search for this unique and special design. I just can't believe that the designer actually thought of doing this at all. Glad to see this becoming a reality. Parts assortment The parts assortment is average as there are zero accessories given for the Hot Dog Man. However, the main design focus is to ensure the singular piece of hot dog suit is done accurately with just one click. The man can just take off the hot dog suit as one piece and the suit still remain like an edible looking hot dog. You can't stop to marvel the fine detail from the back view and side view. Hot Dog Man, we are hungry... Hot Dog and Ice Cream Cart Vibrant City Scene 15) The fierce Lady Cyclops This is also an unexpected female counterpart minifigure which is designed to pair up with the Series 9 - Cyclops. I just didn't expect to see this coming and the exact shaping is similar to the male design as well. At least now we know that female Cyclops come in different colour skin tone. Although she might be a female, but I do believe she can be rather fierce and temperamental. With her eyes wide awake, I wonder what she will do with her club? Parts assortment The parts assortment for the Lady Cyclops is average, including the common club. She comes with nice detailed back printing and the shape of the Cyclops body can be examined closer from the side view. The minifigure head comes in two different emotions, namely the half awake and the full awake. Do check out the difference of both Cyclops in their snooze mode and fully awake mode. Can the heroic Spartan hold them off? Let's run and get out of here!!! 16) The elite Galaxy Trooper This is the last minifigure highlight in Series 13, and it is none other than the elite Galaxy Trooper. I am very pleased to see a new variant of the Galaxy Trooper which is tougher, monotone, highly armoured than the Series 7 - Galaxy Patrol. Suggested by the name 'trooper', I believe this Galaxy Trooper is the foot solider for the Space Defenders I am surprised that the symbol on the armour suit is not belonging to Classic Space logo. Instead, you might notice that his symbol represent his affiliation which is geared towards the recent LEGO Galaxy Squad. This is a very pleasant surprise indeed. In this case, this Galaxy Trooper is featured in his battle mode which is super battled ready and he can switch back to the non-combat mode. I will think this is another popular space army building minifigure among the collectors, including myself which also inspired me to expand my troopers as well, along with the existing ranks of Galaxy Patrols and to add it to my existing Galaxy Squad collection. Parts assortment The parts assortment is great, especially with the newly impressive space armour that can hold the dual space blasters securely at the back of it. You can see how the dual blasters are placed by seeing the back view. If you have observed carefully, you may also notice the same logo at the front also appearing at the back of it. The side view also reveal the fine detail of the entire minifigure. I really felt that the newly designed space armour revolutionise on how the space blasters can be stored for safe transportation, which will be shown in my simple MOC creation: Skylet Spacecraft. Space Troopers Specialised Space Combat Armours Classic Space Defenders Galaxy Trooper reporting for Skylet Skylet Commanding Pilot New space armour enable weapons to store nicely General Statistics for 71008 LEGO Minifigures - The LEGO Collectable Minifigures Series 13 Below is the combination which I have received from my box, 4 Classic Kings 4 Sheriffs 3 Unicorn Girls 4 Snake Charmers 5 Goblins 3 Paleontologists 4 Alien Troopers 4 Egyptian Warriors 5 Carpenters 4 Evil Wizards 3 Fencers 3 Samurai 3 Disco Divas 3 Hot Dog Men 3 Lady Cyclops 5 Galaxy Troopers Based on the above distribution, I have managed to achieve only three full complete sets of 16 one-of-a kind minifigures each. It means I will have 12 remaining random spares left. Read down to find out what are the remaining spares I have. My remaining spares 1 Classic Kings 1 Sheriffs 0 Unicorn Girls 1 Snake Charmers 2 Goblins 0 Paleontologists 1 Alien Troopers 1 Egyptian Warriors 2 Carpenters 1 Evil Wizards 0 Fencers 0 Samurai 0 Disco Divas 0 Hot Dog Men 0 Lady Cyclops 2 Galaxy Troopers Data Analysis Given the complete new data which I have compiled and received, I have indicated my comprehensive analysis based on my individual viewpoint. By buying one full complete MISB box, it will allow you to achieve three maximum complete unique sets. Ever since the significant shift of the distribution ratio in LEGO Minifigures - The Simpsons, TLG have miraculously return to the LEGO consumers with the traditional three complete sets. The ongoing LEGO CMFs Series 13 has also continued the best ideal arrangement of having three full sets in a sealed box of 60. I am extremely pleased with this outcome which will definitely be much eventful. I felt the appeals of these minifigures are taken into a brand new level despite giving due considerations, restrictions and limitations which the LEGO CMFs Design Team has to work with. The LEGO CMFs Design Team will have to base on their best judgement through the support of market research data and probably parts per piece count manufacturing process in order to determine the distribution ratio. As you have noticed through the given distribution ratio, the less appealing minifigures such as the Palaeontologist, Disco Diva, Fencer and Lady Cyclops do not need to have a larger number of identical minifigures in a box and is suitable for the distribution ratio of three. However, it will be even better if the Samurai can be given a distribution ratio of four or five since it is considered to be a potential army building minifigure which would be highly sought for. While, City or Town related minifigures such as the Unicorn Girl and Hot Dog Man, it will be better if it can be given a distribution ratio of four due to the high possibility of them being popular minifigures similar to the past LEGO CMFs mascot character costumes. I am extremely pleased to see the Classic King, Evil Wizard, Egyptian Warrior, Goblin and Galaxy Troopers to be given with this current ratio since these could be highly probability of being the popular ones which are most likely to be taken out of the box first. Ultimately, I am satisfied with this distribution arrangement and I will think that they have done their best to ascertain the popularity level of these minifigures to their best knowledge and ability. Well, I can certainly see that many popular minifigures in this series would just be the case of potential army building. What do you think? All in all, I think the LEGO CMFs Design Team did an excellent job in this distribution allocation. What do you guys think about this round of distribution? Do you share the same sentiments as I do? To conclude and summaries, based on the probability demonstrated by this review, as an example, here are the results, High probability 1) Goblins 2) Carpenters 3) Galaxy Troopers Total range: 25% Each: 8.33% Medium probability 1) Classic Kings 2) Sheriffs 3) Snake Charmers 4) Alien Troopers 5) Egyptian Warriors 6) Evil Wizards Total range: 40% Each: 6.67% Low probability 1) Unicorn Girls 2) Palaeontologists 3) Fencers 4) Samurai 5) Disco Divas 6) Hot Dog Men 7) Lady Cyclops Total range: 35% Each 5% The LEGO Collectable Minifigures Series 13 will be launching on the 1st January 2015 or 1st February 2015 (worldwide) To conclude, the LEGO Collectable Minifigures Series 13, without any doubt, has put together an terrific and remarkable effort to introduce even more new highly desired and relevant minifigures designs into this ongoing LEGO Minifigures Series. It is no easy challenge to be able to create, design and introduce many new creative and original designs to attract to the masses. In fact, I noticed the recent Series 12 release has even attracted more fans into collecting this theme than the LEGO Movie and the LEGO Simpsons, who are not even LEGO fans. By that point, I can really see the increasing popularity of this theme and hopefully it can even retain these casual buyers and convert them into full-pledged LEGO fans. The LEGO Collectable Minifigures Series or known as LEGO Minifigures Theme is an unique commanding class of their own, which distinguish themselves from regular LEGO Theme or special releases. Instead, everything that you have seen in a single released series is all based on the 16 minifigures to reach out to fans, children, adults and collectors of LEGO. It has been a very long tradition and yet they are able to retain the charm and excitement, until today. I will like to point out something and bring to your attention, like what I have done in my Series 12 review. I noticed the removal of the marked indent at the armpit of the minifigures which we will normally associate the production to somewhere in Mainland China, is consistent from Series 12 to Series 13. As indicated at the back of the packaging, the LEGO components in the Series 13 are 100% produced in China. I can also highlight and infer that it is no longer the same production process. I have observed that in our very own Eurobricks discussion that the quality of some Series 12 minifigures parts including the connection process of the head to the hairpiece and the torso to the legs are rather loose than normal for some minifigures. However, the overall quality for the Series 12 is still made up of high quality ABS plastic. I suspect that TLG may have changed the production process or technology for producing these minifigures. At least from what I have obtained for this review, the minifigures in Series 13 do not suffer the very obvious loose parts symptoms. The quality is better than before but until now, nothing is for certain why the removal of the marked indent and the rational of it. Nothing can be certain and based on this paragraph that I have indicated, is merely my own wild conjecture. Now with a total of 240 minifigures released for the entire Series 1 to 12, the recent LEGO Movie Series, LEGO Simpsons Series and the current LEGO Collectable Minifigures Series 13, not including Mr. Gold which unfortunately I do not have the blessings or lucky stars to own it till this date, and the special exclusive Toy Soldier minifigure that can only be obtained through The Minifigures Character Encylopedia. At this rate that it has been releasing, I believe most of the display collectors for this LEGO Minifigures Series, will need to source and upgrade their display capabilities by creating future provision for upcoming new releases in the near future. With this LEGO Collectable Minifigures Series 13 in the releasing schedule for the start of year 2015, what more exciting new series will TLG have for us. Only time will tell and let's be patient about it. I am confident that it is worth the wait. Please note that the The LEGO Collectable Minifigures Series 13 do not contain the placement of LEGO spare parts/accessories. This was practiced since the start of LEGO Collectable Minifigures Series 3. Summary review Playability: 8/10 (Plentiful new minifigure designs that can be integrated across many new and existing themes/settings.) Design: 8.5/10 (Excellent detailed printing with good new accessories especially the new design of the capes.) Price: 7.5/10 (I believe pricing may remain the same for Singapore, but prices have gone up for other regions and if it remains, this will go down by one notch.) Overall: 8/10 (Prepare yourself for this upcoming new Series 13 and hope you can get the ones that you want the most! There are at least one minifigure that will bound to attract you.) I gave it a "5" based on my Review Score Card. What about yours? I hope every one of you enjoyed reading this simple review of mine. Comments and Criticisms are strongly welcomed. Pictures can be found in My Flickr. If you are interested to read the past LEGO Collectable Minifigures Series reviews, you may find the following links below! 8683: Collectable Minifigures Series 1 8684: Collectable Minifigures Series 2 8803: Collectable Minifigures Series 3 8804: Collectable Minifigures Series 4 8805: Collectable Minifigures Series 5 8827: Collectable Minifigures Series 6 8831: Collectable Minifigures Series 7 8833: Collectable Minifigures Series 8 71000: Collectable Minifigures Series 9 71001: Collectable Minifigures Series 10 71002: Collectable Minifigures Series 11 71004: Collectable Minifigures The LEGO Movie Series 71005: Collectable Minifigures The LEGO Simpsons Series 71007: Collectable Minifigures Series 12 -
Hi everyone! While being on a trip in Denmark, I've been able to get my hands on the Stormtrooper Sergeant Polybag. It's seems that this one is pretty rare, considering there is none on Bricklink (yet), and only one available on Ebay. How so? This one is, so far, only available in the BR shops...and supposedly "only gave away when you come by dressed as a Stormtrooper". As it is not indicated, you will also have to ask (nicely) to the BR shops staff :) Here are some pictures. Sorry for the quality but I didn't have any proper white background. Nothing interesting on the back of the package, except maybe the reference 5002938 - Item : 6105721 which I forgot to shoot. What do you get? 5 parts + a tissus epaulet (similar to other lego cloaks). Good thing is, the blaster is a classic style one...Less playability, but doesn't look like a pickle pot launcher. Now, let's compare with some other Troopers. Below, you can see the one from the Troop Transport battlepack (blue marks on the helmet), and the one from the Ewoks Village : And here is the one from the polybag : So basically, you get almost the same trooper as in the battlepack, with a classic blaster and an epaulet...But if you look in details, the lines below the eyes are black (instead of grey for the battlepack troopers). Maybe this little detail will get you excited and send you to a new "Find this polybag" quest? If not, then what we complain about? This polybag is available for free, no minimum buy or so :) The only thing that bother me - just a little bit - is that you can't rise the right arm with the blaster in it, thank you epaulet! Maybe that's why troopers can't shoot properly... Anyway, hope you like this left handed little guy! Could be a nice adition to the current Battlepack :)
-
... There stood a tower of marvelous shape. It was fashioned by the builders of old, who smoothed the Ring of Isengard, and yet it seemed a thing not made by the craft of Men, but riven from the bones of the earth in the ancient torment of the hills. A peak and isle of rock it was, black and gleaming hard: four mighty piers of many-sided stone were welded into one, but near the summit they opened into gaping horns, their pinnacles sharp as the points of spears, keen-edged as knives. Between them was a narrow space, and there upon a floor of polished stone, written with strange signs, a man might stand five hundred feet above the plain. - JRR Tolkien, The Two Towers Orthanc is the tower home of traitor wizard Saruman. It sits in the centre of Isengard, a once-lush valley at the southern end of the Misty Mountains, the range which runs like a spine down the centre of Middle-Earth. It is one of the eponymous Two Towers of the middle episode of the Lord of the Rings trilogy, together with Barad-Dûr (in the movies) or Minas Morgul (in the novels). This set represents the flagship of the LEGO Lord of the Rings range. It was first spotted in the background of a photograph of The LEGO Group's design workshop some time ago, but finally revealed in an official press release in April of this year. Although it is not scheduled for release until July, I was lucky to snag an early copy from the shop at LEGOLAND Deutschland during the Eurobricks Event. The sheer scale of the towers of the Lord of the Rings saga - Barad-Dûr, Minas Tirith, Minas Morgul, and Orthanc - makes them difficult to render in LEGO bricks at an affordable price, which I suspect is why TLG have shied away from producing sets of these behemoths ... until now. Of the four, Orthanc is probably the most achievable; let's see how the result shapes up. Review: 10237 The Tower of Orthanc Set Information Name: The Tower of Orthanc Number: 10237 Theme: Lord of the Rings (Shop@Home Exclusive) Release: July 2013 Parts: 2359 Figures: 5 minifigures, Eagle, and Ent Price: GB £169.99 | US $199.99 | EUR 199.99 | AU $279.99 | CA $249.99 | DKK 1699.00 Links ... Shop@Home ... Brickset ... Bricklink ... Peeron The Box Click for a larger full-frontal image This is a big box. It has the same frontal dimensions as last year's UCS-scale 10227 B-Wing Starfighter - a similarly priced set, though with fewer pieces - but it isn't as deep. Orthanc is shown amidst the Ent-derived desolation of the valley of Isengard; an unnamed Ent shakes an Uruk while another Orc attempts to bring him down with a grappling hook; Gandalf simultaneously escapes on an eagle in a strange time-warp of the storyline. A darkening sky sets the mood of the scene perfectly; quite why Barad-dûr is visible in the background is anyone's guess. The height of Orthanc isn't readily apparent from the picture; a small inset therefore demonstrates the tower's dimensions. Round the back, the tower's entire detailed interior is displayed for your perusal, accompanied by insets of various scenes: some canon, some less so. Click for a larger image Behind the parchment-like insets lies a map of Middle-Earth set on a beautiful gradient from earth blue on the right to fiery orange on the left; this is visible to a lesser extent on the front ... ... and continues on the sides: Here are left and right sides respectively. The latter's top edge is on the right, so the map - which continues at the top end of this side - is the right way up. Isengard is just visible in the centre, about a third of the way from the right, at the end of the Misty Mountains range. Kudos to the box artist if its placement here was deliberate. The five minifigures are represented in 1:1 scale on the box top ... ... while the bottom has a wall of text with the usual language lesson. My box is a little battered here, but it has just travelled six hundred miles in the back of an over-packed car. It appears that the set's components were made in DENMARK, CHINA, SWEDEN, HUNGARY, MEXICO, HONG KONG, the CZECH REPUBLIC, NARNIA, the MOON, and EVERYWHERE. What's in the Box? The box flaps are sealed with tape, so it can be flat-packed easily. Out falls the separately-wrapped and cardboard-backed Instructions and sticker pack, and eighteen polybags forming fifteen modules: see one to eight, which includes the separately packed Eagle, and nine to fifteen. The Instructions Three booklets are included, all of a similar size and thickness; all featuring the same image as the box front, and all covered with nice glossy paper. On their backs are an advertisement for the LEGO Club, the detestable WinGangeGewinne kid, and a trailer for The Hobbit: The Desolation of Smaug; I'm not sure whether the last is a console game, a web game, a video, or a set; but whatever it is, it's coming in December 2013. Maybe it just refers to the forthcoming cinematic release. The modular construction is demonstrated over three pages at the start of manual one: It's actually a little daunting. Although the build process is modular, most sections start building directly onto the previous; there are only two places where the tower is designed to separate - between modules 9 and 10, and 12 and 13 - but even then, it doesn't separate easily. Part call-outs accompany the instruction steps, which are generally easy to follow. The Middle-Earth map is faintly visible in the parchment-coloured background. Despite the preponderance of blacks and dark bluish-greys, there are no major colour-differentiation issues; I only made one mistake in the entire build - mistaking black for DBG on a 1x1 round plate - and I noticed the error very quickly. The substantial inventory is located over three pages at the back of book three; click the links for pages 1, 2, and 3. Also at the rear of this booklet is a subversive 'Collect them all!' enticement, in the form of a minifigure display: Quite why this is included in an adult-oriented set is anyone's guess, but I guess adults can be pretty obsessive collectors too (though less likely deface their instructions by ticking the boxes). Other sets from the impressive Summer LOTR range are advertised: We are encouraged to buy two copies of the Black Gate in order to complete the scene; quite what we'll do with two Gandalfs the White is questionable, but it will help towards amassing an army of Eagles. I'm particularly looking forward to the Corsair ship with its Dead crew. Sticker haters beware ... ... there's a lot of them. Thankfully, they are all applied to flat surfaces, but that doesn't stop them being a pain in the backside. I've actually applied them this time, so we'll see where they go later. The Parts To save space and sanity, I've paired the bags up to show the parts. Modules One and Two build the Ent: There's a lot of useful reddish and dark brown here, along with some less useful parts. I can live without the reddish brown wing-end modified brick, and the Symmetrical wedge with fractured top may be relatively uncommon, but I can't see it becoming sought-after. New in dark brown are the Technic ball-joint bricks; a rather unexciting brick to find in a new colour, but it might be useful for tree-building (obviously). I am pleased by the selection of reddish-brown and dark brown bricks, plates and slopes; there's also a useful array of SNOT bricks and brackets, along with a smattering of dark and olive green. It's worth pointing out the two reddish-brown half-arches; these are the continuous-curved type, like the older 2339, but have a reinforced underside like the discontinuous style 76768 (and a new mold number: 14395). See here for a comparison. The three printed 1x1 tiles at the bottom-right of the picture are Ent eyes; one is spare. From this point onwards, we'll be seeing a sea of black and grey, so be prepared. Bags Three and Four build the base of the tower, and the Uruk. There are a whole load of useful basic black bricks, plates, and tiles, and a load of dark bluish-grey SNOT bricks, with more to come later. The 7x3 flags are new in earth blue; the new 'Elven' arches start to feature here. Bags Five and Six ... whoa. These form the SNOT sides to the tower base. Whoa. Need black plates/jumpers/headlights/bows/tiles? Look no further. Shame the 1x1 bricks with handle were on the Pick-A-Brick recently. Saruman appears with Bags Seven and Eight, and he brings with him more black jumpers and headlights: The 4x4 round plate with central cut-out is new in black. Just in front of the red Light Brick is a green and black round ball, the purpose of which we'll see in due course, if you haven't guessed already. There's also ten 1x3 black arches in this selection. Bag Nine should have been included with 7 and 8 - it forms part of the same section: the Throne Room. Here we start to see lots of black 1x2 bricks with grooves, which will feature prominently throughout the set. The two trans-yellow crystal ball globes also appear in the contemporary 79005 Wizard Battle, and serve exactly the same purpose here. Moving on to Bags Ten and Eleven, the black theme continues ... ... here accompanied by Gríma, and many more useful headlights, SNOT bricks, cheeses and tiles. The trans-clear flask with purple liquid makes its first appearance in a non-Collectable Minifigure set. Gandalf finally appears with Bags Twelve and Thirteen: 1x2 grooved bricks, 1x1 bricks, and 1x2 plates with ridge dominate the selection here; in the top right corner are several 2x2x3 slopes and their corner equivalents. Just visible at the front is a single trans-clear minifigure head - I love this part. And finally, Bags Fourteen and Fifteen build the tower's summit with its spines. There are lots of clippy- and clicky-hinges; the latter make for an interesting build technique, as we shall see. The four black 'Persian' arches contrast to the much larger quantity of 'Elven' arches we have seen earlier. Parts Summary There might not be a great spread of new or rare parts in this set, but I hope I have demonstrated the massive quantity of useful elements included. Here are the front-runners: 113 Black 1x1 Brick 86 Black 1x2 Brick with grooves 73 Black 1x2 Plate 58 Black 1x1 Brick with vertical handle 58 Black 1x2 Jumper Plate 54 Black 1x1 Headlight Brick 45 Black 1x1 Plate 41 Black 1x2 Brick 37 Black 1x1 Cheese Wedge 37 Black 1x1 Tile 37 Black 1x2 Plate with ridge 36 Black 1x10 Bow 32 Black 1x3 Brick 32 DkBGr 1x4 SNOT Brick 26 Black 1x3x3 Elven Arch All in all, this makes a great parts pack - if you need black. The Figures From left to right: Saruman the White, Gríma Wormtongue, Gandalf the Grey, Uruk-Hai, and Orc Pitmaster. Just five figures for a flagship set? It seems a bit stingy, especially considering the range which accompanies other sets of the line: this year's 79008 Pirate Ship Ambush, for example, comes with nine. However, we do also get the Eagle, and the large brick-built Ent which is an important character in itself. Moreover, Gríma is (I believe) unique to this set, and Saruman is new to this summer wave. Gandalf the Grey This version of Gandalf - prior to his level in badass after the Balrog encounter - is surprisingly rare in LEGO Lord of the Rings. He previously appeared only in the entry-level 9469 Gandalf Arrives, and there had a different face and pointy hat instead of this 'Dumbledore' hairpiece. His torso is the same here. This face is new, and reversible: amiable on one side, and ... angry? distressed? I'm not sure. This version is the same as included in the 79005 Wizard Battle - which is basically a way for people who just want Saruman to avoid having to buy this set - except he has a cape in 10237. The cape is another issue: it gets awfully crumpled under the beard and headpiece, and the latter doesn't sit comfortably above the cape. Gríma Wormtongue For a bad guy, I find Gríma's LEGO version to be rather sympathetic. He has a countenance which is somewhere between glum and scared; even his 'angry' face is tinged with fear. I like the use of tan to mimic his sallow complexion. His torso is, I believe, unique, though it looks like he's stolen the Ring for himself. His hair isn't nearly greasy enough. Saruman the White I'm slightly annoyed that this figure will soon be available in a £10 set. To be fair, this version comes with a dress and cape, and people would undoubtedly complain about having to buy a $200 set for an essential LOTR character. As head of the wizards' order, his dress robe has the necessary finery, and looks great! He also has a rubbery-feel, decorated hair-and-beard piece, which judging by its feel, decoration, and separate wrapping is presumably a Chinese production. Under the hair/beard, his face is new; though it puts me in mind more of Sean Connery than Chritopher Lee (think Marco Ramius in The Hunt for Red October, and you'll see what I mean). The set includes legs, for when the unposeable dress is too much, and the front-and-back-printed torso is simply gorgeous. Here are Gríma and Saruman for comparison - on the Orthanc balcony: TLG have captured both well. Look also to either side - it's like that tooth piece was made for Orthanc (or Orthanc designed with LEGO in mind! ). Uruk-Hai Solder This guy is nice (if a ferocious cross-bred maggot soldier can be nice ), though sadly he isn't unique. He can be found in quantity in 9471 Uruk-Hai Army, and, with the beautiful White Hand printed armour, in 9476 Orc Forge. Still, at least he's compatible with the rest of the army. His head is reversible, allowing for some variety in Uruk heads within the army; I'd like to have seen some with the White Hand in different orientations, but that might be a tall order. Orc Pitmaster This dude is ugly. But, he's meant to be. He can be found also in 9476 Orc Forge. Sadly, he doesn't have the ears/hair that one of his doubles from that set has, and I think he looks a little 'unfinished' without it. Great Eagle Although not listed as a minifigure, I've included the Eagle here. He comes in a separate polybag, suggesting Chinese production; and has the detailed printing to match. The LEGO Group haven't given him a name, and he isn't directly named in the movie, to my knowledge; however, I've read the book, and I know that he must therefore be Gwaihir the Windlord. (Apparently, in the movie version of Fellowship, Gandalf whispers 'Gwaihir' to the moth, but I confess I didn't pick that up.) Gwaihir consists of three pieces: the body/head, and the two wings. Unfortunately the head doesn't move. He's pretty big, with a magnificent wingspan, as Gandalf here demonstrates. Four studs on the top allow Gandalf to 'ride' him. I'd have preferred somewhere for him to grip, so that he looks like he's clinging on, but hey. The printing of the wings and tail-feathers is beautiful ... ... and it continues on the underside: His 'talons' aren't so hot: just a 2x2 anti-stud matrix. If you want a bigger, more versaitile eagle, use the new CREATOR one. I'm pretty pleased with this, and I'm almost glad LEGO is encouraging us to buy two copies of the Black Gate set - we'll have three eagles! The Ent Here's the unspecified Ent. I'm not sure which Ent he's meant to be - I think only Treebeard is named in the movies - but in LEGO form, he's basically a big Steampunk macha with foliage and a mushroom. There's a nicely irregular, lopsided look as befitting these strange woody creatures. Take your pick as to which of the many Ents he represents. Judging by the earth green 'beard', he might be meant to represent Treebeard himself, though the resemblance isn't perfect: The LEGO version doesn't really have a 'head'; his eyes are level with his shoulders. I couldn't find an Ent exactly like this in the movies. He does have space at the top where Merry and Pippin might perch: You can also see here the he has a Bionic Arm. Turning the grooved cylinder at the back rotates the arm around the shoulder joint. I'm not exactly clear what purpose this serves; the Ent could hurl rocks at the tower, or perhaps high-five other Ents. The gearing is stiff (achieved by using a stud-end axle in a Technic brick), so the arm will stay in whatever position you leave it: Here he's giving some kind of salute. Note the opposable thumbs, meaning he can pick up stuff. The big downside of the Bionic Arm is that the arm can't be abducted (swung outwards) at the shoulder; therefore, when the arm is lowered, the elbow has to twist uncomfortably: He looks like he's about to start dancing here. The stiff ball-joints, strong clicky-hinges at the hips, and huge feet means that he balances rather well: I'm not sure whether he's skating, or pushing something, but it's a dynamic pose. For a tree, he's quite bendy: 90 degrees movement at the hips ... ... forwards or backwards. This is handy for sticking his head in the water if it catches fire, like one Ent in the film. I haven't directly demonstrated this, but he can also swivel at the waist, where a Technic axle allows a full 360 degrees of movement. If he gets tired, he can have a rest: Note the reddish-brown 'wing-end modified bricks' that cover the arms. I hate these parts anyway, but here they are super-annoying: if you try to grip the arm, it's all to easy to apply pressure to the wing end, the result of which will be the piece pinging off across the room. Still, they do help produce a nice contour to the arms. Enty's prehensile arms enable him to pick up figures: Here he's grabbed the Orc and the Uruk. The Bionic Arm doesn't help here, but you can bash the two figures together ... ... like this: Nice. The Tower It's really hard to demonstrate in these photos, but this is a tall building. At 73cm from base to tip, it's the tallest LEGO structure I've ever built (not counting contributions to multi-coloured monoliths at LEGO roadshows when I was little, or an ugly thing I made as part of a team-building exercise at work ). There's some beautiful detailing on the structure, which we'll look at in due course. The basic construction of the tower - four pillars of black rock moulded together and tapering towards the peak with its four spines - is rendered faithfully, though obviously scaled down ... Click each frame for a larger view ... and of course the fourth pillar is missing, to allow the detailed interior to be visible. Now we'll take a look at the exterior, layer by layer, starting at the base: The black is highly reflective. Apparently Saruman lives in Heartlake next to the school. It's also a dust-magnet. I love the way the spines of rock at the base have been recreated with the long black bows, and the tall staircase leading up to the arched entranceway is simply magnificent. To see how the stairs are attached at 45 degrees, click here. Obviously, the number of spines, and the width of the staircase have been reduced to match the scale. Here's what the base should look like: The many 1x1 bricks with vertcal handle, and the 1x2 cheese wedges above, add further realism; compare here. Moving up, the next layer includes lots of little windows, made with 1x3 arches mounted on jumper plates at a half-stud offset. These are rather fiddly to build, but the result is great. Here also is Saruman's balcony, from which he surveys the building of his army and the wanton destruction of his own garden. Again, the detail is reproduced as faithfully as possible given the scale: Click for an alternative shot of this level Those rubbery tooth-pieces are perfect facsimiles of the spines higher up; 1x2 bricks with grooves are used to mimic the vertical spines above the windows. Higher still, we encounter some tall windows made with 6L bars set vertically under Elven arches. Sorry about the dust. You'll notice that the tower tapers in stages, produced by slope bricks at various intervals; the effect is rather more sudden than I'd like, but I think it is forgiveable. Bear in mind that - at minifigure scale - the tower would have to be about three and a half metres tall for the top to be the equivalent of 'five hundred feet about the plain'. I don't know about you, but we don't have room for that in our house. Approaching the summit, some three-brick tall slopes help to taper the tower more gently, and we find more of the tooth-pieces - again accurate to the real tower. I was a little perturbed by the dark bluish-grey stripes which indicate the floors at various levels; however, if you compare to this distant shot, there do appear to be lighter stripes at various levels. This may be a trick of the light, but it excuses the DBG to some extent. There's a notable anomaly in the open-backed construction of the tower: the side pillars are wider than they should be. This is to allow more depth to the interior. I'd like to see someone build a 'complete' tower, which you could probably do with two of these sets (and probably make it a little taller, too. ) Edit: Someone has! See Missing Brick's back wall here. Finally, Gandalf gets imprisoned at the summit platform: I absolutely adore the four SNOT-mounted spines here, with their 'serrated' lower edges. You can just about see these details in this shot. They are attached with an interesting technique: two 1-wide 'male' clicky-hinges on the spines marry to two 2-wide 'female' ones on the central column. This produces both a sturdy connection and a half-stud offset, centering the spines nicely. The Interior Now we get to see inside the great tower, starting with Gandalf's arrival to visit his master Saruman, before his betrayal was revealed. Inside the entrance hall, we find some stickered flags representing drapes emblazoned with the White Hand of Saruman; there's a little statue formed of a plain LEGO Games figure, and some Classic Castle axes in pearl dark grey. The dark blue tile on the floor has a sticker with a diminutive version of this pattern - fantastic attention to detail, even if the result is a little smaller than the real thing, and should really be in the throne room rather than here. This is the best place for Gandalf and Saruman to fight with sticks. Remember the chandelier; it's important. Note also the grooved round brick facing the camera ... ... this controls a trap door ... ... which opens as Gandalf faceplants onto the floor ... ... and drops him into the dungeon. Exactly how it happened in the movie. Ahem. Inside the dungeon hide some stickered Wargs, some creepy eyes, a ball and chain and some bones. Gandalf looks annoyed, probably because he's fallen into a Plot Hole. The box art has Saruman throwing an Orc into the dungeon instead. Moving up, the next room is the Throne Room, containing an ornate throne and the Palantír - one of the Seeing Stones of Númenor, and the source of Saruman's betrayal as he gazed too far and was ensared by the Eye of Mordor. Here Gríma has joined Saruman, to witness the Palantír in use. Pushing up on the chandelier below ... ... activates the Light Brick ... ... and the Palantír glows! But only if you orientate it with the green side down. It's a pity you can't lock the light on - it requires constant finger pressure to keep it lit - but I guess it saves on battery life. An alternative view of this room shows off the bookcases, formed from SNOT-mounted plates and tiles, with a loose stickered 'parchment' tile; there are also colured phials of arcane liquids. The two tall 'lamps' with yellow globes represent these (seen unlit also in the previuous linked picture). Identical lamps are found in the related set 79005 Wizard Battle, which as I've already said is a significantly cheaper alternative for people who want a Saruman figure. I guess the room above is the 'Alchemy Room' - it's where Saruman Builds the Bomb. Gríma is actually meant to be in this scene, though he's looking a little self-conscious. The bomb is mounted on a platform which rotates forward via a little gear (hidden behind Saruman here). Saruman is standing on a 2x2 jumper tile which normally holds the bomb 'lid'. Here we can see the wonderful, tall, arched and barred windows from the inside. More jars and bottles line the shelves; the torches are - wisely - unlit. Floor five is a little chamber with more bookcases, and a couple of large stickered books which may be grimoires, and skulls for arcane value. Pictures of five wizards line the walls, and might indicate that this room is a wizardly council chamber - though you'd be hard pressed to squeeze more than two wizards in here. Saruman, as head of the order, takes pride of place in the centre ... ... while on his left is Radagast the Brown. Radagast plays a significant role in the LOTR novels, but is all but ignored in the films; he is mentioned but once in The Hobbit book, but is cast in the movie: see his image here. The stickered image is a good representation. Two other wizards form part of the Order, but are not named in either the LOTR or Hobbit books; they should both be Blue, but this one is - apparently - also Grey. Note the stickered map on the wall. [Edit - I just watched the first Hobbit movie. There's a lovely in-joke, where Gandalf cannot remember the names of the other two Blue wizards. ] On the right is Gandalf the Grey, and another wizard, this one also Brown. At least the numbers are correct! Another bookcase is found here. On the ceiling is a little trans-clear inverted dome, mounted on a turntable - we'll see what it is for shortly. The sixth and final floor is Saruman's Secret Chamber. In it, his true allegiance to the Eye of Morder is revealed, and he keeps some Uruk armour as mementoes, it seems, along with spare staves. The helmet rests on a trans-clear minifigure head with a round 1x1 tile, also trans-clear. The Keys of Orthanc hang on the wall: the one on the left has some ugly plastic flashing attached, which I'm sure wouldn't have passed quality control in Billund, so probably originates elsewhere. The Secret Room is accessed via a trap door with a folding ladder. Rotating the turntable on the ceiling of the room below allows the trap door to open, and the ladder unfolds. It's a little tight on space, but can be done without removing walls. This is the only means of climbing from one floor to another in the whole tower - save for the entrance staircase. Perhaps the main tower staircase is in the missing fourth wall? Comparison I've saved this move still till now, as it best sums up the entire set: Orcs try to topple and Ent with a rope and grappling hook, with the best exterior shot of the tower in the background. This is also the only decent shot I could find of the tall barred windows of the Bomb Room. Compare the tower again to here. Conclusion Click for a larger image Orthanc features prominently in two parts of the movie trilogy: the encounter between Saruman and Gandalf, in which Gandalf is imprisoned on the summit until rescued by Gwaihir the Eagle; and the destruction of Isengard by the Ents. This set attempts to recreate both scenes, while also allowing for Bomb-building scene with Gríma, and for Saruman to survey his 'army' of Uruk-Hai - if you've managed to collect a significant proportion of the ten thousand figures you'd need! In addition, there are some added extras not in the movies, in the form of the dungeon, the Council Chamber, and the Secret Room, all produced with remarkable detail for such small spaces. The Tower itself is a brave production. There is no way the five-hundred foot tower could be recreated accurately in LEGO bricks at a scale compatible with the rest of the range, and at an affordable price. The result is a necessary compromise - it looks a little squat from certain angles, and tapers perhaps too suddenly, but I hope you'll agree that the outcome is still remarkable - for its detail, its beauty, and its size. And that's just the outside. Inside are six floors of detailed interior, recreating several important scenes from the movies, and packed with little features making the model both a great play-set and a wonderful display and talking-point. TLG have been a little stingy with the figures - I'd have thought that Merry and Pippin could have been included to sit on the Ent; or, failing that, at least another Orc and Uruk, but we do get the one and only Ent figure yet released, in addition to the lovely Eagle mold. All in all, I'm delighted with the set. It's far more impressive in the flesh than even the box art or press-release pictures suggest; of my pictures, only the final 'Conclusion' photo really does justice to its size. It's also a great source of black parts, at a reasonable price-to-part ratio; however, I think I'll keep this built. If I can find a shelf to put it on! Design & Build 9 There's some fantastic attention to detail in the architectural features of the Tower, and a remarkable number of features crammed into the interior. Building the tower is interesting, with plenty of SNOT techniques and offsets used to reproduce the tower's design as faithfully as possible; there is by necessity a little repetition but far less than you might expect. And the result is well worth the effort. Parts 8 If you're after rare or new parts, you might be disappointed, but the set is probably the best source of useful black pieces that I have ever seen. I will never complain about basic bricks in useful colours, and the quantity of headlights and jumper plates is awesome. There's also surprisingly little multi-coloured filler. Figures 8 Gríma is the only unique figure. Saruman could have been a big selling-point had TLG not decided to release him in an entry-level set; he does come with a unique skirt in this set. Coupled with the Black Gate set, Gwaihir will allow the building of a little Eagle Army; the Ent figure is brick-built (and could perhaps be cobbled together from spare parts), but this is the only Ent yet available in the whole LEGO LOTR range. Play and Display 9 Bearing the 14+ age guide, this is an adult-orientated set, but nevertheless includes quite a range of play features, whether it be recreating movie scenes or bashing orcs with the Ent. Mostly, though, Orthanc makes a superb centre-piece for your LOTR display - though it will tend to dwarf the other sets. Value 9 $200 or £170 might be a little outside many people's budget, but for just under 2400 pieces - and useful ones - this actually represents good value. Add to that the enjoyable building experience, and the magnificent result, and I think that the set is well-worth the money. Overall 86% My Score 9/10 This monster is a joy to build and to own. A must for any die-hard Lord of the Rings fan, and a great set for any LEGO Collector. Orthanc you for reading. Please leave a comment! Rufus Acknowledgements All movie scenes © New Line Cinema EB Staff for assistance - especially Rick, Pandora, and ISC. And Hinckley for encouraging 'schnell'. Resources Orthanc at Tolkien Gateway Orthanc at LOTR Wiki LEGO LOTR Page LOTR on Shop@Home My flickr set Endpiece Treebeard forgets which movie he is supposed to be in If you like my reviews, and would like to learn how it's done, please consider joining the Reviewers Academy
-

Incredible LEGO Technic Book Discussion
Thirdwigg posted a topic in LEGO Technic, Mindstorms, Model Team and Scale Modeling
Got my copy. It's worth the purchase. Read the review at thirdwigg.com. -
I am a Black Ops fan and I love replicating lego guns from the game. Here are some I made: [removed link] You can also check out the PDW-R [removed link] Please share your opinion on them!