Search the Community
Showing results for tags 'jeep'.
Found 63 results
-
Small jeep in Warthog-style. RCI Military ATV (Warthog style) by FrostNovejkee, on Flickr RCI Military ATV (Warthog style) by FrostNovejkee, on Flickr RCI Military ATV (Warthog style) by FrostNovejkee, on Flickr RCI Military ATV (Warthog style) by FrostNovejkee, on Flickr Thanks for watching and if you like the model , you can use the instructions.
-
hey guys, So this whole year I've been working on MOCs and photos so I could make a calendar for our Etsy store, i finally got it all together and thought I'd share the finished pics... park ranger truck thread... http://www.eurobrick...showtopic=96800 jeep thread... http://www.eurobrick...showtopic=99463 the unimog camper thread... http://www.eurobrick...showtopic=97705 RV thread... http://www.eurobrick...showtopic=95857 vw van threads... http://www.eurobrick...showtopic=97703 http://www.eurobrick...showtopic=94600 my UTV thread... http://www.eurobrick...showtopic=99322 Bronco thread.... http://www.eurobrick...showtopic=94778
-
Hey everyone, I have finally finished the crawler. It took me awhile and a lot of versions till I liked something. So lets get right into it. Features: 1 XL motor for drive 2 Servo motors for steering 2 IR Receivers LED lights 2 Speed gearbox with M motor for remote changing 1 Lego Lipo battery Images: I took some ideas from Madoca1977 and Nico71(which are some great builders) I hope you guys and gals enjoy!
-
as a continuation of my 4x4 series, i made a few Jeep CJ5's. i've attached the LXF file if you wish to check it out. anyway enjoy.... like my UTV builds the two seats are more for looks than function.... interior dash, w/ speedo and passenger side grab bar... some bottom side details, a faux driveshaft... the typical 4x4 gear i add to my MOC's, a spare tire and a jerry can and hilift jack of my own design... next i'm working on a YJ with different headlights, front fenders, door openings, and rollcage. I'm too lazy to make perfect instructions for this, however, here's some notes to supplement the crappy instructions from LDD (assuming your LDD gives you the same instructions)... + STEP 3, add a 2x4 black plate (from step 8) in front of the 1x6 plate on top of the main 2x12 plate before adding the 4x10 plate + STEP 6, before starting, jump to step 72 to make SNOT assembly that fills the fender gap, add that on first + STEP 10, before adding the 2x3 brick, you can add two downward facing 1x2 brackets (from step 91/92) to the top of the frontmost 1x4 plate you just added + STEP 14, save the hood until after step 88. + STEP 16, do step 17 first. + STEP 20, before adding the black 1x2 plate, add a 1x4 black plate that sticks out 2 studs past the rear of the jeep (from step 78) this will be the rack for the jerry can + STEP 21/22, you can add the four 1x2 plates with mounting studs on both sides of the 1x1 plate before adding the 1x2 tiles that overlap them. (the 1x2 plates with mounting studs show up in steps 28/30 & 59/62) + STEP 23, before adding the 1x4 plate you can mount the black and colored (white) technics 1x2 bricks with axle holes to the open 2x2 space, (these bricks are found in step 81), note the black brick can be a regular technics brick with a round hole, it's main function is to just give the small axle we'll use some room to go into, the outer brick should be an axle brick though since it will hold the spare tire in position. + STEP 24-26, do these steps AFTER doing steps 50-56 + STEP 50, before starting, do steps 53-56 + STEP 56, afterwards don't forget to go back and do steps 24-26 + STEP 65, do after step 68 (unless you are a wizard) hope that helps, brick on folks! jeep-cj-v5-white.lxf.zip
-

Hello all, my names Anton and im in need of some advice
Bricabrac posted a topic in Hello! My name is...
Hello fellow lego tinkerers Well after about 12 or so years away from lego, with it all tucked neatly in the loft, ive now been given a reason to get it all down and start tinkering again. About me: Well im currently going through the latter stages of my Commercial Pilot Training, and my hands on background is engineering, which mainly involved working on lawn mowers and motorcycles. Im a member of a model engineering society where ive built a few interesting versions of locomotives of the garden railway size (G Scale) and on the 5 inch gauge size (ride on). (got links to my youtube channel if anyone is interested (although being new here I dont want to start adding loads of non lego stuff yet as im not to sure what people get up to on here...) Like all youngsters who are engineering minded or just generally see anything with wheels and a motor/engine, as something to take apart, modify and "make better", I have many so called toys which have been changed over the years, but to get to the point of why I am here and signed up to eurobricks, I have a particular RC 1:12 scale rc suzuki vitara that I blew the engine on a few years ago when I was messing around with Lithium batteries instead of alkaline or NiCad. Now I couldnt bare to through it away as I frankly liked the look of it, and so I went around adding a newer bigger motor, (in the hope to make some sort of off road rock crawler type thing for a bit of fun in the mud and or snow when it does), but had now way of getting drive to the axles with where the motor was and through the existing gearing.. So the reason why Im here is that I started reconstructing the rear end out of lego as it was very easy to work with and had all the gears and chains etc that would work for me, which saved me having to go and buy a load of stuff as well......and also gave me my childhood back (a toy story moment really) so here are the pictures and ill explain the advice I need after them..... As you can see, ive made a sort of gearbox at the back and im using a lego 32 stud axle with a chain drive. Ive been comparing motors for this and had the idea of using my own motor, but then realised trying to make a lego adapter for the axle to go in was a pain and it could so easily break....so ive been looking at the lego XL motor for this...if anyone could shed some light on it, as I just wanted as much torque and grunt as possible and speed (if I want it) can be achieved through gearing. I assume they are just normal can type DC motors although not sure why they have three wires coming from them....as I just want to use the traditional 27mhz 2 channel receiver and speed controller and use my trusty acoms techniplus transmitter...as ill be using a metal gear micro servo for the front steering, and the lego rc gear that ive seen from YouTube vids seems very restrictive?? So to conclude, I would love some advice on how to mount the motor, and help with gearing as im sure there are parts that I havnt even thought of yet that would make this build easier -

[C-MODEL] 8110 Jeep
MrTekneex posted a topic in LEGO Technic, Mindstorms, Model Team and Scale Modeling
Hello guys! I wanted to introduce my latest creation. A MOC made exclusively with the pieces of the set 8110. It has various functions, such as motorized winch, motorized hood, fake 4 cylinder in-line engine, suspension, 4-wheel drive with center differential, gearbox with two-speed, steering wheel connected to the steering and opening doors. The model is ready to IR power function: using a remote control, receiver, XL-motor, M-motor and a switch you can drive it. Here some pics The lever near the left-seat change the speed from low to high. The lever near the right-seat change the functions between winch and hood. Under the hood Under the chassis View from the ground to the fake motor. Hope You like it! Here the video: Here the link where you can purchase the building instructions! http://mrtekneex.alt...g/building.html Diego -
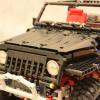
Hi guys, finally, after 4 months, i got back to lego (so much work). I wanted to build smallest 4x4 jeep that will looks and drive good. I started to build smallest suspensioned 4x4 chassis. I was afraid of driving characteristics, becouse there were no space for differencials. However, i was really suprisend how good jeep drives. The turning radius is little bigger on carpet, but on floor, or ground it´s perfect! Jeep is driven by one XL motor witch gave a lot of strenght and speed (do not expect juping :D), but it´s a total snale. Both axle has supsnesions. (no springs only rubbers). However it´s greate to take it to the nature. Even snow is not problem for this beast :D The body is build as jeep, but not as any existing one. It´s just some jeep :). The body can bee easyly removed and replace by another one. So, what do you think? I will upload only 1 photos, but you can find more here: http://www.kostky.or...p?topic=43677.0 or here: http://tomashubik.cz/temp/lego_jeep/001.jpg http://tomashubik.cz/temp/lego_jeep/002.jpg http://tomashubik.cz/temp/lego_jeep/003.jpg http://tomashubik.cz/temp/lego_jeep/004.jpg http://tomashubik.cz/temp/lego_jeep/005.jpg http://tomashubik.cz/temp/lego_jeep/006.jpg I hope i will make some video soon. PS: Sorry for my english. Not nativ language for me.
-

Willys Rat Rod
HorcikDesigns posted a topic in LEGO Technic, Mindstorms, Model Team and Scale Modeling
Hope you like it. More info in Video: More photos: https://imageshack.com/a/fFQb/1 And dA: http://horcikdesigns...t-rod-413033576, And dA: http://horcikdesigns...t-rod-413033576 ; http://horcikdesigns...Ratty-408884013 -
Jeep Comanche
Jeka Jackson posted a topic in LEGO Technic, Mindstorms, Model Team and Scale Modeling
Hi) I'm glad to represent you my new MOC - Jeep Comanche short bed, high lift, for Truck Trial Mini project. Jeep Comanche was a forerunner of the legendary Jeep Cherokee XJ. Comanche has been produced since 1986 to 1992. The LEGO model is made in a middle scale, it has XL-motor for all wheel drive, servo-motor for steering, 3-link dependent long travel suspension, easy removable body with openable doors. Front axle: Rear axle: -
I know, I know, the presentation is as always horrendous, but it is the best I can do for now (and for those who regularly check my stream knows that I usually change the photo a couple of times). But enough with that, this is my new designed willys jeep, now the back is heavily inspired by PA´s, otherwise I think it is pretty unique (as unique a willy gets these days).
-
C model for the 42010
tibivi posted a topic in LEGO Technic, Mindstorms, Model Team and Scale Modeling
Hey all, I got the new 42010 buggy for my birthday yesterday and I did not really like the looks of the A model, so I build my own C-model. Its functions: Steering with working steering wheel Pull back motor The pictures More pictures on my Flickr: http://www.flickr.com/photos/tibivi/sets/72157632939016521/ What do you think? Greets, Tibivi -
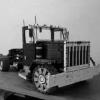
I used Lego Digital Designer (LDD) to model a 1990 Jeep Grand Wagoneer. It features an opening hood (bonnet) and rear tailgate, a working V4 engine, and folding front seats. It uses 643 parts and has 216 steps in the LDD Building Guide. The LDD .lxf Building Instruction file is available for download via Rebrickable, or via SkyDrive here. I used the LDD to POV-RayTM Converter (LDD2PovRay) software for these sharp renders: The working V4 engine moves when the rear axle turns. You can see the Lego Technic elements used: The real vehicle looks like this (note that the camera created a slight "fisheye" effect and the proportions are distorted a tad): Here are some LDD screenprints of the 12-studs-wide, 35-studs-long, 9-2/3 bricks high model. One can see the slanted, folding seats and other details:
-

Rally jeep "Storaq 2.0"
Sicil posted a topic in LEGO Technic, Mindstorms, Model Team and Scale Modeling
Hello. I want to present you a model to Technic Rally.Nothing in common between this model and the "Storaq" no, except for appearance. I used all the electrics of crawler, which resulted in a high speed on obstacles. Compared with the previous model, "Storaq" I modified the rear part of body. There are front and rear suspension in this model. Datasheet: - 2 L-motor to the drive with gear 3:5 - Servo motor on the steering - IR receiver a new type, BB That's all. Thank you for your attention. Your Sicil. Sorry for my bad english.